1
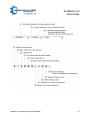
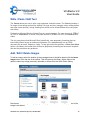
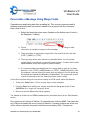
VF-Blaster 2.0 | VisionFriendly.com | 630-553-0000 VF-Blaster 2.0 User Guide Table of Contents Subject Quick Start Guide 8 Easy Steps to Send Out a VF-Blaster 2.0 Email Campaign Upload a List Upload a List Map File Fields to List Fields Set Import Rules Upload Results Building an Email Email Creation Tools The Library Library Tour Using the Wizard Write the Copy Offer Styles Edit Email Campaign The Email Canvas Write / Paste / Edit Text Add / Edit / Delete Images Create Links Personalize a Message Using Merge Fields Launching and Analyzing a VF-Blaster 2.0 Email The Launch Process Reporting Tracking VF-Blaster 2.0 | VisionFriendly.com | 630-553-0000 Page 2 2 4 4 5 5 6 7 7 7 9 9 10 11 12 12 16 16 17 18 19 19 20 22 1 VF-Blaster 2.0 User Guide Quick Start Guide 8 Easy Steps to Send Out a VF-Blaster 2.0 First Email Campaign There is a lot of great, detailed information to be found throughout this user manual. The next couple of pages is a brief summary that can get users started in a short amount of time. The rest of manual goes into more detail and elaborates on more specific details. To get started right away, just follow the 8 easy steps below: 1. Login to VF-Blaster 2.0 at https://visionfriendly.vresp.com – New users will need to contact VisionFriendly.com at 630-553-0000 or email [email protected] to set up an account. 2. Upload a List – There will be a New List link on both the Home and Lists sections of the account. Click that link and the system will walk the user through the rest of the process. When finished, there should be at least one list in the account alongside the Master List. Just note that lists will need to be in either Comma Separated Values (.csv) or Text Tab Delimited (.txt) format before they can be uploaded. These are the two standard spreadsheet formats, so just about any spreadsheet or contact management program (like Excel) will have the option to Save As or Export To one of these formats. 3. Upload (or Find) Images – The Library section of the account is where images can be uploaded for use in emails. VF-Blaster 2.0 also provides 75,000 pictures in a free Stock Photo Gallery for users to utilize. Any uploaded images need to be in JPEG (.jpg) or GIF (.gif) format. Using one of these two formats ensures uploaded pictures will look right to all recipients. 4. Edit Images – Use the Library’s editor to resize, crop, flip or rotate pictures. VF-Blaster 2.0 will open an image editor by mousing over any image in the Library and clicking the pencil icon. The editor can also be accessed when adding pictures to an email. 5. Choose an Email Builder – There are four different email editors in VF-Blaster 2.0: the Wizard, the Canvas, Freeform, and Plain Text. The Wizard is a template-driven editor that is great for new users. The Canvas is a graphical HTML editor with enhanced design options and flexibility Freeform allows users to copy and paste their own pre-designed HTML code into the system Plain Text can be used to create simple text emails without pictures or logos 6. Build an Email – Several sections of this guide provide detailed instructions on how to use the various email creation options. VF-Blaster 2.0 | VisionFriendly.com | 630-553-0000 2 VF-Blaster 2.0 User Guide 7. Launch an Email – After an email has been designed, it is time to send it out. Launching an email through VF-Blaster 2.0 is a quick five-step process: Preview: This tab provides a preview of the email message Send Test: From here a test of the email can be sent to an email address and to a list of other people who may want to look over the message before launch. Select Lists: One or more lists may be selected as the audience for a message. If more than one list is selected, any duplicate recipients will automatically only receive one copy of the email. Schedule: A message can either be sent out as soon as possible or it can be scheduled for a future launch. VF-Blaster 2.0 will allow advanced scheduling of up to four weeks. Launch: VF-Blaster 2.0 will ensure all the previous steps have been completed before allowing a launch. If a step was missed, VF-Blaster 2.0 will make the user go back and finish it before continuing. But if everything is ready, click the Launch button. 8. Look Over the Reports – Once an email is sent, reporting will immediately begin. Reporting on who opened the email, who clicked on links (and which links they clicked), who bounced and/or unsubscribed. More advanced – and free – reporting like Google Analytics Integration and Click-to-Conversion Tracking can be turned on by changing the Analytics Settings found within the Account section. VF-Blaster 2.0 | VisionFriendly.com | 630-553-0000 3 VF-Blaster 2.0 User Guide Upload a List Before an email can be sent out through VF-Blaster 2.0, a list will need to be prepared. If an optin form from VF-Blaster 2.0 is being used then the list is already in the account. Otherwise a list will need to be uploaded. VF-Blaster 2.0 allows for any number of lists with any amount of records in each list. When sending an email, a list will need to be chosen to send to. It’s important to note that VisionFriendly.com maintains a strict anti-spam policy as this helps us achieve extremely high delivery rates for the emails sent. VisionFriendly.com does not allow the use of purchased, rented, or harvested lists. Emails sent through VF-Blaster 2.0 should only go to those people who have requested to receive that email in one way or another (i.e., through a website, over the phone, at a tradeshow, etc.). To upload a list, navigate to Lists > Mailing Lists > New List Once the user agrees to VF-Blaster 2.0 anti-spam terms & conditions, the user will be given the option to build a list from scratch (by entering one record at a time) or to upload a file from a computer. Most users upload a file from their computer – as entering one record a time would be incredibly tedious for more than a few records. The only technical requirement to upload an external file is that the file is saved in CSV (Comma Separated Values) or TXT (Tab Delimited Text) format. These are the standard spreadsheet formats, so whether a file originates in Excel, Outlook Address Book, Apple Numbers, FileMaker, ACT!, Quickbooks, or any other spreadsheet / contact management program, one of the available options within that program will be to save (or export) that file in .CSV or .TXT format. After a file is chosen for upload, click Next. A Map File Fields to List Fields section will appear. This is where the user can appropriately label each column of data using the drop down menu to the right of each group. Email Addresses should be labeled as Email Addresses, First Names as First Names, and so on. The drop down menu can be used to choose one of the standard fields or to create custom fields. Data can also be ignored by selecting the Do Not Import option from the same drop down menu. VF-Blaster 2.0 | VisionFriendly.com | 630-553-0000 4 VF-Blaster 2.0 User Guide After labeling the data, Import Rules can be set. If this is the first list in the account, ignore this section for now. Import Rules are important and will be discussed a bit further down. After clicking Next, a Results page will be displayed. Duplicate email addresses, incorrectly formatted addresses, and previous unsubscribes / bounces are all removed during the upload process. A report of this data can be downloaded if needed. VF-Blaster 2.0 | VisionFriendly.com | 630-553-0000 5 VF-Blaster 2.0 User Guide The Results page also includes an Account Snapshot that shows how many records and unique mailable addresses are now included in the entire database. Assuming this is the first list, the total numbers seen here should reflect the number of addresses that were uploaded. If this is the second or third or twentieth list, then this number will be different. With the upload complete, at least three lists should be in the users account: The Master List My Web Signup Form The List That Was Just Uploaded VF-Blaster 2.0 | VisionFriendly.com | 630-553-0000 6 VF-Blaster 2.0 User Guide Building an Email To help ensure such a wide variety of users can get the most out of VF-Blaster 2.0, four different email creation tools are provided to cover all levels of expertise. They are: The Email Wizard – This is a basic email builder for novice to moderate users. The Wizard gives users the choice of about 300 different email borders and then walks users through adding content to the border chosen. The Email Canvas – This is a graphical HTML (WYSIWYG) editor for moderate to expert users. The Canvas is far more flexible that the Wizard, and allows for more types of layouts and content editing. Freeform HTML – This tool is for anyone (generally an expert user) who has their own HTML design ready to go. All that’s necessary to create an email with this tool is to copy and paste HTML into the provided content box. Plain Text – This editor creates simple, plain text emails. Images, font styles or adjusting layouts is not permitted with this tool. This section of the manual will take a detailed look at two of these tools: the Wizard and the Canvas. But first, let’s examine a resource that plays a very important part in the email creation process. The Library Before building an email, the Library section of the account will need to be used to prepare images. 25mb of space has been reserved for images (all at no charge), which can be used with any of the email tools – except for the Plain Text editor. The Media Library allows for: Upload Images – VF-Blaster 2.0 allows for the upload of images in .jpg or .gif format (the two standard image formats on the web). Search the Free Library – There are more than 75,000 pictures available in numerous categories that can be used as often as needed, and at no additional cost. VF-Blaster 2.0 | VisionFriendly.com | 630-553-0000 7 VF-Blaster 2.0 User Guide Resize images – Easily create email-friendly graphics that complement any layout. Images can be adjusted by pixel or percent to get the exact size needed. Flip & rotate images – The flip & rotate tools can instantly change the orientation of an image. A simple click will change the orientation for any image. Crop images – The Media Library comes with a simple cropping tool that allows for trimming specific sections of an image. Organize images – Create and manage folders and subfolders to store images. Start by uploading new images then drag-and-drop from one folder to another. VF-Blaster 2.0 | VisionFriendly.com | 630-553-0000 8 VF-Blaster 2.0 User Guide Library Tour Accessing features from the library is a simple process. To upload images, choose the Upload Images link in the Lower Left. Then select the file from a location on a computer. To choose images from the VF-Blaster 2.0 free Stock Photo Gallery, click the Search Gallery Images link, which can be found right next to the Upload Images link within the Library. This will open a pop-up window with a search for photos option or a browse through a variety of different categories option. Scrolling over an image will open a larger preview. It is recommended to use the smaller image whenever possible. If editing of the image is required, use the larger size image. To access the provided photo editing tools, scroll over the image. This will present the options to either delete or edit the image. Selecting the edit option will open the image up on a new screen where changes and edits can take place. After making changes, either Save over the current image or Save As a new image using the options found in the lower right hand corner of the screen. To create folders and sub-folders, click the Create New Folder link on the main page of the library. Then drag-and-drop images between folders. Using the Wizard As noted at the beginning of this stage, the Email Wizard is a basic email creation tool that walks through the process of adding content to any one of 300 different borders. The Wizard is a tool perfect for beginners or users who don’t have access to a web designer. To access the Wizard, go to Emails > New Email, select the Email Wizard Option, and click Next Step. The first step to creating a Wizard email is to choose the border for the message. The borders are categorized according to design & industry. They all function in the exact same way, aside from two exceptions: Some of the borders are known as “Color Match” Borders (these appear within their own marked categories). These are basic borders that allow the user to change the colors to match the contents of the email. Other borders are “Fixed Width” borders (these can be found under various categories). This means the width of the border, and by extension the content within that border, is set to a specific pixel width that does not change with the size of the recipient’s email browser. Any borders not noted as fixed width are variable width, which means they expand and contract with the size of the recipient’s email browser. VF-Blaster 2.0 | VisionFriendly.com | 630-553-0000 9 VF-Blaster 2.0 User Guide Write Your Copy After selecting a border, the system will go to the Write Your Copy page. From here a user can start adding text content in the form of a From Label, Subject Line, Salutation, Greeting, and Closing. 1. Enter Your From Label – It is recommend that this be something that is consistent and rarely changes, like a company name. A much better response to an email can be achieved if the name is one recipients recognize. 2. Enter Your Subject Line – The subject line is like the headline of a newspaper article: it should be concise, interesting and describe what the message is about. Try to keep the subject under 45 characters, because many email browsers cut the subject line off at that point. 3. Hosted Version – This check box inserts a link at the top of the email that points readers to an online version of the email message that is hosted by VF-Blaster 2.0. If a reader clicks that link, then the email will open up in a web browser. This is useful since there are still email browsers out there that could break parts of an email message, and opening the email in a web browser -which will always support a wider range of HTML and content -will ensure everything looks exactly right. Most recipients won’t need to use this, but it’s nice to include for the small number that might. 4. Enter Your Salutation – This is a great place to personalize the message. Type Hello, Dear, etc. and follow that with {FIRST_NAME} and VF-Blaster will automatically populate the first name of each recipient within the individual email they receive. So “Dear {FIRST_NAME}. friend of XYZ Company,” in an email received by Rebecca will become “Dear Rebecca, friend of XYZ Company”. Any data from a mailing list can be merged into any part of a message by writing the name of the field within the {} brackets. And note that the Salutation field is optional. If first names are not available on a list, “Hello” or “Greetings”, can be used as a default value in the event that personalization data is only available for a portion of a list. Ex. {FIRST_NAME|Valued Customer}... 5. Greeting – Generally used as an opening paragraph for a message. On the section following Write Your Content, the option to add numerous “offers” or “articles” to the message will be available and will follow the greeting. As with Salutation, the Greeting field is optional. 6. Closing – The ending paragraph(s) and signature for a message. This will follow any “offers” that are added. VF-Blaster 2.0 | VisionFriendly.com | 630-553-0000 10 VF-Blaster 2.0 User Guide 7. Unsubscribe Message - As noted in the List section of this guide, VF-Blaster 2.0 takes care of all unsubscribes automatically. This is done by automatically inserting an unsubscribe link at the bottom of every email sent out. A provided drop down menu can be used to have that link say something other than “unsubscribe” (like Remove Me or Leave This List) and customize the unsubscribe message that introduces the link. 8. Postal Address – Including an organization’s postal address within the message is required by the US CAN-SPAM Act of 2003 (as well as laws within many other countries). VF-Blaster 2.0 requires the user to enter their current postal address within this box, this will automatically be populated if entered in the users account profile. The profile can be found under the Account section. To proceed, click Next Step. VF-Blaster 2.0 will now allow the user to select an Offer Style. Offer Styles Offer Styles allow for adding images, links, and other text content to a Wizard email. There is no limit to the number of these sections allowed in a message – think of them as individual content blocks that stack on top of one another. There are a number of different types of offer styles – some are image only, some are text and link only, and some allow links, text, and images. A description and illustration of each layout are available. Let’s take a moment to look at an Offer that allows for the addition of links, text, and images. 1. Content Title – This creates a bold header or title for this particular offer section. This field is optional. 2. Copy – This is the text message of an offer, and it can be as long or as short as needed. Personalization (such as {FIRST_NAME}) can be used here, the same as with anywhere else in the message. 3. Click-through URL – Use this to create a link to a website. The link has two parts, the link itself and the link text. VF-Blaster 2.0 | VisionFriendly.com | 630-553-0000 11 VF-Blaster 2.0 User Guide URL: http://www.VisionFriendly.com/tutorials/ Link Text: Visit our How To Do Everything Site Offer Image – Browse a computer for an image or use one that is already saved to the Library. The image will align to the left, right or above the messages text depending on which offer layout is selected To proceed, click Next Edit Email Campaign This will bring up Edit Email Campaign staging area of an email. All work has now been saved up to this point, and any changes to the email can be done here: Use the green buttons along the top of the page to choose a different border, change the color of the current border (if it’s a Color Match border), add a logo, or add more offers. Use the links in the upper right hand corner to add a Forward to a Friend Link or do a basic Spam Check of content – It is recommended to do both for all emails. Use the links within the body of the message to edit any part of the content, to delete offers, and move offers up and down in relation to each other. Use the tabs along the very top to launch the email. Each tab must be gone through before sending the email. To learn more about this, move on to the section – Launching and Analyzing a VF-Blaster 2.0 Email - to read about the email launch process. The Email Canvas The Email Canvas is a Graphical, or WYSIWYG – What You See Is What You Get, HTML tool. The Canvas opens with a blank canvas, and provides a full “designer’s toolbar” to assist in adding and editing content. With the Canvas the user can create emails with multiple columns, change text fonts, colors, and sizes similar to the same way as a word processing program, import images from the Library, turn any text or pictures into links, alter background colors, and so on. The flexibility and customization options are the major benefits of the Canvas. There are three ways to start adding content to the Canvas editor (listed in order from least advanced to most): VF-Blaster 2.0 | VisionFriendly.com | 630-553-0000 12 VF-Blaster 2.0 User Guide 1. The most straightforward way to build a Canvas email is to click the Choose Layout button and select one of the over one hundred starter layouts provided. This section allows the user to alter the layouts and content. This is the method used by nearly all Canvas users. 2. The Canvas can be used to edit a premade HTML email. Use the Edit Source tab to paste in the HTML code – the design will then appear in the editing area and can be edited by using VF-Blaster 2.0’s tools to make changes. 3. For users familiar with a WYSIWYG editor, every single part of the email can be built from scratch by adding and formatting tables, and then dropping content into those tables. To get started with the Canvas, go to Emails > New Email, choose the Email Canvas, and click Next Step. Just as with the Wizard, VF-Blaster 2.0 will prompt the user to enter a From Label and a Subject Line. To repeat: Enter Your From Label – It is recommend that this be something that is consistent and rarely changes, like a company name. A much better response to an email can be achieved if the name is one recipients recognize. Enter Your Subject Line – The subject line is like the headline of a newspaper article: it should be concise, interesting and describe what the message is about. Try to keep the subject under 45 characters, because many email browsers cut the subject line off at that point. Beneath these two steps, is the Canvas itself, which is divided into an HTML Content and Text Content section. The HTML Content section is open by default. Within the HTML Content area is the Designer’s Toolbar and the blank canvas itself. The best way to get started is to click the very first button in the toolbar: Choose Layout. This will open a pop-up window that provides numerous layouts filtered into several categories. Many of the layouts are themed with particular industries in mind, but this can all be changed and edited, unlike the Wizard borders. Every part of each layout can be edited and changed very easily. After choosing a layout, start adding content. This guide will cover specific actions like adding images, creating links, adding / editing text, personalizing the message and changing background colors. The following two pages are images that describe the functionality of each button. VF-Blaster 2.0 | VisionFriendly.com | 630-553-0000 13 VF-Blaster 2.0 User Guide VF-Blaster 2.0 | VisionFriendly.com | 630-553-0000 14 VF-Blaster 2.0 User Guide VF-Blaster 2.0 | VisionFriendly.com | 630-553-0000 15 VF-Blaster 2.0 User Guide Write / Paste / Edit Text The Canvas allows the user to write, copy and paste, and edit content. The Canvas includes a full range of text editing options (like altering Font type and size, changing colors, adding bullets, and other similar options), writing & editing text should not be all that different than using other text editors. Pasting from Microsoft Word or Google Docs is a simple process. The copy shortcut is CTRL-C on a PC or Command-C on a Mac. The paste shortcut is CTRL-V on a PC or Command-V on a Mac. The only snag here is that Microsoft Word, specifically, uses proprietary formatting that can leave behind some foreign or malformed characters if it is pasted directly into an HTML document like an email, website or a blog. To help get around this problem, a Paste from Word option is included in the toolbar that will remove proprietary formatting and ensure all recipients can see the text without any problems. Add / Edit / Delete Images To add an image, select the location in the message where it should be placed click the Insert Image button in the top row of the toolbar. This will open up the Library, where there is the option to select any image previously uploaded or choose from the Stock Photo Gallery. Now there will be an Adjust Display page. This page allows several different properties of the image to be altered: VF-Blaster 2.0 | VisionFriendly.com | 630-553-0000 16 VF-Blaster 2.0 User Guide Alternative Text – The Alt Text for the image should be a description of the image. The Alt Text serves two purposes: 1. Many email browsers initially block images when an email arrives in the inbox, requiring the recipient to click a button or link to turn the images on. Many of these same email browsers will display the Alt Text to the recipients to help them decide if they want to turn the images on or not. So it’s a good idea to be either descriptive or action oriented like “Go here to read more!” 2. If the recipient is blind, subscribers who use a screen reader to check email and access the internet, can have their screen reader read the image Alt Text aloud. Alignment – This drop down menu assists with how the image will align with nearby text (to the left, right, etc.). If there is no text near the image, no action here needs to take place. Dimensions – Allows altering the height and width of an image. Note that it is much better to make alterations using the editor provided within the Library itself, and it is not recommended using this field to make changes to the size of an image. Vertical and Horizontal Space – These two fields allow for the addition of space around the image to cushion it from whatever other content surrounds it. Border – This determines whether the image will have a blue border around it if a link is added to it. Keep the default to 0 here if no border is desired. Click Insert when finished, and the image will be added to the email. To Edit the properties of an image. Select the image and click the Insert Image button. This will pull up the Adjust Display page for that image. To Delete any image choose the image and click the delete key on the keyboard. Create Links Turn any images and text within an email into links (the more opportunity readers have to click-through to a site, the better!). To do so, highlight the text / select the image and click the Hyperlink icon within the toolbar. This will open a dialog box to insert the link – be sure to include the http:// portion of the link when entered. To remove links, select a created link and click the Unlink icon. VF-Blaster 2.0 | VisionFriendly.com | 630-553-0000 17 VF-Blaster 2.0 User Guide Personalize a Message Using Merge Fields Personalize an email using data from a mailing list. This is most commonly used to address recipients by their own names, instead of by a generic title like “customer.” Here’s how to do it: 1. Select the Insert drop down menu (located on the bottom row of icons in the Designer’s Toolbar). 2. Choose to insert First Name, Last Name, Title, etc., depending on what information is needed to merge into the message. 3. There should be an equivalent merge field in the email that looks like this: {FIRST_NAME} or {TITLE}. 4. The insert drop down menu shows only standard fields. If a list includes custom fields, merge those by manually entering them. A custom field named LastPurchase, would be merged as {LastPurchase}. 5. It is recommended to set default text for a merge field to catch any missing data from a list: {FIRST_NAME|Reader} or {FIRST_ NAME|Subscriber} -with this example, anyone whose first name does not appear in the list would see the default text instead (like Reader or Subscriber). The system will prompt to enter this backup text if the Insert drop down menu is used. A few other important things to note about creating an HTML email within the Canvas: There is an Undo button. This is an easy way to erase mistakes. Pressing Enter while writing text, creates a double line paragraph break. Press Shift-Enter for a single line paragraph break. Be sure to use the Save button fairly regularly. The Canvas is divided into an HTML Content section (described above) and a Text Content section. Every email sent out through VF-Blaster 2.0 is formatted as a multi-part MIME. This means that any HTML email created and sent out using VF-Blaster 2.0 includes a backup text version that will be visible to recipients using email clients that cannot display HTML. Though these VF-Blaster 2.0 | VisionFriendly.com | 630-553-0000 18 VF-Blaster 2.0 User Guide recipients will generally be an extremely small percentage, including the text backup message ensures they receive a legible message instead of a broken HTML email. The Text Content section is for creating the backup text version. VF-Blaster 2.0 allows the user to either write the backup version from scratch or use the Import from HTML button at the very top of this section to pull the text from the HTML version. Using the Import option is recommended -just be sure to review the imported text to ensure that it displays properly. Once finished creating both the HTML and text versions of the email, VF-Blaster 2.0 will prompt the user to enter an Unsubscribe message and Postal address: Unsubscribe Message – As noted in the List section of this guide, VF-Blaster 2.0 takes care of all unsubscribes automatically. This is done by automatically inserting an unsubscribe link at the bottom of every email sent out. A provided drop down menu can be used to have that link say something other than “unsubscribe” (like Remove Me or Leave This List) and customize the unsubscribe message that introduces the link. Postal Address – Including an organization’s postal address within the message is required by the US CAN-SPAM Act of 2003 (as well as laws within many other countries). VF-Blaster 2.0 requires the user to enter their current postal address within this box, this will automatically be populated if entered in the users account profile. The profile can be found under the Account section. Click Next Step to proceed. This will save all work. Launching and Analyzing an Email The Launch Process Now that email is designed, it is time to Launch. The launch process consists of six steps, each of which is represented by a tab in the email editor. All steps must be completed to send the email. 1. Edit Email Campaign – Any final changes to an email can be made here. 2. Preview – This step shows a preview of both the HTML and Text versions of the message. 3. Send Test – Send a test of the email to any email address or list of email addresses. There is no cost for sending tests. The only difference between a test email and a live email is that the subject line in a test message clearly states that the email is a test and, both HTML and text versions will be sent out as separate messages. Remember, in a live email the appropriate version will display depending on each recipient’s preferences. VF-Blaster 2.0 | VisionFriendly.com | 630-553-0000 19 VF-Blaster 2.0 User Guide 4. Select Lists – One or more lists may be selected as the audience for a message. If more than one list is selected, any duplicate recipients will automatically only receive one copy of the email. 5. Schedule – A message can be scheduled to go out up to 4 months in advance or as soon as possible. When scheduling an email, every email that is sent through VF-Blaster 2.0 scanned by the system before it can be sent. This helps put a stop to spam, fraudulent messages, and other emails that violate VFBlaster 2.0’s Terms of Service. This helps ensure that the email campaigns for all VF-Blaster 2.0 users get delivered at a high rate. Because of this policy of looking over every email, approval windows fall between the hours of 7 AM to 7 PM PST (7, 9, 11, 1, 3, 5, 7), seven days a week. Each noted approval time represents the guaranteed time an email will be approved. If a message is launched at 1:30 PM, the next approval time is at 3:00, which means the email will be approved between 1:30 and no later than 3:00 (as that is the guaranteed time). If a message is scheduled two months in advance, it will still be approved by the next guaranteed time on the day of scheduling. The email will then sit in the users account – with a status of pending launch – until the scheduled date and time. 6. Launch – The system will ensure all the necessary steps have been completed. VF-Blaster 2.0 will allow the user to set a reply-to address (this is the address that receives any replies to the message). VF-Blaster 2.0 will notify the user of any duplicates that have been removed from a list. When ready to Launch click Launch. Reporting Once an email is sent out, reporting will begin automatically. This includes who opened the email, clicked a link, bounced, unsubscribed, or wasn’t tracked as doing anything at all (these reports are available under Emails > Sent Emails or in the Reports section of the Home Page). 1. Open – This is tracked based on whether or not an invisible tracking image within the email was loaded by the recipient. Since many email browsers turn images off by default (requiring end users to click a link to view images in the email they receive), only those people interested enough in the email to turn the images on -or those people who do not have this restriction on their own inbox – will be reported as an open if they open the email. The need for an image also means that opens for plain text emails cannot be tracked. If someone opens an email more than once, only one open will be counted. VF-Blaster 2.0 | VisionFriendly.com | 630-553-0000 20 VF-Blaster 2.0 User Guide 2. Clicks – The total number of clicks displayed in the report shows exactly how many times each link within the email has been clicked. If one person clicks a single link several times, each of those clicks will be counted individually. 3. Bounces – If an address bounces, it means the email could not be delivered to that address. Bounces are broken down into two categories: Hard Bounces – Bounces that very clearly state the email could not be delivered (i.e. “user unknown”, “no user mailbox here”, etc). Are marked as bounced within the account immediately. Soft Bounces – Bounces that are caused by an apparent temporary error. VF-Blaster 2.0 will try to deliver these for three days -if the message still can’t be delivered after this period then VF-Blaster 2.0 will mark the email address as bounced. 4. Non-Responder – A non-responder is an address that cannot be placed into any of the above categories. To help with the analysis and use of this data, graphs are provided showing response percentages in each category, lists showing exactly which links were clicked and how many times that clicking happened, lists showing how the email performed with the top 100 recipient domains, and exportable spreadsheets that show exactly who opened the email, exactly who clicked links, and so on. VF-Blaster 2.0 | VisionFriendly.com | 630-553-0000 21 VF-Blaster 2.0 User Guide Tracking In addition to this default reporting, VF-Blaster 2.0 also provides more advanced tracking options that have to be turned on through Account > Analytic settings. These advanced options are: Click-to-Conversion (CTC) Tracking – This requires adding a snippet of code to a page on a website. If someone clicks a link in the email and makes their way to that page, VF-Blaster 2.0 will count them as a conversion. Click-to-Sale (ROI) Tracking – This allows tracking of how much money any email recipients who clicked a link in the email spent once they reached the organizations site. This data can then be used to calculate the Return on Investment for an email. ROI tracking works in much the same way as Click-To-Conversion tracking – By adding a snippet of code to the site that VF-Blaster uses for reporting within the users account. This requires more technical knowledge, as it must be setup on the site in such a way that it can capture the specific amount of money spent by each individual. Google Analytics Integration – VF-Blaster 2.0’s integration with Google Analytics allows users to take click-through tracking to the next level –This will follow a recipient from an open, to a click, and then to see exactly what that recipient does on a website through a Google account. VF-Blaster 2.0 | VisionFriendly.com | 630-553-0000 22