1
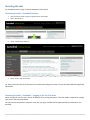
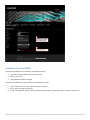
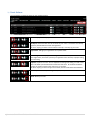
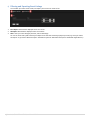
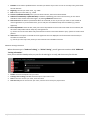
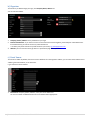
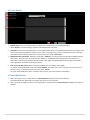
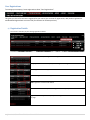
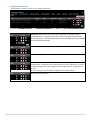
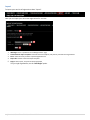
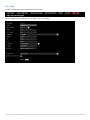
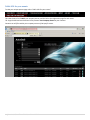
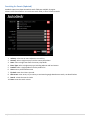
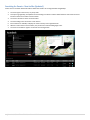
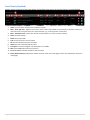
Autodesk Global Event Platform User Manual Updated: January 8th 2013 Created by: Onemedia Contents Accessing the tool ...................................................................................................................................................................................... 3 Accessing the tool – Autodesk Partners ................................................................................................................................................ 3 Accessing the tool – Autodesk – Logging in for the first time. .............................................................................................................. 3 Availability of the Tool (NEW) ............................................................................................................................................................... 4 Navigation Bar............................................................................................................................................................................................ 5 Your Events ............................................................................................................................................................................................ 6 a) Event Details: ................................................................................................................................................................................ 6 b) Event Actions: ............................................................................................................................................................................... 7 c) Filtering and Exporting Event Listings ........................................................................................................................................... 8 Create a New Event ............................................................................................................................................................................... 9 a) Event: ............................................................................................................................................................................................ 9 b) Organizer .................................................................................................................................................................................... 11 c) Event Venue ................................................................................................................................................................................ 11 d) Event Details ............................................................................................................................................................................... 12 e) Email Notification ....................................................................................................................................................................... 12 Your Registrations ............................................................................................................................................................................... 13 a) Registration Details: .................................................................................................................................................................... 13 b) Registration Actions: ................................................................................................................................................................... 14 c) Filtering and Exporting Registrations .......................................................................................................................................... 15 Add Registrations ................................................................................................................................................................................ 16 Import .................................................................................................................................................................................................. 17 Archive ................................................................................................................................................................................................. 18 Your Login ............................................................................................................................................................................................ 19 Public URL for your events .................................................................................................................................................................. 20 Accessing the Event Platform - Visitors ................................................................................................................................................... 21 Searching for Events (Updated) ........................................................................................................................................................... 22 Searching for Events – Next to Me (Updated) ..................................................................................................................................... 23 Event Display (Updated) ...................................................................................................................................................................... 24 Event Registration Forms (Updated) ................................................................................................................................................... 25 1 | Autodesk Global Event Publisher Manual 2013 Event Notifications (Updated) ............................................................................................................................................................. 26 New Features ........................................................................................................................................................................................... 27 Creating a New Event .......................................................................................................................................................................... 27 Automatic Notifications to Publisher of Events ................................................................................................................................... 27 Event Registration ............................................................................................................................................................................... 27 Updates to the Front End – Event Search Page ................................................................................................................................... 28 Updates to the Front End – Event Registration Page .......................................................................................................................... 28 2 | Autodesk Global Event Publisher Manual 2013 Accessing the tool For Autodesk Partners, Login is from the Autodesk Partner Portal. Accessing the tool – Autodesk Partners 1. 2. Login to partner Portal, using your regular Partner Portal Login select “News/Events” 3. select “Global Event Platform“ 4. Select “Create, edit, view events” Tip: Here you will find the link to the new tool to create and manage your events. You will also find additional supporting information. Accessing the tool – Autodesk – Logging in for the first time. When you login for the first time, you will be asked to fill in missing information. This information is required to manage your events. See screenshot below. You only need to complete this step once: next time you login, the fields will be populated with the information you provided. 3 | Autodesk Global Event Publisher Manual 2013 Availability of the Tool (NEW) In 2012 the Event platform was available to the following countries: UK, Sweden, Norway, Netherlands, Finland, Denmark DACH, France, Italy Spain, Middle East, Poland, Portugal In 2013 the Event Platform has been extended to the following countries: USA, Canada, Brazil, Peru, Chile, Columbia, Argentina, Mexico Korea, Japan, Australia, New Zealand Turkey, Czech Republic, Slovakia, Hungary, Romania, Serbia, Bulgaria, Bosnia, Montenegro, Slovenia, Croatia, Russia 4 | Autodesk Global Event Publisher Manual 2013 Navigation Bar Your Events The events page gives you an overview of your events. From here you can check the details of individual events, edit, delete, or duplicate an event, see how many people have registered and export these details as an Excel report or as a .pdf file. Create New Event This is where you create a new event. Your Registrations Here you can manage your registrants, you can delete registrations, and mark which registrants attended the event. You can filter your registration lists and download registrants in an Excel file. Add Registrations On this page you can manually enter your own registrations (e.g. registrations by fax or phone) to an event, or you can import registration details from an Excel file. Import The import page lets you bulk import registrations for a specific event. Archive The archive contains a view of archived events for January 1 to December 31 of the previous year. Events will be automatically archived after one year or on special request after the end of a fiscal year. Your login Your account details are here. This is where you can change your password, contact details including address etc. Public URL for your Events This shows the URL for your event, you can use this URL when you want to link direct to your events, e.g. from a promotional banner on your website. 5 | Autodesk Global Event Publisher Manual 2013 Your Events To manage your existing events select “Your Events”. TIP: if you have multiple events, you can use the event filter at the bottom of this page, to show only the events you are interested in. a) Event Details: You can see a summary of your existing event(s) details. ID: Your unique event number(s), auto-generated by the system. HOST: The name of the company that created the event(s). Event: the event name(s). # REG: number of registrations currently existing for the event.* *TIP: you cannot delete an event that has registrations. To delete an event with registrations, please select the registration icon for your event (see below), download any registrations, delete the registrations, then you can delete your event. You should use your registration download list, and notify your registrants, the event has been cancelled. # ATT: you can add and save the number of attendees to your event. CITY: the city where your event is located. DATE: the live event date. TIP: select the blue arrow to change the event date sorting. LIVE?: the status of your event, green means it’s online, red means its offline. 6 | Autodesk Global Event Publisher Manual 2013 b) Event Actions: You can perform a number of actions on your existing event(s). Details: Display a summary of your event details. PDF Export: Download a PDF with all the details of your event. If customers have already registered, the PDF will also contain the registrants. TIP: this is useful if you want to send someone internally a summary of your event. Registrations: Manage your registrations for a specific event. Internal Registration: Display your event registration form. This is your internal URL for event registrations, this shows you how your registration form will look, to people visiting the event listing. Duplicate: Duplicate an event. You can duplicate an existing event listing, to create a new event. All details you entered will be stored in the new event. Go to edit and make the changes you need to change to the new event, e.g. the date. TIP: this is useful if you are running an event series, with the same details and new dates. Edit: Edit your event details, including Venue, Date, Time, Event name. Delete: Delete your event. 7 | Autodesk Global Event Publisher Manual 2013 c) Filtering and Exporting Event Listings You can filter your event search results, and export your events as an excel csv file. 1. 2. 3. Excel Export: Download the displayed events as a csv file. PDF Export: Download the displayed events as a PDF file. Filter: Filter your event listings by Event ID, Title or Date Range. TIP: use the “Event Title” field to search for multiple events with titles containing specific key words (e.g. search for “Meet the Experts” to get events “Meet the Experts: Autodesk & Crystal CG” AND “Meet the Experts: Autodesk & Digital District”) 8 | Autodesk Global Event Publisher Manual 2013 Create a New Event To create a new event select “Create New Event” To create a new event, you need to complete the following event sections: a. b. c. d. e. Event Additional Training Information (only displayed where event type is “Hands on Training” or “Online Training”) Organizer Event Venue Event Details a) Event: 1. 2. 3. 4. 5. 6. Event Type: Select your event type: Local Event, for physical event(s) Webcast, for online event(s). Tradeshow / Exhibition and Customer Showcase for Autodesk only events and seminars. Hands on Training for physical training event(s). Online Training for online training event(s). Event Series: If your event is related to an Autodesk campaign (e.g. Launch events for AEC) please select the related event series. By selecting the appropriate event series, you ensure, that your event will also be listed in campaign specific event search results. Title: Enter your event title as it should be shown on the Autodesk event pages/Event searches. Industry (UPDATED FEATURE): Select the event industry. Multiple industry selections are now available. If your event is not aligned to a specific industry (e.g. an AutoCAD event), select Cross Industry. TIP: The industry field determines how your event shows up in search results so try to be specific. Show additional checkbox with this text: You can add an additional yes/no question to your event registration form. Start date: Please select the start date here. Month, Day, Year. 9 | Autodesk Global Event Publisher Manual 2013 7. 8. 9. 10. 11. 12. 13. 14. End date: The end date is prefilled with the start date you selected. If your event is a two or more day event, please select the end date here. Beginning: The time your event starts, e.g. 9:00h End: The time your event ends, e.g. 17:00h Timezone (UPDATED FEATURE): Enter your local event timezone, where event will be hosted. Publish Event additionally in (NEW FEATURE): In addition to publishing your event on the local site, you can make it available to event searches from other regions, by selecting additional countries here. Push Event Live?: This Button is preselected. When this is selected, as soon as you save your event it is live and able to receive registrations. If you uncheck this box, you can edit your event details but keep the event offline (e.g. until it’s approved). Event Fully Booked?: Check this box, when your event is fully booked. The event will remain visible in event searches, but will show as fully booked and not accept any new registrations. e.g. Visitors can see the event details and if interested can view the event contact details to query if there are similar events planned. Hide Event?: If this option is activated the event registration won't be displayed in the frontend search and will only be accessible via a direct link. e.g. Use this for invite only events, where you don’t want the event available in searches. Additional Training Information Where the event type is “Hands on Training”, or “Online Training”, you will get an extra section called “Additional Training Information”. Here you can add the related product, any cost for the training (or no cost), and the currency for this cost. 1. 2. 3. 4. Product: select the lead product for your event. Training is free of charge / no cost: select this option if your event is free. Costs: if there are costs for your event, enter them here. Costs Currency: if there are costs for your event, enter the local currency for payment here. 10 | Autodesk Global Event Publisher Manual 2013 b) Organizer This section is pre-filled through your login, with Company Name, Address etc. You can edit these details. 1. 2. Company /Name / Address: this is prefilled from your login Email for Notifications: If you want to receive an email each time someone registers, please add your email address here. If this field is blank, you will not receive any email notifications. It could be your personal email or a specific email for your events, [email protected] 3. Website: you can revise this link to go direct to a promotional page about your event. c) Event Venue This section is hidden by default, if the event venue is different from the organizers address, you can select the checkbox next to “Differing from Host Address”, then add it here. e.g. A Conference Venue Address. 1. Event Venue: Company /Name / Address, enter your venue details here. TIP: You can include an additional link to the venue website where appropriate. 11 | Autodesk Global Event Publisher Manual 2013 d) Event Details 1. 2. 3. 4. Reseller Logo: Here you can upload a logo. It could be your company logo, or an event specific logo. Select “Browse” and select the logo, you want to be displayed with your event. Description: Enter your event description here. The details will be shown on the public Autodesk event search page, on the event summary PDFS, (available to customer on the event search page, and in your event registration form), in the event confirmation email received by registrants, and in the admin area under “Your Events”. Additional Access Information: Where the event type is “Webcast”, you will get a extra section called “Additional Access Information”. Here you enter your webcast access details, e.g. the Webcast URL and Conference Call numbers. This information is not shown on the public Autodesk event search page, but will be distributed to the registrant with their event registration confirmation and reminder emails. Save / Save and Add / Cancel: When you have completed your event details, select “Save”. To continue creating additional events, select “Save and Add”, this will save your event and open a new empty form to create an event. To stop creating your new event, select “Cancel”. TIP: If the “PUSH EVENT LIVE” option is checked, when you save, your event will be live immediately. e) Email Notification 1. 2. When you setup an event, you will receive an email notification, that the event has been created. This email includes the “public URL” to promote your events, for your reference. After your event is complete, if your event has registrations, you will receive an email reminder, to update your attendee numbers. 12 | Autodesk Global Event Publisher Manual 2013 Your Registrations To manage your company / event registrations select “Your Registrations”. This gives you a list of all customers registered to your event. You can view all registrations, add / delete registrations and download registrations as an excel file (for reference or follow up actions). a) Registration Details: You can see a summary of your existing registration details. Event: the event name, the registration belongs to. Company: The name of the company that the registrant belongs to. Name: registrants first name(s). Last Name: registrants last name(s). email: registrants contact email address RBP*: a check confirms this person was registered direct by the partner. Registration Summary: a summary of your total registrations is included at the bottom of this page. 13 | Autodesk Global Event Publisher Manual 2013 b) Registration Actions: You can perform a number of actions on your existing registrations. Attendance: After the event, you can mark a registrant as attendee, if they attended the event. This gives you the full picture of the registrant/attendees. TIP: Use this feature, to do specific follow up actions with registrants who attended and those who did not attend. Details: Display a summary of the event registration. Edit: Edit your registration details including first and last name and contact details. Duplicate: Duplicate a registration. You can duplicate an existing registration, to create a new registration. All details you entered will be stored in the new registration. Go to edit and make the changes you need to change to the new registration, e.g. update first and last name. TIP: this is useful if you receive additional registrations via a direct contact. Delete: Delete the registration. 14 | Autodesk Global Event Publisher Manual 2013 c) Filtering and Exporting Registrations You can filter your registration search results, and export your registrations as an excel csv file. 1. 2. Excel Export: Download the displayed registrations as a csv file. Filter: Filter your registration listings by Event, Country, Attendance, Date Range. TIP: use the “Event Title” field to search for registrations belonging to multiple events with titles containing specific key words (e.g. search for “Meet the Experts” to get registrations for the event “Meet the Experts: Autodesk & Crystal CG” AND “Meet the Experts: Autodesk & Digital District”) 15 | Autodesk Global Event Publisher Manual 2013 Add Registrations To add registrations select “Add Registrations”. Here you can enter registrants, who have contacted you directly (e.g. Phone or Fax). You don’t need to go to the public registration form. Registrants you enter here will be marked as “Registered by Partner” in your event registration list. 1. 2. 3. 4. 5. Excel Import: this is a quicklink to the “Import Registrations” page. Event: select the event you want to upload registrations for. Name, Salutation, Address: enter the contact details for your registrant. Did Attend the Event: If you are adding registrations after the event, select this option for event attendees. Cancel / Save and Return / Save and Add: When you have completed your registration details, select “Save”. To continue creating additional registrations, select “Save and Add”, this will save your registration and open a new empty form to create another registration. To stop creating your new registration, select “Cancel”. TIP: for bulk listings use the “Import Registrations” option. 16 | Autodesk Global Event Publisher Manual 2013 Import To import your own list of registrations select “Import”. Here you can import your own event registrations for an event. 1. 2. 3. 4. Add Single: this is a quicklink to the “Add Registrations” page Download Excel Import Template: Download the Excel template, and paste in your bulk event registrations. Event: select the event you want to upload registrations for Import file: browse to the excel import template 5. Import: select import, and your file will be uploaded. TIP: for single registrations, use the “Add Single” option. 17 | Autodesk Global Event Publisher Manual 2013 Archive To view previously archived events select “Archive”. Events will be automatically archived after one year or on special request after the end of a fiscal year. 18 | Autodesk Global Event Publisher Manual 2013 Your Login To edit or update your contact details select “Your Login”. You can change your login details - email, address etc. on this page 19 | Autodesk Global Event Publisher Manual 2013 Public URL for your events To view your unique partner page select “Public URL for your events”. This view shows a list of ONLY your company events, and the link to the registration page for each event. TIP: Copy the URL and use this direct link to promote Your Company Events to your contacts. Contacts can still filter within your company events to find specific events. 20 | Autodesk Global Event Publisher Manual 2013 Accessing the Event Platform - Visitors Visitors access the Event platform from: Your unique URL Autodesk campaign pages Autodesk Product Center Pages (see example below) Traffic drivers, e.g. an external banner promoting Autodesk partner events Partner websites The Autodesk Reseller Pages Social Media sites / Social media sharing Search results e.g. Google search (see example below) 21 | Autodesk Global Event Publisher Manual 2013 Searching for Events (Updated) Autodesk super Users determine which search fields are available, by region. Visitors to the Event Platform can use these search fields, to filter the event results. 1. 2. 3. 4. 5. 6. 7. 8. 9. 10. Industry: select one or more industries to search by. Country: select a single country from the country drop down. State: select a single state from the country drop down. Event Type: select a single event type including webcast and local events. Product: select a single product from the product list. Host: enter a preferred host name Zip Code: enter the visitors zip code. Next to me: enter street, city or country to activate the google based event search, see details below. Search: submit the search criteria Reset: reset the search criteria 22 | Autodesk Global Event Publisher Manual 2013 Searching for Events – Next to Me (Updated) Visitors can use a location based search filter called “Next to Me” this is integrated with Google Maps. 1. 2. 3. 4. 5. 6. 7. The visitor types in their street, city or Zip code. This opens a google Map, and updates the event listings to include a colomn called “Distance” that shows the event locations relative to the visitors search location. The visitor’s location is shown as a blue marker. The surrounding events are shown as red markers. Event markers are clickable, to display the event summary and a registration link. When the visitor clicks an event marker, they see also the recommended google route. The visitor is also able to register via the text event listings below. 23 | Autodesk Global Event Publisher Manual 2013 Event Display (Updated) Visitors can see a summary of the event details, and perform some actions on the event listings, as outlined below. 1. 2. HOST: The name of the company that created the event(s). INFO – Event Type Icon: A globe icon shows the event is online and available to anyone from any location, a house icon shows the event is a physical event, at a physical location, e.g. a training session or local event. 3. INFO – information Icon: Visitors can roll over the information icon, to see the event summary. 4. Event: the event name(s). 5. DATE: the live event date. 6. CITY: the city where the event is located. 7. ZIP: the Zip code where the event is located. 8. COSTS: Any Costs associated with the event. 9. Free Spots?: A tick and “Register” link show places are available. 10. PDF: Downloadable PDF of the event summary. 11. ICS: Downloadable calendar reminder of the event date. 12. Search Results Summary: displays the number of search results, and results pages. Visitors can click between the search result pages. 24 | Autodesk Global Event Publisher Manual 2013 Event Registration Forms (Updated) Visitors register for events using a standard short form, as defined by the Autodesk Super Users. Registration Form: Visitors complete pre-defined marketing questions and contact details. Show event details: Visitors can view a summary of the event details, download the event summary as a PDF, and download an ICS calendar reminder. Interactive Map: Visitors can view a map of the event location, this automatically updates as the visitor enters their registration details. Preferred Reseller: Where Autodesk has created an event and added this optional field, the visitor can select their preferred reseller. Opt in to email: the visitor can opt in to receive promotional emails from Autodesk and Autodesk Partners. The Autodesk Super Admin determines if opt in is checked or unchecked by default. Share Features: the visitor can share the event listing via Twitter or Facebook. 25 | Autodesk Global Event Publisher Manual 2013 Event Notifications (Updated) When a visitor registers for an event, they receive a series of notifications: 1. Registration Confirmation (Web Page): when a registration is submitted the user lands on an event confirmation page. 2. Automated emails (Email Automessages): After registering, the registrant receives a series of branded, automated email messages containing the event details, the event summary PDF and an ICS calendar reminder. Confirmation Email : as soon as the visitor is registered, they receive the confirmation email. 24 hour Reminder : they receive an automated reminder message 24 hours before the event. 1 hour Reminder : they receive an automated reminder message 1 hours before the event. * Previously only event type online webinars had the additional 1 hour reminder email, now this is active for ALL event types. This replaces the 4 hour reminder for all event types. 26 | Autodesk Global Event Publisher Manual 2013 New Features Below is a summary for existing Event Platform users (EMEA Autodesk and Partners), of the NEW features and updates for the 2013 release. Creating a New Event The following features are New / Updated: 1. 2. 3. Industry (UPDATED FEATURE): Select the event industry. Multiple industry selections are now available. Timezone (UPDATED FEATURE): Enter your local event timezone, where event will be hosted. Publish Event additionally in (NEW FEATURE): In addition to publishing your event on the local site, you can make it available to event searches from other regions, by selecting additional countries here. Automatic Notifications to Publisher of Events An additional notification feature has been added, when new event(s) are published. When you setup an event, you will receive an email notification, that the event has been created. This email includes the “public URL” to promote your events, for your reference. 1. 2. When you setup an event, you will receive an email notification, that the event has been created. This email includes the “public URL” to promote your events, for your reference. After your event is complete, if your event has registrations, you will receive an email reminder, to update your attendee numbers. Event Registration The deadline for registering for Online events (only) has been extended. 1. Prolonged deadline for online events, visitors can now register up until one hour before the online event. 27 | Autodesk Global Event Publisher Manual 2013 Updates to the Front End – Event Search Page A number of updates have been made to the front end, to improve usability. 1. 2. 3. 4. 5. 6. 7. 8. 9. Enable multi-industry searches Only show offline events for “next to me” search function Option to display unique disclaimer copy on registration form (region based) New graphic for Event Search homepage Decrease height of page header and Google map for “next to me” searches Increase font size, Improve readability of text in the search results listing. Hide Google map for “next to me” searches that yield online events only Make search form fields look active Add search event results display, and ability to navigate between search page results using backwards and forwards arrows. Updates to the Front End – Event Registration Page Social Media Share functions have been added to all events. 1. Enable Social media Share via Twitter Tweet / Facebook Recommend. 28 | Autodesk Global Event Publisher Manual 2013