1
Lindos User Manual
issue 03/2006
Lindos user manual
INDEX
page
1.
Introduction ................................................................................................................2
2.
Selection of requested Spare Parts Catalogue ...........................................................2
2.1
Selection of the spare part catalogue through product family......................................2
2.2
Spare part catalogue selection via "Search by series and type" ......................3
3.
Navigation in the spare part catalogue.................................................................. 4
3.1
Changing the screen display ....................................................................................... 5
3.2
Pop up Menu (right mouse button).............................................................................. 6
3.3
Explanation of the Toolbar .......................................................................................... 7
4.
Search functions for spare parts .................................................................................. 8
4.1
Search for part numbers
5.
Printing of spare part catalogues ............................................................................... 9
6.
Note function ............................................................................................................. 10
6.1
Notes on spare part catalogue pages........................................................................ 10
6.2
Notes on part numbers ........................................................................................... 10
7.
Order function for spare parts ................................................................................... 11
7.1
Ordering program .................................................................................................... 11
7.1.1
Menu items and toolbar............................................................................................. 11
7.1.2
Ordering form – header data of order form ....................................................... 13 - 14
7.2
Export of order forms "Parts-Link" ............................................................................. 15
8.
Updates..... ................................................................................................................ 16
8.1
Updates-Konfiguration................................................................................................16
8.1.1
Update via LAN ..........................................................................................................17
8.1.2
Update via Internet .....................................................................................................17
8.2
Carry out update ...............................................................................................18 – 19
9.
Installation options..................................................................................................... 20
9.1
Server installation............................................................................................... 20 - 21
9.2
Terminal server installation....................................................................................22
......................................................................................... 9
Some of the software pictures in this manual are not shown in the installation language
as the programm language of some messages depends on the operating system.
This information is available in the Lindos system as file "help_GB.pdf" ; menu "? ~ H e l p ”
page 1 of 23
Lindos User Manual
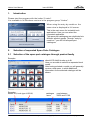
1.
issue 03/2006
Introduction
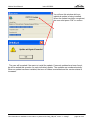
Please start the program with the button "Lindos".
It is available in all Windows versions in the program group "Lindos".
When using the entry by model-no. the
same view is displayed in full screen.
This is the main menu for industrial truck
applications. Here you can select the
requested application.
The spare part catalogues are subdivided into
different product groups. Through "entry by
model-no." you will find all spare part
catalogues.
2.
Selection of requested Spare Parts Catalogue
2.1
Selection of the spare part catalogue through product family
Example:
diesel-LPG-forklift trucks up to 8 t
Here you are able to select the requested truck
model.
After having selected a model you will generally
receive a sub menu, in which additional
information for the selected catalogue will be
shown:
Example:
Model 353, truck type H 50-80,
catalogue
Issue
year between
09/93 and 07/00
This information is available in the Lindos 1 system as file "help_GB.pdf" ; menu "? ~ H e l p ”
page 2 of 23
Lindos User Manual
issue 03/2006
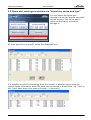
2.2 Spare part catalogue selection via "Search by series and type"
You can select the spare part
catalogue which you require using this
search screen if you do not know
which product family the device
belongs to
All truck types from a specific series are displayed here:
It is possible to continue narrowing down the number of possible types using the
various fields. Information about the parts can be entered in these fields, e.g. "H50" in
the "Type" field (there is no need to include * in the entry):
This information is available in the Lindos system as file "help_GB.pdf" ; menu "? ~ H e l p ”
page 3 of 23
Lindos User Manual
issue 03/2006
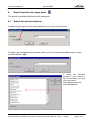
3. Navigation in the spare part catalogue
To select registers and spare part
catalogue pages please click on
the particular lines.
For further navigation use the
toolbar (chapter 3.3).
This information is available in the Lindos 1 system as file "help_GB.pdf" ; menu "? ~ H e l p ”
page 4 of 23
Lindos User Manual
3.1
issue 03/2006
Changing the screen display
The view on a spare parts list can be changed easily.
By dragging the mouse on the
border line between graphic and
text contents of both windows are
displayed in the desired size.
If the option "total view” or
"pagewidth” is active the zoom
factor will be adjusted accordingly.
Using free zooming the detail view
will not be adjusted (see chapter
3.2).
In case of not enough horizontal
window size first the columns
description and remarks will be
displayed in several lines. If the
window size is decreased further
more
a
horizontal
scrollbar
appears.
This information is available in the Lindos 1 system as file "help_GB.pdf" ; menu "? ~ H e l p ”
page 5 of 23
Lindos User Manual
3.2
issue 03/2006
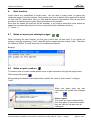
Pop up Menu (right mouse button)
On the right mouse button there is a popup menu which lists further commands depending on
the cursor position
Part information
Ordering Link
Start zoom Total view
Pagewidth
Maximize
Copy into the clipboard
Switch to order
Single view of part information with links to
notes (chapter 6.2) and ordering this part
Order directly
If additional information available
(example: Packaged quantities)
Free zooming with placing a fence
(section of view) Graphic in full screen
Graphic fitting into page width
Switch the graphic or spare part list to full
window size (back with "Minimize")
Depending on the cursor position copying
graphic, field or line of table or complete parts
list into the clipboard for using in another
application (e.g. MS-Excel).
Direct link to ordering menu
This information is available in the Lindos 1 system as file "help_GB.pdf" ; menu "? ~ H e l p ”
page 6 of 23
Lindos User Manual
3.3
issue 03/2006
Explanation of the Toolbar
Back to main menu
Back to start page of the catalogue
One level back
Backwards
Forwards
Switching on/off the ordering menu (chapter 7)
Switching on/off the order function (
~ ordering possible)
Switching on/off the hyperlink between graphic and text (switched off:
)
Delay for the hyperlink between graphic and text
Free zooming, dragging a fence (selection of view) with left mouse button
Display complete graphic (fit all)
Fit graphic to full page width
Search for part descriptions (chapter 4.1)
Search for part number (chapter 4.2)
Printing (chapter 5)
Note function for spare part catalogue pages (if note existing:, chapter 6.1)
Switch over the data and program language *
Carry out Update
* If the document is not available in the selected language, the program switches the language automatically!
This information is available in the Lindos 1 system as file "help_GB.pdf" ; menu "? ~ H e l p ”
page 7 of 23
Lindos User Manual
4.
issue 03/2006
Search functions for spare parts
The search is generally effected over all catalogues.
4.1
Search for part descriptions
A search by part name can be case-sensivite or not, as the user chooses.
To insert a part designation as a search criterion you can insert the complete word or a part
of it with asterisk *xyz*.
If using the wildcard
function (*) you receive a
list of hits before you get
your final result.
Here please select the
exact designation.
This information is available in the Lindos 1 system as file "help_GB.pdf" ; menu "? ~ H e l p ”
page 8 of 23
Lindos User Manual
issue 03/2006
Then you receive the list of results, it contains:
Found parts numbers (=
ascending sequence)
Item numbers of spare
parts lists
Numbers of Registers
and Spare Parts Lists of
Catalogues (e.g. 03/01)
Headlines of the Pages
of the Spare Part
Catalogue
Model, Type
From the list of results you can get directly into the place of use. With the function "one level
back” () you get back to the list of results and get into another place of use.
4.2
Search for part numbers
If a part number is the
search criterion you can
insert it complete or
parts of it, e.g. *1234*.
If several part numbers match with the inserted criterions the system first shows an overview of
this part numbers. From this list you have to select a part number to get the final result.
The list of results is corresponding to the result list of searching for part numbers but there is
only one part number displayed with its place of use.
5.
Printing of spare part catalogues
There are three different ways to print
spare part catalogue pages:
picture + table:
Graphic and spare part list will be printed
in portrait format on one page .
ATTENTION:
In favour of legibility remarks will not
be printed here!
picture:
Graphic in landscape format
table:
Spare Parts List in landscape format
This information is available in the Lindos 1 system as file "help_GB.pdf" ; menu "? ~ H e l p ”
page 9 of 23
Lindos User Manual
6.
issue 03/2006
Note function
Lindos offers two possibilities to make notes. You are able to make notes on spare part
catalogue pages or on part numbers. During setup you have to decide if the notes will be saved
on your local PC (stand alone use) or if they shall be saved in the network. Then all net users
are able to access the same notes. Mixed procedure is not possible.
Even after an update all notes will still be available. If you wish to delete this notes before an
update the corresponding files have to be removed from the installation directory
("...\notes\...”).
6.1
Notes on spare part catalogue pages
When choosing the note function you first get a notice that no files exist. If you decide for
making a note (by answering "Yes") a data file will be created with the ending "notiz". Therefore
the software "Editor" is used. Notes can be modified and deleted.
Beispiel:
6.2
Notes on part numbers
To create a note on a part number please move to part information through the popup menu.
There exists this symbol
After pressing this button a note data will be created, file name is "part number”, ending is
"notiz".
When you again open the part
information the symbol has changed
into:
Please regard:
This notes are saved independently
from their place of use and therefore
they are valid for this part over all
catalogues.
This information is available in the Lindos 1 system as file "help_GB.pdf" ; menu "? ~ H e l p ”
page 10 of 23
Lindos User Manual
7.
issue 03/2006
Order function for spare parts
There are different ways to
order parts:
To switch on the order
function in the toolbar
Popup-menu ~ Ordering
(out graphic or spare part
list)
Popup-menu ~ Part
Information ~
Ordering with immediate
enter of quantity
In any case the parts are
loaded into a new or already
opened order form. It is not
necessary that the ordering
menu is open.
7.1
Ordering program
If you have ordered the parts as described and have switched into the ordering menu through
the toolbar ( ) you will see the following window:
In this window
you again have
the possibility to
modify or delete
items.
The sequence
can be altered
by a click with
the mouse on
the respective
column.
With a double click on a line of the order you will get this screen and will be able to modify the
single positions (e.g. increasing amounts):
This information is available in the Lindos 1 system as file "help_GB.pdf" ; menu "? ~ H e l p ”
page 11 of 23
Lindos User Manual
issue 03/2006
7.1.1 Menu items and toolbar
For further research in the spare part catalogues it is not necessary to close the ordering
program. With the common known Windows functions it can be activated or deactivated on
demand (minimize the screen ~ task bar ~ restore).
This commands refer to the handling of complete order forms.
With this command you can built up one order form out of two. The
dates of the active form will be copied into the form to be selected.
For this function a faxsimile software has to be installed on the PC:
Export functions (e.g. "Parts Link”) for transferring the order form to
your Enterprise Resource Planning (chapter 7.2)
This commands refer to an active order form. Modification of the
header of a form (optin).
Here you can save several addresses.
To insert and administrate different ways of ordering and
dispatching.
of addresses
This information is available in the Lindos 1 system as file "help_GB.pdf" ; menu "? ~ H e l p ”
page 12 of 23
Lindos User Manual
issue 03/2006
Toolbar:
Create a new order form
Open the existing order form
Save the order form
Export the order form ("Parts-Link", Ch. 7.2)
Add an order item
Edit an item
Delete an item
Address data (form header and address management, Ch. 7.1.2)
Order data (form header, Ch. 7.1.2)
Type of order (Ch. 7.1.2)
Type of dispatch (Ch. 7.1.2)
Print
Fax (only possible if a fax program has been installed, has to be set up on a one-off
basis)
Call up information about parts
This information is available in the Lindos 1 system as file "help_GB.pdf" ; menu "? ~ H e l p ”
page 13 of 23
Lindos User Manual
issue 03/2006
7.1.2 Ordering form – header data of order form
This is the menu for selecting the addresses of an order in use
With a mouse click on the button "address" you open the address administration.
Creating and modifying of addresses through
this menu.
The addresses will be preserved after an
update.
It is possible to create and administrate
addresses centrally per dealer or subsidiary.
When this data are distributed to staff and
fitters a multiple administration is not
necessary.
Please contact your IT manager
Function last and next
Herewith you can accept the displayed
address into the active order form.
This information is available in the Lindos 1 system as file "help_GB.pdf" ; menu "? ~ H e l p ”
page 14 of 23
Lindos User Manual
issue 03/2006
With this menu you can insert further header dates for the order in use:
These data are e.g. also transferred to the interface "Parts Link” (chapter 7.2).
Here you can save several addresses.
With this menu you administrate the kinds
of ordering.
Afterwards you can select those out of a
pull down menu in the ordering data
menu.
The different kinds of dispatch are
administrated equally through
the symbol:
Addresses can be exported and imported
in a pre-defined XML format:
This information is available in the Lindos 1 system as file "help_GB.pdf" ; menu "? ~ H e l p ”
page 15 of 23
Lindos User Manual
7.2
issue 03/2006
Export of order forms "Parts-Link"
This function can be used for the electronic processing of order forms. It can be started in the
toolbaror through ”File ~ Export ~ Export order".
Here you define the directory where your data shall be exported to – only once.
This are different formats of interfaces. Linde
MH will support the format "Parts-Link" only.
Here you start the export.
You will receive a note about the
export of the data and the file name.
The file name has got the format:
"YYMMDDxx.TXT", "xx" is a
sequence number.
ATTENTION:
The sequence number is always
created by the client PC. If you want
to save the data from different users
in network, there have to be a
separate subdirectory (folder) for
each user (client).
Now this file can be transferred into your Enterprise Resource Planning system.
Therefore an adjustment of your Enterprise Resource Planning system is necessary! For
further information (e.g. the format of the interface) please contact your IT manager.
This information is available in the Lindos 1 system as file "help_GB.pdf" ; menu "? ~ H e l p ”
page 16 of 23
Lindos User Manual
8.
issue 03/2006
Updates
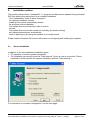
In Lindos version F-03/2006 or higher, it is possible to update an existing Lindos installation. In
an admin or full installation (see Chapter 10: "Installation variants"), this button is located in the
navigation bar. You must perform the search for
an update on your own. Before doing
this however, you must choose and configure one of the two update search variants.
The updates must be performed one after the other in the correct sequence. None of them
must be omitted. This is the only way to ensure that the material is up to date and further
updates can be imported.
8.1
Update configuration
This window appears if no update
.
Enter the configuration menu from the homepage
via "Settings – Update – update config.".
There are three tabs here "General", "Internet" and "LAN".
In the "General" tab, select the type of update
search, i.e. choose the perform the search in the
"Internet" or in the "LAN".
This information is available in the Lindos 1 system as file "help_GB.pdf" ; menu "? ~ H e l p ”
page 17 of 23
Lindos User Manual
issue 03/2006
8.1.1 Update via LAN
In this variant, the updates must be downloaded manually from the LMH extranet and placed in
a directory which the Lindos users can access (read rights). Enter the path and directory in the
screen in the "LAN" tab. You can navigate to the drive you require using the arrow beside the
field:
The address of the LMH extranet is http://extranet.linde-mh.com. This Internet site can only be
accessed by approved users with a user name and password. If you want to find out how to be
granted access, contact
[email protected].
The update files are executable files and appear at least once a month (at the start of the
month) on the above-mentioned page in the "After Sales – Service handling equipment –
Lindos".
8.1.2 Update via Internet
During installation, the target Internet address where the updates are stored is given in
encoded form. It therefore does not have to be entered again here.
If your company uses a proxy server, you may
have to enter the user name and password in
the appropriate fields in the above-mentioned
configuration window. Contact your local IT
administrator for more information.
If a proxy server is being used, it may not be
possible to connect to the Update Internet site.
If this is the case, contact your local IT
administrator.
If your IT administrator wants to enable the Internet site on the proxy and requires the URL for this
purpose, he should contact this address: [email protected].
This configuration abolishes the need for manual downloading from the Extranet. Instead, an
update provided in the Internet is automatically downloaded and copied to the system directory
when the "Update searcher" is started ("Settings – Update – Carry out update" or the "Carry
out update" button, see Chapter 8.2).
This information is available in the Lindos 1 system as file "help_GB.pdf" ; menu "? ~ H e l p ”
page 18 of 23
Lindos User Manual
8.2
issue 03/2006
Carry out update
The user initiates the process of carrying out the file and Lindos starts this process. You can
start the search for an update by pressing the "Carry out update" button or by using the
"Settings – Update – Carry out update" menu bar. Every search variant places the update file in
the system directory provided for this purpose.
This window appears if there is no
update available, e.g. when Lindos is
started for the first time.
This window appears during the copying
process.
If the network connection is of good
quality, the window will only appear
briefly.
The user is then asked whether he wants to carry out the update(s):
"Yes"
"No"
"Cancel"
= Update is carried out immediately.
= Update is not carried out immediately. Each time a product group is changed
during the same Lindos session, the update is offered again.
= The update is no longer offered during the same Lindos session.
It is not offered again until Lindos is started again.
This information is available in the Lindos 1 system as file "help_GB.pdf" ; menu "? ~ H e l p ”
page 19 of 23
Lindos User Manual
issue 03/2006
You will see this window while an
individual update is being installed.
When the update has been completed,
the user must press "OK" to confirm.
The user will be asked if he wants to install the update. If several updates have been found,
he will be asked this question for each individual update. The updates are numbered serially.
When an update has been installed, the term of Lindos is extended and the version status is
increased.
This information is available in the Lindos 1 system as file "help_GB.pdf" ; menu "? ~ H e l p ”
page 20 of 23
Lindos User Manual
9.
issue 03/2006
Installation options
This version makes Lindos "updateable", i.e. program and data can be updated using individual
EXE files without the requirement for a complete installation.
- This "updateability" leads to some changes in
the various installation variants.
- Installing this version automatically deletes
the previous Lindos installation.
- The update files are provided by Linde in various
formats.
- The update files must not be carried out manually (by double-clicking)
as Lindos processes them automatically.
- Linde is planning on providing the updates on a monthly basis.
Please read the Readme file for more information on configuring and installing the updates.
9.1
Server installation
In addition to the two established installation types
CD operation of Lindos (update impossible!)
Full installation (previously known as "Data optional"), there is now an innovative "Server
installation" which replaces the network installation (without "Data optional").
For information on complete configuration, see the next page.
This information is available in the Lindos 1 system as file "help_GB.pdf" ; menu "? ~ H e l p ”
page 21 of 23
Lindos User Manual
issue 03/2006
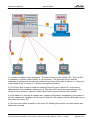
1) A server is installed using "setup.exe". This can be found on the Lindos CD1. This is a "flat"
F-installation. Activation with LindeAC is not necessary. The important thing is that the
installation is performend on a directory which future users will be able to access. A "client.exe"
is generated in the "x:\Lindos_F\" directory during this procedure.
2) This CLient-Exe is used to install the various Client-PCs and 1 Admin-PC, and must be
selected when the installation is being set up. The Admin-PC needs write permission on the
Lindos-F server directory. Attention: admin and clients require activation with LindeAC.
3) If the Admin-PC receives an update (see "Update configuration" transparency) and carries it
out, this updates the installation on the server. Attention: the update must be performed from no
more than one Admin-PC.
4) The next time Lindos is started on the client PC following this update, the client Lindos also
shows the new data.
This information is available in the Lindos 1 system as file "help_GB.pdf" ; menu "? ~ H e l p ”
page 22 of 23
Lindos User Manual
9.2
issue 03/2006
Terminal server installation
This installation variant is essentially identical to client server installation. The terminal server is
to be treated as a client PC (see Chapter 11.1). Activation is performed in the same way as in
the past (cfg file is still required).
Alternatively, a terminal server can be operated as a full version - see Readme.
This information is available in the Lindos 1 system as file "help_GB.pdf" ; menu "? ~ H e l p ”
page 23 of 23