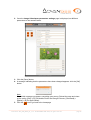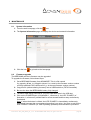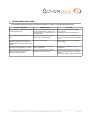
1
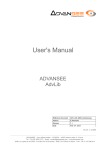
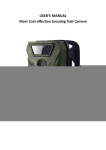
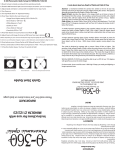
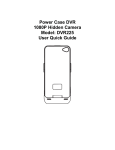
User's Manual
®
Timelapse camera
for Biodiversity Inventory
Référence Document
ADV_UM_9022_01
Révision
1.5
Date
31/07/2015
ADV_UM - 1.3 - 20120608
ADVANSEE – 2 rue Alfred Kastler – CS30750 – 44307 Nantes cedex 3– France
Tél. : 33 (0)2 4050 2173 – Email : [email protected] – www.advansee.com
SARL au capital de 40 200€ - 510 580 814 RCS Nantes - SIRET 510 580 814 00042- TVAI : FR 31 510 580 814
Table of content
1 Introduction................................................................................................................ 3
2 Description................................................................................................................. 4
2.1 Product references.................................................................................................4
2.2 Product usage........................................................................................................4
2.3 Operating conditions..............................................................................................4
2.4 Storage conditions.................................................................................................4
2.5 Package content....................................................................................................4
2.6 Additional mandatory accessories.........................................................................4
2.7 Product description................................................................................................5
3 Installing the camera..................................................................................................7
3.1 Installing the storage media...................................................................................7
3.2 Installing the device...............................................................................................7
3.3 Supplying power.....................................................................................................7
4 Setting the image frame.............................................................................................8
5 Configuring the camera............................................................................................10
5.1 Configuring through the web interface.................................................................10
5.2 Configuring through the USB flash drive.............................................................14
6 Operating a timelapse sequence..............................................................................16
6.1 Normal usage.......................................................................................................16
6.2 Checking camera healthiness..............................................................................16
6.3 In-situ reviewing of images or video sequences..................................................17
7 Getting the recorded material...................................................................................19
7.1 USB flash drive....................................................................................................19
7.2 FTP access..........................................................................................................19
8 Maintenance............................................................................................................21
8.1 System information..............................................................................................21
8.2 Firmware upgrade................................................................................................21
8.3 Cleaning...............................................................................................................22
8.4 Repair...................................................................................................................22
8.5 End of life.............................................................................................................22
9 Troubleshooting guide..............................................................................................23
Document: ADV_UM_9022_01_v1.5 - © ADVANSEE SARL 2015, All rights reserved
page 2
1
INTRODUCTION
This document is the user's manual for the timelapse camera BEECAM® (firmware version
3.11.1 and above).
This product is aimed at recording video sequences (MP4 format) or still images (JPEG
format) according a daily schedule (hereafter called a “timelapse sequence”).
The daily schedule can be programmed over-the-air from a WIFI capable device (smartphone,
tablet, PC, …) or with a configuration file written in a USB flash drive.
The video sequences and the still images are stored on a USB flash drive plugged in the
camera.
Document: ADV_UM_9022_01_v1.5 - © ADVANSEE SARL 2015, All rights reserved
page 3
2
DESCRIPTION
2.1
Product references
Commercial name: BEECAM
Product number: ADV00100V (without WIFI), ADV00100VW (with WIFI)
2.2
Product usage
This product is dedicated to record video sequences or still images on a USB flash drive
according a programmed daily schedule.
Image frame and camera configuration are done through a WIFI connection from a WIFI
capable device running an internet browser (BEECAM® acting as a WIFI hotspot), or via a
configuration file stored on a USB flash drive.
Please note that, in this document, all mentions to WIFI operations are applicable only to
camera featuring the WIFI option.
2.3
Operating conditions
Operating free-air temperature : -10°C to +40°C.
Operating air moisture : 15% to 90%.
2.4
Storage conditions
Storage temperature : -20°C to +60°C.
Storage air moisture : 15% to 90%.
Outside storage is prohibited.
2.5
Package content
•
camera body,
•
camera cover,
•
4 screws,
•
supply cable,
•
quick start guide
2.6
Additional mandatory accessories
In order a get a functional system, the following accessories are needed:
Document: ADV_UM_9022_01_v1.5 - © ADVANSEE SARL 2015, All rights reserved
page 4
•
•
2.7
either the battery pack (external 12V Pb battery) (reference ADV00115) with its charger
(reference ADV00106),
or the solar pack (solar panel and 12V Pb battery) (reference ADV00120)
or the 110V/240V main supply adapter (reference ADV00105)
A USB flash drive, FAT32 formatted.
Product description
General overview
The product is composed of a waterproof casing containing the camera
core and a hermetic cover. Once assembled together, those two
elements constitute the water-resistant camera device (hereafter
denoted “camera”).
Presentation
Illustration 1: BEECAM description
1: Camera cap
6: STATUS Led
2: Cap screw
7: USB slot
3: Camera body
8: Power supply plug
4: POWER button
9: Internal supply connector
5: POWER Led
10: fixation nut diameter 6 mm (M6)
Technical characteristics
• 5 Megapixel 1/4 " CMOS sensor
Document: ADV_UM_9022_01_v1.5 - © ADVANSEE SARL 2015, All rights reserved
page 5
•
Still image maximum resolution : 2592x1944
•
Video maximum resolution :
•
video encoding : MP4/H264 AVC [email protected]
•
still image encoding: JPEG
•
Optical lens : focal: 3.6 mm, aperture f/2,9
•
Field of view :
•
1920x1080 @ 30 frames/second
1080x720 @ 60 frames/second
640x480 @ 90 frames/second
•
VFOV=40°, HFOV=53° @ 2592x1944
•
VFOV=22°, HFOV=39° @ 1920x1080
WIFI hotspot: IEEE 802.11 b/g/n 2.4 Ghz 150Mbit/s
Mechanical characteristics
•
Height: 128 mm (+ connector: 10 mm)
•
Width: 74 mm
•
Depth: 55 mm
•
Body material : PVC
•
Fixation nut : M6
•
Protection: IP65
Electrical characteristics
The camera is supplied with different type of batteries, depending on purchase options.
Dual supply voltage: 7.4 Volts or 12 Volts (internal automatic switch)
Document: ADV_UM_9022_01_v1.5 - © ADVANSEE SARL 2015, All rights reserved
page 6
3
INSTALLING THE CAMERA
The installation of the BEECAM® camera consists on: connecting the USB flash drive where
the images will be recorded later on, physically fixing the camera on its support and connecting
the power supply source,.
3.1
Installing the storage media
Open the camera cover and plug an USB flash drive (formatted in FAT32) in the USB slot (cf
Illustration 1, reference 1) of the camera core.
Warning:
The camera must be powered-off when plugging or unplugging the USB flash drive.
3.2
Installing the device
Strongly fix the BEECAM® camera on a rigid support through the 6mm nut (cf Illustration 1,
reference 1) located on the camera base.
3.3
Supplying power
Connect the camera supply cable to power supply plug (cf Illustration 1, reference 1). The plug
is keyed.
Attention:
Never use a battery not strictly equivalent to the one provided at purchase time. In case you
need to replace the battery, we strongly recommend to buy from ADVANSEE.
Document: ADV_UM_9022_01_v1.5 - © ADVANSEE SARL 2015, All rights reserved
page 7
4
SETTING THE IMAGE FRAME
The BEECAM® camera being fixed to a support (cf §3), adjust the image composition.
When powered on, the BEECAM® camera behaves as a WIFI hotspot. Thus, the actual image
frame can be viewed over-the-air by any WIFI capable device (located close to the camera)
running an internet browser.
Follow the procedure below:
1. Follow the steps described in §3, so that the camera in installed and power supplied.
2. Remove the camera cover.
3. Click on the POWER button (cf Illustration 1, reference 4): the LED “POWER” (cf
Illustration 1, reference 5) should flash for a few seconds and then stay continuously
illuminated.
Note: if, when the button is clicked, the LED “POWER” is immediately continuously
illuminated, it means that a programmed recording is on going. You have to wait for the
LED “POWER” extinction (i.e. end of pending operation) and reiterate the procedure.
4. Once the LED “POWER” is continuously illuminated, setup your WIFI capable device
(smartphone, tablet, etc...) to connect to a WIFI hotspot denominated with the
BEECAM® hostname (to be found on the sticker located inside the camera cover).
The password to establish the WIFI connection with BEECAM® is
tgv44air!
5. Once the WIFI connection is established, open an internet browser (such as Mozilla
Firefox, Google Chrome, Microsoft Internet Explorer, Apple Safari, etc...) and type the
following address in the address bar:
http://192.168.42.1
Document: ADV_UM_9022_01_v1.5 - © ADVANSEE SARL 2015, All rights reserved
page 8
6. The following web page should appear, displaying the camera live-view:
7. Adjust the camera position so that the image composition fits your needs.
8. If the camera parameters (record start time and duration, image resolution, etc...) have
to be modified, refer to operating instructions described in §5.1; else:
9. To safely power-off the camera, click again on the POWER button (cf Illustration 1,
reference 4): the LED “POWER” will blink for a few seconds and then unlit: the camera
is off.
Note:
The camera is automatically powered off after 5 minutes of inactivity (i.e. no user's interaction
with the webpages). A progress bar indicates the remaining time before power off.
When the remaining time is more than 2 minutes, the progress bar is
green.
When the remaining time is between 1 and 2 minutes, the progress bar
is orange.
When the remaining time is less than 1 minute, the progress bar is red.
Document: ADV_UM_9022_01_v1.5 - © ADVANSEE SARL 2015, All rights reserved
page 9
5
CONFIGURING THE CAMERA
Once the device has been installed so that the framed scene correspond to the view of interest
(refer to §4), the image and timelapse parameters have to be configured.
5.1
Configuring through the web interface
Establish a connection between the BEECAM® camera and your WIFI capable device, so that
the BEECAM® web homepage is displayed on your internet browser (cf §4, step 1 to 6).
Configuring the language
1. From the web homepage, click the
icon and then the
icon.
2. Once the Language page is displayed, choose the language for the web interface.
3. Click the [OK] button
4. A message indicating that the language as been modified appears: click the [OK]
button.
Note:
Should this message not appear, something goes wrong. Reload the page and cleanup the cache ([Ctrl] + [F5] for Mozilla Firefox and Google Chrome, [Command] +
[Option] + [E] for Apple Safari).
5. Click the
icon to go back to the homepage
Document: ADV_UM_9022_01_v1.5 - © ADVANSEE SARL 2015, All rights reserved
page 10
Configuring the date and time
This configuration has to be done only when the actual local time has changed (Daylight
Daving Time, camera location changed, …) or when the internal CR2032 battery has been
changed.
Please note that the Daylight Saving Time is not managed by the camera.
1. From the web homepage, click the
icon and then the
icon.
2. Once the Date & Time page is displayed, set the date and time to the actual local
values.
3. Click the [OK] button
4. A message indicating that the date and time have been changed appears: click the
[OK] button.
Note:
Should this message not appear, something goes wrong. Reload the page and cleanup the cache ([Ctrl] + [F5] for Mozilla Firefox and Google Chrome, [Command] +
[Option] + [E] for Apple Safari).
5. Click the
icon to go back to the homepage
Configuring the image and timelapse parameters
This configuration allows to set the recording mode (still images or video sequences), the
image and video resolutions, the framerate and duration (for video sequences) and the image
settings (orientation, brightness, contrast, saturation and white balance).
1. From the web homepage, click the
icon and then the
Document: ADV_UM_9022_01_v1.5 - © ADVANSEE SARL 2015, All rights reserved
icon.
page 11
2. Once the Image & timelapse parameters settings page is displayed, set different
parameters to the wanted values.
3. Click the [Save] button
4. A message indicating that the parameters have been changed appears: click the [OK]
button.
Note:
Should this message not appear, something goes wrong. Reload the page and cleanup the cache ([Ctrl] + [F5] for Mozilla Firefox and Google Chrome, [Command] +
[Option] + [E] for Apple Safari).
5. Click the
icon to go back to the homepage
Document: ADV_UM_9022_01_v1.5 - © ADVANSEE SARL 2015, All rights reserved
page 12
Details of the available parameters:
For still images, the following image resolutions are available:
•
2592x1944,
•
1920x1080,
•
1280x720,
•
640x480,
•
320x240.
For video sequences, the following resolution/framerate are available:
•
1920x1080 (aka “1080p”) at 30 frames/second
•
1280x720 (aka “720p”) at 30 frames/second
•
640x480 (aka “VGA”) at 30 or 90 frames/second
•
320x240 (aka “QVGA”) at 30 or 90 frames/second
The video sequence duration (in seconds) can be set to any value (excluding 0). However,
please be aware that the FAT32 formatting of the USB flash drive limits the size of each
individual file to 4 Gbytes (i.e. nearly 400 minutes of continuous recording in 640x480 @ 30 fps
– exact size of a file depends on resolution, framerate and also lightning conditions).
The recording schedule depends on the following parameters:
•
time of the first record in the day (e.g: 9:00)
•
interval between two successive record starts (e.g: 30 minutes)
•
number of records per day (e.g: 6)
With the figures given as example above, the BEECAM® camera will shoot (a still image or
video sequence, depending on the chosen mode) every 30 minutes from 9 o'clock and 15
minutes, 6 times; that is to say: at 9:15, 9:45, 10:15, 10:45, 11:15 and 11:45.
Please be aware of the following characteristics:
•
the schedule is daily based, and thus will be played in the same way every days (as
long as the parameters are not changed),
•
when recording video sequences, the interval between two successive starts must be
at least 1 minute greater than the video duration.
•
when recording still images, the interval between two successive shots must be at least
1 minute.
Document: ADV_UM_9022_01_v1.5 - © ADVANSEE SARL 2015, All rights reserved
page 13
The other setting are:
•
image orientation: 0°, 90°, 180° (default) and 270°
The image is always in landscape mode (even when rotated from 90 or 270°)
Note: the sensor is mounted internally upside-down. Thus, if the camara stands
vertically with its base at the bottom, the configured orientation should be 180°.
•
image brighness: 0 (darkest) to 100 (brightest). Default is 50.
•
image contrast: -100 to 100. Default is 0.
•
image saturation: -100 to 100. Default is 0.
•
white balance: automatic (default), sunlight, tungsten light, fluorescent light,
incandescent light.
The effects of the settings are immediately visible on the live-view display.
5.2
Configuring through the USB flash drive
The parameters (date, time, image and timelapse parameters) can alternatively be set by
putting a configuration file on the USB flash drive. With this procedure, there is no need for a
WIFI capable device.
The steps to follow are:
1. From an internet-connected computer, go to:
http://tools.advansee.com/beecam.php
2. Once connected, the online configuration tool will allow you to set the different
parameters (interface is very similar to the one embedded in BEECAM®, thus refer to
§5.1 for details on the parameters).
Document: ADV_UM_9022_01_v1.5 - © ADVANSEE SARL 2015, All rights reserved
page 14
Note 1:
with the left-hand selector, you can choose whether to configure date and time or not.
In the case you want to update the date and time of the BEECAM®, please be aware
that the date and time values will be taken into account by the BEECAM® device on
the first power-on featuring the USB key containing the generated configuration file.
Thus, remind to set time and date values to the expected actual values at the time of
this power-on.
Note 2:
The parameter Video format is present for downward compatibility but will not be used
by BEECAM®. It can be set to any value.
3. Click the [Save to file] button: the configuration file will be saved in your Internet
browser's download folder (shortcut: [Ctrl] + [J] for Mozilla Firefox and Microsoft
Internet Explorer on Windows PC).
4. On a USB flash drive, create a folder named CONF and copy the configuration file in it.
The name of the configuration file must be system.conf. If, for any reason, the filename
is not system.conf, rename it accordingly.
5. The BEECAM® being powered-off, plug the USB flash drive in the USB slot.
6. Click on the POWER button (cf Illustration 1, reference 4): the LED “POWER” (cf
Illustration 1, reference 5) should flash for a few seconds and then stay continuously
illuminated.
Note: if, when the button is clicked, the LED “POWER” is immediately continuously
illuminated, it means that a programmed recording is on going. You have to wait for the
LED “POWER” extinction (i.e. end of pending operation) and reiterate the procedure.
7. Once the LED “POWER” is continuously illuminated, the new configuration has been
taken into account by the BEECAM® device.
8. Power-off the camera by clicking again on the POWER button: the LED “POWER” will
blink for a few seconds and then unlit: the camera is off.
9. The USB flash drive can be unplugged.
Note:
Once the configuration file has been successfully read by BEECAM®, it is automatically
renamed system.conf.bak, in order to avoid re-configuring again the device (possibly with
wrong date and time values, if set) at next power-on. If you want to use the same configuration
file for configuring another BEECAM® device, rename the file to system.conf.
Warning:
The configuration file system.conf is a human-readable text file. However, we strongly
recommend to not edit the file manually, as any inappropriate content may lead to
unpredictable camera's behavior.
Document: ADV_UM_9022_01_v1.5 - © ADVANSEE SARL 2015, All rights reserved
page 15
6
OPERATING A TIMELAPSE SEQUENCE
Once installed and configured, the camera is ready for shooting images or video sequences
following the programmed schedule.
6.1
Normal usage
Check the following points:
1. The USB flash drive is plugged.
2. The power is supplied.
3. The “POWER” LED (cf Illustration 1, reference 5) is unlit.
If the “POWER” LED were not unlit, it means that the camera has previously been
manually powered and is currently in LIVE-VIEW mode (cf § 4). Power-off the camera
by clicking on the POWER button (cf Illustration 1, reference 4): the LED “POWER” will
blink for a few seconds and then unlit: the camera is off.
If the check is positive, then the BEECAM® camera is in OPERATING mode and is ready for
shooting the configured timelapse sequence (refer to §5 for details on how to configure the
sequence).
Note that, while the camera is in OPERATING mode, the LEDs are deactivated. In order to
know the camera status, perform a short press on the “POWER” button: the “POWER” LED
will light-on and the “STATUS” LED (cf Illustration 1, reference 6) will display the last status
(refer to §6.2 for details).
When a record is ongoing, the WIFI connection is not possible (the WIFI is deactivated to save
power).
6.2
Checking camera healthiness
The camera being powered,
1. click on the POWER button (cf Illustration 1, reference 4): the LED “POWER” (cf
Illustration 1, reference 5) should flash for a few seconds and then stay continuously
illuminated.
Note: if, when the button is clicked, the LED “POWER” is immediately continuously
illuminated, it means that a programmed recording is on going. In this case, the LEDs
will give the status, but the WIFI connection (point 3 below) will not be available.
2. If the “STATUS” LED (cf Illustration 1, reference 6) is unlit: no error are to be reported.
If the “STATUS” LED” blinked, an error occurred. The number of pulse give the error
type:
◦ 1 pulse/second: USB flash drive was not detected at startup.
Please power-off the camera, check that the USB flash drive is correctly
plugged and that it is FAT32 formatted.
◦ 2 pulses/second: Battery voltage is low.
Please change the battery.
◦ 3 pulses/second: Hardware fault detected.
Please contact the ADVANSEE's hotline: [email protected]
Document: ADV_UM_9022_01_v1.5 - © ADVANSEE SARL 2015, All rights reserved
page 16
Note: In the case where USB flash drive is not detected AND the battery voltage is low,
the behavior is: 1 pulse/second during the first 4 seconds (indicating that the USB flash
drive is not detected), then 2 pulses/second (indicating that battery voltage is low).
3. Either power-off the camera by clicking again on the POWER button (cf Illustration 1,
reference 4): the LED “POWER” (cf Illustration 1, reference 5) will blink for a few
seconds and then unlit: the camera is off;
or connect a WIFI-capable device to the BEECAM® camera (refer to §4 for details) in
order to review framing and parameters. Once reviewed, power-off the camera by
clicking again on the POWER button: the LED “POWER” will blink for a few seconds
and then unlit: the camera is off;
6.3
In-situ reviewing of images or video sequences
Establish a connection between the BEECAM® camera and your WIFI capable device, so that
the BEECAM® web homepage is displayed on your internet browser (cf §4, step 1 to 6).
1. From the web homepage, click the
icon.
2. Once the Playback & download page is displayed, select a file in the list to preview or
download it.
◦ The type of file (still image, video sequence or both) can be filtered from the
corresponding selector on top of file list.
◦ The file being previewed can be downloaded or deleted using the corresponding
button below the preview window.
◦ All the filtered files can be deleted at once by clicking the Delete all button at the
bottom of the files list.
◦ All the filtered files can be downloaded at once by clicking the Download all button
at the bottom of the files list. The files are compressed and packed in a file named
archive.gz (GZIP format). The archive can then be unpacked on a computer (using
Document: ADV_UM_9022_01_v1.5 - © ADVANSEE SARL 2015, All rights reserved
page 17
for example the application 7-ZIP on Microsoft Windows® PC or natively on Apple
MacOS® or Linux systems).
Note:
A long as the Playback & download page is displayed, the camera automatic power-off
(after 5 minutes of inactivity) is deactivated. The camera stops after 60 minutes, if not
manually powered off before.
3. Click the
icon to go back to the homepage.
Document: ADV_UM_9022_01_v1.5 - © ADVANSEE SARL 2015, All rights reserved
page 18
7
GETTING THE RECORDED MATERIAL
7.1
USB flash drive
The BEECAM® camera being powered off, the USB flash drive can be unplugged, allowing to
conveniently transfer the images to a computer.
The still images and/or the video sequences are stored on the USB flash drive, under a folder
named DCIM.
The filename for still images looks like:
◦ img_YYYYMMDD_HHMM.jpg
The filename for video sequences looks like:
◦ video_YYYYMMDD_HHMM_FF.mp4 for video
where:
YYYY: 4-digit year
MM: 2-digit month (01 to 12)
DD: 2-digit day (01 to 31)
HH: 2-digit hours in 24-hour mode (00 to 23)
MM: 2-digit minutes (00 to 59)
FF: 2-digit framerate (30, 60 or 90) – for video sequences only
7.2
FTP access
The USB flash drive's directory where the images are stored is accessible through a FTP
connection.
Follow the procedure below:
1. Follow the steps 1 to 4 described in §4, so that you can access BEECAM® from a WIFI
capable device (recommended: a computer running Microsoft Windows®, Apple
MacOS® or Linux).
2. Using a FTP Client software (e.g. Filezilla), open a FTP connection with the camera:
FTP host:
FTP port:
FTP user:
password:
192.148.42.1
21
ftp
tgv44air!
Document: ADV_UM_9022_01_v1.5 - © ADVANSEE SARL 2015, All rights reserved
page 19
Remark: the connection will failed if the USB flash drive is not plugged.
3. Transfer the image files from BEECAM® to the computer.
Tips:
A command-line FTP transfer client can be used in order to retrieve all files at once. By
exemple, with wget:
wget ftp://”ftp:tgv44air!”@192.168.42.1/*
Document: ADV_UM_9022_01_v1.5 - © ADVANSEE SARL 2015, All rights reserved
page 20
8
MAINTENANCE
8.1
System information
1. From the web homepage, click the
icon.
2. The System information page will display the device and network information.
3. Click the icon
to go back to the homepage.
8.2
Firmware upgrade
The BEECAM® camera's firmware may be upgraded.
To upgrade the firmware, follow these steps:
1. Get a BEECAM® firmware from ADVANSEE. This is a file named
fw_upgrade_vX.x.x_to_vY.y.y.bin (where X.x.x must be the firmware version number
currently installed in the camera and Y.y.y is the new firmware version number).
2. Copy this file (without altering its name) onto a USB flash drive (FAT32 formatted).
3. Be sure the have the BEECAM®'s battery fully charged.
4. The BEECAM® being powered-off, plug the USB flash drive in the USB slot.
5. Click on the POWER button (cf Illustration 1, reference 4): the LED “POWER” (cf
Illustration 1, reference 5) should flash for a few seconds and then stay continuously
illuminated.
Note: if, when the button is clicked, the LED “POWER” is immediately continuously
illuminated, it means that a programmed recording is on going. You have to wait for the
LED “POWER” extinction (i.e. end of pending operation) and reiterate the procedure.
Document: ADV_UM_9022_01_v1.5 - © ADVANSEE SARL 2015, All rights reserved
page 21
6. Once the LED “POWER” is continuously illuminated, the new firmware has been
installed.
7. Power-off the camera by clicking again on the POWER button: the LED “POWER” will
blink for a few seconds and then unlit: the camera is off.
8. Unplug the USB flash drive and erase the firmware file from it.
8.3
Cleaning
The exterior of the unit can be cleaned with a soft damp cloth.
8.4
Repair
There is no serviceable part inside.
Repair of the device should only be made by an ADVANSEE's authorized agent.
8.5
End of life
The device must be recycled according to the local regulations related to electrical and
electronic equipments.
Document: ADV_UM_9022_01_v1.5 - © ADVANSEE SARL 2015, All rights reserved
page 22
9
TROUBLESHOOTING GUIDE
If something goes wrong with the camera behavior, please check the following points.
Problem / Symptom
Probable cause
Remedy
Nothing as been recorded whereas a daily
schedule is programmed.
If, when the camera is powered on, the
Using a computer, format the USB flash
LED “STATUS” blinks at 1 pulse/second,
drive as FAT32.
the USB flash drive is not recognized or not Use another FAT32 formatted USB stick.
FAT32 formatted.
Some (video or still) files have a size of 0
bytes.
The USB flash drive was full when the
camera tried to record those files.
Transfer the content of the USB flash drive
on another media and empty the USB flash
drive.
The camera does not power on when
pushing the POWER button whereas the
external battery is correctly plugged to the
camera.
The battery is discharged.
Fully charge the battery with the adapted
battery charger.
The date is reset to December 31st 1969
each time the external battery is removed.
The internal Real-Time Clock keeper
battery is discharged.
Contact [email protected] for
maintenance.
When saving a configuration (by clicking
the Save or OK button), there is no
confirmation popup displayed.
The Javascript has not been correctly
loaded by your internet browser.
Reload the page and clean-up the cache:
[Ctrl] + [F5] for Mozilla Firefox and Google
Chrome,
[Command] + [Option] + [E] for Apple Safari
Document: ADV_UM_9022_01_v1.5 - © ADVANSEE SARL 2015, All rights reserved
page 23