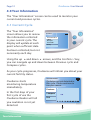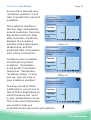
1
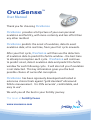
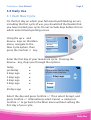
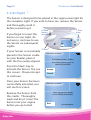
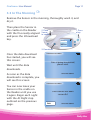
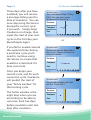
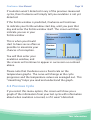
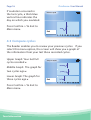
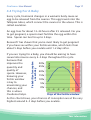
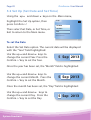
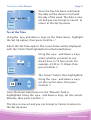
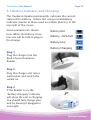
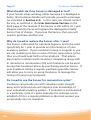
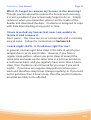
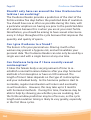
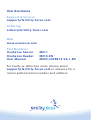
OvuSense Realtime Fertility Monitor User Manual ™ OvuSense™ User Manual Thank you for choosing OvuSense OvuSense provides a full picture of your own personal ovulation and fertility, with more certainty and less effort than any other method. OvuSense predicts the onset of ovulation, detects exact ovulation date; all in real time, from your first cycle onwards. After your first cycle, OvuSense will then use the detection of ovulation date to predict the fertile window – the best time to attempt conception each cycle. OvuSense will continue to predict onset, detect ovulation date and predict the fertile window for each following cycle. It will also tell you if ovulation is not detected. This key information gives you the best possible chance of successful conception. OvuSense has been rigorously developed and tested in extensive clinical trials against “gold standard” ultrasound follicle measurement. It is 99% accurate1, comfortable, and easy to use2. We wish you all the best in your fertility journey. The team at Fertility Focus www.ovusense.com Contents 1.0 Important Notes1 1.1 Indications For Use1 1.2 Device Components List1 1.3 Warnings and Precautions1 2.0 Overview4 2.1 Switching the Reader On and Off5 2.2 Cleaning the Sensor5 2.3 Inserting Your Sensor6 2.4 Removing Your Sensor 7 2.5 Sexual intercourse and the Sensor8 2.6 Sensor Life8 3.0 Daily Use9 3.1 Each New Cycle9 3.2 At Night 10 3.3 In The Morning 11 4.0 Your Information12 4.1 Current Cycle12 4.2 Previous Cycle15 4.3 Compare cycles16 4.4 Trying For A Baby17 4.5 Understanding Your Cycle18 5.0 System Functions 19 5.1 Your Health: what to do if you have a fever19 5.2 Set Up (Set Date and Set Time)20 5.3 Battery Indicator and Charging23 6.0 Messages24 6.1 Fertility information Messages24 6.2 System Messages 25 7.0 Frequently Asked Questions28 8.0 Reference Information35 FCCID: Z8YM009-V1. This device complies with part 15 of the FCC Rules. Operation is subject to the following two conditions: 1. This device may not cause harmful interference, and, 2. This device must accept any interference received, including interference that may cause undesired operation. M C0088 © Fertility Focus Limited 2014 Manufacturer Fertility Focus Ltd Unit 19D University of Warwick Science Park Warwick Innovation Centre Warwick Technology Park Gallows Hill, Warwick CV34 6UW, United Kingdom OvuSense™ User Manual Page 1 1.0 Important Notes 1.1 Indications For Use The Fertility Focus OvuSense Fertility Monitor (which includes OvuSense Reader M010-EN and OvuSense personal Sensor M011) is intended for measuring and recording basal body temperature (BBT) as an aid in ovulation prediction to aid in conception (not to be used for contraception). 1.2 Device Components List This user manual covers the following components: OvuSense Reader OvuSense Sensor M010-EN M011 1.3 Warnings and Precautions THIS PRODUCT IS NOT FOR CONTRACEPTIVE USE As with the use of tampons, there may be a small risk of toxic shock syndrome – a rare condition caused by the bacterium Staphylococcus aureus growing on blood or fluids in the vagina. If you feel ill or have a high temperature (above 39˚C or 102˚F), muscular pains, headaches, vomiting, diarrhoea, or if a skin rash appears, STOP using the Sensor immediately and see your doctor. DO NOT use the Sensor during your menstrual bleed. Should ‘spotting’ occur, or an unexpected bleed begin, STOP using your Sensor until this bleeding stops. The Sensor will not produce valid fertility monitoring results during menstruation. Important Notes OvuSense™ User Manual Page 2 The Sensor is for your personal use. DO NOT share it with other women, as this may present a risk of infection, and invalidate your personal results. DO NOT insert the Sensor anywhere other than your vagina. DO NOT leave the device in place in the vagina during sex, as this may present a risk to you and your partner. If you experience repeated difficulty or discomfort during insertion; or discomfort, irritation or a vaginal discharge during use of the Sensor, DO NOT continue use. Consult your doctor. Use of any hormonal contraceptive or intrauterine device at the same time as OvuSense may invalidate the data collected. Electrical Safety & Compliance The charger is a mains isolating device. Make sure the charger is accessible during use, so the plug can be easily removed from the mains socket if necessary. WARNING: No serviceable parts are contained inside the Reader, Sensor or the charger. Modification, repair or change of this equipment is not possible and is expressly forbidden by the manufacturer. Damaged or defective units must be returned within two years of purchase for assessment by the manufacturer at the address identified in the User Assistance Section on the back page of this manual. The OvuSense Sensor is a B-type applied part, according to the classifications defined in IEC 60601-1. Important Notes OvuSense™ User Manual Page 3 The data port on the back of the Reader is for manufacturer use only. DO NOT attempt to plug in any cables. Handling The surface of the Reader and the Sensor cradle should be regularly wiped with fresh paper tissue to keep it clean. Care must be taken not to drop the Sensor. If dropped, check the seal around the centre ring for signs of cracking or breakage. If found, STOP use of the Sensor immediately. DO NOT use the Sensor if any damage to the coating occurs, or if the tail is broken. In all cases of damage, REPLACE the Sensor with a new one by contacting Service using the address in the User Assistance Section on the back page of this manual. If you lose or damage your Sensor during a cycle, you can simply place a new Sensor on the Reader, and press the Start key to activate it. Recordings from the previous Sensor will remain in the memory of the Reader. Care must be taken not to drop the OvuSense Reader, or immerse it in liquids. If this does happen, you should check the unit is still working: Disconnect from the mains supply. Then switch it on. If the Reader doesn't start or a warning message is displayed, contact Service using the address in the User Assistance Section on the back page of this manual. DO NOT clean the Sensor in disinfectants or alcohol, or with antibacterial or disinfectant wipes. DO NOT subject your Sensor to temperatures above 50°C (or 122°F), e.g. by boiling or microwaving, as this will damage it. Important Notes OvuSense™ User Manual Page 4 2.0 Overview OvuSense has two parts – a personal Sensor shaped like a small tampon, and a Reader. When you first unpack the Reader it will need to be charged overnight. When using your OvuSense Reader for the first time, you will be automatically prompted to set up the date and time as indicated in Section 5.2 The Reader Personal Sensor Cover Select / Up Confirm Download LCD Display Select / Down Operating Keys Main Menu Confirm key, referred to in this manual with the symbol Your Information Cancel New Cycle Your Health Set Up Overview Up key, referred to in this manual with the symbol Down key, referred to in this manual with the symbol OvuSense™ User Manual Page 5 The Sensor Personal Sensor fins must be neatly aligned in cradle Personal Sensor over cradle on Reader Sensor tail Start Sensor Record 2.1 Switching the Reader On and Off Switch ON: Press any key and hold it down for 3 seconds. The screen will light up with the OvuSense logo, and then display the Main menu. Switch OFF: Press the Confirm key and hold down for 3 seconds and release. If no key is pressed for 3 minutes, the Reader will automatically turn itself off. 2.2 Cleaning the Sensor Before and after use, the Sensor should be thoroughly cleaned by washing it with soap in hand-hot water. Make sure that you wash all parts of the Sensor, including all of the tail and the area where the tail joins the main part of the Sensor. Overview Page 6 OvuSense™ User Manual You will need to clean your Sensor twice each day: 1st time: before you insert it for overnight use. 2nd time: after you have used it overnight so that it is clean when you place it on the Reader. When you are not using the Sensor, clean it and store it in its cradle on the Reader with the lid closed – this will keep it clean and secure. 2.3 Inserting Your Sensor The Sensor is shaped like a tampon and made of a special medical grade material. This material is naturally slippery, but if you find that the Sensor is ‘dry’ to insert, apply a very small amount of standard water-based lubricant gel approved for vaginal use, such as K-Y Jelly®, Durex Play® Feel®, or Sensilube®. DO NOT use gels with "flavour", "warming" or "cooling" additives. 1. Clean the Sensor as outlined in Section 2.2. Then wash your hands. 2. Hold the Sensor where the tail joins the main body. 3. Get into a comfortable position. 4. The Sensor is inserted just as you would a tampon (4a and 4b) 5. The Sensor tail is designed to hang outside of your body. If you feel any discomfort, the Sensor may not be placed far enough inside. If this happens, gently remove and try again. Overview OvuSense™ User Manual Page 7 1 2 3 4a 4b 5 2.4 Removing Your Sensor The Sensor tail is designed so that it cannot be inserted "too high" in the vagina. To remove: 1. First wash your hands with soap and warm water. 2. Then check carefully with your fingers to see if you can feel the tail portion of the Sensor. 3. Remove the Sensor by gently grasping and pulling on the tail. If you cannot locate the tail: 4. Get into a similar comfortable position as for insertion. It is much easier to remove if you are squatting and relaxed. 5. Then try to find the tail with one finger. Once you have Overview Page 8 OvuSense™ User Manual located it, use your finger and thumb to hold the Sensor tail and pull it out. If you still have a problem, then seek medical advice. You should remove your Sensor after each night's sleep. If you forget to take your Sensor out when you first get up, don’t worry, simply take it out when you can, and clean and dry it. 2.5 Sexual intercourse and the Sensor The use of the Sensor should not prevent you from having sex as frequently as you wish. Having sex will not affect that night's temperature recordings. Remove your Sensor before sex. Clean it and re-insert it afterwards. 2.6 Sensor Life Each Sensor has a life of one year and has a unique code. After you have used your Sensor for 330 days, a message will let you know that a new Sensor will be required for the next cycle. If you need to continue using OvuSense after the first year, then you can simply purchase an additional Sensor. The Reader will store data for each cycle that you use the Sensor, and will carry on doing so when a new Sensor is used. Overview OvuSense™ User Manual Page 9 3.0 Daily Use 3.1 Each New Cycle On the first day on which your full menstrual bleeding occurs, including the first cycle of use, you should tell the Reader that you have started your cycle. Do not include days before this on which minor blood spotting occurs. Using the up and down keys on the Main menu, navigate to the New Cycle option, then press the Confirm key. Main Menu Your Information Cancel New Cycle Your Health Set Up Enter the first day of your menstrual cycle. Pressing the down key, steps you through the options. today yesterday 2 days ago 3 days ago 4 days ago 5 days ago ........ 20 days ago New Cycle Please enter the first day of your menstruation. 5 days ago Accept Cancel Select the day and press Confirm . Then select Accept, and press Confirm . Alternatively select Cancel and press Confirm to go back to the Main menu without setting the first day of your cycle. Daily Use OvuSense™ User Manual Page 10 3.2 At Night The Sensor is designed to be placed in the vagina overnight for the complete night. If you wish to have sex, remove the Sensor and thoroughly wash it before reinserting it. If you forget to insert the Sensor on one night, do not worry, continue to use the Sensor on subsequent nights. If your Sensor is not already placed in the Sensor cradle on your Reader, place it with the fins neatly aligned. Press the Start key to activate the Sensor. You see this screen: Choose Accept to continue. Once your Sensor has been successfully activated, you will see this screen: Remove the Sensor from the cradle. Thoroughly wash and dry it. Insert the Sensor into your vagina before you go to bed. Daily Use 2. Place Sensor in cradle 1. Press a key Information and Alerts Activate sensor? When Wh activated, i d please l use as soon as possible. Accept Cancel 3. Start Information and Alerts Activate sensor? W When activated, please use as soon as possible. Accept Cancel Information and Alerts Your sensor has been successfully activated. Exit Sensor Nr: 000123 OvuSense™ User Manual 3.3 In The Morning Page 11 Remove the Sensor in the morning, thoroughly wash it, and dry it. Then place the Sensor in the cradle on the Reader with the fins neatly aligned and press the Download key. 2. Place Sensor in cradle 1. Press a key Main Menu Your Information Cancel New Cycle Your Health Set Up 3. Download Once the data download has started, you will see this screen: Information and Alerts Data is being transferred, please wait. Wait until the data downloads. As soon as the data download is complete, you will see this screen: Sensor No: 000123 Information and Alerts You can now leave your Sensor in the cradle on the Reader until you use it again. Begin each night with the At Night step outlined on the previous page. Data transfer has been successful. Exit Sensor No: 000123 Daily Use OvuSense™ User Manual Page 12 4.0 Your Information The "Your Information" screen can be used to monitor your current and previous cycles. 4.1 Current Cycle The "Your Information" screen allows you to review the information collected in your current cycle. The display will update at each point when sufficient data has been collected, but not necessarily each day. Main Menu Your Information Cancel New Cycle Your Health Set Up Using the up and down arrows, and the Confirm key, you can navigate up and down between Previous cycle and Compare cycles. As your cycle progresses, OvuSense will inform you about your current fertility status. OvuSense starts monitoring temperature immediately. In the first days of your first cycle of use the OvuSense Reader will tell you ovulation is not yet detected. Your Information Your Information Ovulation not yet detected in this cycle. Please continue to use your sensor. Previous Compare Exit OvuSense™ User Manual As you move towards your "ovulation window", it will start to predict the onset of ovulation. The ovulation window is the four days immediately around ovulation, from one day before until two days after ovulation. OvuSense displays the ovulation window with a light green shaded area, and the predicted date of ovulation with a blue vertical line. OvuSense uses a number of methods to predict ovulation. Sometimes it will predict "ovulation tomorrow". Sometimes, "ovulation today". It may just say "you are now in your ovulation window". Page 13 Your Information You are now in your ovulation window. Ovulation: tomorrow. Previous Compare Exit then, or Your Information You are now in your ovulation window. Ovulation: today. Previous Compare Exit then, or Your Information You are now in your ovulation window. You may see all of these notifications, or just one or Previous two of them, depending on Compare what OvuSense has "seen" Exit in your temperature curves. This is the vital information you need to help you understand your personal cycle pattern. Your Information OvuSense™ User Manual Page 14 Three days after you have ovulated, you will receive a message telling you the date of ovulation. You can now stop using the Sensor during the current cycle if you wish. Simply keep OvuSense on charge, then input the start of your next cycle on the first day your bleed begins again. If you fail to ovulate around the expected time during a particular cycle you'll need to continue using the Sensor to ensure that ovulation is detected if it does occur late. Once you begin your second cycle, and for each successive cycle, OvuSense will predict the start of your "fertile window" for that coming cycle. The fertile window is the eight days when you are most likely to be able to conceive, from five days before ovulation until two days after ovulation. Your Information Your Information You ovulated on Wed 14 May 2014. You can stop using OvuSense for this cycle. Previous Compare Exit or Your Information Ovulation not yet detected in this cycle. Please continue to use your sensor. Previous Compare Exit Your Information Your fertile window will start on Thu 12 Jun 2014 Previous Compare Exit OvuSense™ User Manual Page 15 If ovulation wasn't detected in any of the previous measured cycles, then OvuSense will simply tell you ovulation is not yet detected. If the fertile window is predicted, OvuSense will continue to indicate your fertile window start day, until you pass that day and enter the fertile window itself. The screen will then indicate you are in your Your Information fertile window This is when you should start to have sex as often as possible to maximize your chances of conception. You are now in your fertile window. Previous Compare Exit You will then enter your ovulation window, and the screens will continue to appear in succession as outlined above. Please note that OvuSense uses a fixed scale on the temperature graphs. The curve will change as the cycle progresses and the temperature values are averaged out. This "smoothing" helps you read and understand the graph. 4.2 Previous Cycle If you select this menu option, the screen will show you a graph of the information from your last cycle with information about when ovulation occurred, or if it wasn't detected. Your Information OvuSense™ User Manual Page 16 If ovulation occurred in the last cycle, a thick blue vertical line indicates the day on which you ovulated. Previous Cycle Press Confirm to Exit to Main menu. Exit 4.3 Compare cycles The Reader enables you to review your previous cycles. If you select this menu option, the screen will show you a graph of the information from your last three recorded cycles. Upper Graph: Your last full cycle recorded Compare Cycles Middle Graph: The graph for two cycles ago Lower Graph: The graph for three cycles ago Press Confirm to Exit to Main menu. Your Information Exit OvuSense™ User Manual Page 17 4.4 Trying For A Baby Every cycle, hormonal changes in a woman’s body cause an egg to be released from the ovaries. This egg travels into the fallopian tubes, which connect the ovaries to the uterus. This is called ovulation. An egg lives for about 12–24 hours after it’s released. For you to get pregnant, a sperm must fertilize the egg within this time. Sperm can live for up to 5 days. Research3 has shown that you’re most likely to get pregnant if you have sex within your fertile window, which lasts from about 5 days before you ovulate until 1-2 days after. After Ovulation Before Probability of conception on each day If you are trying for a baby, you should be aiming to have sexual intercourse every 2–3 days throughout the cycle because that 30% improves the 25% quantity and quality of 20% sperm. However, 15% knowing your 10% fertile window is key to 5% maximizing your 0% chances, and -5 -4 -3 -2 -1 0 +1 this is where Days of the fertile window OvuSense helps. As this chart shows, your chances of conception are at the very highest around 2–3 days before you ovulate. Your Information OvuSense™ User Manual Page 18 4.5 Understanding Your Cycle The menstrual cycle can range from 15 to 45 days in length. Most women and clinicians start with the assumption that regular cycles of about 28 days long will result in ovulation on day 14. Although studies4-7 have shown that only around 30% of women exhibit this pattern, it is used for the illustration below. Menstrual bleeding can last from 2 to 7 days, and the first day of the menstrual bleed is the first day of the menstrual cycle. The fertile window is usually up to 8 days in length, and ovulation generally occurs a day or so before the end of the fertile window. OvuSense also uses an "ovulation window" and this lasts from one day before ovulation until 2 days after ovulation. 28 Day Cycle, Day 14 Ovulation Menstruation Day 14 Ovulation Ovulation Window 0 2 4 6 8 10 12 14 16 18 20 22 24 26 28 30 Fertile Window 28 Day Cycle OvuSense is designed to help you, whatever your cycle length, and whatever day of the cycle on which you ovulate. By predicting and detecting ovulation in each cycle, OvuSense helps you to try and conceive at the best possible time each cycle. If you are receiving diagnosis or treatment, it helps maximize the efficiency of that intervention, saving you valuable time in trying to get pregnant. Your Information OvuSense™ User Manual Page 19 5.0 System Functions 5.1 Your Health: what to do if you have a fever OvuSense has an intelligent filtering system, which removes single fluctuations in temperature as a result of fever or, for instance, alcohol intake. If you run a fever for more than three days you will need to tell the Reader. The "Your Health" screen allows you to enter the date on which the fever started. today yesterday 2 days ago 3 days ago 4 days ago 5 days ago ........ 20 days ago Your Health Please enter the day of your last fever 3 days ago Accept Cancel Select the day and press Confirm . Then select Accept, and press Confirm . Alternatively select Cancel and press Confirm to go back to the Main menu without making a selection. System Functions OvuSense™ User Manual Page 20 5.2 Set Up (Set Date and Set Time) Using the up and down keys on the Main menu, highlight the Set Up option, then press Confirm . Then select Set Date, or Set Time, or Exit to return to the Main menu. Set Up Set Date Cancel Set Time Exit Software Version 2.1 To set the Date Select the Set Date option. The current date will be displayed with the "Year" field highlighted: Use the upand down keys to 5 Sep 2013 change the current Year. Press the Confirm key to set the Year. Set Date: Once the year has been set, the “Month” field is highlighted: Use the upand down keys to change the current Month. Press the Confirm key to set the Month.Set Date: 5 Sep 2013 Accept Once the month has been set, the “Day” field is highlighted: Cancel Use the upand down keys to change the current Day. Press the Confirm key to set the Day. Accept Cancel System Functions 5 Sep 2013 Time: ccept OvuSense™ User Manual Set Date Wed 5 Sep 2013 Accept Page 21 Once the Day has been confirmed, the date will be shown in full with the day of the week. The date is now set and you can Accept or Cancel to return to the Set Up menu. Cancel To set the Time Using the upand down keys on the Main menu, highlight the Set Up option, then press Confirm Select the Set Time option. The current time will be displayed with the “Clock” field highlighted as illustrated below: Set Time 24 12 : 45 Accept Using the up and down keys, select whether you want to use the 24 hour or 12 hour clock. For example, 23:00 or 11.00pm, then press Confirm Cancel 24 12 : 45 The "Hours" field is then highlighted. Using the up and down keys, set the current Hour, then press Confirm Once the Hours have been set, the “Minutes” field is ancel highlighted. Using the up and down keys, set the current Minutes, then press Confirm The time is now set and you can Accept or Cancel to return to the Set Up menu. System Functions Page 22 OvuSense™ User Manual Once you have finished setting up Date and/ or Time, use the down key on the Set Up menu to highlight the Exit option, then press Confirm . You will then return to the Main menu. Note: OvuSense will not automatically make changes for daylight saving or time zones, and may be affected by irregular sleeping patterns. You can change the time +/- 1 hour using the instructions above to allow for daylight saving time without affecting your fertility information. However, greater time changes may cause errors in the determination of your fertile window, as may sleep pattern changes. OvuSense works most effectively if you have a regular sleeping pattern. System Functions OvuSense™ User Manual Page 23 5.3 Battery Indicator and Charging The OvuSense Reader permanently indicates the current status of the battery. It does this using a small battery indicator (similar to those used on mobile phones), in the top right of the screen. Some examples are shown here. When the battery is too low you will be told to plug in the charger. Battery Full Battery ~65% Full Battery Low Battery Charging Step 1 Plug the charger into the back of your OvuSense Reader. Step 2 Plug the charger unit into a wall socket, and switch the socket on. Step 3 If the Reader is on, the "battery charging" indicator will show the unit is charging. You should fully charge your unit by leaving it plugged in overnight. Main Menu Your Information Cancel New Cycle Your Health Set Up System Functions OvuSense™ User Manual Page 24 6.0 Messages 6.1 Fertility information Messages When you indicate on the Reader that a New Cycle has begun, OvuSense produces detailed information on the length of your cycle and ovulation. This will help you, and if necessary your doctor, to better understand your fertility, and the best course of action to help you get pregnant. Normally, the message will be in the form: Your last cycle length was (XX) days. You ovulated on day (YY) of your last cycle. Information and Alerts Your last cycle length was 32 days. You ovulated on day 24 of your last cycle. Exit You may also get one of the following alerts: .....Ovulation was not detected [confirmed] in the last cycle. OvuSense did not find evidence of ovulation in your previous cycle [even though it may have provided a prediction]. You should not worry if you see this message once, but if you receive it in two out of any three consecutive cycles you should seek the advice of a doctor. Your last cycle length was (XX) days; this is unusually short. The data collected indicates that you have had an unusually short cycle (less than 20 days) – ask your doctor's advice if this occurs regularly. Messages OvuSense™ User Manual Your last cycle length was (XX) days; this is unusually long. The data collected indicates that you have had an unusually long menstrual cycle (more than 37 days) – ask your doctor's advice if this occurs regularly. Page 25 Information and Alerts Your last cycle length was 39 days; this is unusually long. You ovulated on day 25 of your last cycle. Exit 6.2 System Messages You may occasionally receive a system message on your OvuSense Reader. NOTE If the message appears for a second time after taking the suggested action, note down the error number in the top left corner of the screen if there is one. Press Confirm key to Exit. Then contact OvuSense support as outlined in the User Assistance Section on the back page of this manual quoting the message and error number. A fault has been detected with this device. Please consult the user manual. There is an problem with your Reader. See NOTE. Error 02 A fault has been detected with this device. Please consult the user manual. Exit Messages OvuSense™ User Manual Page 26 A problem has been encountered with this sensor. Please consult the user manual. Try placing the Sensor again in the cradle on the Reader, ensuring that the fins on the Sensor are properly aligned. Alternatively, try turning the Sensor over in the cradle, again ensuring that the fins on the Sensor are properly aligned. See NOTE. Sensor not detected. Please ensure the sensor is located correctly on the reader and try again. The personal Sensor may not be placed correctly in the cradle on the Reader. Try placing it again, ensuring that the fins on the Sensor are properly aligned in the Reader cradle. Then repeat the Start or Download function you had previously tried, as appropriate. Information and Alerts Sensor not detected. Please ensure the sensor is located correctly on the reader and try again. Exit This sensor has no data to download. Please place your current sensor on the reader and try again. You have attempted to download data from a Sensor which is not activated on your Reader. Try again with your current activated Sensor. See NOTE Messages OvuSense™ User Manual Page 27 This sensor has already been activated. Please use your current sensor, or activate a new sensor. You have attempted to activate a Sensor which is not known by your Reader but has already been activated on another Reader. Try again with your current activated Sensor, or activate a new Sensor. This is the final cycle for this sensor. A new sensor will be required for the next cycle. Each personal Sensor can only be used for 1 year once started, and has a unique code. This message lets you know that you will need to purchase a new personal Sensor for your next menstrual cycle. See User Assistance Section on the back page of this manual for ordering details. This sensor has been used for 1 year. Please use a new sensor. For hygiene reasons, each personal Sensor can only be used for 1 year once started, and has a unique code. This warning lets you know that you will need to purchase and use a new personal Sensor for a further year's use. See User Assistance Section on the back page of this manual for ordering details. Low battery warning: Battery power is low. Connect to the charger as soon as possible Charge the Reader as explained in Section 5.3 Information and Alerts Battery power is low. Connect to the charger as soon as possible. Messages Page 28 OvuSense™ User Manual 7.0 Frequently Asked Questions What happens if I miss a night? It is not a problem if you miss a night, OvuSense will carry on using the data collected on the following night. However, you may get spaces on the cycle graph and for best results, you should aim to use OvuSense most of the days when you are not menstruating until it tells you that you've ovulated. How long should I keep the Sensor in overnight? Minimum 2 hours, but ideally 4-6 hours. The Sensor will continue to gather data for the whole time until you place the Sensor on the cradle of the Reader and press Download. It will not use any data over each 14 hour overnight period. When should I start using my Sensor? The day after you stop bleeding completely. If you are still spotting after a period, or if spotting starts during your cycle then you should not use the Sensor. What if the Sensor falls out? The Sensor is designed to be removed and reinserted (for instance if you want to go to the toilet in the night), and so if it falls out, simply wash it and reinsert it as described in Sections 2.2 to 2.3. If you find that the Sensor is falling out on a regular basis, then you should contact Service as outlined in the User Assistance Section on the back page of this manual. What if I want to have sex? It is essential to remove the Sensor before sex. We recommend that the Sensor is reinserted after sex, to increase the amount of data collected. If you decide to continue using the Sensor after sex, remember to wash it before inserting it. If you FAQ OvuSense™ User Manual Page 29 reinsert it in the same night, and you have already activated the Sensor using the Start button on your Reader, you don't have to activate it again. The Sensor will simply start taking readings from the time at which you reinsert. The Sensor is designed to cope with changes in temperature so you won't get any false measurements. Should I replace the Sensor after sex? Yes, in fact we recommend that the Sensor in reinserted after sex, but you don’t have to (see the answer to missing a night). Follow the instructions in the question above. Can I use the Sensor during my period? No, you should ensure the Sensor is never used when you are bleeding or spotting. What should I do if I forget to tell the Reader that I have started a new cycle? The Reader will detect if you've not entered the date of your first cycle when you carry out your first data download, and automatically prompt you to enter the date the cycle started. In all cycles after that, it will detect any gap of 5 days and prompt you to enter the date the cycle started. You can input the start date of a new cycle up to seven days after it has actually begun. Simply choose “New Cycle” from the main menu and choose the relevant day. I started using the Sensor late and not on the first day after my period stopped. What should I do? As long as you input the correct start date of the cycle in which you are using the Sensor, there is no issue with starting late in a cycle. You can input the start date of a new cycle up to 20 days after it has actually begun. The Sensor will measure from FAQ Page 30 OvuSense™ User Manual that point onwards, and if ovulation has already passed then it will simply register that no ovulation was detected. The data are still useful for future cycles. Can I still use the personal Sensor if I have a yeast infection, or have been diagnosed with a sexually transmitted infection (STI)? If you are undergoing treatment for a yeast infection or an STI, you should not use the Sensor. If you suspect you have an infection or condition, you should stop using the Sensor and consult your doctor. Wait until all symptoms have cleared up and treatment finished before starting to use Sensor again. Is the Sensor likely to make me more prone to yeast infections, cystitis or other infections? The Sensor is designed to be placed comfortably in the vagina, and used only overnight during sleep. It should be removed before going to the toilet, or having sex, and washed before being re-inserted. The Sensor has been designed specifically for repeated insertion in the vagina, and is made of the highest medical grade materials already used in a number of other approved medical devices. In addition, the Sensor has undergone extensive biocompatibility and toxicity testing and passed all of these tests first time. It therefore should cause no irritation, and nor should it increase the chances of infection. However, you should observe the washing steps before and after each use, and if you do notice any signs of irritation or infection, you should stop using the Sensor and consult your doctor. FAQ OvuSense™ User Manual Page 31 I think the Sensor is causing me to have yeast infections, cystitis or another infection. What should I do? Stop using the Sensor, and if the irritation is still noticeable after more than 48 hours you should consult your doctor. If you notice a return of symptoms then you should stop using OvuSense altogether. Can I sterilize the Sensor using sterilizing solutions? No, the Sensor material is designed from specific biocompatible materials that prevent the growth of bacteria, and simple washing with soap and water is sufficient to maintain this material properly. Use of sterilizing solutions, alcohol wipes or sanitizing gels may damage the Sensor material. I am unwell and I'm running a temperature. Will this affect the readings? No, OvuSense has an intelligent filtering system that removes "spikes" in the data. However, if you have been running a fever for more than two days use the “Your Health” option on the main menu to input the date on which the fever started. The personal Sensor is uncomfortable when I use it. What should I do? Check that you are inserting the Sensor properly so that a portion or all of the tail is outside of the vagina. You can also use a small amount of aqueous based lubricant (such as KY Jelly™) to help make insertion and “wearing” of the Sensor more comfortable. If the discomfort persists, then you should stop using the Sensor for a couple of days. If the discomfort returns after you start using it again then you should stop using the OvuSense system altogether. FAQ Page 32 OvuSense™ User Manual What should I do if my Sensor is damaged or lost? If your Sensor stops working, either because it is damaged or faulty, the OvuSense Reader will provide you with a message (as indicated in Section 6.2). In this case you should contact Service, as outlined in the User Assistance Section on the back page of this manual. If the Sensor is still within its 1 year lifespan, Fertility Focus will replace the damaged or faulty Sensor free of charge. If you lose the Sensor, then you will need to purchase another one. Why do I need to replace the Sensor after 1 year? The Sensor is designed for optimum hygiene, and to be used specifically for 1 year to provide an initial analysis of your ovulatory pattern. If your ovulation timing is irregular or you are not ovulating on two or more of three consecutive cycles, then you should seek further clinical advice. That advice may lead to treatment with ovulatory stimulating drugs and/ or intrauterine insemination (IUI) and OvuSense can be used during that treatment phase by purchasing another Sensor. If your ovulation timing is regular, purchasing another Sensor will allow you to carry on using OvuSense to manage the timing of trying to get pregnant. Do I need to use the Sensor for consecutive cycles? OvuSense can provide you with valuable results straight away, and continued use will improve your knowledge of your individual ovulatory pattern. If ovulation is not detected in a particular cycle, it's quite important to continue use to establish if this is a regular problem or like most women you occasionally miss an ovulation. FAQ OvuSense™ User Manual Page 33 What if I forget to remove my Sensor in the morning? Though you are advised to remove the Sensor each morning, it is not a problem if you occasionally forget to do so. Simply remove it when you remember, place it on the cradle of the Reader and download the data. OvuSense is designed to cope with data downloading at any point in time. I have inserted my Sensor but now I am unable to locate it and remove it. Don't panic.... this issue can occur occasionally and is normally easy to solve. Follow the instructions in Section 2.4. I work night shifts, is OvuSense right for me? In general, normal night time sleep is the time at which your temperature is at its most stable. However, if you have a regular sleep pattern, where you go to sleep at around the same time and wake up the same time in a 24 hour period on a continuous basis, and you regularly have more than 4 hours sleep, then OvuSense can still work for you even if you work nights. If you have an irregular sleep pattern (where your work and therefore sleep times change regularly) or if you tend not to get more than 4 hours sleep, then the results OvuSense provides are likely to be affected. FAQ Page 34 OvuSense™ User Manual Should I only have sex around the time OvuSense has told me I am ovulating? The OvuSense Reader provides a prediction of the start of the fertile window five days before the predicted date of ovulation. You should have sex as often as possible during this time, with a particular emphasis on having sex prior to the predicted date of ovulation because this is when you are at your most fertile. Nonetheless, you should be aiming to have sexual intercourse every 2-3 days throughout the cycle because that improves the quantity and quality of sperm. Can I give OvuSense to a friend? The Sensor is for your personal use. Sharing it with other women may present a hygiene risk, and will invalidate your personal data. The OvuSense Reader can also only be used by a single user and with a single Sensor at any one time. Can OvuSense help me if I have recently ceased contraception? It takes the female body a varying amount of time to reestablish a normal hormone balance after you stop hormonal methods of contraception or have an IUD removed. The length of time it takes depends on the type of contraceptive and your individual body. As the hormone patterns start to normalize, regular menstruation will return and eventually so will ovulation. However, this may take up to 9 months with hormonal methods. During this time, OvuSense may be able to help by showing you whether you are ovulating, but the fertile window prediction may be of less use, as the cycle length and ovulation timing is likely to vary greatly, especially in the first three cycles. FAQ OvuSense™ User Manual Page 35 8.0 Reference Information Storage Environment The OvuSense Reader and Sensor require no special storage conditions, but should ideally be stored in a dry environment with an ambient temperature of 20°C (65.0°F) + or -5°C (41°F). The Reader and Sensor are capable of withstanding an environment of -20°C to 50°C (-4.0°F to 120.0°F) in a relative (non-condensing) humidity of 15% to 95% (Reader), and 15% to 100% (Sensor). Storage for a period of one month outside of these limits may lead to product failure and will invalidate the product warranty. Operating Environment The OvuSense Reader must be operated in an environment of 16°C to 40°C (60.8°F to 104.0°F) and in a relative (noncondensing) humidity of 15% to 95%. The OvuSense Sensor can be operated in an extreme environment of -20°C to 50°C (-4.0°F to 120.0°F) in a relative (non-condensing) humidity of 15% to 100%, but will discard temperature values recorded below 36.0°C (95.9°F) and ignore temperatures above 42.0°C (107.6°F). Disposal and Recycling Each Sensor has a life of one year. After you have used your Sensor for 330 days, a message will let you know that a new Sensor will be required for the next cycle. For advice on recycling, check with your local recycling services. Reference Page 36 OvuSense™ User Manual The OvuSense Reader is intended for use by a single user at a time. It can be used by the same user with consecutive Sensors (each of which has a lifetime of 1 year) until their monitoring is finished. For further information on recycling contact Service (see User Assistance Section on back page of this manual). Trade Marks OvuSense and the Fertility Focus logo are trade marks of Fertility Focus Limited, Warwick, UK. K-Y Jelly® is a registered trade mark of Johnson & Johnson, New Brunswick, NJ, USA, Durex Play® Feel® and Sensilube® are registered trade marks of LRC Products Limited, London, UK. Clinical References 1. –Fertility Focus Limited Internal Data - Unpublished. –Papaioannou S, Aslam M (2012) Ovulation Assessment By Vaginal Temperature Analysis (Ovusense Fertility Monitoring System) In Comparison To Oral Temperature Recording. American Society for Reproductive Medicine 68th Annual conference. – Papaioannou S, Aslam M (2013) Quality Index assessment of vaginal temperature based Fertility Prediction, and comparison with LH Testing, Ultrasound Folliculometry and other home Cycle Monitors. American Society for Reproductive Medicine 69th Annual conference. Reference OvuSense™ User Manual Page 37 2. Papaioannou S, Aslam M (2013) User’s acceptability of Ovusense: a novel vaginal temperature sensor for prediction of the fertile period. J Obstet Gynaecol 33: 705–709. 3. Adapted from Colombo B, Masarotto G (2000) Daily Fecundability: First Results from a New Data Base. Demogr Res 3: article 5. 4. Lenton EA, Landgren BM (1984) Normal variation in the length of the luteal phase of the menstrual cycle: identification of the short luteal phase. Br J Obstet Gynaecol 91: 685-689 5. Lenton EA, Landgren BM (1984) Normal variation in the length of the follicular phase of the menstrual cycle: effect of chronological age. Br J Obstet Gynaecol 91: 681-684. 6. Wilcox AJ, Dunson D (2000) The timing of the “fertile window” in the menstrual cycle: day specific estimates from a prospective study. BMJ 321:1259-1262. 7. American Society for Reproductive Medicine (2013). Optimizing natural fertility. Fertil Steril 100: 631–637. Reference User Assistance Support & Service [email protected] Ordering [email protected] Web www.ovusense.com Part Numbers OvuSense Sensor OvuSense Reader User Manual M011 M010-EN M002-20FEB14-V6.1-EN For faulty or defective units, please email [email protected] in advance for a return authorization number and address.