1
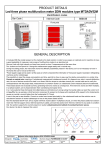
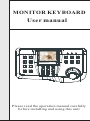
MONITOR KEYBOARD
User manual
Please read the operation manual carefully
before installing and using this unit
INDEX
1.Important safeguards----------------------------1
2.General Install and connect----------------------2
3.Install and connect--------------------------------3~8
4.Description of Functions-------------------------9~11
5.Menu Setup---------------------------------------12~25
6.Appendix-----------------------------------------26~28
Important safeguards
Note:
● Read the manual before install and use the keyboard.
● The product provide some same window information
of Operation at not same protocol, if the product is not valid
Function that it will display “NONE VALID”.
● The monitor keyboard used to DC12V power supply,
check to the voltage and polarity of power-box before use
the Monitor keyboard.
● Do not set the monitor keyboard to dank condition,
prevent it to trouble.
● Do not open the product , prevent it to trouble.
● The keyboard have multi-protocol, right setup
protocol, baud rate and ID address before use it, these
parameters will display on screen.
1
General Install and connect
General
The monitor keyboard is a product which can control to
demo camera and decoder. Used to EIA/RS-485 import
between keyboard and demo camera. One keyboard can
control 256 demo camera at best , the most communication
distance is 2.4Km.end device can be set and Control easily
with keyboard, Front device such as constant speed pan/tilt,
lens, lamplight, water-brushcan
be controlled also with
keyboard by directly control decoder.
Install and connect
Please read user manual of high speed dome camera
carefully before connection. Device may be damaged
forever with any error connection. Please shut off power
before connection . use STP line to connect between device
and device . Avoid from high voltage line or any possibly
disturbed line as soon as possible when connecting cable.
2
Install and connect
B VIDEO
C RS485
VIDEO
A1 B1 A2 B2
A DC12V
DC12V
A1 B1 A2 B2
+ DVR
+
-
SPEED
DOME
RS485-IN RS485-OUT
2
KN01 Video Line
VIDEO
1
BNC1
2
BNC 2
3
BNC 3
4
BNC 4
5
BNC 5
6
BNC 6
7
BNC 7
8
BNC 8
9
BNC 9
1 0
1 1
1 2
1
1 chanel Video Output(BNC13)
12 channel Video Input(BNC1-12)
Figure 1
3
3
BNC10
BNC11
BNC12
BNC13
Install and connect
Figure 1 is the keyboard interface, include power in ,video
in ,Rs485 communication interface special interface.
A. Power supply import: used to DC12V/1A.
B. Video import(VGA import): Video input and output,
connect KN01 video line.
C. RS485 communication import.
Note: Fence port is RS485 connection .If select special
interface line which supply by engender, please refer to
information of label to connect .
1.Keyboard connection:
RS485A+
A2
RS485A-
B2
......
Speed Dome
Keyboard
Figure 2
Series connected and parallel connection method:
RS485A+
RS485A+
RS485BA1
RS485-IN
DVR
RS485B-
B1 A2B2
RS485-OUT
Keyboard
Speed Dome
Figure 3
4
Install and connect
RS485A+
A2
RS485B- RS485A+
RS485A-
B2
Keyboard
Speed Dome
DVR
Figure 4
NOTE: When DVR is occupies the RS485 bus, accoring
to figure 3 the connection, When DVR dose not occupies
the RS485 bus, according th figure4 connection.
2.System connection:
A2 B2
1200m
JaRa 2115B
Distributor
RS485 BUS
1200m
1#
2#
3#
Figure 5
5
4#
Install and connect
A2
B2
1200m
JaRa2115B
Distributor
RS485 BUS
JaRa2115B
JaRa2115B
JaRa2115B
JaRa2115B
Distributor
Distributor
Distributor
Distributor
1200m
Speed Dome
1# 2# 3# 4#
5# 6# 7# 8#
9# 10#11#12#
13# 14#15#16#
Figure 6
Picture Control Keyboard
Monitor
JaRa2115B
16 pictures
divisions
Distributor
JaRa2115B
JaRa2115B
JaRa2115B
Distributor
Distributor
Distributor
1# 2# 3# 4#
5# 6# 7# 8#
9# 10#11#12#
JaRa2115B
JaRa2115B
Distributor
分配器
Video
frequency
transmission
line
Speed Dome
13# 14#15#16#
Figure 7
6
Install and connect
Picture Control Keyboard
Monitor
1 chanel Video
Output(BNC13)
JaRa2115B
Distributor
JaRa2115B
JaRa2115B
JaRa2115B
Distributor
Distributor
Distributor
1
2
3
4
5
6
7
8
KN01 Video
Line
12 channel Video
Input(BNC1-12)
9 10 11 12
Speed Dome
1# 2# 3# 4#
5# 6# 7# 8#
9# 10#11#12#
Notes:the address of terminal camera1#-12# must suit to the
serial number of 12 channel video input port KN01 video line ,for
example :No.1 video BNC1 suit 1# camera.
Figure 8
7
Install and connect
NOTE:
1、The distributor can be in-line 3 tiers.
2、 Ordinary circumstances, 120 Ω of speed dome is in
OFF state, If unable control, Then 120 OMEGA of speed
dome ought to in ON state.
3、 Transmission distances of RS485 Bus: When user
selects the 0.56mm( 24AWG) twisted pair wires as data
transmission cable, the maximum theoretical transmitting
Baud Rate
distances
are as follows: Maximum Transmitting Distance
1200 Bps
2400m
2400 Bps
1800m
4800 Bps
1200m
9600 Bps
800m
19200 Bps
200m
Figure 7 is the connection of the two keyboard each.
Picture Control Keyboard can work with the 16 pictures
divisions, control it at long distance. and show image itself
also. In connection diagram, the thick line is video line and
the thin line is RS485 line. If use cable of connection,
depend on label to connection cable. The communication
mode between keyboard and demo speed camera: dot to
multi-dot, semiduplex communication.
Communication import:RS485.
Baud rate : 1200bps,2400bps, 4800bps, 9600bps,
19200bps.
Communication distance:2.4km(Max).
Power supply:DC12/1A.
Control number of demo camera: 256 (Max).
8
Description of Functions
Function
Character Control Keyboard
●
Setup demo camera or decoder ID address
range0~255.
● Control to multi-function of demo camera, such as:
menu, focus, white balance.
● control the demo camera to multi-speed.
● Save preset position of demo camera, setup shot about
the preset position. The keyboard can setup 8 shots, each
shot can save 16 preset position.
● Two control mode: manual mode and auto mode.
● Control zoom, focus and iris of demo camera by
manual mode.
● When you control the camera or dome camera ,The
video can switch to the video of relevant camera or dome
camera.
Picture Control Keyboard
● Picture Control Keyboard can show image, and the
other function are same as the Character Control Keyboard.
It can work with 16 pictures divisions and control it at long
distance.
Panel introduce
1.front panel introduce (figure 8/8-1)
9
Description of Functions
Figure 8 Character control keyboard panel
figure 8-1 Image control keyboard panel
10
Description of Functions
1.Controls in front of the keyboard on to have the 3D
speed change control rocking bar, the pressed key and the
16X2LCD display monitor, the display monitor uses in the
display system condition and the operation information.
pressed key explanation as follows:
[ON] open to function setup
[OFF] close to function setup
[F1] aux-keyboard
[CAMERA] setup demo camera ID address
[PRESET] save to preset position
[SHOT] call shot of demo camera
[CALL] call preset position
[AUTO] auto run demo camera
[0]~[9] number keyboard
[A/B] Swap key and clear number key Swap key: swap
general A key to Division plus processor B key, It is default
general A key (type name on key ) after power on. Press the
[A/B] key Transformation plus processor B key (type name
below key).Press again the [A/B] key return to general A
key.
[ENTER] enter keyboard
[CLOSE] reduce iris
[FAR] focus far
[WIDE] zoom out
[OPEN] increase iris
[NEAR] focus near
[TELE] zoom in
On the Picture control keyboard, the key operation of image processor please refer to the manual of the image
11
Menu Setup
2. Control keyboard support Protocol and baud rate.
List1:Protocol list and baud rate list.
Protocol
Baud rate(default)
protocol
Baud rate(default)
PELCO-D
2400
KALATEL
4800
PELCO-P
9600
VCLDOME
9600
PELCO-P
4800
REDAPPLE
9600
VIDO-BO1
9600
HTSCAM
9600
LILIN
9600
SAMSUNG
9600
ALEC
4800
SANTACHI450
9600
HD600
9600
SANTACHI650
9600
TOTA
4800
VICON
4800
NOTE: Press F1 +61+ON, F1 +62+ON to change protocol
and baud rate, about content show on List 2.
3. Operation introduce
The keyboard controller must connected to demo camera
and right setup ID address before operation. Then turn on
power that it will display at bellow:
PELCOD 2400
Camera Id:000
PELCOD: current protocol
2400: current baud rate
000: current demo camera ID
3.1 Setup demo camera id address:
[CAMERA]+[N]+[ENTER]Display:
CHANGE CAMERA ID
Camera ID:N
12
Menu Setup
Note:N---ID address,range:0~255
Function: The choice treats the control the terminal
address, when N value and ball machine address match the ball
machine will accept the control, the following operates based
on the terminal ID number will be 0 situations.
3.2 Aux-function setup
Enter menu of aux-function: [F1] + [ON] Display:
FUNCTION MENU
CHANGE PROTOCOL
Note: Press [WIDE] / [TELE] to select menu, press
[ENTER] in to item.
Option such as change protocol ,change baud rate, change
LCD back light (character) or expand monitor (image) and so
on has be supplied at present .Expand monitor function is used
when user need connect video with keyboard and connect it
with monitor or image procession at the same time .When only
connect with keyboard , select“ CHANGE MONITOR
S” ,When connect with monitor or other at the same time
,select “CHANGE MONITORM” .
Direct in to aux-function setup: [F1] +[N] + [ON]
Note 1:see List 2 about N value
Note 2:[F1] +[61] + [ON] for change protocol,
[F1] +[62] + [ON] for baud rate
13
Menu Setup
3.3 Save preset position:[PRESET]+[N]+[ENTER]
Display:
PRESET FUNCTION
PRESET :N
Note:N---position,range:1~255
Function: Stores up the current position, and supposes this
position for the Nth position.
3.4Call preset position:[CALL]+[N]+[ENTER] Display:
PRESET FUNCTION
CALL :N
Note:N---the number of preset position, range:1~255.
Function: Ball turning point to N initialization position .
3.5 Clear preset position:[PRESET]+[N]+[OFF]
Display:
PRESET FUNCTION
PRESET :N
Note:N---preset position, range:1~255 .
Function: Will store up Nth initialization deletion.
14
Menu Setup
3.6 Setup shot of preset position
Note: the function is only used at VEDIO-B01.
3.6.1 Enter to item of setup shot :
[SHOT] + [N] + [ON] Display:
SHOT OPERATION
Track 01 Sum 07
Note: the current setup is 1 shot, it contains 7 preset
positions.
3.6.2 Edit shot:
press [ENTER] into status of editing shot, press [TELE]
to ahead edit, press [WIDE] to backward edit. Each shot
contain 16 preset positions and each a preset position can
setup to speed or time of pause. Display:
EDIT SHOT
NO.:01 Point:01
Note: select 01 preset position in first shot , The change
preset position needs press [ENTER] to confirm and enter
the next setup. Display:
EDIT SHOT
NO.:01 Speed:02
Note: select 2 stop speed in 01 preset , The change
preset position needs press [ENTER] to confirm and enter
the next setup.
15
Menu Setup
Display:
EDIT SHOT
NO.:01 Time:03
Note: select 3 seconds for pause time of 01 preset
position, The change pause time needs press [ENTER] to
confirm and enters the next setup.
Note:
1). Speed range:1~8, the first step speed is the most slow,
the eighth step speed is most flash speed. The speed will be
defaulted 1 step if speed range is over. Pause time range:
1~255.
2). If the preset position, speed and pause time is not
defined that these parameter is defined to 0.
3). Press OFF key to exit when finishing the shot setup,the
parameter will be not saved if you are operation to joystick
while setup the parameter.
4). Some high speed dome camera can set track on menu ,
detailed operation look at user manual of high speed dome
camera.
16
Menu Setup
3.7 Run shot:[SHOT]+[N]+[ENTER] Display:
SHOT OPERATION
Running N SHOT
Note:N―――number of shot , range: 0~8
Function: Moves the Nth path, the shot mode will be stop
when operation joystick.
3.8
Stop to shot mode:[SHOT] +[OFF]
Function: stop the state of shot running, the shot mode
will be stop when operation joystick.
3.9 Run the state of plane scan:[AUTO]+[ON] Display:
Scan Operation
Auto Running
Function: run the state of plane scan for 360°monitor.
3.10 Stop the state of plane scan:[AUTO]+[OFF]
Function: run the state of plane scan for 360°monitor.
3.11 Control camera to zoom:[WIDE] / [TELE]
3.12 Control camera to focus:[FAR ] / [NEAR]
3.13 Control camera to iris: [OPEN ] / [CLOSE]
17
Menu Setup
3.14 Press [A/B], the screen will show “ *” , it can
carry out the special function:
1).OSD(Image control keyboard appropriation)
Press [OSD ON] the 3.5' screen will show character OSD.
Press [OSD OFF] the 3.5' screen will close the character
OSD.
Notes: it will close the character OSD and then press
[A/B], it will show“ *” under the special function, it will
also show relevant character when you operate the keyboard
.After operation, no character showed on screen( except
under special function ,it will show“*”).
2). CYCLE
Press [CYCLE] show:
CYCLE T-IN 2-8 S
DWELL TIME:
Input the dwell time(2-8):
CYCLE T-IN 2-8 S
DWELL TIME: 002
Press [ENTER] show:
CYCLE V-IN 1-11
CYCLE ST:
18
Menu Setup
Input cycle ST (1-11 ):for example:001
CYCLE V-IN 1-11
CYCLE ST: 001
Press [ENTER] show:
CYCLE V-IN 2-12
CYCLE EN:
Input cycle EN(2-12) :for example:012
CYCLE V-IN 2-12
CYCLE EN: 012
a、 If the time you input is at the second of 2-8 within,the
cycle ST is during 111,and the cycle EN is during 212,the
cycle ST is less than the cycle En:
Press[ENTER] show:
CYCLE FUNCTION
OK
It will cycle from 1 channel to 12 channel video,and each
channel will dwell the above time you input.
19
Menu Setup
B、If the time you input isn't at the second of 2-8 within,
and the cycle ST isn't during 111, the cycle EN isn't during
212,the cycle ST isn't less than the cycle En:
Press [ENTER] show:
CYCLE FUNCTION
ERROR
it will not cycle.
Under the cycle function to press[EXIT], it will exit and
show about 1 second:
CYCLE FUNCTION
EXIT
3).P age up ,page down:
Press [PAGE UP], the video will page up, the monitor
will show the next channel's video; the keyboard will show
CH-01、CH-02……CH-12 (cycle)
Press [PAGE DOWN], the video will page down, the
monitor will show the above channel' video; the keyboard
will show CH-12、CH-11… …CH-12 (cycle)
3.15 U nder the natural function:
press [CAMERA]+[N]+[ENTER]:N:between 1-12,it
will show the N channel's video on the screen.
20
Numb
[F1]+N+[ON]
[F1]+N+[OFF
Menu Setup
er
0
Camera power
Turn on
Turn off
List2 Aux-function about+N+ENTER
supply
1
ON
OFF
N Backlight
controlitem
define
compensate
Numb
[F1]+N+[ON]
[F1]+N+[OFF]
er Zero illumination ON
2
OFF
0
Camera power
Turn on
Turn off
3
menu
ON
OFF
supply
1 Digital
Backlight
ONON
OFF
4
zoom
OFF
compensate
5
Camera
reset
Returns
to
the
level
2
Zero illumination ON
OFF
3
menu
ONwhich wasset by the
OFF
4
Digital zoom
ONmanufacturer forOFF
5
Camera reset
Returns
to the level
shipment
which wasset by the
6
focus
Auto
manual
manufacturer
for
shipment
7
iris
Auto
manual
6
focus
Auto
manual
8
White
balance
Auto
manual
7
iris
Auto
manual
9
indoor
outdoor
8
White balance
Auto
manual
9
indoor
outdoor
10
ATW
One Push WB
10
ATW
One Push WB
11
Color
white
11 Color/black-whit
Color/black-whit Color
white
e e
12
Speed of line
Less than 180°low
more than 180° low
12
Speed
of line
Less than 180°low
more than 180
scan direction of speed
speed
scan
direction
of
speed
speed
line
scan
13
Less than 180°mid
more than 180°mid
line scan
speed
speed
13
Less than 180°mid
more than 180
14
Less than 180°high
more than180°high
speed
speed
speed
speed
14
15
Keyboard
ONLess than 180°high
OFF
more than180
backlight
speed
speed
61
Change protocol Enable the function
disable the function
15
Keyboard
ON
OFF
62
Change baud
Enable the function
disable the function
rate
backlight
61
Change protocol Enable the function
disable the fun
62 Note:
Change
Enable
the function
disable the fun
1 to 14baud
function is
only used
at VEDIO-B01
rate
Notice: what introduce is some common operation
function, but not all protocol and end device have this ,such
camera that not supply night /day can not switch between
black and color .Operation that protocol not supply will show
“NONE VALID”.
21
Menu Setup
Below is the LILIN Protocol establishment
1、Setup preset position:
a) Press [CALL]+[N]+[ENTER] Display:
PRESET FUNCTION
CALL:N
Note: N---position, range:0~255 Is the speed dome run to
set up before the preset position, if not previously set up,
every time in a specific location. Operation joystick to the
need place.
b)Save pause time: press [PRESET]+[N]+ [ENTER]
Display:
PRESET FUNCTION
DWELL TIME:N
Note: N---pause time,range 0~255
c) Save step speed in preset position: Save pause time and
press [ENTER] Display:
PRESET FUNCTION
RUN SPEED :N
Note:N--- step speed , range: 1~255(1:low speed,
255:high speed)
22
Menu Setup
d)Save step speed in preset position, press [N]+[ENTER].
2、Call preset position: [CALL]+[N]+[ENTER]
3、Clear all preset position:[PRESET]+[255]+
[ENTER]+[255]+[OFF]
a) Press [PRESET]+[255] Display:
PRESET FUNCTION
DWELL TIME:255
b) Press [ENTER]+[255] Display:
CLEAR IN:255--OFF
RUN SPEED:255
Note: input 255, press [OFF] It will clear all preset
position.
4.Setup alarm: [AUTO]+[ON]+[N]+ [ENTER]
a) Press [AUTO] Display:
.
SPECIAL FUNCTION
AUTO:
b) Press [ON]+[N] Display:
Alarm Polling
ALARM NO.:N
23
Menu Setup
Note: N---PIN's input, range: 0~255.
(Actual could not use to be 255) The key completes PIN
after [ ENTER ] the establishment.
5、Clear setup alarm: [AUTO]+[OFF]
6、Run shot: [SHOT]+[N]+ [ENTER] Display:
SHOT OPERATION
SHOT : N
Note:
1) N=000 sets up 1, 2,3,4 group group and runs 1~16
preset position.
2) N=001
set up 1 group group and run 1~4 preset
position.
3) N=012 sets up 1, 2 group group and runs 1~8 preset
position.
4) N=234 sets up 2,3,4 group group and runs 5~16 preset
position.Commonly : First group group comprises 1,2,3,4
presetposition, Second group group comprises 5,6,7,8 preset
position; Third group group comprises 9,10,11,12 preset
position,Fourth group group comprises 13,14,15,16 preset
position.
If differ, please refer to “speed dome user manual”.
7、1)Setup menu: [CALL]+[95]+ [ENTER]
24
Menu Setup
Speed change joystick control the DEMO following chart:
The use speed change rocking bar may control the camera at
will electrically operated the DEMO revolves/deals with the
direction speed. Through the change joystick angle of tilt size
which revolves the speed which/deals with is which the basis
shows the operation rocking bar angle determined may in the
step less control rotational speed rotation scanning process, the
camera opportunity automatic focusing maintenance picture be
clear.
Specification list
Screen display
16x2 character
Control object
High speed ball , general ballPTZ decode
3.5'LCD color picture
High speed ball ,general ball
PTZdecode,16picture processor
Protocol
PELCO-D , PELCO-P
ALEC , SAMSUNG
VIDO-B01 , NEON
HTSCAM
HD600 , TOTA
KALATEL , VCLDOME
REDAPPLE ,SANTACHI450
SANTACHI650 ,VICON
Baud rate
Out channel
1200bps,2400bps,4800bps,9600bps,19200bps
2 channel
Communication distance
Max :2400m
Operation Temperature
-10℃- 5 0℃
Power
DC12V/1A
25
DC12V/1A
Appendix
1.Lighting proof and surge signal proof
The product adopts TVS lightning proof technology to
prevent from damage by lightning strike below 1500 W and
impulse signals such as surge; but it is also necessary to
abide by the following precautions to ensure electrical safety
based on practical circumstances:
● Keep the communication cables at least 50 M away
from high voltage equipment or cables.
● Make outdoor cable laying-out under eaves as possible
as you can.
● In open area shield cables in steel tube and conduct a
single Point ground to the tube. Trolley wire is forbidden in
such circumstances.
● In strong thunderstorm or high far adic zone (such as
high voltage transformer substation), extra strong lightning
proof equipment must be installed.
● Take the building lightning proof requirements into
account to design the lightning proof and grounding of
outdoor equipment and cable laying-out in accordance with
the national and industrial standards.
● The system must be grounded with equal potentials.
The earth ground connection must satisfy the antiinterference and electrical safety requirements and must not
short circuited with high voltage electricity net. When the
system is grounded separately, the resistance of down
conductor should be ≤ 4Ω and the sectional area of down
conductor should be ≤25mm 2.
26
Appendix
2.RS485 bus basic knowledge
1)Characteristics of RS485 Bus As specified
by RS485 standards, RS485 Bus is of half duplexed
data
transmission
cables
with
characteristic impedance as 120 . The maximum
load capacity is 256 nit loads (including main
controller and controlled equipment).
2.)Transmission distances of RS485 Bus When user
selects the 0.56mm( 24AWG) twisted pair wires as data
transmission cable, the maximum theoretical transmitting
distances are as follows:
Baud Rate
Maximum Transmitting Distance
1200 Bps
2400m
2400 Bps
1800m
4800 Bps
1200m
9600 Bps
800m
19200 Bps
200m
3)connection and termination resistor
a)The RS485 standards require a daisy-chain
connection between the equipment. There must be
termination resistors with 120impedance at both
ends of the connection. (refer to Figure
1).Please refer to Picture 2 for simple
connection. “D” should exceed 7m.
120Ω
120Ω
1#
4#
3#
2#
32#
Figure1
A+
BD
A+
B-
120 Ω
Controller
27
120 Ω
1#
2#
Figure2
3#
31#
Appendix
b)The
connection
of
120
termination
resistor: See to single system connection. In some
circumstances user adopts a star configuration in practical
connection. The termination resistors must be connected to
the two equipment that are farthest away from each other,
such as equipment 1# and 15# in figure3. As the star
configuration is not in conformity with the requirements of
RS485 standards, problems such as signal reflections, lower
anti-interference performance arise when the cables are long
I the connection. The reliability of control signals is
decreased with the phenomena that the dome does not
respond to or just responds at intervals to the controller, or
does continuous operation without stop (refer to figure4)
1#
32#
6# Equipment
15#
Figure3
A+
120Ω
1#
120Ω
2#
120Ω
16#
B-
Figure4
28
N
PA P - M K
01EA00