1
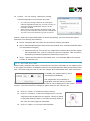
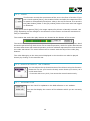
Observation and Access with Kinect User Manual English edition Manual ver.1.1 Contents 1 2 Introduction ........................................................................................................... 3 1.1 About OAK .......................................................................................................................... 3 1.2 Instructions for safe use..................................................................................................... 3 1.3 Operating environment of OAK .......................................................................................... 3 1.3.1 Hardware requirements ............................................................................................... 3 1.3.2 Windows 4 5 PC requirement .......................................................................................... 4 1.4 Software license ................................................................................................................. 4 1.5 Copyright and Trademark information ............................................................................... 5 Preparations before initial use .............................................................................. 6 2.1 3 Installation of OAK software and Kinect driver software etc. ............................................ 6 Starting up OAK .................................................................................................. 10 3.1 Connecting Kinect ............................................................................................................. 10 3.2 Connecting other peripheral equipment .......................................................................... 10 3.3 Starting up OAK software ................................................................................................. 11 License authentication and Trial version ............................................................ 12 4.1 Product key ....................................................................................................................... 12 4.2 Trial version ...................................................................................................................... 13 Air switch ............................................................................................................. 14 5.1 Depth mode ...................................................................................................................... 14 5.1.1 Switches ..................................................................................................................... 15 5.1.2 Adjustment of sensitivity ........................................................................................... 15 5.1.3 Output ........................................................................................................................ 16 5.1.4 Motion history ............................................................................................................ 18 5.1.5 Video .......................................................................................................................... 19 5.1.6 Orientation of the camera ......................................................................................... 19 1 5.1.7 5.2 6 7 Information ................................................................................................................ 19 Color mode ....................................................................................................................... 20 5.2.1 Switches ..................................................................................................................... 20 5.2.2 Adjustment of sensitivity ........................................................................................... 21 5.2.3 Output ........................................................................................................................ 21 5.2.4 Motion history ............................................................................................................ 22 5.2.5 Video .......................................................................................................................... 22 5.2.6 Orientation of the camera ......................................................................................... 22 5.2.7 Information ................................................................................................................ 22 Face switch .......................................................................................................... 23 6.1.1 Switches ..................................................................................................................... 23 6.1.2 Adjustment of sensitivity ........................................................................................... 24 6.1.3 Output ........................................................................................................................ 24 6.1.4 MOTION HISTORY .................................................................................................. 25 6.1.5 Video .......................................................................................................................... 26 6.1.6 Orientation of the camera ......................................................................................... 26 6.1.7 Information ................................................................................................................ 26 Support ................................................................................................................ 27 7.1 Known technical issues ..................................................................................................... 27 7.2 Support ............................................................................................................................. 28 7.2.1 Support INformation .................................................................................................. 28 7.2.2 Inquiry ....................................................................................................................... 28 2 1 INTRODUCTION 1.1 ABOUT OAK OAK is software which uses Microsoft Corporation’s KinectTM for Windows (referred to as Kinect below) to observe the body movement of the people, and enable operation of switches upon capturing the movement. This software aims to support the activities of people with physical disabilities. 1.2 INSTRUCTIONS FOR SAFE USE Please do not use OAK for any other purpose other than those mentioned. Please note the following precautions for safe use of OAK. If you do not heed the warnings displayed below, you may endanger the health or even the life of the user. Warning Warning Warning Use is prohibited in situations where it may endanger the life of the user Do not use in a situation in which physical or emotional damage could be caused Adhere to the rules for the use of equipment in medical facilities such as hospitals etc. Warning Avoid use for long duration, and use under the guidance of appropriate supervisory personnel 1.3 OPERATING ENVIRONMENT OF OAK 1.3.1 HARDWARE REQUIREMENTS Windows PC Kinect™ for Windows (Kinect) Does not work on KinectTM for Xbox 360 3 Warning Equipment connected to OAK must be used within the limits specified in the User Manual for that equipment 1.3.2 WINDOWS PC REQUIREMENT CPU: Dual core, 2.66 Hz or faster, 32 bit ( x86) or 64 bit (x64) processor OS:Microsoft Windows 7、Windows 8 Connection port: USB port (Connection to USB 2.0 is recommended.) It has been reported that the following USB ports may have problems when they are used to connect Kinect: Ports using the AMD Fusion A75 USB 2.0 Controller, some models of NEC USB 2.0 Controller, Etron USB 3.0 Extensible Host Controller and Renesas Electronics USB 3.0 Controller. If Kinect does not work correctly, please use a USB 2.0 port other than the ones listed above. Memory: 2 GB RAM 1.4 SOFTWARE LICENSE The redistribution rights for this OAK software have been assigned by the copyright holder, namely, the Assistive Information Technology Lab of the Research Center for Advanced Science and Technology (RCAST) at the University of Tokyo to Assist-I Corporation. The clauses in the license for this OAK software (referred to as [this license] below) constitute an agreement between you and Assist-I Corporation (referred to as [our company] below. Please ensure that you read the license clauses given below. The clauses in this license are applicable to OAK software and the media on which the software is recorded (referred to collectively as [this software] below). They are also applicable to all update programs, additional programs, user manuals and support services for this software. This software is supplied as a user license, and is not an outright sale. By downloading, installing and using this software, or by accessing this software, it is assumed that you agree to all the clauses in this license. Unless you agree to the clauses in this license, you cannot download, install, use or access this software. Further, this license pertains to this software alone, and is apart from the licenses of the products that are related to the OAK and used jointly. Terms and conditions of the license The terms and conditions of the license that are needed to be agreed by you are given below: You should use this software on a computer which meets the requirements of the operating environment for the Kinect sensor with which this software shall be associated with. If you have been given a user license for this software, you should only use this software on a computer belonging to you, and not on a computer belonging to another person. While we will release updates as required to fix any bugs in this software which may arise in future and we are not yet aware of, there may be cases where we are unable to fix some bugs due to the technical or cost constraints prevailing at that time. Some function cannot be operated in English version software. We will not provide support to fix any malfunction caused by defects in the equipment associated with this software. You may not copy, reverse engineer, decompile or disassemble this software. Cancellation of the agreement You can terminate this agreement at any time by removing this software completely from your system. If you have violated any clause in this agreement, this agreement will immediately be cancelled without any prior notice from us to you. When this agreement is terminated, you must remove this software and all its copies from your system(s). Warranty and liability limitations Only if you have purchased this software on physical media such as a CD or DVD, we offer a warranty on initial failure of the media for 1 year from the date of purchase. Regardless of whether you have purchased it on physical media, or by downloading it, this software is offered such as it is, irrespective of any flaws in the software. Any risks or damages associated with the use of this software will be borne by you as the customer. We do not bear any explicit warranty or liability against any defects in this software. This is true even if our company or the representatives of our company have been informed of such a possibility. In any case, the maximum amount of 4 compensation, inclusive of damages or loss to you and lawsuit costs, in case our company is liable for them, shall not exceed the total price you have paid for this software. Applicable law The clauses in this license are in conformity with Japanese law. This agreement is applicable within the framework permitted by the law, and excluding those items banned by the law. Further, this agreement does not in any way restrict or alter the legal rights of the customer. 1.5 COPYRIGHT AND TRADEMARK INFORMATION This software has been jointly developed by the Research Center for Advance Science and Technology (RCAST) at the University of Tokyo and Microsoft Japan Co., Ltd. Its copyright belongs to the Assistive Information Technology Lab of the Research Center for Advanced Science and Technology (RCAST) at the University of Tokyo. Microsoft, Windows, KinectTM and Xbox are the registered trademarks or trademarks of Microsoft Corporation (USA) in the United States and elsewhere. The official name of Windows is the Microsoft Windows Operating System. Any other company names or product names mentioned in this User Manual are the registered trademarks or trademarks of their respective companies. 5 2 PREPARATIONS BEFORE INITIAL USE In order to use OAK, you will need a PC, Kinect and Kinect driver software in addition to the OAK software. * Please ensure that you make preparations for initial use in the order described below. If you do not follow this order, the software may malfunction. 1. 2. 3. 4. 5. Install the [OAK software] and the [Kinect driver software]. Connect [Kinect] Wait until the driver is properly set up. Connect [USBox ] (If you have) Wait until the driver is properly set up. 2.1 INSTALLATION OF OAK SOFTWARE AND KINECT DRIVER SOFTWARE ETC. This manual uses the example of the installation of [OAK Pro] for the purpose of explanation. However, the installation procedure remains the same even for the installation of OAK air switch or OAK face switch separately. 1. Run setup. If you have purchased the download version (1) Unzip the OAK.zip file. (2) The contents will be displayed. If you have purchased the DVD version (1) Display the contents of the DVD. 2. Installation of [Microsoft.NET Framework 4 Client Profile] will begin only if it is not already installed in the computer. Click on <Accept>. * If it is already installed, Step 4 shall be executed. 6 3. [Microsoft.NET Framework 4 Client Profile] will be installed. A confirmation message is displayed during the process to confirm whether to continue with the installation or not. Please select <Yes>. 4. To continue and start installation of the OAK software, click on <Next>. 5. Select the installation folder as well as the user and then click on <Next>. 6. To continue with the installation, click on <Next>. 7. The program installation begins. Please wait. 8. During the installation of the OAK software, the installation screen for the FTDIChip CDM Driver software for the USBox is displayed. Click on <Extract>. 9. Click on <Next>. 10. Wait while the driver software is being installed. 11. The installation of the driver software for the FTDIChip CDM Driver is completed. Click on <Finish>. 7 12. The installation screen for the Microsoft Visual C++ software is displayed. Click on <Yes>. 13. Wait while the software is being installed. 14. The installation of the Kinect runtime software begins. Please put a check accepting the license conditions, and then click on <Install>. 15. Wait while the runtime software is being installed. 16. Once the installation is complete, click on <Close>. 17. Once the OAK software is installed, click on <Close>. *Note that this window may sometimes be hidden behind another window. 8 18.Once the installation is complete, click on the <Start> button and check that the software is displayed as shown in the figure below. If it is displayed, then it means that the installation is successfully completed. The start menu displayed is the same for all types of software irrespective of what you have purchased. The following shall be displayed. OAKAirSwitch - Color mode OAKAirSwitch - Depth mode OAKFaceSwitch Uninstall OAK * Along with the installation of the OAK software, the following software is also automatically installed: Driver software for the [USBox (sold separately)]. USBox…Manufactured by : Compusult LTD. Relay box that enables up to 4 contact outputs from the computer. http://www.compusult.at/ 9 3 STARTING UP OAK When starting up OAK, please ensure that you make preparations in the following order. If you do not follow this order, OAK may not start up correctly. 3.1 CONNECTING KINECT ① Connect the power supply cable and the USB cable (which is supplied in the Kinect package) to the Kinect device and plug the AC adaptor into the power socket. ② Connect the Kinect USB connector to the USB port of the computer. We recommend that you connect Kinect to a USB 2.0 port. ③ The computer automatically detects Kinect and sets up the driver. The status is displayed on the task bar at the bottom right of the screen. (It may take few minutes to connect for the first time. Once the driver is installed, the lamp on the front of Kinect device changes from a blinking green light to a steady glow.) 3.2 CONNECTING OTHER PERIPHERAL EQUIPMENT Once the Kinect driver software is installed, connect the peripheral equipment. However, please avoid connecting multiple hardware items at the same time. Please allow the driver software of one hardware item to be completely set up before connecting the next one. OAK Switch activated toy Battery device adapter USBox 10 3.3 STARTING UP OAK SOFTWARE After connecting Kinect and the peripheral equipment, select the Start menu. To use the depth mode of the [Air switch], Click on <OAKAirSwitch - Depth Mode>. To use the color mode of the [Air switch], Click on <OAKAirSwitch - Color Mode>. To use the [Face switch], Click on <OAKFaceSwitch>. For information on how to use each of the programs, please see the following pages. If Kinect is not connected, the OAK software will not start. When starting up the OAK software for the first time, it may take few minutes since it initializes Kinect as well as the peripheral equipment. Kinect cannot be used simultaneously from more than one application. Therefore, multiple instances of the OAK software cannot be used simultaneously. 11 4 LICENSE AUTHENTICATION AND TRIAL VERSION 4.1 PRODUCT KEY OAK software requires the license to be authenticated using a product key before initial use, for both downloaded version and the DVD version. Please look for the product key for the DVD version at the end of the section on [Please read these instructions before using this product] in the leaflet inside the DVD box. * If you do not authenticate the license, the software is started up as the trial version. Buyers of the OAK air switch are provided with ONE product key that can be used for air switch only. Buyers of the OAK face switch are provided with ONE product key that can be used for face switch only. Buyers of OAK Pro are provided with ONE common product key that can be used for both air switch and face switch. ① If you have purchased any OAK software, please click on <Yes>. To use the product for 30 days as a trial version, please click on <No>. (The same screen will be displayed when the product is started up the next time) ② If you have purchased the OAK software, please enter the product key that has been provided to you. If you have purchased OAK Pro, you can use all the functions with a single product key. If you have purchased the air switch and face switch individually, you need separate product keys for each of them. ③ Once you have entered the correct product key, license authentication is completed and you can then use the product for an unlimited period. [NOTE] Please note down your product key on a piece of paper and keep it safe. The product key will not be reissued. Your product key will not be reissued for any reason, such as for purchasing a new computer or restoring an old computer. If you lose the product key, it is necessary for you to purchase the product once more. 12 4.2 TRIAL VERSION The OAK software will start up as a trial version unless license authentication is done. The objective of the trial version is to enable the users and their supporters to determine if OAK is useful to them or not. The trial version of OAK software can be used for 30 days from the date of installation. During this period, you can test all of its functions without any restrictions. It will not start up once 30 days have elapsed. To continue to use it, please purchase the OAK software and enter the product key to authenticate the license for your software. 13 5 AIR SWITCH The OAK air switch is software which can create a virtual switch in the air. This virtual switch is called as an “air switch”. 5.1 DEPTH MODE In the depth mode, you can use the Kinect depth (distance) sensing function to turn the air switch ON/OFF. The air switch drawn on the operation monitor responds when a part of the body such as a hand or head comes into the area of the switch. This mode is suitable for capturing relatively large body movements. Since it uses the infrared rays emitted by the Kinect device, it can be used even in dark places. Operation monitor Output monitor Timeline bar In the depth mode, the image captured by the depth sensor is displayed on the operation monitor on the left hand side. Nearer the object to the Kinect device, blacker is the display color. The depth mode of the air switch can only recognize objects which are at a distance of 40 cm to 150 cm from the Kinect device. Objects outside this range are displayed in white. The output monitor on the right is used to display RGB (normal screen) images or the motion history images. 14 5.1.1 SWITCHES Use the mouse to create an air switch within the operation monitor. Click on [Draw], and drag the mouse within the operation monitor to create a rectangular air switch. Click on the drop down button next to [Draw] to display a drop-down menu from which you can then select [Polygon] to draw a polygonal air switch. You can also create 1 – 5 air switches as required. To delete an air switch, select the air switch and press the Delete or Backspace key on the keyboard. After selecting an air switch, you can change its size by dragging its endpoints, and also change its position by dragging its center. If you click on [Tracking], the tallest object inside the operation monitor (for example, the central line of the body) is automatically detected, and its position is used as a reference to maintain the distance from the switch. Even when the body of the user shakes sideways, switch operations can be performed with the distance from the switch maintained constant. * You can also draw an air switch on a person. In that case, the body is saved as a background at the instant the air switch is created, and the response area for the air switch is setup a few centimeters in front of the body. 5.1.2 ADJUSTMENT OF SENSITIVITY You can adjust the sensitivity of the air switch. You can set the minimum onset value indicating the amount of body that should enter into the area of the air switch in order to turn the air switch ON/OFF as the [Threshold] value in pixels. The smaller the [Threshold] value, the higher is the sensitivity. Further, when the part to be recognized is very uneven (the outline of the subject location is displayed in white on the operation monitor and its boundary appears jagged), please use with reduced sensitivity (i.e., increase the [Threshold] value) since noise is included in the depth measurement of Kinect. 15 5.1.3 OUTPUT Set the actions to be performed by the computer when the air switch is switched ON. For example, you can click on the mouse and connect to the USBox and battery (BD) adapter (sold separately), and operate dry battery driven appliances (toys, etc.). If you have created a single air switch, set the output destination (action) from the dropdown list which is below [Switch1] in the figure on the left. You can select the standard output destinations from among the following. Relay1 – 4…Contact output from the specified terminal number of the [USBox] Relay1 and 2… Contact output from both the terminals 1 and 2 of the [USBox] Relay1-Shot… single shot contact output from the terminal 1 of the [USBox] Left click…Send the left click of the mouse Right click…Send the right click of the mouse Drag/Release… Alternately send the drag and release of the mouse. Enter…Send the Enter key Space…Send the Space key ↑...Send the Up arrow key ↓...Send the Down arrow key ←...Send the Left arrow key →...Send the Right arrow key Canceling… When activated, cancel all the outputs from other switches. This switch may be useful for canceling unwanted operations if it is located for a body part that has involuntary movement. Custom…You can specify a particular running software application and send the key code. You can select a target either from among the software applications that are currently running, or select the software application which is in the frontmost window. After clicking on the Sending Keystroke field, type the key on the keyboard. The keycode is displayed. You can even use a shortcut key such as Ctrl+P. 16 Further, when the output destination is set as the [Relay], you can select the type of operation from among the following. Direct…Switched ON only while the air switch is being touched. Latch…Switched ON when the air switch is touched once, and switched OFF when it is touched once again. Minimum interval…This is the non-responsive duration after the air switch has responded once, until it is ready for the next response. This is useful in eliminating unwanted operations caused by tremors, etc. Timer… When the air switch is touched once, it is switched ON for the preset number of seconds only. *When multiple air switches are set。 Click on the icon in the enclosed box as shown in the left figure. A dialog is then displayed (as shown in the right figure) and you can set the output and action of up to 5 switches individually. 17 5.1.4 MOTION HISTORY Motion history displays the history of movement in the form of images. It can capture even a very slight movement, and helps to observe and understand the body movements of the user. With the help of this function, one can decide the best location and size of the air switch. This also helps the user to view the images and understand one’s own movement. To use this function, click on the <History> tab which is on the top left of the output monitor The magnitude of movements is integrated, and the history of those movements which change the color from violet to red is displayed on the output monitor. (The color does not change for parts which do not move at all). Click on <Clear> to erase the motion history. Click on <Camera> to save the image which is on the output monitor at that time as a picture. The file is saved in the [OAK Photos] folder in the [My Pictures] folder of the user who has logged on Windows. Click on <Open> to view the saved photos. 18 5.1.5 VIDEO This function records the movements of the user in the form of a video. If you put a check against [Save], the situation before and after the response of the air switch is automatically saved as a video in the avi file format. It is saved in the [OAK Videos] folder in the [My Videos] folder of the user who has logged on Windows. If you put a check against [Flip], the image captured by Kinect is laterally inverted. Use [Flip] depending on the changes in the direction of the screen so that the movement is easy to understand. The timeline bar and video play buttons are located at the bottom of the screen. The timeline bar displays the switch operations by the user over the time. The green band shows the period during which there was no switch operation, while the yellow band shows the time when there was a switch operation, and the red band represents the time at which the video was saved. The saved videos can be viewed with the help of the video play button. The video belonging to the time period displayed on the timeline can also be played directly by clicking on the timeline bar. 5.1.6 ORIENTATION OF THE CAMERA You can adjust the up-down direction of the Kinect using this function. Please do not use your hand to directly move Kinect up or down, as it could cause fault. * It moves with every click, but cannot be moved continuously. 5.1.7 INFORMATION You can check for updates to the OAK software on our website. You can also display the version of the software which you are currently using. 19 5.2 COLOR MODE In the color mode, the function to detect color changes is used. The change in color of the pixels within the area of the air switch set up on the operation monitor is captured, and the air switch responds. This mode is suitable for capturing slight movements. Operation monitor Output monitor Timeline bar In the color mode, unlike in the depth mode, there is no restriction on the distance (depth) of the user from the device. (Recognition can be done from 0 m onwards). 5.2.1 SWITCHES Use the mouse to create an air switch within inside the operation monitor. Click on [Draw], and drag the mouse within the operation monitor to create a rectangular air switch. Click on the drop down button next to [Draw] to display a drop-down menu from which you can then select [Polygon] to draw a polygonal air switch. You can also create 1 – 5 air switches as required. To delete an air switch, select the air switch and press the Delete or Backspace key on the keyboard. 20 After selecting an air switch, you can change its size by dragging its endpoints, and also change its position by dragging its center. In addition, selecting [Auto] enables you to automatically set an air switch to the most active region based on the motion history data. This can be used for creating a sensitive switch to a slight movement. When [Auto] is selected, set the measurement time and click [Start] to begin the measurement. By default, the measurement will be carried out for the whole area of the capturing image. You can limit the switch area by drawing a rectangle on the operation monitor beforehand in order to ignore unwanted movements. Click [Cancel] to stop the measurement. 5.2.2 ADJUSTMENT OF SENSITIVITY You can adjust the sensitivity of the air switch. You can set the minimum onset value for the number of pixels within the air switch area whose color has to change in order to turn the air switch ON/OFF as the [Threshold] value in pixels. 5.2.3 OUTPUT The output contents and the output destination settings in the color mode are the same as those in the depth mode as described in [5.1.3 Output]. 21 5.2.4 MOTION HISTORY Put a check against [Enabled] to display the motion history. Other than this, the use of the motion history function in the color mode is the same as its use in the depth mode as described in [5.1.4 Motion history]. 5.2.5 VIDEO The use of the video function in the color mode is the same as its use in the depth mode as described in [5.1.5 Video]. 5.2.6 ORIENTATION OF THE CAMERA The adjustment of the orientation of the camera in the color mode is the same as in the depth mode as described in [5.1.6 Orientation of the camera]. 5.2.7 INFORMATION The method to obtain information regarding color mode software is the same as in the depth mode as described in [5.1.7 Information]. 22 6 FACE SWITCH The OAK face switch is the software that can use the movement of the face as a switch. It automatically recognizes the face of the user and turns the switch ON/OFF in response to actions such as the opening and closing of the mouth, moving the tongue in and out, blinking of the eyes, and the vertical and horizontal movement of the face. Output monitor Operation monitor Timeline bar ※Please use the face switch in an entirely bright room with the user positioned at a distance of 1 – 1.5 m from Kinect device so that the upper half of the user’s body (waist and above) is visible on the screen and the user is facing the camera. If the user moves forward and back, or lifts his/her hands or arms up on either side of the face, the person can be easily distinguished from the background, enabling easier face recognition. If the user finds it difficult to move, ask the helper to move their (the helper’s) arms up and down in front of the user while hiding behind or beside the user to enable easier face recognition for the user. 6.1.1 SWITCHES You can change the part of the face which is to be recognized. Select from the drop-down list. [Mouth]… The action of opening the mouth acts as a switch. [Tongue]…The action of moving the tongue out acts as a switch. [Eyes]…The action of keeping the eyes closed for 1 second acts as a switch.In order to differentiate this from involuntary blinking, the face switch responds when the eyes are kept closed for 1 second. [Face]…The action of changing the direction of the face acts as a switch.The direction can be specified as up, down, left or right. 23 6.1.2 ADJUSTMENT OF SENSITIVITY Adjust the sensitivity of the face switch by setting the threshold value to indicate the amount of movement of recognized part in order to turn the switch ON/OFF. The red dot moves to the right in conjunction with the movement of the recognized part. If the red dot crosses the threshold value (the knob on the slide bar), the switch is turned ON. Adjust the threshold value by dragging the knob on the slide bar. The righter the threshold value slider, the lower the sensitivity, requiring large movements of the recognized part. 6.1.3 OUTPUT Set the actions to be performed by the computer when the face switch is switched ON. For example, you can click on the mouse and connect to the USBox and battery (BD) adapter (sold separately), and operate dry battery driven appliances (toys, etc.). You can select the standard output destinations from among the following. Relay1 – 4…Contact output from the specified terminal number of the [USBox] Relay1 and 2… Contact output from both the terminals 1 and 2 of the [USBox] Relay1-Shot… single shot contact output from the terminal 1 of the [USBox] Left click…Send the left click of the mouse Right click…Send the right click of the mouse Drag/Release… Alternately send the drag and release of the mouse. Enter…Send the Enter key Space…Send the Space key ↑...Send the Up arrow key ↓...Send the Down arrow key ←...Send the Left arrow key →...Send the Right arrow key 24 Custom…You can specify a particular running software application and send the key code. You can select a target either from among the software applications that are currently running, or select the software application which is in the frontmost window. After clicking on the Sending Keystroke field, type the key on the keyboard. The keycode is displayed. You can even use a shortcut key such as Ctrl+P. Further, when the output destination is set as the [Relay], you can select the type of operation from among the following. Direct…Switched ON only while the face switch is being activated. Latch…Switched ON when the face switch is activated once, and switched OFF when it is activated once again. Minimum interval…This is the non-responsive duration after the face switch has responded once, until it is ready for the next response. This is useful in eliminating unwanted operations caused by tremors, etc. Timer… When the face switch is activated once, it is switched ON for the preset number of seconds only. 6.1.4 MOTION HISTORY Motion history displays the history of movement in the form of images. It can capture even a very slight movement, and helps to observe and understand the body movements of the user. This also helps the user to view the images and understand one's own movement. To display the motion history, put a check against [Enabled]. The magnitude of movements is integrated, and the history of those movements which change the color from violet to red is displayed on the output monitor. (The color does not change for parts which do not move at all). Click on <Clear> to erase the motion history. Click on <Camera> to save the image which is on the output monitor at that time as a picture. The file is saved in the [OAK Photos] folder in the [My Pictures] folder of the user who has logged on Windows. Click on <Open> to view the saved photos. 25 6.1.5 VIDEO This function records the movements of the user in the form of a video. If you put a check against [Save], the situation before and after the response of the air switch is automatically saved as a video in the avi file format. It is saved in the [OAK Videos] folder in the [My Videos] folder of the user who has logged on Windows. If you put a check against [Flip], the image captured by Kinect is laterally inverted. Use [Flip] depending on the changes in the direction of the screen so that the movement is easy to understand. The timeline bar and video play buttons are located at the bottom of the screen. The timeline bar displays the switch operations by the user over the time. The green band shows the period during which there was no switch operation, while the yellow band shows the time when there was a switch operation, and the red band represents the time at which the video was saved. The saved videos can be viewed with the help of the video play buttons. The video belonging to the time period displayed on the timeline can also be played directly by clicking on the timeline bar. 6.1.6 ORIENTATION OF THE CAMERA You can adjust the up-down direction of the Kinect using this function. Please do not use your hand to directly move Kinect up or down, as it could cause fault. * It moves with every click, but cannot be moved continuously. 6.1.7 INFORMATION You can check for updates to the OAK software on our website. You can also display the version of the software which you are currently using. 26 7 SUPPORT 7.1 KNOWN TECHNICAL ISSUES The following are the known technical issues as on March 25, 2013. We will be making improvements to resolve them one by one. Once an issue is resolved, it will be published on the web site of Assist-I Corporation, and the updater will be released. When Kinect is connected to some USB ports, OAK stops working. We recommend connection to USB 2.0 ports. It has been reported that the following ports may have problem when they are used to connect Kinect:Ports using the AMD Fusion A75 USB 2.0 Controller, some NEC USB 2.0 Controllers, Etron USB 3.0 Extensible Host Controller and Renesas Electronics USB 3.0 Controller etc. If Kinect does not work correctly, please use a USB 2.0 port other than the ones listed above. If the lamp in front of Kinect glows red, or is OFF, please disconnect the Kinect from the USB port and reconnect. Please also check the power connection. Face recognition may sometimes not work properly in case of face switch. If the place where it is being used is insufficiently lit, or if some objects are placed over or adjacent to the user, face recognition may not work correctly. If the face is not being recognized, Try changing the distance from Kinect. The preferred distance is 1 – 1.5 m. Look straight at Kinect while operating it. Use Kinect in a completely well-lit place. Ensure that the upper half of the body (waist and above) is visible on the screen. Lift your hands or arms upwards on either side of your face If the user finds it difficult to move, ask the helper to move their (the helper’s) arms up and down in front of the user while hiding behind or beside the user to make face recognition easier. 27 7.2 SUPPORT 7.2.1 SUPPORT INFORMATION Please visit the web site of OAK download where further details are given. The URL is given below for your reference. http://www.assist-i.net/at/en/ Updater Manual Trial software Driver software 7.2.2 INQUIRY Please use the inquiry form provided in the web site of Assist-I Corporation to enter your questions and send to us. [email protected] 28 assist-i corporation http://www.assist-i.net/ 601, FS Building, 2-21-1, Nihonbashi -Ningyo-cho, Chuo-ku, Tokyo JAPAN 103-0013 29