1
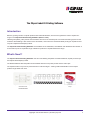
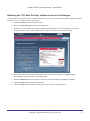
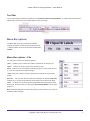
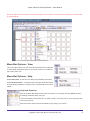
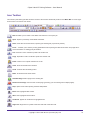
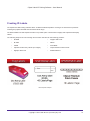
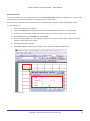
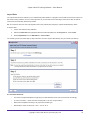
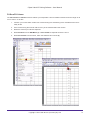
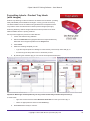
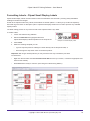
Clipsal Label ID Printing Software
User Manual
Version 3.4.2
Schneider Electric (Australia) Pty Ltd.
33 Port Wakefield Road, Gepps Cross, SA, 5094
Phone: 1300 2025 25
Fax: 1300 2025 56
Email: [email protected]
Website: www.clipsal.com.au
Copyright © Schneider Electric (Australia) Pty Ltd.
All rights reserved.
This material is copyright under Australian and international laws. Except as permitted under the relevant
law, no part of this work may be reproduced by any process without prior written permission of and
acknowledgement to Schneider Electric (Australia) Pty Ltd. .
Contents
The Clipsal Label ID Printing Software4
Introduction4
What’s New?!4
System Recommendations5
System Recommendations5
Minimum Requirements5
Installing the ‘ID Label Printing’ software from the eCatalogue
6
Tool Bar7
Menu Bar options 7
Menu Bar options - File7
Menu Bar Options - Edit8
Menu Bar Options - View9
Menu Bar Options - Help9
Keyboard Shortcuts 9
Icon Toolbar10
Creating ID Labels12
Designing Labels13
Formatting Labels14
Insert Symbol 14
Create Sequence 14
Insert Floor Lot15
Import Data16
Fill Row/Fill Column17
Manual Insert18
Formatting Labels - Product Tray labels
(with images)19
Formatting Labels -Clipsal Small Display Labels20
Using the Label Printing Wizard21
Calibrating Printer Settings22
Software Updates23
Support 23
Feedback23
Copyright © Schneider Electric (Australia) Pty Ltd.
3
The Clipsal Label ID Printing Software
Introduction
With the growing number of Clipsal products with label identification, we have recognised the need to expand our
range in the Clipsal ID Label Printing Software (Version 3.4.2).
Labelling wall plates, patch panels and termination devices is an essential part of a structured cabling system for the
contractor. But labelling is also useful for the wholesaler, and so we have introduced label printing for Clipsal Product
Trays and Clipsal Small Display Labels.
The Clipsal ID Label Printing Software accomodates for the C2000A4L, SC2000A4L and 30PIDA4L label sheets. It
is also able to print an expanded range of labels for products in Clipsal Datacomms range.
What’s New?!
The Clipsal Label ID Printing Software now has new labelling templates for RJ6AU/24PPLS, Clipsal product trays
and Clipsal Small Display Labels .
The RJ6AU/24PPLS label templates accommodates both the front patch panels and the ends caps.
The Clipsal Product Trays can be produced with or without images – making instant identification of the Clipsal
product range easier than ever!
Clipsal Titanium C2000 Flexiport
Patch Panel 24 Port Cat 6A UTP
Grid and Cover
Clipsal Product
Trays
C2032HRJA6SS
Copyright © Schneider Electric (Australia) Pty Ltd.
4
Clipsal Label ID Printing Software - User Manual
System Recommendations
For your reference, recommended and minimum System Requirements for the Clipsal ID Label Printing Software are
listed below.
System Recommendations
•
800 MHz or above x86/x64 CPU running Microsoft Windows 2000 or later.
•
Microsoft .Net Framework 2.0 Runtime (if running Windows XP)
•
Microsoft® Excel
•
Windows Screen Driver capable of displaying 16 bit colour or higher.
•
256 MB or more of available RAM on Microsoft Windows 98, Windows 2000, Windows XP, Windows 7
•
2 GB or more RAM on Microsoft Vista and Windows 7
•
50 Megabytes of hard disk space
•
1024 x 728 display resolution
Minimum Requirements
•
400 MHz or above x86/x64 CPU running Microsoft Windows 98.
•
Microsoft .Net Framework 2.0 Runtime (if running Windows XP)
•
Windows Screen Driver capable of displaying 16 bit colour or higher.
•
128 MB available RAM on Microsoft Windows 98, Windows 2000, Windows XP, Windows 7.
•
1 GB RAM on Microsoft Vista and Windows 7
•
50 Megabytes of hard disk space
•
800x600 display resolution
We also recommend that the latest print driver for your printer should be installed.
NB: The Clipsal Product Tray Labels with Item Images and Clipsal Small Display Label templates require Internet
connection.
Copyright © Schneider Electric (Australia) Pty Ltd.
5
Clipsal Label ID Printing Software - User Manual
Installing the ‘ID Label Printing’ software from the eCatalogue
The ID Label Printing software can be installed at any time. You do not need to have the Clipsal eCatalogue installed
in order for it to run. Simply follow the steps below:
1. Select the Extras tab from the Top Menu Bar.
2. Select the Label Printing tab from the Sub-Menu Bar.
3. Select the Launch Label Printing button to install the programme or launch the programme if you have
already installed it. Disc 1 of the eCatalogue will need to be inserted for installation to begin.
4. Once clicking the Launch Label Printing button the screen below will appear. Click Next to begin
the installation and proceed with the following steps.
5. Select the Browse button and navigate to where you want the programme installed. Click Next.
6. Click the Install button to install the application.
7. Click the Finish button and leave the ‘tick box’ checked to launch the programme.
Copyright © Schneider Electric (Australia) Pty Ltd.
6
Clipsal Label ID Printing Software - User Manual
Tool Bar
The Tool bar displays all options available in the Clipsal ID Label Printing Software. It contains both the Menu Bar
options (top row) and the Icon Toolbar (bottom row). See below.
Menu Bar options
The Menu Bar (see right) contains all available
programme options containing the following options.
* These functions can also be accessed via the Icon
Toolbar.
Menu Bar options - File
The File menu contains the following options:
*New...: enables you to create a new label work sheet for a new print job.
*Open... : allows you to open a previously saved print job.
Close : shuts your current working document but gives you the option to save
it, if you have not saved the latest changes.
*Save: saves the current document, replacing the existing file (if previously
saved).
Save As... : lets you save the work sheet as a different file. Selecting Save As
enables you to choose a new filename and location for the label work sheet.
*Print... : enables you to set the printing parameters before printing the label
work sheet. See the section on using the Label Printing Wizard to learn more
(page 21).
Exit: closes the application but gives the option to save the file (if you have not
saved the latest changes).
Copyright © Schneider Electric (Australia) Pty Ltd.
7
Clipsal Label ID Printing Software - User Manual
Menu Bar Options - Edit
The Edit menu allows you to modify a label work sheet to suit your own design requirements.
It also enables you to name multiple labels quickly and easily using functions such as Create Sequence, ImportData
and Insert Floor Lot.
Functions of the Edit menu include:
Undo: reverses the last editing action.
Redo: reverses the last Undo action.
Cut: removes a cell’s contents to paste into another cell.
Copy: duplicates a cell’s contents to paste into another cell.
Paste: inserts cut or copied contents into a cell.
Clear: removes selected cell contents.
Select All: Selects all cells in the label worksheet.
Import Data: Imports data as an .CSV file. See page 16 for
more details.
Create Sequence: creates a number/letter sequence for
selected cells. See page 14 for more details.
Floor Lot: allows you to fill multiple cells with pre-defined
content.
Fill Row: fills the row with a selected cell’s content (see
page 17).
Fill Column: fills the column with a selected cell’s content
(see page 17).
Insert Symbol: insert Datacomm’s symbols into an active
label cell.
Reverse Colours: reverses the cell content’s text and fill
colour.
Text Colour: Choose text/symbol colour from a list or create
your own.
Background Colour: Choose a label’s background colour
or create your own.
Horizontal Alignment: aligns a label’s content to the top,
middle or bottom of a cell.
Vertical Alignment: changes the text direction to normal,
inverted, upwards, downwards or vertically aligned.
Safe Align: used as a guide so cell content remains in the
viewable area when used (only for the ‘C2000’ labels).
Text Direction: changes the text direction to normal,
inverted, upwards or downwards.
Increase Font Size: increases the text size.
Decrease Font Size: decreases the text size.
Bold: sets highlighted text to bold.
Italic: sets highlighted text to italics.
Underline: applies an underline to highlighted text.
Copyright © Schneider Electric (Australia) Pty Ltd.
8
Clipsal Label ID Printing Software - User Manual
Quick Tip: Edit functions can also be accessed through the Icon Toolbar or via the right-click function in an active work
sheet (see below).
Access Edit functions by right-clicking within an active label ‘cell’.
Menu Bar Options - View
This menu option allows the view of the label worksheet to be magnified
so that a label cell appears larger on the screen (zoom in) or smaller on
the screen (zoom out).
Menu Bar Options - Help
Select Show Help.. to open the ID Label printing software Help Notes.
Select About ID Labels .. to display basic information about the Clispal
ID Label Printing Software, including version, release dates and contact
details.
Keyboard Shortcuts
Each of the Menu Bar options has a keyboard shortcut. For example, selecting Ctrl+O will open
an existing worksheet ready. See right.
To see all available shortcuts left-click on a Menu option. The shortcut tip is on the right-hand side
of the drop-down list.
Most of the Menu options are also available by right-clicking your mouse.
Copyright © Schneider Electric (Australia) Pty Ltd.
9
Clipsal Label ID Printing Software - User Manual
Icon Toolbar
This section (see below) provides shortcut access to all functions otherwise present in the Menu Bar or via the rightclick function in an active work sheet.
New: Enables you to create a new label work sheet for a new print job.
Open: Opens a previously saved label worksheet.
Save: saves the current document, replacing the existing file (if previously saved).
Print:.. : enables you to set the printing parameters before printing the label work sheet. See page 20 for
more information on setting print parameters.
Cut: removes a cell’s contents to paste into another cell
Copy: duplicates a cell’s contents to paste into another cell.
Paste: inserts cut or copied contents into a cell.
Clear: removes selected cell contents.
Undo: reverses the last editing action.
Redo: reverses the last Undo action.
Add New Page: adds a page to the working file.
Delete Current Page: removes the current page (providing you are working with multiple pages).
Help: opens the ID Label printing software Help Notes.
Bold: sets highlighted text to bold.
Italic: sets highlighted text to italics.
Underline: applies an underline to highlighted text.
Align Left: aligns text or symbol to the left hand side of the label cell.
Copyright © Schneider Electric (Australia) Pty Ltd.
10
Clipsal Label ID Printing Software - User Manual
Align Center: aligns text or symbol in the centre of the label cell.
Align Right: aligns text or symbol to the right hand side of the label cell.
Align Top: vertically aligns text or symbol to the top end of the label cell.
Align Middle: vertically aligns text or symbol to the middle of the label cell.
Align Bottom: vertically aligns text or symbol to the bottom of the label cell.
Safe Align: used as a guide so cell content remains in the viewable area when used (only for the ‘C2000’
labels).
Text Colour: This option allows the text/symbol colour to be changed from a list of available colours or you
can create your own colour.
Fill Colour: This option allows for the background colour of a label to be changed from a list of available
colours or you can create your own colour.
Reverse Colours: inverts both the cell contents text and fill colour.
Normal Text Direction: changes the direction text to run from left to right in the standard configuration.
Inverted Text Direction: rotates text clockwise 180°.
Upwards Text Direction: rotates text (in the normal configuration) anti-clockwise 90° - running up from the
bottom of the cell.
Downwards Text Direction: rotates text (in the normal configuration) clockwise 90° - running down from the
top of the cell.
Vertical Align Text : Aligns text so that each letter runs beneath the previous one. NB: This function only
allows one line of text.
Insert Symbol: insert Datacomm’s symbols into an active label cell.
Create Sequence: creates a number/letter sequence for selected cells. See page 14.
Fill Row: fills the row with a selected cell’s content
Fill Column: fills the column with a selected cell’s content.
Floor Lot: allows you to fill multiple cells with pre-defined content.
Import Data: Imports data as an .CSV file. See page 16.
Copyright © Schneider Electric (Australia) Pty Ltd.
11
Clipsal Label ID Printing Software - User Manual
Creating ID Labels
The Clipsal ID Label Printing software offers 10 different labels templates: covering a an assortment of products
including the popular SC2000 and new Patch Panel range.
The latest additions include Clipsal’s Product Tray Labels (with or without item images) and Clipsal Small Display
Labels
The following steps show how to design and format a new label for the following products:
•
SC2000
•
Gigapro 300 5 Pair
•
SL2000
•
30PID
•
C2000
•
3107WPDL
•
Clipsal’s Product Tray Labels (no images)
•
Clipsal Titanium Patch Panels
•
Gigapro 300 4 Pair
•
RJ6AU/24PPLS
Label template samples
Copyright © Schneider Electric (Australia) Pty Ltd.
12
Clipsal Label ID Printing Software - User Manual
Designing Labels
1. Launch the Label Printing Software.
2. With the Create New tab highlighted select a label
template from the Projects list. Click Create.
3. Using the tools found within the Edit menu or Icon
Toolbar changing the look of your labels is quick and
easy. For example:
•
To modify a single label: left-click your mouse
within a label cell. A red bounding box and
flashing cursor indicate that the cell is active
and ready to edit (see right).
•
To select multiple cells: Left-click and drag
your mouse across the required cells. To deselect, left-click anywhere within the sheet
(see below).
Left-click your mouse in a label cell to select a single cell
•
To select all cells within all available pages
select Edit > Select All then:
•
Select the edit function you require. NB: Visit
the Edit menu (page 8) or Icon Toolbar
(page 10) sections for more details.
•
Select Edit >Undo to reverse any unwanted
actions: provided it’s the last editing action.
•
Select Ctrl+Enter (within an active cell) to start
typing on a new line. See page 18 for further
details.
Click-drag the mouse across the required cells to select
multiple labels
Copyright © Schneider Electric (Australia) Pty Ltd.
13
Clipsal Label ID Printing Software - User Manual
Formatting Labels
There are 7 ways to insert text/symbols into a label cell. These are:
Insert Symbol
1. Left-click your mouse within a label cell. A red bounding box and
flashing cursor indicate that the cell is ready to edit.
2. Select Insert Symbol.
Available
3. Scroll through the resulting screen to local the symbol to insert
(see right). Click OK.
symbols for label
cells.
Create Sequence
1. Launch the Label
Printing Software.
2. With the Create New
tab highlighted select
the label template from
the Projects list. Click
Create.
c
3. Left-click your mouse
within a label cell. A red
bounding box indicates
that the cell is ready to
edit.
a
b
4. Select Create
Sequence.
5. Step 1 allows you to
define the range of cells
to label.
6. Step 2 dictates the fill
parameters.
You can:
Select options (a) and (b) to duplicate the contents and formatting of a selected cell (c)
•
Select the second radio button to duplicate the contents of a selected cell (b). OR
•
Select the first two options (a) and (b) to duplicate the contents and formatting of a selected cell (c).
OR
•
Select Define advanced parameters to create an arranged series of labels defined by the options
available.
7. Once you have set your sequence parameters select Generate to complete the process.
NB: This function does not work with Clipsal Product Tray labels (with images) or Clipsal Small Display Labels.
Copyright © Schneider Electric (Australia) Pty Ltd.
14
Clipsal Label ID Printing Software - User Manual
Insert Floor Lot
The function of the Floor Lot is a slight variation on the Create a Sequence function. It enables you to create a series
of labels based on predefined parameters, including postfix and prefix values.
NB: This function does not work with Clipsal Product Tray labels (with images) or Clipsal Small Display Labels.
To Insert a Floor Lot:
1. Launch the Label Printing Software.
2. With the Create New tab highlighted select the label template from the Projects list. Click Create.
3. Left-click your mouse within a label cell. A red bounding box indicates that the cell is ready to edit.
4. Select Floor Lot from the Edit Menu or Icon Toolbar.
5. Fill in the resulting fields to suit your labelling requirements (see below). NB: Copies indicates how many
replicas of each label will be created.
6. Click OK to generate the labels.
7. Select Edit >Undo to reverse any unwanted actions: provided it’s the last editing action.
Insert a Floor Lot
Copyright © Schneider Electric (Australia) Pty Ltd.
15
Clipsal Label ID Printing Software - User Manual
Import Data
The Import Data function enables you to create/modify label details in a program such as MS Excel to then import into
the Label Printing software. This is a useful process as you are able to work with larger amounts of data, as well as
use the extra functionality that Excel provides.
NB: This function does not work with Clipsal Product Tray labels (with images) or Clipsal Small Display Labels.
To import data:
1. Launch the Label Printing Software.
2. With the Create New tab highlighted select the label template from the Projects list. Click Create.
3. Select ImportData from the Edit Menu or Icon Toolbar.
The resulting screen provides step-by-step instruction of how to import data directly into your labels (see below).
It is recommended that:
•
You use the supplied template to organise your label details as each CSV is structured accordingly.
•
To avoid confusion – name and save the template in its own unique location.
•
Name each template according to its purpose and label type.
•
Remember to save the file as an .CSV – not an .XLS.
Copyright © Schneider Electric (Australia) Pty Ltd.
16
Clipsal Label ID Printing Software - User Manual
Fill Row/Fill Column
The Fill Column and Fill Row function enables you to duplicate a cell’s formatted contents across the length of its
row or column. To do this:
1. Left-click your mouse within a label cell. A red bounding box and flashing cursor indicate that the cell is
ready to edit.
2. Insert content using the manual method or any of the methods within this section.
3. Select the cell that you intend to duplicate.
4. Select Fill Row from the Edit Menu (a) or Icon Toolbar to duplicate across the row or
5. Select Fill Column to do the same, within the selected cell’s column (b).
a
b
Copyright © Schneider Electric (Australia) Pty Ltd.
17
Clipsal Label ID Printing Software - User Manual
Manual Insert
Manual insert is the simplest, yet most time consuming, way to insert text into a label cell. Simply,
1. Left-click your mouse within a label cell. A red bounding box and flashing cursor indicate that the cell is
ready to edit.
2. Type directly into the cell.
Quick Tip: To skip to the next line within a label cell.
1. Click once within a cell and type the first line (a).
2. Whilst holding down the Ctrl key select Enter (b).
3. Release the Ctrl key and select Enter again.
4. The flashing bar should now display on the next line, indicating that you can start typing (c & d).
a
b
c
d
Copyright © Schneider Electric (Australia) Pty Ltd.
18
Clipsal Label ID Printing Software - User Manual
Formatting Labels - Product Tray labels
(with images)
Product Tray labelling is useful for both the wholesaler and contractor: providing
easily identifiable product details and images – saving you time and money.
The latest additions to the ID Label Printing Software are the Clipsal Product
Tray Labels. These are offered with or without product images (see right).
Producing label trays without images follows the same process as the other
labels available within the printing software.
For trays with images the process is a little different:
1. Launch the Label Printing Software.
2. With the Create New tab highlighted select the Clipsal Product tray
labels with Item Images template from the Projects list.
3. Click Create.
4. Within the resulting template you can:
•
Type the required product’s catalogue number directly into the drop-down field (a), or
•
Scroll through the drop-down menu to locate the product.
5. By selecting the checkbox (b) you can include a brief product description.
e
a
b
c
d
Important: With longer named products you may notice the text may overflow the print area (c).
To resolve this:
•
right-click the text area and select Decrease Font Size from the fly-out menu (d), or
•
select an appropriate font size from the Toolbar (e).
6. Select Print when ready to continue.
Copyright © Schneider Electric (Australia) Pty Ltd.
19
Clipsal Label ID Printing Software - User Manual
Formatting Labels - Clipsal Small Display Labels
Clipsal Small Display Labels are also useful for both the wholesaler and contractor: providing easily identifiable
Catalogue numbers and images.
Similar to the Clipsal Product Tray Labels, these labels are smaller (58mm x 17.8mm), they contain the Clipsal by
Schneider logo and have no description option. Clipsal Small Display Labels can be used to promote any available
Clipsal product.
The label making process is very similar to that of the Clipsal Product Tray Labels.
To create a label:
1. Launch the Label Printing Software.
2. With the Create New tab highlighted select the
Clipsal Small Display Labels template from the Projects list.
Example of a Small Display Label
3. Click Create.
4. Within the resulting template you can:
•
Type the required product’s catalogue number directly into the drop-down field, or
•
Scroll through the drop-down menu to locate the product
Important: With longer named products you may notice the text may overflow the print area.
To resolve this:
•
Right-click the text area and select Decrease Font Size from the fly-out menu, or select an appropriate font
size from the Toolbar).
•
Select Print when ready to continue. (See Using the Label Printing Wizard.)
Copyright © Schneider Electric (Australia) Pty Ltd.
20
Clipsal Label ID Printing Software - User Manual
Using the Label Printing Wizard
Once you have completed the design and formatting of your labels, you are ready to calibrate your printer to print.
Calibrating printer settings is an essential point of the label printing process. Not only does each label type have
unique print settings but no two label batches are the same.
It is recommended that it be done each time there is a change to your printer’s setup. ie new ink cartridge installed,
repairs etc
To help save time the software allows you to save calibration settings as a unique ‘printer profile’ (a).
You can then re-instate the ‘profile’ whenever you print for that particular label type (b).
NB: You may need to ‘tweak’ the settings when using a new batch of labels.
b
a
Clipsal’s label printing wizard.
Copyright © Schneider Electric (Australia) Pty Ltd.
21
Clipsal Label ID Printing Software - User Manual
Calibrating Printer Settings
The Printing Wizard allows you to either save a new profile or Browse for an existing one. Let’s assume that you have
yet to create a profile.
1. Within the ID Label software select Print.
2. (Step 1) Check the Cut Lines tickbox to include print marks. Cut lines indicate where the labels are
positioned on its sheet.
3. (Step2) To nominate the number of rows to print - deselect the All Fields checkbox and enter the range in
the resulting fields.
We recommend that your first test print is done without any adjustment to the horizontal or vertical settings.
Consider it a ‘pure base print’.
4. (Step 3) Select Test Print on plain A4 paper.
5. (Step 4) To check the alignment lay a blank sheet of labels over the test print (holding it to the light can help
visibility). If the cell content does not align to your satisfaction you will need to adjust either the vertical and/
or horizontal alignment (as per Step 5).
6. (Step 5) When adjusting the print placement:
•
Compressing and stretching affects the dimensions of the text.
•
Moving left/right and up/down affects the position of the overall print out on the page (see below).
7. It may take a few rounds to perfect the overall alignment but once satisfied SAVE YOUR FILE.
8. (Step 6) Insert the sheet of labels into the manual feed tray of your printer.
9. If selected, deselect the Cut Lines tickbox.
10. Select Final Print.
Moving left/right and up/down affects the position of the overall print out on the page
Copyright © Schneider Electric (Australia) Pty Ltd.
22
Clipsal Label ID Printing Software - User Manual
Software Updates
The Clipsal ID Label Printing Software is always improving and as such updated versions will be released.
To check if there has been a software update follow these steps:
1. Open your current version of the Clipsal ID Label Printing Software.
2. At the opening screen select the link “Check here to check for updates”. The software will automatically
update.
Select the link titled “Check here to check for updates”
Support
If you have any problems or questions regarding the Clipsal ID Label Printing Software, please contact the
eCatalogue Help Desk at [email protected] or phone 1800 806 668 between 9am to 5pm (CST), Monday
to Friday.
Feedback
Feedback on this programme is always appreciated. It helps develop this product to suit your needs.
Feedback can be sent to [email protected]
Copyright © Schneider Electric (Australia) Pty Ltd.
23