1
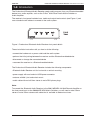
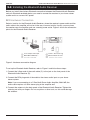
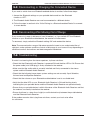
Professional Bluetooth Audio Receiver
560011BT
Installation Instructions
560011BT
Professional Bluetooth Audio Receiver Installation Instructions
Contents
1.0Introduction.................................................................................................................... 3
2.0
Installing the Bluetooth Audio Receiver...................................................................... 4
2.1 Hardware Connection............................................................................................... 4
3.0
Connecting the Power Supply....................................................................................... 5
4.0
Initial Pairing to a Bluetooth-Enabled Device.............................................................. 6
5.0
Disconnecting or Changing the Connected Device.................................................... 7
6.0
Reconnecting After Moving Out of Range................................................................... 7
7.0Troubleshooting.............................................................................................................. 7
8.0Warranty.......................................................................................................................... 8
The Bluetooth® word mark and logos are registered trademarks owned by Bluetooth
SIG, Inc. Any use of the word mark and logos is under licence.
iPad and iPhone are registered trademarks of Apple, Inc.
Clipsal is a registered trademark of Schneider Electric SAS.
All other trademarks are property of their respective owners.
2 of 8
© 2014 Schneider Electric. All Rights Reserved.
560011BT
Professional Bluetooth Audio Receiver Installation Instructions
1.0 Introduction
The Professional Bluetooth Audio Receiver sends audio program from your Bluetooth-enabled
device to an audio amplifier, such as the C-Bus® Multi-Room Audio Matrix Switcher or
Audio Amplifier.
The receiver’s front panel includes bass, treble and output level controls (see Figure 1) and
uses standard audio cables to connect to the audio system.
Figure 1. Professional Bluetooth Audio Receiver front panel details
These installation instructions tell you how to do the following:
• connect the hardware to a power outlet and the audio system
• perform the initial pairing between the receiver and the Bluetooth-enabled device
• disconnect or change the connected device
• reconnect the receiver to a Bluetooth-enabled device.
The Professional Bluetooth Audio Receiver includes the following components:
• Bluetooth Audio Receiver unit for horizontal or vertical mounting
• power supply with cord and mini-USB power connector
• antenna with 90° joint and swivel mount
• audio cable with male 3.5mm stereo to male RCA phono plugs.
Note:
To connect the Bluetooth Audio Receiver to the 560110R MRA 10-Watt Remote Amplifier or
the front panel input on the 560884/2E MRA Matrix Switcher, you will need a male 3.5mm
stereo to male 3.5mm stereo audio cable that is available at electronics stores.
© 2014 Schneider Electric. All Rights Reserved.
3 of 8
560011BT
Professional Bluetooth Audio Receiver Installation Instructions
2.0 Installing the Bluetooth Audio Receiver
Before you install the wireless Bluetooth connection between the Bluetooth Audio Receiver
and your Bluetooth-enabled device, you need to connect the receiver to your home stereo
system and to a source of AC power.
2.1 Hardware Connection
Select a location for the Bluetooth Audio Receiver, where the receiver’s power cable and the
audio cable to the amplifier will not be in the way of normal activity. Usually, you can place
the receiver near the amplifier and use a nearby power outlet. Figure 2 shows the connection
points for the Bluetooth Audio Receiver.
Power adapter USB output
3.5mm to RCA audio lead
Mini-USB to USB lead
Bluetooth Audio Receiver
Figure 2. Hardware connection diagram
To set up the Bluetooth Audio Receiver, refer to Figure 2 and follow these steps:
1. Connect the 3.5mm end of the audio cable (C) to the jack on the front panel of the Bluetooth Audio Receiver (D).
2. Connect the RCA plug ends of the cable to the stereo audio input on your home stereo system.
Note: if you are connecting to a C-Bus Multi-Room Audio Amplifier, 560110R, the audio cable requires a 3.5mm stereo plug at the amplifier end.
3. Connect the antenna to the back panel of the Bluetooth Audio Receiver. Tighten the retaining nut with your fingers. Do not use pliers or other tools, as this could damage the antenna.
4 of 8
© 2014 Schneider Electric. All Rights Reserved.
560011BT
Professional Bluetooth Audio Receiver Installation Instructions
3.0 Connecting the Power Supply
The power supply, outlet adapter and USB power cord are supplied with the
Bluetooth Audio Receiver.
Warning: Avoid Electrical Shock
Use only the power supply provided with the Bluetooth Audio
Receiver. Do not attempt to disassemble or modify the adapter
or the power cable. There are no user serviceable parts inside.
To install the AC outlet adapter in the power supply body, follow the steps shown in Figure 3:
1. Align the outlet adapter. Note the position of the latch and the mating part of the outlet adapter.
2. Press and hold the button on the power supply body.
3. Insert the outlet adapter in the power supply body and then release the button.
4. Make sure that the latch holds the outlet adapter securely in place.
Insert the adapter
2
1
Press and hold
the button
Figure 3. Installing the outlet adapter in the power supply body
Connect the USB cable to the power supply and to the Bluetooth Audio Receiver back panel.
Plug the power supply into a suitable power outlet.
Place the cable so that it will not interfere with normal activities. Whenever power is supplied to
the Bluetooth Audio Receiver, a blue LED will illuminate on the back panel of the receiver.
© 2014 Schneider Electric. All Rights Reserved.
5 of 8
560011BT
Professional Bluetooth Audio Receiver Installation Instructions
4.0 Initial Pairing to a Bluetooth-Enabled Device
The device that is to be paired with the Bluetooth Audio Reciever should be within 20 metres
of the receiver. At greater distances the device might disconnect, requiring reconnection.
When connected, the blue LED on the Bluetooth Audio Receiver will flash slowly, returning to
a constant blue state when a connection is lost.
To connect to an iPad or iPhone, follow these steps:
1. From the iPad or iPhone home page, select ‘Settings’.
2. From the Settings menu, select ‘General’.
3. From the General menu, select ‘Bluetooth.’
4. Turn Bluetooth ‘ON’ and search for devices. Select the ‘Clipsal’ device ID.
5. When connected, adjust the Treble, Bass and Level controls
Clipsal
Step 4
Step 1
From your iPad,
iPhone or iPod
Touch home page
select ‘Settings’.
Step 2
Inside Settings,
select ‘Bluetooth’.
Step 3
Turn Bluetooth
‘ON’ and search for
devices, Select the
‘Clipsal or Customised’
device ID.
Insert pin code
to screen,
default “0000”.
Note: For Bluetooth-enabled devices other than those above, refer to the instructions for your
device. To rename the receiver device IDs for different zones in your home, you will need to
download software from the following location:
www.clipsal.com/cis/technical (then select ‘Downloads’).
Your PC must use Windows XP or Windows 7 and have at least 6.5MB of free disk space.
iPad and iPhone are registered trademarks of Apple Inc. Clipsal by Schneider Electric makes
no claims or warranties regarding the compatibility or performance with any specific type of
Bluetooth-enabled device. Refer to the instructions provided with your mobile device.
6 of 8
© 2014 Schneider Electric. All Rights Reserved.
560011BT
Professional Bluetooth Audio Receiver Installation Instructions
5.0 Disconnecting or Changing the Connected Device
If you want to switch from one Bluetooth-enabled device to another, follow these steps:
1. Access the Bluetooth settings on your portable device and turn the Bluetooth function to ‘OFF’.
2. The Bluetooth Audio Receiver can now be connected to a different device.
3. Follow the steps in section 4.0 for “Initial Pairing to a Bluetooth-enabled Device” to connect to a new device.
6.0 Reconnecting After Moving Out of Range
If you move out of range (a distance of over 20 metres), or if you switch OFF the Bluetooth
function on your Bluetooth-enabled device, the receiver will disconnect.
To reconnect, simply switch the Bluetooth setting ‘ON’ and reselect the device.
Note: The communication range of 20 metres quoted is based on an unobstructed line of
sight test, under optimum conditions. Actual usable range in your home will vary depending on
conditions such as obstructions and electromagnetic interference.
7.0 Troubleshooting
If music is not coming from the stereo speakers, try these solutions:
• Check that the Bluetooth Audio Receiver is powered ON and the blue LED is ON. Ensure that
the power cable (mini-USB plug) is firmly attached to the receiver.
• Make sure that the audio cable is correctly installed and firmly connected to the stereo system and the Bluetooth Audio Receiver.
• Check that the following home stereo system settings are set correctly: Input Selection, Volume Level and Speaker Selection.
• Check that the volume on your Bluetooth-enabled device is set to a suitable level.
• Verify that the blue LED on your Bluetooth Audio Receiver is ON and flashing slowly, indicating that your portable device and the Bluetooth Audio Receiver are paired correctly.
• Ensure that your portable device is within 20 metres of the Bluetooth Audio Receiver and that the antenna is correctly installed on the receiver.
• Ensure that there is a clear line of sight (no solid obstructions) between the portable device and the Bluetooth Audio Receiver.
If the problem remains after trying these solutions, contact your local sales office
for assistance.
© 2014 Schneider Electric. All Rights Reserved.
7 of 8
8.0 Warranty
The Professional Bluetooth Audio Receiver is covered by a two-year warranty against
manufacturing defects.
1. The benefits conferred herein are in addition to, and in no way shall be deemed to
derogate; either expressly or by implication, any or all other rights and remedies in respect
to the Clipsal product, which the consumer has under the Commonwealth Competition and
Consumer Act or any other similar State or Territory Laws.
2. The warrantor is Schneider Electric (Australia) Pty Ltd of 33 - 37 Port Wakefield Road,
Gepps Cross, South Australia 5094. With registered offices in all Australian States.
3. This Clipsal product is guaranteed against faulty workmanship and materials for a period of
two (2) years from the date of purchase.
4. Schneider Electric (Australia) Pty Ltd reserves the right, at its discretion, to either repair
free of parts and labour charges, replace or offer refund in respect to any article found to be
faulty due to materials, parts or workmanship.
5. This warranty is expressly subject to the Clipsal product being installed, wired, tested,
operated and used in accordance with the manufacturer’s instructions.
6. All costs of a claim shall be met by Schneider Electric (Australia) Pty Ltd, however, should
the product that is the subject of the claim be found to be in good working order all such
costs shall be met by the claimant.
7. When making a claim the consumer shall forward the Clipsal product to the nearest office
of Clipsal by Schneider Electric with adequate particulars of the defect within 28 days of the
fault occurring. The product should be returned securely packed, complete with details of
the date and place of purchase, description of load, and circumstances of malfunction.
Schneider Electric (Australia) Pty Ltd
Contact us: clipsal.com/feedback
National Customer Care Enquiries:
Tel 1300 2025 25
Fax 1300 2025 56
F2363/02
Schneider Electric (Australia) Pty Ltd reserves the right to
change specifications, modify designs and discontinue items
without incurring obligation and whilst every effort is made to
ensure that descriptions, specifications and other information
in this catalogue are correct, no warranty is given in respect
thereof and the company shall not be liable for any error therein.
© 2014 Schneider Electric. All Rights Reserved.
Trademarks are owned by Schneider Electric Industries SAS or
its affiliated companies.
SEAU 119470 September 2014