1
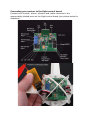
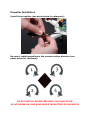
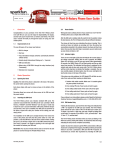
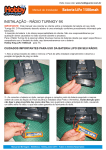
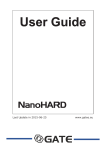
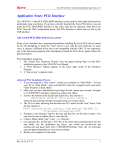
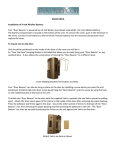
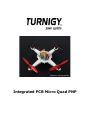
Integrated PCB Micro Quad PNP
WARNING
Read the ENTIRE instruction manual to become familiar with the features of
the product before operating. Failure to operate the product correctly can
result serious injury or damages to personal property. This model is NOT a
toy and It must be operated with caution. Seek assistance from an
experienced modeler if you are not confident with remote control models.
This product must not be operated by children without the supervision of a
responsible adult.
As the user of this product, you are solely responsible for damages to the
product, property or others. This model is controlled by a radio signal
subject to interference from many sources outside your control. This
interference can cause momentary loss of control so it is advisable to always
keep a safe distance in all directions around your model, as this margin will
help avoid collisions or injury.
• Never operate your model with low transmitter batteries.
• Always operate your model in an open area away from cars, traffic or
people.
• Carefully follow the directions and warnings for this and any optional
support equipment (chargers, battery packs, radio equipment etc.)
• Keep all small parts and anything electrical out of the reach of children.
• Moisture causes damage to electronics. Avoid water exposure to all
equipment not specifically designed
Do Not work on your Micro Quad while the battery is
plugged in.
Do Not install the propellers until the final stages are
complete and you are ready for the first flight.
Specification:
Width: 250mm
Height: 85mm
Motor: 4 x Turnigy T1811-2900kv Brushless
ESC: 4 x Turnigy Plush 6A
Props: 4 x 5x3 inch (2CW & 2CCW)
Controller: Hobbyking Multi-Rotor Control Board (X configuration)
Included in box:
1 x Turnigy Integrated PCB Plug and Fly Micro Quad (motors/ESCs/control
board pre-installed)
4 x Propellers (2CW & 2CCW)
4 x Servo extension leads (for connecting receiver to control board)
Required:
500-900mAh 2S 7.4V Lipoly Battery
4 channel transmitter and receiver
Battery Charger
User Guide
Thank you for purchasing the Turnigy Integrated PCB Plug and Fly Micro
Quadcopter! This PNF quad takes all of the guesswork out of choosing your
electronics, arriving with the motors, ESCs and multi-rotor control board
pre-installed. You simply need to add your own 4ch transmitter/receiver
system, 500-900mAh 7.4V lipoly battery, and this quad is ready to fly!
The Turnigy PNF Micro Quadcopter comes pre-setup out of the box, but you
will still need to configure your transmitter and conduct a pre-flight check
before attempting to fly. Please follow the instructions below prior to your
first flight with this model.
Setting up your transmitter:
Create a new model memory (fixed wing mode) and make sure that all
mixes are disabled, all trims are neutral and that all End Point Adjustments
(EPA) and D/R (dual rates) are set to 100%. Then bind your receiver to the
transmitter.
Initial transmitter EPA/servo travel adjust settings:
-pitch (elevator): 50%
-roll (aileron): 50%
-yaw (rudder): 100%
Connecting your receiver to the flight control board:
Connect your throttle, aileron, elevator and rudder channels to the
appropriately labeled ports on the flight control board (see photos below for
reference).
IMPORTANT!!
ESC throttle range calibration:
-Turn yaw pot to zero.
-Turn on transmitter.
-Move throttle stick to full position.
-Turn on flight controller.
-Wait until the ESC's beep twice after the initial beeps. (Plush ESCs)
-Move throttle stick to low position. ESCs beep.
-Turn off flight controller.
-Restore the yaw pot.
Checking transmitter channels:
-Turn on transmitter and flight controller.
-Set throttle to about 1/4. Motors should start.
-Move pitch (elevator) stick forward. Back motors should speed up. If not,
reverse pitch (elevator) channel.
-Move roll (aileron) stick to the left. Right motors should speed up. If not,
reverse roll (aileron) channel.
-Move yaw (rudder) stick to the left. Front and back motors should speed up.
If not, reverse yaw (rudder) channel.
Checking gyro directions:
-Turn on transmitter and flight controller.
-Set throttle to about 1/4. Motors should start.
-Tilt quad forward. Forward motors should speed up. If not, reverse pitch
gyro. (see next section for gyro reversing instructions)
-Tilt quad to the left. Left motors should speed up. If not, reverse roll gyro.
(see next section for gyro reversing instructions)
-Turn quad CW. Front and back motors should speed up. If not, reverse yaw
gyro. (see next section for gyro reversing instructions)
Reversing gyros (if required):
1: Set roll gain pot to zero.
2: Turn on flight controller.
3: LED flashes rapidly 10 times.
4: Move the stick for the gyro you want to reverse.
5: LED will blink continually.
6: Turn off flight controller.
7: If there is more gyros to be reversed, go to step 2, otherwise set roll gain
pot back.
Pre-Flight Check
Transmitter throttle adjusting:
-Turn on transmitter and flight controller.
-If LED does not turn on and stay on, lower your throttle trim.
-If still no go, you may need to reverse the throttle channel.
-On Quad v4.7 firmware or above, you need to arm your board by putting
the left stick down and to the right for the LED to come on. If this does not
happen, adjust your throttle and yaw trim down and to the right on your
transmitter.
Lift off procedure.
Install propellers (See “Propeller Installation”). Place the quad on a flat
surface. Ensure it is safe to fly and arm the board by holding the Yaw
(rudder) stick full right. Slowly increase throttle until your quad lifts off. After
landing be sure to disarm your quad by holding the yaw (rudder) stick full
left.
NOTES:
Propeller Installation
Install the propellers (see photo below for reference):
Be sure to install propellers in the correct rotation direction (see
photo below for reference):
DO NOT INSTALL PROPELLERS UNTIL THE FINAL STAGE
DO NOT WORK ON YOUR QUAD WHILE THE BATTERY IS PLUGGED IN