1
TinySec 0.91: User Manual
Chris Karlof
Naveen Sastry
David Wagner
{ckarlof, nks, daw}@cs.berkeley.edu
February 11, 2003
1
Introduction
We introduce TinySec, a link layer encryption mechanism which is meant to be the first part in a
suite of security solutions for tiny devices. The core of TinySec is an efficient block cipher and keying
mechanism that is tightly coupled with the Berkeley TinyOS radio stack. TinySec currently utilizes a
single, symmetric key that is shared among a collection of sensor network nodes. Before transmitting
a packet, each node first encrypts the data and applies a Message Authentication Code (MAC), a
cryptographically strong unforgeable hash to protect data integrity. The receiver verifies that the
packet was not modified in transit using the MAC and then deciphers the message.
There are four main aims of TinySec:
• Access control. Only authorized nodes should be able to participate in the network. Authorized
nodes are designated as those nodes that possess the shared group key.
• Integrity. A message should only be accepted if it was not altered in transit. This prevents,
for example, man-in-the-middle attacks where an adversary overhears, alters, and re-broadcasts
messages.
• Confidentiality. Unauthorized parties should not be able to infer the content of messages.
• Ease of use. Finally, taking into account the diversity of sensor networks users, TinySec should
not be difficult to use. We hope to provide a communication stack that provides the above three
goals which is no more difficult to use than the traditional, non-security aware communication
stack.
TinySec works both in the TOSSIM simulator as well as on the Mica motes.
1.1
Organization of this Guide
This guide has two sections: the first is aimed at application writers who wish to make use of the
TinySec service. The second part provides more detail for people to understand the code organization
of TinySec. The second part of the manual is an attempt to aid people in extending the TinySec service.
2
2.1
TinySec Usage Guide
Installation
Currently, the TinySec code resides in the CVS repository maintained at Sourceforge. Installing TinySec
requires a working installation of TinyOS. In our example, we will obtain fresh copies of both from the
Sourceforge CVS repository.
1
1. Create a new directory to hold the tree and change directory into it:
mkdir ~/tinyos-ts && cd ~/tinyos-ts
2. Check out copies of TinyOS and TinySec from the repository:
cvs -d :pserver:[email protected]:/cvsroot/tinyos
co broken/experimental/tinysec
cvs -d :pserver:[email protected]:/cvsroot/tinyos co tinyos-1.x
2.2
Testing Your Installation
Since TinySec makes modifications to the Makerules file, it has its own applications subdirectory which
references this set of rules for make. The change to the Makerules file is to accommodate a mechanism
to pass a key from the keyfile to the new radio stack which will use the key for encryption and the MAC
(see Section 2.4 for more details about the keyfile).
There are a few sample applications which use TinySec, located within the broken/experimental/tinysec/apps
directory. The first test, uses only the BlockCipher and not full TinySec communications stack. The
test will validate that your platform specific files have been properly installed and that the search paths
are valid. In addition, it validates the cipher operation against known test values.
To test the application:
1. Build the CipherTest application and install it on a mote:
cd ~/tinyos-ts/broken/experimental/tinysec/apps/CipherTest
make mica install
2. Verify that the CipherTest application produces the proper results. The green LED signifies that
a known data value has been encrypted with the block cipher (using a known key) to obtain a
previously verified correct value. The red and yellow LEDs will appear roughly 10 seconds after
the mote has been turned on. Their illumination signifies that 20,000 cipher operations have been
executed.
If the application fails to build, recheck that TOSDIR is properly set to use the new tree (step 5
of the installation) and that the platform files have properly been copied. If the error message “make:
mote-key: Command not found” appears, then make sure that tinysec/bin is in your execute path (step
3 from the installation).
2.3
Writing Applications
Enabling TinySec for your applications should be a straightforward process.
We’ve created a new components SecureGenericComm, RadioPacketTinySec, and AMStandardTinySec which supports the same interfaces as GenericComm, RadioCRCPacket, and AMStandard.
Applications can use the TinySec versions anywhere where the old versions were used simply by replacing old components with the TinySec versions in the wiring file. Application code does not need to
change1 .
You will also need to modify your application’s Makefile in order to enable the Makefile changes.
this can be accomplished by adding TINYSEC=true to the application’s Makefile or by invoking make:
make mica TINYSEC=true.
1
Except for applications using the group field. See Section 2.5 about deprecation of the group field in the packet header.
2
2.4
Key Management
When using TinySec, you must be aware of keys and the key-file. Each Mica mote can only communicate
with other motes that have been programmed with the same key. The key is currently set in a given
program at build time. Without any extra arguments to the normal build process, the default key-file
and default key will be used. The default key-file is found at ~/tinyos keyfile. It looks like:
# TinySec Keyfile. By default, the first key will be used.
# You can import other keys by appending them to the file.
default 6D524D67F24F178B0A69933FDD6C6F7B
Note that the actual key value will not be the same as listed above. Each line lists a key name and
the key value. When you invoke make mica, the first key in the default key-file will be installed.
This means that by default, if you install a program onto one mote from your laptop, and install a
program onto another mote from your desktop, they will not be able to interoperate. This is because
they will be using different keys. Thus, you’ll need to perform one of the following:
• Use the same key-file on both computers
• Copy the key-file from your laptop to the desktop, renaming the file to “laptop-keyfile”. Then,
when building on the desktop, use the new keyfile whenever you wish to create motes that interoperate with motes programmed from the laptop:
make mica KEYFILE=laptop-keyfile
• Copy the line from the keyfile which reads “default 6D524. . . ” from the laptop to the desktop
keyfile (.keyfile). In addition, rename the key label from “default” to “laptop”. Then, when
building on the desktop, use the new keyfile whenever you wish to create motes that interoperate
with motes programmed from the laptop:
make mica KEYNAME=laptop
2.5
Groups
The concept of “groups” does not exist under TinySec. Groups are a means to provide namespaces for
destination addresses when sending packets. Each mote belongs to one of 255 different groups. The
group byte is transmitted as a part of every packet. A packet is accepted only if the sender and receiver
are in the same group.
This functionality is subsumed by using keys under TinySec. Using TinySec, a message will only be
accepted if the sender and receiver use the same key. This is enforced cryptographically.
3
3.1
Under the Covers
Code Organization
There are two main components to TinySec: the cryptographic primitives and the changes to the radio
stack that make use of the primitives. The cryptographic primitives meant to provide useful abstractions
and allow for further implementations of ciphers, modes and MACs. In addition, it provides a basic set
of implementations that are sufficient to use the interfaces.
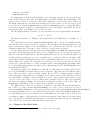
3
Figure 1: Organization of major TinySec modules. Arrows indicate a “uses” relationship. The CBCMAC, CBCModeM, and RC5M files comprise the cryptographic primitives which are used. TinySecM
provides a key and session management service which the new radio stack uses.
We have created a new radio stack which uses two new files: MicaHighSpeedRadioTinySecM.nc and
RadioPacketTinySecM.nc. These files interact with TinySecM which bridges the cryptographic primitives with the changes in the radio stack. TinySecM serves to handle interleaving and key management
(see Figure 1).
3.2
Cryptographic Primitives
There are three cryptographic interfaces: one for a BlockCipher, one for a BlockCipher mode, and one
for the MAC. It is expected that implementations of the latter two will make use of the BlockCipher
interface.
In designing the cryptographic portion of TinySec, we made a decision to forbid the module from
holding any state. The state may include key schedules and intermediate calculations. By eliminating
per module state, the module can be reused without expensive setup operations between uses. Each
user of the primitive must provide a context which allows the cipher, for example to store its state.
The file tinysec/lib/crypto.h defines the contexts. Let’s look at a part of the file:
/* Context for block cipher.
*/
typedef struct CipherContext {
// rc5 needs 104 bytes, so that’s what we’ll use
uint8_t context[104];
} CipherContext;
/**
* Context for the block cipher modes
*/
typedef struct CipherModeContext {
CipherContext cc;
4
uint8_t context[16];
} CipherModeContext;
The CipherContext is used by BlockCiphers to store their state. As such, we size it for the largest
such context, in this case RC5. The other implementation of the BlockCipher, the IdentityCipher, only
requires a 4 byte context, so a 104 byte context will be sufficient for it as well. It is expected that each
BlockCipher will define its own CipherContext struct and perform a cast to provide some typed access
to the data. Note that the CipherModeContext includes a CipherContext as one of its fields. This is
because it the natural construction of a CipherMode is to use a BlockCipher. In addition, the 16 byte
field context will be used within the mode for its own data.
The BlockCipher interface is meant to provide an abstraction for block ciphers functions which are:
{0, 1}n →K {0, 1}n
The function is meant to be difficult to invert without the key K. Furthermore, n is usually one of
{64, 128};
All of the functions except the getPreferredBlockSize() take a context. It is initialized in the
init call where the context can store key expansions. The encrypt() and decrypt() functions each
take a context and two buffers a source and destination. As a convenience to the caller, the source and
destination buffers may be the same to allow for in place encryption and decryption.
We have implemented two different ciphers: the IdentityCipher and RC5M which implements RC5
(32/12/64). The IdentityCipher should only be used for debugging as it does not perform any encryption,
instead it acts as the identity function. The RC5 implementation provides a reasonably fast cipher. On
the Mica platform, it makes use of a series of assembly macro operations to improve performance. The
tinysec/platform/mica/CryptoPrimitives.h file contains Atmel assembly code to provide a 32 bit
left and right rotate operation. It operates in 42 cycles average case, and 60 cycles worst case. Since the
32 bit rotate operation is at the core of RC5, it was important to make this primitive run quickly. There
is a corresponding CryptoPrimitives.h file for the pc platform (used in the TOSSIM simulator), but
it is implemented using C.
We implement cipher block chaining mode (CBC Mode) with cipher text stealing (CTS). A mode
provides confidentiality and ensures that repeated encryptions of the same data yield different ciphertexts. This is necessary to achieve semantic security. We use CTS2 . to eliminate message expansion
when encrypting a buffer which is not a multiple of a block size. Under normal CBC Mode, the input buffer must be a multiple of the BlockCipher’s block size. Thus, if using a cipher which operates
on 8 byte blocks, there will be a 7 byte penalty when encrypting 9 bytes of data. Note that using
the cipher text stealing technique only works when encrypting more than a block of data. Thus, our
implementation still suffers a 7 byte overhead when encrypting a 1 byte buffer.
The MAC interface allows for incremental computation of the MAC. The incremental interface
has 3 calls: 1) a setup call (initIncrementalMAC()), 2) a call to provide data as it is produced
(incrementalMAC()) which may be called repeatedly, and 3) a call to retrieve the final MAC (getIncrementalMAC()).
A given implementation is free to store intermediate state in the context. The CBCMAC implementation that is distributed as a part of TinySec stores data until it has a block size worth of data. It then
xors this new “chunk” of data with the prior result and encrypts the result. Thus, a block cipher call is
made only when there is sufficient data; furthermore, if data is being acquired slowly, the computation
can be spread out over the entire time that data is being acquired.
3.3
2
Changes to the Radio Stack
See Bruce Schneier, Applied Cryptography for more details on cipher text stealing
5