1
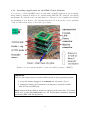
Power-efficient and Reliable MAC for Routing in
Wireless Sensor Networks
MSc DCNDS - Group C - User’s Guide
Ioannis Daskalopoulos
Hamadoun Diall
Kishore Raja
. . .
Supervisors: Stephen Hailes (UCL) and George Roussos (Birkbeck College)
. . .
University College London
Department of Computer Science
MSc Data Communications, Networks and Distributed Systems
. . .
Gower Street, London WC1E 6BT, UK
September 2005
Version: 1.0
1
Contents
1 Introduction
2
2 TinyOS Environment Installation
2.1 Hardware and Software Requirements .
2.1.1 Microsoft Windows 2000 or XP
2.1.2 GNU/Linux Systems . . . . . .
2.2 Directory Layout and Environment . .
2.3 Basic System Verification . . . . . . . .
.
.
.
.
.
.
.
.
.
.
.
.
.
.
.
.
.
.
.
.
.
.
.
.
.
.
.
.
.
.
3
3
4
4
5
6
3 TinyOS Support for the IMEC Platform
3.1 Installation of the Software Release . . . . . . . . . . . . . . . .
3.2 Compiling and Running Applications . . . . . . . . . . . . . . .
3.2.1 Installing Applications on the IMEC Sensor Modules . .
3.2.2 Simulating Applications with TOSSIM and TinyViz . . .
3.2.3 Connecting to the Sensor Network with SerialForwarder
3.3 Demo Applications . . . . . . . . . . . . . . . . . . . . . . . . .
3.3.1 Miscellaneous Functionality Tests . . . . . . . . . . . . .
3.3.2 Oscilloscope Family . . . . . . . . . . . . . . . . . . . . .
3.3.3 Surge - Sensing and Multihop Routing . . . . . . . . . .
.
.
.
.
.
.
.
.
.
.
.
.
.
.
.
.
.
.
.
.
.
.
.
.
.
.
.
.
.
.
.
.
.
.
.
.
.
.
.
.
.
.
.
.
.
6
7
8
9
11
13
15
15
16
18
.
.
.
.
.
.
.
.
.
.
.
.
.
.
.
.
.
.
.
.
.
.
.
.
.
.
.
.
.
.
.
.
.
.
.
.
.
.
.
.
.
.
.
.
.
4 Further Information
1
.
.
.
.
.
.
.
.
.
.
.
.
.
.
.
.
.
.
.
.
20
Introduction
This document1 provides usage and testing guidelines to the TinyOS software developed
for the IMEC sensor module prototypes in the context of the DCNDS Project 2005
Group C at the Computer Science Department of UCL. Note that this document is
more than a mere User’s Guide as it contains a host of relevant technical details as well
as insights into the rationale of specific issues presented.
It is assumed that the reader is fairly experienced dealing with computer hardware
in general, as well as working in a Unix/Linux software environment2 . Some familiarity
with small embedded systems, wireless sensor networks and TinyOS in particular is a
plus but not an absolute requirement -- pointers to further documentation will be given
throughout.
1
2
For convenience, this guide is provided in PDF and HTML formats.
A Linux API emulation layer (Cygwin) is used on top of MS Windows.
2
2
TinyOS Environment Installation
This sections presents summarised installation instructions of the environment necessary
for developing and using TinyOS applications. Please refer to the appropriate documentation for full details as noted in the sections ahead.
Managing a TinyOS installation and all the software dependencies is not for the faint
of heart -- a degree of patience and persistence may be required to make a sense of the
basic concepts and, eventually, master the whole system.
2.1
Hardware and Software Requirements
An IBM/PC compatible computer with one free USB port is required, plus the following
hardware:
• 1 standard USB A/B cable;
• 1 IMEC programming board (w/ USB B-type connector);
• 2 or more IMEC sensor stack modules;
• 2.4V batteries or power supply (w/ appropriate connectors).
Both, GNU/Linux and MS Windows 2000/XP (with Cygwin) are supported. The
software listed below is required to use TinyOS with the IMEC sensor modules:
• FTDI FT232 driver: enables USB-to-serial (RS232) port emulation for communications between the host computer and the sensor modules attached to the USB
port (http://www.ftdichip.com).
• Java Development Kit (only tested with J2SE 1.4.2): used for TinyOS Java
tools to bridge data to and from sensor networks (http://java.sun.com/j2se).
• Java Communications API, a.k.a. JavaComm or javax.comm package: enables
support for RS232 serial ports and IEEE 1284 parallel ports in Java applications
(http://java.sun.com/products/javacomm)3 .
• GNU development tools and mspgcc: standard GNU development environment (make, binutils) and port of the GCC compiler tools for Texas Instruments
MSP430 micro-controller family, including utilities for managing, reading and writing binary code images to/from devices (http://mspgcc.sourceforge.net).
• TinyOS and nesC: distribution of TinyOS software (http://www.tinyos.net) and
its supporting nesC programming language (http://nescc.sourceforge.net).
• GraphViz (optional ): Enables support for dynamic generation of documentation
for nesC code with component wiring diagrams (http://www.graphviz.org).
3
Note
TinyOS was initially developed around the UC Berkeley motes -- the Mica family
with Atmel AVR micro-controllers -- and this heritage shows at the very core of
version 1.x as well as throughout the documentation. This is bound to change in
version TinyOS 2.0, designed from the ground up with portability in mind.
2.1.1
Microsoft Windows 2000 or XP
A user-friendly installer is available for Windows 2000/XP that automatically installs
and configures all the software items listed above, with exception of the FTDI driver to
be installed manually. This installer will set up the Cygwin emulation system, featuring
the a GNU development environment including the MSP430-specific tools, the nesC
compiler and a TinyOS release; optionally the JDK 1.4.2 and JavaComm can also be
installed.
This is the recommended procedure to install TinyOS on Windows for the first time.
To download and install this package look for “Installshield Installation Instructions” at
http://www.tinyos.net/download.html. Instructions for a fully manual installation can
be found on the same page; the information available for the Telos platform from Moteiv
(also based on MSP430) may also be useful:
http://moteiv.com/support/install-windows.html
2.1.2
GNU/Linux Systems
TinyOS is supported on both Linux kernel version 2.4 and 2.6 and RPM packages exist for
Red Hat Linux systems. For most other GNU/Linux distributions some of the software
items will be available on their native packaging systems, namely GNU Make, Java
Development Kit, and GraphViz; the FTDI driver is bundled in the kernel as ftdi_sio
(compilation as module preferred).
Instructions for the resolution of all the software dependencies are beyond the scope
of this guide and appropriate documentation should be consulted. Below are listed
resources for installation and configuration of the software packages specific to using
TinyOS with the IMEC sensor modules. All instructions that are AVR-specific can
be safely ignored (unless support for Mica motes is required) and replaced with the
development tools for MSP430 platforms.
• http://www.tinyos.net/download.html -- Instructions to download and install TinyOS
on RPM-based systems (focussed on AVR platforms).
• http://www.tinyos.net/tinyos-1.x/doc/install-from-src.txt -- Instructions to download and install TinyOS from source code (focussed on AVR platforms).
3
For GNU/Linux the JavaComm package may be tricky as support varies with different vendors. At
the time of this writing, apparently support was recently included by Sun and discontinued by IBM.
4
• http://mspgcc.sourceforge.net/manual/x1608.html -- Official instructions to install the mspgcc tool chain from source code.
• http://www.mikrocontroller.net/en/mspgcc -- Unofficial instructions to install the
mspgcc tool chain from source code.
• http://cents.cs.berkeley.edu/tinywiki/index.php/Tmote Linux install -- Instructions
to download and install the software and tools necessary to develop for Tmote
(a.k.a. Telos) using TinyOS on a GNU/Linux system.
• http://www.owlnet.rice.edu/˜tm/tinyos/telos-linux.pdf -- Another document about
setting up the TinyOS development environment for Telos motes (based on MSP430)
on GNU/Linux.
2.2
Directory Layout and Environment
By default TinyOS is installed into /opt/tinyos-1.x/ but the base directory can be
located anywhere as long as the appropriate environment variables point to the right
place (assuming bash shell):
export TOSROOT=/opt/tinyos-1.x
export TOSDIR=$TOSROOT/tos
export MAKERULES=$TOSROOT/tools/make/Makerules
In order to make use of the Java tools and utilities bundled with TinyOS (in the
net.tinyos package) that allow communication with the sensor network, the following
variables must be set too (more details on these variables will be given in later sections):
export CLASSPATH=$TOSROOT/tools/java:$CLASSPATH
export MOTECOM=sf@localhost:9001
Below is presented an overview of the main items in the TinyOS 1.x directory layout.
Henceforth, all references to sub-directories in the TinyOS tree assume tinyos-1.x/ as
base, unless explicitly noted otherwise or an absolute pathname (with a leading forward
slash “/”) is specified.
tinyos-1.x/
|-- apps/
|-- contrib/
|-- doc/
|-- tools/
|
|-- java
|
|-- make
|
‘-- (...)
‘-- tos/
|-- interfaces
|-- lib
|-- platform
|-- sensorboards
|-- system
‘-- types
A large collection of example applications
Non-core, community contributed software
Documentation, including a tutorial
TinyOS system/environment tools
Java classes for interfacing sensor networks
Make system configuration and extensions
Other tools and scripts
TinyOS library modules and interfaces
Global interface definitions
Component library modules
Platform-specific components
Components for sensorboards
Core system components (some mica-specific)
Core header files and type definitions
5
Note
The directory structure for TinyOS version 2.x will undergo major modifications.
2.3
Basic System Verification
If all went well, execution of the TinyOS system checking utility toscheck should report success -- failure of Mica-specific tools (avr-*, uisp) can be ignored as mentioned
earlier. It is important, though, to verify that the mspgcc C compiler, assembler and all
binary tools (including msp430-bsl, msp430-jtag, msp430-objcopy, msp430-objdump,
etc), as well as some TinyOS utilities (such as motelist, mote-key, etc) are located in
directories in the PATH environment variable and operational, as these are not checked
by the aforementioned utility.
When doing a manual installation of TinyOS the Java tools need to be compiled:
cd $TOSROOT/tools/java; make; make
3
TinyOS Support for the IMEC Platform
As a pre-requisite before delving further into this section the reader is advised to turn to
the online tutorial (also available in the local copy: doc/tutorial/index.html). This
will confer important knowledge on the major concepts about the programming model
of TinyOS/nesC as well as a get familiar with the terminology involved -- components,
interfaces, commands, events, tasks, modules, configurations, wirings, etc.
Tutorial lesson 1 is very important, lessons 2 and 3 are also recommended; others
will be suggested along the way as they become relevant to the topic at hand. A word of
warning again: several instructions or examples throughout the TinyOS documentation
pertain explicitly to the mica platform, and are not always directly interchangeable with
others such as telos or imec.
Tip
If the reader has the “luxury” of having access to motes of the Mica family4 , it
may very well help smoothen the steep TinyOS learning curve. If not, the Telos
platform5 also enjoys extensive support in the TinyOS community and might be a
good alternative to getting used to the system.
That being said, this manual attempts to provide sufficient information and precise
instructions for the discerning reader to understand the key ideas involved, as well as
to be able to successfully test the sample applications with the IMEC sensor modules
and in the built-in simulator. Nonetheless, if any errors happen to occur, some technical
TinyOS/nesC knowledge might be in order to troubleshoot them.
4
5
Available from Crossbow, at http://www.xbow.com.
Available from Moteiv, at http://www.moteiv.com.
6
3.1
Installation of the Software Release
Having successfully configured the standard TinyOS environment, the release of this
project’s code needs to be installed to enable support for the IMEC sensor modules
(imec platform) and sample test applications. The code in this project was produced
against an official snapshot of the TinyOS CVS tree in May 2005, versioned as 1.1.13,
downloaded from http://www.tinyos.net/dist-1.1.0/tinyos.
Note
Although newer TinyOS releases in the 1.x branch might work, for assured results
it is recomended to install version 1.1.13.
The project’s software release is contained in a gzip’d tar archive named ucl-dcndstinyos-imec-1.0.tar.gz. After installing the project’s release files, the README.imec
file (in tinyos-1.x/) should be referred to for details about the additions and modifications in the TinyOS tree. An overview is presented below:
• New sample applications under apps/ (see Demo Applications);
• Extra debugging components (BufferedUart, CircularBuffer) in tos/lib/Util/;
• New TinyOS platform definition and hardware support code for the IMEC sensor
modules (tos/platform/imec/);
• New target in make system for imec platform (tools/make/imec.target);
• Support for IMEC’s nRF2401 radio stack packet format (TOS_Msg) in the TinyOS
Java tools (tools/java/net/tinyos/message/imec/).
It should be noted that there is preliminary support for the IMEC USB stick radio
interface, essentially pin directions in hardware.h and integration with the make system.
This was not completed during the project due to lack of time to tackle the (rather
extensive) changes required in TinyOS’ clock subsystem... Please find more details in
tos/platform/imec_usb/README.
The following procedure is recommended to install the project’s files in the target
system’s TinyOS environment (configured according to the instructions in the previous
section):
1. Change to the TinyOS distribution root directory (tinyos-1.x/):
cd $TOSROOT
2. Extract the project’s code gzip’d tarball (assuming it is located in /tmp):
gunzip -c /tmp/ucl-dcnds-tinyos-imec-1.0.tar.gz | tar xvf 3. Finally, re-compile the Java tools:
cd $TOSROOT/tools/java; make; make
7
3.2
Compiling and Running Applications
As described in the first lesson of the tutorial, TinyOS or “nesC application consists
of one or more components linked together to form an executable”. There is not an
operating system as such, that is all core OS components (the task scheduler, clocks,
timers, I/O peripherals such as sensor ADC and radio stacks, etc) are combined with
the components of the application logic itself and the libraries it uses (routing protocols,
query processors, flash filesystems, etc) into one monolithic program.
Applications bundled in the TinyOS distribution are normally located in the apps/
sub-directory; applications contributed by third-parties live in contrib/*/apps/. All
applications in this project were developed and tested inside the former directory (apps/).
Each application has a Makefile declaring the components it provides or uses (if any),
specify special compiler flags, define conditional behaviours; in the end, it provides a link
(include ../Makerules) to hook up with the global TinyOS make system. To compile,
install and/or run a TinyOS application, one needs to change into its sub-directory and
use the make with appropriate parameters; the general syntax is shown below:
make <platform> [extra options]
This will invoke the correct sequence of commands to compile the application for the
specified <platform>, such as imec for instance. The extra options enable changing or
extending the behaviour of the TinyOS make system to perform different or additional
actions than compiling the application, like generating documentation or installing the
compiled image on a connected sensor module.
Specific platform compilation and installation details are provided in further sections.
A very useful feature to explore and analyse nesC programs is the nesdoc facility (similar
to JavaDoc) that provides the ability to create automated documentation from the components’ source code and specially formatted comments embedded therein. Moreover,
with the GraphViz package installed, component wiring diagrams are generated too.
This functionality is accessible with the following command for the intended platform:
make <platform> docs
8
3.2.1
Installing Applications on the IMEC Sensor Modules
To program (or flash) an IMEC sensor module with a TinyOS application, its executable
image must be written from the host computer using MSP430’s Bootstrap Loader (BSL)
mechanism. For this the sensor module must be connected to the computer through the
programming board. Refer to the diagram presented below shows the correct assembly
of the modular stack layers of the sensor prototypes.
Figure 1: Correct stack assembly of sensor modules (courtesy of IMEC).
Important
There are two ways to power a sensor module placed on the programming board:
1. Leave the battery plugged in and remove the red jumper (J3); or
2. Unplug the battery and connect the red jumper to power the module
with 3V from the USB port.
Never connect both the battery and the red jumper at the same time. For further
details refer to the GETTINGSTARTED.txt file and hardware schematic diagrams
provided by IMEC with the project kit.
9
To enable BSL operation, the patched-on connector must be plugged to the header
(JB) on the IMEC programming board. Using an USB A/B cable6 , the programming
board must be connected to the PC hosting a TinyOS environment and the project’s code
properly installed. If the FTDI drivers properly recognise the hardware, the motelist
utility should display on which virtual serial port the board is connected to. Finally,
plug the IMEC sensor module into the programming board with the battery connector
towards the side of the USB connector.
As introduced in the previous section, TinyOS applications are compiled to an executable image appropriate for the IMEC sensor modules with the make imec command.
To actually install or program the executable code onto a sensor module connected placed
on the programming board, a command with the following syntax should be issued:
make imec install.<#> bsl,<PORT>
Where <#> is the TinyOS node id (TOS_LOCAL_ADDRESS) to be assigned to the
sensor module and <PORT> is the operating system’s identifier for the serial
port where the programming board is connected7 . It should be noted that
this command compiles and installs the application onto the target sensor
module; to simply flash the a compiled application replace install.# with
reinstall.#.
As an example, the commands below will compile an hypothetical application TestApp
for the imec platform, program it onto an IMEC sensor module sitting on a programming board connected to the USB port /dev/ttyUSB2 (on GNU/Linux, on Windows it
would be COM port “3”), and assign it the node id 123:
cd $TOSROOT/apps/TestApp
make imec install.123 bsl,/dev/ttyUSB2
The sequence of events for the above commands can be outlined as follows:
1. Create the build output directory as apps/TestApp/build/imec/.
2. The nesC compiler driver (ncc) is invoked on the application component (toplevel configuration file, e.g. TestApp.nc) to control the whole compilation
process until the production of an executable for the target platform.
3. The ncc driver reads the tos/platform/imec/.platform file to obtain the
actual C compiler for the selected platform (msp430-gcc) and MCU model
(msp430x149); this in turn:
1. Invokes a series of helper tools that process all application’s components, and end up generating a standalone C
source file apps/TestApp/build/imec/app.c8 .
6
It is possible to use USB or RS232, which is selectable through 3-pin jumper J1 (in the middle) of
the programming board: to side of USB connector for USB, to other for legacy RS232.
7
The USB radio interface is programmed with JTAG instead of BSL, so the bsl,PORT option should
be replaced with jtag on the command line. Naturally,
10
2. Then, msp430-gcc is called to compile the standard C
source code into a temporary binary object file (going
through an assembly step).
3. Finally, msp430-ld is invoked to link the object with the
necessary libraries and produce an ELF executable for the
target platform apps/TestApp/build/imec/main.exe.
4. Information from the executable file is extracted with objdump and filtered
through a Perl script to display how much space the program will take in
ROM and RAM.
5. Using msp430-objcopy the ELF executable is converted into IntelHex format
(apps/TestApp/build/imec/main.ihex), necessary for the BSL procedure
(yet another Perl script embeds the IntelHex output into an XML file, designated TOS image).
6. The IntelHex file is copied to apps/TestApp/build/imec/main.ihex-123
and set-mote-id is used to change the TOS_LOCAL_ADDRESS variable to the
appropriate value (123 in this case) in the new image file.
7. This latter image is passed to msp430-bsl9 to actually program and reset
the sensor module; once BSL is finished the temporary image is deleted.
3.2.2
Simulating Applications with TOSSIM and TinyViz
The TinyOS distribution bundles a discrete event simulator framework (TOSSIM), as
well as a GUI to visualise and control simulations (TinyViz9. One of the most remarkable
features of this framework is the possibility to compile unmodified code written for
the simulator on real wireless sensor hardware and vice-versa -- there are exceptional
situations to the above (more on this below), but nonetheless it is a feat. Other notable
aspects include a very fine-grained simulation, a probabilistic radio bit error model and
the possibility to analyse energy consumption.
This allows users to test, troubleshoot and evaluate algorithms in a controlled, repeatable and reasonably accurate environment; furthermore, in many cases, reuse the
code for the actual wireless sensors. Tutorial lesson 5 provides a good introduction to
the usage of both TOSSIM and TinyViz. Further technical details about the simulation engine and usage instructions can be found in the document entitled “TOSSIM - A
Simulator for TinyOS Networks”, which discloses some of the simulator’s imperfections:
8
These helpers are basically nesC’s Perl scripts: nescc starts up by calling msp430-gcc itself overriding the built-in specs to recognize .nc files and parse them with nesc-compile and in conjunction
with nesc1 transform all nesC code into a single, standard C source file.
9
Due to a peculiarity in the design of IMEC’s programming board, it is necessary to invert the
polarity of the RTS and DTR control lines to program over USB without any extra hardware. Hence
--invert-reset --invert-test command line switches (defined in tools/make/imec.target) are
necessary for msp430-bsl to work. Please note that this might not be so with other programming kits.
11
Although TOSSIM captures TinyOS behavior at a very low level, it makes
several simplifying assumptions. This means that it is very possible that
code which runs in a simulation might not run on a real mote. For example,
in TOSSIM interrupts are non-preemptive (a result of being a discrete event
simulator). On a real mote, an interrupt can fire while other code is running.
If pre-emption can put a mote in an unrecoverable state, then simulated
motes will run without mishap while real-world motes may fail. Also, if
interrupt handlers run too long, a real-world mote may crash; as code in
TOSSIM runs instantaneously, no problems will appear in simulation.
The TOSSIM simulation framework uses the same make system, supports most of
the standard TinyOS interfaces and core components, and its specific modules reside in
tos/platform/pc. So, compiling a TinyOS application, say TestApp, as a simulation
program is as simple this:
cd $TOSROOT/apps/TestApp
make pc
If all goes well, a TOSSIM simulation of the application will be ready to run through
the executable file apps/TestApp/build/pc/main.exe. The output of the simulation
can be controlled through the DBG environment variable (see documentation for details).
The simulation program receives a single mandatory argument -- the number of sensor
nodes to simulate -- run it with the -h command line switch to see other options and DBG
modes. For example, to run the simulation compiled above with 20 nodes and display
sensing and routing protocol activity, the following sequence of commands can be issued
(while in the application’s directory):
export DBG=sensor,route
build/pc/main.exe 20
To visualize the simulation in TinyViz it is recommended that the tinyviz script (in
tools/java/net/tinyos/sim/) be installed in a directory in the system’s search path.
TinyViz is a Java application (net.tinyos.sim.SimDriver) so it is very important that
the CLASSPATH variable be correctly set in the environment, as shown earlier in Directory
Layout and Environment. Then, TinyViz can be invoked to run the example simulation
above as follows:
export DBG=sensor,route
tinyviz -run build/pc/main.exe 20
TinyViz accepts a host of other command line options to control its operation (see
tinyviz -help). For instance, there is support for executing simple scripts (command
batch files) with the -autorun switch, which is very useful to automate simulation runs;
moreover, TinyViz boasts a fully-featured Python scripting capability to interact with
the simulation -- dubbed as Tython. Finally, TinyViz supports a plug-in API to present
simulation data in an application-specific way or interact with the running simulation
(several bundled plug-ins are available -- see documentation for more details).
12
Figure 2: TinyViz, displaying a simulated sensor field on the left hand side and the
tabbed plug-in control panels on the right.
3.2.3
Connecting to the Sensor Network with SerialForwarder
A network of wireless sensors in itself is rather useless if the intended users cannot
interact with it in some way... It is therefore imperative to connect the sensor network
to external applications running on more resourceful systems.
A common approach is to have a mote play the role of base station (or sink), by
connecting it to a serial port on the host computer, either directly or through a programming board10 . This mote also needs to be programmed to bridge data across the
two sides -- the sensor network and the serial link to the computer. Thus applications
on the host computer have an interface to the sensor network and, furthermore, this
interface can be exposed to other networked systems.
Tutorial lessons 6 and 7 provide the information necessary to grasp how the integration of the sensor network with external systems is achieved in TinyOS. These show how
to receive data (e.g. sensor readings) from the motes as well as to communicate back
(e.g. send commands) to the sensor network.
Basically, the standard TinyOS communication subsystem (GenericComm) implements a special behaviour that forwards all packets addressed to node id 0x7E (defined
as TOS_UART_ADDR) to the mote’s UART serial port, as opposed to the radio stack.
10
The MCU of wireless sensor modules usually features an Universal Asynchronous Receive/Transmit
(UART) serial device, which is linked to its external physical connectors.
13
The base station mote is commonly programmed with the TOSBase application, which
bridges packets to and from the wireless sensor network.
The distribution also includes Java classes that implement this serial protocol and
can be used by other Java applications on the host computer to interact with the sensor
network. As pointed out in Directory Layout and Environment, the CLASSPATH and
MOTECOM environment variables must be correctly set. The latter controls the method
used by these Java classes (and hence applications) to connect to the base station11 .
For instance to print the contents of all packets received from an IMEC sensor module’s
UART connected on serial port COM3 (JavaComm uses DOS semantics) the Listen tool
can used in this way:
export MOTECOM=serial@COM3:imec
java net.tinyos.tools.Listen
Where the imec part selects both, the communication baud rate (57600 bps
in this case) and the TinyOS packet format (TOS_Msg structure)12 .
Note
To enable serial communication with the sensor module’s UART, BSL must be
disabled on the IMEC programming board by unplugging the patched-on connector
from the header (JB). The orange LED on the board flashes when data is sent or
received over the USB link.
To enable multiple applications, on the same host or even across a TCP/IP network,
to share access to the sensor network bridge (i.e. base station mote), the SerialForwader
program must be started (assuming the same parameters from the previous example):
java net.tinyos.sf.SerialForwarder -comm serial@COM3:imec
Once SerialForwarder is listening to the specified serial port, applications can connect to its TCP socket for bi-directional communication with the base station mote.
MOTECOM needs to be updated to sf@<IP_ADDRESS>:<TCP_PORT> according to the SerialForwarder ’s IP address and TCP port. The example below assumes the localhost and
the default port (9001):
export MOTECOM=sf@localhost:9001
Finally, it should be noted that TinyViz includes an embedded SerialForwarder,
which is active by default (disabled with -nosf command line switch). This enables
packet-level interation with a running simulation (MOTECOM must be set to tossimserial or tossim-radio).
11
Further technical details about the serial protocol and values for the MOTECOM variable at
http://www.tinyos.net/tinyos-1.x/doc/serialcomm.
12
Java support for the frame format developed for IMEC’s nRF2401 radio stack is included in
tools/java/net/tinyos/message/imec/ (initially generated with MIG and then customised).
14
3.3
Demo Applications
Building upon the general instructions provided above, the following sub-sections describe the sample applications used to test TinyOS on the IMEC sensor modules. These
applications are installed in individual sub-directories under apps/ (e.g. apps/TestApp/),
which also contain README files that the reader is advised to refer to as well.
Unless explicitly noted otherwise, all procedures that involve compilation assume the
current directory being the one of the application being described. Also, unless stated
otherwise the node id assigned to the motes when programming are irrelevant.
3.3.1
Miscellaneous Functionality Tests
These are very simple applications that can be used to test different hardware subsystems
of the IMEC sensor module under TinyOS.
The LED: The Blink application, covered in tutorial lesson 1, is the TinyOS incarnation of the classical “Hello World!” example -- as motes do not feature a screen, it
does nothing but toggle an LED on/off every second. To try it, simply program
one IMEC mote and watch the LED blinking.
The radio stack: A pair of applications, covered in tutorial lesson 4, are used to work
out the radio subsystem. CntToLedsAndRfm updates a counter every 1/4 second
whose value is “displayed” on the mote’s LEDs in binary form (as the IMEC prototype has only one LED, it lights for every odd counter value) and broadcasted
over the radio. RfmToLeds, on the other hand, just waits to receive packets with
the counter’s value and also “display” it on its LEDs.
Program one mote with CntToLedsAndRfm, and one (or more) mote(s) with RfmToLeds. The transmitting mote will constantly blink its LED, while the receiver(s)
should react accordingly to every packet received.
The UART: HelloWorldUart was crafted to test raw serial communication, from a
mote to a computer -- it sends the ASCII string “Hello World!” over the UART13 .
This string can be displayed on the computer using serial terminal emulation software (such as HyperTerm or minicom). Communication parameters for the serial
port should be set to 57600 bps, 1 start bit, 8 data bits, 1 stop bit, no parity and
either hardware RTS/CTS or no flow control. Reset the mote to re-execute the
program.
Another demo application that exercises the UART is CntToUart, which keeps a
counter and outputs its value in ASCII for display on a serial terminal.
These applications rely on the BufferedUartC component which uses CircularBuffer to store and dispatch data to the UART port. This components have been
created in the context of this project (under tos/interfaces/ and tos/lib/Util/)
and can be wired to from other applications/components to provide a convenient
means of debugging using the standard printf() function defined in stdio.h.
15
The sensors: Three test applications were written to sample the various sensor devices
present on the IMEC prototypes and output the readings over the UART port to
be printed on-screen by a terminal emulator (as described above):
• SenseToUart: periodically samples MSP430’s internal temperature sensor
(mapped in platform/msp430/DemoSensorC.nc) and sends the raw ADC
reading converted to ASCII over the UART.
• TestLightSensor : periodically samples the light sensor (the light-dependant
resistor on the IMEC platform) and sends the raw ADC reading converted to
ASCII over the UART.
• TestHumTempSensor : periodically samples temperature and humidity from
the Sensirion SHT15 sensor, converts the digital reading to appropriate physical units (degrees celsius and RH %) and sends the results in ASCII over the
UART.
3.3.2
Oscilloscope Family
This family of applications are introduced in tutorial lesson 6. There are basically two
main pieces of software involved:
1. An application running on the mote(s), apps/Oscilloscope*/, reads data
from the sensors, after a certain number of readings have been collected, they
are grouped into a packet that is sent either on the serial port or the radio.
2. A Java application running on the PC, tools/java/net/tinyos/oscope/,
receives the packets containing the sensor readings and plots the raw data
(i.e. not converted to actual physical units) on a graphical chart.
For best results, each variation of the application described below requires:
• An active SerialForwarder connected to a mote sitting on the programming board
(as explained earlier).
• A running Oscilloscope Java GUI with the MOTECOM variable pointing to the correct
SerialForwarder. The example below assumes that the GUI is started on the
same system, but it can be just as easily done over the network by replacing the
localhost:9001 with appropriate parameters:
export MOTECOM=sf@localhost:9001
java net.tinyos.oscope.oscilloscope
13
As noted in earlier sections, for proper serial communication through the mote’s UART, it is necessary to disable BSL operation on the programming board by unplugging the patched-on connector
from the header (JB).
16
Figure 3: Oscilloscope application, displaying readings from 3 sensor modules. (If no
data points appear in the plot window, the X and Y axis may need to be zooomed out.)
Oscilloscope: Collects readings from the light sensor (on the IMEC platform) and
forwards the data in a packet directly to the serial port (i.e. destination address
TOS_UART_ADDR). Program a single mote with this application and set up the PCside as described above.
OscilloscopeRF : Performs exactly as the previous one, but broadcasts the packets
over the radio (i.e. destination address TOS_BCAST_ADDR), instead of the UART.
Program one or more motes with OscilloscopeRF, and another one with TOSBase
that must be connected to the PC serving as base station. The Java GUI will plot
data points in different colours for every mote from which it receives readings.
OscilloscopeImec: Operates similarly to OscilloscopeRF, but each IMEC mote sends
readings from multiple sensors: Sensirion SHT15 relative humidity and temperature sensor, light-dependent resistor, and MSP430 internal temperature sensor.
17
3.3.3
Surge - Sensing and Multihop Routing
Surge is an application that demonstrates ad hoc multi-hop routing of sensor readings
(the light sensor to be precise). It is designed to be used in conjunction with a Java
GUI that displays the network topology based on the packets received from the sensor
network. Each Surge node takes sensor readings and forwards them, hop by hop, to
the base station, which is always the mote with node id 0 (zero). The motes can also
respond to broadcast commands (change sampling rate, sleep, wakeup...) sent from the
Java control panel through the base station.
The original TinyOS application (apps/Surge) could not be compiled to an MSP430
platform due to the lack of qsort() in mspgcc’s standard C library (libc.a) used by
the MultiHopRouter component (tos/lib/Route). This issue was overcome by creating another version of this application (apps/SurgeImec) and providing a quick sort
implementation locally.
Moreover, all message headers (structs SurgeMsg, SurgeCmdMsg and MultihopMsg)
were adjusted to be even-sized, in order to ensure proper word-alignment of their payloads. Under certain circumstances (e.g. the first field of the payload is a 16-bit word),
this can be a major issue on MSP430 platforms14 . This requires that the Surge Java
GUI be re-compiled to properly recognise the updated message structure formats:
cd $TOSROOT/tools/java/net/tinyos/surge
make clean
SURGE_PLATFORM=imec make
The procedure to run Surge with a network of IMEC motes is described below:
1. Program all motes with Surge from directory apps/SurgeImec, assigning
arbitrary addresses to all nodes except for one -- the base station, which will
have node id 0;
2. The base station mote must be connected to the host computer and the
SerialForwarder started;
3. Launch the Surge Java GUI (recompiled with the updated message format -see above) specifying the appropriate TinyOS group id (0x7D by default)15
on the command line and having the MOTECOM variable point to the correct
SerialForwarder (again, this may be a remote computer):
export MOTECOM=sf@localhost:9001
java net.tinyos.surge.MainClass 0x7d
4. The base station should appear in the Surge control panel... At this point,
all the other motes may be scattered around the target area (e.g. office :-)
and powered up. After a while (several seconds with the default settings) a
multi-hop network topology should start forming and, if there are motes in
range of the base station, this should be reflected in the GUI.
14
See “MSP430x1xx Family User’s Guide” (slau049e.pdf), section 1.4.5 “Memory Organization”.
18
Figure 4: Surge control panel, displaying the topology of the sensor network. (Nodes
can be repositioned on the screen by dragging them with the mouse.)
As with the original Surge application, this version can be simulated with TOSSIM.
Following the instructions provided in earlier sections, the procedure below should
achieve this:
1. Compile the Surge application for the pc platform.
2. Set up a simulation with the intended number of nodes and, preferably, with
a lossy radio model (otherwise all nodes will connect directly to the base
station -- node 0).
3. Launch TinyViz to spawn a SerialForwarder and connect to the simulation.
15
See tutorial lesson 4 for information about the purpose of group id in TinyOS messages. Unless
DEFAULT_LOCAL_GROUP is explicitly set (usually from within Makelocal), all motes are programmed
with 0x7D by default.
19
4. Set MOTECOM to tossim-serial and run the Surge Java GUI.
5. Start the simulation; wait (roughly 80 seconds of simulation time) for the
multi-hop topology to form and be reflected in the Surge control panel.
4
Further Information
Please find additional information about the technical aspects of this project in the main
group report. Other resource and links of interest are listed below:
• GETTINGSTARTED.txt file provided by IMEC with the project kit.
• IMEC’s hardware schematic diagrams provided (confidential).
• TinyOS Documentation: http://www.tinyos.net/tinyos-1.x/doc/index.html
• TinyOS Tutorials: http://www.tinyos.net/tinyos-1.x/doc/tutorial/index.html
20