1
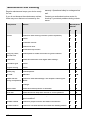
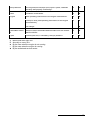
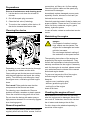
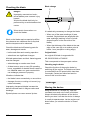
Operating Instructions
Mulching Mower
AS 420 4T, AS 420 4T A,
AS 470 4T, AS 470 4T A, AS 470 Universal 4T
From serial number:
420 4T: 025613030001, 420 4T A: 025713030001,
470 4T: 025413030001, 470 4T A: 025513030001,
470 Universal 4T: 026513090001
Issued:
10 February 2015, V5.0
EN-Translation of the Original Operating Instructions
dummy
Preface
Intended use
Please fill in all data referring to your device.
When ordering spare parts, provide your dealer with the device and engine number.
The device is exclusively intended for mowing
well maintained grassed lawn areas.
Serial number:
Any use exceeding this purpose is inadmissible. The manufacturer is not responsible for
any damage resulting from this. Observe the
required maintenance and repair measures.
Pleases adhere the sticker from the warranty
card here.
Only use attachments and cutting tools authorised by “AS-Motor Germany”.
The user of the device is responsible for accidents or damage to other persons or their
property!
The device must not be used:
– To cut hard objects, rocks, rubble, or pieces
of wood.
Engine number:
– To trim bushes, hedges, and shrubbery.
Date of purchase:
– To cut plants in flower pots or planters or on
rooftops.
Address of dealer:
– To clean (vacuum) footpaths.
– As shredder for shredding tree and hedge
cuttings.
Dear customer:
Congratulations on your purchase. You have
acquired a reliable quality product by “ASMotor Germany”.
This product has been manufactured according
to modern manufacturing methods and comprehensive quality assurance measures. Only
when you are satisfied with your device, we
have attained our goal.
Read these operating instructions carefully and
attentively so that your device operates
smoothly and you and others are safe from any
hazards. If you have questions concerning
your device, please contact your dealer or call
our customer service (telephone +49/(0)7973/9123-0). For international
AS partners, please see:
www.as-motor.de/worldwide.
“AS-Motor Germany” wishes you much joy with
your new device.
2
– As drive unit for work tools and any type of
tool sets that are not authorised by “ASMotor Germany”.
Contents
dummy
Preface .....................................................
2
Switching off and parking ....................... 15
Intended use ............................................
2
Maintenance and cleaning ...................... 16
Explanation of the symbols ....................
4
Symbols in the instructions ....................
Symbols on the device ...........................
4
4
Type overview ..........................................
5
Safety instructions ..................................
6
Get informed! .........................................
User restrictions and hours of operation .
Safe handling of fuel ..............................
Check the device prior to use .................
Use caution during operation .................
Prior to mowing ......................................
Use caution when mowing .....................
When work is completed ........................
Use caution during maintenance and
repair .....................................................
6
6
6
7
7
7
7
8
9
dummy Inhalts verz eichnis
2
Preparations ..........................................
Cleaning the device ...............................
General inspection .................................
Maintaining the engine ...........................
Checking the engine oil level ..................
Checking the spark plugs .......................
Maintaining the air filter ..........................
Checking the drive (devices with drive) ..
Checking the blade ................................
4
Device description ................................... 10
Control elements ..................................... 11
Assembly ................................................. 12
18
18
18
18
18
19
19
19
20
Storage ..................................................... 20
Storing the device .................................. 20
Longer storage ....................................... 21
Restarting .............................................. 21
Spare parts ............................................... 21
Wear parts ................................................ 21
Disposal ................................................... 21
Warranty ................................................... 21
Troubleshooting ...................................... 22
12
12
12
12
Accessories ............................................. 24
Transport ................................................. 12
Declaration of conformity AS 420,
29
AS 420 A ...................................................
Scope of delivery ...................................
Unpacking..............................................
Mounting guide bar and handlebar .........
Mounting impact protection AS 470 Universal 4T ................................................
Technical data AS 420 ............................. 25
Technical data AS 470 ............................. 27
Information on mowing ........................... 13
Prior to starting........................................ 13
Fuel .......................................................
Tanking up .............................................
Checking the engine oil level .................
Adjusting cutting height ..........................
13
14
14
14
Declaration of conformity AS 470,
30
AS 470 A, AS 470 AS ...............................
Mar keti ng
31
Starting..................................................... 14
Starting the device ................................. 15
Driving (devices with drive) .................... 15
Driving ................................................... 15
Turning .................................................. 15
Driving (devices without drive) ............... 15
Turning .................................................. 15
3
dummy Inhalts verz eichnis
Explanation of the symbols
Symbols in the instructions
Prior to any repair and maintenance work, pull off the spark
plug connector.
In these operating instructions, the following
symbols are used to denote special dangers.
Warning.
These symbols denote special
dangers.
Prohibition sign.
These symbols denote inadmissible procedures.
Directive sign.
These symbols denote required
protective measures.
Clean the ventilation grid!
The cooling air of the
motor is sucked in through
the ventilation grid of the
engine cover. Always keep
the entire surface open
and free!
Noise is causing health problems. Use personal ear protection to avoid hearing damage.
Symbols on the device
The following symbols are placed on the device to inform you must be careful and attentive when using the device:
Working with the device requires
extreme cautiousness.
Read the operating instructions
before you use the device.
Risk of injury!
Make sure that no one is within
the danger zone of the device.
Objects may be ejected.
The quickly rotating blade can
cause life threatening injuries or
immense property damage! Be
especially careful to keep your
hands and feet away from the
blade when the device is put into
operation.
4
Only for AS 470 Universal 4T
Operate the device only
when impact protection or
mulching accessory is
fitted.
Type plate
The type plate on the device provides you
with information on the device type and
the technical data.
1
Name and address of the manufacturer
2
Device designation
3
4
5
Type designation
Rated power output in kW / engine
speed
Weight
6
Year of manufacture
7
Serial number
8
CE marking
9
Sound level LWA
leer er Abs atz
Type overview
In this operating manual, the following device
types are described.
Depending on their equipment, the corresponding descriptions of this operating manual
apply.
Drive
Impact protection
AS 420 4T
-
-
AS 420 4T A
X
-
AS 470 4T
-
-
AS 470 4T A
X
-
AS 470
Universal 4T
X
X
5
Safety instructions
Safe handling of fuel
Get informed!
Danger!
Fuel is toxic and highly inflammable.
For your safety, read these operating instructions with care. Familiarize yourself with the
control elements and the proper use of the
device. Share these operating instructions with
other users of the device.
Danger of fire and explosion!
Keep the fuel away from ignition
sources and do not smoke while
handling the device.
Do not inhale fuel vapours; they are
dangerous to your health.
Before you use the device for the first time, let
the dealer instruct you regarding safe use.
Get familiar with the device in a wide, open
and flat terrain first.
Use gloves and avoid skin
contact with the fuel.
User restrictions and hours of
operation
Never allow children or persons who are not
familiar with the operating instructions to use
the device. Persons under 18 years of age
may operate the device only under proper
supervision. Local regulations determine the
minimum age of the operator und the operating
times.
Unsuitable for operation of the device are
persons who
– are under the influence of alcohol, drugs or
reaction retarding medicines.
– have physical and mental/emotional impairments.
– are tired or sick.
People fitted with pace makers
are not allowed to touch any
current carrying parts of the
ignition system.
Fuel up outdoors only when the engine is cool
and not running. Use a filler or funnel.
Do not spill any fuel and do not let the fuel get
into the canalisation or ground water.
If you spilled fuel, do not start the device until
the fuel vapours have evaporated (wipe dry).
Move the device away from the area where the
fuel was spilled.
Always close the tank cap securely and do not
open it while the engine is running or the device is still hot.
Drain the fuel tank only when outdoors. Use a
suitable container or run the tank empty.
Keep the fuel away from children and store it in
a suitable container in a dark, cool, and dry
location.
Never park the device with fuel in the tank
inside a building where fuel vapours could
come in contact with open fire or sparks.
Immediately replace a damaged fuel tank or
tank cap (authorised dealership).
First aid
When swallowing fuel or inhaling fuel vapours,
do not force vomiting and immediately consult
a doctor.
6
In case of skin contact, immediately wash with
water and soap. Change your soiled clothing
as soon as you can.
Measures in case of a fire
In case of a fire, use foam, dry powder extinguisher, or carbon dioxide (CO2). Never douse
with water!
– before you adjust the cutting height.
– before you refuel.
Switch off the engine and wait until the blade
comes to a standstill, and pull off the spark
plug connector
– before you clean or check the device or
before you carry out work on the device.
Check the device prior to use
– before you unblock or unclog the discharge
area.
Prior to use, check the knife, drive and fastening parts for proper working condition and
firm seating by visual inspection.
Prior to mowing
Never use the device with defective or missing
covers.
Do not remove, change or override any safety
devices or control elements.
Observe the maintenance instructions and
replace damaged or worn parts immediately.
Have an authorised service centre check your
device if the blade does not stop within
3 seconds.
Use caution during operation
Personal protective measures
While mowing, always wear
sturdy footwear with good grip,
long trousers, and gloves. Do
not mow in open sandals or
bare feet.
Noise is causing health problems. Use personal ear protection to avoid hearing damage.
Wear safety glasses and headgear.
Do not start the engine
Ask your specialised dealer about suitable
protective equipment.
– if fuel was spilled.
Preparing the mowing area
– in closed or poorly ventilated rooms (danger
of poisoning!).
– if there are other persons nearby.
Prior to mowing, carefully check the perimeter
of the lawn. Remove rocks, pieces of wood,
bones, wires, and other objects that could be
picked up and thrown out by the device.
Only start the device when your feet are at a
safe distance to the blade.
Use caution when mowing
During startup of the engine, do not tilt the
device.
Do not touch the engine or the silencer. They
become very hot during operation and you can
get burned. Resulting unintentional movements
constitute an additional injury hazard.
Switch off the engine and wait until the blade
comes to a standstill
Risk of injury
Stay within shouting distance to other people
who can help you in case of an emergency.
Danger!
Risk of injury caused by thrown out
objects.
Never mow while persons, children,
pets, or property are in the vicinity.
– before you tilt or transport the device.
– if you step away from the device, even for
just a short time.
– when you drive on surfaces other than
grass.
7
The area in front of and to the right of the
device is especially dangerous.
Keep your hands and feet away from the
rotating parts.
Only mow during daylight or with adequate
artificial lighting. Never mow in the event of
uncertain weather conditions and risk of lightning.
Be especially carefully when mowing on soft
ground, nearby landfills, ditches and dikes.
Avoid mowing wet grass slipping hazard!
– When mowing steep slopes, meet the appropriate safety measures, e.g. use step
irons.
– Always mow in horizontal directions, never
up- or downwards.
– Sure footing is essential for your safety,
always wear skid proof safety shoes.
– Be extremely careful when changing the
direction.
– Only mow when the surface is dry and nonslip.
The device can roll away when you mow
downhill. Put the device down on even surfaces only and prevent inadvertent rolling.
Be extremely cautious when turning the device
round or pulling it toward you and when moving in reverse.
Mowing surfaces with fire hazard
Always walk slowly!
– If side inclination is too great, fuel may leak
from the carburetor or the tank. This poses a
fire hazard!
Never lift or carry the device when the engine
is running.
When using the device over a longer period of
time, vibrations can cause disturbances in the
blood supply of the hands. A generally accepted usage time cannot be determined. Use
gloves.
Take breaks on time.
– Carry a sufficient amount of suitable extinguishing agent.
– Observe the mowed surface also after moving is completed to ensure that no fire will
start.
To avoid risk of fire, keep the following components free of dirt, grass, hay, leaking oil,
grease, etc.:
– Engine
Have an authorised service centre check the
device immediately
– Silencer (manifold, guard, clearances)
– if the blade hit an object.
– Area around the fuel tank
– if the device starts to vibrate unusually
severely.
When work is completed
Caution when mowing slopes
After mowing, always close the fuel valve (if
existing).
Devices fitted with a four stroke engines may
only be operated on less than 20° slopes.
Otherwise, the four stroke engine can by damaged due to insufficient oil lubrication.
Prior to leaving the device, wait until the blade
comes to a standstill and pull off the spark plug
connector.
When mowing slopes,
there is a risk of slipping
and tilting!
– Only mow steep slopes when safe operation
assured.
– Do not mow excessively steep slopes.
8
After switching it off, let the device cool down
for at least 20 minutes before you store it in a
dry, closed, sufficiently ventilated room.
Never store the device when there is fuel in the
tank inside a building where fuel vapours might
come into contact with open fire or sparks.
Use caution during maintenance
and repair
Only carry out maintenance work as described
in these operating instructions. Have an authorised service centre carry out all other work.
Only use the knives and spare parts authorized
by “AS-Motor Germany”. Unauthorized knives
and spare parts can cause severe injuries.
leer er Abs atz 11 Z eilen
Prior to all maintenance work, wait until the
engine comes to a standstill and pull off the
spark plug connector.
We explicitly point out that, in accordance with
the Product Liability Act, we are not liable for
damages that were caused by our devices if
– worn or damaged parts were not repaired or
replaced on time.
– these damages were caused by improper
repair.
– when changing a part, our original parts or
parts authorised by use were not used.
– the repair work was not carried out by an
authorised service station.
The same applies for spare parts and accessories.
9
Device description
6
7
8
9
5
10
4
11
3
12
2
14
1
13
1
Fuel valve (if existing)
2
Cutting height adjustment
(40 mm, 50 mm, 60 mm, 70 mm,
80 mm)
3
Air filter
4
Spark plug connector
5
Type plate
6
Guide bar with control elements
7
Bar release
8
Starter grip
9
Silencer
10
Ventilation grid
11
Tank filler spout
12
Oil filler opening
13
Impact protection (only for
AS 470 Universal 4T)
14
Cover
10
2. Swivel the handlebar to the desired position and tighten both knobs again.
Control elements
1
Mounting handlebar one position lower
1
3
A
2
2
B
Engine brake lever (1)
The engine brake lever is a guard device.
When you release the lever, the engine is
shut off immediately, the knife comes to a
standstill within3 seconds.
1. Unscrew the knob (2) from the left and right
guide bar.
Operating position:
Press the engine brake bar towards the
handlebar.
3. Screw the screws (1) back down on position lower (A).
Switching off the engine:
Release the engine brake lever.
0
M
I
I
Top:
Engine brake bar
Bottom:
Drive bar
2. Unscrew the screw (1) from the left and
right guide bar.
4. Screw the knobs (2) back in (do not tighten) one position lower (B).
5. Swivel the handlebar to the desired position and screw the knobs back down.
Fuel valve
1: Closed
2: Open
0
2
Drive bar (2 – only for devices with drive)
1
With the drive bar, you switch the drive on
and off.
Drive on:
Pull the bar toward the handlebar
Drive off:
Release the bar
Height adjustment of handlebar
1. Release both knobs (3) at the handlebar.
11
5. Tighten the two cable ties (4) at the bar.
Assembly
Folding the guide bar
1. Pull the bar release device (5) upwards.
Scope of delivery
2. Fold the guide bar forward.
The device is delivered in a carton.
Mounting impact protection
AS 470 Universal 4T
The scope of delivery includes:
– The device.
– These operating instructions.
– Tool bag with small items.
– Warranty card.
– Operating instructions of the engine manufacturer.
Unpacking
2
1. Remove the loose parts from the box.
1
2
2
2
2. Cut open the front side of the box.
3. Push the device out of the box
Mounting guide bar and handlebar
1. Insert the attached 4 screws with square
neck from the inside of the device housing
into the holes (2).
2. Thread the impact protection (1) through
and screw it down with 4 nuts.
2
leer er Abs atz
Transport
3
4
1
Switch off the engine and wait until the blade
stands still before you lift the device. Two
people shall lift the device.
Prior to transport, let the device cool down for
at least 20 minutes. Close the fuel valve (if
existing).
For transport, you can fold up the guide bar.
When transporting by vehicle, secure the
device against rolling, sliding, tilting, and fuel
and oil leakage.
5
1. Fold the guide bar (1) until it engages.
2. Unscrew both knobs (2) all the way.
3. Swivel the handlebar (3) into the desired
position.
4. Screw both knobs back in and tighten
them.
12
Only mow with a sharp and undamaged blade
so that the blades of grass do not fray. Have
the blade sharpened and balanced regularly
(authorised service centre).
Do not mow when the grass is wet or when it is
raining. The turf may be damaged and there is
a danger of slipping!
Turn the device around only in already mown
sections. Do not leave the device unattended
while the engine is running.
To evenly distribute grass remains and to
achieve an even cutting height, we recommend, for flat terrain, to proceed according to
the illustrated mowing pattern.
The mulch layer that results form mowing
should not be thicker than 1-2 cm. Otherwise,
during the decomposing process, a thick layer
forms that negatively effects the important airgas-exchange of the soil. In addition, the mower can clog.
Use tension belts to secure the device.
Beware: To avoid damage to the device,
fasten the tension belts exclusively as shown
in the illustration. Do not overtighten the tension belts.
leer er Abs atz
Information on mowing
Prior to mowing, check your device for completeness, proper functioning, and cleanliness.
A dirty ventilation grid causes overheating of
the engine, this can damage the engine. A dirty
protective grid at the silencer poses a fire
hazard.
For your grass to grow beautiful and thick,
mow frequently and keep the grass short. Do
not mow your lawn too low in dry and hot
conditions because the lawn is susceptible to
sun and heat damage and will look unsightly!
If you mow once a week or every other week,
we recommend a cutting height of 7-8 cm. If
you desire a lawn that is lower, you need to
mow more often. As a rule, you should not be
cutting off more than 1/3 of the length of blade
of grass.
If the grass is extremely high, mow twice at
different cutting height settings.
leer er Abs atz
Prior to starting
Fuel
As fuel, use unleaded petrol (see operating
instructions of the engine manufacturer).
You can use E10 petrol. Do not store E10
petrol longer than 30 days.
13
Tanking up
Danger!
Fuel is ignited by hot engine parts.
Prior to filling up, switch off the
engine and wait for at least
20 minutes until the engine has
cooled down. Observe the safety
instructions regarding the fuel!
Filling in the fuel:
1. For filling, use a canister with a filler spout
or use as funnel.
1
2. Open the canister carefully so that the
existing overpressure is discharged slowly
and no fuel spurts out.
3. Open the tank cap carefully so that the
existing overpressure is discharged slowly
and no fuel spurts out.
4. Fill the fuel tank.
5. Screw the tank cap on tightly.
Checking the engine oil level
Attention! Prior to each use, check the engine
oil level (see operating instructions of the
engine manufacturer).
The cutting height can be adjusted in 5 positions from 4 cm to 8 cm.
1. Switch off the engine and wait until the
blade has come to a standstill.
2. Push the central adjustment lever (1)
backwards and push the device at the
guide bar to the desired height.
leer er Abs atz
Starting
Danger!
During startup, there is a risk of
injury caused by the rotating blade.
To ensure sufficient oil supply for the four
stroke engine and to avoid resulting engine
damage, the device may only be used on
slopes up to 20°.
Adjusting cutting height
Adjust the cutting height setting only when the
engine is switched off.
Set the cutting height so that the blade does
not touch the ground even in case of terrain
unevenness. If the cutting height is set too
high, objects can be ejected and the “clean cut
appearance” can be destroyed.
14
Make sure that no one is within the
danger zone of the blade. Do not tip
the device over to one side during
startup.
Danger!
If after startup the carburetor does
not close properly, fuel will overflow
and a fire hazard occurs.
Close the fuel valve (if existing) and
contact an authorised service centre.
Starting the device
1. Put the device on even terrain, not in high
grass.
3. Switch the drive back on.
Turning round on a sloping area:
1. Keep the drive switched on.
2. Open the fuel valve (if existing).
2. Turn the device upslope.
3. Put on the spark plug connector.
3. Hold back the handlebar and the inner
wheel.
4. Actuate and hold the engine brake lever.
5. Pull the starter point slowly out until you
feel resistance then pull out quickly – engine starts to run.
The drive prevents sliding and supports the
turn manoeuvre.
leer er Abs atz
6. Let the starter rope retract slowly.
leer er Abs atz
Driving (devices without
drive)
Driving (devices with drive)
Danger!
Risk of injury caused by tripping or
sliding while moving the mower
backwards and turning it round.
Danger!
Risk of injury caused by tripping or
sliding while pushing the mower,
moving it backwards and turning it
round.
Make sure that the area is clear of
objects and watch for safe footing.
Make sure that the area is clear of
objects and watch for safe footing.
Driving
Turning
In case of a dangerous situation, switch off the
blade by releasing the engine brake bar.
Turn the device round only where the grass
has been mowed already.
Drive on
1. Press the drive lever towards the handlebar
– device is running.
leer er Abs atz
Switching off and parking
Beware: If the drive is not completely engaged, the gearbox can overheat and be
damaged. Always pull the drive lever all the
way to the handelbar.
Check the settings of the drive regularly (see
Maintenance).
Drive off
1. Release the drive bar.
Caution!
On a slope, the device can roll
away.
Put the device on even ground only
or secure it against rolling away.
1. Release the drive lever (devices with
drive).
2. Release the engine brake bar.
Turning
Turn the device round only where the grass
has been mowed already.
Turning round on an even surface:
3. Wait until the engine comes to a standstill
before you step away from the device.
4. Close the fuel valve (if existing).
5. Pull off the plug connector.
1. Switch off the drive.
leer er Abs atz
2. Turn the device to the desired side.
15
Maintenance and cleaning
Regular maintenance keeps your device ready
for use.
warranty. Operational safety is endangered as
well.
If you do not observe the maintenance notices,
faults may occur that are not covered by the
Contact your authorised service centre for
checkup if you detect problems during maintenance.
Component
Device
Action
Maintenance
interval
A
B
Check for safe working condition (basic inspection).
■
▲
Clean.
■
▲
Customer service.
Check fuel level.
■
Is the tank cap closed?
■
Tank,fuel valve,
and fuel line
Check parts for leaks and check for good condition.
■
▲
Carburetor
Does the carburetor close again after starting?
■
▲
Ventilation grid
Clean.
■
▲
Engine cooling
Clean.
▲
Spark plug
Check/replace.
▲
Air filter
Maintain.
■
■▲
Blade and fastening components
Check for wear and damage. See chapter Checking the
blade.
■
▲
Fuel
▲
Change.
Motor brake
Does the knife stop within 3 seconds?
□
▲
Drive bar
Does the device stop when the bar is in zero position?
□
▲
V-belt
Are the belts tensioned correctly, without fissures, and in
good condition?
Bowden cables
Check for proper function and ease of movement.
■
▲
Chassis and im-
Check for rust and fissures and check the welding seams.
■
▲
16
▲
pact protection
Are all protective devices and covers in place, fastened
correctly and properly functioning?
■
▲
Label
Condition of the labels.
■
▲
Engine
See operating instructions of the engine manufacturer.
■
▲
Check oil level (see operating instructions of the engine
manufacturer).
■
▲
▲
Oil change.
Flammable material
Remove easily flammable debris buildup from the engine
and the device.
■
▲
Tyres
Check tyres and, if necessary, the tyre pressure.
■
▲
A
B
■
□
▲
Before and after each use.
Annually or every 50 h.
By the user when the engine is not running.
By the user when the engine is running.
By the authorised service centre.
17
Preparations
Prior to all maintenance and cleaning work:
1. Let the device cool down for at least 20
minutes.
2. Pull off the spark plug connector.
3. Close the fuel valve (if existing).
4. To work on the undeside of the device, tilt
the device towards the silencer side.
Cleaning the device
connections, air filters, etc. for firm seating.
Check the ignition cable and the spark plug
connectors for damages.
Immediately replace damaged or worn parts,
especially covers, silencers or fuel tank (authorized service centre).
Check all parts that contain fluids for leaks and
proper condition. These can be: Fuel tank, fuel
valve, fuel lines, carburetor, engine, gears,
battery, hydraulic system.
In case of leaks, contact an authorised service
centre.
Maintaining the engine
Danger!
If the speed of rotation is set too
high, objects can be ejected. The
engine can be damaged and noise
pollution increases.
Do not change the basic setting of
the carburetor or the speed control.
Depending on use, clean the device thoroughly, especially the bottom and the knife.
Grass cuttings and dirt that are stuck interfere
with the grass ejection and impair the cutting
quality. To sufficiently cool the engine, keep
the engine cover, ventilation grid and engine
clean.
Fire hazard! Take particular care that the
components at the silencer are clean.
For cleaning, use a hand brush. Remove
stubborn dirt with a wooden or plastic spatula.
Clean the outside housing parts with a cloth.
Do not clean the device with water spray or
high-pressure cleaner! Do not use any aggressive cleaning agents.
General inspection
To ensure proper working order of the device,
regularly check all nuts, bolts, screws, fuel line
18
The operating instructions of the engine are
prepared by the engine manufacturer. They
contain the maintenance instructions and the
warranty conditions for the engine. If warranty
work for the engine is required, please contact
your authorised service centre or the nearest
authorised engine dealer.
To ensure a long service life of the engine,
sufficient engine cooling is required.
Keep the
- engine cover (ventilation grid),
- silencer (protective grid) and
- cooling fins of the engine
clean at all times.
Checking the engine oil level
Never allow the oil level to be too low otherwise the engine can be damaged. Never fill in
too much oil. Otherwise, there is the risk that
the oil enters and destroys the air filter.
For this, observe the attached operating instructions of the engine.
Checking the spark plugs
Danger!
The ignition system generates an
electromagnetic field.
If the rear wheels lock, the drive is correctly
adjusted. If you can pull the device, the drive
must be re-adjusted.
2
1
Wearers of pacemakers must not
work on live parts.
Soiled spark plugs reduce the engine output.
Clean the electrode of the spark plug with a
brass wire brush. Check the electrode gap
(see operating instructions of the engine manufacturer). Make sure that the insulator around
the electrode is not damaged. Never use a
damaged spark plug.
Tighten the spark plug using the correct torque
(see operating instructions of the engine manufacturer).
4
3
Maintaining the air filter
Readjusting the drive
Danger!
Cleaning agents pose a fire and
explosion hazard.
Never clean the air filter with flammable solvents.
Make sure that the air filter is always clean. A
dirty air filter reduces the engine performance
and leads to increased engine wear and fuel
consumption. Irrespective of the operating
hours, change the filter insert at least once a
year. Do not operate the engine without air
filter.
For this, observe the attached operating instructions of the engine.
You can readjust the drive at 2 points.
1. Turn the nut (1) towards the drive lever.
2. Lock the counternut (2) against the nut (1).
Or:
1. Turn the sleeve (3) at the drive away from
the nut (4).
2. Lock the nut (4) against the sleeve.
Adjust the drive so that
– while the drive is actuated, the wheels will
lock up when the device is pulled,
– while the drive is not actuated, the wheels
turn feely.
Checking the drive (devices with
drive)
If there is not any noticeable improvement after
the adjustment, have an authorised service
centre check the device.
1. Put the device on a non-slip surface (e.g.
concrete or asphalt).
Beware: If the drive is not adjusted correctly,
the gearbox can overheat or be damaged.
2. Switch off the engine.
3. Actuate the drive.
4. Try to pull the device backwards.
19
Checking the blade
Blade change
2
1
1
2
Danger!
Improperly mounted and maintained blades pose a severe injury
hazard.
Work at the blade shall only be
performed by an authorised service
centre.
Wear sturdy gloves when you
check the blades.
Work on the blade requires special qualifications because an unbalance test is required
and the torques must be observed.
It is absolutely necessary to change the blade:
– When one of the wear markings (1) was
reached. Original blade are engraved with
wear markings (marking in form of a ballshaped imprint on the rear side of the
blade).
Check the blade and all fastening parts for
wear, damage and cracks
– When the thickness of the blade at the rear
edge of the vane (2) or at another point is
below 1 mm (exception: cutting edge).
– before and after each mowing operation.
Original blade
– when there are significant changes.
An original AS-blade is engraved with:
All blade parts shown and their fastening parts
must be changed
AS GXXXXXXXX or EXXXXX
– when damage or cracks were found.
– At least once a year or every 50 operating
hours, regardless of whether there is wear or
not. Material wears out, gets cracks which
can endanger persons or property.
Vibrations indicate that
This corresponds to the spare part number.
Checking engine brake
Check the function of the engine brake by
switching off the engine. The blade must come
to a standstill from full speed within less than
3 seconds. Contact an authorised service
centre if this is not the case.
– the blade is worn excessively on one side or
leer er Abs atz
– damage of motor or cutting unit mount (e.g.
rubber elements).
Improperly sharpened blades increase the
device load and result in fatigue cracks and
breakage.
Ejected pieces can cause severe injuries.
20
Storage
Storing the device
Keep the device in a closed, dry, and well
ventilated room and out of reach of children.
Always eliminate all problems of the device
before you store it so that the device is always
in a safe-to-operate state. Let the engine cool
down before you store the device in closed
rooms.
Longer storage
1. Observe the safety instructions regarding
the handling of fuel.
2. Draining fuel tank:
If fuel valve is existing: Put a piece of a
tube on the fuel valve and fill the fuel in an
adequate fuel container.
If no fuel valve is existing: Contact an authorised service centre.
3. Emptying carburetor: Start the engine and
let it run until it stops on its own.
4. Clean the device thoroughly.
5. Touch up defects in painting (for spray
paint, see Accessories).
Inform your authorised service centre about
the device type and serial number of your
devices when you order spare parts.
leer er Abs atz
Wear parts
Some parts are wear parts. They wear during
use and must be replaced. The warranty does
not cover the following parts:
Blades, cutting blades, cutter bars, blade bolts,
sliding plates, V-belt, chains, Bowden cables,
starter ropes, pressure plates, air filters, spark
plugs, disc springs, lock washers, fuses, discs,
thrust plates, pressure discs, protection skirts,
impact protection, wheels, tires.
6. Perform corrosion protection on the engine:
– Unscrew the spark plug.
– Fill a tablespoon of engine oil into the
spark plug opening.
– Pull the starter rope slowly until you get
resistance (oil distribution in the cylinder).
– Re-insert the spark plug and screw in
fully.
– Do not fit the spark plug connector!
In autumn, have your device checked by an
authorised service centre!
Restarting
If you want to start the device after a longer
storage, carry out the tasks described in chapter Maintenance.
leer er Abs atz
Spare parts
The reliable and safe operation of the device
also depends on the quality of the spare parts
used. Only use original spare parts and accessories that were approved by
“AS-Motor Germany”. When foreign parts are
installed, the warranty and guarantee shall be
void for the foreign part and for the device and
for any resulting damage.
leer er Abs atz
Disposal
Grass clippings must not be thrown into the
waste but should be composted.
Shredded plant material decomposes quickly,
can be utilized as fertilizer, and, therefore, be
left on the ground.
Dispose of waste oil and fuel in accordance
with the local regulations or return it to an oil
shop.
Packaging, device, and accessories are made
of recyclable materials and must be disposed
of accordingly.
leer er Abs atz
Warranty
The conditions of the warranty can be found on
the reverse side of your warranty card. Send
the filled-out warranty card immediately after
the purchase of your device to
“AS-Motor Germany” or the supplier. Otherwise, the warranty is no longer valid.
Preserve the proof of purchase or the warranty
card that was filled out by the vendor.
21
Troubleshooting
The following table contains the most frequent problems and their elimination. If more problems
occur, contact the closest authorised service centre.
You can find an authorised service centre on our home page www.as-motor.de.
Problem
Possible cause
Remedy
Engine does not
start
Engine brake bar is not
pressed.
Press the engine brake bar towards
the handlebar.
Fuel valve is closed.
Open fuel valve (if existing).
No fuel is in the tank.
Refill fuel.
Device was tilted – oil leaked
into the air filter.
Replace air filter, unscrew spark plugs
and start several times when the fuel
valve is closed (if existing), dry the
spark plugs and screw them back in.
Engine was flooded due to too
many start attempts.
Replace spark plugs, unscrew spark
plugs and start several times when the
fuel valve is closed (if existing), dry the
spark plugs and screw them back in.
Spark plug connector is pulled
off.
Observe the safety instructions! Put
spark plug connector back on.
Air filter is dirty.
Maintain air filter (see also Maintenance and cleaning).
Spark plugs are sooted, damaged, or incorrect electrode
gap.
Clean spark plugs and check electrode
gap (see also Maintenance and cleaning). Replace spark plugs if necessary.
Housing of the mower is
jammed.
See also Maintenance and cleaning.
Poor quality, dirty, or old fuel.
Clean fuel system (authorised service
centre).
Always use fresh fuel.
Blade is loose.
Authorised service centre.
Air filter is dirty.
Maintain air filter (see also Maintenance and cleaning).
Poor quality, dirty, or old fuel.
Always use fresh fuel.
Spark plug is sooted, damaged, or incorrect electrode
gap.
Clean spark plug and check electrode
gap (see also Maintenance and cleaning). Replace spark plug if necessary.
Engine starts badly
or runs irregularly
22
Housing of the mower is
jammed.
See also Maintenance and cleaning.
Drive belt is insufficiently
tensioned.
Authorised service centre
Drive train is incorrectly adjusted.
Check the drive (see Maintenance and
cleaning).
Clutch is worn.
Check the drive (see Maintenance and
cleaning).
The blade slides
Replace friction discs.
Authorised service centre.
Strong vibrations
during operation
Unbalance at the blade
caused by incorrect sharpening or chips on the blade.
Have blade resharpened and balanced
by an authorised service centre. Replace a damaged blade immediately.
Blade drive shaft is bent due
to collisions with foreign objects.
Authorised service centre.
Engine fastening is loose.
Authorised service centre.
Blade fastening is loose.
Authorised service centre.
Loose fastening elements.
Authorised service centre.
Silencer is defective.
Authorised service centre.
Air filter is soiled or drenched
with oil.
Maintain or replace air filter (see also
Maintenance and cleaning).
Oil level is too high.
Have authorised service centre lower
the oil level to the marking.
Ventilation grid is dirty.
Clean ventilation grid.
Oil level in the engine is too
low.
Refill engine oil (see operating instructions of the engine manufacturer).
Cooling fins of the engine are
dirty.
Have cooling fins cleaned by authorised service centre.
Blade is dull or worn.
Have blade resharpened and balanced
by an authorised service centre. Replace a damaged blade immediately.
Speed is too high proportionately to the cutting height.
Reduce speed and/or select the correct cutting height.
Housing of the mower is
heavily contaminated.
Clean.
No or insufficient
drive when the drive
bar is actuated.
Irregular noises
Engine is smoking
Engine gets hot
Uneven cut, lawn
becomes unsightly
23
Housing is jammed
Mowed grass was too long or
too damp.
Adjust cutting height and mowing
speed to the mowing conditions.
Blade is worn.
Authorised service centre.
Engine speed is too low despite full power.
Authorised service centre.
The device does not
stop
Drive belt does not declutch.
Authorised service centre.
The engine does not
switch off
Switching off system is defective.
Close fuel valve (if existing.
Authorised service centre.
leerer Ab satz
Accessories
Spray paint 400 ml, colour orange:
G00011050
E04606
Operating hours counter
G06927008
E10740
Clinometer:
G06950027
E11835
Mulching accessories (AS 470 Universal 4T):
G47026003
E09163
24
Technical data AS 420
Type
Range of application (temperature)
Engine
Type
Manufacturer
Type
Cylinder capacity
Performance
Engine speed
AS 420 4T
0 - 30 °C
For temperatures below 5 °C, observe the
engine manufacturer's information regarding
the engine oil.
One cylinder four stroke engine
Briggs & Stratton
575 Ex series
140 cm3
2.2 kW (3.0 PS)
3000 min-1
Cutting device
Type
Cutting width
Cutting height adjustment
42 cm
42 cm
central 40 – 80 mm, in 5 levels (40 mm,
50 mm, 60 mm, 70 mm, 80 mm)
up to approx. 15 cm
Starting device
Rope start
Drive
Measures and weights
Transport sizes
with packaging L/W/H
Max. tyre dimensions L/W/H
Weight
3000 min-1
Blade
Growth height
Maximum area coverage
AS 420 4T A
Rear wheel drive 2.5
km/h
1000 m2/h
-
120/65/52 cm
127/46/100
27 kg
127/46/100
31 kg
Capacities
Fuel tank
0.8 litres
Engine oil
0.65 litres
25
Type
Vibration emission value
Hand-arm-vibrations ah,W
Measurement uncertainty U
AS 420 4T
AS 420 4T A
according to DIN EN ISO 5395
<2,5 m/s2
1.5 m/s2
<2.5m/s2
1.5 m/s2
Sound level
according to DIN EN ISO 5395
measured
sound level LWA
91.6 dB
91.6 dB
guaranteed
sound level LWA
93 dB
93 dB
82.2 dB
82.2 dB
sound level
at working place LpA
26
Technical data AS 470
Type
AS 470 4T
Range of application
(temperature)
AS 470 4T A
0 - 30 °C
For temperatures below 5 °C, observe the engine manufacturer's information regarding the engine oil.
Engine
Type
Manufacturer
One cylinder four stroke engine
Briggs & Stratton
575 Ex series
140 cm3
2.2 kW (3.0 PS)
Type
Cylinder capacity
Performance
3000 min-1
Engine speed
Cutting device
Type
47 cm
Growth height
47 cm
47 cm
up to approx.
30 cm
Rope start
Drive
Rear wheel drive
2.5 km/h
Rear wheel drive
3.0 km/h
1000 m2/h
-
Measures and weights
Transport sizes
with packaging L/W/H
Engine oil
2800 min-1
up to approx. 15 cm
Starting device
Capacities
Fuel tank
2800 min-1
central 40 – 80 mm, in 5 levels (40 mm, 50 mm, 60 mm,
70 mm, 80 mm)
Cutting height adjustment
Max. tyre dimensions L/W/H
Weight
800 E series
175 cm3
3.0 kW (4.1 PS)
Blade
Cutting width
Maximum area coverage
AS 470
Universal 4T
120/65/52 cm
131/51/100
28 kg
131/51/100
34 kg
0.8 litres
131/66/100
35 kg
1.2 litres
0.65 litres
27
Type
AS 470 4T
AS 470 4T A
AS 470
Universal 4T
Vibration emission value
according to DIN EN ISO 5395
Hand-arm-vibrations ah,W
Measurement uncertainty U
<2.5m/s2
1.5 m/s2
Sound level
according to DIN EN ISO 5395
measured
sound level LWA
92.3 dB
91.8 dB
92.8 dB
guaranteed
sound level LWA
93 dB
93 dB
94 dB
sound level
at working place LpA
79.6 dB
80.6 dB
81.3 dB
28
Declar ati on of c onfor mity AS 420, AS 420 A
AS-Motor Germany GmbH & Co. KG
Ellwanger Straße 15
D-74424 Bühlertann
www.as-motor.de
Declaration of conformity
We declare that the lawnmowers
Type
AS 420 4T
AS 420 4T A
Cutting width
42 cm
42 cm
starting from serial no.
025613030001
025713030001
as brought into circulation by us conform to all relevant safety and health
requirements of the EC directives listed.
- 2006/42/EC
- 2000/14/EC
- 2004/108/EC
- 97/68/EC
Function:
The devices are exclusively intended for the mowing of well maintained grasslands and lawns.
Applied standards:
DIN EN ISO 5395
Applies to 2000/14/EC:
Applied conformity assessment procedures
Annex VI
Type
AS 420 4T
AS 420 4T A
Measured sound level
91.6 dB
91.6 dB
Guaranteed sound power level
93 dB
93 dB
Party involved:
DPLF, D-64823 Groß-Umstadt, EC identification number 0363
Place where all technical records are filed:
AS-Motor Germany GmbH & Co. KG
Ellwanger Straße 15
D-74424 Bühlertann
Bühlertann, January 2015
Eberhard Lange
Managing director
By Proxy Frank Einsiedler
Head of development
29
Declar ati on of c onfor mity AS 470, AS 470 A, AS 470 AS
AS-Motor Germany GmbH & Co. KG
Ellwanger Straße 15
D-74424 Bühlertann
www.as-motor.de
Declaration of conformity
We declare that the lawnmowers
Type
AS 470 4T
AS 470 4T A
AS 470
Universal 4T
Cutting width
47 cm
47 cm
47 cm
starting from serial no.
025413030001
025513030001
026513090001
as brought into circulation by us conform to all relevant safety and health
requirements of the EC directives listed.
- 2006/42/EC
- 2000/14/EC
- 2004/108/EC
- 97/68/EC
Function:
The devices are exclusively intended for the mowing of well maintained grasslands and lawns.
Applied standards:
DIN EN ISO 5395
Applies to 2000/14/EC:
Applied conformity assessment procedures
Annex VI
Type
AS 470 4T
AS 470 4T A
AS 470
Universal 4T
Measured sound level
92.3 dB
91.8 dB
92.8 dB
Guaranteed sound power level
93 dB
93 dB
94 dB
Party involved:
DPLF, D-64823 Groß-Umstadt, EC identification number 0363
Place where all technical records are filed:
AS-Motor Germany GmbH & Co. KG
Ellwanger Straße 15
D-74424 Bühlertann
Bühlertann, January 2015
Eberhard Lange
Managing director
30
By Proxy Frank Einsiedler
Head of development
Mar keti ng
31
AS-Motor Germany GmbH & Co. KG
Ellwanger Straße 15
D-74424 Bühlertann
www.as-motor.de
Professional technology for gardens and landscapes
Allmäher®
Manoeuvrable meadow mower for extensive green area care. The
Allmäher reliably shreds metre-high grass, undergrowth, and
weeds.
Ride-on Allmäher®
Ease of use and high area coverage all combined in a compact
ride-on mower. Low centre of gravity, optimum weight distribution,
and broad wheel base provide you with the best performance on
slopes and power reserves.
Rear discharge mower
Professional lawn mower with rear discharge. With wheel drive
and infinite speed regulation for exceptional cutting and catching
performance in any situation.
Rotary mower
The economic alternative to bar mower. Ideal for fodder production. The grass is not shredded and placed into a pile on the side.
Flail mower
The flail blades are supported movably and avoid rocks and other
obstacles and chop the cuttings several times.
Side discharge mower
This solid allrounder has a side discharge, wheel drive, and a
housing of 3 mm thick plastic-coated steel.
Mulching mower
Mulching saves both time and money. The mulch stays on the
ground and practically disappears into the lawn so that no complex disposal is necessary.
WeedHex
Removes weeds carefully, quickly, and without the use of chemicals: on transport surfaces, walls, curbs, and between interlocking
blocks.
32