1
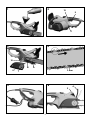
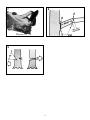
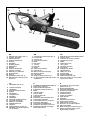
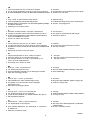
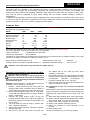
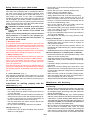
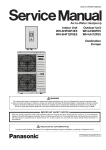
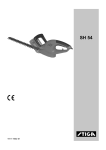
KSE
DE
GB
FR
NL
IT
ES
PT
NO
DK
SE
FI
Gebrauchsanweisung Vor Inbetriebnahme Gebrauchsanweisung lesen !
Operating Instructions Read operating instructions before use!
Manuel d’utilisation Lire attentivement le mode d'emploi avant chaquemise en service !
Gebruiksaanwijzing Voor inwerkingstelling de gebruiksaanwijzing lezen!
Istruzioni per l’uso Prima della messa in funzione leggere le istruzioni perl'utilizzo!
Instrucciones de Manejo ¡Lea las instrucciones de manejo antes de efectuar la puerta en marcha!
Instruções de Serviço Antes da colocação em funcionamento leia o manual de instruções!
Bruksanvisning Les bruksanvisningen før bruk!
Brugsanvisning Læs instruktionerne, inden maskinen tages i brug!
Bruksanvisning Läs bruksanvisningen före användning!
Käyttöohjeet Lue käyttöohjeet ennen käyttöä!
1
2
15
9
1
3
4
16
B
8
A
3 mm
7
5
6
2
2
4
7
8
17
9
3
12
11
3
15
4
2
9
14
5
10
16 8
6
7
13
1
2
3
4
5
6
7
8
9
10
11
12
13
14
15
16
DE
Ölsichtfenster (siehe Abb. 2)
Vorderer Handgriff
Öltankverschluß
Vorderer Handschutz
Schwert
Sägekette
Knebelschraube
Ritzeldeckel
Schalter
Hinterer Handschutz
Hinterer Handgriff
Netzleitung mit Stecker
Schwertschutz
Fällgriff
Sperrknopf (siehe Abb. 2)
Rändelrad zur Kettenschnellspannung
NL
1 Oliekijkglas (zie afb. 2)
2
3
4
5
6
7
8
9
10
11
12
13
14
15
16
Voorste handgreep
Olietankdop
Voorste handbeschermer
Zwaard
Zaagketting
Vleugelschroef
Afdekkap
Schakelaar
Achterste handbeschermer
Achterste handgreep
Netsnoer met stekker
Zwaardbeschermer
Velgreep
Veiligheidsknop (zie afb. 2)
Kartelwiel voor het snel spannen
van de ketting
1
2
3
4
5
6
7
8
9
10
11
12
13
14
15
16
1
2
3
4
5
6
7
8
9
10
11
12
13
14
15
16
GB
Oil inspection window (see Fig. 2)
Front handle
Oil tank cap
Front hand protection
Blade
Saw chain
T-screw
Pinion lid
Switch
Rear hand protection
Rear handle
Mains connection with plug
Blade protection
Fell handle
Stopping button (see Fig. 2)
Knurling wheel for quick chain tension
adjustment
IT
Finestrella di controllo dell'olio (vedi ill. 2)
Impugnatura anteriore
Tappo del serbatoio dell'olio
Protezione anteriore delle mani
Spada
Catena di taglio
Vite ad aletta
Coperchio zigrinato
Interruttore
Protezione posteriore delle mani
Impugnatura posteriore
Cavo d'alimentazione con spina
Protezione della spada
Impugnatura d'abbattimento
Pulsante di bloccaggio (vedi ill. 2)
Rotella zigrinata per bloccaggio
rapido della catena
4
1
2
3
4
5
6
7
8
9
10
11
12
13
14
15
16
FR
Ecran témoin pour niveau d'huile (voir ill. 2)
Poignée avant
Couvercle du réservoir d'huile
Protège-main avant
Guide
Chaîne de la scie
Vis à garret
Couvercle à pignon
Interrupteur
Protège-main arrière
Poignée arrière
Câble avec fiche
Protège-guide
Poignée d'abattage
Bouton d'arrêt (voir ill.2)
Roue à molette pour une tension
rapide de la chaîne
E
1 Ventanilla de control de aceite
(véase la Fig. 2)
2 Empuñadura delantera
3 Cierre del depósito de aceite
4 Guardamanos delantero
5 Cuchillas-espada
6 Cadena de sierra
7 Tornillo de muletilla
8 Tapa de piñón
9 Interruptor
10 Guardamanos posterior
11 Empuñadura posterior
12 Cable de red con conector
13 Protección de cuchillas-espada
14 Mango de leñador
15 Botón de bloqueo (véase la Fig. 2)
16 Rueda moleteada para tensar
rápidamente la cadena
1
2
3
4
5
6
7
8
9
10
11
12
13
14
15
16
1.
2.
3.
4.
5.
6.
7.
8.
9.
10.
11.
12.
13.
14.
15.
16.
PT
Visor do óleo (ver Fig. 2)
Manípulo dianteiro
Tampa do tanque de óleo
Protecção dianteira da mão
Lâmina
Corrente da serra
Parafuso com pega
Tampa do pinhão
Interruptor
Protecção traseira da mão
Manípulo traseiro
Cabo de rede com ficha
Protecção da lâmina
Cabo de lenhar
Botão de bloqueio (ver Fig. 2)
Roda serrilhada para tensão rápida
da corrente
1.
2.
3.
4.
5.
6.
7.
8.
9.
10.
11.
12.
13.
14.
15.
16.
SE
Oljekontrollfönster ( se bild 2 )
Främre handgrepp
Oljetankslock
Främre handskydd
Svärd
Sågkätting
Vingskruv
Kugghjulslock
Strömbrytare
Bakre handskydd
Bakre handgrrepp
Nätanslutningskabel med stickkontakt
Svärdskydd
Fällgrepp
Spärrknapp ( se bild 2 )
Räfflad ratt för snabbspänning av
kedjan
NO
Oljeseglass (se fig. 2)
Fremre håndtak
Oljetanklokk
Fremre håndvern
Sverd
Kjede
Vingeskrue
Tannhjulsdeksel
Bryter
Bakre håndvern
Bakre håndtak
Nettkabel med støpsel
Sverdbeskyttelse
Fellingshåndtak
Sperreknapp (se fig. 2)
Serratert hjul for
hurtigstramming av kjede
1.
2.
3.
4.
5.
6.
7.
8.
9.
10.
11.
12.
13.
14.
15.
16.
2
3
DK
Olievindue (se ill. 2)
Forreste håndtag
Låg til olietank
Forreste håndbeskyttelse
Sværd
Savkæde
Tersskrue
Låg til tandhjul
Kontakt
Bagerste håndbeskyttelse
Bagerste håndtag
Netkabel med stik
Sværdbeskyttelse
Fældehåndtag
Spærrekontakt (se ill. 2)
Fingerhjul til hurtigstramning af
kæde
FI
Öljynnäyttöikkuna (katso kuvaa 2)
Etumainen käsikahva
Öljysäiliön kansi
Etumainen käsisuoja
Miekka
Sahaketju
Sakararuuvi
Uritettu kansi
Kytkin
Takimmainen käsisuoja
Timmainen käsikahva
Verkkojohto pistokkeella
Miekkasuoja
Kaatamiskahva
Sulkunuppi (katso kuvaa 2)
Pyällyskiekko ketjun pikakiristystä
varten
Abbildung und Erklärung der Piktogramme
Représentation et explication des pictogrammes
Illustrazione e spiegazione dei simboli
Imagens e Explicações dos Pictogramas
Piktogramillustration og forklaring
Symbolien selitykset
1
1.
2.
3.
4.
5.
6.
7.
8.
9.
10.
11.
12.
13.
14.
15.
16.
Illustration and explanation of pictograms
Afbeelding en toelichting van de pictogrammen
Símbolos y su significado
Illustrasjon og forklaring av symboler
Illustration och förklaring av symboler
4
5
6
7
1
3
5
7
DE
Augen- / Kopf- und Gehörschutz tragen!
Vor Gebrauch Gebrauchsanweisung lesen
Bei Beschädigung der Anschlußleitung sofort Netzstecker ziehen
Mit beiden Händen halten!
2 Warnung!
4 Dieses Werkzeug nicht dem Regen aussetzen
6 Achtung, Rückschlag!
1
3
5
7
GB
Wear eye, head and ear protection !
Read operation instructions before use
Remove plug immediately if the power flex is damaged or cut
Hold tool with both hands!
2 Warning!
4 Do not subject this electric power tool to rain
6 Attention, kick-back!
FR
1 Toujours protéger les yeux, la tête et les oreilles!
2 Attention!
3 Lire le manuel d’utilisation avant de se servir de la machine
4 Ne pas laisser cet outil électrique sous la pluie!
5 En cas de détérioration ou section du câble retirer immédiatement la prise 6 Attention aux rebondsl!
NL
1 Oog- / hoofd- en gehoorbescherming dragen!
3 Voor inbedrijfstelling gebruiksaanwijzing lezen
5 Bij beschadiging of doorsnijden van de aansluitingsleiding dadelijk
de stekker uittrekken
7 Werktuig met 2 handen houden
IT
1 Indossare occhiali protettivi, copricapo e paraorecchi!
3 Leggere le istruzioni sull’uso prima della messa en marcia
5 In caso di danneggiamento o taglio della linea di allacciamento,
tirare immediatamente la spina.
7 Tenere con tutte e due le mani!!
ES
1 Llevar protección para los ojos, la cabeza y el oído.
3 Lea las instrucciones de manejo antes de usar la máquina
5 Al dañarse o cortarse el cable de red desenchufe inmediatamente
el aparato
7 Solamente manejar con las dos manos
PT
1 Trajar protecção para os olhos, cabeça e ouvidos!
3 Antes de utilizar, ler as instruções de servicio
5 Em caso de danificar ou cortar o cabo eléctrico, tire
a fiche de rede imediatamente!
7 Só manejar com ambas as mãos!
1
3
5
7
2 Avvertimento!
4 Non esporre questo utensile alla pioggia
6 Attenzione: Ritorno!
2 Cuidado!
4 No exponga esta herramienta a la lluvia
6 Atención: Rebote!
2
4
6
NO
Bruk øye-, hode- og hørselsvern!
Les bruksanvisningen før bruk!
Trekk øyeblikkelig støpselet ut hvis ledningener skadet!
Hold fast med begge hender!
Atenção!
Não expor esta ferramenta eléctrica à chuva
Atenção: Recuo!!
2 Advarsel!
4 Ikke bruk dette elektriske redskapet i fuktig vær!
6 Obs! Tilbakeslag!
DK
1 Anvend øjen- / hoved- og høreværn!
3 Læs instruktionerne, inden maskinen tages i brug!
5 Tag stikket ud, hvis ledningen bliver beskadiget
eller klippet over!
7 Hold saven med begge hænder
1
3
5
7
2 Waarschuwing!
4 Dit elektrowerktuig niet de regen onderwerpen!
6 Attentie, terugslaggevaar!
2 Advarsel!
4 Brug ikke dette elektriske apparat i fugtigt vejr!
6 Advarsel: Tilbage kast.
SE
Använd ögon- / huvud- och hörselskydd!
Läs bruksanvisningen före användning!
Ta genast bort kontakten om sladden skadas eller går av!
Håll med båda händerna!
FI
1 Käytä silmien- / pään- ja kuulonsuojaimia!
3 Lue käyttöohjeet ennen käyttöä!
5 Irrota pistoke välittömästi, jos verkkojohto on vauriotunut
tai katkennut!
7 Pidä kiinni molemmin käsin!
2 Varning!
4 Använd inte detta eldrivna redskap i fuktig väderlek!
6 Varning för kast!
2 Varoitus!
4 Älä käytä tätä sähkökäyttösistä työvälinettä
märällä ilmalla!
6 Huomio! Takaiskun vaara!
10/2003
6
ENGLISH
Introduction to the Operating Instructions
These Operating Instructions are intended to facilitate your becoming acquainted with the machine and using it in
accordance with the regulations. The Operating Instructions contain important information on how to use the
machine safely, correctly and economically. Observing this information will help increase the reliability and
working life of the machine. The Operating Instructions must always be at hand when the machine is being used.
They must be read and observed by every person dealing with the machine, whether operating, servicing or
transporting it.
In addition to the Operating Instructions and the applicable rules of the prevention of accidents valid in the country
of use and on site, the generally recognised rules on working safely and correctly must be observed as well as the
accident prevention rules of the relevant professional associations.
Technical Data
This chain saw has been built in accordance with Regulation DIN EN 50144-2-13 and fulfils the requirements of the
European law on equipment safety.
Model
KSE
1800
2000
Rated Voltage
V~
230
230
Nominal Frequency
Hz
50
50
50Fuse (time lag)
A
16
16
Rated Output
W
1800
2000
Nominal current
A
8,4
9,4
Guide Bar
cm
30-45
30-45
Speed
m/sec
ca. 11
ca. 11
Weight
kg
ca. 4,3
ca. 4,4
Oil
ml
200
200
All models with automatic chain lubrication and mechanical chain brake and rundown brake.
The type designation of the chain you will find on the type plate.
Class of Protection:
II/ DIN-EN 50144/ VDE 0740
Interference Suppression: nach EN-55014
Information on noise emission in accordance with the 3rd Decree on the German law on equipment safety of 18.1.1991
and the EU Guideline on machines, Appendix I, Section 1.7.4 f.
Noise emission values EN-50144-2-13:
Vibration values in accordance with EN 50144-2-13:
Sound Pressure Level LpA
Weighted acceleration handle
93 dB (A)
max. 5,5 m/s2
Attention: This chain saw is only intended for cutting wood !!!
Important instructions for your personal safety
A) General safety instructions
Attention: You run danger of injuring yourself if
you use the chain saw incorrectly. It is imperative
that you read these Operating Instructions and follow
the instructions given.
Attention: Noise protection ! Please observe the local
regulations when operating your device.
1. Caution! : When electric tools are being used, the
following basic safety measures must be taken to
protect against electric shock, injury and risk of fire.
2. Protect yourself against electric shock. Avoid body
contact with grounded elements, e.g. pipes, radiators,
stoves, refrigerators.
3. Children and young persons under 18 may not
operate electrical chain saws, with the exception of
apprentices older than 16 under the supervision of a
trained adult.
4. The chain saw may only be used by persons who
have sufficient experience.
5. Always keep these Operating Instructions together
with the chain saw.
6. Only lend or give this chain saw to persons who
are familiar with its use. Also give them these
Operating Instructions.
7. You should always be in a good physical state when
working with the chain saw. Work steadily and with
concentration.
Particular
concentration
is
necessary towards the end of your duty.
8. Never use the chain saw while under the influence of
alcohol, medication or drugs.
B) Instructions on the use of personal protective
clothing
Working with a chain saw requires special measures with
regard to protective equipment and clothing suitable for
protecting your head, hands, feet and legs, eyes and
ears.
9. Wear close fitting clothing which cannot get caught
10. Always wear an approved and tested safety helmet
when felling trees and removing branches.
11. Always wear safety goggles or a face guard.
12. Always wear suitable protective gloves.
13. Wear ear protection to avoid damage to your
hearing.
14. Wear safety boots.
15. We recommend that you wear leg guards.
GB-1
C) Instructions on using the chain saw safely
16. Attention! Read the Operating Instructions carefully and have yourself instructed in the use of a
chain saw before you use it for the first time.
17. Always store your electric tools in a safe place.
Electric tools not being used should be stored in a
dry, inaccessible or locked place, outside the
reach of children.
18. Use the cable only for the intended purpose. Never
carry or suspend electric devices by the cable. Do
not use the cable to pull the plug from the socket.
Protect the cable from heat, oil and sharp edges.
19. Check the extension cable regularly and replace it
if it gets worn or damaged. Keep the handle dry
and free of oil and grease.
20. Pull the plug from the socket when replacing the saw
chain or sword.
21. Do not leave the tool key in the ignition. Check
before switching on that the key and adjustment
tools are removed.
22. Avoid accidental starting. Do not hold your finger on
the switch when carrying an electric tool that is
connected to the power source. Ensure that the
switch is off when the plug is inserted in the socket.
23. Damaged switches have to be replaced by a
customer service workshop. Do not use an electric
tool if the switch cannot be switched on or off.
24. Caution: Only use accessories or parts that are listed
in the operating instructions. Use of other tools and
other accessories mean safety risks for the
operator.
25. Never subjekt the electrical chain saw to rain and do
not work in wet surroundings.
26. Check the chain saw for its proper operating state
before every use.Please pay special attention to the
sword and chain.
27. Check the power cable for damage or cracks every
time before you use it. Damaged cables must be
replaced.
28. Always hold the chain saw with both hands while
working with it.
29. No other person may be within the working range of
the chain saw.
30. The chain saw must be disconnected from the power
supply before you tighten the chain, exchange the
chain or carry out any other work on the saw. Withdraw the plug!
31. During work breaks put the machine down in such a
manner that nobody is at risk.
32. Always use the chain cover when transporting the
chain saw.
33. When switching on the chain saw, ensure that it is
supported well and hold it firmly. The chain and bar
must be free.
34. Before you start working ensure that you are standing firmly.
35. Withdraw the plug immediately if the power cable is
damaged or cut.
36. Never cut with the tip of the bar - the saw may recoil
(“kick-back”).
37. Do not use the chain saw near combustible gases
or dust - danger of explosion.
38. The chain saw may only be connected to socket
outlets with earthing contact and tested electrical
installations. We recommend the use of a residualcurrent-operated circuit-breaker. The fuse must have
a value of 16 A and mustn’t be used by other
consumers while working with the chain saw.
39. The cable must be winded off completely when you
use a cable drum.
40. Ensure that the power cable has no kinks and is
not damaged.
41. The chain saw may only be used in a completely
assembled state. No protective devices may be
missing.
42. Switch the chain saw off immediately if you notice
any changes in the machine.
43. Always have a first-aid kit fulfilling DIN 13164 at
hand in case of accidents.
44. If the chain saw comes into contact with earth,
stones, nails or other foreign objects, withdraw the
plug immediately and check the chain as well as
the bar.
45. Ensure that no chain oil penetrates into the earth or
sewage. Always place the chain saw on something
that will absorb any oil dripping from the bar or chain.
D) Warning to the danger of recoil (“kickback”)
46. Attention: If the tip of the bar contacts a hard
object while the motor is running, the saw may
recoil dangerously. In recoiling, the chain saw is
flung upwards at high speed towards the person
holding the chain saw.
47. Do not touch wood or branches with the bar tip.
48. If possible, use a stand.
49. Always keep an eye on the bar tip.
50. Only place a running saw on the object to be cut.
Never start the machine while the chain rests on
something.
51. So called piercing cuts with the bar tip may only be
carried out by trained personnel.
E) Instructions on safe working techniques
52. Before starting to work ensure that there is sufficient light.
53. Always maintain a normal body posture when operating the device. Always keep your balance.
54. Do not work with your body bent forwards.
55. Ensure that you are standing securely and do not
work on snow, ice or newly-barked wood. Danger of
slipping!
56. Working on ladders, scaffoldings or trees is forbidden.
57. Do not use chain saw above shoulder height.
58. Use the chain saw only to cut wood. It is absolutely
forebidden to cut plastics or minerals (gas concrete).
59. Ensure that the wood cannot twist while it is being cut.
60. Never climb on a tree to cut wood.
61. Watch out for splintering wood. While you are
sawing you may be injured by flying wood chips.
62. Do not use the chain saw to lever or move the wood.
63. Only cut with the lower section of the saw. The saw
will be repulsed towards you if you try and cut with
the upper section of the saw.
64. Ensure that the wood is free of stones, nails or other
foreign objects.
GB-2
Starting up
1. Filling the oil tank (Fig. 1)
The chain saw must never be operated without sufficient
oil on the chain as this could cause damage to the chain,
blade or motor. No claims for guarantee can be accepted
if damage occurs when the device is being operated
without chain oil.
Please use only biologically-based chainsaw oil, i.e.
oil which is 100% biologically decompos-able.
Biological chainsaw oil should be available every-where
at your local specialist dealer.
Do not use old oil. This will damage the chainsaw and will
also lead to loss of the guarantee.
• Before filling the oil tank, pull out the mains plug
• Open the twist cap and place safely aside so that the
sealing ring in the tank cap does not get lost.
• Fill approx. 200 ml oil into the tank using a funnel and
screw on the tank cap tightly once more.
• The oil level can be seen in the inspection window (Fig.
2). If you plan not to use the machine for a longer
period, you should remo ve the chain oil from the oil tank.
• The oil tank should also be emptied before the chainsaw
is transported or dispatched.
• Check correct functioning of the chainsaw before
commencing work. Switch on the saw with cutting
fittings assembled and hold over a bright
background at a safe distance (Be careful not to
come in contact with the ground !). An track of oil will
show you that the chain is sufficiently lubricated.
• After use, lay the chainsaw horizontally on some absorbing surface. The oil spread on the blade, chain and drive
may lead to some further dripping of oil.
2. Assembling the blade and chain (Fig. 3)
CAUTION ! Risk of injury ! Always use safety gloves
when assembling the chain !
For assembling the bar and chain with this chain
saw no tools are required !
• Put the chain saw on a stable rest.
• Loosen the T-screw 7 turning it clockwise.
• Remove the gear cover 8.
• Put the chain on the bar considering the running
direction of the chain. The cutting teeth on the
upper side of the bar must point in forward
direction (see Fig. 4).
• Put the free end of the chain over the chain driving
wheel (B).
• Place the bar such that the long hole in the bar is
placed exactly on the guiding element in the bar seat.
• Take care that the chain tensioning bolt (A) is seated
exactly in the small opening in the bar (Fig. 3). It must
be visible through the opening. If necessary, adjust
the knurling wheel of the chain tensioning device (16)
in both directions until the chain tensioning bolt is
seated in the opening in the bar.
• Check whether all chain links are seated exactly in
the bar’s groove and the chain is lead around the
chain driving wheel correctly.
• Put the gear cover 8 back on and push it in place.
• Moderately tighten the T-screw 7 by turning it clockwise.
• Tension the chain. To do so turn the knurling wheel
upwards (+ direction of arrow). The chain should be
tensioned such that it can be lifted by about 3mm in
the middle of the bar (Fig. 4). To decrease the chain
tension turn the knurling wheel downwards (- direction
of arrow).
• Finally, tighten the T-screw 7 well by hand.
The tension in the chain has a major effect on the service
life of the cutting fittings, and must therefore be checked
regularly. When the chain warms up to operating temperature it will expand and must be retightened. A new
saw chain will have to be tightened more frequently until
it has reached its full length.
CAUTION: During the running-in period, the
chain must be more frequently tightened. The
chain must be immediately retightened if it
shakes or leaves the grove !
To tension the chain slightly loosen the T-screw 7. Then
turn the knurling wheel upwards (+ direction of arrow).
Tension the chain such that it can be lifted by about
3mm in the middle of the bar, as shown in Fig. 4.
3. Connecting the chainsaw (Fig. 5)
We recommend to operate the chain saw in connection with a residual current operated device with a
maximum breaking current of 30mA.
This device is designed to be operated on a mains supply
with a system impedance Z max at the point of connection (house service connection) of max. 0.4 Ohm. The
user must ensure that the device is only operated on an
electricity supply system meeting these requirements.
If required, system impedance data may be obtained
from the local public utility.
Use only extension cords that are approved for
outdoor use and are not lighter than rubbersheathed cables of type H07 RN-F according to DIN/
VDE 0282 with a diameter of at least 1.5 sq. mm. They
cords must be splash-proof. If the connection cable
of this device should be damaged it must be
replaced by a workshop named by the manufacturer
only as this work requires the use of special tools.
Mobile devices for outdoor use should be connected over a residual current operated device.
This chainsaw is fitted with a strain-relief device to provide
extra safety for the connection. First connect the device
plug with the connection line. Then form the connection line
into a tight loop and push this through the safety web on the
lower side of the machine. Hang the loop into the hook as
shown in Fig. 6. The plug connection is now secure against
automatic release.
4. Switching on (Fig. 2)
• Press with your thumbs the stopping button 15 on the left
side of the rear handle and then the operating switch 9.
• The stopping button 15 is used for unlocking the switchon mechanism and does not need to be pressed again
after the device is switched on.
• To switch off the device, release switch 9.
GB-3
Caution: The chainsaw will run immediately at
full speed and will continue running for a certain
period after it is switched off. You must wait until
the chain has come to a full stop before putting
chainsaw down.
Safety devices on your chain brake
1. Chain brake (Fig. 6)
This chain saw is equipped with a mechanical brake for
the chain. In the case of uncontrolled movements, when
the tip of the sax blade gets in contact with wood or a
solid object, the drive of the chain is immediately
stopped by activation of the hand guard 4, the motor will
not be stopped. This brake function is initiated by the
back of your hand on the front handle 2 pushing the hand
guard. The proper function of the saw chain brake shall be
checked before each use of the saw.
CAUTION: No buttons should be pressed when
the chain brake is released (hand protection
pulled back in the direction of the handle and
locked).
Always ensure before starting the chainsaw that the
hand protection 4 is locked in the operating position. To do this, pull back the hand protection in
the direction of the handle.
2. Rundown brake
In accordance with the latest regulations, this chain saw
is equipped with a mechanical rundown brake. This brake
is connected to the chain brake and stops the running
chain after the chain saw has been switched off.
It is activated by releasing the ON/OFF switch. The rundown
brake avoids injuries through the coasting of the chain.
3. Safety starting lock
The starting delay that is effective for about 3 sec. after each
switch-off of the chain saw provides for additional safety.
Thus, for your own safety, there is a delay of 3 seconds
before the device can be switched on again after each
time it is switched off.
Only after this phase, the saw may be operated again by
pushing the locking button 15 and subsequently activating
the operating switch 9, as described in the section ‘Switching on’.
4. Chain catch bolt (Fig. 7)
This chainsaw is fitted with a chain catch bolt (17). If the
chain breaks when the saw is in operation, the chain bolt
will catch the loose chain end and thus prevent injury to
the operator's hand.
Instructions on working properly with the
chain saw (Fig. 8+9)
Removing branches (Fig. 8)
• Ensure that you are standing firmly.
• Cut a deep notch from below into the branch about 15
cm from the trunk.
• Now cut the branch from above about 5 cm further outwards from the lower notch until the branch drops off.
• In order to remove the rest, cut from below about 1/3
into the remaining branch close to the trunk.
• Cut into the branch from above until the branch has
been removed completely.
• Do not remove free-hanging branches from below.
Felling a tree (Fig. 9)
• Ensure that no one is within the felling area, minimum
distance: 2 tree lengths.
• Ensure that no one can be hit by falling branches or the
tree to be felled.
• Ensure that you have a possible escape route.
• Ensure that you are standing firmly.
• Keep the working area free of objects.
• Always stand at the side of the tree during felling.
• First determine in which direction the tree is to be
felled. The felling notch is cut on this side of the trunk.
• First cut 1/3 of the trunk diameter horizontally into the
tree at the intended felling notch.
• Now cut the second part of the felling notch from
above at an angle of 45° to the first cut.
• Now make the felling cut exactly opposite to the felling
notch. The felling cut must run horizontal and a bit
higher than the felling notch.
• Do not cut completely through the tree. Leave about 1/
10 of the trunk diameter.
• Put wedges into the felling cut to bring the tree to fall.
Cutting a felling tree
• First support the trunk so that the section to be cut off
always hangs freely and does not lie on anything so
that the bar cannot jam.
• If the chain saw does become jammed, switch it off
immediately and withdraw the plug. Use the wedges to
free the bar.
• Avoid letting the saw chain coming into contact with the earth.
General instructions on working with a chainsaw
• Ensure that children and other spectators keep a safe
distance from the working area.
• Apply little pressure to the machine when sawing wood.
If the chain is keen, it will cut almost by itself through
the wood.
• If possible, always work with the chainsaw running at
high speed.
• Never try to continue sawing with a blunt chain. That
causes the motor to overheat and the loss of your right
to claim under guarantee. Always have a replacement
chain at hand.
• Allow the motor to cool off and make working breaks.
• After use always place the chain saw horizontally to
avoid oil dripping from the oil reservoir.
• Always use the chain cover when transporting the chain saw.
Maintenance and Servicing
Always withdraw the plug when carrying out maintenance
and servicing.
• Always remove wood shavings and oil from your chain saw
after use. Ensure in particular that the motor ventilation slits
for cooling the motor in the housing of the chain saw is free
(danger of overheating).
• If the saw chain is particularly dirty, e.g. in case of gumming
with resin, remove the chain and clean it. Place the chain for
a few hours in a vessel containing IKRA chainsaw cleaner.
There-after clean the chain with clear water. If the chain is not
used again immediately, it must be treated with IKRA-service
spray or a customary anti-corrosion-spray.
• Only in case of use of biological oil: As some biological
oils may tend to incrustation after a time, the oiling
system should be rinsed thoroughly before storing the
chain saw for a longer period. Therefore, please fillhalf
of the oil reservoir (about 50 ml) with IKRA chainsaw
GB-4
•
•
•
•
•
•
•
cleaner and close it as usually. Then switch on the
chainsaw - without bar and chain being mounted - and
keep it running until the total rinsing liquid has
evapurated through the oil opening of the chain saw.
Before using the chain saw again, it is absolutely
necessary to refill the oil reservoir.
Do not store the saw outdoors or in damp and moist
areas.
Check all the chain saw parts, in particular the chain,
bar and sprocket, of wear after every use.
Ensure that the chain tension is correct. If the chain is
too loose, it may come off during use and lead to
injuries. The chain must be replaced immediately if it is
damaged. The cutting teeth must be at least 4 mm
long.
Check the motor housing and power cable after every
use for damage. If there is any sign of damage, have
the chain saw checked by a specialised workshop or
the works after-sales service.
Check the oil level and lubrication of your chain saw
after every use. Insufficient lubrication leads to
damage to the chain, bar and motor.
Check how keen the chain is every time before you
use the chain saw. A blunt chain will cause overheating
of the motor.
Sharpening a saw chain requires experience and
specialised knowledge. We therefore recommend to
have sharpening carried out by a specialised workshop.
In the case of technical problems
• The machine does not start up: Check whether the
current socket is live. Check whether the power cable
is undamaged. If neither case applies, take the chain
saw to a specialised workshop or the works after-sales
service.
• Chain does not run: Check position of handguard
(see ill. 7). Chain only runs if handguard brake is released.
• Sparks fly at the motor: Motor or carbon brushes
damaged. Take the chain saw to a specialised workshop or the works after-sales service.
• Oil does not flow: Check the oil level. Clean the oil
flow openings in the bar (see also the corresponding
hints of “Maintenance and servicing). If this is not
successful, take the chain saw to a specialised workshop or the works after-sales service.
Attention: Any maintenance or repair work going
beyond that described in these Operating Instructions may only be carried out by authorised persons or the works after-sales service.
Attention: If the power supply lead of this device
shows any defects, the lead must be replaced by
an authorized repair shop only or through the
manufacturer’s own service personnel, as this
work requires special tools.
Repair Service
Repairs to electric power tools should only be carried
out by specialist electrical personnnel.
GB-5
11/2002
DE
EG-Konformitätserklärung
entsprechend der EG-Maschinenrichtlinie 98/37/EG
Wir, ikra® GmbH, Schlesier Straße 36, D-64839 Münster / Altheim, erklären in alleiniger Verantwortung, dass das
Produkt Kettensäge KSE 1600 / 1800 / 2000, auf das sich diese Erklärung bezieht, den einschlägigen Sicherheitsund Gesundheits-anforderungen der EG-Richtlinie 89/336/EWG (EMV-Richtlinie), 73/23/EWG (Niederspannungsrichtlinie), 98/37/EG (EG-Maschinenrichtlinie) und 2000/14/EG (Geräuschrichtlinie) entspricht. Zur sachgerechten Umsetzung der in den EG-Richtlinien genannten Sicherheits- und Gesundheitsanforderungen
wurden folgende Normen und/oder technische Spezifikation(en) herangezogen: EN 50144-1, EN 50144-2-13,
EN 55014-1, EN 55014-2, EN 61000, EN 50366, Baumusterprüfbescheinigung 1014 MSR, VDE Offenbach
gemessener Schalleistungspegel :
garantierter Schalleistungspegel :
98,3 dB (A)
101 dB (A)
* Prüfstelle: DPLF, D-34114 Kassel
Konformitätsbewertungsverfahren nach Anhang VI / Richtlinie 2000/14/EG
Münster, 11.12.2003
GB
Gerhard Knorr, Technischer Leiter
EC Declaration of Conformity
according to EU Guideline of Machines 98/37/EG
We, ikra® GmbH, Schlesier Straße 36, D-64839 Münster / Altheim, declare under our sole responsibility that the
products KSE 1600 / 1800 / 2000, to which this declaration relates correspond to the relevant basic safety and
health requirements of Directives 89/336/EEC (EMV-Guideline), 73/23/EEC (Low Voltage Guideline), 98/37/EG (EU
Guideline of Machines ) and 2000/14/EC (noise directive). For the relevant implementation of the safety and health
requirements mentioned in the Directives, the following standards and/or technical specification(s) have been
respected: EN 50144-1, EN 50144-2-13, EN 55014-1, EN 55014-2, EN 61000, EN 50366, Engineering type
licence No. 1014 MSR, VDE Offenbach
measured acoustic capacity level :
granted acoustic capacity level :
98,3 dB(A)
101 dB(A)
* Testing laboratory: DPLF, D-34114 Kassel
Conformity assessment method to annexe VI / Directive 2000/14/EC
Münster, 11.12.2003
FR
Gerhard Knorr, Technical Director
Déclaration de Conformité pour la CE
conforme à la directive CE sur les machines 98/37/EG
Nous, ikra® G mbH, Schlesier Straße 36, D-64839 Münster / Altheim, déclarons sous notre seule responsabilité
que les produits KSE 1600 / 1800 / 2000, faisant l’objet de la déclaration sont conformes aux prescriptions
fondamentales en matière de sécurité et de santé stipulées dans les Directives de la CEE 98/37/EG (directive CE sur
les machines), 89/336/CEE (directive EMV) , 73/23/CEE (directive de basse tension) et 2000/14/C.E. (directives en
matière de bruit). Pour mettre en pratique dans les règles de l’art les prescriptions en matière de sécurité et de santé
stipulées dans les Directives de la CEE, il a été tenu compte des normes et/ou des spécifications techniques
suivantes: EN 50144-1, EN 50144-2-13, EN 55014-1, EN 55014-2, EN 61000, EN 50366, Attestation de type 1014
MSR, VDE Offenbach
Niveau sonore mesuré :
Niveau sonore garanti :
98,3 dB (A)
101 dB (A)
* Service de contrôle : DPLF, D-34114 Kassel
Procédure d’évaluation de conformité voir annexe VI / directive 2000/14/CE
Münster, 11.12.2003
Gerhard Knorr, Directeur technique