1
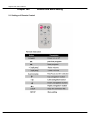
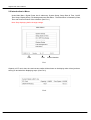
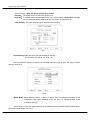
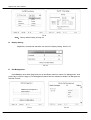
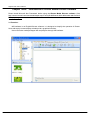
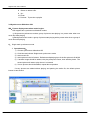
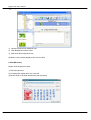
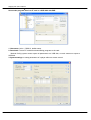
Digital Poster
User’s Manual
L Series & V Series
Multimedia-Display
Geschäftsführer: Helmut Schulz
Nordstraße 4
30900 Wedemark
Tel.: 00495130 5849830 / Fax.: 00495130 584093
mail: [email protected]
Internet: http://www.mm.display.de
Digital Poster User’s Manual
Contents
Chapter One
1.1
1.2
1.3
Chapter Two
Overview
-----------------------------------------------------------------------------------------3
Introduction ----------------------------------------------------------------------------------------3
Packing List -------------------------------------------------------------------------------------3
Function ------------------------------------------------------------------------------------------3
Remote, Menu Introduction ------------------------------------------------------------------4
2.1
2.2
Chapter Three
Remote ---------------------------------------------------------------------------------------------4
Menu Introduction --------------------------------------------------------------------------------5
Introduction to IPoster Media Director software--------------------------------------11
Multimedia-Display
Geschäftsführer: Helmut Schulz
Nordstraße 4
30900 Wedemark
2
Tel.: 00495130 5849830 / Fax.: 00495130 584093
mail: [email protected]
Internet: http://www.mm.display.de
Digital Poster User’s Manual
Chapter One Overview
1.1 Introduction:
This display can play JPEG, MP3 files.
For convenience of customer, most of operation can be done through remote control software.
To new users:
Before turning on the Digital Poster, Please make sure to plug-in the power cable.
The display will play picture automatically when the power is on. If there is no card in, the display
will show the main menu or the switch on picture.
Advice from factory:
1. Do not change any parameters when it is not necessary.
2. Memory card inside Digital Poster, generally do not need to be taken out.
3. Keep far from the water when installing or using the product.
4. Recommend pictures with resolution of 1600 x 1200 for V20A1, 1920 x 1080 for L46H1/
L52H1/ L70H1
1.2 Packing list:
1.
2.
3.
4.
5.
Digital Poster host x 1
Power cable x 1
User’s manual x 1
Remote Controller x 1
Key x 1
If any damage and shortage of accessories is found, please contact dealers or manufacturer in
time.
1.3 Introduction to products function
1. Display pictures and sound files in the effect set by play lists to take place of traditional
light boxes.
2.Powerful iPoster Media Director for easy operation
3.2GB CF card built-in for storage of high definition pictures
4.Turn on/off the display automatically according to settings of the timer by week or by date.
5.Interval time and switch mode of pictures set up by software.
6.Support encrypted programs to avoid unauthorized display.
7. Multiple play lists in storage for on time display.
8. Efficient programs downloading through USB.
9. Support Group Import. Update playlists of several displays with only one USB flash disk.
3
Digital Poster User’s Manual
Chapter Two
Remote and Menu setting
2.1 Settings of Remote Control
4
Digital Poster User’s Manual
2.2 Introduction to Menu
Under Main Menu, Digital Poster has 6 submenus: System Setup, Setup Date & Time, On/Off
Time Setup, Display Setup, File Management and Exit Menu.. The Main Menu is followed by Date,
Time and Version Number of the software. (See Pic.1)
Note: Stop displaying before change settings.
Date
Time
Version Number
Pic.1
Capacity of CF card, date, time and current media will be shown on the display when it has just been
turning on and when the displaying stops. (See Pic.2)
Pic.2
5
Digital Poster User’s Manual
A. System Setup
Press Setup button to set the main menu. In the main menu, press navigation buttons to select
System Setup,and press Play button to enter submenu System Setup. There are 6 submenus:
OSD Language,Clock Display,Scroll Text Display,Import Mode, Set Client Group
Number,Restore Factory Setting and Return to Main Menu.
a) OSD Language:English、Chinese
Pic.3
b) Clock Display: Set the location of the clock on the screen.
c) Scroll Text Display: Set the scroll text display On/Off.
d) Import Mode: Set the mode of import. There are two modes: Default Mode and Group
Mode.
Pic.4
Default Mode: The display will import the default playlist automatically when updating the
playlist with a USB flash disk. Select the “Default Mode” when creating card with iPoster
Media Director software.
Group Mode: The display will import the playlist which matches to its group number
automatically when updating the playlist with a USB flash disk. Select a preset group number
when creating card with iPoster Media Director software.
6
Digital Poster User’s Manual
e) Set Client Group Number: Set the group number of the client.
Pic.5
f) Restore Factory Setting:
Default Setting:
OSD Language:
Clock Display:
Scroll Text Display:
Import Mode:
Client Group Number:
On/Off Time Setup:
Display Setting:
English
OFF
OFF
Default Mode
0000
Same Mode(Keep On)
Brightness 50
Contrast Ratio 50
Saturation 50
Note:Stop displaying before restoring to factory settings. Above mentioned settings will be
changed when the machine restores to factory setting.
B. Setup Date & Time
Use Left and Right buttons to select Year, Month, Day, Hour or Minute and press Up and Down to
change values. Select Update Date/Time and press Play to save the changes. See Pic. 6
Pic.6
7
Digital Poster User’s Manual
C. On/Off Time Setup:
Three Settings:Keep On, Keep Off and Time On/Off
Keep On:The Poster will be on while the power is on.
Keep Off:The Poster will be off while the power is on. If time setting is Keep Off, the display
will turn off automatically 5 seconds after the setting and will keep off.
Time On/Off:There are three groups of settings in this function.
Pic.7
Same Setting: Make the same set from Monday to Sunday.
For example: On at 8:00, Off at 22:00
Use Up and Down buttons to select Same Setting and press Play to enter the page of Same
Settings. See Pic.8
Pic.8
Week Mode: Make different sets for 7 days in a week. This is developed according to the
requirement that some buildings won’t be open on weekends and some
overnights settings.
Press Setup to enter this page and use Up and Down buttons to select On/Off Control Mode,
then select Week Mode. See Pic.9.
8
Digital Poster User’s Manual
Pic.9
Note:Factory default setting is Keep On.
D. Display Setting
Brightness, contrast and saturation can be set in Display Setting. See Pic.10
Pic.10
E.
File Management
Press Setup to enter Main Page and use Up and Down buttons to select File Management. And
press Play to enter the page of File Management which has two submenus: Media File Management
and Disk Format.
Pic.11
Pic.12
9
Digital Poster User’s Manual
View info of Schedule::
View info of IMP:
Previous
F.
Disk Format: Format the CF card.
10
Next
Return
Digital Poster User’s Manual
Chapter Three
Introduction to IPoster Media Director Software
Please install Microsoft Net Framework before using the IPoster Media Director software. Click
http://www.microsoft.com/downloads/details.aspx?FamilyID=0856eacb-4362-4b0d-8edd-aab15c5e04f
5&displayLang=en to download or install Dotnetfx.exe in user’s manual disk.
3.1 Function:
IMD software is an English/Chinese software. It is designed to simplify the operation of iPoster.
Users edit a play list and display schedule with a graphical interface.
Users can make media packages IMP and playlists through IMD software.
11
Digital Poster User’s Manual
3.2 Menu Introduction
1. File:create, open, close, save, save as, exit.
2. Tools:option, preview, language
1) Pictures interval and switch mode
Click:tool— option,to setup interval time and switch mode
2) Preview setup: preview display effect, screen resolution
4:3
16:9
16:10
1024 x 768,1600 x 1200
1366 x 768,1920 x 1080
1440 x 900,1680 x 1050,1920 x 1200
12
Digital Poster User’s Manual
3)
Group Import: Click Tool —— Group Import, to add, delete or edit group number.
4)
Language: ENGLISH, Chinese
3.3 IMP: Support classic digital poster mode, a sound effect corresponding a picture
A. View: Picture modes
Detail
Thumbnails
Icons
13
Digital Poster User’s Manual
B. Add:to add pictures only
Click “Add” to add and edit pictures.
1) to add multiple pictures press Ctrl while select pictures.
2) to add all pictures Press Ctrl+A
C. Edit introduction
1.
2.
3.
4.
5.
6.
7.
New:to create an IMP file
Open: to open a saved IMP file
Close: to close an IMP file in editting
Split: to revert a packed IMP file into several separated pictures
Save: to save an IMP file
Add more: to add more programs to a playlist
Edit:to edit a playlist
To browse a picture file
To browse a music file
Interval time:2s-180s
Switch mode: multiple switch
modes for selection
14
Digital Poster User’s Manual
8. Delete: to delete a file
9. Up:
10. Down
11. Preview:To preview a playlist
3.4 Synchronous Slideshow ISS:
ISS:Picture display starts when music begins.
ISS supports two synchronous slideshow modes:
1) Single track synchronous mode-a group of pictures start playing in a preset order when one
music file starts playing
2) Background music mode- a group of pictures start playing with a preset order when a group of
music files start playing
A: Single-track synchronous mode
1
Operation step:
1) Choose synchronous slideshow ISS
2) Click New and choose Single-track synchronous mode
3) Add a music file
4) Add a picture in the left column. Default start displaying time of the first picture is 00:00:00
5) If another image should be added, click play and press Pause, then add the picture. The
second picture will start to play where it is inserted.
6) If more pictures should be added, repeat above operation.
If many pictures are added without playing and pausing the audio file, the default picture
interval is two second.
15
Digital Poster User’s Manual
B:Background music mode: Pictures and music files loop display
1) Choose synchronous slideshow ISS
2) Click Background music mode
3) Add music files and picture files
Up/Down is set to adjust display order of music files.
2. Edit ISS items:
Double click the picture to be d
1) To browse pictures.
2) To change the display time of a music file.
3) Switch mode: to change the switch mode of pictures
16
Digital Poster User’s Manual
3.4 IMD card creation:
Users make program lists in a CF card or a USB disk with IMD.
1. Characters: Latin-1, GB2312, default setup.
2. Download: Format CF card before downloading programs to the card.
Marked Config system means export all parameters to a USB disk, no mark means no export to
USB disk.
3. System settings: to setup parameters of a player without a remote control.
17
Digital Poster User’s Manual
OSD languages: English and Chinese
Time display: Close, the upper right corner, the upper left corner, the lower right corner, the lower left
corner
Scroll Text display: on or off
Parameter setup: brightness, contrast ratio, saturation, range 0-100, default setup 50.
On time display mode: common mode, week mode
4. Schedule: About IMD schedule/ date/time operations.
1) Unmarked Schedule means programs will be displayed according to the order files are added;
2) Mark Schedule to setup a schedule:
Date ----/--/--, Time--:-- unchanged means the schedule is a default schedule.
3) Add: to add a schedule. No overlapping time allowed in two schedules.
4) If there is a schedule setup for a playlist, programs in the list will be played on time; if not,
programs in the default schedule will be played when no other playlist is on errand.
5) Save schedule:to save a play list. Open a play list setup previously.
5. Media:
1) At least one file should be added to backup schedule for programs display when no schedule
is on errand.
2) Add: A schedule must be chosen before adding a media file so that the file will be shown on
time.
3) Remove: to remove selected media files. Multiple media files could be chosen in Create Card
menu when ctrl or Shift+ Up / Down buttons are pressed in selecting files.
4) Up/Down: to adjust the order of program to be shown;
5) 30 play lists each day and 10 files in each Playlist at most.
6. Write to a disk:
1) Single or multiple disks can be chosen. Error reports will be shown if no disk or card chosen.
2) Click“Write to a disk”, information will be written to a disk, two file folders—iMedia and
iSystem will be written in the disk. IMedia for IMP and programs storage,iSystem for
characters storage.
7. Create Card Option:
Select “Default” or “Group Import” before creating card. It’ll create card according to default settings
if select “Default” mode. Users can choose one or several different group number in “Group Import”
mode to make that the specified iPoster only play the specified program.
Multimedia-Display
Geschäftsführer: Helmut Schulz
Nordstraße 4
30900 Wedemark
18
Tel.: 00495130 5849830 / Fax.: 00495130 584093
mail: [email protected]
Internet: http://www.mm.display.de