1
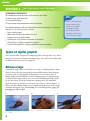
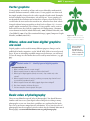
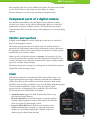
UNIT 1
Digital Graphics
UNIT 1
DIGITAL GRAPHICS
INTRODUCTION
This unit is designed to introduce you to multimedia technologies,
applications and design processes. You will investigate how multimedia
is used effectively in a range of existing professional products. You
will develop knowledge and skills to creatively design and implement
elements of a multimedia product using multimedia authoring tools.
LEARNING OUTCOMES
After studying this unit you will be able to:
use a digital camera to obtain images and transfer these electronically
use the basic editing tools and features of a digital image manipulation program
edit a digital graphic for a particular purpose.
RESOURCE TOOLKIT
Hardware
− Computer
− Digital camera
Software
− Adobe Photoshop
− Word processing application
(e.g. Microsoft Word)
Other
− Planning and Review Form
− Digital camera images
− Evidence Checklist
Optional
− Books on photographic
techniques
− Photography magazines
− Access to the Internet to
research different types
of digital cameras and
photographic techniques
− Objects to photograph (e.g.
people, landscapes, buildings)
− Scanner
1
ABOUT THIS UNIT
For this unit you will need access to a digital camera. You will need to be
familiar with the camera parts and the basic rules of photography.
You will need to plan and record what images you will obtain based on the
needs of your client as detailed in an assignment brief. You will look at ways of
identifying your client’s requirements and use planning methods appropriate
for your brief.
You will obtain appropriate digital images, transfer these to your computer,
organise and rename the images, and select which images you will edit. You
will then use the editing tools and features of a digital image manipulation
application to edit, retouch and repair your digital photographs. You will need
to save images in different file formats.
Finally you will review the quality of your edited images against the
original assignment brief and assess if the edited images meet your client’s
requirements.
The Student Review activities and Practical Tasks in this chapter will
allow you to develop your understanding of the requirements for an OCR
assessment and practise the skills required for the unit 1 syllabus. The
images you take and edit in this chapter cannot be submitted for assessment
purposes.
ASSESSMENT FOR UNIT 1
Your assessment work should be submitted to OCR via e-portfolio. You
should therefore save all original and edited images and all screen prints in
electronic format. Any hard-copy evidence should be scanned and saved
electronically.
For the assessment, you must ensure that you show evidence of progression
from one task to the next. For example, the images that you edit must be
selected from the ones you originally took.
You may use your original
and/or edited images for
other units.
Digital image files have
not been provided with this
book because you will need
to source and manipulate
your own images in an OCR
assessment.
Copyright
You must ensure you
comply with copyright
law when working with
images. Note that images
from the Internet are not
necessarily in the public
domain and may be subject
to copyright. If you are using
any images downloaded
from the Internet you must
either obtain permission or
reference your sources.
Evidence
You will need to provide:
evidence of planning your project – this could be included in, or be in addition to, the Planning and Review Form
Planning and Review Form
a diary (e.g. digital diary) or log of your activities for this project
evidence (e.g. a list or notes) that you understand the basic rules of photography
screen print(s) to show evidence of downloading original images from a camera and renaming these images
evidence of original images (a minimum of six images) and of selecting some of these images for your project
evidence of edited images with a brief description of editing techniques used on each image
screen print(s) to show edited images saved in appropriate file formats
Evidence Checklist.
2
UNIT 1
Digital Graphics
Evidence file formats:
Images can be provided in any appropriate image file format.
Screen prints, your diary, the Planning and Review Form and the Evidence
Checklist can be in Microsoft Word format.
Refer also to ‘Planning
your work’, ‘Evidence’
and ‘The Evidence
Checklist’ on pages
XX, XX and XX in
the ‘Common Skills’
chapter.
SOFTWARE
This chapter is written specifically for Adobe Photoshop CS but it may also
be used with other versions of Photoshop or Photoshop Elements. However,
please note that some screenshots, methods and features may not be available
and/or will not match other versions exactly.
ABOUT THIS CHAPTER
This chapter for Unit 1 is divided into three sections. You must work through
the sections in sequence.
In Section 1 you will learn about different types of digital graphics, how
they may be used, some basic rules of photography and the basic parts of
a digital camera. You will learn how to save your digital images, and create
and rename files and folders. You will learn about different file formats and
file extensions. You will learn about the types of software applications that
are available for manipulating images and their capabilities.
In Section 2 you will become familiar with the Photoshop interface and
toolbox tools, use the selection tools and work with layers. You will learn
about image and canvas size, resolution and how to correct mistakes.
You will learn how to open, edit, retouch and repair graphics using the
functions in Photoshop.
In Section 3 you will learn how to save images in different file formats.
Assessment objectives 3a (plan the image editing to a specific brief) and 3b
(review the edited image against the original brief) and the corresponding
knowledge, skills and understanding criteria are covered in the ‘Common
Skills’ chapter.
Note: There are many ways
of performing the skills
covered in this book. The
guidelines in this book
explain one way only. The
HOW TO guidelines provided
have proven to be easily
understood by learners.
AOs 1a, 1b, 2a
AO 2b
AO 2c
Refer to ‘Planning your
work’ and Reviewing
your work’ on pages
XX and XX.
3
iMedia
SECTION 1
Types of digital graphics, using a digital camera
ASSESSMENT OBJECTIVES
The following assessment objectives will be covered in this section:
1a Obtain source digital image files
1b Save the digital images
2a Open a bitmap image manipulation software application
TIP!
The following knowledge, skills and understanding criteria corresponding to assessment
objectives 1a, 1b and 2a will also be covered:
Types of digital graphic
Where, when and how digital graphics are used
Component parts of a digital camera
Different types of file formats and common file extensions
Different types of software manipulation application
Properties and capabilities of image manipulation software applications
Types of digital graphic
There are two main categories of computer graphics: bitmap and vector. Raster
images are the technical name for bitmap images. You will need to understand
the difference between the two categories.
Bitmap image
A bitmap is a map of dots or bits (hence the name). A bitmap image is made
of pixels (dots) that are arranged and coloured differently to form an image
or pattern such as a photograph. Each pixel has its own colour value. A
bitmap might contain millions of colours. Bitmap images are dependent on
resolution. When you zoom in, you can see the individual pixels that make
up the total image. When you zoom into a bitmap effect, the individual
pixels that make up the image can be seen more clearly (refer to Figure 1.1).
When you edit a bitmap image, you are manipulating the pixels in the image.
Common bitmap file types include bmp (the raw bitmap format), jpeg, gif,
pict, png, pcx, tiff and psd.
a
b
c
Figure 1.1 The same bitmap image in different views: a) at 100% b) zoomed in to 500% c) zoomed
in to 1500%
4
1a: For an assessment,
you will need to take a
minimum of six digital
photographs, choose
four of these and then
manipulate at least one of
your chosen four images.
UNIT 1
Digital Graphics
Vector graphics
Vector graphics are made up of lines and curves defined by mathematical
formulae and measurements called vectors. Vector graphics are often used
for simple graphics that need to be easily reproduced and resized. Examples
include company logos, illustrations, text and clip art. Vector graphics are
not dependent on resolution and retain their crispness when altered. They
can therefore be increased or decreased in size, moved or have their colour
changed without losing any quality or detail (refer to Figure 1.2). A vector
graphic might contain only a few colours. Vector graphics can be easier to
work with because they lack the complexity of a bitmap image. Common
vector formats include ai (Adobe Illustrator), wmf (Windows Metafile), cdr
(CorelDRAW), cmx (Corel Presentation Exchange), cgm (Computer Graphics
Metafile) and dxf (AutoCAD).
Where, when and how digital graphics
are used
Digital graphics can be used for many different purposes. Images can be
published in books, magazines, on the World Wide Web or inserted on web
pages. If you are intending to publish images on the Internet, you will need
to save the image in a file format that can be read by most browsers (e.g. gif,
jpg).
Figure 1.2 The same vector
graphic in different views: a) at
100% b) zoomed in to 400%
Refer to ‘Different
file formats and
file extensions’ on
page XX, and ‘Saving
images in different file
formats’ on page XX.
Student review 1.1 – Identify types of digital graphics
Assessment objective 1a
1. What is another name for a raster image?
2. Which image file format is made up of dots called pixels?
3. Which type of digital graphic (bitmap or vector) may contain only a few
colours?
4. Which image file format is best for producing a company logo that will need
to resized and reproduced easily?
5. Which image file format will display jagged edges when enlarged?
6. Give three examples of bitmap file types.
7. List two examples of vector graphic file types.
Basic rules of photography
There are no defined or agreed ‘rules of photography’. You should become
familiar with how to use your digital camera and practice taking as many
photographs as you can. Some basic guidelines are explained in this book,
these are by no means comprehensive or definitive. To see how the rules of
photography have been applied, visit the website for the National Museum of
Photography: www.nationalmediamuseum.org.uk/photography/
5
iMedia
Modern cameras can focus for you, work out exposure and select a suitable
shutter speed or aperture as well as many other functions; however, they
cannot compose the picture for you.
You should try your hand at different types of photography:
Pictorial
Portrait
Photojournalism
Abstract
e.g. landscape and nature photography
e.g. people and animals
e.g. press photography (compelling storytelling)
e.g. extreme close ups of detail of something
Composition
Photography captures a moment in time so an important point to consider
when taking photographs is composition. Below are some basic principles of
composition:
Look at the forms in your image. A good photo is a good arrangement
of form. In a portrait the form could be the features in a woman’s face
whereas in a landscape the forms are the landscape, trees, rocks, hills etc.
Colour – you need to consider what colours go together. Colours can
harmonise, contrast dramatically or clash violently.
Contrast – your photos should have a good balance between different
colours. Even black and white photos should have a good contrast of black,
white and grey.
Motion – avoid having movement in or outside your image. It will direct
the eye away from the main focus in the image.
Leading lines – use these to draw the viewer’s eye to the intended subject.
A leading line can be almost anything, e.g. a road, building, tree, river or
shadow. You will not find strong leading lines around every subject, but
if present, take advantage of them. Lines in a picture should lead into the
picture and should lead your eye toward the main subject.
Orientation: landscape/portrait – before you take a picture, think
about whether it would better taken with the camera held horizontally
(landscape) or vertically (portrait). For example, a vertical shot of a tall
building emphasises its height. A horizontal shot of a landscape can give a
feeling of space and breadth.
Rule of thirds
The rule of thirds is probably the most recognised rule and has been used
for centuries by artists and photographers. Many famous photographs and
paintings have the rule of thirds applied to them. Imaginary lines are drawn
dividing the frame into three vertical and three horizontal sections making a
total of nine rectangles (refer to Figure 1.3).
Where these lines intersect is an ideal spot to place important elements of
your composition, e.g. an individual or a point of interest. The subject is given
6
Figure 1.3 The rule of thirds
UNIT 1
Digital Graphics
more emphasis than if it is in the middle of the photo. The intersection points
are also useful if there is more than one main subject in a photo.
Features and objects can also be placed along the imaginary lines.
Component parts of a digital camera
You should become familiar with your digital camera and how to make
the most of its features to take effective photographs. Below are some brief
explanations of the parts of digital cameras. You should read your digital
camera manual. Please note that cameras, like computers, are constantly being
updated.
Shutter and aperture
A digital camera shutter is a device which opens and closes to control the
time of a photographic exposure.
ph_002 to come
The shutter opening time affects the image exposure and how motion is
portrayed in it. Most digital cameras have an automatic setting to determine
the appropriate shutter speed; some will have the option to set shutter speed
manually for greater artistic control.
Shutter speed is calculated in relation to aperture. The aperture is the size
of the lens opening which regulates how much light passes through the lens
to strike the image sensor. Aperture is measured in f-stops: a higher number
represents a smaller amount of light.
The shutter and aperture settings are used together to determine the amount
of light that strikes the image sensor.
Flash
Most digital cameras have an automatic flash setting which can be set to
trigger automatically in poor light conditions, and some have additional
settings that allow greater control over the flash. Automatic flash settings
should be used carefully as problems can occur with digital flash photography.
The most common problem is red eye, where the subject’s pupils
appear red in the resulting photo. These problems can be overcome
by selecting the correct flash mode, for example:
Automatic mode triggers the flash automatically if there is too
little light for a good exposure.
Red-eye reduction fires a short burst prior to exposing a photo,
causing a subject’s pupils to contract. This reduces the reflection
in the eyes before the photograph is taken.
Forced or Fill-in flash keeps the flash on in situations when
additional illumination is needed, e.g. when the main source
of light (or a particularly bright light) is behind a subject or
shadows prevent details from showing.
7
iMedia
Liquid crystal display screen
The liquid crystal display (LCD) screen is the
screen on the back of a digital camera that the
photographer may use to compose images. The
LCD is also used to preview images immediately
after they are taken and to review captured images
stored in the camera’s memory card. It can be also
be used to view camera settings and menus. Because
the LCD consumes a lot of battery power, in order
to save power it can be set to shut off or standby
automatically after a set time period.
Memory card
A digital camera memory card is a small electronic device that stores
image files. In some models, images are stored in the camera’s own internal
memory. Memory cards vary in storage size from 16 MB (megabytes) to 4 GB
(gigabytes). The larger the memory card storage capacity, the more images of
a given size/quality it can hold. Once you have taken photographs, you can
delete them from the memory card, before or after transferring them to your
computer, thus freeing up space on your memory card.
Assignment brief
Cove Photography Club – Booklet
You have recently become a member of a photography club. The
club organiser is in the process of producing a booklet for new
members. In it, he would like to include some guidelines for new
photographers showing the parts of a digital camera and giving
some tips for taking photographs.
At the last photography club meeting, all the members were split into groups. Each group will
be required to present their photographs at the club’s quarterly meetings. The next meeting will
take place in three months’ time. The group that submits the best retouched photograph will
win a free digital camera. Each stage of the editing and retouching will need to be shown with a
brief explanation of the editing technique used. Each group member has been assigned the task
of taking photographs, which they will need to repair and retouch individually. The group will
then agree which member’s photograph will be presented at the club meeting. Each member must
present their editing photo to their group in two months’ time.
Every member must take at least six photographs:
• Three well-composed, digital photographs: one of a landscape, one of a building and one of an
individual. These three photographs must be composed or framed creatively following the basic
rules of photography.
• Three photographs which will require retouching and repairing. These photos can be of any
appropriate but not offensive subject (e.g. streets, buildings, places of interest).
• At least one photo must be in portrait orientation and at least one in landscape orientation.
8
UNIT 1
PRACTICAL TASK 1.1
Digital Graphics
Refer to assignment brief, produce
guide
PLATFORM
Assessment
objective 1aWINDOWS®
MACINTOSH®
Minimum 800
MHz– Booklet’
Minimum
600 MHzbrief.
1.Processor
Refer to the ‘Cove Photography
Club
assignment
Intel® Pentium® III or
PowerPC® G3 and
equivalent
2. Produce a simple guide
about the basic rulesprocessor
of photography that
could be included in aWindows®
booklet2000,
about photography.
Operating system
Mac OS® X 10.3, 10.4
XP
3. In your guide, includeWindows
some information
about the parts of a digital
camera that new members
for example,
shutter
Memory
256 MBshould
RAM (1consider,
GB recommended
to run more
speeds and using flash.
than one Studio 8 product simultaneously
4.Monitor
You may present your1024
guide
as 16a bulleted list1024
or short
x 768,
x 768, paragraphs
thousands of
bit
display
(32-bit
colors
display (millions
with subheadings.
recommended)
of colors recommended)
Saving digital images
Once you have taken your digital images, you must download them from the
digital camera into a folder on your computer. To connect your digital camera
to your computer and download the images, you should refer to your digital
camera user manual. WindowsXP usually detects any new hardware so you
may be able to take advantage of its ‘plug and play’ capability.
Once you have downloaded your images to your computer, you should
save the required images into a folder, then rename each image using an
appropriate filename to reflect the image content. Digital camera images will
usually be a jpg file format, if so, you will not need to change the file format at
this stage.
TIP!
Copy the folder containing
the original downloaded
images before renaming
any photos so that you
have backup copies of
your originals.
FILE MANAGEMENT
HOW TO …
Create a folder in your user area
File menu → New → Folder → delete the text New Folder and enter
an appropriate folder name → press Enter.
or
Right-click → a menu is displayed → select New → Folder → enter a
suitable folder name → press Enter.
HOW TO …
HOW TO …
Copy a folder
Click on the folder
to select it → Edit
menu → Copy →
Edit menu → Paste.
Create a subfolder
Double-click to open an existing folder → repeat the steps for ‘How
to create a folder’ above.
9
iMedia
HOW TO …
HOW TO …
Produce a screen print
1. Open the folder containing the files you wish to screen print.
2. From the Standard buttons toolbar, click the drop-down arrow to
the right of Views and select an option (refer to Figure 1.4):
To display miniatures of your original images, select
Thumbnails.
To display the file Size and Type, select Details. The Details
option will also show the Date Picture Taken for any digital
images.
3. To capture only the active window, press the Alt +
PrtSc (Print Screen) keys (or to capture the entire
screen press the Print Screen key only).
Rename a file or
folder
Click on the file
or folder to select
it → File menu →
Rename → delete
the existing name
and enter the new
name → press
Enter.
4. Open a new Word document.
5. Right-click → Paste or Edit menu → Paste.
6. Remember to enter your name in the screen print
document.
7. To print the screen print document, click the
Print icon
.
Figure 1.4
Selecting a view
Backing up files
To avoid accidentally deleting, overwriting or corrupting your files, once you
have organised them, you should create a back-up copy on another network
area or removable medium.
HOW TO …
Back up work on to a CD-R or CD-RW
1. Using a computer that has a CDR drive, insert a blank, writable CD
into the CD drive → open the My Computer window → select the
folders you want to copy to the CD (to select more than one folder,
hold down the Ctrl key).
2. In the My Computer window, below File and Folder Tasks →
select Copy this folder → in the Copy Items dialogue box, select
the CD drive → select Copy.
3. In the My Computer window, double-click the CD drive → below
Files Ready to be Written to the CD select the folder(s) you want
to write to CD → below CD Writing Tasks, select Write these files
to CD → Windows displays the CD Writing Wizard.
4. Follow the instructions in the wizard.
10
HOW TO …
Back up a folder
onto a memory
stick
Insert the memory
stick into a USB
port → right-click
on the folder name
→ Send To →
Removable Disk.