1
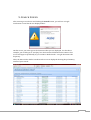
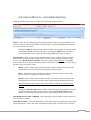
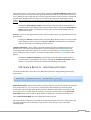
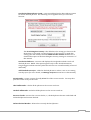
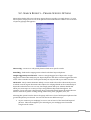
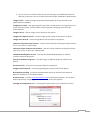
Micro Niche Finder User Manual
Version 4.xx
TABLE OF CONTENTS
1.
Activation ................................................................................................................................................................... 2
2.
Home Page ................................................................................................................................................................. 3
2.A.
Keyword and Search Statistics................................................................................................... 4
2.B.
Additional Tasks ................................................................................................................................ 4
2.C.
Current Program Settings ............................................................................................................. 4
2.D.
Client Testimonials .......................................................................................................................... 4
2.E.
Google Settings ................................................................................................................................... 5
3.
Features Accessible From Any Screen ........................................................................................................ 6
4.
Getting Started ........................................................................................................................................................ 7
5.
Search Screen ........................................................................................................................................................... 8
5.A.
Search Results – Column Definitions ...................................................................................... 9
5.B.
Search Results – Additional Options .................................................................................... 10
5.C.
Search Results – Phrase-Specific Options.......................................................................... 13
6.
Saved Searches ..................................................................................................................................................... 17
7.
Manage Projects ................................................................................................................................................... 18
8.
Importing Keywords and Results ............................................................................................................... 20
1
1. ACTIVATION
If this is the first time you are using Micro Niche Finder, you will see an activation screen.
You can activate your Micro Niche Finder software by entering your ClickBank Receipt
Number. This receipt number was emailed to you after you purchased Micro Niche Finder.
The receipt number is normally 8 or 9 digits long and is a mix of letters and numbers. If you
did not receive your receipt number, you may use the following link to request that it be
emailed to you:
http://www.micronichetool.com/userlookup/form.php?whichForm=email
If there are updates available for Micro Niche Finder, a message will appear on the Home
page under the “Welcome to Micro Niche Finder” heading. You will see the following
statement in red letters: “A program update is available!” Click the download link next to
the message to update your Micro Niche Finder software. The picture below is a snippet of
the home page – this is the link you are looking for:
Once you click the download link, your Micro Niche Finder software will update itself
automatically. You have to restart Micro Niche Finder to fully activate your new version.
When attempting to restart Micro Niche Finder, you may be directed to a Micro Niche
Finder Start Up Wizard – that’s OK. Merely click that you agree to the terms, and the
program will update itself completely. You are now ready to go!
Notes:
2
2. HOME PAGE
The Home Page Screen is the first screen you’ll see when you open Micro Niche Finder. It
looks like this:
The Home Page provides the following information and features:
Version Number -- The version number is important if you have a support issue. This
number is located directly under the words “Home Page” in the top left portion of your
screen. If you ever need to contact support always include the version number.
Activation Status -- If you have successfully entered your receipt number and activated
Micro Niche Finder, this screen will state that Micro Niche Finder has been activated.
Otherwise it will warn that you need to activate it before proceeding. This information is
found under the “Welcome to Micro Niche Finder!” heading.
If you see Trouble with Product Activation, this means you may have entered
your receipt number incorrectly or there may have been other problems with the
Activation. Click the link provided to reset your receipt number. You will then see a
link that reads, “Click here to activate Micro Niche Finder now.” Click this link to
reenter your receipt number. If you still have problems activating your software go
to : www.micronichetool.com/userlookup/form.php?whichForm=license
where you will be able to reset your computer’s serial number that is registered in
Micro Niche Finder user database.
The following five sub-sections describe the other features available on the Home Page.
3
2.A. KEYWORD AND SEARCH STATISTICS
If you have performed searches in the past, stats about those searches are displayed right
under the heading.
Below the statistics, there are two links:
1. Click here to Manage your Saved Searches - this is a link to your Saved Searches
(for more details, see Saved Searches Section later in this manual).
2. Click Here to Import Keywords and Results - this link allows you to import
keywords from a comma-delimited file (see Importing Keywords and Results
Section later in this manual.)
2.B. ADDITIONAL TASKS
Click on the following links to perform the specified functions:
Optimize Data Files – on the rare occasion that your data becomes corrupt, click
this link and it will usually fix the problem.
Change your Data Path – click this link if you need to change the location of your
Data Files.
Check for Program Updates – click this link periodically to check for software
updates.
Micro Niche Finder Support on the Web – click this link to go to the on-line
Support Blog for Micro Niche Finder.
2.C. CURRENT PROGRAM SETTINGS
The following information is provided on this section of the Home Page:
Data Folder - displays the current location of your Data Files.
Program Path - displays the current location of your Program Files.
2.D. CLIENT TESTIMONIALS
Each time you refresh the Home Page, a new Client Testimonial appears. These are
comments submitted by other Micro Niche Finder users. If you would like to submit your
own testimonial, simply click the link and follow the instructions.
4
2.E. GOOGLE SETTINGS
This section displays and allows you to modify two settings relevant to your Micro Niche
Finder’s use of Google:
First, the name of the Google Server you are currently using is displayed. To
change to a different Google Server, click the link and follow the instructions. This is
especially useful if you are investigating international niche markets or if you are
not primarily located in the USA (the Default Google Server is the US Google Server).
Second, the Google Search Engine Courtesy setting is displayed. In an effort to
reduce the risk of “Google Blocks,” Micro Niche Finder uses a proprietary timing
mechanism when retrieving results; you control the setting for this mechanism.
Click the Change Setting link to access the Search Engine Courtesy screen:
Here, you can set your desired timing delay to one of three settings:
1. Minimum – Searches will be faster, but there is a higher likelihood of being
blocked by Google.
2. Default – Searches will be slower, but there is a lesser likelihood of being
blocked by Google.
3. Maximum – Searches will be much slower (one minute wait between searches),
but there is a very small likelihood of being blocked by Google.
5
3. FEATURES ACCESSIBLE FROM ANY SCREEN
No matter where you are in Micro Niche Finder, you always have access to these important
functions:
Search for – enter your search term and press the Search button. You can also click the
drop-down box (the down arrow) for a list of past searches.
Hot Trends – click this button for a list of search phrases that are hot right now (according
to Google.) No search counts will be displayed because Micro Niche Finder gets this
information from a different source than is uses for general searches. You may click on the
Dig This, Exact Phrase Count, Ad Cost and Get OCI links to retrieve the specific information
for a phrase.
Brainstorm – click this button for a random list of hot product ideas. Use this function if
you’re stuck for new ideas. No search counts will be displayed because Micro Niche Finder
gets this information from a different source than is uses for general searches. You may click
on the Dig This, Exact Phrase Count, Ad Cost and Get OCI links to retrieve the specific
information for a phrase.
Home Icon – click this icon to return to the Micro Niche Finder Home Page.
Power Icon – click this icon to exit Micro Niche Finder.
Home – click this link to return to the Micro Niche Finder Home Page.
Back – click this link to return to the previous screen or search result set.
Manage Searches – click this link to view and manage an alphabetical list of your past
saved searches (for more details, see Saved Searches Section later in this manual).
Manage Projects – click this link to view and manage your search projects (for more
details, see Manage Projects Section later in this manual).
Support - click this link to join a live support chat for program support (if support
personnel are available) – you can also contact support at [email protected]
Downloads – click this link to go to the website where you can access all the Micro Niche
Finder bonus items.
Exit - click this link to exit Micro Niche Finder.
6
4. GETTING STARTED
Micro Niche Finder is extremely easy to use. All you have to do is enter a “base keyword
phrase” into the search box (located on the top left corner of your screen) and click the
Search button. Micro Niche Finder will go to work finding possible niche market keywords
using your entered phrase as a starting point.
A base keyword phrase can be a:
Pre-term – a word or phrase that people use in combination with their specific keyword
phrases. Micro Niche Finder will return up to several hundred possible niche market
keywords. A pre-term is especially helpful when you don’t know exactly what it is you’re
looking for. See the table below for some suggested pre-terms.
Product name - the name of a product you would like to promote. Micro Niche Finder will
return narrow keywords related to the product.
Broad keyword phrase – a word or phrase that has general meaning (such as car, credit
card, fishing, etc.) Micro Niche Finder will return all sorts of niche keyword possibilities.
Here’s a list of some Pre-terms to get you started:
Alleviate
Best
Build
Control
Correct
Create
Cure
Directions
Do It Yourself
Eliminate
Fast
Get Rid Of
Help
How To
Increase
Instant
Learn
Make
Prevent
Relieve
Remedy
Remove
Repair
Revise
Solve
Sooth
Another way to begin your search is to click the Hot Trends or Brainstorm buttons to
return a list of keyword results.
Hot Trends – returns a list of search phrases that are ‘hot’ right now, according to Google.
No search counts are displayed because we’re getting this information from a different
source than we use for general searches. You may click on the Dig This, Exact Phrase Count,
Ad Cost and Get OCI links to retrieve the specific information for a phrase.
Brainstorm – returns a random list of ‘hot’ product ideas. Use this function if you’re stuck
for new ideas. You may click on the Dig This, Exact Phrase Count, Ad Cost and Get OCI links to
retrieve the specific information for a phrase.
7
5. SEARCH SCREEN
After entering a search term and clicking the Search button, you will see a Google
Verification screen like the one displayed here:
On this screen, you must type in the characters that you see displayed. For the above
example, you would type in “wxofpey” into the Password field and click Continue. This
screen will appear sporadically as you use Micro Niche Finder… Google determines the
frequency.
Then, the Micro Niche Finder Search Results screen is displayed showing the preliminary
results of your search:
8
5.A. SEARCH RESULTS – COLUMN DEFINITIONS
On the Search Results screen, you will see the following column headers:
Phrase – these are the niche keyword or keyword phrases that are returned based on the
term you entered. Micro Niche Finder will return up to several hundred different phrases
for every base term you enter.
Clicking the Phrase column header will cause Micro Niche Finder to sort the results
in ascending alphabetical order by Phrase. Clicking the Phrase column header a
second time will sort the results in descending alphabetical order by Phrase.
Search Count – these are the average monthly counts for the number of times the given
phrase was searched in Google each months. There are three possible variations of the
search count: Broad, Exact and Phrase. The values in this column default to the Exact
Search Count, but you can use the links just above the Phrase column header to view any of
the three types of Search Counts:
Broad - these search counts include searches in which all of the words from the
search phrase were used, but not necessarily in the same order.
Exact – these search counts include searches in which the searcher entered the
phrase exactly as it appears in the first column.
Phrase - these search counts include searches in which all of the words from the
search phrase were used, in the same order, but possibly with additional words.
When searching for your niche market, think of these counts as the demand in the
market.
Clicking the Search Count Column header will cause Micro Niche Finder to sort the
results in ascending order by Search Count. Clicking the Search Count Column
header a second time will sort the results in descending order by Search Count.
Date Range for Previous 12 Months – these bar graphs represent the search count trend
over the past 12 months.
Exact Phrase Count – these are the number of web pages that are indexed in Google for the
given exact phrase. This is the count returned by Google when a searcher enters a search
9
phrase with quotes. This count is returned by clicking the Get Exact Phrase Count link for
each phrase (you must click the link to get this data because Micro Niche Finder retrieves it
from a different source than the ones used for general searches.) The counts are saved and
automatically displayed the next time you search for the same term within Micro Niche
Finder. When searching for your niche market, think of these counts as the competition in the
market.
Clicking the Exact Phrase Count column header will cause Micro Niche Finder to
sort the results in ascending order by Exact Phrase Count. Clicking the Exact Phrase
Count column header a second time will sort the results in descending order by
Exact Phrase Count.
Ad Cost – these are the approximate costs for the top ad position in Google Adwords for the
given phrase.
Clicking the Ad Cost column header will cause Micro Niche Finder to sort the results
in descending order by Ad Cost. Clicking the Ad Cost column header a second time
will sort the results in ascending order by Ad Cost.
Commercial Intent – these values represent the Microsoft OCI (or Online Commercial
Intent) index. They show the likelihood of a searcher making a purchase based on the
search phrase he entered. If an OCI is .5 or greater, it means there is strong commercial
intent on the part of the searcher. To retrieve an OCI value, click the Get OCI link for that
phrase.
Clicking the Commercial Intent column header will cause Micro Niche Finder to
sort the results in ascending order by OCI. Clicking the Commercial Intent column
header a second time will sort the results in descending order by OCI.
5.B. SEARCH RESULTS – ADDITIONAL OPTIONS
On the Search Results screen, there are additional options for manipulating and viewing
your results:
Refresh from Web – Micro Niche Finder automatically saves your past searches and results
in its search history. So, if you enter a search phrase that matches a previously saved
search, Micro Niche Finder pulls the data from its database rather than retrieving it from
the various sources on the internet. However, you may override this by clicking Refresh
from Web which will force Micro Niche Finder to update the results from the Internet.
Note: Refresh from Web does not update Exact Phrase Count.
The following three features work with the check boxes found to the left of each phrase. By
checking the boxes next to the phrases you wish to work with you can perform the
following tasks:
10
Get Checked Exact Phrase Count – retrieves and displays the Exact Phrase Counts
for all the checked phrases. The following screen appears when you select this
function:
The Search Engine Courtesy value defaults to the setting you chose on the
Home Page. If you wish, you may change it for this search. To make this
setting your new default, check the Make this the default checkbox. For a
detailed description of the Search Engine Courtesy setting, see section 2.C of
this manual.
Get Checked Ad Cost – retrieves and displays the Google Adword Ad Cost for all
checked phrases. NOTE: This option appears only on Hot Trend, Brainstorm,
Google Suggest and LSI searches (when the Ad Costs are not automatically retrieved
and listed).
Add Checked to Project – adds the checked phrases to either a new or an existing
search project (for more details, see Manage Projects Section later in this manual).
Print Results – creates a printer friendly HTML file of the current results. You may then
print the results from your browser.
Check All Results – checks all the phrases in the current result set.
Uncheck All Results –unchecks all the phrases in the current result set.
Reverse Checks –reverses the current checks, i.e., checked phrases become unchecked and
unchecked phrases become checked.
Delete Checked Results – deletes the currently checked phrases.
11
Check Filtered Results – checks all the results that match the filtering criteria you provide.
The following screen is displayed when you click the Check Filtered Results link:
In the Field box, select the field you want to base your filter against. In the Criteria
box, select the math operator you want to use and in the Value box, enter the
number to complete your filter equation. The example above will select all search
phrases with a Search Count that is greater than 999.
Export Results – exports the current results. You may export to the following formats:
CSV, DBF, XML, XLS, TAB
Export Checked Results - exports only the checked results. You may export to the
following formats: CSV, DBF, XML, XLS, TAB
Notes:
12
5.C. SEARCH RESULTS – PHRASE-SPECIFIC OPTIONS
Micro Niche Finder offers several more options that are specific to a single phrase. To view
these options, simply click on one of the phrases listed in the Phrase column. This is the box
of options (popup) that appears:
Narrow Dig – zooms in on a keyword phrase to find more specific results.
Broad Dig – finds wider-ranging terms related to the base keyword phrase.
Google Suggest Keyword Search – returns a Google Suggest list of keywords. Google
Suggest is a feature that analyzes your keyword phrase and offers relevant suggested search
terms. This is another source for keywords that you may not find in your other searches.
LSI Search - LSI (or Latent Semantic Index) is a term used to describe a theoretical process
in which a search engine determines the subject of a webpage based on the commonality of
keywords within the text. For our use, this simply means that your website should talk
about your main topic in a variety of ways using different keywords throughout. For
example, if your web page is about pasta, then you should include keywords within the text
that are relevant to pasta: cooking, dining, Italian food, pizza, spaghetti, wine, etc.
Selecting this option from the list on the popup will return a list of LSI keyword phrases that
go with the phrase you selected. You can use this list two different ways:
1. As you construct your webpage, be sure to use at least 7 of the listed LSI keyword
phrases. This will strengthen your LSI and give your webpage more favorable
Google search results.
13
2. In your search for a niche market, this function will give you additional keywords
that may or may not come up in other keyword searches within Micro Niche Finder.
Google Trend – returns a Google Trend Chart that displays the search volume for the
phrase (where available.)
Google Hot Trends – this option appears only if the selected phrase is a Google Hot Trend.
If you select this option, you’ll be taken to the Google Hot Trend page relevant to the
selected phrase.
Google Search – returns Google search results for the phrase.
Google Exact Phrase Search – returns Google search results for the phrase in quotes.
Google News Search – returns Google News search results for the phrase.
Unlicensed (Commercial) Content – returns content related to the keyword phrase that is
free to use or share commercially.
Unlicensed (Non-Commercial) Content – returns content related to the keyword phrase
that is free to use or share non-commercially.
ClickBank Marketplace Search – searches the ClickBank Marketplace for Affiliate
products related to the phrase.
Search for Affiliate Programs – searches Google for Affiliate products related to the
phrase.
Amazon Search – searches for the keyword phrase on Amazon.
Google Product Search – returns Google Shopping search results for the phrase.
DomainTools Lookup – performs a Domain Name Search to determine if a Keyword
Phrase is available as a .com Domain Name.
E-Zine Articles – searches www.ezinearticles.com for the keyword phrase. It is useful to
find out how many competing articles there are for the keyword phrase.
Strength of Competition (SOC) – selecting this option opens a screen like the one here:
14
Use the Click here to retrieve SOC link to display an icon and a value that represent how
strong the existing competition is for the given phrase:
Strong Competition - a difficult market to grab a foothold in Google.
Moderate Competition - a moderately easy market to rank in Google.
Light Competition - should be relatively easy to rank for this term in Google.
SOC is calculated by determining how many sites have done a minimum amount of SEO
(Search Engine Optimization) for a given keyword phrase. In calculating SOC, we look at the
following factors:
inAnchor Count – How many sites are linking to the target site with the keyword
phrase as the anchor text?
intitle Count – How many sites use the Keyword phrase as part of the title of the
page?
inurl Count– How many sites use the keyword phrase as part of the URL?
To view the values for each of these factors, you may use the corresponding Click to
retrieve link.
Caution about SOC: SOC is extremely Google intensive (meaning it has to make a
lot of data pulls from Google) so you should use it sparingly in order to avoid getting
temporarily banned by Google. You should only check SOC when Search Count and
Exact Phrase Count indicate that you have a potential good market. It's pointless to
spend time retrieving SOC for phrases with fewer than 250 searches since those are
not good markets anyway.
Use SOC in conjunction with Exact Phrase Count to determine how difficult it will be
to penetrate a niche market:
So, What is a Potentially Good Market?
I knew you were going to ask that! ☺
As a general rule of thumb, I look for a keyword phrase with:
Search Count of at least 250 and
Exact Phrase Count of less than 10,000
But, I’ll go over that number for Exact Phrase Count if the Search Count is high and
SOC is good. For example, if I see a Search Count of 5000 and an Exact Phrase
Count of 20,000, then I will look at SOC. If the SOC is green, I would consider that a
good market to target.
That’s because the SOC is indicating that even though there are many competitors,
they are fairly weak and someone should be able to grab a foothold in Google with
some good SEO techniques (i.e., backlinks).
15
Adword Ads – retrieves and displays a count of Google Adword Ads for the selected phrase.
Select the Click Here to Open in Your Web Browser link to view the ads
themselves.
Copy Phrase – copies the current phrase to the Windows clipboard for access in other
applications.
Copy All Phrases – copies all phrases to the Windows clipboard for access in other
applications.
Copy Checked Phrases – copies checked phrases to the Windows clipboard for access in
other applications.
Check All | Uncheck All – checks or unchecks all phrases.
Notes:
16
6. SAVED SEARCHES
Every search that you do in Micro Niche Finder is saved in a local database on your
computer. To view these searches on the Manage Searches screen, either click the Manage
Searches icon on the Home Page or use the Click here to Manage your Saved Searches
link on the Home Page.
The results are alphabetized with an index provided at the top of the page. Simply click the
appropriate letter or number in the index and the related searches will appear. Click any of
the search phrases to load the search results from the database.
Note: If you perform a search by entering a search term into the Search box or by
selecting a prior search from the search dropdown box, Micro Niche Finder will load
your prior results from your local database just as if you had clicked the search link
from the Manage Searches screen.
You can also delete a Search and its related results by clicking on the Delete link to the right
of a particular search phrase.
17
7. MANAGE PROJECTS
In Micro Niche Finder, a project bucket is a user-defined combination of search results. This
is a feature you can to use to save various search results for reference at a later time. The
advantage of saving your results in a project bucket is that when you create it, you can pick
and choose results from one search and then combine those with selected results from
another search. You can also add results to an existing project bucket at anytime.
Here’s how to add phrases to an existing project bucket and how to create a new project
bucket:
1. Perform a keyword search.
2. Check the phrases you wish to include in the project bucket.
3. Click the Add Checked to Project button and this screen appears:
4. To add your checked results to an existing project bucket, click the down-arrow for
a list of project buckets, select the one you want and click the Save button.
5. To create a new project bucket:
a. Click the New button and this screen appears:
18
b. Enter a name in the Project Bucket Name field and click the Save button.
c. Back on the Select Project Bucket screen, use the down-arrow to select the
project bucket you just created and click the Save button.
To view your project buckets, click the Manage Projects button and you will see a screen
like this:
Just like on the Saved Searches screen, the projects are alphabetized with an index
provided at the top of the page. Simply click the appropriate letter or number in the
index and the related projects will appear. Click any of the project bucket names to
load the search results from the database.
Notes:
19
8. IMPORTING KEYWORDS AND RESULTS
This function is used for importing a file of keyword phrases. This file may have been
generated by another software package and you may wish to perform Micro Niche Finder
analyses against the phrases.
To use the import feature you must first prepare your import file. Your import file must be
in the following format:
Keyword Phrase, Search Count, Exact Phrase Count
Here is an example of a properly formatted import file:
test phrase,125,7895
test phrase 2,329,85642
This will import two rows of data:
test phrase with a search count of 125 and an exact phrase count of 7895
test phrase 2 with a search count of 329 and an exact phrase count of 85642
Note: do not use commas in the counts to indicate placement. For example, use 123456
instead of 123,456. Commas should only be used to separate the three values.
Also, you may import just the Keyword Phrase without the counts. The format for this is:
keyword phrase 1
keyword phrase 2
keyword phrase 3
If you are importing just the Keyword Phrase you may use Micro Niche Finder to return the
Search Count and/or Exact Phrase Count.
Once your file is formatted correctly, save it as either a .txt or .csv file. The file name itself
may be anything you want. When you are ready to import, click the Click Here to Import
Keywords and Results link on the Home Page. The following screen will appear:
20
Choose the Google Server you wish to use for Exact Match and SOC counts. The default
Google Server is the U.S. server. Use the Import Name field to enter a name for this import.
If you leave this field blank, then Micro Niche Finder will name the import using the current
date and time. Then, click the ellipsis button
to browse to your import file. The
following screen will appear:
Click on your import file and click the Select button. Micro Niche Finder will begin
importing your file and you will see the following screen while the file is loading:
21
Depending on how large your import file is, loading may take a few seconds or several
minutes. After loading is complete, you will see the following screen:
Click the Import button to begin importing. Once the import is complete you'll see the
results:
22
All imported results are stored under Imported: in the Manage Searches screen. If there
are more then 300 imported keyword phrases they will be stored in groups of 300:
23