1
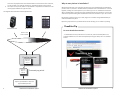
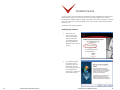
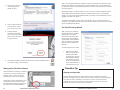
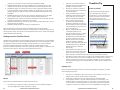
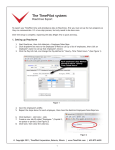
TimePilot
Extreme
TimePilot
Time and
Attendance
Systems
Instruction Manual
TimePilot
Vetro
TimePilot PC
© 2010 TimePilot Corporation, all rights reserved. Part No. 01023080
TimePilot Corporation
340 McKee Street, Batavia, Illinois 60510
630.879.6400 www.TimePilot.com
TimePilot
Time and Attendance
Systems
Table of contents
Introduction........................................................................................................ 2
TimePilot Extreme .............................................................................................. 7
TimePilot Vetro.................................................................................................. 11
TimePilot PC ...................................................................................................... 17
TimePilot Central ............................................................................................... 25
TimePilot Supplies and Services ........................................................................ 35
Returns/Replacements/Money-Back Guarantee............................................... 37
Technical Support .............................................................................................. 41
TimePilot End-User License Agreement ............................................................ 43
TimePilot Corporation, 340 McKee St., Batavia, Illinois 60510
www.TimePilot.com 630-879-6400
All contents copyright 2010, TimePilot Corporation.
TimePilot time and attendance systems
1
Introduction
Congratulations and thank you for purchasing a TimePilot time and attendance system. We’ve
worked hard to make it a thorough and easy-to-use system, and we’re sure it will cut your
payroll processing time by hours and virtually eliminate mistakes.
TimePilot offers three different time and attendance systems, each designed for a different
environment:
•
TimePilot Extreme. Our weatherproof, battery-powered system
is designed for outdoor use, although it can be used inside, too. It
commonly would be used at construction sites, where the clock is
exposed to the elements. The clock is locked down to prevent theft, but
can be moved easily to another site when necessary.
•
TimePilot Vetro. This system is intended to replace old-fashioned punch
clocks. It consists of a elegant, wall-mounted timeclock and keeps
employee clock-ins and clock-outs in memory until they are downloaded
on the TimePilot USB drive and imported into the TimePilot software.
•
TimePilot PC. This is our completely software-based time and attendance
system. Employees click on the image of a time clock on their computer
screens to clock in and out. The basic software package includes licenses
that allow the program to be installed on up to five computers. (Just
like its big brothers, TimePilot Extreme and Vetro, TimePilot PC can
accommodate up to 2,000 users.) TimePilot PC gives a company lots
of options: It could have all of its employees clock in at any of the five
PCs running the software; or it could—with the purchase of additional inexpensive
licenses—have hundreds of employees clock in at the PCs on their desks.
All three systems use the same core software: TimePilot Central. This means that you can
combine our products to create the perfect system for your business—for instance, TimePilot
Extremes at your worksites, TimePilot Vetro in your shop and TimePilot PC in your office—and
if you have a network, all of them will work together seamlessly.
No matter which system(s) you use, the principle behind them remains the same:
1.
2.
3.
2
TimePilot time and attendance systems
Employee clock-in and clock-out data, also known as transactions, from all systems
are collected in the TimePilot software’s database, which can be located on a network
server or on a PC’s hard drive.
At the end of the pay period, the transactions are “extracted” from that database and
placed in a separate database, where they are checked and corrected (if necessary) by
supervisors.
Supervisors use that information to create reports that indicate the exact number of
TimePilot time and attendance systems
3
4.
hours each employee worked. The extracted data can be archived on their hard drive,
on a CD or DVD, on an external hard drive or uploaded to storage on the Internet.
The report can be printed, saved as a spreadsheet or exported in a format that can be
used by payroll software or a payroll service.
The diagram below illustrates how the system works:
Why so many choices in installation?
We’ve found that many of our customers use more than one TimePilot time and attendance
product. All of our products—TimePilot Extreme, TimePilot Vetro and TimePilot PC—can work
together, creating one custom system. So, for instance, you can run TimePilot PC in the front
office, TimePilot Vetro in the back shop and TimePilot Extreme at the job site or on the trucks,
with all three systems feeding time and attendance data into one folder on your PC or server.
By including all these choices on your disk, we give our customers the greatest flexibility to
install the software they want.
By the way, if you’d like to try TimePilot PC for free for 30 days, you can install it by clicking
TimePilot Tip
TimePilot Extreme
TimePilot Vetro
TimePilot PC
For more detailed instructions...
Clock-in and
clock-out data
...and definitions of many of the terms in this manual, check out the Help files in the
TimePilot software. You can view the help files by clicking the “Help” menu in TimePilot
Central.
TimePilot Database
Data from
May 1 to
May 14
Data from
May 1 to
May 14
Extracted pay period
Reports, spreadsheets or export to
payroll software/service
4
TimePilot time and attendance systems
TimePilot time and attendance systems
5
“Yes” when you’re asked, “Do you want employees to clock in and out at this computer using
the TimePilot PC clock?” After it’s installed, you’ll see a registration screen; simply click the
“Evaluation” box and you’re good for the next 30 days.
If you wish to purchase TimePilot PC, call us at 630.879.6400. You will receive the registration
code that converts the software from a trial version to the regular retail version, a copy of the
program on CD and a printed version of the manual. The setup information entered into the
trial version, as well as the data collected, will automatically be transferred to the permanent
version of the software.
TimePilot Extreme
For more on TimePilot PC, please see Page 17 or visit our web site, www.TimePilot.com.
How does the system work?
The mounting plate is screwed to a wall, stud, empty junction box or other flat surface. The
Extreme time clock is set up with the TimePilot USB drive (as described in the Quick Start
Guide), placed on the mounting plate and locked in place with the padlock.
Employees clock in and out with their iButtons (see the next page for details) and the clock-in
and clock-out data is saved in the clock’s memory.
When it’s time to do payroll, a supervisor downloads the data onto the TimePilot USB drive and
imports it into a PC running the TimePilot Central software. (See Page 8 for details.)
The supervisor uses TimePilot Central to make any necessary corrections or changes to the
attendance data, then uses the software to extract the pay period’s data and generate reports
or prepare the data for payroll.
6
TimePilot time and attendance systems
TimePilot time and attendance systems
7
Clocking in and out
Setting the time on your Extreme time clock
To clock in or out, just touch
your iButton to the appropriate
iButton probe. You’ll hear a
“beep” and the light in the probe
will flash. The metal part of the
iButton must touch both the
inner flat surface of the probe as
well as the inner rim of the collar.
If you touch your iButton to the
probe and nothing happens,
hold the iButton gently against
the probe and slide the iButton
slightly to the side, so the iButton
makes contact with the rim of
the probe.
It’s important that the time on your Extreme time clock be accurate. You can check the time on
the clock when you import time and attendance data into TimePilot Central. If the time on the
clock is off, here’s how to correct it:
Collecting and retrieving data
Here’s an overview of the process you’ll use to collect the time and attendance data from the
Extreme time clock(s) and import the data into the TimePilot software:
First, you’ll have the time clock(s) download the time and attendance data onto the included
USB drive. Then you’ll upload data from the USB drive to the PC running the TimePilot
software. Data can be collected from multiple clocks before returning to the PC and uploading
the data. The data can be also be collected as frequently as desired. Even though your pay
period may be weekly or biweekly, you may collect the data every day, if desired.
1.
2.
3.
4.
5.
6.
7.
8.
8
1.
2.
Insert the USB drive into the USB port on the PC running the TimePilot software.
Run the “Extreme Data Manager”: Click “Start” on the Windows desktop, then “All
Programs.” Select “TimePilot IV” and then click “TimePilot Extreme.”
3. Click the icon of the clock you want to change.
4. Click the “Edit” menu and choose “Set Station Date and Time…” from the pop-up menu.
5. The Set Date and Time box will appear.
6. The first option will set the date and time on your time clock to match your PC’s clock.
Please note that if your time clock is far from the PC, it may take a few minutes to reach
the clock and the time will be off by that number of minutes. If that’s the case, don’t
use this option; use the second option.
7. The second option allows you to manually set the date and time. This is a better option
if there will be a delay between the time you load the time on the USB drive and the
time you get to the time clock.
8. Choose one of the options and click OK.
9. Remove your USB drive and bring it to the time clock.
10. Remove the padlock, plug the USB drive into the time clock and tap your gray
Management iButton to the “In” probe.
11. The lights will flash on the clock to indicate that it is being updated. When the lights
stop flashing, the process is complete. Remove the USB drive and re-lock the clock with
the padlock.
Unlock the padlock securing the time clock to the mounting plate, then insert the USB
drive into the USB port on the bottom of the clock. The clock can be removed from the
mounting plate to make it easier.
Tap the included gray Management iButton to the “In” probe of the clock. The lights
on the two probes will begin flashing yellow in an alternating pattern while the clock
readies the drive to write data to the USB drive. When complete, the probes’ lights
will flash green as the clock writes the most recent data to the drive. When the lights
stop flashing, a series of beeps will sound, indicating that the data has been written
successfully.
Remove the USB drive, reattach the clock to the mounting plate (if necessary) and
secure the clock with the padlock.
Repeat the above steps for each clock you own, if desired.
Return to the PC and insert the USB drive into an available USB port on your PC.
Run the TimePilot software’s “Extreme Data Manager”: Click “Start” on the Windows
desktop, then “All Programs.” Select “TimePilot IV” and then click “TimePilot Extreme.”
Extreme Data Manager will automatically detect the presence of the USB drive with the
TimePilot data files. Follow the screen prompts to import your data into the TimePilot
database.
View and edit the transactions in TimePilot Central. For more about TimePilot Central,
see Page 25.
TimePilot time and attendance systems
TimePilot time and attendance systems
9
TimePilot Vetro
How does the system work?
Your TimePilot Vetro clock is attached to a wall and powered by a nearby electrical outlet.
Employees can clock in and out in two ways: by tapping their iButton to the “In” or “Out”
probes at the bottom of the clock; or by entering a four-digit ID code and pressing the “In” or
the “Out” button on the clock’s keypad.
The clocks operate two ways: Standalone Mode or Network Mode.
Once the clock-in and clock-out data is transferred into the TimePilot software, supervisors can
10
TimePilot time and attendance systems
TimePilot time and attendance systems
11
view the data, make changes and corrections, create reports based on the data and prepare
the data for their payroll service or software.
Setup Wizard, which will guide you through setting up your clock in the software.
In the Vetro Setup Wizard, you’ll do the following:
The Quick Start Guide gives more details, but here’s an overview of the basic setup process:
•
1.
2.
3.
4.
Mount your clock according to the directions in the included template. Plug in the
power supply and set the time and date.
Install your software and set up your company. Follow the instructions in this manual
for installing and setting up TimePilot Central.
If employees will use iButtons to clock in and out, assign iButtons to each employee.
If they’ll use four-digit ID numbers, assign them numbers. Instructions for both
procedures appear later in this chapter.
Distribute the iButtons or ID numbers to employees and show them how to clock in and
out. Instructions for both procedures appear later in this chapter.
•
•
Mounting the clock
Your first step should be to decide where the clock will be located. Usually, this will be either
on a wall at a central location in your facility or at the employee entrance. The TimePilot Vetro
clock should not be placed outdoors—it is not designed to be exposed to the elements.
•
To mount the clock on a wall, use four screws (included, with wall anchors). The included
drilling template can be taped to the wall to make it easier to place the screws in exactly the
right place. The recommended placement on a wall is to have the top of the station 5 feet off
the floor. At this level, it’s easy for most employees to see the LCD screen.
After mounting, plug the power supply into an electrical outlet. As with all electronic
equipment, we suggest using a surge protector to protect your system.
Setting the date and time
When the Vetro powers up, you’ll see a message on the clock’s screen asking you to set the
date and time. To do so, follow these instructions:
1.
2.
Enter the factory-set administrative password: “123456” (You’ll change this password
to something unique to your business later, when you run the TimePilot Vetro Setup
Wizard.)
Follow the on-screen instructions, using the keypad to enter the date and time.
Assigning iButtons or ID numbers
You initially set up employees with iButtons or ID
numbers when you ran the Vetro Setup Wizard. Later,
after you’ve finished using the wizard, you may find that
you want to add more employees and assign them an
iButton or an ID number.
For the greatest security we strongly recommend using iButtons. If you’re using ID numbers, it’s
easier for one worker to clock in another; all they have to do is know their co-worker’s number.
Because iButtons are usually kept on an employee’s keychain, it’s much less likely that an
employee will loan another their keys to clock them in.
Here’s how to set up employees without using the Vetro Setup Wizard:
For users of Standalone Mode:
Installing the software
Follow the instructions for installing and setting up your TimePilot Central software on Page 25.
When you complete the TimePilot Central Setup Wizard, you’ll be taken directly to the Vetro
TimePilot Tip
1.
2.
3.
4.
iButton serial numbers
The iButton numbers will appear in each employee’s profile in TimePilot Central after
the clock-in and clock-out data is collected for the first time. See Page 14 for more on
collecting data from your clock.
12
Give the Vetro timeclock a name. The name of the clock where employees clocked in
or out will appear in TimePilot Central--helpful if you’re using more than one Vetro
timeclock in your business.
Set an administrative password on the clock. The factory-set password is 123456, and
you’ll use that to set the time and date on your clock when you first power it up, but
you’ll change the password here
to a six-digit number unique to
your business.
Transfer the clock’s name and
new password, as well as the
names and the ID numbers of
each employee, to the TimePilot
USB drive. After the data has
been transferred to the drive, you’ll plug it into
the Vetro clock and download it into the clock’s
memory.
Assign iButtons to employees. This is done at the
Vetro clock.
TimePilot time and attendance systems
5.
6.
7.
Start TimePilot Central by clicking the icon on your desktop.
Click the “Setup” menu, then “Profile Setup.”
Click “Add a Profile.”
Enter the employee’s name and other information by filling in the blanks. Be sure to
enter a four-digit ID number of your choosing and click the “Enable User ID Entry” box
in the profile’s Identification section. Don’t enter an iButton serial number; that will be
done at the Vetro clock later in this process.
Plug your TimePilot USB drive into your computer’s USB port.
In TimePilot Central, click the Setup Menu, then choose “Transfer Changes to Vetro
Clocks.”
Wait until the new data is loaded on the USB drive. When the process is complete,
TimePilot time and attendance systems
13
8.
9.
10.
11.
12.
13.
remove the drive from the computer and plug it into the USB port on the Vetro clock.
On the Vetro clock’s keypad, enter Administrative Mode by pressing “99” and then
“OK,” followed by your Vetro password.
Select “Read USB Drive” from the menu that appears on the clock’s screen by entering
its menu number (3) on the keypad. The data will be transferred from the USB drive to
the clock.
Press the “ESC” key to return to the Administrative Mode’s main menu.
If you’re just using ID numbers to clock in and out, stop here; the process is complete.
You can press “ESC” to exit Administrative Mode.
If you’re going to use iButtons, stay in Administrative Mode; now you’ll need to assign
an iButton to each employee:
Select “Assign iButtons” from the clock’s menu by entering its menu number (4) on the
keypad.
Use the up and down arrow keys to scroll to the name of the employee to receive the
iButton and tap the iButton to the “In” or the “Out” probe. The iButton’s serial number
will appear on the timeclock’s screen.
Repeat Step 12 for the next employee, or press the “ESC” key to return to the
Administrative Menu and ESC again to exit Administrative Mode.
•
Clocking in and out
There are two ways a person can clock in or out: with an iButton or with a four-digit ID number.
•
•
For users of Network Mode:
1.
2.
3.
4.
Start TimePilot Central by clicking the icon on your desktop.
Click the “Setup” menu, then “Profile Setup.”
Click “Add a Profile.”
Enter the employee’s name and other information by filling in the blanks. Be sure to
enter a four-digit ID number of your choosing and click the “Enable User ID Entry” box
in the profile’s Identification section. Don’t enter an iButton serial number; that will be
done at the Vetro clock later in this process.
5. Click Save and return to the TimePilot Central main screen.
6. Click the Setup Menu, and choose “Transfer Changes to Vetro Clocks.”
7. Follow the instructions in the box that pops up to transfer the changes via Vetro Data
Manager.
If you’re just using ID numbers to clock in and out, stop here; the process is complete.
If you’re going to use iButtons, now you’ll need to assign an iButton to each
employee:
8. On the Vetro clock’s keypad, enter Administrative Mode by pressing “99” and then
“OK,” followed by your Vetro password.
9. Select “Assign iButtons” from the clock’s menu by entering its menu number (4) on the
keypad.
10. Use the up and down arrow keys to scroll to the name of the employee to receive the
iButton and tap the iButton to the “In” or the “Out” probe. The iButton’s serial number
will appear on the timeclock’s screen.
11. Repeat Step 12 for the next employee, or press the “ESC” key to return to the
Administrative Menu and ESC again to exit Administrative Mode.
employee’s iButton serial number to all zeroes, and you can assign his or her iButton to
another employee.
ID Numbers: Every employee has to have an ID number, but you can prevent him or her
from clocking in with it. In TimePilot Central, open the employee’s profile and clear the
“Enable User ID Entry” checkbox. Then transfer your changes to the clock either wirh
the USB drive or with the Vetro Data Manager as described above.
Clocking in and out with the iButton: Using the iButton is the least likely method
to allow “buddy-punching.” Each user simply taps his or her iButton to the “In” or
“Out” probe on the clock. The clock will display the employee’s name, date and time
on its screen and beep twice when they clock in or out to indicate that the process is
complete.
Clocking in and out with a four-digit ID number: Each user enters their fourdigit number on the clock, which will display their name as confirmation that they’ve
entered the correct number. The user then presses the “In” or “Out” key on the keypad
to complete the process. The clock will display the employee’s name, date and time on
its screen and beep twice to indicate that the process is complete.
Collecting data
At some point—usually at the end of a pay period—you’ll want to move your employees’ clockin and clock-out data into the TimePilot Central software so supervisors can prepare the data
for payroll. The method depends upon whether you’re using your system in Standalone Mode
or Network Mode.
Standalone Mode
First, you’ll have the time clock(s) download the time and attendance data onto the TimePilot
USB drive. Then you’ll import the data from the USB drive to the computer running the
TimePilot Central software.
Two important points:
•
•
If you have more than one Vetro clock, you can go from clock to clock collecting the
data from each on the USB drive before importing it all to the PC. When you view the
clock-ins and clock-outs in TimePilot Central, each will be labeled with the name of the
clock where it occurred.
The data can be collected as often as you want. Even though your pay period may be
weekly or biweekly, you may collect the data every day, if desired.
Here are step-by-step instructions:
Do you want to delete an employee’s iButton or ID code? (This might occur if an employee
leaves your company.) Here’s how:
•
14
iButtons: Enter Administrative Mode on your Vetro clock (99 > OK > password), select
“Assign iButtons” from the clock’s menu by entering its menu number (4) on the
keypad and follow the instructions to clear the iButton. This process will change the
TimePilot time and attendance systems
1.
2.
3.
Plug the TimePilot USB drive into the USB port on the side of the Vetro time clock.
Enter the clock’s Administrative Mode by pressing the “9” button twice, then the “OK”
button on the Vetro clock keypad.
The clock will ask you to enter your six-digit administrator password. This is the
password you created while setting up your software.
TimePilot time and attendance systems
15
4.
5.
6.
If the password is correct, a menu will appear on the clock’s screen. Press the number
on the keypad corresponding with the “Collect Data” menu item (1). The clock will copy
the data to the USB drive and tell you when the process is complete.
If you want to collect data from other Vetro clocks, repeat Steps 1-4 at each one.
Now return to the computer running TimePilot Central and plug the USB drive into a
USB port. TimePilot Central will detect the presence of the TimePilot USB drive and
automatically import the data on the drive into the TimePilot database.
Once the data is imported, you can view and edit the transactions in TimePilot Central. For
more about TimePilot Central, see Page 25.
Network Mode
As long as the Vetro Data Manager is running, each clock-in and clock-out is instantly
transferred to the TimePilot software the moment it occurs.
If the Vetro Data Manager isn’t running, the clock holds the data in memory and transfers
it the next time the Data Manager program is started. The clock’s memory can hold 15,000
transactions: that’s equivalent to 166 days of average use by a 15-employee company. If your
network goes down for an extended period of time, you can always use the TimePilot USB drive
to collect the data. See the instructions for Standalone Mode above for details.
Vetro Data Manager
The Vetro Data Manager is a small program that acts as the link between the TimePilot Central
software and the clock when the clock is connected to your local area network. When Vetro
Data Manager is running, employee clock-ins and clock-outs are sent instantly to the server
and can be viewed in TimePilot Central. If Vetro Data Manager isn’t running, the software and
the clock can’t communicate, so the clock holds the employee clock-ins and clock-outs in its
memory until Vetro Data Manager is started.
Vetro Data Manager does other things too:
•
•
•
It keeps the date and time on your clock synchronized with the date and time on your
server.
It transmits changes that are made in TimePilot Central’s Employee Profiles to the
clock.
It helps set up additional clocks on your system.
You can see if Vetro Data Manager is running by looking for its icon in your
system tray (the area in the bottom right corner of your Windows screen,
next to the clock). If you see the image of a small Vetro timeclock (shown at
right), then Vetro Data Manager is running.
Starting Vetro Data Manager
You can start Vetro Data Manager several ways:
•
•
•
16
Start TimePilot Central. When TimePilot Central starts, so will Vetro Data Manager.
If you’re running TimePilot Central, click the “File” menu, then “Vetro Data Manager.”
Click the Windows Start button, then “All Programs” > “TimePilot IV” > “Vetro Data
Manager.”
TimePilot time and attendance systems
TimePilot PC
The core of TimePilot PC is the “virtual timeclock”
(shown at right). This clock appears on your
employees’ computer desktop, allowing them to clock
in and out right at their PC. The clock-in and clockout data is collected on the PC or at your server and
can be manipulated by supervisors using TimePilot
Central.
TimePilot PC ships with five licenses, which means the
“virtual clock” can be installed on up to five employee
PCs. Any number of employees can clock in and out
at those PCs. Additional licenses are inexpensive, so
you could have dozens of employees clocking in and
out right at their desks. (Need more licenses? You can
order them at the TimePilot web site, www.TimePilot.
com.)
Setting Up TimePilot PC
Users of TimePilot PC have a few extra steps to perform to get their system up and running.
First, like any TimePilot user, you’ll install TimePilot Central on the PC that a supervisor will
use to work with the time and attendance data collected by the system. Then you’ll install the
“virtual timeclock” on the PC(s) that employees use to clock in and clock out. If the supervisor’s
computer will also be used to clock in and out, you’ll perform both installations on that PC.
Here’s how to install the “virtual timeclocks”:
1.
2.
3.
4.
5.
6.
7.
8.
Install and set up TimePilot Central on the supervisor’s PC, as described on Page 25.
Place the CD in the CD drive of the first PC that will run the “virtual timeclock.” When
the opening screen appears, click “Install TimePilot software.”
On the next screen, click “TimePilot Installation Wizard.”
Click “No” when the software asks if you’ll manage TimePilot Data from this computer.
Click “No” when asked if you want to install Hardware Manager, and “No” again when
asked if you want to install the Extreme Data Manager.
When the “TimePilot PC Clock” screen appears (screenshot on next page), click “Yes.”
The Installation Wizard will start up. Follow its instructions to install the clock on the PC.
Will you have employees clock in and out by clicking the buttons on the screen with
their mouse or with iButtons? If they’ll use their mouse, continue to Step 9. If they will
use iButtons to clock in and out, you must install the drivers for the Blue Dot Receptor,
a device that plugs into a USB port and can read iButtons. Here’s how:
TimePilot time and attendance systems
17
receive the registration code that converts the software from a trial version to the
regular retail version, a copy of the program on CD and a printed version of the manual.
The setup information entered into the trial version, as well as the data collected, will
automatically be transferred to the permanent version of the software.
12. Repeat steps 2-11 for each PC on which you’ll install the “virtual clock.”
You can see which computers have the virtual clock installed, as well as delete a license from
a particular computer so it can be used on another computer, by going to the “TimePIlot PC
Administration” item in the Administrative menu in TimePilot Central.
Using TimePilot PC
When employees enter their ID number, their name appears in the field at the top of the clock
and the four buttons down the right side, “In,” “Out,” “View” and “Clear,” become active.
•
•
•
A. Return to the TimePilot software CD’s main
menu.
B. Click “Install TimePilot Drivers.”
C. Click “Blue Dot Receptor” and follow the
instructions that appear.
9.
After the TimePilot software is installed, you’ll
see:
A. If you installed just the Virtual Clock:
Blue Dot Receptor
A TimePilot PC icon on the computer’s
desktop (shown at right). Double-click the
icon to start the program.
B. If you installed just TimePilot Central: A TimePilot Central
icon on the desktop (shown at right).
C. If you installed both programs: Both icons.
10. When you’ve finished the installation, double-click the
TimePilot PC icon. The software will ask you to select the drive
where the time and attendance data collected by this PC will be stored. This should be
the same location that you chose for the data when you set up TimePilot Central on
the supervisor’s computer. Don’t remember the location? Start TimePilot Central, and
on the opening screen, below the fields for your username and password, the data
location is listed.
11. Next, you’ll be asked to register your program. The “5-Client TimePilot PC License
Number” is on a sticker on the inside cover of your user manual. If you’re just trying
out TimePilot PC, click the “Evaluation” button to get a 30-day tryout. If you wish to
purchase TimePilot PC at any time during the tryout, call us at 630.879.6400. You will
18
TimePilot time and attendance systems
“In” and “Out” are self-explanatory (click “In” to clock in and “Out” to clock out.).
“View” will show the employee their Current Transactions. This function is optional:
See the Options menu below.
“Clear” will erase a digit if the employee makes a mistake entering his or her ID
number.
To close the program, click the
“Exit” button or press the “Esc”
key on your keyboard.
At the bottom left of the screen is
the “Menu” button. Clicking the
menu button will cause a list of
items (see screenshot at right) to
appear:
Options
•
“View Options” tab
Enable at Startup:
Clicking this box will
cause the “virtual
clock” to appear
automatically when
the computer is
started.
Enable Users to
View and Print Their
Transactions: If this
box is checked,
employees can click
the “View” button on
the “virtual clock” to
see and print their
transactions. If the
TimePilot time and attendance systems
19
TimePilot Tip
•
their keyboards (See details
later in this chapter). They’ll still
need to use their mouse to click
the “Menu” button. When the
smaller clock is displayed, you
can exit the program by either
clicking “Menu” on the clock
and choosing “Exit” or simply
by pressing the “Escape” key on
your keyboard.
“Restrictions” tab: Checking this box
will allow employees to clock in and out with their ID number. If the box is unchecked,
they’ll have to clock in with iButtons and the Blue Dot Receptor.
Change Data Location
This allows you to change the location of the database where the data collected by this “virtual
clock” is stored.
Check for Updates
Checks for updates to the TimePilot PC “virtual clock” software (not for TimePilot Central—to
check for updates to TimePilot Central, click the Start button on your desktop, click “All
Programs,” then “TimePilot IV,” then “TimePilot Utilities,” then “TimePilot Update Utility.”
Minimize
Minimizes the “virtual clock” to the taskbar, and keeps it running.
About
Password-protect your TimePilot PC menu
To keep employees from changing the settings on each virtual clock, you can set a
password to allow access to these menu items. To do so, go to TimePilot Central, click the
“Administrative” menu, then “TimePilot PC Administration.” Check the “Enable Password
Protection” checkbox and enter a password.
box is unchecked, the View button won’t appear. For the employee to see their
transactions, they should identify themselves to the system either with their 4-figit
ID number or iButton, then click the “View” button. The employee cannot make
any changes to the transactions.
Minimize Screen after Transaction: Checking this box will cause the “virtual clock”
to be minimized after a clock-in or a clock-out. To get the clock back on the screen
quickly, you are offered the chance to set a shortcut, for instance, by holding down
the “Alt” key and pressing “A.”
Display Keypad: Checking this box will display the “virtual clock” with a full keypad,
as shown on the previous page. If you don’t check this box, the clock will appear
as at the top of the next page. Employees will be required to clock in and out with
20
TimePilot time and attendance systems
Gives information about the product, including:
•
To whom it is licensed.
•
The software serial number.
•
The software version and build number.
•
The application path (the location of the software on your hard drive).
•
The data path (the location of the clock-in and clock-out data).
Exit
Quits program.
Clocking in and out
Basic method
1. Using your mouse to click the keys on the “virtual clock,” enter your employee ID
number. Employee ID numbers can be found by double-clicking the employee’s name
in TimePilot Central.
2. The employee’s name will appear on the TimePilot PC screen, and the “In,” “Out,”
“View” and “Clear” buttons will appear down the right side of the clock.
3. Click the “In” or “Out” button to clock in or out. Clicking the “View” button will show
the employee his or her Current Transactions.
TimePilot time and attendance systems
21
Keyboard method—virtual clock with or without keypad
1. Click the “virtual clock” on your screen to make it active, then enter your employee
ID number using either the number keys across the top of the computer keyboard or
the keypad at the right side of most full-sized keyboards. Employee ID numbers can be
found by double-clicking the employee’s name in TimePilot Central.
2. The employee’s name will appear on the TimePilot PC screen.
3. Press the “+” (plus) key to clock in or the “-” (minus) key to clock out. Clicking the
“View” button will show the employee his or her Current Transactions.
Clocking in with an iButton
If you’ve set up the system to work with iButtons and the Blue Dot Receptor, here’s how to
clock in:
1.
2.
22
Tap your iButton to the Blue Dot Receptor. Your name will appear on the TimePilot PC
screen.
Click the “In” or the “Out” button on the screen.
Or
Press the “+” (plus) key on the computer’s numeric keypad to clock in or the “-” (minus)
key on the keypad to clock out.
TimePilot time and attendance systems
TimePilot time and attendance systems
23
TimePilot Central
In earlier sections, you learned about the hardware part of your TimePilot time and attendance
system. Now it’s time to learn about the other half: the TimePilot software. The essential
functions of the TimePilot software--setting up employees in the system, checking or correcting
their clock-in and clock-out data, generating reports--are the same no matter which timeclock
system you use.
The first step is to install the software.
Installing the software
24
TimePilot time and attendance systems
1.
Place the CD into
your computer’s CD
drive. The installation
program should start
up automatically. Click
the “Install TimePilot
Software” button. (Shown
at right.)
2.
The program will check
your system to see if
it already contains the
appropriate drivers. If
you’re missing any drivers,
you’ll be offered the
opportunity to install them
now. (Shown at right.)
TimePilot time and attendance systems
25
3.
Click “Next” to see a list
of the missing drivers.
(Shown at right.)
button. In the TimePilot system, the database is where all employee transactions are stored.
Generally, the database is not kept with the TimePilot software files, much like a letter that
you write with word processing software generally is not saved in the same folder as the word
processing program.
By keeping the data in a separate location, you can uninstall or install the TimePilot software
without affecting the data that the system has collected. (Note: If you’re re-installing the
software, you may see an existing database listed; if you wish to use that database, click it to
highlight it and then click “Open.” )
The software will suggest a location for the new database. You can accept that location or
change it to any location you want. Once you create your database, you’ll set up your company
using the TimePilot Setup Wizard.
4.
5.
Click the “Next” button to
install the drivers. When
you’re done, click “Finish.”
Continue with the
installation as guided by
the on-screen instructions.
When you see the screen
at right, click “Exit.”
The TimePilot Setup Wizard
After you set up your database,
you’ll be taken to the TimePilot
Setup Wizard, which guides
the first-time user step-by-step
through the process of setting
up the system. Simply follow the
steps, and when you complete a
task, the next task will become
available.
The seven-step process includes:
1.
6.
The TimePilot software has been installed and you’ll see the TimePilot Central
icon (shown at right) on your desktop.
Setting up the TimePilot Software
Once the software and drivers are installed
on your PC, you can start setting up your
software. To do so, double-click on the
TimePilot Central icon on your desktop.
The first time you start the software, you’ll
be asked if you want to create or open a
TimePilot database. (Shown at right.) Click
the “Create a new TimePilot database...”
26
TimePilot time and attendance systems
Add a Company: Here’s
where you’ll enter your
company information,
including name, your pay
cycle (weekly, bi-weekly,
etc.), whether you want
to have rounding applied
to your employees, etc. If
you have more than one
TimePilot Tip
Keeping accurate time
TimePilot PC takes its time from the computer where your database is stored. For
example, let’s say you save your data to a server and use a local PC to process employee
hours and run reports. If the time on the server is incorrect, it will be incorrect in
TimePilot PC, too, even if the time on the local computer is correct. To correct the
problem, make sure your server has the correct time.
TimePilot time and attendance systems
27
2.
3.
4.
5.
6.
7.
pay cycle, you can create a second “company” with different settings.
Add/Edit Overtime Policy: Do you pay overtime to your employees? You can have
multiple overtime policies, each with a different set of criteria and payment rates.
Add/Edit Pay Types: This is where you’ll set up how your employees will be treated
in terms of whether they get overtime, vacation pay, holiday pay, etc. You can have
multiple pay types; for instance, one for salaried employees and another for hourly
employees.
Add/Edit Departments: You’ll enter your company’s departments here. Later, when
you’re using the system, you can generate reports grouped by department.
Add/Edit Shifts: This is where you create your employees’ shifts. The system uses shift
schedules to determine if an employee is early or late.
Add/Edit Holiday Schedules: You’ll set up your company holiday schedule here. You can
have more than one schedule.
Add/Edit Employee Profiles: You’ll add your employees here.
When you finish the process, click OK and the TimePilot Central screen will appear.
Want to add or delete an employee, modify an overtime policy or make other changes to your
setup? Click the “Setup” menu at the top of the TimePilot Central screen, and all the categories
mentioned above will be available.
•
•
•
•
•
Getting started in TimePilot Central
TimePilot Central is the place you’ll be spending most of your time when you use the TimePilot
software. In TimePilot Central, which is password-protected, you can set up employees, create
or change your company’s policies (overtime, holiday schedule, etc.), monitor employee
transactions and generate reports. Let’s take a look at the TimePilot Central screen:
(Note: For a detailed explanation of each item, please see the Help system in TimePilot Central.
You’ll find it in the menu bar at the top of the TimePilot Central screen.)
•
•
View: Lets you customize how your
TimePilot Tip
employees and their transactions are
displayed in TimePilot Central.
Green or yellow?
Periods: This is where you extract a
pay period, open Current Transactions
How can you know instantly whether
or a past pay period.
you’re looking at a list of Current
Setup: This is where you set up the
Transactions or at a Past Time Period?
software to match the work policies
Look at the header in the Transaction
your company has. You also add,
List. It will be green in Current
delete and modify employees here.
Transactions and yellow in a Past Time
Edit: The items in the Edit menu
Period.
are used to manipulate employee
transactions. Generally, you’ll click on
the transaction you want to work with
in the Transaction List, then click on an
item in the Edit menu.
Reports: TimePilot’s Reports function
is extremely flexible. You can
generate printable reports on a single
employee, group of employees or
all employees and specify what data
you want included in each report.
Reports can be printed, converted
to PDF format (within TimePilot
Central) or exported to Microsoft Excel
spreadsheet format (.xls), Microsoft
Word format (.doc) or Rich Text
Format (.rtf).
Administrative: This is where you can
change your password or time format
(from a.m./p.m. to military time) as
well as keep track of TimePilot PC licenses (if you use that TimePilot product).
Help: Want to check to see if there’s an update to the TimePilot software? This is where
to go. It’s also where you can find your software’s serial number, version and build
number and where it’s located on your computer. In addition, you can also find links
to several relevant pages on the TimePilot web site as well as the very detailed online
help system.
Employee List
Down the left side of TimePilot Central is the list of all employees in the system, no matter
what company they work for.
•
•
•
Menus
Across the top of TimePilot Central are eight drop-down menus:
•
28
File: Allows you to export your payroll information to a payroll software package or
service (see Page 32 for details) and exit the program.
TimePilot time and attendance systems
Click once on an employee’s name to see just his or her transactions. To return to a
complete listing, click the “All Transactions” Quick Button.
Double-click an employee’s name to view and edit their employee profile.
If an employee’s name is in red, that indicates that there is an “exception”—the
TimePilot system has noticed that there is a clock-in with no corresponding clockout or vice versa. To correct the problem, click the person’s name to see just their
transactions. In the list of transactions, clock-ins are identified by a triangle to the
TimePilot time and attendance systems
29
left of the employee’s name; clock-outs are blank. A perfect set of transactions for an
employee will have lines with a red triangle alternating with blank lines.
•
You can’t see it here because her name is
highlighted, but Dawn Altman’s name is in
red, indicating an exception. When you click
on her name, you see two triangles in a row,
indicating two clock-ins without a clock-out
between them. In this case, Dawn forgot to
clock out for lunch on 10/9/10. A supervisor
can make a correction easily by inserting an
Out transaction with the Quick Buttons (see
below).
A perfect set of transactions: lines with
a red triangle (clock-ins) alternate with
blank lines (clock-outs).
•
•
•
Quick Buttons
The Quick Buttons are shortcuts that allow you to make changes to, add or delete transactions,
change your view in TimePilot Central and open or extract pay periods. You can use the Edit
menu for all of these actions, but the Quick Buttons are faster. Here’s how and when each
button can be used (see the help files in the TimePilot Central software for even more detail):
•
•
•
30
View Profiles/View Transactions: Depending upon what’s displayed in the Transaction
List, this button switches identities between “View Profiles” and “View Transactions.”
Clicking “View Profiles” brings up a summary of every employee’s profile and changes
the button to “View Transactions”; clicking “View Transactions” shows all Current
Transactions and changes the button to “View Profiles.”
All Transactions: Displays all Current Transactions in the Transaction List. If you click
once on an employee’s name in the Employee List, you’ll see just that employee’s
transactions; to return to all Current Transactions, click the “All Transactions” Quick
Button.
Insert IN and Insert OUT: These buttons are often used by supervisors to insert a
transaction when an employee has forgotten to clock in or out (see the example
above). You’ll be able to specify the employee who “owns” the transaction and
the date and time of the transaction. In addition, you can indicate the employee’s
location, shift, department and company, as well as the time clock they used for that
TimePilot time and attendance systems
transaction, as shown in
the screenshot at right.
You also can add a note
to the transaction; for
example, “Forgot to clock
out.” To read the note,
double-click the note icon
() in TimePilot Central.
Please note that any
changes you make to an
employee’s location, shift,
department or company
will appear only with that
individual transaction;
they won’t change the
employee’s profile.
Delete: To delete a
transaction, first click on
it to highlight it, then click
the “Delete” button.
Insert Time: The TimePilot
software also allows
you to add time to an
employee’s work hours. This might be done if an employee calls in sick and is paid for
sick time. You can also delete time by clicking the “negative” checkbox.
Open Past Time Period: Need to see a pay period that you’ve already extracted? Click
this Quick Button, then choose the company and the pay period and click OK. You’ll
know you’re in a past pay period by the yellow bar at the top of the screen (Current
Transactions—those transactions that haven’t been extracted yet—have a green bar.)
Extract Data: Clicking this button allows you to extract, or remove, all the transactions
for a specific company and time period from the Current Transactions and place them
in a separate file (database). Extracting your data is a key procedure in the TimePilot
system. It’s explained further in the next section.
Closing out a pay period
You’ve set up your clocks and your software, assigned your employees their iButtons and
started collecting their clock-ins and clock-outs. Now the pay period has ended and it’s time to
collect your data and get it ready for payroll. This is where the TimePilot software really shines.
Here’s how it works: When your pay period is complete and it’s time to process your payroll,
you use TimePilot Central to take, or “extract,” all the transactions that occurred during
that time and place them in a separate file (database). If you need to make any corrections
that weren’t made during the pay period—if, for instance, an employee forgot to clock in or
out—and add transactions for vacations, holidays, etc., to create a complete record of each
employee’s workweek. Then you can create and print reports for further review. Optionally,
you can “export” the file to your payroll service or accounting software.
Note: You can also export your data to a spreadsheet (.xls format, commonly used by Microsoft
Excel) or word processing document (.doc, commonly used by Microsoft Word, or .rtf, Rich
Text Format). In addition, you can print your data or create a PDF version of the data with
TimePilot time and attendance systems
31
TimePilot’s built-in tools. For more, see the page on Reports in the TimePilot Central help
system.
Getting ready for payroll, step by step
1.
2.
3.
4.
5.
6.
7.
32
Start TimePilot Central.
Extract your pay period.
(Click on “Periods” in the
menu bar, then select
“Extract Pay Period.”)
A. You’ll be asked if you
want to back up your
Current Transactions.
Click “Yes” and follow
the instructions.
B. In drop-down list at the
top of the pay period
extraction box (right),
choose the company
whose pay period you
want to extract.
C. Choose the beginning
and ending of the pay
period.
D. Click “Begin
Extraction.”
E. Now you’ll have the
extracted pay period
open (look for the yellow bar across the top of the transaction window.)
Correct any employee transactions that are erroneous, using the Quick Buttons across
the top of the screen. Names in red in the Employee List down the left side of the
screen indicate possible trouble spots that the TimePilot software has identified.
It’s a good idea to also look over each employee’s transactions to verify that they make
sense. For instance, if an employee clocks in at 8 a.m. on Tuesday, forgets to clock out
that night and also forgets to clock in Wednesday morning, but clocks out Wednesday
night, the TimePilot software sees a clock-in followed by a clock-out and will not flag
the error, unless you set the Alerts feature to flag excessive amounts of time.
Insert transactions for vacations, sick days, paid time off and bereavement time,
if necessary. This is done manually. The simplest way to do this is to click on the
employee’s name, then on the “Edit” menu and choose “Insert Amount of Time.” Enter
the date and amount of time the employee is entitled to and click “OK.”
Generate a report. Click “Reports” in the menu bar, then choose your report.
(“Summary Report” is the most common choice.) If you want a printed copy of the
report, click the “Print” button on the left side of the Reports screen. If you want an
electronic copy of the report that can be saved or e-mailed, click the “Export” button
at the left side of the screen and choose your file format. You can choose from six
different formats: Crystal Reports (.rpt), Adobe Acrobat (.pdf), Microsoft Excel (.xls),
Microsoft Excel Data Only (.xls), Microsoft Word (.doc), or Rich Text Format (.rtf). When
you’re done, close the Reports screen to return to TimePilot Central.
Optional: Export your data to your payroll software or service. The
TimePilot.com web site has available for download many exports that will convert
TimePilot time and attendance systems
TimePilot data into a
format that can be read
by leading payroll services
and software packages,
like QuickBooks or ADP.
To see how to install the
export for your service
or software, open the
Help system in TimePilot
Central (in the Help
menu at the top of the
screen), scroll down to
“Definitions” and choose
“Exports.” To use an export
after you’ve downloaded
and installed it, here’s the
general procedure (see
the instructions that came
with your particular export
for details):
A. Click “File” on the
menu bar, then “Export
to payroll software.”
B. Choose the format
for your payroll or
accounting program.
If that option doesn’t
appear in the menu,
you probably haven’t
installed any formats.
C. Enter the required
information (available
from your payroll
service or software
manual) and click
“Export” to create a file
that can be imported into your software or e-mailed to your payroll service.
TimePilot time and attendance systems
33
TimePilot Supplies and Services
To order supplies and extra services, please visit the TimePilot web site (www.TimePilot.com)
or call TimePilot at 630.879.6400. Available supplies and services include:
For all TimePilot systems:
•
Additional iButtons. These iButtons make it simple for you to add employees to your
system. iButtons are available in packs of 5, 10, 30, 50, 100 and 200 and in 12 different
colors.
•
Support contracts. One year of telephone or e-mail support, in addition to the 90 days
of free support that start at the time of your purchase.
•
Blue Dot Receptors.
•
QuickBooks Pro. A discount is offered to TimePilot customers.
For TimePilot Extreme:
•
Additional Extreme time clocks.
•
Extreme mounting plates.
•
TimePilot USB drives.
•
Management iButtons.
•
Extreme padlocks.
For TimePilot Vetro:
•
TimePilot USB drives.
For TimePilot PC:
•
Extra licenses. They come in packs of 5, 10 and 25. Larger installations are also
available.
34
TimePilot time and attendance systems
TimePilot time and attendance systems
35
Returns/Replacements/MoneyBack Guarantee
If you have issues or concerns with items you’ve purchased, please
contact our Technical Support Specialists by calling 630.879.6400 x104 or
e-mailing [email protected]. We often are able to solve problems
over the phone quickly and for free! All of our products include 90 days of
free support from the time of purchase.
TimePilot Corporation has a 30-day money-back guarantee and a one-year
warranty against hardware defects on all of its systems purchased directly
from TimePilot, except TimePilot PC. See below for special rules regarding TimePilot PC.
Return Policy
If you purchased your
product directly from
TimePilot less than 30 days
ago: You may return the
system to us for a full refund.
See below for the Return
Procedure. Note: Special
rules apply to TimePilot PC;
see below.
If there is a problem with
your system, please contact
our Technical Support
Specialists at the telephone
number or e-mail address
listed above.
•
•
If you purchased your
product directly from
TimePilot more than 30 days
ago: The product cannot
be returned for a refund. If
there is a problem with your
system, please contact our
Technical Support Specialists
at the telephone number or
e-mail address listed above.
If you purchased your
product from one of our
resellers: Please contact the
store where you purchased
your item for their return
policy. If there is a problem
with your system, please
contact our Technical
Support Specialists at the
telephone number or e-mail
address listed above.
Because TimePilot PC consists of software only, we will not accept returns on that
product. We strongly suggest you take advantage of the 30-day trial of TimePilot PC
that is available for download on our web site. By doing so you will be able to see if the
system meets your needs before purchasing it.
Defective items covered under the one-year manufacturer’s warranty will be repaired
or replaced. Our manufacturer’s warranty is one year after the date of purchase. See
the “Product Warranty” section later in this chapter for details.
Return Procedure
•
•
36
TimePilot time and attendance systems
Please request a Return Merchandise Authorization (RMA) number before sending your
product back. To do so, please call 630.879.6400 x104 or e-mail returns@timepilot.
com. Our returns department is open business days from 9 a.m. to 4:30 p.m. Central
time.
Any product returned to us without prior authorization from TimePilot will be
considered an unauthorized return; the customer will not receive credit for the product
TimePilot time and attendance systems
37
•
and TimePilot will not ship the product back to you.
Mail your product to:
•
Warranty Returns Department
TimePilot Corporation
340 McKee St.
Batavia, IL 60510
Returns Department
TimePilot Corporation
340 McKee St.
Batavia, IL 60510
The WRMA number must appear on all packages and paperwork in connection with
the return or your shipment may be refused.
The RMA number must appear on all packages and paperwork in connection with
the return or your shipment may be refused.
Note: You must ship the product to TimePilot within 5 days of the date that
TimePilot issues the Warranty Return Merchandise Authorization number.
Note: You must ship the product to TimePilot within 5 days of the date that
TimePilot issues the Return Merchandise Authorization number.
•
•
•
•
•
•
•
Any costs incurred while shipping returns are the purchaser’s responsibility.
Unless the product is defective or the return is a direct result of a TimePilot error, a
minimum restocking fee of 25% of the purchase price paid, plus any applicable sales
tax, will be imposed on any item not returned in the original condition it was received.
This includes damaged packaging, manuals, accessories or cable.
Credit card purchases can be refunded to the original credit card number only.
Purchases made with checks will be refunded by check. Please allow 2 - 3 weeks for
processing of all refunds.
Before you return the product to TimePilot, make sure to back up any data in the
device’s memory (if applicable) and on any other storage device accessory (USB
drive, etc.). TimePilot is not responsible for any confidential, proprietary or personal
information, lost or corrupted data or damaged or lost removable media that may be
included with your return.
Issuance of a Return Merchandise Authorization does not bind TimePilot Corporation
to accept the return. Final decision shall be made after TimePilot has inspected the
returned product.
In no event will TimePilot Corporation be liable for any special, incidental, indirect or
consequential damages whatsoever arising out of the inability to use the product.
For one year after you purchase a TimePilot product, we will repair or replace (at our
discretion) any malfunctioning hardware. The purchaser pays only the shipping to return the
malfunctioning part to us. See below for the Warranty Repairs/Replacement Procedure.
This warranty is void if the product is returned in a damaged state for any reason, including
damage that occurs because of failure to follow installation instructions.
Warranty Repair or Replacement Procedure
•
38
•
•
•
Any costs incurred while shipping returns are the purchaser’s responsibility.
Before you return the product to TimePilot, make sure to back up any data in the
device’s memory (if applicable) and on any other storage device accessory (USB
drive, etc.). TimePilot is not responsible for any confidential, proprietary or personal
information; lost or corrupted data; or damaged or lost removable media that may be
included with your return.
TimePilot has an Advance Replacement program for customers who wish to reduce the
amount of time it takes to get their system up and running again. Here’s how it works:
1.
2.
3.
Contact TimePilot’s Returns Department at the telephone number listed above.
Request a WRMA number and tell the specialist you’d like to take advantage of
the Advance Replacement Program.
The TimePilot specialist will take your credit card information and ship out a
replacement part immediately.
Ship us the defective part. If we receive the defective part within 14 days of the
date the WRMA number is issued, we will not charge your credit card. If we have
not received the part within 14 days, we will charge your credit card for the cost
of the part.
Special-Order Items
Product Warranty
•
Mail your product to:
Please request a Warranty Return Merchandise Authorization (WRMA) number before
sending your product back. To do so, please call 630.879.6400 x104 or e-mail returns@
timepilot.com. Our warranty returns department is open business days from 9 a.m. to
4:30 p.m. Central time.
Any product returned to us without prior authorization from TimePilot will be
considered an unauthorized return; the customer will not receive credit for the product
and TimePilot will not ship the product back to you.
TimePilot time and attendance systems
Occasionally we’ll offer for sale an item that is not necessarily part of our normal product line.
Such items are not stocked in our warehouse and are designated as a “Special-Order Item” on
our web site. The following rules for these products apply:
•
•
•
•
Orders may not be canceled after placement.
Products cannot be returned unless defective.
Defective items can be returned for exchange only.
The products are usually drop-shipped from the manufacturer within 2-3 weeks.
Terms of Sale
TimePilot Corporation reserves the right to limit quantities on any item sold, and to change the
pricing of any item at any time without prior notice. As a protection to our customers, when
the shipping address differs from the billing address, there may, in some cases, be a delay in
the ship date until we can verify that the cardholder and buyer are the same.
TimePilot time and attendance systems
39
Errors on Our Web Sites
We do our best to ensure that the information on our web sites is accurate, thorough and
up-to-date. However, there may be instances of inaccurate or incomplete data, including
availability and/or price. We make no warranty or guarantee that the information on our web
site is current, complete or free from errors. We reserve the right to correct errors and/or
update our web site at any time without notice. We reserve the right to refuse or cancel orders
containing errors and/or inaccuracies, including those already submitted, whether or not the
order has been confirmed and/or your credit card charged. We will issue a full refund to the
original pay type if your order is canceled after your payment has been processed.
Questions and comments
If you have any questions or comments about any of the policies described above, please
contact us at 630-879-6400 or e-mail us at [email protected].
Technical Support
For technical support, call us at 630.879.6400 or e-mail us at
[email protected]. When you contact a TimePilot Technical Support specialist, please
have your registration number available. The registration number can be found on a sticker on
the inside cover of this manual.
TimePilot Tip
Before you call or e-mail for support...
...you might be able to save some time by checking the help files in the TimePilot
Central software. Those files contain many details about our systems and definitions of
terms that are used throughout this manual. You can view the help files by clicking the
“Help” menu in TimePilot Central.
40
TimePilot time and attendance systems
TimePilot time and attendance systems
41
TimePilot End-User License
Agreement
NOTICE TO USER:
THIS IS A CONTRACT. READ IT CAREFULLY. BY BREAKING THE SEAL ON THE DISK ENVELOPE
YOU ACCEPT ALL THE TERMS AND CONDITIONS OF THIS AGREEMENT. IF YOU DO NOT AGREE
WITH THE TERMS AND CONDITIONS OF THIS AGREEMENT, YOU WILL NOT BE ABLE TO USE THE
SOFTWARE. IF YOU DO NOT ACCEPT THIS AGREEMENT AND HAVE PROOF OF PURCHASE, YOU
SHOULD RETURN THE UNUSED SOFTWARE AND THE TIMEPILOT PRODUCT IN ITS ENTIRETY
TO THE PLACE OF PURCHASE FOR A REFUND, WITHIN THE TERMS OF THE RETAILER’S RETURN
POLICY.
This TimePilot Corporation License Agreement for TimePilot ("Agreement") is a legal agreement
between you (either an individual or a single legal entity) and TimePilot Corporation, whose
products include computer software and may include associated media, firmware, printed
materials, and "online" or electronic documentation ("Licensed Material"). By downloading,
installing, copying, or otherwise using the Licensed Material, you agree to be bound by the
terms of this Agreement.
LICENSE FOR LICENSED MATERIAL
Copyright laws and international copyright treaties, as well as other intellectual property laws,
including, without limitation, those covering trade secrets, and treaties protect the Licensed
Material. The Licensed Material is licensed, not sold.
GRANT OF LICENSE.
This Agreement grants you the following rights:
Licensed Material: You may install and use, during the Term of this Agreement, the Licensed
Material on the number of computers identified by you when you purchased this Licensed
Material License to use TimePilot.
Storage/Network Use: You may also store or install a copy of the Licensed Material on a storage
device, such as a network server, used only to install or run the Licensed Material on your other
computers over an internal network: however, you must acquire and dedicate a license for
each separate computer on which the Licensed Material is installed or run from the storage
device. A license for the Licensed Material may be shared and used concurrently on different
computers to the limit specified above.
Exclusion for Commercial Use: Notwithstanding the foregoing, you are not licensed to use the
Licensed Material to provide services of any kind to others, whether for a fee or not, without
TimePilot Corporation's express written consent.
DESCRIPTION OF OTHER RIGHTS AND LIMITATIONS.
Assignment: Neither this Agreement nor any rights hereunder may be assigned, sublicensed or
otherwise transferred, in whole or in part, by you.
Limitation on Reverse Engineering, Decompilation and Disassembly: You may not reverse
engineer, decompile or disassemble the Licensed Material.
Rental: You may not rent, lease, lend or otherwise transfer the Licensed Material whether for
value or not.
Support Services: TimePilot Corporation may provide you with support services related to the
42
TimePilot time and attendance systems
TimePilot time and attendance systems
43
Licensed Material ("Support Services"). Use of Support Services is governed by the TimePilot
Corporation policies and programs described on its web site, in "online" documentation and/
or in other TimePilot Corporation-provided materials. Any supplemental Licensed Material
provided to you as part of the Support Services shall be considered part of the Licensed
Material and subject to the terms and conditions of this Agreement. With respect to technical
information you provide to TimePilot Corporation as part of the Support Services, TimePilot
Corporation may use such information for its business purposes, including but not limited to
product support and development. TimePilot Corporation shall not be obligated to provide
Support Services during any period during which an annual fee is not paid by Licensee or
offered by TimePilot Corporation.
Termination: Without prejudice to any other rights, TimePilot Corporation may terminate this
Agreement if you fail to comply with the terms and conditions of this Agreement or fail to pay
TimePilot Corporation's invoice for this Licensed Material. In such event, you must destroy all
copies of the Licensed Material and all of its component parts.
Upgrades: If the Licensed Material is labeled as an upgrade, you must be properly licensed
to use a product identified by TimePilot Corporation as being eligible for the upgrade in
order to use the Licensed Material. Licensed Material labeled as an upgrade replaces and/or
supplements the product that formed the basis for your eligibility for the upgrade. You may
use the resulting upgraded product only in accordance with the terms of this Agreement. If the
Licensed Material is an upgrade of a component of a package of software programs that you
licensed as a single product, the Licensed Material may be used and transferred only as part of
that single product package and may not be separated for use on more than one computer.
Copyright: All title and copyrights in and to the Licensed Material (including, but not limited
to, any images, photographs, animations, video, audio, music, text, and "applets" incorporated
into the Licensed Material), the accompanying printed materials, and any copies of the
Licensed Material are owned by TimePilot Corporation and/or its suppliers. Copyright laws and
international treaty provisions protect the Licensed Material. Therefore, you must treat the
Licensed Material like any other copyrighted material. You may not copy the printed materials
accompanying the Licensed Material.
Dual-Media Licensed Material: You may receive the Licensed Material in more than one
medium. Regardless of the type or size of medium you receive, you may use only one medium
that is appropriate for your computer. You may not use or install the other medium on another
computer. You may not loan, rent, lease or otherwise transfer the other medium to another
use.
Intended beneficiary: TimePilot Corporation, its suppliers and Licensors are the intended
beneficiaries of this Agreement and shall have the right to enforce it on their own behalf and in
their name.
U.S. GOVERNMENT RESTRICTED RIGHTS. The Licensed Material and documentation are
provided with RESTRICTED RIGHTS. Use, duplication, or disclosure by the Government is
subject to restrictions as set forth in subparagraph (c)(1)(ii) of the Rights in Technical Data
and Computer Software clause at DFARS 252.227-7013 or subparagraphs (c)(1) and (2) of
the commercial Computer Software -- Restricted Rights at 48 CFR 52.227-19, as applicable.
Manufacturer is TimePilot Corporation, Illinois, USA.
efforts to solve any problem issues. Some states and jurisdictions do not allow limitations on
duration of an implied warranty, so the above limitation may not apply to you. To the extent
allowed by applicable law, implied warranties on the Licensed Material, if any, are limited to
thirty (30) days.
CUSTOMER REMEDIES.
If a problem with the licensed material cannot be resolved by TimePilot Corporation's Limited
Warranty above, TimePilot Corporation and its suppliers' entire liability and your exclusive
remedy shall be the remedy provided in the Time Clock Limited Warranty found on the
preceding pages of this manual. This Limited Warranty is void if failure of the Licensed Material
has resulted from accident, abuse, or misapplication. Any replacement Licensed Material will
be warranted for the remainder of the original warranty period or thirty (30) days, whichever
is longer. Outside the United States, neither these remedies nor any product support services
offered by TimePilot Corporation are available without proof of purchase from an authorized
source.
NO OTHER WARRANTIES.
TO THE MAXIMUM EXTENT PERMITTED BY APPLICABLE LAW, TIMEPILOT CORPORATION AND
ITS SUPPLIERS DISCLAIM ALL OTHER WARRANTIES AND CONDITIONS, EITHER EXPRESS OR
IMPLIED, INCLUDING, BUT NOT LIMITED TO, IMPLIED WARRANTIES OF MERCHANTABILITY,
FITNESS FOR A PARTICULAR PURPOSE, TITLE, AND NON-INFRINGEMENT, WITH REGARD TO THE
LICENSED MATERIAL, AND THE PROVISION OF OR FAILURE TO PROVIDE SUPPORT SERVICES.
THIS LIMITED WARRANTY GIVES YOU SPECIFIC LEGAL RIGHTS. YOU MAY HAVE OTHERS, WHICH
VARY FROM STATE/JURISDICTION TO STATE/JURISDICTION.
LIMITATION OF LIABILITY.
TO THE MAXIMUM EXTENT PERMITTED BY APPLICABLE LAW, IN NO EVENT SHALL TIMEPILOT
CORPORATION OR ITS SUPPLIERS BE LIABLE FOR ANY SPECIAL, INCIDENTAL, INDIRECT, OR
CONSEQUENTIAL DAMAGES WHATSOEVER (INCLUDING, WITHOUT LIMITATION, DAMAGES
FOR LOSS OF BUSINESS PROFITS, BUSINESS INTERRUPTION, LOSS OF BUSINESS INFORMATION,
OR ANY OTHER PECUNIARY LOSS) ARISING OUT OF THE USE OF OR INABILITY TO USE THE
LICENSED MATERIAL OR THE PROVISION OF OR FAILURE TO PROVIDE SUPPORT SERVICES, EVEN
IF TIMEPILOT CORPORATION HAS BEEN ADVISED OF THE POSSIBILITY OF SUCH DAMAGES.
IN ANY CASE, TIMEPILOT CORPORATION'S ENTIRE LIABILITY UNDER ANY PROVISION OF THIS
AGREEMENT SHALL BE LIMITED TO THE GREATER OF THE AMOUNT ACTUALLY PAID BY YOU FOR
THE LICENSED MATERIAL OR U.S. $5.00; PROVIDED, HOWEVER, IF YOU HAVE ENTERED INTO
A TIMEPILOT CORPORATION SUPPORT SERVICES AGREEMENT, TIMEPILOT CORPORATION'S
ENTIRE LIABILITY REGARDING SUPPORT SERVICES SHALL BE GOVERNED BY THE TERMS OF THAT
AGREEMENT. BECAUSE SOME STATES AND JURISDICTIONS DO NOT ALLOW THE EXCLUSION OR
LIMITATION OF LIABILITY, THE ABOVE LIMITATION MAY NOT APPLY TO YOU.
MISCELLANEOUS
This Agreement is governed by the laws of the State of Illinois. Should you have any questions
concerning this Agreement, please contact TimePilot Corporation.
LIMITED WARRANTY.
TimePilot Corporation warrants that (a) the Licensed Material will perform substantially in
accordance with the accompanying written materials for a period of thirty (30) days from
the date of receipt, and (b) any Support Services provided by TimePilot Corporation shall
be substantially as described in applicable written materials provided to you by TimePilot
Corporation, and TimePilot Corporation support engineers will make commercially reasonable
44
TimePilot time and attendance systems
TimePilot time and attendance systems
45
46
TimePilot time and attendance systems