1
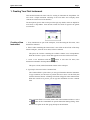
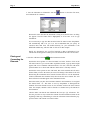
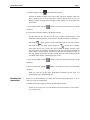
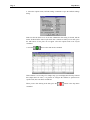
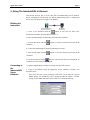
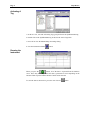
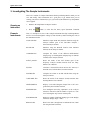
Quick Start Guide Copyright 1991-1998 by HEM Data Corporation 17336 West Twelve Mile Road Southfield, Michigan 48076-2123 U.S.A. Voice (248) 559-5607 Fax (248) 559-8008 http://www.hemdata.com Quick Start Guide Page i Contents 1. Creating Your First Instrument................................................................................................................ 1 Creating a New Instrument....................................................................................................................... 1 Placing and Connecting the Elements....................................................................................................... 2 Running the Instrument............................................................................................................................ 3 2. Using The IndustrialSQL In Element....................................................................................................... 5 Building the Instrument ........................................................................................................................... 5 Connecting to the IndustrialSQL Server Database .................................................................................... 5 Activating A Tag...................................................................................................................................... 6 Running the Instrument............................................................................................................................ 6 3. Investigating The Sample Instruments ..................................................................................................... 7 Opening an Instrument............................................................................................................................. 7 Example Instruments................................................................................................................................ 7 Preface This document is designed to give you a brief overview on how to get started in Snap-Master. For more information on using Snap-Master, check out the online help file (especially the Tutorials section) and the SnapMaster User’s Manual. Set aside approximately 30 to 60 minutes to check out Snap-Master and its capabilities. In that short time, you will see how easy it is to get data into your computer and on your screen with Snap-Master. Quick Start Guide Page 1 1. Creating Your First Instrument This tutorial illustrates the basic tasks for creating an instrument in Snap-Master. We will create a simple instrument consisting of the A/D Demo and a Display (these elements are used in most of the tutorials). The descriptions given in this section provide step-by-step details, which are helpful for newcomers to Snap-Master. Later tutorials contain less detail in regard to the general user interface. Creating a New Instrument 1. If any instruments are open in the workspace, close them using the File menu, Close Instrument command. 2. If the Toolbox containing the element icons is not visible on the left side of the SnapMaster workspace, select the View menu, Toolbox command. This places the Toolbox containing the available element icons in Snap-Master. When the Toolbox is open, a check mark appears next to the Toolbox menu item. 3. Create a new instrument with the button or select the File menu, New Instrument command in the Snap-Master workspace. This opens a clean, untitled instrument window in the workspace. 4. Type Sample Instrument in the Comment Field. The Comment Field is a place where you can type information about the instrument. To type comments, use the mouse to position the arrow cursor over this field, then click the left mouse button. A flashing vertical bar will appear in the comment field. When this vertical bar is present, you can type the information in to the comment field. If the Comment Field is not visible, double click in the instrument window or select the button in the Command Bar to open the Instrument Settings dialog. Select the Two Line Option in the Title group, then press the OK button. Page 2 Snap-Master 5. Save the instrument as EXAMPLE1 with the button or select the File menu, Save Instrument As command. Because this is the first time the instrument is being saved, the File Save As dialog box appears. The File Name field is highlighted, so all we have to do is type EXAMPLE1. It is not necessary to type the .INS extension in the file name because Snap-Master will automatically add it for you. It is not recommended that you specify an extension other than .INS. The default directory for your instruments is the DEFUSER subdirectory, which is what we will use for this example. NOTE: It is important to save your files frequently so that no information is lost. The tutorials are designed to remind you to save the data at the end of each section. Placing and Connecting the Elements 1. Place the A/D Demo element in the instrument window. Position the mouse pointer over the A/D Board icon in the Toolbox. Click on the left mouse button. If you own the Data Acquisition module, a pop-up menu might appear with a list of installed A/D Board drivers. If it does, select the A/D Demo option from the list. A check mark indicates which driver is currently selected. Position the mouse pointer on the A/D board, then click and hold the left mouse button. When you move the mouse, the cursor will change to the outline of the A/D Board. Drag the A/D Board cursor from the Toolbox until it is over the instrument window (underneath the comment field), then release the mouse button. The A/D Demo element icon should appear in the instrument window. Notice that when you place the A/D Demo element in the instrument, it is assigned the element letter “A”. This letter is used by Snap-Master to distinguish the channels from each element because no two elements can have the same element letter. For example, channel 0 will be referred to as channel A0 by all elements in the instrument. Check to make sure that the text underneath the icon says "[A] A/D Demo". If it does not, press the DEL key to delete the element from the instrument. Return to the beginning of this step, remembering to select the A/D Demo element from the popup menu on the A/D element icon in the Toolbox. Quick Start Guide Page 3 2. Place the Display element in the instrument window. Position the Display element to the right of the A/D Demo element. Follow the same instructions given for the A/D Demo element. Because there is only one Display element, no pop-up menu will appear when clicking once on the element in the Toolbox. 3. Activate Pipe Mode with the button or select the Element menu, Pipe Mode command. 4. Connect the A/D Demo element to the Display element. For this data pipe, the A/D Demo is the source element, and the Display is the destination element. Therefore, we will connect from the A/D Demo to the Display. Position the mouse pointer over the A/D Demo element icon, then click the left mouse button. The mouse pointer changes to , with the arrow pointing down and to the left. As you move the cursor towards the Display element, a data pipe connected to the A/D Demo element follows the cursor movement. Position the mouse pointer over the Display element icon, then click the left mouse button. A data pipe appears between the elements, with the data pipe arrow pointing from the A/D Demo to the Display, indicating the flow of data. 5. Turn off Pipe Mode with the button or select the Element menu, Pipe Mode command. 6. Save the instrument with the button or select the File menu, Save Instrument command. When you save the file this time, Snap-Master remembers the file name you specified previously and updates the file. Running the Instrument Before we run the instrument, let’s make sure the Auto Layout function is set up to create a new plot for each channel. 1. Double click on the Display element to open the Display window. If there are four plots (one for each channel from the A/D Demo) in the window, you can skip step 2. Page 4 Snap-Master 2. Select the Options menu, Default Settings command to open the Default Settings dialog. Make sure the On check box is on, the One Channel Per Plot setting is selected, and the Delete All Plots Before Auto Layout check box is turned on. When you are done, press the OK button. If four plots do not appear select the Options menu Auto Layout command. 3. Press the button or the Start! menu command. That's all there is to it! Using a few simple steps, you can display data from any element that outputs data. Of course, it is possible to configure the elements to perform more specific tasks, but even that is not difficult. When you are done looking at the data, press the command. button or the Stop menu Quick Start Guide Page 5 2. Using The IndustrialSQL In Element This tutorial discusses how to access data from and IndustrialSQL Server database. Before continuing the tutorial, make sure that the IndustrialSQL Server is running and that you have the proper access rights to the database. Building the Instrument 1. Create a new instrument with the button or select the File menu, New Instrument command in the Snap-Master workspace. 2. Place the IndustrialSQL In and Display elements in the instrument. 3. Activate Pipe Mode with the button or select the Element menu, Pipe Mode command. 4. Connect the IndustrialSQL In element to the Display element. 5. Turn off Pipe Mode with the button or select the Element menu, Pipe Mode command. 6. Save the instrument with the button or select the File menu, Save Instrument As command. Save the instrument as ISQLIN. Connecting to the IndustrialSQL Server Database 1. Open the IndustrialSQL In Settings by double clicking on the element. 2. Login to the database using the appropriate Server, Database, Username, and Password entries. If this is the first time you are connecting to this server, you are asked to verify the ODBC settings. You should only enter or modify the Network Address - all other settings for the ODBC DSN (Data Source Name) are created automatically. Page 6 Snap-Master Activating A Tag 1. In the tree view, select the All Analog Tags group and locate the SysMinutesRun tag. 2. Double click on the SysMinutesRun tag to add it to the Active Tags table. 3. Press OK to close the IndustrialSQL In Settings dialog. 4. Save the instrument with the button. Running the Instrument When you press the button, all of the data is requested from the database server. There may be a delay before the data is presented on screen depending on the amount of data requested and the amount of traffic on the network. To scale the data as shown above, press the Auto Y-Scale button. Quick Start Guide Page 7 3. Investigating The Sample Instruments There are a number of example instruments that ship with Snap-Master which you can view and modify. These instruments are a good place to get started when you are creating your first few instruments to give you an idea of the different ways Snap-Master can be applied. Opening an Instrument Example Instruments 1. Return to the Snap-Master workspace window. 2. Press the button or select the File menu, Open Instrument command. Here is a description of some of the example instruments that ship with Snap-Master. Feel free to browse through the settings of each element by double-clicking the icons in the instrument window. ANALYSIS.INS Illustrates simple math and statistical functions using the Analysis element (part of the Waveform Analyzer / General Analysis module). BLOCK.INS Illustrates using the BLOCK function with statistical functions in the Analysis element. COMPARE.INS Compares the results of the different Differentiation (Display Page 1) and Integration (Display Page 2) methods available in the Analysis element. FAEX1_OK.INS Shows the results of the FFT element (part of the Frequency Analysis module) tutorials from the SnapMaster User’s Manual. FFT.INS Calculates a forward FFT and an inverse FFT based on a Sawtooth wave from the Wave Generator element. FILTERS.INS Compares the results of an FIR and IIR filter using the Analysis element. GAEXAMPL.INS Shows the results of the Analysis element tutorials from the Snap-Master User’s Manual. HISTOGRM.INS Displays a real time histogram output from a sine wave generated by the A/D Demo element. PEAKFIND.INS Uses Intelligent Processing capabilities in the Analysis element to find and count the number of peaks in a sine wave and integrate only between certain peaks. PLOTDEMO.INS Displays a number of different plotting types in the Display element on Display Pages 1 and 2. REPLAY.INS Shows how data is brought into an instrument from a data file using the Disk In element. Page 8 Snap-Master SCOPE.INS Shows how Snap-Master emulates an oscilloscope’s Y-T and X-Y plotting modes. SINEWAVE.INS Highlights the different types of Sine waves that the Wave Generator element can create. STRPCHRT.INS Shows how Snap-Master emulates a Strip-Chart recorder, along with other plot types on the same Display page. TANK.INS Shows a custom picture used for the Bar Meter plot type in the Display element. TRAPZD.INS Creates a trapezoid waveform with different rise and fall times using the Wave Generator element. WAVEGEN.INS Illustrates many of the different waveforms that can be created using the Wave Generator element, including an arbitrary custom waveform (look at the plot in the lower right corner of the Display window). YXPLOT.INS Shows a Y vs. X plot of a signal in the Display element. For more information and examples on Snap-Master instruments, refer to the User’s Guide which has a series of tutorials at the end of each chapter. Also check out HEM Data’s web page at www.hemdata.com for Application Notes on using different SnapMaster features.