1
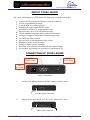
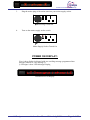
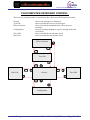
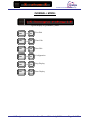
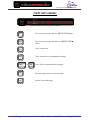
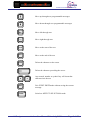
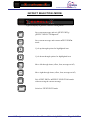
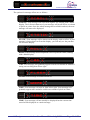
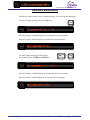
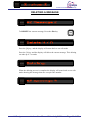
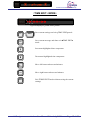
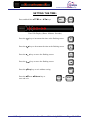
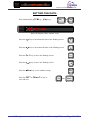
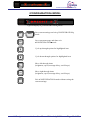
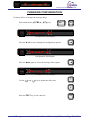
Products from LS Electronics Group
i-show LED Message Display
User Manual
Issue 2.0
LS Designs
July 2006
i-show User Manual 2.0
July 2006
Page 1 of 23
Products from LS Electronics Group
Table of Contents
Page 3
Page 4
Page 5
Page 6
Page 7
Page 9
Page 10
Page 12
Page 13
Page 14
Page 15
Page 16
Page 17
Page 18
Page 19
Page 20
Page 21
Page 22
LS Designs
Product Overview & Connecting up Your i-show
Turning on your i-show
Computer Keyboard Control
Normal Mode
Text Edit Mode
Effect Selection Mode
Changing Messages
Erasing Messages
Inserting Messages
Deleting Messages
Time Edit Mode
Changing the Time
Date Edit Mode
Changing the Date
Configuration Mode
Changing the Configuration
Technical Details
Connector Pin-outs
i-show User Manual 2.0
July 2006
Page 2 of 23
Products from LS Electronics Group
ABOUT YOUR I-SHOW:
The i-show LED display is a LED matrix for displaying user defined messages.
Control via PS2/computer keyboard or serial port (RS232).
99 user programmable messages.
Cycle through all or some messages.
Individual message enable/disable setting
for inclusion/exclusion in programmable cycle.
Each message can be up to 240 characters long.
Various animated and static display effects for messages.
Setting for number of times that scrolled messages loop.
Two different fonts available.
Speed control for all animated message effects.
Brightness control for all messages.
Setting for delay between messages.
Real-time clock onboard with adjustable time & date display.
All messages and settings are retained even when turned off.
CONNECTING UP YOUR I-SHOW:
RS232
Serial Control
12V DC
Power Input
PS2
Keyboard
i-show Connections
1.
Connect your PS2 keyboard to the PS2 connector on the i-show.
PS2 Keyboard Connected
2.
Plug the mains unit into the 12V DC power input on the i-show.
Mains Unit Connected
LS Designs
i-show User Manual 2.0
July 2006
Page 3 of 23
Products from LS Electronics Group
3.
Plug the mains plug of the mains unit into your mains supply socket.
Mains Plug Connected
4.
Turn on the mains supply socket switch.
Mains Supply Socket Turned On
POWER ON DISPLAY:
Your i-show display is shipped with one scrolling message programmed into
message number 01. The message is:
LS Designs i-show LED Message Display
is h o w
www.lselectronicsgroup.com
Default Power-on Display
LS Designs
i-show User Manual 2.0
July 2006
Page 4 of 23
Products from LS Electronics Group
PS2/COMPUTER KEYBOARD CONTROL:
There are six principal modes of operation to the i-show under PS2/keyboard control:
Normal
Text Edit
Effect Selection
-
Configuration
-
Time Edit
Date Edit
-
where your messages are displayed.
where you edit the text of your messages.
where you edit the animated/static effects for your
messages.
where you change brightness, speed, message delay and
scroll loops.
where you edit the current time stored.
where you edit the current date stored.
Effect Selection
F1
Enter
Enter
Text Edit
F1
Ctrl
Ctrl
+
+
F1
Ctrl
F6
Date Edit
+
F5
Time Edit
Normal
F1
F1
Ctrl
+
F9
F1
Configuration
LS Designs
i-show User Manual 2.0
July 2006
Page 5 of 23
Products from LS Electronics Group
NORMAL MODE:
Typical Display in NORMAL Mode
Ctrl
+
F6
F1
Text Edit
Ctrl
+
F6
F5
Time Edit
Ctrl
+
F6
Date Edit
Ctrl
+
F6
F7
Configuration
Ctrl
+
F6
F11
Stop Display
Ctrl
+
F12
F6
Start Display
LS Designs
i-show User Manual 2.0
July 2006
Page 6 of 23
Products from LS Electronics Group
TEXT EDIT MODE:
Typical Display in TEXT EDIT Mode
F1
Save current message and exit TEXT EDIT mode
F2
Save current message and don t exit TEXT EDIT
mode
F3
Clear current text
F4
Clear current user programmable message
Ctrl
+
F6
F4
Clear all user programmable messages
F5
Insert message before current message
F6
Delete Current Message
LS Designs
i-show User Manual 2.0
July 2006
Page 7 of 23
Products from LS Electronics Group
Move up through user programmable messages
Move down through user programmable messages
Move left through text
Move right through text
Home
Move to the start of the text
End
Move to the end of the text
Delete the character at the cursor
Delete
Delete the character preceding the cursor.
A
2
Any normal, number or symbol key will insert that
character into the text
Esc
Exit TEXT EDIT mode without saving the current
message
Enter
Switch to EFFECT SELECTION mode
LS Designs
i-show User Manual 2.0
July 2006
Page 8 of 23
Products from LS Electronics Group
EFFECT SELECTION MODE:
is h o w
www.lselectronicsgroup.com
Typical Display in EFFECT SELECTION Mode
F1
Save current message and exit TEXT EDIT /
EFFECT SELECTION mode
F2
Save current message and return to TEXT EDIT
mode
Cycle up through options for highlighted item
Cycle down through options for highlighted item
Move left through items (effect, font, message on/off)
Move right through items (effect, font, message on/off)
Esc
Exit TEXT EDIT / EFFECT SELECTION mode
without saving the current message
Enter
Switch to TEXT EDIT mode
LS Designs
i-show User Manual 2.0
July 2006
Page 9 of 23
Products from LS Electronics Group
CHANGING MESSAGES:
Press and hold the CTRL + F1 keys.
Ctrl
+
F1
F6
is h o w
www.lselectronicsgroup.com
Message Edit Display
Press the F3 key to clear the default power-on text.
F3
is h o w
www.lselectronicsgroup.com
Message Edit Display
Type in your message e.g. My Message
is h o w
www.lselectronicsgroup.com
Message Edit Display
Press the Enter key to confirm your message entry.
Enter
is h o w
www.lselectronicsgroup.com
Effect Selection Display
Use the
and
keys to select your desired
effect for your message.
Press the F1 key to save and exit.
LS Designs
i-show User Manual 2.0
F1
July 2006
Page 10 of 23
Products from LS Electronics Group
The options for message effects are as follows:
is h o w
www.lselectronicsgroup.com
SCROLL: Your message will scroll from right to left, starting with a blank
display. The left most character of your message will scroll in first, a column
of pixels at a time. Once the whole message has scrolled in and out, the next
message will start to be displayed.
is h o w
www.lselectronicsgroup.com
STATIC: Your message will be shown on the display with no effect. If your
message is longer than can fit on the display, you will only see the part that
can fit on the display.
is h o w
www.lselectronicsgroup.com
ROLL: Your message will roll upwards a row of pixels at a time, starting
with a blank display.
is h o w
www.lselectronicsgroup.com
CAR: Your message will gradually appear from the left behind an animated
racing car travelling from left to right.
is h o w
www.lselectronicsgroup.com
FLASH: Your message will flash on and off.
is h o w
www.lselectronicsgroup.com
WIPE: Your message will wipe in from left to right. Your message will
gradually appear more and more visible one column of pixels at a time.
is h o w
www.lselectronicsgroup.com
TIME: Your message will not actually be displayed but the current time
stored will be displayed as a static message.
LS Designs
i-show User Manual 2.0
July 2006
Page 11 of 23
Products from LS Electronics Group
ERASING MESSAGES
The F4 key can be used to erase a single message, or to erase all the messages.
To erase a single message, Press the F4 key
F4
Press the N key, and the display will return back to text edit mode
Press the Y key and the display will erase the current message
To erase all the messages in the display,
press and hold the CTRL and F4 Keys.
Ctrl
+
F4
Press the N key, and the display will return back to text edit mode
Press the Y key and the display will erase the all 99 messages
LS Designs
i-show User Manual 2.0
July 2006
Page 12 of 23
Products from LS Electronics Group
INSERTING A MESSAGE
To INSERT a message before the current message,
Press the F5 key
F5
Press the N key, and the display will return back to text edit mode
Press the Y key and the display will insert a blank message. This inserting
can take up to 7 seconds.
When the inserting process is complete the display will return back to text edit
mode showing the inserted empty message
The message that was in number 02 is now in message number 03.
IMPORTANT NOTE:
Message number 99 will be lost when inserting a new message
LS Designs
i-show User Manual 2.0
July 2006
Page 13 of 23
Products from LS Electronics Group
DELETING A MESSAGE
To DELETE the current message, Press the F6 key
F6
Press the N key, and the display will return back to text edit mode
Press the Y key and the display will delete the current message. This deleting
can take up to 7 seconds.
When the deleting process is complete the display will return back to text edit
mode showing the message that now occupies this number
LS Designs
i-show User Manual 2.0
July 2006
Page 14 of 23
Products from LS Electronics Group
TIME EDIT MODE:
Typical Display in TIME EDIT Mode
F1
F2
or
Enter
Save current settings and exit TIME EDIT mode
Save current message and don t exit TIME EDIT
mode
Increment highlighted time component
Decrement highlighted time component
Move left between hours and minutes
Move right between hours and minutes
Esc
LS Designs
Exit TIME EDIT mode without saving the current
settings
i-show User Manual 2.0
July 2006
Page 15 of 23
Products from LS Electronics Group
SETTING THE TIME:
Press and hold the CTRL + F5 keys.
Ctrl
+
F5
Time Edit Display (Hours: Minutes: Seconds)
Press the
key to increment the time at the flashing cursor.
Press the
key to decrement the time at the flashing cursor
Press the
key to move the flashing cursor.
Press the
key to move the flashing cursor.
Press the Esc key to exit without saving.
Press the F1 or Enter key to
save and exit.
LS Designs
i-show User Manual 2.0
Esc
F1
July 2006
or
Enter
Page 16 of 23
Products from LS Electronics Group
DATE EDIT MODE:
is h o w
www.lselectronicsgroup.com
Typical Display in DATE EDIT Mode
F1
F2
or
Enter
Save current settings and exit DATE EDIT mode
Save current message and don t exit DATE EDIT
mode
Increment highlighted date component
Decrement highlighted date component
Move left between date, month and years
Move right between date, month and years
Esc
LS Designs
Exit DATE EDIT mode without saving the current
settings
i-show User Manual 2.0
July 2006
Page 17 of 23
Products from LS Electronics Group
SETTING THE DATE:
Press and hold the CTRL + F6 keys.
+
Ctrl
F6
is h o w
www.lselectronicsgroup.com
Date Edit Display (Date: Month: Year)
Press the
key to increment the date at the flashing cursor.
Press the
key to decrement the date at the flashing cursor
Press the
key to move the flashing cursor.
Press the
key to move the flashing cursor.
Press the Esc key to exit without saving.
Press the F1 or Enter or key to
save and exit.
LS Designs
i-show User Manual 2.0
Esc
F1
July 2006
or
Enter
Page 18 of 23
Products from LS Electronics Group
CONFIGURATION MODE:
is h o w
www.lselectronicsgroup.com
Typical Display in CONFIGURATION Mode
F1
F2
or
Enter
Save current settings and exit CONFIGURATION
mode
Save current message and don t exit
CONFIGURATION mode
Cycle up through options for highlighted item
Cycle down through options for highlighted item
Move left through items
(brightness, speed, message delay, scroll loops)
Move right through items
(brightness, speed, message delay, scroll loops)
Esc
LS Designs
Exit CONFIGURATION mode without saving the
current settings
i-show User Manual 2.0
July 2006
Page 19 of 23
Products from LS Electronics Group
CHANGING CONFIGURATION:
Example of how to change the message delay:
Press and hold the CTRL + F7 keys.
Ctrl
+
F7
is h o w
www.lselectronicsgroup.com
Configuration Edit Display
Press the
to move though the configuration options.
Configuration Edit Display
Press the
again to select the message delay option.
Configuration Edit Display
Use the
and
keys to adjust the delay time.
Press the F1 key to save and exit.
LS Designs
i-show User Manual 2.0
F1
July 2006
Page 20 of 23
Products from LS Electronics Group
TECHNICAL DETAILS
ELECTRICAL RATINGS
Input Voltage:
Maximum Input Voltage:
Minimum Input Voltage:
12V DC Nominal
16V DC
10V DC
Current Consumption @ 12V DC
Display with 8 s in every character position, full brightness. Message is static
i-show 300:
i-show 500:
i-show 700:
2.0A
2.6A
3.5A
ENVIRONMENTAL RATINGS
Operating Temperature:
Storage Temperature:
0 55 Degrees Centigrade (Ambient)
-10 70 Degrees Centigrade
It is recommended that the display is operated below 85% Relative Humidity (noncondensing)
IP Rating (not confirmed by testing) IP33
MECHANICAL DETAILS
Space envelope dimensions (includes protruding connectors, but not mating halves)
i-show 300
i-show 500
i-show 700
810mm x 120mm x 35mm
1240mm x 120mm x 35mm
1670mm x 120mm x 35mm
COMMUNICATIONS
Keyboard Input:
Serial Input:
LS Designs
Standard PS/2 Keyboard connection
(6 pin mini din connector)
RS232
( 9 way D connector)
i-show User Manual 2.0
July 2006
Page 21 of 23
Products from LS Electronics Group
CONNECTOR PINOUTS
RS232
Serial Control
12V DC
Power Input
PS2
Keyboard
SERIAL CONNECTOR
1
5
9
6
Pin 1 = No connect
Pin 2 = Transmit to PC
Pin 3 = Receive from PC
Pin 4 = No Connect
Pin 5 = Ground
Pin 6 = No Connect
Pin 7 = No Connect
Pin 8 = No Connect
Pin 9 = No Connect
PS/2 KEYBOARD CONNECTOR
6
4
2
5
3
1
Pin 1 = Data
Pin 2 = No Connect
Pin 3 = Ground
Pin 4 = +5V Supply to Keyboard
Pin 5 = Clock
Pin 6 = No Connect
POWER INPUT CONNECTOR
1
2
3
Pin 1 = Ground (0V)
Pin 2 = +12V DC
Pin 3 = RS232 RX (Note this is not to be connected at the same time as the serial
connector)
LS Designs
i-show User Manual 2.0
July 2006
Page 22 of 23
Products from LS Electronics Group
LS Electronics Group – LS Designs
The First Floor, Trent House, Meadowbank Way,
Eastwood, Nottingham, NG16 3SB
United Kingdom
Tel: +44 (0) 1773 767 633 Fax: +44 (0) 1773 767 655
e-mail: [email protected]
website: www.ishowdisplay.com
Customisation service
Our design service can design and manufacture products to a customer's own specification.
Please contact LS Electronics Group or your supplier to discuss your requirements.
LS Electronics Group has an on-going policy to improve the performance and reliability of its products
and we therefore reserve the right to make changes without prior notice. The information contained in
this data sheet is believed to be accurate, but LS Electronics Group does not assume any responsibility
for errors nor any liability arising from the application or use of any product or circuit described herein.
This data sheet neither states nor implies warranty of any kind, including fitness for any application.
LSdesigns, LS Applications (UK) Ltd., & LS Electronic Solutions are divisions of the LS Electronics Group Ltd.
Registered in England No. 4473417
LS Designs
i-show User Manual 2.0
July 2006
Page 23 of 23