1
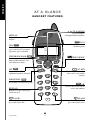
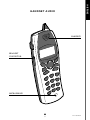
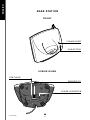
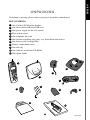
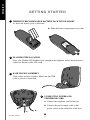
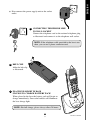
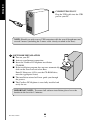
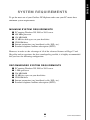
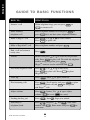
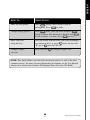
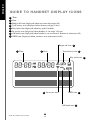
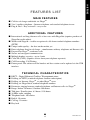
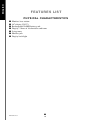
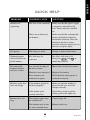
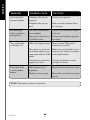
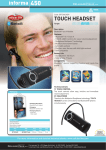
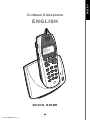
E N G L IS H
QUICK GUIDE
■
P/N 95100360,Version 1.3
1
ENGLISH
Cordless DUALphone
ENGLISH
DEAR CUSTOMER
We would like to thank you for purchasing our Cordless DUALphone and/or an additional
Cordless DUALhandset. We hope you will enjoy it.
Please read the following thoroughly and observe the operating instructions and information
provided. If you are still experiencing difficulties, please call our helpline:
United Kingdom:
Deutschland:
France:
Danmark:
Norge:
Sverige:
Suomi:
0800 092 3745
0800 1802 108
0800 910 643
80 20 90 03
80 06 10 01
020 79 44 77
0800 115 399
For customers in other countries we handle calls in these languages:
Call these numbers:
German:
English:
Français:
0045 72274116
0045 72274117
0045 72274115
Opening hours:
Mon - Fri: 8 am to 8 pm (CET)
Weekends and public holidays closed
Please visit our website where you can find additional help:
www.dualphone.net
Conformity of the telephone to EU directives is confirmed by the CE symbol. Hereby, we
declare that the Cordless DUALphone and/or Cordless DUALhandset are in compliance with
the essential requirements and other relevant provisions of Directive 1999/5/EC.
For US
This equipment complies with Parts 68 of the FCC rules and the requirements adopted by the
Administrative Council for Terminal Attachments (ACTA). This device complies with Part 15
of the FCC rules. For further information on Parts 15 and 68, see “FCC and other information”
on the Safety Information sheet for US.
Copyright ©. All rights reserved. All forms of copying or reproduction of the product or its
associated user guide are strictly prohibited.
This product is manufactured for RTX Products A/S.
■
2
ENGLISH
IN THIS GUIDE
AT A GLANCE .................................................................................................... 4
■ Handset features ....................................................................................... 4
■ Handset audio ........................................................................................... 5
■ Base station .............................................................................................. 6
Front .................................................................................................... 6
Upside down........................................................................................ 6
UNPACKING ...................................................................................................... 7
GETTING STARTED ......................................................................................... 8
■ Inserting rechargeable battery pack into handset ..................................... 8
■ Planning the location ................................................................................ 8
■ Base station assembly .............................................................................. 8
■ Connecting power and telephone cord...................................................... 8
■ Connecting telephone line to wall socket ................................................. 9
■ Belt clip .................................................................................................... 9
■ Placing handset in base station to charge battery pack............................ 9
■ Connecting to PC ................................................................................... 10
■ Software installation................................................................................ 10
SYSTEM REQUIREMENTS ......................................................................... 11
GUIDE TO BASIC FUNCTIONS. .................................................................. 12
GUIDE TO HANDSET DISPLAY ICONS .................................................... 14
FEATURES LIST .............................................................................................. 15
QUICK HELP.................................................................................................... 17
■
3
IN THIS GUIDE
ENGLISH
AT A GLANC E
HAN DSET F EATURES
UP & DOWN
Used to navigate
through handset functions
DISPLAY
Displays the status of your
handset
LOG
DEL
Used to delete digits
(press and release) or cancel
operation (press and hold)
TELEPHONE BOOK
RED PHONE
Used to open the telephone
book to find numbers, add,
edit and delete entries
INT
LOG
Press to see list of
incoming calls
DEL
Press to end a call
INT
PC KEY
Press to make calls to
additional handsets (internal)
For making Internet calls.
Press to see your online
contacts
PHONE KEY
For making and answering calls
OK
OK
Used to enter menu and to
select and confirm
KEY PAD
Buttons used for entering 0-9
and letters A-Z
PAUSE
FLASH
Press and hold for pause,
press and release for *
Press and hold for flash,
press and release for #
■
AT A GLANCE
4
ENGLISH
H AN DSET AUDI O
EARPIECE
HEADSET
CONNECTOR
MICROPHONE
■
5
AT A G L A N C E
ENGLISH
BASE STAT I ON
FRONT
CHARGE LIGHT
PAGE BUTTON
UPSIDE DOWN
USB CABLE
PHONE PLUG
POWER CONNECTOR
AT A GLANCE
■
6
ENGLISH
UNPACKING
If anything is missing, please contact your place of purchase immediately.
BOX CONTENTS:
1
2
3
4
5
6
7
8
9
10
11
One Cordless DUALphone handset
One base station with fixed USB cord
One power supply for the base station
Base station socket
One telephone line cord
One national telephone plug (may vary from illustration below)
One battery pack (rechargeable)
Battery compartment cover
One belt clip
One software installation CD-ROM
This Quick Guide
1
4
3
2
5
7
6
9
8
10
11
■
7
UNPACKING
ENGLISH
GETTING STARTE D
1
INSERTING RECHARGEABLE BATTERY PACK INTO HANDSET
a) Insert the battery pack as indicated.
b) Slide the battery compartment cover shut.
2
PLANNING THE LOCATION
Place your Cordless DUALphone close enough to the telephone socket and main power
sockets so that the cables will reach.
3
BASE STATION ASSEMBLY
Click socket and base together. Make sure the USB
cable is placed as illustrated.
4
CONNECTING POWER AND
TELEPHONE CORD
a) Connect the telephone cord to the base.
b) Connect the power supply cable to the
power socket on the underside of the base.
a)
GETTING STARTED
b)
■
8
ENGLISH
c) Now connect the power supply unit to the socket
outlet.
c)
5
CONNECTING TELEPHONE LINE
TO WALL SOCKET
Connect the telephone cord to the national telephone plug
as illustrated and connect it to the telephone wall socket.
NOTE: If the telephone cable provided in the box is too
short, you can use a phone extension cord.
6
BELT CLIP
Affix the belt clip
as illustrated.
7
PLACING HANDSET IN BASE
STATION TO CHARGE BATTERY PACK
When placed in the base the battery pack will begin to
charge immediately. Successful contact will illuminate
the base charge light.
NOTE: For full charge, please always allow 24 hours.
■
9
GETTING STARTED
ENGLISH
8
CONNECTING TO PC
Plug the USB cable into the USB
port on your PC.
NOTE: Should you wish to use a USB extension cable the overall length must not
exceed 5 metres (including the 2-metre cable already attached to the base).
9
SOFTWARE INSTALLATION
■ Turn on your PC.
■ Activate your Internet connection.
■ Insert the Cordless DUALphone installation
CD-ROM.
■ If the installation program does not run automatically,
click on the Start icon and select Run.
Enter D:\Setup.exe (if D is not the CD-ROM drive,
enter the appropriate letter)
■ The installation wizard will now guide you through
the process.
■ The Cordless DUALphone is now fully installed and
ready for use.
IMPORTANT NOTE: To ensure full software installation please leave the
handset in the base for 15 minutes.
GETTING STARTED
■
10
ENGLISH
SY STEM REQUIREME N TS
To get the most out of your Cordless DUALphone make sure your PC meets these
minimum system requirements:
MINIMUM SYSTEM REQUIREMENTS
■
■
■
■
■
■
■
PC running Windows XP, 2000 or 2003 server
400 MHz processor
128 MB RAM
15 MB free disk space on your hard drive
CD-ROM drive
Internet connection (any broadband: cable, DSL, etc.)
Standard telephone landline subscription (PSTN)
However, in order to take advantage of all of the advanced features of Skype™ and
SkypeOut and to experience the best sound quality possible, it is highly recommended
that you have the following configuration:
RECOMMENDED SYSTEM REQUIREMENTS
■
■
■
■
■
■
■
PC running Windows XP, 2000 or 2003 server
1 GHz processor
256 MB RAM
30 MB free space on your hard drive
CD-ROM drive
Internet connection (any broadband: cable, DSL, etc.)
Standard telephone landline subscription (PSTN)
■
11
SYSTEM REQUIREMENTS
ENGLISH
GU I D E TO BASIC FUN C TIO N S
HOW TO…
WHAT TO DO
Answer a call
When telephone rings you can press
to answer call.
Make ordinary
telephone call
or
Enter telephone number first and press
first and then enter telephone number.
press
Make a Skype™ call
Press
Press
Make a SkypeOut™ call
Enter telephone number and press
End a call and return to
ready state
Press
or
. Use
&
to select contact.
to place call.
.
.
Redial
or
to scroll list of previous
In idle state press
to place call. To redial the telephone
calls. Press
.
number using SkypeOut press
.
SkypeTM contacts can be redialled with
Dial from telephone book
. Use
Press
&
to find entry.
to place call. Press
to place
Press
SkypeOut call.
View log
Press
Dial incoming calls
to place
Press LOG . Scroll entries and press
for SkypeOut
ordinary telephone call and
and SkypeTM calls.
Adjust volume
Press OK 3 times. Use
volume. OK to save.
Locking the key pad
Press
Add entry to
telephone book
and press
and OK . Now enter
Press
number and OK . Enter name and press OK to
save entry.
GUIDE TO BASIC FUNCTIONS
LOG
. Press
, then
OK
■
12
or
to scroll list.
&
to adjust
to cancel.
. Repeat to unlock.
ENGLISH
HOW TO…
WHAT TO DO
Mute the microphone
Press DEL during conversation to turn off
microphone. Press DEL to undo.
Change ringing pattern
Press OK twice, press
twice and press OK .
Scroll to choose Net, External or Internal with OK .
Scroll to choose 1-5 tones. Press OK to save.
Enter characters
using the keys
Press the button with the letter you want accordingly
to position on key e.g. press
twice for the letter
once for ‘M’ etc.
‘B’, press
Change to upper
case text
Press and hold
to change to upper case.
NOTE: This Quick Guide covers the basic installation process as well as the most
common features. For more advanced funtionality descriptions see the User Manual
which can be found in the Cordless DUALphone Suite and on the CD-ROM.
■
13
GUIDE TO BASIC FUNCTIONS
ENGLISH
G U I D E T O HANDSET DISPL AY IC O N S
1
2
3
4
5
6
7
8
Time
Date
Ringer off icon (displayed when user turns the ringer off)
Low battery icon (displayed when battery voltage is low)
Key lock icon (displayed when key pad is locked)
In service icon (displayed when handset is ‘in range’ of base)
Off hook icon (displayed when handset is on an external, Internet or intercom call)
NEW icon (displayed when you have new unanswered calls)
Ringer off icon
1
Time
2
Date
3
Low battery icon
4
Key lock icon
6
In service icon
NEW icon
Off hook icon
GUIDE TO HANDSET DISPLAY ICONS
■
14
7
8
5
ENGLISH
FEATURES L IST
MAI N F EAT UR ES
■ Call free of charge worldwide via SkypeTM
■ 2-in-1 cordless telephone – Internet telephone and standard telephone in one
■ Plug & Dial – Easy to install – easy to use
ADDI T I O N AL F EAT URES
■ International and long distance calls at low rates with SkypeOut (requires purchase of
SkypeOut credit online)
■ Works with SkypeIn – enables reception of calls from standard telephone numbers
(PSTN)
■ Unique audio quality – the best on the market yet
■ Extra telephone line free of charge – simultaneous ordinary telephone and Internet calls
■ Prepared for SkypeTM conference calls
■ Secure and encrypted communication
■ Multiple handset capacity – up to 4 units
■ Caller ID (CLIP), (requires service from your telephone operator)
■ Call Forwarding, Call Waiting
■ Future-proof: The software of the handset and base station can be updated via the USB
interface
T E CHNI CAL CHAR AC TERISTICS
■
■
■
■
■
■
■
■
■
■
■
■
DECT – Digital Enhanced Cordless Telecommunications
Dialling via PSTN (standard telephone landline subscription)
Dialling via Internet: SkypeTM to other SkypeTM users
Dialling via SkypeOut to standard telephone numbers
Distinctive ringing between standard telephone and Internet calls via SkypeTM
Range: Indoor 50 metres / Outdoor 300 metres
Talk time / Standby time: 6.5 hours / 100 hours
16 KHz audio sampling
Telephone book: 160 entries
Redial: 30 entries
Call log: 30 entries
Key lock
■
15
FEATURES LIST
ENGLISH
FEATURES L IST
P H Y SI CAL CHAR AC T E RISTICS
■
■
■
■
■
■
■
Handset, base station
AC adapter (230 V)
Rechargeable Ni-MH battery pack
Display: 2 lines of 16 characters and icons
9 ring tones
Headset jack
Display back light
FEATURES LIST
■
16
ENGLISH
QUICK HEL P
PROBLEM
POSSIBLE CAUSE
SOLUTION
Handset not
registering
The base is not connected
Make sure that the power supply
is properly connected to the
base. Power must be switched
on
There are no battery in
the handset
Make sure that the rechargeable
battery (included) is fitted in
the handset correctly. Place the
handset in the base station
correctly and wait approx. 60 secs.
then try to register again
No display
The battery is dead
Charge or replace the battery
Nothing happens
when you push any
of the buttons
Key lock may be
activated
See if key lock icon is lit.
to
If so press OK and
switch key lock off
No connection
between handset
and base station
Are you out of range of
the base station?
Move closer to the base station
Handset is not registered
Register the handset
Base station is not
connected to power
Check that the mains power is
connected correctly
Is the handset placed in
the base properly?
Make sure that the handset is
placed on the base or in the
charger correctly
Is the battery pack
inserted correctly?
Check that you have put the
battery pack in the right way
The handset ringer may
be switched off
Cancel ringer off
The handset may be too
far away from the base
Return to the base
Handset on the base
does not charge
Handset does not
ring
■
17
QUICK HELP
ENGLISH
PROBLEM
POSSIBLE CAUSE
SOLUTION
You cannot dial
external numbers
Telephone line may be
damaged
Contact your operator
Telephone line may be
busy
Make sure the telephone line is
not occupied
The incoming
caller’s number is
not displayed
The caller’s number has
been withheld
Caller has to allow their number
to be sent
You do not subscribe to a
Caller ID service
Contact your telephone operator
for details
You cannot make
an Internet call
USB cable might be loose
Make sure the USB cable is
connected to your PC
The software you use for
net dialling might not be
compatible with the USB
phone
Make sure you install the correct
software. See Setting Up chapter
in this Quick Guide
Your Internet connection
might have failed
Contact your Internet service
provider for details
Other handset is not
registered
Register handset with base station
Handset is out of range
Move closer to the base to regain
service
You cannot make
a call to another
handset
NOTE: The handset cannot be turned off.
QUICK HELP
■
18