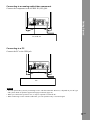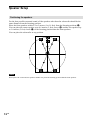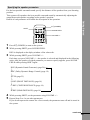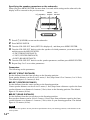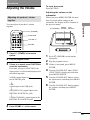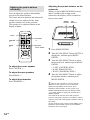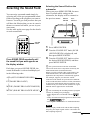
1
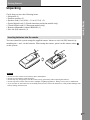
4-240-621-71(2)
Home Theater
System
Operating Instructions
HT-BE1
© 2002 Sony Corporation
WARNING
To prevent fire or shock
hazard, do not expose the unit
to rain or moisture.
To prevent fire, do not cover the
ventilation of the apparatus with
news papers, table-cloths,
curtains, etc. And don’t place
lighted candles on the apparatus.
To prevent fire or shock hazard,
do not place objects filled with
liquids, such as vases, on the
apparatus.
Do not install the appliance in
a confined space, such as a
bookcase or built-in cabinet.
Don’t throw
away the battery
with general
house waste,
dispose of it
correctly as chemical waste.
For customers in the U.S.A.
This symbol is intended to
alert the user to the
presence of uninsulated
“dangerous voltage” within the
product’s enclosure that may be of
sufficient magnitude to constitute a
risk of electric shock to persons.
This symbol is intended to
alert the user to the
presence of important
operating and maintenance
(servicing) instructions in the
literature accompanying the
appliance.
Owner’s Record
The model and serial numbers are
located at the rear of the unit.
Record the serial number in the
space provided below. Refer to them
whenever you call upon your Sony
dealer regarding this product.
Model No. HT-BE1
Serial No.______________
2US
CAUTION
You are cautioned that any changes
or modifications not expressly
approved in this manual could void
your authority to operate this
equipment.
WARNING
This equipment has been tested and
found to comply with the limits for a
Class B digital device, pursuant to
Part 15 of the FCC Rules. These
limits are designed to provide
reasonable protection against
harmful interference in a residential
installation. This equipment
generates, uses, and can radiate radio
frequency energy and, if not
installed and used in accordance
with the instructions, may cause
harmful interference to radio
communications. However, there is
no guarantee that interference will
not occur in a particular installation.
If this equipment does cause harmful
interference to radio or television
reception, which can be determined
by turning the equipment off and on,
the user is encouraged to try to
correct the interference by one or
more of the following measures:
- Reorient or relocate the receiving
antenna.
- Increase the separation between the
equipment and receiver.
- Connect the equipment into an
outlet on a circuit different from that
to which the receiver is connected.
- Consult the dealer or an experienced
radio/TV technician for help.
ENERGY
STAR® is a
U.S. registered
mark.
As an ENERGY STAR® partner,
Sony Corporation has determined
that this product meets the
ENERGY STAR® guidelines for
energy efficiency.
If you have any questions about this
product, you may call;
Sony Customer Information Center
1- 800 - 488 - 7669
The Number below is for the FCC
related matters only.
Declaration of Conformity
Trade Name:
SONY
Model No.:
SA-WBE1
Responsible Party:Sony
Electronics Inc.
Address:
680
Kinderkamack
Road, Oradell,
NJ 07649 USA
Telephone No.: 201-930-6972
This device complies with Part 15
of the FCC Rules. Operation is
subject to the following two
conditions: (1) This device may not
cause harmful interference, and (2)
this device must accept any
interference received, including
interference that may cause
undesired operation.
Welcome!
Thank you for purchasing the Sony
Home Theater System. Before
operating the unit, please read this
manual thoroughly and retain it for
future reference.
Precautions
On safety
• Should any solid object or liquid fall into the
cabinet, unplug the system and have it checked
by qualified personnel before operating it any
further.
On power sources
• The system is not disconnected from the AC
power source (mains) as long as it is connected
to the wall outlet, even if the system itself has
been turned off.
• If you are not going to use the system for a long
time, be sure to disconnect the system from the
wall outlet. To disconnect the AC power cord
(mains lead), grasp the plug itself; never pull
the cord.
• AC power cord must only be changed at the
qualified service shop.
On placement
• Do not place the system in a location near heat
sources, or in a place subject to direct sunlight,
excessive dust or mechanical shock.
On adjusting volume
• Do not turn up the volume while listening to a
portion with very low level inputs or no audio
signals. If you do, the speakers may be damaged
when a peak level portion is played.
On cleaning
• Clean the cabinet, panel and controls with a soft
cloth slightly moistened with a mild detergent
solution. Do not use any type of abrasive pad,
scouring powder or solvent such as alcohol or
benzine.
On your TV’s color
• If the speakers should cause the TV screen to
have color irregularity, turn off the TV then turn
it on after 15 to 30 minutes. If color irregularity
should persist, place the speakers further away
from the TV.
If you have any questions or problems concerning
your system, please consult your nearest Sony
dealer.
3US
Table of Contents
WARNING .......................................................................................................... 2
Welcome! ........................................................................................................... 2
Precautions ........................................................................................................ 3
Getting Started ................................................................. 5
Unpacking .......................................................................................................... 5
Hookup .............................................................................................................. 6
Speaker Setup ................................................................................................. 12
Operations ..................................................................... 15
Adjusting the Volume .......................................................................................
Selecting the Sound Field ................................................................................
Adjusting the tone quality .................................................................................
Playing the Disc on the “PlayStation 2” or DVD Player ....................................
Controlling the TV with the Supplied Remote ..................................................
Turning off the power automatically .................................................................
15
17
19
21
22
23
Additional Information ....................................................... 24
Troubleshooting ............................................................................................... 24
Specifications ................................................................................................... 26
Index to Parts and Controls ............................................................................. 27
“PlayStation 2” is a registered trademark of Sony Computer
Entertainment.
This system incorporates Dolby* Digital and Pro Logic Surround and
the DTS** Digital Surround System.
4US
* Manufactured under license from Dolby Laboratories.
“Dolby,” “Pro Logic,” and the double-D symbol are trademarks of
Dolby Laboratories.
Confidential unpublished works. © 1992-1997 Dolby Laboratories. All
rights reserved.
** Manufactured under license from Digital Theater Systems, Inc. US Pat.
No. 5,451,942 and other worldwide patents issued and pending. “DTS”
and “DTS Digital Surround” are trademarks of Digital Theater Systems,
Inc. © 1996 Digital Theater Systems, Inc. All rights reserved.
Getting Started
Unpacking
Getting Started
Check that you have the following items:
• Subwoofer (1)
• Satellite speakers (5)
• Speaker cords (3 m (10 ft) × 3.8 m (12.5 ft) × 2)
• Optical digital cord (1) (North American and Asian models only)
• Coaxial digital cord (1) (European models only)
• Remote commander (remote) RM-BE1 (1)
• Size AA (R6) batteries (2)
Inserting batteries into the remote
You can control the system using the supplied remote. Insert two size AA (R6) batteries by
matching the + and – on the batteries. When using the remote, point it at the remote sensor
on the system.
Notes
•
•
•
•
•
Do not leave the remote in an extremely hot or humid place.
Do not use a new battery with an old one.
Do not drop any foreign object into the remote casing, particularly when replacing the batteries.
Do not expose the remote sensor to direct sunlight or lighting apparatuses. Doing so may cause a malfunction.
If you will not use the remote for an extended period of time, remove the batteries to avoid possible damage from
battery leakage and corrosion.
5US
Hookup
Speaker installation
For best performance, we recommend speaker placement as shown.
You can use any satellite speakers for the front, center, and rear speakers.
Center speaker
Place on the top of or
below the TV.
Subwoofer
Can be placed anywhere.
Rear speakers
Place right beside or slightly behind your listening
position, and a little higher than your ears.
6US
Front speakers
Place on both sides of the
TV equal distances apart.
Connecting the Satellite speakers
Center speaker
Front speaker (R)
Getting Started
Connect the supplied satellite speakers to the subwoofer.
Use the five supplied cords to connect the satellite speakers. Connect them to their correct
jacks.
The connectors of the speaker cords are the same color as the label of the terminals to be
connected. Connect the red cord to the FRONT (R) speaker, the green cord to the CENTER
speaker, the white cord to the FRONT (L) speaker, the black cord to the REAR (R) speaker, and
the blue cord to the REAR (L) speaker.
Each speaker cord has two different size jacks. Connect the big one (A) to the subwoofer, and
the small one (B) to the satellite speaker by matching the indication + and – on the cord to
those of the terminals.
Front speaker (L)
B
A
Subwoofer
L
SPEAKER
FRONT R
UDIO IN
CENTER
FRONT L
R
L
SPEAKER
FRONT R
AUDIO IN
CAL COAXIAL
DIGITAL IN
REAR R
CENTER
FRONT L
R
REAR L
USB
OPTICAL COAXIAL
DIGITAL IN
REAR R
REAR L
to AC outlet
(mains)
Rear speaker (R)
Rear speaker (L)
continued
7US
Adjusting the angle of the satellite speakers
You can adjust the angle of the supplied satellite speakers if necessary.
1
Loosen the screw at the bottom of the speaker.
2
Tighten the screw again after adjusting the angle of the speaker.
Note
When you loosen or tighten the screw at the bottom of the speaker, use an appropriate driver.
8US
Installing the satellite speakers on the wall
Remove the screw at the bottom of the
speaker.
2
Turn the speaker stand opposite 180˚,
and then lightly tighten the screw.
Getting Started
1
Note
Do not turn the speaker stand more than 180˚.
The cord may become disconnected.
3
Tighten the screw again after adjusting
the angle of the speaker.
4
Install the speaker on the wall.
Install screws (not supplied) in the wall
and mount the satellite speaker by the
hollow for the screw in the bottom of
speaker. You can adjust the angle of the
satellite speakers by selecting the hollow
on the speaker.
The middle hollow is used to attach the
speaker straight on the wall. The right or
left hollow is used to attach the speaker
on the wall at an angle.
Notes
• When you loosen or tighten the screw at the bottom of the speaker, use an appropriate driver.
• Be sure that the cord between the satellite speaker stand and the speaker is not pinched.
• If you install the speaker to a wall, make sure the wall you install to is strong enough. Since the speaker is
heavy, it is dangerous if it falls. Sony cannot take any responsibility for any injury or damage during
installation of those speakers.
continued
9US
Connecting to other components
You can connect this system to “PlayStation 2” and enjoy the surround sound.
This system can also be connected to digital audio/video components such as a DVD player or
CD player, and analog components such as TV or VCR. It can also be connected to a PC using
a USB cable.
Connecting to a “PlayStation 2”
“PlayStation 2” can be connected to OPTICAL jack.
L
SPEAKER
FRONT R
AUDIO IN
USB
CENTER
FRONT L
R
OPTICAL COAXIAL
DIGITAL IN
REAR R
REAR L
optical digital cord
“PlayStation 2”
Connecting to a digital audio/video component
Connect the component to the DIGITAL IN OPTICAL (or COAXIAL) jack.
Use the optical digital cord or the coaxial digital cord to connect the DIGITAL IN OPTICAL
jack or the DIGITAL IN COAXIAL jack.
L
SPEAKER
FRONT R
AUDIO IN
USB
optical digital cord
OPTICAL COAXIAL
DIGITAL IN
or
CENTER
FRONT L
R
REAR R
REAR L
coaxial
digital cord
DVD player, CD player, etc.
Note
Do not bundle or knot the optical digital cord and coaxial digital cord.
10US
Connecting to an analog audio/video component
Connect the component to the AUDIO IN (L/R) jack.
L
SPEAKER
FRONT R
USB
CENTER
FRONT L
R
OPTICAL COAXIAL
DIGITAL IN
REAR R
REAR L
Getting Started
AUDIO IN
TV, VCR, etc.
Connecting to a PC
Connect the PC to the USB jack.
L
SPEAKER
FRONT R
AUDIO IN
USB
CENTER
FRONT L
R
OPTICAL COAXIAL
DIGITAL IN
REAR R
REAR L
PC
Notes
• You can operate this system by connecting to a PC with the USB cable. However, it depends on your PC type
and system. Read our product support homepage for details (page 24).
• When you connect this system to a PC, it may be required to restart the PC.
• When connecting to a PC with the USB cable, you can reproduce only 2 ch sound signal.
11US
Speaker Setup
Positioning the speakers
For the best possible surround sound, all the speakers other than the subwoofer should be the
same distance from the listening position.
Place the front speakers within 0.2 to 5 meters (1 to 16 feet) from the listening position (A).
You can place the center speaker up to 0.6 meters (2 feet) closer (B) and the rear speakers up
to 1.6 meters (5 feet) closer (C) to the listening position than the front speakers.
You can place the subwoofer at any position.
45°
Note
Do not place the center and rear speakers farther away from the listening position than the front speakers.
12US
Specifying the speaker parameters
For the best possible surround sound, specify the distance of the speakers from your listening
position.
This system will reproduce the best possible surround sound by automatically adjusting the
output from each speaker according to the speaker’s position.
Details of each parameter will follow the description of the operation.
Getting Started
?/1 (POWER)
SHIFT
SOUND FIELD
VOLUME +/–
1
2
Press ?/1 (POWER) to turn on the system.
While pressing SHIFT, press SOUND FIELD.
DSG is displayed on the diplay window of the subwoofer.
3
While pressing SHIFT, press VOLUME +/–.
Each time you press VOLUME +/–, the speaker is selected and displayed in the following
order. After the speaker of which parameter you want to specify appears, press SOUND
FIELD while pressing SHIFT again.
DSG (Dynamic Sound Generator) (page 20) T
r
DRC (Dolby Dynamic Range Control) (page 19)
r
AUTO (page 23)
r
F-DST (FRONT DISTANCE) (page 14)
r
C-DST (CENTER DISTANCE) (page 14)
r
R-DST (REAR DISTANCE) (page 14)
4
5
While pressing SHIFT, set the parameter using VOLUME +/–.
Repeat Steps 2 to 4 to set other parameters.
If you do not operate the remote for a few seconds, the parameter turns off and is stored in
the system.
continued
13US
Specifying the speaker parameters on the subwoofer
When you press MENU/ENTER for more than 2 seconds while setting on the subwoofer, the
display will be returned to the previous menu.
?/1 (POWER)
MENU/
ENTER
VOL/
SELECT
1
2
3
4
Press ?/1 (POWER) to turn on the subwoofer.
5
6
Turn the VOL/SELECT knob to set the speaker parameter, and then press MENU/ENTER.
Press MENU/ENTER.
Turn the VOL/SELECT knob (SETUP is displayed) , and then press MENU/ENTER.
Turn the VOL/SELECT knob to select the speaker of which parameter you want to specify,
and then press the MENU/ENTER.
• F-DST (FRONT DISTANCE)
• C-DST (CENTER DISTANCE)
• R-DST (REAR DISTANCE)
Repeat Step 2 to 5 to set other parameters.
Parameters
The following are the parameters.
xF-DST (FRONT DISTANCE)
Set the distance from the front speakers to the listening position.
Front speaker distance can be set in 0.2 meter (1 foot) steps from 0.2 to 5 meters (1 to 16 feet).
The default figure is 2.4 meters (8 feet).
xC-DST (CENTER DISTANCE)
Set the distance from the center speaker to the listening position.
Center speaker distance can be set in 0.2 meter (1 foot) steps from a distance equal to the front
speaker distance to a distance 0.6 meters (2 feet) closer to the listening position. The default
figure is 2.4 meters (8 feet).
xR-DST (REAR DISTANCE)
Set the distance from the rear speakers to the listening position.
Rear speaker distance can be set in 0.2 meter (1 foot) steps from a distance equal to the front
speaker distance to a distance 1.6 meters (5 feet) closer to your listening position. The default
figure is 2.0 meters (6 feet).
Note
If the front or rear speakers are not placed an equal distance from your listening position, set the distance of the
closer speaker.
14US
Operations
Adjusting the Volume
Adjusting all speakers’ volume
together
Adjusting the volume on the
subwoofer
When you press MENU/ENTER for more
than 2 seconds while setting on the
subwoofer, the display will be returned to
the previous menu.
?/1 (POWER)
MENU/
ENTER
Operations
You can adjust all speakers’ volume
together.
To mute the sound
Press MUTING.
VOL/
SELECT
?/1 (POWER)
FUNCTION
VOLUME +/–
MUTING
1
2
3
Press ?/1 (POWER) to turn on the
system.
Play the program source.
If there is no sound, press FUNCTION to
select the input source.
Each time you press FUNCTION, the
input source is selected and displayed in
the following order.
AUDIO (signal input to T
the AUDIO IN jack)
r
USB
(signal input to the USB jack)
r
OPT(OPTICAL) (signal input to the
DIGITAL IN OPTICAL jack)
r
COAX(COAXIAL) (signal input to the
DIGITAL IN COAXIAL jack)
4
1
Press ?/1 (POWER) to turn on the
subwoofer.
2
3
Play the program source.
4
Turn the VOL/SELECT knob (FUNC
(FUNCTION) is displayed), and then
press MENU/ENTER.
5
Turn the VOL/SELECT knob to select
the input source, and then press MENU/
ENTER.
6
Turn the VOL/SELECT knob to adjust
the volume, and then press MENU/
ENTER.
If there is no sound, press MENU/
ENTER.
Press VOLUME +/– on the remote.
continued
15US
Adjusting the speaker balance
individually
You can adjust the speakers individually,
except for the front speakers.
The center and rear speakers and subwoofer
volume levels are adjusted to the front
speaker volume level as the criterion.
The speaker to be adjusted flashes in the
display window.
Adjusting the speaker balance on the
subwoofer
When you press MENU/ENTER for more
than 2 seconds while setting on the
subwoofer, the display will be returned to
the previous menu.
MENU/
ENTER
VOL/
SELECT
SHIFT
CENTER
+/–
REAR
+/–
WOOFER
+/–
MUTING
(TEST TONE)
1
2
Press MENU/ENTER.
3
Turn the VOL/SELECT knob to select
the desired level, and then press MENU/
ENTER.
• C-LEV (CENTER LEVEL)
• R-LEV (REAR LEVEL)
• W-LEV (WOOFER LEVEL)
4
Turn the VOL/SELECT knob to adjust
the speaker balance, and then press
MENU/ENTER.
To adjust the center speaker
Press CENTER +/–.
To adjust the rear speakers
Press REAR +/–.
To adjust the subwoofer
Press WOOFER +/–.
16US
Turn the VOL/SELECT knob (SETUP is
displayed) , and then press MENU/
ENTER.
z The test tone will make it easier to hear the
difference in the volume level of each speaker.
While pressing SHIFT on the remote, press
MUTING (TEST TONE). On the system, press
MENU/ENTER and turn the VOL/SELECT knob
(T-T (TEST TONE) is displayed), and then press
MENU/ENTER.
You will hear the test tone from each speaker in
sequence. Adjust the volume level so that the volume
of the test tone from each speaker sounds the same on
the remote.
To turn off the test tone, while pressing SHIFT, press
MUTING (TEST TONE) again. Or press MENU/
ENTER on the system again.
Selecting the Sound Field
ENTER
SELECT
Operations
You can enjoy surround sound simply by
selecting one of the pre-programmed sound
fields according to the program you want to
listen to. You will get such presence that you
will have the illusion that you are in a movie
theater or concert hall while you are in your
own room.
See the table on the next page for the details
on each sound field.
Selecting the Sound Field on the
subwoofer
When you press MENU/ENTER for more
than 2 seconds while setting on the
subwoofer, the display will be returned to
the previous menu. MENU/
VOL/
SOUND
FIELD
Press SOUND FIELD repeatedly until
the sound field you want appears on
the display window.
Each time you press SOUND FIELD, the
sound field mode is selected and displayed
in the following order.
AFD (AUTO FORMAT DECODE) T
r
PL (DOLBY PRO LOGIC)
r
MOVIE (DOLBY PRO LOGICII MOVIE)
r
MUSIC (DOLBY PRO LOGICII MUSIC)
1
2
Press MENU/ENTER.
3
Turn the VOL/SELECT knob to select
the desired SOUND FIELD, and then
press MENU/ENTER.
Turn the VOL/SELECT knob (S-FLD
(SOUND FIELD) is displayed), and
then press MENU/ENTER.
z The system memorizes the last sound field
selected for each source component selected by the
FUNCTION button (Sound Field Link).
When you select an audio/video component by the
FUNCTION button, the sound field that was last
applied for the component is automatically applied.
For example, suppose you select the “DVD”
connected to the OPTICAL jack and select MOVIE
as the sound field, then switch to COAX (COAXIAL)
by the FUNCTION button and select MUSIC as the
sound field. If you switch to OPT (OPTICAL) again,
MOVIE will be applied as the sound field.
z You can identify the encoding format of program
software by looking at its packaging.
– Dolby Digital discs are labeled with the
logo.
– Dolby Surround encoded programs are labeled with
the
logo.
– DTS Digital Surround discs are marked with DTS.
Note
When you play sound tracks with 96 kHz sampling
frequency, the output signals will be converted to 48
kHz sampling frequency.
continued
17US
Features of each sound field mode
Recommended cases
To listen to the original sound
of the program.
Effect
Automatically detects the type of audio signal
being input (Dolby Digital, DTS, Dolby Pro
Logic, or standard 2 channel stereo) and performs
the proper decoding if necessary. This mode
presents the sound as it was recorded/encoded,
without adding any effects.
Sources recorded in 2 channels are decoded in 4
DOLBY PRO LOGIC When set to “DOLBY PRO
LOGIC,” the receiver performs channels.
Pro Logic decoding.
This setting is ideal for movies This mode reproduces sound in 5.1 channel when
MOVIE
encoded in Dolby Surround.
watching pictures encoded in Dolby Surround.
(DOLBY PRO
LOGICII MOVIE)
This setting is ideal for normal The stereo source is reproduced in 5.1 channel
MUSIC
stereo sources, such as CDs.
appropriately.
(DOLBY PRO
LOGICII MUSIC)
Sound field mode
AUTO FORMAT
DECODE
18US
Adjusting the tone quality
Making the low-level sound (DOLBY
DRC*)
Making the low-level sound (DOLBY
DRC) on the subwoofer
When you press MENU/ENTER for more
than 2 seconds while setting on the
subwoofer, the display will be returned to
the previous menu.
MENU/
ENTER
SHIFT
SOUND
FIELD
VOLUME +/–
1
While pressing SHIFT, press SOUND
FIELD.
DSG is displayed on the display window
of the subwoofer.
2
While pressing SHIFT, press VOLUME +
to indicate DRC (DOLBY DRC).
3
While pressing SHIFT, press SOUND
FIELD.
4
While pressing SHIFT, select STD
(STANDARD) or OFF using VOLUME +/–.
VOL/
SELECT
Operations
When you listen at low volume to a DVD
player, the system compresses the dynamic
range and finely adjusts for low-level sound.
It is only functional when a DVD disc for
DRC (audio DRC) is played. To use this
function, connect the DVD component to
the optical digital jack and set the Dolby
digital sound to DOWNMIX PCM.
* Dolby DRC=Dolby Dynamic Range
Control
1
2
Press MENU/ENTER.
3
Turn the VOL/SELECT knob, select
DRC (DOLBY DRC), and then press
MENU/ENTER.
4
Turn the VOL/SELECT knob, select
STD (STANDARD) or OFF, and then
press MENU/ENTER.
Turn the VOL/SELECT knob (SETUP is
displayed), and then press MENU/
ENTER.
continued
19US
Making Dynamic sound (DSG*)
Although the sound is low-level, you can
enjoy Dynamic sound.
* DSG = Dynamic Sound Generator
SHIFT
Making the Dynamic sound (DSG) on
the subwoofer
When you press MENU/ENTER for more
than 2 seconds while setting on the
subwoofer, the display will be returned to
the previous menu.
SOUND
FIELD
MENU/
ENTER
VOL/
SELECT
VOLUME +/–
1
20US
While pressing SHIFT, press SOUND
FIELD.
DSG is displayed on the display window
of the subwoofer.
2
While pressing SHIFT, press SOUND
FIELD again.
3
While pressing SHIFT, select ON or OFF
using VOLUME +/–.
1
2
Press MENU/ENTER.
3
Turn the VOL/SELECT knob, select ON
or OFF, and then press MENU/ENTER.
Turn the VOL/SELECT knob (DSG is
displayed), and then press MENU/
ENTER.
Playing the Disc on the
“PlayStation 2” or DVD
Player
Depending on the DVD or VIDEO CD,
some operations may be different or
restricted.
Refer to the instructions supplied with
your disc.
DVD 1/DVD 2
Operations
You can play DVDs on the Sony DVD
player or “PlayStation 2” using the supplied
remote. Refer to the instructions supplied
with the “PlayStation 2” as well.
Go back to the
Press ..
preceding
chapter, track or scene
in continuous play
mode
Turn on the DVD
Press DVD 1.
player
If you connect a DVD
player with new signal
format (available in
future), press this button
while pressing SHIFT to
turn it on
(DVD 2*).
* In this case, press each button above while pressing
SHIFT to operate the DVD player.
Note
To operate the “PlayStation 2” using the remote,
attach the IR receiver for the “PlayStation 2” and point
the remote to the IR receiver. Refer to the instructions
supplied with the “PlayStation 2” as well.
Using the title menu
X
N
x
m/M
./>
DVD MENU
DVD TOP
MENU
</M/m/,/
ENTER
DISPLAY
To
Play a disc
Stop
Pause
Resume play after
pause
Locate a point quickly
(Scan)
RETURN
Operation
Press N.
Press x.
Press X.
Press N.
Press m or M while
playing a disc. When you
find the point you want,
press N to return to the
normal speed.
Go to the next chapter, Press >.
track or scene in
continuous play mode
A DVD is divided into long sections of a
picture or a music piece called “titles.”
When you play a DVD which contains
several titles, you can select the title you
want using the title menu.
1
Press DVD TOP MENU.
The title menu appears on the TV
screen.
2
Press </M/m/, to select the title you
want to play.
3
Press ENTER.
The system starts playing the selected
title.
Notes
• Depending on the DVD, you may not be able to
select the title.
• Depending on the DVD, a “title menu” may simply
be called a “menu” or “title” in the instructions
supplied with the disc. “Press ENTER.” may also
be expressed as “Press SELECT.”
continued
21US
Using the DVD menu
Some DVDs allow you to select the disc
contents using the menu. When you play
these DVDs, you can select the language for
the subtitles, the language for the sound,
etc., using the DVD menu.
1
Press DVD MENU.
The DVD menu appears on the TV
screen. The contents of the menu vary
from disc to disc.
2
Press </M/m/, to select the item
you want to change.
3
To change other items, repeat Step 2.
4
Press ENTER.
Controlling the TV with
the Supplied Remote
You can control the Sony TV having
mark with the supplied remote.
TV
SHIFT
TV CH +/–
(TV/VIDEO)
Note
Depending on the DVD, a “DVD menu” may simply
be called a “menu” in the instructions supplied with
the disc.
Using the setup display
You can operate the setup display of the
DVD player.
1
Press DISPLAY.
The setup display appears on the TV
screen.
2
Press </, to select the setup item,
then press ENTER.
3
Press M/m to select the item you want
to change, then press ENTER.
4
Change the item setting.
To return to the previous display
Press RETURN.
22US
To
Turn the TV on or off
Change the channel
of the TV
Select the input source
for the TV
Operation
Press TV.
Press TV CH +/–.
While pressing SHIFT,
press TV CH – (TV/
VIDEO).
Note
Depending on the TV, you may not be able to control
your TV or to use some of the buttons above.
Turning off the power
automatically
While pressing SHIFT, press SOUND
FIELD.
2
While pressing SHIFT, press VOLUME +/
– repeatedly to indicate AUTO.
3
While pressing SHIFT, press SOUND
FIELD.
4
While pressing SHIFT, press VOLUME +/
– to indicate OFF.
To turn off the Ready mode on the
subwoofer
When you press MENU/ENTER for more
than 2 seconds while setting on the
subwoofer, the display will be returned to
the previous menu.
indicator
MENU/
ENTER
Mode
Turn on
Ready mode
Turn off
VOL/
SELECT
indicator
Green light up
Red light up
Light out
Press ?/1 (POWER) if you want to turn off
the system completely. Indicator will be
light out.
To turn off the Ready mode
You can turn off the Ready mode. The
default setting is set to ON.
SHIFT
Operations
If there is no sound output from the input
source selected by the FUNCTION button
for more than 3 minutes, system power will
turn off automatically (Ready mode). Power
will be turned on again automatically when
the input source which you selected before
Ready mode recognizes any sound signal
output. Each type of mode, the indicator on
the system is changed the following.
1
1
2
Press MENU/ENTER.
3
Turn the VOL/SELECT knob, select
AUTO, and then press MENU/ENTER.
4
Turn the VOL/SELECT knob, select
OFF, and then press MENU/ENTER.
Turn the VOL/SELECT knob (SETUP is
displayed), and then press MENU/
ENTER.
SOUND
FIELD
VOLUME +/–
23US
Additional Information
Troubleshooting
If you experience any of the following
difficulties while using the system, use this
troubleshooting guide to help you remedy
the problem. Should any problem persist,
consult your nearest Sony dealer.
The power is not turned on.
, Check that the AC power cord (mains lead) is
connected securely.
There’s no sound or only a very lowlevel sound is heard.
, Check that the speakers and components are
connected correctly and securely (page 7,10).
, Make sure that you’ve selected the correct
component on the system (page 15).
, Press MUTING if “M-ON (MUTING ON)”
is displayed on the display window.
, The protective device on the system has been
activated because of a short circuit. Turn off
the system, eliminate the short-circuit
problem and turn on the power again.
, The connecting cord is damaged. Replace it
with a new one.
The left and right sounds are
unbalanced or reversed.
, Check that the speakers and components are
connected correctly and securely (page 7,10).
, Adjust the volume level of each speaker
(page 16).
Severe hum or noise is heard.
, Check that the speakers and components are
connected correctly and securely (page 7,10).
, Check that the connecting cords are away
from a transformer, motor, TV or fluorescent
light.
, Move the TV away from the audio components.
, The plugs and jacks are dirty. Wipe them
with a cloth slightly moistened with alcohol.
, Clean the disc.
24US
The sound loses stereo effect when
you play a VIDEO CD or a CD.
, Check that the speakers and components are
connected correctly and securely (page 7,10).
The surround effect is difficult to
hear when you are playing a Dolby
Digital sound track.
, Make sure a proper sound field function is
selected (page 17).
, Check the speaker connections and settings
(page 7, 13).
, Depending on the DVD, the output signal
may not be the entire 5.1 channel but
monaural or stereo even if the sound track is
recorded in Dolby Digital format.
The sound comes from the center
speaker only.
, Depending on the disc, the sound may come
from the center speaker only.
No sound is heard from the center
speaker.
, Make sure a proper sound field function is
selected (page 17).
, Adjust the speaker volume (page 16).
No sound or only a very low-level
sound is heard from the rear
speakers.
, Make sure a proper sound field function is
selected (page 17).
, Adjust the speaker volume (page 16).
No sound is heard from the PC
connecting the USB terminal.
, Check the system and PC are connected
correctly and securely. (page 11)
, Depending on your type of your PC or PC
system, the system may be unstable. Read our
product support homepage for details.
http://www.sony.co.jp/en/Products/
homeaudio/
The remote does not function.
, Remove any obstacles between the remote
and the system.
, Use the remote near the system.
, Point the remote at the remote sensor on
the system.
, Replace all the batteries in the remote with
new ones if they are weak.
The system does not operate
properly.
Additional Information
, Static electricity, etc., may affect the system’s
operation.
Disconnect the AC power cord (mains lead)
once, then connect it again.
25US
Specifications
AUDIO POWER SPECIFICATIONS
POWER OUTPUT AND TOTAL HARMONIC DISTORTION:
With 6 ohm loads, both channels driven, from 120 – 10,000 Hz; rated 19
watts per channel minimum RMS power, with no more than 10 % total
harmonic distortion from 220 milliwatts to rated output.
SA-WBE1 (subwoofer)
Max. output
Subwoofer:
30 W (6 ohms)
Front:
15 W + 15 W (6 ohms)
Center*:
15 W
Rear*:
15 W + 15 W
* Depending on the sound field settings and the source, there may be no sound output.
Speaker system
Bass reflex type
Speaker unit
130 mm (5 1/8 inches) dia. cone type/
Dimensions (approx.)
215 × 271 × 302 mm (8 1/2 × 10 3/4 × 12 inches)
(w/h/d, not including the projecting parts)
Mass (approx.)
North American model:
6.3 kg (13 lb 15 oz)
Other model:
6.4 kg (14 lb 2 oz)
SS-BE1 (satellite speakers)
Speaker system
Speaker unit
Rated impedance
Dimensions (approx.)
Mass (approx.)
Closed box type
50 mm (2 inches) dia. cone type
6 ohms
61 × 82 × 65.5 mm (2 1/2 × 3 1/4 × 2 5/8 inches) (w/h/d)
175 g (7 oz)
General
Power requirements
North American model:
European model:
Other model:
Power consumption
U.S. model:
Canadian model:
Other model:
Operating temperature
Operating humidity
Supplied accessories
120 V AC, 60 Hz
230 V AC, 50/60 Hz
220-240 V AC, 50/60 Hz
60 W
1.0 W (at the Power Saving Mode)
75 W
1.0 W (at the Power Saving Mode)
45 W
0.3 W (at the Power Saving Mode)
5˚C to 35˚C (41˚F to 95˚F)
5 % to 90 %
See page 5.
Design and specifications are subject to change without notice.
US
26
Index to Parts and Controls
Refer to the pages indicated in parentheses for details.
Subwoofer
3
4
2
5
6
L
SPEAKER
FRONT R
AUDIO IN
CENTER
FRONT L
R
7
USB
8
OPTICAL COAXIAL
DIGITAL IN
REAR R
REAR L
9
Additional Information
1
Top panel/Front panel
1 ?/1 (POWER) switch and indicator (15,
23)
Turns on and off the power of the
system.
2 remote sensor (5, 25)
Accepts the remote control signals.
3 MENU/ENTER (15, 16, 17, 19, 20, 23)
Displays the menu on the display
window. To executes the settings, press
this button again.
4 VOL/SELECT knob (15, 16, 17, 19, 20,
23)
Adjust the volume and select settings.
5 Display window (13, 15, 17)
Indicates the speaker setting, input
signal, sound field mode, etc.
Rear panel
6 AUDIO IN L/R jacks (11)
Connect to the audio output of a TV,
VCR, etc.
7 USB jack (11)
Connect to the PC.
8 DIGITAL IN OPTICAL/COAXIAL
jacks (10)
Connect to the DIGITAL OUT
(OPTICAL) jack of the “PlayStation 2,”
DVD player, etc.
9 SPEAKER jacks (7)
Connect to the supplied satellite
speakers.
continued
27US
Remote
qs
1
SHIFT
qd
DVD2
DVD1
TV
2
3
qf
SOUND
FUNCTION FIELD
TV CH
qg
qh
4
TV/VIDEO
5
CENTER
WOOFER VOLUME
qj
6
PLAY PAUSE STOP MUTING
qk
TEST TONE
ql
MENU
LEVEL
REAR
7
8
PREV
NEXT
SCAN
DVD TOP MENU
w;
DVD MENU
9
wa
q;
ENTER
DISPLAY
RETURN
ws
qa
DVD CONTROL
1 TV button (22)
Turns the TV on and off.
2 SHIFT button (13, 16, 19, 20, 22, 23)
Switches the function of the buttons on
the remote.
3 TV CH +/– (TV/VIDEO) buttons (22)
Changes the TV channel.
To change the TV input, press – while
pressing SHIFT.
4 REAR +/– buttons (16)
Adjust the rear speakers volume.
5 CENTER +/– buttons (16)
Adjust the center speaker volume.
6 XPAUSE button (21)
Pauses playing a disc.
7 NPLAY button (21)
Plays a disc.
8 ./>PREV/NEXT buttons (21)
Press to go to the next chapter or track,
or to go back to the previous chapter or
track.
US Corporation
28Sony
Printed in Korea
9 DVD TOP MENU button (21)
Displays the title menu on the TV
screen.
0 </M/m/,/ENTER button (21)
Selects and executes the items or
settings.
qa DISPLAY button (21)
Displays the setup display of the DVD
player.
qs DVD 1/DVD 2 button (21)
Turns on and off the power of the DVD
player.
qd ?/1 (POWER) switch (13, 15)
Turns on and off the system.
qf FUNCTION button (15)
Selects the input signal.
qg SOUND FIELD (MENU) button (13,
17, 19, 20, 23)
Selects the sound field mode.
Pressing this button while pressing
SHIFT will select the menu.
qh WOOFER +/– buttons (16)
Adjust the subwoofer volume.
qj VOLUME +/– buttons (13, 15, 19, 20,
23)
Make the speaker settings or adjust the
volume of the system.
Pressing this button while pressing
SHIFT will set the speaker setup
parameters.
qk xSTOP button (21)
Stops playing a disc.
ql MUTING (TEST TONE) button (15,
16)
Mutes the sound.
Pressing this button while pressing
SHIFT will sound the test tone.
w; m/M (SCAN) buttons (21)
Locate a point while monitoring the
picture.
wa DVD MENU button (21)
Displays the DVD menu on the TV
screen.
ws RETURN button (21)
Returns to the previously selected
screen.