1
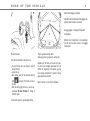
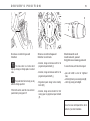
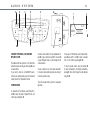
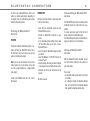
WIND
QUICK GUIDE
WELCOME ABOARD YOUR VEHICLE
Note
Congratulations on your choice and thank you for your purchase.
Your new vehicle was designed by the RENAULT design team to provide you with a versatile model offering a unique style.
Enjoy the exceptional open-air driving experience afforded by your new vehicle and learn about its main features in this document.
RENAULT wishes you happy driving.
This document does not replace the driver’s handbook.
Please read the complete driver’s handbook for more detailed information on your vehicle’s equipment.
The reference guide covers all existing equipment (both standard and optional) for all models of this vehicle. Whether the equipment is fitted to the vehicle depends
on the version, the options selected and the country where the vehicle is sold.
Detailed information regarding your vehicle’s use, maintenance and warranty, as well as videos and simulators are all
only a click away in the e-Guide for your new vehicle, accessible from the website www.e-guide.renault.com.
Translated from French. Copying or translating, in part or in full, is forbidden unless prior written permission has been obtained from RENAULT, 92 100 Billancourt
2 009.
Front and engine compar tment
3
Passenger side
4
Rear of the vehicle
5
Rotating hard roof
6
Accessing the vehicle
7
Star ting/Stopping the engine
8
Driving position
9
Dashboard10
Instr ument panel11
Lighting/W ipers12
Cr uise control/Speed limiter13
Multimedia systems14
Heating and air conditioning system17
Gadgets18
eco219
fron t
and
engine
compar t men t
4
5
2
1
Opening the bonnet
To open, pull unlocking handle 1 and push the
bonnet catch tab to the left. Lift the bonnet and
secure it using the stay.
Closing the bonnet
Check that nothing has been left in the engine
compartment. To close the bonnet, replace the stay
in its mounting, lower the bonnet to approximately
20 cm above the closed position and release it.
It will latch automatically under its own weight.
Check that it is locked.
3
Coolant level
The level indicated on tank 2 should be between
the “MINI" and "MAXI" markings.
When this level must be topped up, always do so
with the engine cold, switched off and with the vehicle on level ground.
Screen washer fluid level
With the engine switched off, top up the fluid in
reservoir 3 if necessary.
Engine oil level
To check the oil level, use dipstick 5.
The level indicated on dipstick 5 should be between
the MINI and MAXI marks.
If the oil level is at minimum, unscrew filler cap 4
to top up the oil.
You must observe the service intervals and the oil
grades recommended for your engine. Refer to the
Maintenance Service document for your vehicle,
and to Section 4 of the vehicle handbook for the
precautions to take when filling with oil.
P assenger
side
3
2
1
Deactivating the front
passenger air bag
If you wish to fit a rear-facing child seat on the
front passenger seat, you must deactivate the air
bag: with the vehicle stationary, push and turn
switch 1 to OFF.
With the ignition on, warning light 2,
lights up orange on the instrument panel.
¹
Refer to the driver’s handbook for specific information on child safety.
,
Activation of the front
passenger air bag
You should reactivate the air bag as soon as you
remove the child seat from the front passenger seat
to ensure the protection of the front passenger in
the event of an impact.
To reactivate the air bag: when the vehicle is stationary, push and turn lock 1 to the ON position.
With the ignition on, it is essential to check that
warning light 2
is off.
¹
on the instrument panel
Immediately reposition the lock to ON as soon
as you stop using the child seat.
Accessories socket 3
It is located in the glove box.
It is designed for connecting accessories approved
by RENAULT's Technical Department with a maximum power rating of 120 Watts (12 V).
rear
of
t he
vehicle
Anchorage points
2
A
1
Fuel tank
Your vehicle is fitted with a flap and a cap.
–To open the flap, place your finger in recess 1
and pull the flap;
–remove the cap;
–when driving, when the low fuel level warning
L
light
comes on, fill the tank as soon as
possible.
–After the warning light comes on, you have approximately 30 miles (50 km) left, driving at
moderate speed.
The fuel tank capacity is approximately 40 litres.
Hooks 2 located on either side of the luggage compartment allow the load to be secured.
Luggage compartment
volume
When the roof is folded back in its compartment,
you still have the entire volume of the luggage
compartment.
Tyre pressure kit/
emergency spare wheel
Depending on the vehicle, in the event of a puncture, there is an emergency spare wheel or a tyre
inflation kit. Depending on the vehicle, you may
have a storage compartment. To access it, lift luggage compartment carpet A.
Refer to Section 5 of your driver’s handbook.
R o t a t ing
hard
roof
2
A
B
1
Opening the rotating hard
roof
Closing the rotating hard
roof
With the engine running and the handbrake engaged.
With then engine running and the handbrake engaged, raise control 2 (movement A) until the
message “lock handle” appears on the instrument
panel and a beep sounds.
Unlock the roof by pulling and turning control 1
clockwise.
Do not lift the roof.
Lower control 2 (movement B) until the message
“roof open” appears on the instrument panel and
a beep sounds. The side windows and roof cover
open.
The roof folds into its housing and the roof cover
closes.
The side windows and roof cover open.
The roof and its cover close.
Lock the roof by turning control 1 anticlockwise.
Do not move handle 1 when driving.
A ccessing
t he
Locking/unlocking the
vehicle
vehicle
A
B
1
RENAULT REMOTE CONTROL key A or B
Press :
‡
…
to unlock;
to lock .
In all situations:
–Two flashes of the direction indicator lights confirm vehicle locking;
special features of key A
Special features
–One flash of the direction indicator lights confirms vehicle unlocking.
To release key A from its housing, press button 1,
it will come out automatically.
–Never leave a key in the vehicle;
To reinsert it in its housing, press button 1 and
move key A until it is locked away.
–
depending on the vehicle, pressing this
button twice in succession prevents the vehicle
from being opened, even from the inside.
…
S t ar t ing / S t opping
t he
engine
Accessing functions
1
Turn the key through two positions to be able to
use certain functions (radio, wipers…)
Depending on the case, these functions will
switch off at the latest when the vehicle is
locked.
Starting the engine
With the key in the ignition switch 1, turn it fully
on. Once the engine has started, release it.
Stopping the engine
With the engine idling, turn the key towards you.
D river ’ s
posi t ion :
sea t s
4
1
3
2
5
Manual seat adjustment
moving the seat forwards or backwards
Lift handle 1 to release. Release the handle once
the seat is in the correct position and ensure that
the seat is fully locked into position.
raising or lowering the seat
Depending on the vehicle, lift handle 2.
tilting the seatback
Move the lever 4 and tilt the seatback to the required position.
Heated seats
With the ignition on, press switch 3.
The system, which has a thermostat, decides
whether or not the heating is needed.
Door mirrors with
electrical adjustment:
Rear view mirror with button 5
Select the rear view mirror using button 5, then
adjust it to the required position.
Heated door mirrors
Depending on the vehicle, the door mirrors may
be heated. To activate this function, refer to the
information on the “Heating and air conditioning
system” in Section 3 of your driver’s handbook.
D ashboard
10
The equipment fitted, described opposite,
DEPENDS ON THE VEHICLE VERSION AND THE
COUNTRY.
1
2
3
4
1Location of the driver’s air bag.
7Central door locking/unlocking controls.
2Instrument panel.
8Manual parking brake control.
3Front seat belt reminder warning lights and passenger air bag activation/deactivation status indicator lights:
9Cruise control/speed limiter main on/off switch.
™
¹
buckled;
driver or front passenger seat belt not
passenger air bag in the OFF position;
5Electric window controls, rotating hard roof
opening/closing control.
6
14 13
7
12 11 10
9
8
11 Heating/air conditioning controls.
12 Cruise control/speed limiter control.
4Hazard warning lights.
5
10 Location for radio.
6Sockets for audio connection
These give you the option to connect a portable
audio player, an MP3 player, a USB key, etc. to
your audio system.
13 Bonnet release control.
14 Controls for adjusting the electric door mirrors.
I ns t rumen t
1
panel
2
11
4
3
5
Warning lights:
© This requires you to drive carefully to a
RENAULT dealer as soon as possible. If you fail
to follow this recommendation, you risk damaging your vehicle.
® this warning light requires you to stop im7
B
A
6
1 Rev counter (rpm × 1,000).
7 Gear change indicator light
2 Speedometer (km or miles per hour).
Depending on the vehicle, when this indicator light
comes on a higher gear should be engaged.
3 Trip computer and warning system.
4 Fuel level gauge.
5 If the minimum fuel level is reached, the warning
light comes on and a beep sounds.
6 Engine coolant temperature indicator.
A and B: cruise control/speed limiter operating indicator. The indicator lights come on according to
the function status.
Note: the engine speed at which the light flashes
may vary depending on certain conditions (engine
temperature, etc.).
mediately, for your own safety, as soon as traffic
conditions allow. Stop your engine and do not restart it. Call a RENAULT Dealer.
Distance before service:
Some vehicles are equipped with a system that
analyses the quality of the oil in real time. It ensures that the engine remains reliable by adapting
the engine oil change intervals to the driving style.
Under certain conditions of use, the message
“Service due in...” may appear before the scheduled service date. If the message “Service soon” is
then displayed, you must arrange for the vehicle to
be serviced as soon as possible.
ligh t ing / wipers
1
2
3
5
12
5
6
6
7
A
B
C
4
Lighting control 5
Turn ring 1 until the symbol is opposite mark 2.
u
k
k
switches on the side lights;
switches on the dipped beam headlights;
Main beam headlights: with ring 1 in position
, pull stalk 5 towards you;
Flash headlights: pull stalk 5 towards you.
Note: depending on the vehicle, the dipped beam
headlights come on automatically. Refer to the
driver’s handbook to activate/deactivate the automatic mode.
D
Turn ring 3 until the symbol is opposite mark 4.
g
h
switches on the front fog lights;
switches on the front and rear fog
lights.
To switch off, repeat the operation.
Lights-on warning buzzer: when the front doors
are opened, a buzzer sounds to warn you that the
lights are on when the ignition is switched off (to
prevent the battery from discharging).
Wiper control 6
With the ignition on, position stalk 6 for:
A: Park position
B: Intermittent or automatic wiping
C: normal wiping speed
D: fast wiping speed
Windscreen washer: pull stalk 6 towards you.
Note: depending on the vehicle, adjust the wiping
speed and the sensitivity of automatic wiping activation by turning ring 7.
D river ’ s
posi t ion
13
2
6
3
1
5
4
Cruise control/speed
limiter
Cruise control/speed
limiter controls
Ï
–Activation, storage and increase switch for the
programmed speed: button 2 (+);
The cruise control is a function which
helps you to keep your driving speed at a constant
value.
Ð
–Activation, storage and decrease switch for the
programmed speed: button 5 (-);
The speed limiter function helps you stay
within the driving speed limit.
–Programmed speed storage function standby:
button 3 (O);
If fitted to the vehicle, select the cruise control or
speed limiter by moving switch 1.
–Activation, storage and recall switch for limit/
cruising speed or programmed speed: button 4
(R).
Dashboard and
instrument panel
brightness management
To access this menu, with the vehicle stopped:
–press and hold 6, to enter the “brightness”
menu;
–set the brightness by successively pressing 6;
–confirm by pressing and holding 6.
To use the cruise control/speed limiter, refer to
Section 2 of your driver’s handbook.
audio
A
sys t em
B
C
14
D
E
RADIO CD
MEM.
1
G
B
FM
100.00
OK
2
3
4
F
Listening to the radio, a CD (audio and
mp3) or a player
Press A to switch the system on or off. Select the
desired source by pressing one of the keys B once
or several times.
If you wish to listen to an AUXILIARY source,
connect your portable audio player to the desired
socket (refer to the “Dashboard” section).
FM radio source
To update the list of stations, press C then F, or
turn H to select the option “Update FM List", and
confirm by pressing E or H.
5
2
1
RDS-AF
6
20:34
RADIO 1
5
TRAFFIC
H
To select a radio station from an alphabetical list,
press D to go to station name field 1, then turn H
or press F several times to scroll through the list
of radio stations.
To save a station to one of the keys numbered 1
to 6, select a radio station and press one of keys 1
to 6 until you hear a beep.
To recall a stored station, press the corresponding button.
To save up to 12 FM stations, select a radio station,
press G and use F or turn H to select a location
from 1 to 12. Confirm by pressing E or H.
To recall a stored station, press the buttons D
to move horizontally to the station number 2 by
pressing D, then scroll through the radio stations
using F or H.
B lue t oo t h
A
B
audio
sys t em
15
1
B
C
3
10:46
T
MEM
F
1
TEL
RADIO
CD
2
4
3
E
To switch the system on or off, press A. Adjust the
volume by turning button A.
Listening to the radio, a CD or an audio
player
Select the desired source by pressing one of keys B
once or several times.
If you wish to listen to an AUXILIARY source,
connect your portable audio player to the desired
socket (refer to the “Dashboard” section).
5
6
D
FM
103.90
TRAFFIC
RDS-AF
RADIO 1
T
G
FM radio source
To select a radio station from an alphabetical list,
press C to go to the station name field 1, then
turn E or G to scroll through the list of radio stations.
To update the list: press D, then turn E or G to
select the “Audio settings” field then “Radio functions” and “Update FM list”; confirm by pressing E
or G.
To store a station from 1 to 6: select a radio station then press one of the buttons 1 to 6 until a
beep sounds.
To recall a stored station, press the corresponding button.
Button F is used to store up to 12 stations (refer to
the previous page).
Pairing your Bluetooth®
device
In order to use your hands-free device (telephone,
portable audio player), you must pair it (button D)
when using it for the first time. After this, it will
automatically be recognised and connected to
the hands-free system once the vehicle ignition is switched on. Refer to the section entitled
“Bluetooth® connection” in the driver’s handbook.
B lue t oo t h ®
connec t ion
In order to use a Bluetooth® device, either a telephone or portable audio player (depending on
the vehicle), from your multimedia system, please
follow the instructions below.
Pairing a Bluetooth®
device
Principle
Pairing will enable the multimedia system to recognise and store your Bluetooth® device. This is
the first step to carry out in order to use your telephone or portable audio player.
Note: you can pair several devices to your multimedia system, but only one device can be used
at a time (a single telephone or a single portable
audio player).
Contact your RENAULT dealer for a list of available devices.
Pairing steps
Pairing is carried out directly on your device (refer
to its user instructions):
–check that your multimedia system and your
Bluetooth® device are on;
–activate the Bluetooth® connection on your
device;
–in the multimedia system settings menu, select
the field which allows you to store or pair a
Bluetooth® device;
–launch a search for Bluetooth® equipment from
your device;
–select “My-Radiosat” or “MY-CAR” from the list
of devices found;
–enter the pairing code using your device’s keypad
(it will appear on the multimedia system screen,
otherwise refer to the user instructions for the
system).
The device is paired.
16
Connecting a Bluetooth®
device
Your Bluetooth® device must be connected to the
multimedia system for all its functions to be accessible.
To connect your device, select it from the list of
devices stored in the multimedia system.
The multimedia system may also automatically recognise your device once it is switched on.
Using a Bluetooth®
device
With your Bluetooth® device connected, you can
use some functions directly via the controls on
your audio system.
You can also:
–for a portable audio system: select a music track
or an album…;
–for a telephone: display the telephone address
book, call a contact from the telephone address
book, update the telephone address book…
H ea t ing
A
1
2
and
3
4
air
5
B
condi t ioning
7
8
9
sys t em
17
Note: pressing any of the buttons (except 14) will
deactivate the automatic mode.
10
Air recirculation
11
Button 16 can be used to recirculate the passenger
compartment air.
Adjusting the air distribution
6
16
15
14
13
Manual air conditioning/
heating A
Automatic climate
control B
–Distribute the air: turn control 1 to select one of
the 5 positions;
–activate de-icing of the rear screen (and, depending on the vehicle, the door mirrors): press
switch 2.
–adjust the ventilation speed: turn control 3;
–activate the air conditioning (depending on the
vehicle): press button 4;
–select the temperature: turn control 5;
–recirculate the air: turn control 6.
Activating automatic mode
12
–Select the required temperature using buttons 14;
–press button 9 for automatic mode to control the
system.
Note: pressing button 8 deactivates the air conditioning. The AC OFF indicator light comes on.
When button 8 is pressed again, the air conditioning is automatically controlled by the system.
Press button 10 or 12 to select the desired position.
Adjusting the ventilation speed
Press button 11 or 13 to increase or decrease the
air flow.
Demisting/De-icing
Press button 7 to activate demisting and de-icing
of the windscreen, side windows, rear screen and/
or door mirrors.
Press button 15 to activate demisting/de-icing of
the rear screen and/or door mirrors.
G adge t s
18
1
Rear storage
compartment 1
To access the storage compartment, move the seat
forwards and tilt the seatback forwards.
Auxiliary sockets
Depending on the vehicle, you have an auxiliary
input: RCA socket or audio multi-connection unit
with USB and Jack sockets. This allows you to
connect an external audio source (portable audio
player, MP3 player, USB key, etc) and listen to your
portable audio player directly through the vehicle’s
speakers.
Refer to the user manual for your audio system or
equipment to find out how to connect your audio
device.
ECO
2
19
When using your vehicle,
adopt an economical driving
style. These driving guidelines will help you to consume less fuel.
Six pieces of everyday practical advice for fuel savings of 10% to 20%.
1 Adapt the gear changes
–Change up a gear from 2000 rpm in Diesel vehicles and 2400 rpm in Petrol vehicles;
–change down a gear from 1000 rpm;
–at a stable speed or for gentle acceleration, use
the top gear.
2 Drive flexibly
5 Use the engine conscientiously
–Anticipate the traffic conditions so as to use
engine braking more than the brake pedal;
–Switch off the engine if stopped for more than
30 seconds;
–above 30 mph (50 km/h), maintain a steady
speed.
–do not run the engine at idle speed (to raise the
temperature) before driving, even in winter.
3 Control acceleration and speed
6 Optimise your use of the vehicle
–Up to 30 mph (50 km/h), accelerate so that 5th
can be quickly reached;
–Use the heating and air conditioning system
only when necessary:
–beyond 30 mph (50 km/h), accelerate moderately and limit the speed.
–limit the difference between the interior and exterior temperature to 5°C;
4 Manage uphill and downhill sections
–check the tyre pressures every month;
–When driving downhill, maintain the driving
speed;
–do not leave unnecessary loads in the vehicle.
–when driving uphill, slow down without affecting the traffic flow.
( www.e-guide.renault.com )
RENAULT S.A.S. SOCIÉTÉ PAR ACTIONS SIMPLIFIÉE AU CAPITAL DE 533 941 113 € / 13-15, QUAI LE GALLO
92100 BOULOGNE-BILLANCOURT R.C.S. NANTERRE 780 129 987 — SIRET 780 129 987 03591 / TÉL. : 0810 40 50 60
RP 910-1 – 99 91 093 58R – 02/2010 – Edition anglaise
à999109358Ròëïä 2L