1
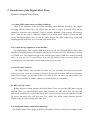
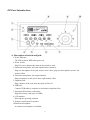
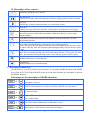
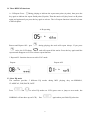
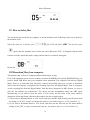
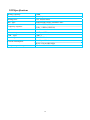
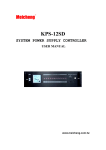
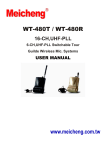
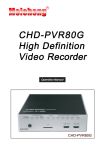
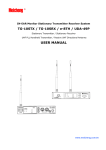
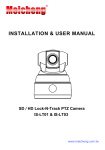
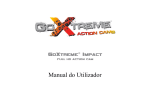
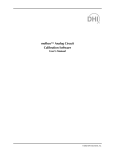
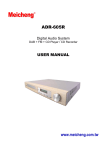
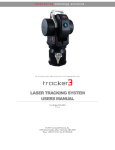
Meicheng ®
MT-1 Digital Music Tutor
USER MANUAL
www.meicheng.com.tw
MT-1
Thank you for purchasing Digital Music Tutor. This classical and elegant machine equips with leading
digital recording technology, for musician, language teachers and students. The digital recording
technology bring pure and wide sound effect, suitable for piano, string, pipe and all
kinds of instruments. The USB port may connect to PC for easy download and duplication. To
own a Digital Music Tutor, to win your music practice more effective and enjoyable..
I. Introduction of the Digital Music Tutor.......................................................................................P2
II.Product Fixture............................................................................................................................P3
III. Parts introduction
A. Description of switch and jacks...........................................................................................P4
B. Description of key control....................................................................................................P5
C. Description of MODE key....................................................................................................P5
D. Switch and jacks on back panel............................................................................................P6
IV. How to operate RECORD
A. How to record.......................................................................................................................P6
B. Record from microphones....................................................................................................P7
C. Record from LINE IN source ..............................................................................................P7
D. The suitable position to record.............................................................................................P7
V. How to operate PLAY function
A. Enter VOC or MP3 mode.....................................................................................................P8
B. How to operate PLAY...........................................................................................................P8
C. Forward or Rewind...............................................................................................................P8
D. Three repeat function............................................................................................................P9
E. Select EQ mode.....................................................................................................................P9
VI. How to delete files.....................................................................................................................P10
VII. Download files from computer.................................................................................................P10
VIII. Specifications..........................................................................................................................P12
1
I. Introduction of the Digital Music Tutor
Features of Digital Music Tutor:
A. Leading MP3 compression recording technology
What is the difference between digital recording and traditional recording? The Digital
recording transfers sound into 0101 digital data, the data is easy to be stored, filed into the
appliances cooperate with computers, such as softdisk, harddisk, flash memory, SD memory
card.... And the data can be edited by computer to be MIDI music, email, or played on MP3
player. The Digital Music Tutor records the music directly into MP3 compression, 128K high
sampling quality to produce very clear and wide sound effect.
B. Two data storage appliances on the machine
The Digital Music Tutor equips 64MB flash memory, can store about 60 minutes music data.
Besides the installed memory, the machine provides an extension socket for SD memory card (up
to 512MB) also. The compression type of the machine takes approx. 1MB for 1 minute recording
data, it is easy for you to count out how long your SD memory card can record. Before you
record and play, you must make sure the right memory you are using.
C. Record tracks selection
The Digital Music Tutor provides 99 tracks for your recording. Select the track number
before you record, when the recording is finished, the data will be named with the track number,
and will not change even the other tracks were deleted. You can select any track number you
want to record, no limit to number sequence or recording time of each tracks.
D. MP3 and VOC modes
Besides digital recording function, the Digital Music Tutor also provides MP3 music playing
function. When you download MP3 music from computer, the MP3 music files will store into
MP3 mode automatically. On the other hand, when you record music from microphones or LINE
IN source, the music files will store into VOC mode. The double modes function provides
flexible usage for your learning and leisure time.
E. Leading and unique sound mixer technology
The Digital Music Tutor equips an build-in microphone, and two extension microphone jacks,
2
you can use one to three microphones to record, all the sound sources will mix up. Besides
microphones, you can record the sound from CD player, tape recorder, radio...etc by connect
the appliances to the LINE IN jack of the Digital Music Tutor, the sound from LINE IN can
also mix up with microphone sources.
Our leading andunique sound mixer technology is suitable to multi instruments playing
occasion, or mix background music from CD with your playing. Surely, you may create more
functions on the Digital Music Tutor and enjoy it.
II. Product Fixture
3
III. Parts Introductions
A. Description of switch and jack:
1. Power indicator:
The LED will turn RED when power on.
2. Power switch:
Plug DC power adaptor then turn on the switch to work.
3. Extension microphone jack (left channel/stereo channel):
Plug one microphone at the jack to have stereo effect, plug two microphones to have left
channel effect.
4. Extension microphone jack (right channel):
Plug microphone to this jack to have right channel effect.
5. Earphone jack:
Plug earphone at the jack, then the speak will be off.
6. USB port:
Connect USB cable to computer to download or duplicate files.
7. Extension SD memory card socket:
Plug SD memory card (up to 512MB)
8. LCD monitor:
Showing the operating situation
9. Volume control knob for speaker
10.Build-in microphone:
A condenser microphone is installed.
4
B. Description of key control :
Record key: push the key to record.
Play/Pause key:
Push the key to play; Push it during play will pause playing, push it again to resume.
Stop key:
Push the key to stop or cancel motions, ex: record, play, delete...
Mode key:
A mode key to provide more functions, will introduce the functions on next page.
Track down select key:
Press the key once to select the next number; Hold down the key to move track
number quickly.
Track up select key:
Press the key once to select the previous number; Hold down the key l to move
track number quickly.
A - B repeat key:
Press the key during playing to indicate the repeat starting point (A
point), then press the key again to indicate the repeat ending point (B point). Then
the music will play from A to B points again and again until you press the key again
to stop
Repeat key:
Press the key during playing, the track will repeat always. If you press the key
twice, the machine will repeat all the tracks. Press the key again to cancel repeat.
Rewind key:
Hold down the key to rewind playing.
Forward key:
Hold down the key to forward playing.
C. Description of MODE Key:
The MODE key is used to provide more functions. To operating MODE function, push MODE
key at first, the LCD will show MODE, please press the other function key immediate to operate
the MODE function.
Followings are the description of MODE functions:
Installed microphone selection function: it can turn on/off the install
microphone to record.
LINE IN select function: it can turn on/off the LINE IN as record source.
EQ select function.
VOC or MP3 mode select function: before record/play,you must select to enter
VOC or MP3 mode.
Delete files inside flash memory or SD memory card.
Flash memory or SD memory card selection function
5
D. Switch and jacks on back panel:
DC IN 12V
LINE IN
R
L/L+R
LINE IN
Volume
LINE OUT
MIN.
MAX.
11. DC power adaptor jack: plug the adaptor into the jack before you turn on the power switch.
12. LINE IN jack (left channel/stereo channel): connect to CD player, tape recorder, radio...as
record source. Plug one jack to be stereo channel, plug two jacks as left channel.
13. LINE IN jack (right channel): connect to CD player, tape recorder, radio...as record source.
Plug this jack as right channel.
14. LINE IN volume control knob: control the volume level of LINE IN source
15. LINE OUT: connect to larger amplifier and speaker.
16. Sound box ventilation.
IV. How to operate RECORD function
A. How to RECORD
1. The machine can only record in VOC mode. To change to VOC mode, press
, when LCD shows VOC ( 1 ), means you are in VOC mode.
2. Then you shall decide to record on flash memory or SD card. Press
6
to interchange flash memory (F) and SD card (C) ( 2 ).
3. Press
to select record track, select from 01 to 99 tracks ( 3 ). Press
when
track number has been selected ( 4 ). The clock start to run means record is processing ( 5 ).
Press
to finish record.
4. If the track you select to record has been occupied, the LCD will show
to remind you.
You
shall delete the occupied file before you update new recording. (Please see DELETE on page
11).
5. When the memory has less than 30 second memory capacity, the LCD will start to count
down from 30, 29, 28... Please change new SD card or stop recording.
B. Record from microphones:
1. The machine equips an build-in microphone and two extension microphone jack, the three
microphones sources will mix up. You can turn the build-in microphone off when press
, and the MIC will disappear. (see 6 )
2. The sound of the installed microphone is for stereo channel. For expanded microphones, if
plugs one microphone on left jack, it is stereo sound; If plug two microphones, the sounds
will be separate into left and right channels.
C. Record from LINE IN source
1. The machine may record from LINE IN sources, such as CD player ,tape recorder, radio....
Connect signal cable from the LINE IN jack on the back panel to LINE IN appliances, the LCD
shows LINE IN (see 7 ) means LINE IN is on. Press
if the mark are not
shown on LCD.
2. LINE IN volume level is adjustable.
3. The sound from LINE IN will mix up with the sound from microphones. Remember to turn off
the build-in microphone if you do not want to record microphone source.
D. The suitable position to record:
1. To produce best recording result, we suggest you to put the machine at the distance of 30 – 60
cm from the instruments at table height.
2. As each instruments produce different sound level, the position to put the machine shall adjust
according to the sound level of the instruments you are recording.
3. In multi instruments playing occasion, the machine shall be put near the instrument with
7
smaller sound level, or use expanded microphone for the instruments.
4. If you want to record teachers' speech together with the playing of instruments, teachers can
use tie-clip microphone for better sound effect.
5. For better recording effect, the tie-clip microphone can be clip on the score stands or the body
of a player.
V. How to operate PLAY function
A. Enter VOC or MP3 mode?
Enter VOC mode to play the files recorded from microphones and LINE IN; Enter MP3 mode to
play the files downloaded from computer. The method to interchange VOC or MP3 modes:
Press
,take reference to the below LCD indication.
Play in VOC mode
Play in MP3 mode
B. How to operate PLAY function?
Setup flash memory or SD card (take reference to the operation on P. 9) , then select the track
number you want to play and press
play. Press
. The LCD will show
during playing to pause, the LCD show
key again to continue playing.
Playing
and start to
and flash. Press the
Pause
C. Forward or rewind during playing
Hold down
during playing to rewind playing, hold down
to forward playing,
the clock will move quickly according to the time of recording. Release the key and back to
normal play.
8
D. Three REPEAT functions:
A - B Repeat: Press
during playing to indicate the repeat start point (A point), then press the
key again to indicate the repeat finish point (B point). Then the music will play from A to B points
again and again until you press the key again to release. The A-B repeat function is benefit to learn
a difficult phase.
A-B repeating
Repeat and Repeat ALL: press
during playing, the track will repeatalways. If you press
twice, the LCD shows
and will repeat all the tracks. Press the key again until the
repeat mark disappear on LCD to release repeat function.
* Repeat ALL function does not work in VOC mode.
Repeat
Repeat ALL
E. Select EQ mode
The machine provides 5 different EQ modes during MP3 playing, they are:NORMAL,
CLASSICAL, POP, ROCK, JAZZ
Press
and
to select EQ modes on LCD (press once to jump to next mode, but
NORMAL will not show up on LCD).
Press
again when you finish EQ selection.
9
Select EQ mode
VI. How to delete files
You can delete the stored files by computer, or by the machine itself. Following is the way to delete by
the machine itself.
, the LCD will show "d EL". You need to press
Select the track no. to delete, press
again, then the machine start to delete the track. When the "d EL" is disappear and the clock
return to 0:00:00, means the track is empty and are able to record new data again.
Delete data
VII.Download files from computer
The machine may connect to computer and download music to play.
First, if the operation system of your computer is below WINDOWS 98 (include WINDOWS 98), you
need to install USB driver into your computer before download. The computer will take the Digital
Music Tutor asa removable disk when they connect successfully, then you can start to download
music from the computer, or duplicate the recording files fromthe Digital Music Tutor to computer.
As the recording files from the Digital Music Tutor has been compressed to MP3 format, it is easy to
playthe file without any transference. The music you has downloaded storesinto MP3 mode
automatically. If you want to store the music to VOC mode, the file name of the music shall be
changed to following format, otherwise the machine can not recognize them.
a. If you want to download music to VOC mode, and store into the flash memory, the file name shall
be change to: M_INT_xx.mp3 (xx means the track no. you want to store to, ex. 03 is track no. 3)
b. If you want to download music to VOC mode, and store into the SD card, the file name shall be
change to: M_EXT_xx.mp3 (xx means the track no. you want to store to, ex. 03 is track no. 3)
10
The original file name
The revised file name
11
VIII.Specifications
Memory capacity:
64MB
Store limit:
Over 10 years
Writing tines:
Over 100,000 times
MIC. type:
unidirectional electric condenser MIC.
Frequency response :
100Hz - 12KHz (MIC.)
50 Hz - 15KHz (LINE IN)
Impedance:
600 Ohm
Balance output:
-60dB (at 1 KHz)
USB Type:
USB 1.1
Power requirement:
DC 12V 420mA
Current consumption:
Computer operation system:
Stand by < 120mA
MAX.<15A(at 0dB,1KHz)
Windows 98、2000、XP
12
Meicheng®
MEI CHENG AUDIO VIDEO CO., LTD
Address: 5F., NO.111, SEC. 2, HUAN HO N. RD., TAIPEI, 10376
Tel: +886(2) 2585 3869,
Website: www.meicheng.com.tw
13
TAIWAN
Fax: +886(2) 2593 6672
Email: [email protected]