1
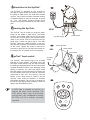
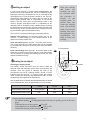
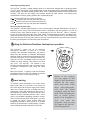
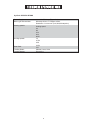
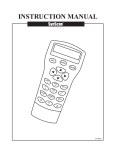
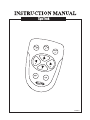
SynTrek
GUIDE
1
TM
SLOW
2
FAST
3
5
4
6
7
SET
GO
040805V1
TABLE OF CONTENTS
Introduction to the SynTrek
Powering the SynTrek
TM
TM
3
SynTrek hand control
3
Tracking an object
3
Slewing to an object
4
TM
0
3
Selecting the slewing speed
4
Selecting the guiding speed
4
Reversing the direction keys
5
Setting for Northern/Southern Hemisphere operation
5
Power saving
5
Technical specifications
6
Appendix A - Key combination quick reference guide
i
NEVER USE YOUR TELESCOPE TO LOOK DIRECTLY AT THE SUN.
PERMANENT EYE DAMAGE WILL RESULT. USE A PROPER SOLAR FILTER
FIRMLY MOUNTED ON THE FRONT OF THE TELESCOPE FOR VIEWING
THE SUN. WHEN OBSERVING THE SUN, PLACE A DUST CAP OVER YOUR
FINDERSCOPE OR REMOVE IT TO PROTECT YOU FROM ACCIDENTAL
EXPOSURE. NEVER USE AN EYEPIECE-TYPE SOLAR FILTER AND NEVER
USE YOUR TELESCOPE TO PROJECT SUNLIGHT ONTO ANOTHER
SURFACE, THE INTERNAL HEAT BUILD-UP WILL DAMAGE THE
TELESCOPE OPTICAL ELEMENTS.
I ntroduction to the SynTrek
TM
Fig.a
The SynTrek is designed for the purpose of
providing a simple slewing and tracking control for
the HEQ5 or EQ6 mount. The small and versatile
SynTrek hand control provides automatic tracking
of celestial objects as soon as the power is turned
on. The user-friendly interface provides quick
access to many other functions the SynTrek has to
offer.
TM
SLOW
2
GUIDE
1
FAST
3
5
4
6
7
TM
SET
GO
TM
Hand Controller
Auto Guider
Power
ON
Powering the SynTrek
OFF
TM
HEQ5
The SynTrek can be turned on using the power
switch on the HEQ5 or EQ6 mount. The HEQ5
SynTrek hand control cable has a RJ-45 connector
on the ends. Correctly plug it into the hand control
outlet on the mount. Push the connector into the
outlet until it clicks into place (Fig.a). The EQ6
SynTrek cable has a DB9 connector on the end.
Plug the DB9 connector into the hand control outlet
on the mount. Tighten the screws to secure the
connector in place (Fig.b). Flip the Power Switch on
the mount to the "on" position to turn on the power.
Auto Guider
TM
TM
power switch
to power supply
TM
Fig.b
power indicator
power switch
EQ6
OF
4
r
Au
to
Gu
ide
r
Fig.c
TM
SLOW
2
GUIDE
1
FAST
3
5
6
4
7
SET
3
6
7
TM
A LED light is installed in each key to
indicate the status of the operation. The
LED will lit when a key is successfully
pressed. Once a key combination is entered,
all LEDs will lit to indicate successful
operation.
FAST
3
ON
to power
supply
we
The SynTrek hand control (Fig.c) has a simple
interface of 9 push buttons. The Guide, Slow, and
Fast keys located near the top are used for setting
the slewing and guiding speed. The arrow keys allow
complete directional control of the telescope during
slewing or tracking. The LEFT and RIGHT arrow
keys are used to control movements in RA axis; the
UP and DOWN arrow keys are used to control the
movements in Dec axis. The Set key near the
bottom of the hand control is used to set the
SynTrek hand control to Northern or Southern
Hemisphere operation. The GO key is reserved for
the use of future Sky-Watcher products. It does not
apply to the HEQ5/EQ6 SynTrek .
TM
SLOW
2
GUIDE
1
5
12V
hand control
Po
TM
DC
S ynTrek
F
Auto Guider
GO
SET
GO
T racking an object
Solar rate tracking
and Lunar rate
tracking can only
be activated while
the telescope is
already in the
tracking mode. To
initiate Solar and
Lunar rate tracking
from non-tracking
mode, first activate
tracking then press
the appropriate key
combination for
Solar or Lunar rate
tracking.
In order for the SynTrek to properly track celestial objects, the
mount must be polar-aligned first. See the HEQ5/EQ6 mount
instruction manual for procedures on how to polar aligned the
TOnce the power is turned on, the SynTrek
HEQ5/EQ6 mount.T
automatically starts tracking by rotating the RA motor at the
proper speed (sidereal rate) to compensate for the Earth's
rotation. The Dec motor does not automatically rotate. If the
mount is properly polar-aligned, little or no adjustment of the
declination axis is necessary to track celestial objects. Pressing
the GUIDE key then SLOW key will stop tracking and allow the
stars to drift by at their normal rotation rate. Pressing the same
key combination again will reactivate tracking.
TM
TM
The SynTrek provides the following three tracking options:
TM
Sidereal rate tracking is the default tracking rate for the
SynTrek . It allows tracking of most celestial objects at the
speed of the Earth's rotation rate.
TM.
Solar rate tracking allows SynTrek to properly track the Sun
over a long period of time. Solar rate tracking can be activated
by pressing and holding the SLOW key, then press the RIGHT
arrow key.
TM.
Lunar rate tracking allows SynTrek to track the Moon at the
same rate the Moon moves across the sky. Lunar rate tracking
can be activated by pressing and holding the SLOW key, then
press the DOWN arrow key.
TM.
RA movements
Fig.c
SLOW
2
GUIDE
1
S lewing to an object
FAST
3
5
Selecting the slewing speed
Dec movements
6
4
The GUIDE, SLOW, and FAST keys are used to select the
speed at which the telescope moves when the arrow keys are
pressed. Once the speed is selected the LED of the
corrisponding key will lit. Flashing GUIDE, SLOW, or FAST
indicates that the SynTrek is currently under the tracking
mode. Pressing the arrow keys will cause the SynTrek to move
the telescope at the speed of the flashing key.
7
SET
GO
TM.
TM.
See the table below for details (the speeds listed here are based
on the Sindereal rate, which is approximately 0.15 arc-min/sec):
When tracking mode is ON
When tracking mode is OFF
GUIDE
SLOW
FAST
Guiding Speed
4X
8X
64X
800X
32X
Slewing speed recommendations:
For manual guiding
Guiding Speed (see Selecting the guiding speed on the next
page).
Centering objects in the eyepiece 4X or 8X
Centering objects in the finderscope
32X or 64X
General fast slewing of the telescope
800X
4
Selecting the guiding speed
The SynTrek provides 4 speed settings equal to or slower than sidereal rate for guiding purpose
(1X, 0.75, 0.5X, and 0.25X). These settings apply to both autoguiding via the autoguider interface and
manual guiding. The default guiding speed is 0.5X. Once a new guiding speed has been selected, the
SynTrek will store the new setting until another speed has been chosen. The following key
combinations will set the guiding speed to the corresponding rate:
TM.
TM.
1X Hold the FAST key, then press the UP key.
0.75X
Hold the FAST key, then press the LEFT key.
0.5X
Hold the FAST key, then press the RIGHT key.
0.25X
Hold the FAST key, then press the DOWN key.
Reversing the direction keys
The direction a celestial object appears to move in the eyepiece changes depending on the type of
telescope you are using, and the accessories used in combination with the eyepiece. This can be
confusing when doing manual guiding. To compensate for this, the SynTrek offers a "Reverse"
function to reverse the button logic of the hand control. To switch between the LEFT and RIGHT key,
press and hold the SLOW key then press the LEFT key. To switch between the UP and DOWN key,
press and hold the SLOW key then press the UP key. Once the direction keys have been reversed,
the setting will be stored even when the power is turned off.
TM.
Setting for Northern/Southern Hemisphere operation
The SynTrek
comes set up for Northern
Hemisphere operation. In order for it to track
correctly in the Southern Hemisphere, you need to
switch from the Northern to Southern Hemisphere
operation mode by press down and holding the SET
key while turning the unit on. Release the SET key
when the unit has successfully turned on and the
GUIDE key starts flashing. This needs to be done
only once. The SynTrek
will operate in the
Southern Hemisphere mode until it is switched back
to Northern Hemisphere mode using the same
method.
TM.
Fig.e
SLOW
2
GUIDE
1
FAST
3
5
6
4
7
TM.
SET
When the SynTrek is tracking under the Southern
Hemisphere mode, the SET key will flash, as well as
the GUIDE, SLOW, or FAST key (see Fig.e).
GO
TM.
Objects in the eyepiece
view may appear to drift
slightly in Dec direction the
moment the Dec motor
enters sleep mode. When
doing astro-photography,
wait until the mount
completely enters the sleep
mode before beginning the
shot to ensure picture
quality. If an autoguider is
used, wait until the
autoguider sends the first
Dec signal to the SynTrek
before taking pictures.
Power saving
To conserve power assumption, Dec motor enters
sleep mode if idle for 15 seconds. In this mode, the
Dec motor stops and the power supply current drops
about 40%. Pressing the UP or DOWN arrow key
(adjustment in Dec) will reactivate the Dec motor. If
an autoguider is attached, the signal it sends in Dec
direction will also reactivate the Dec motor. In this
case, to accomodate autoguiding operation, the Dec
motor will not enter the sleep mode again. If you wish
to initiate the power saving feature when the
autoguiding operation is done, press UP or DOWN
arrow key to switch back to manual guiding. The Dec
motor will enter the sleep mode after 15 seconds.
TM
5
SynTrek SPECIFICATIONS
TM
Power Supply:
Motor type and resolution:
Slewing speeds:
Guiding speeds:
Gear Ratio:
Tracking Rates:
Tracking Modes:
11 to 15 V DC 2Amp (Tip positive)
Microstep driven 1.8° stepper motors.
Resolution: 0.144 arc sec (or 9,024,000 steps/rev.)
Guiding speed
4X
8X
32X
64X
800X
1X
0.75X
0.5X
0.25X
705
Sidereal, Lunar, Solar
RA tracking
6
APPENDIX A - KEY COMBINATION QUICK REFERENCE GUIDE
FUNCTION
KEY / KEY COMBINATION
NOTE
Activate / deactivate tracking
GUIDE, then SLOW
Sidereal tracking rate
Solar rate tracking
SLOW, then RIGHT
Must be under any tracking mode
Lunar rate tracking
SLOW, then DOWN
Must be under any tracking mode
1X Guiding speed
FAST, then UP arrow
0.75X Guiding speed
FAST, then LEFT arrow
0.5X Guiding speed
FAST, then RIGHT
0.25X Guiding speed
FAST, then DOWN
Reverse RA direction keys
SLOW, then LEFT
Reverse Dec direction keys
SLOW, then UP
Northern / Southern Hemisphere switch
SET
i
SynTrek
TM
NEVER USE YOUR TELESCOPE TO LOOK DIRECTLY AT THE SUN.
PERMANENT EYE DAMAGE WILL RESULT. USE A PROPER SOLAR FILTER
FIRMLY MOUNTED ON THE FRONT OF THE TELESCOPE FOR VIEWING
THE SUN. WHEN OBSERVING THE SUN, PLACE A DUST CAP OVER YOUR
FINDERSCOPE OR REMOVE IT TO PROTECT YOU FROM ACCIDENTAL
EXPOSURE. NEVER USE AN EYEPIECE-TYPE SOLAR FILTER AND NEVER
USE YOUR TELESCOPE TO PROJECT SUNLIGHT ONTO ANOTHER
SURFACE, THE INTERNAL HEAT BUILD-UP WILL DAMAGE THE
TELESCOPE OPTICAL ELEMENTS.