1
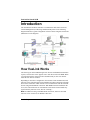
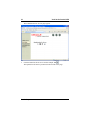
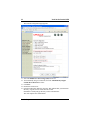
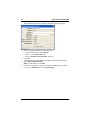
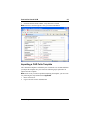
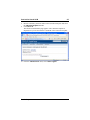
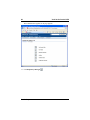
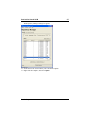
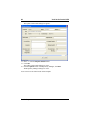
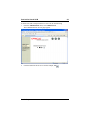
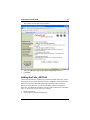
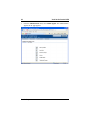
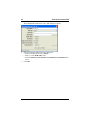
VueLink for Oracle UCM
System Administrator
Manual
Release 19.2
E12160-01
An Integration between
AutoVue Web Edition and Oracle Universal
Content Management Server
VueLink for Oracle UCM System Administrator Manual
E12160-01
Copyright © 2008, Oracle and/or its affiliates. All rights reserved.
The Programs (which include both the software and documentation) contain proprietary
information; they are provided under a license agreement containing restrictions on use
and disclosure and are also protected by copyright, patent, and other intellectual and
industrial property laws. Reverse engineering, disassembly, or decompilation of the Programs, except to the extent required to obtain interoperability with other independently
created software or as specified by law, is prohibited.
The information contained in this document is subject to change without notice. If you
find any problems in the documentation, please report them to us in writing. This document is not warranted to be error-free. Except as may be expressly permitted in your
license agreement for these Programs, no part of these Programs may be reproduced or
transmitted in any form or by any means, electronic or mechanical, for any purpose.
If the Programs are delivered to the United States Government or anyone licensing or
using the Programs on behalf of the United States Government, the following notice is
applicable:
U.S. GOVERNMENT RIGHTS Programs, software, databases, and related documentation and technical data delivered to U.S. Government customers are "commercial computer software" or "commercial technical data" pursuant to the applicable Federal
Acquisition Regulation and agency-specific supplemental regulations. As such, use, duplication, disclosure, modification, and adaptation of the Programs, including documentation
and technical data, shall be subject to the licensing restrictions set forth in the applicable
Oracle license agreement, and, to the extent applicable, the additional rights set forth in
FAR 52.227-19, Commercial Computer Software-Restricted Rights (June 1987). Oracle
Corporation, 500 Oracle Parkway, Redwood City, CA 94065.
The Programs are not intended for use in any nuclear, aviation, mass transit, medical, or
other inherently dangerous applications. It shall be the licensee's responsibility to take all
appropriate fail-safe, backup, redundancy, and other measures to ensure the safe use of
such applications if the Programs are used for such purposes, and we disclaim liability for
any damages caused by such use of the Programs.
The Programs may provide links to Web sites and access to content, products, and services
from third parties. Oracle is not responsible for the availability of, or any content provided
on, third-party Web sites. You bear all risks associated with the use of such content. If you
choose to purchase any products or services from a third party, the relationship is directly
between you and the third party. Oracle is not responsible for: (a) the quality of third-party
products or services; or (b) fulfilling any of the terms of the agreement with the third party,
including delivery of products or services and warranty obligations related to purchased
products or services. Oracle is not responsible for any loss or damage of any sort that you
may incur from dealing with any third party.
Oracle is a registered trademark of Oracle Corporation and/or its affiliates. Other names
may be trademarks of their respective owners.
VueLink for Oracle UCM
iii
Contents
INTRODUCTION ........................................................................5
How VueLink Works ........................................................................ 5
System Requirements ....................................................................... 6
INSTALLATION PREREQUISITES ........................................7
Verification ........................................................................................ 7
Platform-Specific Installers.............................................................. 7
MANUAL INSTALLATION.......................................................8
Customizing UCM ............................................................................ 8
Adding a Markup Schema ............................................................. 13
Deploying the VueLink Web Application..................................... 18
Installing cis-client-8.0.0.jar........................................................... 18
Configuring VueLink...................................................................... 19
Updating adapterconfig.xml...................................................... 19
Updating web.xml ..................................................................... 20
Updating config.cfg................................................................... 20
Updating autovue_environment.cfg.......................................... 21
Updating vuelink.properties (optional) ..................................... 21
Configuring XRefs Using Folios .............................................. 22
Verification ...................................................................................... 36
Verifying that VueLink is Running Properly............................ 36
Running VueLink in Debug Mode............................................ 38
APPENDIX..................................................................................39
Creating a CAD Folio Template .................................................... 39
FEEDBACK ................................................................................49
General Inquiries ............................................................................ 49
Sales Inquiries ................................................................................. 49
Customer Support........................................................................... 49
Oracle Corp.
iv
Oracle Corp.
VueLink for Oracle UCM
VueLink for Oracle UCM
5
Introduction
The VueLink Servlet allows AutoVue to communicate with Oracle Universal
Content Management (UCM) using standard HTTP protocol. The following
diagram illustrates a typical configuration of how AutoVue integrates with UCM
(DMS Server in the diagram).
How VueLink Works
The client logs on to the DMS through a web browser. With DMS customization
in place, a link for the viewer appears next to each file stored in the DMS. When
you click this link, the AutoVue client is launched and you can view that file
inside the web browser window.
Depending on AutoVue’s configuration, the AutoVue client communicates with
AutoVue server either through servlet tunnelling for HTTP connection or through
direct socket connection. Then AutoVue server communicates with the VueLink
Servlet using standard HTTP connection. With DMS Extension installed on the
server, the VueLink Servlet can communicate with Oracle UCM to handle any
request made by AutoVue server, like file “fetching.”
Note: In addition to using a standard HTTP connection, AutoVue client and
AutoVue server can also use an HTTPS connection.
Oracle Corp.
6
VueLink for Oracle UCM
To display a composite file (a file with external references), the VueLink Servlet
retrieves the file along with all its component files from DMS and makes them
available to AutoVue server. Then AutoVue processes them and the AutoVue
client displays the composite file. From here you can redline the file, create new
Markups, save Markups into DMS and open Markups from DMS.
System Requirements
Note: For the most up-to-date list of system requirements, and for a list of
known issues, see the Release Notes in the etc folder of the VueLink Media Pack.
•
•
•
AutoVue Web Edition v19.2c1 (and any service packs for v19.2)
Oracle Universal Content Management (UCM) server 10gR3 on Windows
2003 or Redhat Enterprise Linux 4
Note: For Folio support:
• You need version 10.1.3.3.2
or
• If you are using version 10.1.3.3.1, you need to install the
CS10gR2UpdateBundle update that contains the Folio component
Application Server/Servlet Engine
Generally, the VueLink should work with any application server/servlet
engine. The following is certified:
• Apache Tomcat 5.5.25
Oracle Corp.
VueLink for Oracle UCM
7
Installation Prerequisites
Verification
Before integrating AutoVue with Oracle UCM, ensure UCM, AutoVue Web
Edition, and Tomcat server are properly installed and configured on your system
according to the manufacturer's instructions. It is recommended to test both UCM
and AutoVue independently to verify that the installation has been successful and
that all functions are available and produce the expected results.
Platform-Specific Installers
The media pack contains two folders: win32 and linux.
Each folder contains a platform-specific installer for VueLink for Oracle UCM:
•
•
For Windows 2003: From the win32 folder, launch the setupwin32.exe file.
For Linux Redhat Linux Enterprise 4: From the linux folder, launch the
setuplinux.bin file.
Note: Make sure you have the proper privileges to run the setuplinux.bin
file. If not, enter the following command:
chmod +x setuplinux.bin
After you accept the EULA, the installer unpacks its contents to a user-specified
folder.
Oracle Corp.
8
VueLink for Oracle UCM
Manual Installation
This section describes the steps necessary to install VueLink for Oracle UCM
manually. In order for AutoVue Web Edition and UCM to work properly, you
must perform the following steps:
1
2
3
4
5
6
Customizing UCM
Adding a Markup Schema
Deploying the VueLink Web Application
Installing cis-client-8.0.0.jar
Configuring VueLink
Verification
The following sections explain these steps in further detail.
Customizing UCM
The VueLink module for UCM is responsible for displaying the View in
AutoVue menu item in the UCM user-interface.
To install the VueLink module (AutoVue component) for UCM, do the
following:
1
2
3
Verify that UCM is installed properly.
Run a web browser.
Login to Oracle UCM as Administrator.
Oracle Corp.
VueLink for Oracle UCM
4
From the Administration menu, and then select Admin Server.
Oracle Corp.
9
10
VueLink for Oracle UCM
The Administration for Servers page appears.
5
Click the button for the idc server. In this example, idc
.
The Options for idc frame is presented on the left side of the page.
Oracle Corp.
VueLink for Oracle UCM
6
11
From the Options for idc frame, click Component Manager. The
Component Manager page appears.
7
To install a new component, click Browse.
The File Upload dialog box appears.
8 Navigate to the folder containing the VueLink module for UCM, and select
AutoVue.zip.
Note: This file is usually found on the media pack under the
\AutoVue_Web_Edition\dms_customization folder.
9 Click Install.
Note: If the AutoVue component is listed as a disabled component, select it
and click Enable.
10 From the Options for idc panel, click General Configuration.
Oracle Corp.
12
VueLink for Oracle UCM
The General Configuration page appears.
11 Select the Enable Java Server Page (JSP) check box.
12 To automatically assign a content ID, select the Automatically assign a
content ID on check in check box.
13 Click Save.
14 Restart the UCM service.
15 From the media pack, under the \AutoVue_Web_Edition\dms_customization
directory, copy the autovue folder into the <UCM
installation>\weblayouts\jsp directory on the UCM machine.
This will complete the customization.
Oracle Corp.
VueLink for Oracle UCM
13
Note: You might need to update the autovue_environment.cfg file if the
AutoVue server and/or VueLink are not on the same machine as UCM. For
more information on the autovue_environment.cfg, see Configuring
VueLink.
At this point, the View in AutoVue menu option appears in the search results and
content info pages. Once the AutoVue component is installed in UCM, you can
configure it.
See Configuring VueLink
Adding a Markup Schema
In order for VueLink to support markup functionality, the administrator must first
configure UCM by adding the following two schema elements:
•
•
A new field called Markup_BasedID.
A new content type called Markup.
Note: The field and content type names are case sensitive.
To do so, follow these steps:
1
2
Run a web browser.
Login to Oracle UCM as Administrator.
Oracle Corp.
14
VueLink for Oracle UCM
3
From the Administration menu, and then select Admin Applets.
The Administration Applets for idc page appears.
4
Click Configuration Manager
Oracle Corp.
.
VueLink for Oracle UCM
The Configuration Manager dialog box appears.
5
From the Information Fields tab, click Add.
The Add Metadata Field Name dialog box appears.
6
Enter “Markup_BasedID” in the Field Name field and then click OK.
Oracle Corp.
15
16
VueLink for Oracle UCM
The Add Metadata Field Name ‘Markup_BasedID’ dialog box appears.
7
Enter the following information in the dialog box:
• From the Field Type list, select Integer.
• Enter “2” in the Field Order field.
• Select the Enable on User Interface check box.
8 Click OK.
The dialog box closes and Markup_BasedID is added to the Field Info list.
9 Click Update Database Design.
Note: To edit field info, click Edit.
10 To add a new content type, from the Configuration Manager for idc dialog
box, from the Options menu, select Content Types.
Oracle Corp.
VueLink for Oracle UCM
17
The Content Types dialog box appears.
11 Click Add.
The Add New Content Type dialog box appears.
12 Enter the following information in the dialog box:
• Enter “Markup” in the Name field.
• Enter “AutoVue Markup” in the Description field.
• Optionally, from the Image list, select graphic2.gif.
13 Click OK.
The Add New Content Type dialog box closes. In the Content Types dialog
box, verify that Markup is listed under the Type column.
14 Click Close.
The Content Types dialog box closes.
Oracle Corp.
18
VueLink for Oracle UCM
15 From the Options menu, select Exit to close the Configuration Manager for
idc dialog box.
Deploying the VueLink Web
Application
The VueLink Web Application that is ready to deploy on any J2EE application
server is found on the media pack under the
\AutoVue_Web_Edition\vuelink_war folder. It is recommended to copy the
contents of the vuelink_war folder to the deployment folder of the application
server.
Note: Applet launch configurations are used to initialize the AutoVue applet. To
change these settings you must update the vuelink.properties file under the
WEB_INF\lib folder of the VueLink application.
See Updating vuelink.properties (optional)
To deploy the VueLink web application, follow the instructions for your
application server. The following instruction are for deploying the VueLink web
application into Tomcat.
1
2
Copy the contents of the vuelink_war folder into the webapps folder under
Tomcat.
Restart the Tomcat server.
Installing cis-client-8.0.0.jar
1
2
Run a web browser.
Download the ContentServer_DocMan_10gR3_20071031.zip file from the
Oracle Technology Network (OTN). To do so, enter the following URL in
the Address bar:
http://download.oracle.com/otn/content_management/
ContentServer_DocMan_10gR3_20071031.zip
3
4
5
Save the zip file to a location on your local machine.
Once downloaded, extract the contents of the
ContentServer_DocMan_10gR3_20071031.zip file.
The extracted ContentServer_DocMan_10gR3_20071031 folder appears.
From the extracted folder, extract the contents of the
ContentIntegrationSuite_10gR3_20071031.zip file.
The extracted ContentIntegrationSuite_10gR3_20071031 folder appears.
Oracle Corp.
VueLink for Oracle UCM
6
7
Browse to the
ContentIntegrationSuite_10gR3_20071031\deployments\client folder.
Copy the cis-client-8.0.0.jar file to the <tomcat root>/vuelink/WEB-INF/lib
folder.
Configuring VueLink
The following sections explain how to configure VueLink.
Updating adapterconfig.xml
1
2
In a text editor such as Notepad, browse to the <Tomcat
installation>\webapps\vuelink\WEB-INF\lib folder and open
adapterconfig.xml.
Perform a search in adpaterconfig.xml for the “host” and replace it’s
property value with the host name where UCM is installed.
For example:.
<?xml version="1.0" ?>
<config>
<adapter default="true" name="myadapter">
<config>
<property name="port">4444</property>
<property name="host">localhost</property>
<property name="type">socket</property>
</config>
<beans template="classpath:/META-INF/resources/
adapter/adapter-services-scs.jxml"/>
</adapter>
</config>
3
19
Save and close the text editor.
Oracle Corp.
20
VueLink for Oracle UCM
Updating web.xml
1
2
In a text editor such as Notepad, browse to the <Tomcat
installation>\webapps\vuelink\WEB-INF folder and open web.xml.
Perform a search in web.xml for the parameter name “JVueServer” and
replace the parameter value for JVueServer with the host name where you
installed AutoVue Server.
For example:
<servlet id="csi_1132166257400_0.6103674348009063">
<servlet-name>VueServlet</servlet-name>
<servlet-class>com.cimmetry.servlet.VueServlet
</servlet-class>
<init-param>
<param-name>JVueServer</param-name>
<param-value>localhost:5099</param-value>
</init-param>
<init-param>
<param-name>Verbose</param-name>
<param-value>0</param-value>
</init-param>
</servlet>
3
Save and close the text editor.
Updating config.cfg
1
2
3
In a text editor such as Notepad, browse to the <UCM
installation>\server\config folder and open config.cfg.
Perform a search in config.cfg for “SocketHostAddressSecurityFilter.” The
result will display with list of IP addresses assigned to it.
Add to this list the IP address of the machine where VueLink is installed.
Note: Use the “|” character to separate the IP addresses.
For example:
SocketHostAddressSecurityFilter=127.0.0.1|10.26.1.171|
10.26.6.47
4
Save and close the text editor.
Oracle Corp.
VueLink for Oracle UCM
21
Updating autovue_environment.cfg
Note: Skip this update if Tomcat and AutoVue Server are running on the same
machine and on their default ports—8080 for VueLink and 5099 for AutoVue
Server.
1
2
In a text editor such as Notepad, browse to the <UCM
installation>\custom\autovue folder and open autovue_environment.cfg.
In autovue_environment.cfg, perform a search for the following:
• VueLinkPort: Set it to the port number where Tomcat is running.
• VueLinkHostName: Set it to the host name where Tomcat is running.
• VueLinkContext: Set it to the context name that VueLink is deployed.
• AutoVueHostName: Set it to the host name where AutoVue is running.
• AutoVuePort: Set it to the AutoVue server listening port.
For example:.
VueLinkPort=8080
VueLinkHostName=avserver
VueLinkContext=vuelink
AutoVueHostName=avserver
AutoVuePort=5099
3
Save and close the text editor.
Updating vuelink.properties (optional)
1
2
In a text editor such as Notepad, browse to the <UCM
installation>\webapps\vuelink\WEB-INF\lib folder and open the
vuelink.properties configuration file.
Modify the following settings as needed.
Property
Description
Default
Markup_DocType
Document Type of Markup
defined in UCM.
It should be consistent with
Content Type defined in
Markup Schema section.
Markup
UCPM_Mode
Client connection mode to
UCM.
Standalone
Oracle Corp.
22
3
VueLink for Oracle UCM
Property
Description
Default
UCPM_AdapterConfigXml
Client configuration file to
UCM.
\WEBINF\lib\adapter
config.xml
UCPM_InitializationProperties
Initialization file to UCM.
log4jInitFile
Log4j file used by VueLink.
\WEBINF\lib\log4j.pr
operties
Save the configuration file and close the text editor.
Configuring XRefs Using Folios
VueLink for Oracle UCM supports External Reference Files (XRefs) that are
associated with a document with the use of Folios. Before UCM users can view
CAD files with XRefs, the administrator must first create a Folio template as
outlined below.
See Also Importing a CAD Folio Template
Adding the Folio_dID Field
Note: Only folios based on this template will be interpreted as XRefs by
VueLink.
Before proceeding with steps outlined below, ensure that your UCM installation
has the Folios component (ContentFolios) deployed.
1
2
3
4
Launch a web browser.
Login to Oracle UCM as Administrator.
From the Administration menu, select Configuration for idc.
The Configuration Information for idc page appears.
Click the Feature Details link to expand the Features and Components
table.
Oracle Corp.
VueLink for Oracle UCM
5
23
Under the Feature Name column, verify that Folios is listed.
Note: If Folios is not listed, please verify your Folios installation.
Importing a CAD Folio Template
The CAD Folio Template is included as part of VueLink. It is recommended that
you import the template into your UCM. The following steps explain how to
import and edit a template.
Note: In the event you run into problems importing the template, you can create
it by following the steps outlined in the Appendix.
1
2
Run a web browser.
Login to Oracle UCM as Administrator.
Oracle Corp.
24
VueLink for Oracle UCM
3
Click New Check In. The Content Check In Form page appears.
4
From the Type list, select a type.
For our example, ADENG - Acme Engineering Department is selected.
Enter “Folio Template for CAD with XRefs” in the Title field.
From the Security Group list, select JSP, Public, Secure, or Servlet.
Note: The security group defines the user read/write permissions. The
administrator should select a security group that allows only users with
administrative privileges to modify the template.
To the right of the Primary File field, click Browse. The Choose File dialog
box appears.
5
6
7
Oracle Corp.
VueLink for Oracle UCM
8
9
25
Browse to the dms_extension folder on the VueLink media pack and select
the XRefsFolioTemplate.xcst file.
Click Check In.
The Check In Conformation page appears. The CAD Folio template is
imported into your UCM. Note the Content ID of the CAD Folio template.
10 From the Administration menu, select Admin Applets.
Oracle Corp.
26
VueLink for Oracle UCM
The Administration Applets for idc page appears.
11 Click Repository Manager
Oracle Corp.
.
VueLink for Oracle UCM
The Repository Manager dialog box appears.
12 Scroll down to the Content ID of your CAD Folio template.
13 Right-click the template, and select Update.
Oracle Corp.
27
28
VueLink for Oracle UCM
The Update Content Info dialog box appears.
14 Enter “1” in the Is Template Enabled field.
15 Click OK.
The Update Content Info dialog box closes.
16 From the Options menu of the Repository Manager, click Exit.
The Repository Manager dialog box closes.
Users can now create folios based on this template.
Oracle Corp.
VueLink for Oracle UCM
29
To allow users with a read permission to view a file, do the following:
1
From the Administration menu, select Admin Server.
The Administration for Servers page appears.
2
Click the button for the idc server. In this example, idc
Oracle Corp.
.
30
VueLink for Oracle UCM
The Content Server idc page appears.
3
Under Option for idc, click Content Security.
Oracle Corp.
VueLink for Oracle UCM
31
The Content Security Options page appears.
4
5
Select the Allow get copy for user with read privilege check box.
Click Save.
Adding the Folio_dID Field
This section describes the required steps to add the metadata field, Folio_dID, to
the structure of a document. This field is used to establish a connection from the
master file to the XRef folio that contains data about the master file and its
XRefs. By setting this link, you can view the XRefs whenever viewing the
master file. For additional information on how to link the master file to the XRef
folio, see VueLink for Oracle UCM User’s Manual.
1
2
Run a web browser.
Login to Oracle UCM as Administrator.
Oracle Corp.
32
3
VueLink for Oracle UCM
From the Administration menu, select Admin Applet. The Administration
Applets for idc page appears.
Oracle Corp.
VueLink for Oracle UCM
Click Configuration Manager
appears.
33
. The Configuration Manager dialog box
4
From the Information Fields tab, click Add.
The Add Metadata Field Name dialog box appears.
5
Enter “Folio_dID” in the Field Name field and then click OK.
Oracle Corp.
34
VueLink for Oracle UCM
The Add Metadata Field Name ‘Folio_dID’ dialog box appears.
6
7
Enter the following information in the dialog box:
• From the Field Type list, select Integer.
• Enter “2” in the Field Order field.
• Select the Enable on User Interface and Enable for Search Index check
boxes.
Click OK.
Oracle Corp.
VueLink for Oracle UCM
The dialog box closes and Folio_dID is added to the Field Info list.
Oracle Corp.
35
36
VueLink for Oracle UCM
Verification
Verifying that VueLink is Running Properly
To verify that the VueLink Servlet (com.cimmetry.vuelink.ucm.DMS) is running
properly, from the AutoVue server, launch your web browser and enter the URL
pointing to the Servlet alias name, which you assigned when installing
VueLink.war into the application server.
Here is an example of a URL:
http://127.0.0.1:8080/vuelink/DMS.jsp
The following screenshot shows a sample response if VueLink is running
properly. If you do not get a response similar to the one shown, verify that the
VueLink Servlet is installed and deployed properly and that your application
server is running and functioning properly.
Oracle Corp.
VueLink for Oracle UCM
Note: The build number and build date are shown in the response.
Oracle Corp.
37
38
VueLink for Oracle UCM
Running VueLink in Debug Mode
VueLink for Oracle UCM uses the apache log4j package for logging. The default
configurations are set in the log4j.properties configuration file located in the
WEB-INF\lib folder of the VueLink application. You can change the level and
location of the output by modifying this file.
The following table shows the different levels of logging available.
: No
: Yes
•
•
•
If you set Logger Level to FATAL, then only output messages of level
FATAL are logged in log4j file.
If you set Logger Level to ERROR, then only output messages of level
ERROR or FATAL are logged in log4j file.
If you set Logger Level to DEBUG, then output messages of any level are
logged in log4j file.]
For example, if you want to elevate the log to the DEBUG level, then set
log4j.logger.com.cimmetry.vuelink=DEBUG inside the log4j.properties
file.
VueLink messages are logged inside the file pointed to by the
log4j.appender.R.File entry in log4j.properties.
For more information on log4j capabilities, refer to log4j documentation.
Oracle Corp.
VueLink for Oracle UCM
Appendix
Creating a CAD Folio Template
If you run into problems importing the CAD Folio template shipped with
VueLink, you can create the template with the following steps:
1
2
3
4
Verify that your UCM is installed properly.
Run a web browser.
Login to Oracle UCM as Administrator.
From the Administration menu, select Folio Administration, and then
select Create Folio Template.
Oracle Corp.
39
40
VueLink for Oracle UCM
The Edit Folio Template page appears.
5
Under the Element Info table on the right-section of the page, do the
following:
a. Enter “CAD Folio Root” in the Name field.
b. Enter “Template for CAD with XRefs” in the Description field.
c. From the Removable list, select Prompt.
d. For the Children Moveable option, select No.
e. For the Allow Item Creation option, select No.
f. For the Allow Node Creation option, select No.
g. Enter “100” in the Maximum Items field.
h. Enter “100” in the Maximum Nodes field.
Oracle Corp.
VueLink for Oracle UCM
6
41
The CAD Folio Root tree appears in the left section of the Structure tab and
is assigned the new values.
Right-click the CAD Folio Root node, and select Create Slot.
Oracle Corp.
42
VueLink for Oracle UCM
An new slot appears as a child of the tree.
7
Under the Element Info table on the right-section of the page, do the
following:
a. Enter “Insert Master” in the Name field.
b. Enter “Master File” in the Description field.
c. For the Allow Empty option, select No.
d. For the Lock Content option, select No.
e. For the Removable option, select No.
f. For the Allow External option, select No.
g. For the Allow Folio option, select No.
h. For the Clone Item option, select No.
The slot is renamed to Insert Master and is assigned the new values.
Oracle Corp.
VueLink for Oracle UCM
8
In a CAD structure, this slot will hold information about the top level file
(for example, the master file for 2D or assembly file for 3D).
Right-click CAD Folio Root node, and select Create Node.
Oracle Corp.
43
44
VueLink for Oracle UCM
A new child node appears.
9
Under the Element Info table on the right-section of the page, do the
following:
a. Enter “Insert XRefs” in the Name field.
b. Enter “XRefs” in the Description field.
c. From the Removable list, select Prompt.
d. For the Children Moveable option, select No.
e. For the Allow Item Creation option, select Yes.
f. For the Allow Node Creation option, select No.
Oracle Corp.
VueLink for Oracle UCM
45
g. Enter “100” in the Maximum Items field.
h. Enter “100” in the Maximum Nodes field.
The node is renamed to Insert XRefs and is assigned the new values.
In a CAD structure, this node will hold information about files associated
with the top level file (for example, parts for 3D).
Note: This node cannot contain other nodes or other Folios.
10 Click the Properties tab.
Oracle Corp.
46
VueLink for Oracle UCM
11 Enter the following information:
a. Select the Template Enable check box.
b. From the Viewer list, select Default Viewer.
c. For the Renderers option, select zip rendition, pdf rendition, and XML
rendition.
d. Select the Allow Node Creation and Allow Item Creation check boxes.
e. Make sure the Archive Revised Folio Content, Cone Folio Items, Allow
Nested Folios, and Allow External Items check boxes are not selected.
12 From the Actions menu, select Save Template.
The Content Check in Form dialog box appears.
13 From the Profile list, select None, and then click Next.
Oracle Corp.
VueLink for Oracle UCM
47
The Folio Template Check In page appears.
14 Enter the following information:
a. From the Type list, select ADENG - Acme Engineering Department.
b. Enter “Folio Template for CAD with XRefs” in the Title field.
c. Optionally, in the Author field, enter “sysadmin,” and from the Author
list, select sysadmin.
d. From the Security Group list, select Secure or Public.
15 Click Check in.
Once the template is created, users will be able to create folios based on this
template.
Oracle Corp.
48
Oracle Corp.
VueLink for Oracle UCM
VueLink for Oracle UCM
49
Feedback
Oracle products are designed according to your needs. We would appreciate your
feedback, comments or suggestions. If at any time you have questions or
concerns regarding VueLink for Oracle UCM, call or email us. Your input is an
important part of the information used for revision.
General Inquiries
Telephone:
+1 514-735-3219
Fax:
(514) 735-6440
E-mail:
[email protected]
Web Site:
http://www.oracle.com/applications/autovue/index.html
Sales Inquiries
Telephone:
+1 514-735-3219 or 1-800-361-1904
Fax:
(514) 735-6440
E-mail:
[email protected]
Customer Support
Telephone:
+1 514-735-9941
Web Site:
http://www.cimmetry.com/support
Oracle Corp.