Transcript
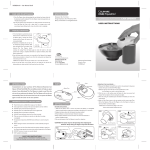
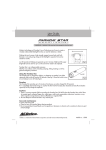
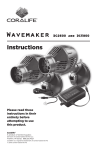
KC25 User Manual (23 Mar 2009)
OPERATING THE SLICER (For Large Vegetables like onion or bell peppers)
1. Remove Plungers and place the Vegetable
Fig.6
Slicer on top of the tray or bowl.
2. Put the vegetables inside the Hopper.
3. Press the vegetables with the Large
Plunger assembly (Fig.6).
4. Slide the Start Button to start.
5. When completed, slide the Start Button
back to ‘stop’ position and remove the
Plungers from the Hopper.
OPERATING THE SLICER (For Narrow Vegetables like carrots or cucumbers)
1. Remove Plungers and place the Vegetable
Fig.7
Slicer on top of the tray or bowl.
2. With Start Button in OFF position, insert
the Large Plunger into the Hopper.
3. Put the vegetables inside the Large
Plunger (see Note 4).
4. Press the vegetables with the Plunger
Assembly (Fig.7).
5. Slide the Start Button to start.
6. When completed, slide the Start Button
back to ‘stop’ position and remove the
Plungers from the Hopper.
NOTE:
1. Unit will only be activated by sliding the Start Button
to ‘on’ position and at the same time inserting the Plunger Assembly.
2. Clean your Vegetable Slicer thoroughly before using for the first time and after each use.
3. All food slices better when it is fresh and firm.
4. If necessary, cut food so that it will fit easily and loosely into the plungers and within the maximum
height of 150mm (6 inches).
5. Push food through the Hopper using even pressure on the Plunger.
6. Inspect the Hopper and Cutter Plate every 3 to 4 cycles and remove any trapped food from the Hopper
and Cutter Plate before further use. Always remove the Power Head before inspecting and cleaning.
7. Vegetables being processed by Julienne blade needs to be fed vertically. Even in this orientation there
is an amount of vegetable left unprocessed.
CLEANING AND STORAGE
1. All parts except the Power Head are
completely waterproof and dishwasher
safe when placed on the upper tray only.
Cleaning the unit or any of its parts on the
bottom dishwasher tray or on the sanitize
cycle may cause damage.
2. Clean the Power Head by using a damp
cloth. Never immerse the Power Head in
water or any liquid.
3. For safety, remove blade from Cutter Plate
during storage.
Fig.8
4. Store the unit with the plunger all the
way down inside the Hopper. The unit is completely covered by the Tray (Fig.8).
5. Store the unit out of reach of children.
6. Always remove the batteries when storing the unit for a long period of time.
NOTE:
Plastic parts may become stained after processing certain foods such as carrots.
Do not use abrasive materials for cleaning.
IMPORTANT SAFETY INSTRUCTIONS
• Read all instructions carefully before using your Vegetable Slicer.
• This Vegetable Slicer is not intended for use by persons (including children) with
reduced physical, sensory or mental capabilities, or lack of experience and
knowledge, unless they have been given supervision or instruction concerning
use of the appliance by a person responsible for their safety.
• Close supervision is necessary when used by or near children and ensure that
they do not play with your Vegetable Slicer.
• Do not operate while under the influence of alcohol or other substances that
affect your reaction time or perception.
• This Vegetable Slicer is intended for household use only. Do not use the
Vegetable Slicer for other than intended use.
• This Vegetable Slicer can be used for vegetables only. Do not uses for other
foods like meat, ham, sausage, cheese, ice, dry, frozen or hard foods.
• This Vegetables Slicer is not suitable for cutting vegetables / fruits with hard
seeds and soft vegetables / fruits like tomatoes.
• Keep hands and utensils out of Hopper while slicing to reduce the risk of severe
injury to persons or damage to the product.
• Never put your hand inside the Hopper with the Power Head in place. Always
use Plungers to press the vegetables through the Hopper.
• Avoid contact with moving parts. Keep hands, hair, jewelry, clothing etc away
from moving parts during operation to prevent injury, and/or damage to the
Vegetable Slicer.
• Switch off the appliance and disconnect from supply before changing
accessories or approaching parts that move in use.
• There is functional sharp edge on the blade, and should be handled carefully
especially when inserting on or removing the blades, clearing trapped food and
cleaning.
• The Vegetable Slicer should always be attended all times when the unit is in
operation.
• Always operate the Vegetable Slicer on a bowl or tray.
• Do not operate the product after malfunctions, or after a fall or other damage occurs.
• Do not attempt to press the Plunger Detect Switch with any item other than the
Plunger Assembly. Breakdown or serious personal injury may occur.
• Do not move unit during operation. Injury and/or damage may occur.
• Do not operate the product with wet hands.
• Always remove the Power Head from the Chassis before changing blade,
clearing trapping foods or cleaning the product.
• Do not use abrasive materials for cleaning.
• Always replace all batteries at once and never mix old and new batteries or
batteries of different types.
• Do not use outdoors.
SAVE THESE INSTRUCTIONS
Read the following instructions before using for the first time.
Trouble Shooting
Problem
The Vegetable Slicer slows during
cutting.
Solution
Reduce pressure on Plungers.
OR
Replace batteries.
OR
Remove any trapped food from the
Hopper and Cutter Plate.
The motor keeps running but the
blade does not move.
Remove and reseat Power Head into
Chassis
OR
Drive Peg is stuck (see below) - Clean the
debris trapped around the drive peg.
AUTOMATIC
DELUXE
VEGETABLE
SLICER
Drive Peg
Specification
Dimension: 285(L) x 104(W) x 112(H) mm
Storage Temperature: 10 to 40ºC (50 to 104ºF)
Battery: 4 x AA alkaline or rechargeable batteries
Disposal
The packaging material can be recycled. Please dispose of it in an
Environmentally friendly manner and take it to a recycling centre.
If you wish to dispose of this equipment at any point, please
also do so in an environmentally friendly manner. It should not
be disposed of alongside general household waste. Instead,
please take it to recycling point for electrical goods. Your local
council will be able to advise you further.
Batteries should not be thrown away in household waste. Please ensure
that you always dispose of batteries and rechargeable batteries only
when they are empty. Your local council will be able to advise you further.
USER MANUAL
© 2008 Daka Research Inc. All rights reserved.
www.onetouchproducts.com
Model no.: KC25
Patented and Patent Pending
Printed in China
Rev.230309
Getting Started
Parts
CHANGING BLADE
1. Remove all Plungers.
2. Press the Power Head Release Button and
remove the Power Head.
3. Remove the End Cap near the blade holder
and take out the Cutter Plate (Fig.1).
4. Remove the blade from the Cutter Plate by a
coin or similar item (Fig.2) and replace with
your desired blade. (Fig.3).
5. Insert the Cutter Plate back into the Chassis
and close it by replacing the End Cap.
Fig.1
Fig.2
1
2
(If battery installation is needed, please proceed to the next
section “Battery Installation”.
Large
Plunger
Assembly
6. To lock the Power Head back onto the chassis,
introduce the round end first and engage the
Locking Tab first (Fig.5).
7. Press the Power Head down and make sure
that the Power Head is attached properly.
Fig.3
2
NOTE: To prevent accidental cuts from spare blade, always put
the blades not in use, sharp edge down, into the Blade Holder.
1
BATTERY INSTALLATION
1. Power Head
2. Start Button
3. Power Head Release Button
4. Power Head Locking Tab
5. Battery Door
6. Plunger Detect Switch
7. Hopper
8. Large Plunger
9. Plunger Assembly
10. Chassis
14. 3mm Blade
11. End Cap
15. Julienne Blade
12. Cutter Plate
16. Transparent Tray
13. Blade Holder
1. Remove all Plungers.
2. Press the Power Head Release Button and
remove the Power Head.
3. Slide open the battery door, remove and
install 4 AA alkaline or rechargeable batteries
into the battery compartment according to
polarity (+/-) instruction (Fig.4).
4. Replace the battery door.
5. To lock the Power Head back onto the chassis,
introduce the round end first and engage the
Locking Tab first (Fig.5).
6. Press the Power Head down and make sure
that the Power Head is attached properly.
PLUNGER ASSEMBLY
Insert the Plunger Assembly into the Larger
Plunger to become a Larger Plunger Assembly.
Fig.4
Fig.5