Transcript
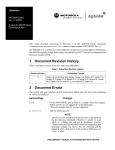
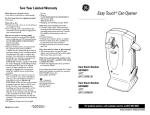
XC69024rev0 – User Manual Draft
SPECIFICATIONS
CARE AND MAINTENANCE
1. If the Can Opener slows during cutting, this may indicate low battery level and
Dimension: 125 x 72 x 50 mm
the batteries should be replaced. If the Can Opener stops during operation, see
Storage temperature: 10 to 40°C (50 to 104°F)
“Trouble Shooting” below.
Battery: 2 x AA alkaline or rechargeable batteries
ADVANCED AUTOMATIC CAN OPENER
2. To clean the Cutter, remove the batteries as a safety precaution and remove the
USER INSTRUCTIONS
Front Cap. Wipe the Cutter with a damp cloth or a sponge, using a mild
non-abrasive cleaner, followed with a clean, dry cloth to dry it completely.
TROUBLE SHOOTING
1. If the Can Opener is jammed due to low
Fig.6
battery level or a deformed can rim, press
the Button again to activate the reverse
function and the Cutter will reset to the
start position.(fig.6)
2. If batteries are depleted, the can may not
be released by pressing the Button. Slide
back the Battery Door and replace 2 AA
batteries. The
Can
Opener
Press the
Button again
should
continue the cutting. Press the Button again to reset the Cutter to the start
position after cutting is completed. Remember to replace the Battery Door after
battery replacement.
3. Cans with heavy seams and uneven rims may stall the Can Opener. If this happens,
follow above procedure to release the can. Start the cutting action just beyond any
minor bump or dent in a can.
NOTE: The Can Opener will not open rimless cans or cans with odd corners.
4. Can’s lid may get stuck at the Cutter after the unit stops. You may pull the lid
backwards by your hands and the lid will come free from the Cutter.
INTRODUCTION
www.onetouchproducts.com
DKB Household UK
GU14 7UE, UK.
Tel: +44 1252 828055
E: [email protected]
Patented and Patent Pending
Printed in China
XC69024rev0
Front Cap
PARTS
Cutter
OPERATING THE CAN OPENER
Drive Wheel
Congratulations on your purchase of The Advanced Automatic Can
Opener (Model No:KC86). This incredible product will help you open
almost all cans effortlessly. The Can Opener is simple to use. Place the
unit on the can and press the button. The Can Opener will cut the can
automatically. Once the lid comes free from the can, press the Button
again to reset the Cutter to the start position.
Battery Door
the Can Opener can work on the lid without tab.
Button
2. With the can on a flat surface, press the Button for about one second and
release. The Can Opener will start cutting the can (fig.3).
3. When the cutting has completed, press the Button immediately to reverse the
Magnet
Cutter. (fig.4)
4. Make sure the Cutter resets to the start position and the motor stops. Then,
lift the Can Opener off the can. The Magnet on the Can Opener will pick up
GETTING STARTED
the lid as well for convenience (fig.5).
NOTE: There is functional sharp edge on the round
◆ Close supervision is necessary when your Can Opener used near children.
BATTERY INSTALLATION
◆ DO NOT open pressurised (aerosol-type) cans.
1. Slide back the battery door to remove and install 2 AA alkaline or rechargeable
◆ DO NOT open cans of flammable liquids such as lighter fluids.
batteries intothe battery compartment according to the polarity (+/-) instruction.
◆ DO NOT leave the Can Opener unattended.
2. Replace the battery door after the batteries have been installed .
◆ DO NOT press the Button when the Front Cap is removed.
3. Press the Button to reverse the Cutter whenever necessary.
◆ Make sure to press the Button to stop the unit right after the cutting
4.Always replace all batteries at once and never mix old and new batteries or
is completed.
◆ During battery replacement, DO NOT press the Button to avoid turning the
unit on.
◆ Before cleaning the Cutter, remove batteries to avoid accidentally turning the
the Cutter during operation to prevent injury, and/or damage to the Can Opener.
Cutter which should be treated with care
Fig.3
Fig.2
batteries of different types.
5. Take out the batteries if the Can Opener is stored for a long time.
CAUTION: The Cutter may be still operating when replacing the
Fig.4
Fig.1
Fig.5
Slide back the bottom cover
◆ DO NOT immerse it in water or any other liquids.
◆ NOT suitable for dishwasher.
SAVE THESE INSTRUCTIONS
This Can Opener is intended for household use only.
Read the following instructions before using for the first time.
Press and hold
Start Button to start
Can rim in groove
batteries. Always keep your fingers away from the Cutter.
unit on.
◆ Avoid contact with the Cutter. Keep hands, hair, jewelry, clothing etc away from
between the Cutter and the Drive Wheel. (fig.2)
NOTE: To open the cans with tab, turn them upside-down, so that
IMPORTANT SAFETY INSTRUCTIONS
◆ Read all instructions carefully before using your Can Opener.
1. Place your Can Opener on top of the can with its rim positioned in the groove
AA
Auto cutting,
press to stop
lift can opener with lid