1
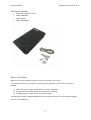
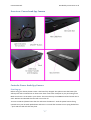
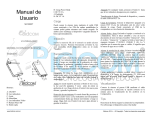
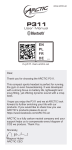
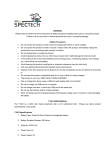
IXIUM
iXium Power Bank Spy
Camera (DN806)
User Manual
Custom Manuals
Provided by www.ixium.co.uk
Contents
Package Contents.................................................................................................................................... 2
Before You Start ...................................................................................................................................... 2
Overview: Power bank Spy Camera ....................................................................................................... 3
Controls: Power bank Spy Camera.......................................................................................................... 3
Starting up........................................................................................................................................... 3
Constant Filming Mode: ...................................................................................................................... 4
Photo Mode: ....................................................................................................................................... 4
Motion Detection Mode: .................................................................................................................... 4
Torch Mode:........................................................................................................................................ 4
Timestamp Edit ....................................................................................................................................... 5
Video Resolution Edit .............................................................................................................................. 6
Still Struggling?........................................................................................................................................ 7
Recommended .................................................................................................................................... 7
Other ................................................................................................................................................... 7
1
Custom Manuals
Provided by www.ixium.co.uk
Package Contents
•
•
•
•
Power bank DVR Spy Camera
USB to USB Cable
30pin adapter
Micro USB adapter
Before You Start
Make sure you have charged the device for 10 or more hours prior to use.
It is recommended that you charge for at least 24 hours; however we know this is not always
possible.
1) Plug in the device using the USB cables to a mains or USB port
2) 2nd light from the bottom will be on constant when charging
3) The light will go out when the device is fully charged
This Battery has a built-in 3000mAh Battery and can charge your phone or a device when plugged
into one of the USB ports.
2
Custom Manuals
Provided by www.ixium.co.uk
Overview: Power bank Spy Camera
Controls: Power bank Spy Camera
Starting up
Before using your device please ensure it has been fully charged. Also please note that battery life
will improve with continued use as these items have never been used prior to you purchasing them.
Make sure there is an SD Card in your device. This item takes up to a 32GB SD Card and needs one to
work. Without and SD Card this item will not work at all.
To insert an SD card please locate the slot and insert the SD Card – with the power button facing
upwards turn your SD Card upside down and insert it. You will feel resistance on a spring loaded slot
– push and the card will click into place.
3
Custom Manuals
Provided by www.ixium.co.uk
When the memory card is full and when the battery is too low to function the 3rd and 4th lights will
flash continuously on the device.
WHEN FOLLOWING THESE INSTRUCTIONS PLEASE HAVE THE
CAMERA LENS FACING AWAY FROM YOU. WITH THE POWERBANK
CAMERA WITH THE USB ENDS FACING TOWARDS YOU.
Constant Filming Mode:
When in constant filming mode the camera will film in 10min chunks each time.
1)
2)
3)
4)
Press the Power button on front of item once
When the light 3rd from the bottom is on constant the item is in standby mode
To take a Video Press Power button once and light will flash 3 times slowly
Press again once to stop filming
Photo Mode:
1)
2)
3)
4)
Press the Power button on front of item once
When the light 3rd from the bottom is on constant the item is in standby mode
Press the Power Button two times in a row
When the light 4th from the bottom has flashed it will have taken a photo
Motion Detection Mode:
When in motion detection filming mode the camera will film in various sized chunks each time
according to the motion detected.
1)
2)
3)
4)
Press the Power button on front of item once
When the light 3rd from the bottom is on constant the item is in standby mode
Press the Power button 4 times in a row
When the light 3rd from the bottom and the light 4th from the bottom both flash it will be in
motion detection mode
5) When motion is detected and the camera is filming the 3rd light from the bottom will go out.
The 4th light from the bottom will slowly flash and go out when it is filming.
6) When motion stops in front of the camera it will stop filming and the 3rd and 4th light will
come back on and slowly flash awaiting any motion then when motion is detected step 5
occurs again and so on until the item runs out of battery power.
Torch Mode:
1)
2)
3)
4)
Press the Power button on front of item once
When the light 3rd from the bottom is on constant the item is in standby mode
Press the Power button 5 times in a row and the torch will activate
Press the Power button once to turn off Torch
4
Custom Manuals
Provided by www.ixium.co.uk
Timestamp Edit
You may need to update the internal clock for the timestamp shown in images and videos.
To do this, you will need to create a Text file with the date and time.
1) Plug the camera into your computer by using a USB cable.
2) It will appear as a Removable Disk.
3) Open the Removable Disk; you might have a folder called DCIM and a text file called “time”
already there.
4) If you already have a file called “time” then move onto Step 7.
5) Right click in the white space and a menu will appear (Figure 3), move down to “New” and
select “Text Document”.
Figure 1
5
Custom Manuals
Provided by www.ixium.co.uk
6) A new Text document will appear (Figure 4) and give you the option to name it, call it
““timeset.txt”.
Figure 2
7) Open this time file and write the date and time in the following method:
a. 2014.01.01 12:00:00 Y (this is only an example use the correct date/time)
b. Type Y to use timestamp and N to not use timestamp
8) Save this file and use your item as normal and the time stamp will be set from now on
9) Save and close the file.
10) Unplug the camera from the computer and turn it on. The time is now updated.
11) Plug the device back into your computer and delete the time file if still there.
Video Resolution Edit
If you want to change the resolution of the videos and images on your device you can do so. The
lower the resolution the less disc space will be used on your SD Card allowing for more files.
1)
2)
3)
4)
5)
Plug in the device to a Computer using the USB cables
Right click and go to “New” and then click on “Text Document”
Save this document as “sizeset.txt”
Open this document
Type the following exactly:
a. 1
i. If you type 1 the resolution ratio will be: 1920 x 1080
b. 2
i. If you type 2 the resolution ratio will be: 640 x 480
c. 3
i. If you type 3 the resolution ratio will be: 1280 x 720
d. 4
i. If you type 4 the resolution ratio will be: 1920 x 1080
6) Save this file and use your item as normal and the resolution will be set
6
Custom Manuals
Provided by www.ixium.co.uk
Still Struggling?
If you are still struggling to understand how this item works you can get in contact via the following
methods.
Recommended
Contact the official stockist through the eBay or Amazon messaging system.
Other
Email:
[email protected]
Telephone:
0115 8716899
7