1
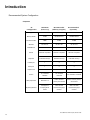
Learning GravoStyle’98
A Training Manual
GravoStyle’98 for Windows® 95, 98 & NT
Congratulations!
You have just acquired GravoStyle’98, the premier engraving software.
This training manual has been produced to help you discover and familiarize yourself with
the available functions in the four levels of GravoStyle’98.
After you become more familiar with GravoStyle’98, you will appreciate the ease and
flexibility with which you can create your engraving jobs. Your customers will recognize the
high quality in your engraving achievements. And, best of all, you will enjoy learning and
using this special software.
Information presented in this document is not contractual in
nature and may be modified without notice by New Hermes.
New Hermes GravoStyle’98 Tutorial
Table of Contents
Table of Contents . . . . . . . . . . . . . . . . . . . . . . . . . . . . . . . . . . . . . . . . . .i
Chapter 1 – Introduction . . . . . . . . . . . . . . . . . . . . . . . . . .1-1
What is GravoStyle’98 . . . . . . . . . . . . . . . . . . . . . . . . . . . . . . . . . . . . .1-2
What you should know . . . . . . . . . . . . . . . . . . . . . . . . . . . . . . . . . . . .1-2
What makes GravoStyle’98 unique? . . . . . . . . . . . . . . . . . . . . . . . . . .1-2
The design process . . . . . . . . . . . . . . . . . . . . . . . . . . . . . . . . . . . . . . .1-2
Background History . . . . . . . . . . . . . . . . . . . . . . . . . . . . . . . . . . . . . . .1-2
Introducing the different levels . . . . . . . . . . . . . . . . . . . . . . . . . . . . . .1-3
Standard Features and Functionality Chart . . . . . . . . . . . . . . . . . . . . .1-4
Recommended System Configuration . . . . . . . . . . . . . . . . . . . . . . . . .1-6
Computers . . . . . . . . . . . . . . . . . . . . . . . . . . . . . . . . . . . . . . . . . . . . . .1-6
Compatibility . . . . . . . . . . . . . . . . . . . . . . . . . . . . . . . . . . . . . . . . . . . .1-7
Contents of the package . . . . . . . . . . . . . . . . . . . . . . . . . . . . . . . . . . .1-7
Resources for learning and using GravoStyle’98 . . . . . . . . . . . . . . . .1-7
Chapter 2 - Installation . . . . . . . . . . . . . . . . . . . . . . . . . . .2-1
Connecting the dongle . . . . . . . . . . . . . . . . . . . . . . . . . . . . . . . . . . . .2-2
Loading the program . . . . . . . . . . . . . . . . . . . . . . . . . . . . . . . . . . . . . .2-2
Step-by-step installation . . . . . . . . . . . . . . . . . . . . . . . . . . . . . . . . . . . .2-2
Installing a table driver . . . . . . . . . . . . . . . . . . . . . . . . . . . . . . . . . . . .2-5
Directories and files . . . . . . . . . . . . . . . . . . . . . . . . . . . . . . . . . . . . . . .2-6
Upgrading levels or installing an option . . . . . . . . . . . . . . . . . . . . . . .2-7
Chapter 3 – Interface . . . . . . . . . . . . . . . . . . . . . . . . . . . . .3-1
The document window . . . . . . . . . . . . . . . . . . . . . . . . . . . . . . . . . . . .3-2
The Status line . . . . . . . . . . . . . . . . . . . . . . . . . . . . . . . . . . . . . . . . . . .3-2
Document window components . . . . . . . . . . . . . . . . . . . . . . . . . . . . .3-3
Editor tips . . . . . . . . . . . . . . . . . . . . . . . . . . . . . . . . . . . . . . . . . . . . . .3-4
Selecting objects . . . . . . . . . . . . . . . . . . . . . . . . . . . . . . . . . . . . . . . . .3-4
Zooming with the mouse . . . . . . . . . . . . . . . . . . . . . . . . . . . . . . . . . .3-4
Zoom tools . . . . . . . . . . . . . . . . . . . . . . . . . . . . . . . . . . . . . . . . . . . . . .3-4
Guide lines . . . . . . . . . . . . . . . . . . . . . . . . . . . . . . . . . . . . . . . . . . . . . .3-4
Origin relocation . . . . . . . . . . . . . . . . . . . . . . . . . . . . . . . . . . . . . . . . .3-5
Changing the viewing perspective of your design . . . . . . . . . . . . . . .3-5
Precise positioning using F2 . . . . . . . . . . . . . . . . . . . . . . . . . . . . . . . .3-5
Snaps – F3 . . . . . . . . . . . . . . . . . . . . . . . . . . . . . . . . . . . . . . . . . . . . . .3-6
Preview – F4 . . . . . . . . . . . . . . . . . . . . . . . . . . . . . . . . . . . . . . . . . . . .3-6
Quick copy . . . . . . . . . . . . . . . . . . . . . . . . . . . . . . . . . . . . . . . . . . . . .3-7
Layers
. . . . . . . . . . . . . . . . . . . . . . . . . . . . . . . . . . . . . . . . . . . . . . .3-7
New Hermes GravoStyle ’98 Tutorial
i
Table of Contents
User preferences – F10 . . . . . . . . . . . . . . . . . . . . . . . . . . . . . . . . . . . .3-7
Text tips . . . . . . . . . . . . . . . . . . . . . . . . . . . . . . . . . . . . . . . . . . . . . . .3-8
Selecting text . . . . . . . . . . . . . . . . . . . . . . . . . . . . . . . . . . . . . . . . . . . .3-8
Text Shortcuts . . . . . . . . . . . . . . . . . . . . . . . . . . . . . . . . . . . . . . . . . . .3-8
Position references . . . . . . . . . . . . . . . . . . . . . . . . . . . . . . . . . . . . . . .3-9
Tabs
. . . . . . . . . . . . . . . . . . . . . . . . . . . . . . . . . . . . . . . . . . . . . . .3-9
Graphic tips . . . . . . . . . . . . . . . . . . . . . . . . . . . . . . . . . . . . . . . . . . . .3-10
Proportional and symmetric shape creation . . . . . . . . . . . . . . . . . . .3-10
Single and double lines . . . . . . . . . . . . . . . . . . . . . . . . . . . . . . . . . . .3-10
Precise shapes using F2 . . . . . . . . . . . . . . . . . . . . . . . . . . . . . . . . . . .3-10
Precise positioning using F2 . . . . . . . . . . . . . . . . . . . . . . . . . . . . . . .3-10
Miscellaneous tips . . . . . . . . . . . . . . . . . . . . . . . . . . . . . . . . . . . . . . .3-11
Invoking the Tool Management selection dialog . . . . . . . . . . . . . . .3-11
Invoking the Styl’Art precision dialog . . . . . . . . . . . . . . . . . . . . . . . .3-11
TUTORIALS . . . . . . . . . . . . . . . . . . . . . . . . . . . . . . . . . . . . .4-1
Tutorial Introduction . . . . . . . . . . . . . . . . . . . . . . . . . . . . . . . . . . . . . .4-3
Discovery Functions and Options . . . . . . . . . . . . . . . . . . . . . . . . . . . .4-5
Discovery
1
2
3
4
5
6
7
8
9
10
11
12
13
14
Beginner Plate . . . . . . . . . . . . . . . . . . . . . . . . . . . . . . . . . . . . . . . .4-7
Simple Plate . . . . . . . . . . . . . . . . . . . . . . . . . . . . . . . . . . . . . . . .4-12
Simple Plaque . . . . . . . . . . . . . . . . . . . . . . . . . . . . . . . . . . . . . . .4-20
Name Badge . . . . . . . . . . . . . . . . . . . . . . . . . . . . . . . . . . . . . . . .4-28
Basic Sign . . . . . . . . . . . . . . . . . . . . . . . . . . . . . . . . . . . . . . . . . .4-38
Tool Management By Color . . . . . . . . . . . . . . . . . . . . . . . . . . . .4-45
Simple Matrix . . . . . . . . . . . . . . . . . . . . . . . . . . . . . . . . . . . . . . .4-56
Matrix with Serialization . . . . . . . . . . . . . . . . . . . . . . . . . . . . . . .4-61
Matrix with Variable List . . . . . . . . . . . . . . . . . . . . . . . . . . . . . . .4-67
Complex Matrix Design . . . . . . . . . . . . . . . . . . . . . . . . . . . . . . .4-71
Plaque with Columns . . . . . . . . . . . . . . . . . . . . . . . . . . . . . . . . .4-78
Simple Laser Engraved Plaque . . . . . . . . . . . . . . . . . . . . . . . . . .4-86
Advance Laser Engraved Plaque . . . . . . . . . . . . . . . . . . . . . . . . .4-93
WYSIWYRE . . . . . . . . . . . . . . . . . . . . . . . . . . . . . . . . . . . . . . . .4-102
Industry
Graphic
Dynamic
New Hermes GravoStyle ’98 Tutorial
ii
Appendix
Toolbar functions by level . . . . . . . . . . . . . . . . . . . . . . . . . . . . . . . . .X-1
Main function toolbar . . . . . . . . . . . . . . . . . . . . . . . . . . . . . . . . . . . . .X-1
Main toolbox . . . . . . . . . . . . . . . . . . . . . . . . . . . . . . . . . . . . . . . . . . . .X-2
Shapes toolbox . . . . . . . . . . . . . . . . . . . . . . . . . . . . . . . . . . . . . . . . . .X-3
Digitizing toolbox . . . . . . . . . . . . . . . . . . . . . . . . . . . . . . . . . . . . . . . .X-4
Text toolbox . . . . . . . . . . . . . . . . . . . . . . . . . . . . . . . . . . . . . . . . . . . .X-5
Green pinwheel text toolbox . . . . . . . . . . . . . . . . . . . . . . . . . . . . . . .X-6
Yellow pinwheel text toolbox . . . . . . . . . . . . . . . . . . . . . . . . . . . . . .X-7
Blue pinwheel text toolbox . . . . . . . . . . . . . . . . . . . . . . . . . . . . . . . .X-8
Red pinwheel text toolbox . . . . . . . . . . . . . . . . . . . . . . . . . . . . . . . . .X-9
Alignment toolbox . . . . . . . . . . . . . . . . . . . . . . . . . . . . . . . . . . . . . .X-10
Special effects toolbox . . . . . . . . . . . . . . . . . . . . . . . . . . . . . . . . . . .X-11
Duplication Tools . . . . . . . . . . . . . . . . . . . . . . . . . . . . . . . . . . . . . . .X-12
Transformation Tools . . . . . . . . . . . . . . . . . . . . . . . . . . . . . . . . . . . .X-12
Wrapping Tools . . . . . . . . . . . . . . . . . . . . . . . . . . . . . . . . . . . . . . . . .X-13
Hot keys . . . . . . . . . . . . . . . . . . . . . . . . . . . . . . . . . . . . . . . . . . . . . .XX-1
Technical Notes . . . . . . . . . . . . . . . . . . . . . . . . . . . . . . . . . . . .
Fine tuning your superscript text . . . . . . . . . . . . . . . . . . . . . . . . . . .4-16
Line length compression . . . . . . . . . . . . . . . . . . . . . . . . . . . . . . . . . .4-16
Paragraph level compression . . . . . . . . . . . . . . . . . . . . . . . . . . . . . . .4-17
Text editing . . . . . . . . . . . . . . . . . . . . . . . . . . . . . . . . . . . . . . . . . . . .4-21
Viewing your work . . . . . . . . . . . . . . . . . . . . . . . . . . . . . . . . . . . . . .4-22
Moving objects . . . . . . . . . . . . . . . . . . . . . . . . . . . . . . . . . . . . . . . . .4-23
Scrolling . . . . . . . . . . . . . . . . . . . . . . . . . . . . . . . . . . . . . . . . . . . . . . .4-30
Adding a symbol to the symbol library . . . . . . . . . . . . . . . . . . . . . . .4-31
Resizing objects . . . . . . . . . . . . . . . . . . . . . . . . . . . . . . . . . . . . . . . . .4-32
Editing machining tool labels . . . . . . . . . . . . . . . . . . . . . . . . . . . . . .4-46
Tool library . . . . . . . . . . . . . . . . . . . . . . . . . . . . . . . . . . . . . . . . . . . .4-48
Tool order of engraving . . . . . . . . . . . . . . . . . . . . . . . . . . . . . . . . . . .4-53
Approaches to matrix axis cutting . . . . . . . . . . . . . . . . . . . . . . . . . .4-58
Text list creation for variable list . . . . . . . . . . . . . . . . . . . . . . . . . . . .4-68
Alignment tools . . . . . . . . . . . . . . . . . . . . . . . . . . . . . . . . . . . . . . . . .4-95
New Hermes GravoStyle ’98 Tutorial
iii
Chapter 1
Introduction
• What is GravoStyle’98
• Introducing the Different Levels
• Recommended System Configuration
• Contents of the Package
• Resources for Learning and Using GravoStyle‘98
New Hermes GravoStyle’98 Tutorial
1-1
Introduction
What is GravoStyle’98
What you should know
GravoStyle’98 is software developed for use under Microsoft® Windows and for this reason
requires some knowledge of this operating environment. If you do not know Microsoft®
Windows, it will be essential to acquire a basic understanding of working in this
environment. Chapter 1 of your Microsoft® Windows user’s manual will provide you with
important information on this topic. Also, we strongly advise you to use the built-in
Windows Help system to further your understanding of Windows. You can see an
introduction by pressing the
key on the task bar followed by the
the pop-up menu. Double-click on the Introducing Windows menu selection.
button on
What makes GravoStyle’98 unique?
GravoStyle’98 has been designed to meet all your engraving needs, from simple plates to
three-dimensional volumetric models. The user does not have to be an artist or an engineer
to get great results. The program is designed in levels so that you can learn and use only
those functions you need. It makes the engraving process fast, accurate and easy.
GravoStyle’98 is both a vector graphics and bitmap graphics application. Vector based
objects are composed of lines and arcs while bitmaps are composed of pixels or picture
elements. GravoStyle’98 neatly integrates bitmap and vector editing tools into the user
interface. And, because it is a full 32-bit Windows application, it is fast.
Some of the more significant capabilities of the software include:
• Scanning and vectorizing
• Typographic text manipulation
• Columns
• Long plate - engrave objects longer than the engraving machine
• Graphic editing
• Photostyle - engraving a photograph
• Importing and exporting text and graphics - interface with other Windows programs
• Automatic toolpath generation
• Dials and Rulers
• Braille
• Styl’Art - Volumetric modeling
• Photo Art - Creating a 3D surface from a gray-scale image
The design process
When preparing a job, the designer has the ability to use either artistic or technical
methods, or a combination of both. Artistically, the user can create and manipulate objects
and text interactively, i.e., visually. When more precise layout is required, precision dialogs
are available to aid the user. The examples in this tutorial help introduce and familiarize the
user with both aspects of the software.
Background history
GravoStyle’98 is the latest in a line of professional engraving software packages offered by
New Hermes. It is Windows® 95/98/NT compatible and follows the standard Windows
conventions you have already learned if you have been using other Windows software
packages. GravoStyle’98 was developed in cooperation with New Hermes’ parent
company, Gravograph, and is available worldwide in many languages.
New Hermes GravoStyle’98 Tutorial
1-2
GravoStyle’98 is packaged in modules so you need only purchase capabilities you need
today. As your needs grow, GravoStyle’98 functionality can be extended by moving to a
more advanced level and/or by adding options. This is accomplished simply by entering
codes into the software.
Introducing the Different Levels
GravoStyle’98 is available in four levels in order to meet the different needs of the numerous
engraving applications throughout the world (personalization, sign-making, marking, machining,
etc). Each level is built upon the previous level. You receive all the functionality of the preceding
level as you move up from Discovery through Industry, Graphic and Dynamic.
For each of these levels, additional options are available for more specialized operations such as
PhotoStyle, Dials and Rulers, Braille, etc. A detailed chart of the levels and options follows.
GravoStyle’98’s basic module allows you to
create simple plates with the help of text or
logos and to control a 2D engraving device in
a remarkably efficient way. Matrix, variable
list, serialization and columns are included.
This is the recommended tool for marking in
an industrial environment. This level adds
powerful design tools such as alignment,
conversions, duplication, welding and
measuring functions. Long plate is included.
Scanning, vectorizing and digitizing functions
in this level provide the full range of graphic
design capabilities. The included machining
module allows complete 2D tool management.
Recessed and relief engraving toolpaths can be
defined and visualized.
Combining all functions available in the
previous levels and including the management
of the 3rd axis, this level is the gateway to your
three-dimensional creations,
New Hermes GravoStyle’98 Tutorial
1-3
Introduction
Introducing the Different Levels
STANDARD FEATURES AND FUNCTIONALITY
DISCOVERY
INDUSTRY
GRAPHIC
DYNAMIC
Automatic composition mode
•
•
•
•
Automatic vertical text
•
•
•
•
Basic font set
•
•
•
•
Diagonal text
•
•
•
•
Dials / scales
NA
OPT
OPT
OPT
Manual composition mode
•
•
•
•
Matrix/list of names & serial numbers
•
•
•
•
Software level:
PLATE COMPOSITION
Spell checker
•
•
•
•
Text in arc
•
•
•
•
Text in columns
•
•
•
•
•
•
•
•
•
•
•
Text on a curve
Vertical text
DESIGN TOOLS
Define drilling points
•
•
•
•
Elementary shapes
•
•
•
•
Right-to-left text entry
•
•
•
•
Tools for moving/resizing
•
•
•
•
Aligning objects with each other
NA
•
•
•
Conversion into circles
NA
•
•
•
Conversions into curves
NA
•
•
•
Duplication tools
NA
•
•
•
Fusion, addition, substraction, offset
NA
•
•
•
Segmentation functions
NA
•
•
•
Shading
NA
•
•
•
Splitting contours
NA
•
•
•
Scanning only
OPT
OPT
•
•
Vectorization only
OPT
OPT
•
•
Guideline grid
•
•
•
•
Help for tool choice
•
•
•
•
Layer / color
•
•
•
•
WYSIWYRE
•
•
•
•
Cost estimate
NA
•
•
•
Spell checker
•
•
•
•
Group/ungroup
NA
•
•
•
Measurements
NA
•
•
•
Upper / lower case
NA
•
•
•
Toggle characters
NA
•
•
•
HELP FUNCTIONS
New Hermes GravoStyle’98 Tutorial
1-4
STANDARD FEATURES AND FUNCTIONALITY (cont’d)
DISCOVERY
INDUSTRY
GRAPHIC
DYNAMIC
Drivers for GII and NHI tables
•
•
•
•
Export DXF, HPGL, EPS
•
•
•
•
Import HPGL, BMP, TIFF, EPS, DXF,
IGES, ISO
•
•
•
•
Import jobs GII, NHI
•
•
•
•
Laser drivers
•
•
•
•
OPT
OPT
•
•
Advanced tool management (CAM module)
NA
NA
•
•
3rd axis management (CAM with true 3-D
capabilities)
NA
NA
NA
•
Bar codes
OPT
OPT
OPT
OPT
Braille level 2
OPT
OPT
OPT
OPT
Dials / scales
NA
OPT
OPT
OPT
Drivers for other engraving machines
OPT
OPT
OPT
OPT
Engraving font (pack # 1)
OPT
OPT
OPT
OPT
Engraving font (pack # 2)
OPT
OPT
OPT
OPT
Engraving font (pack # 3)
OPT
OPT
OPT
OPT
Export DXF (3-D), HPGL, IGES, ISO (2-D
OPT
OPT
OPT
OPT
Filling and 2-D tool management
OPT
OPT
STD
STD
NA
NA
NA
OPT
Software level:
IMPORT/EXPORT
CORRECTION / TOOL PATH
Filling and 2-D tool management
OPTIONS - Specilaty Tools
IGES projection
ISO drivers
NA
NA
NA
OPT
Long plate
OPT
STD
STD
STD
PhotoStyle, bitmap editing, scanning
OPT
OPT
OPT
OPT
Scanning and vectorizing
OPT
OPT
STD
STD
NA
NA
NA
OPT
Styl'Art
New Hermes GravoStyle’98 Tutorial
1-5
Introduction
Recommended System Configuration
Computers
PC
Configuration
Minimum
(Discovery)
Recommended
(Industry/Graphic)
Type
Pentium 200
Pentium II 266
Pentium II 333
Memory DRAM
32 MB
64 MB minimum
128 MB minimum
Internal hard disk
40MB
80 MB
80 MB
Windows
95, 98 or NT
95, 98 or NT
95, 98 or NT
CDROM drive
X 12
X 24
X 24
Mouse
Windows compatible
Windows compatible
Windows compatible
Keyboard
Extended 105 keys
Extended 105 keys
Extended 105 keys
Parallel port
1
2
2
Serial port
1
2
2
Graphic card
256 colors
32000
32000
15", resolution
19", resolution
800x600
1024x768
Screen
Recommended
(Dynamic)
19", resolution 1024x768
Printer, Scanner
Printer, Scanner (Twain),
(Twain), Sound Card
Sound Card
Other peripherals
Disk drive 3.5"
All equipment
2D or 3D New
VMC or 3D New
Engraving Machine
accepting HPGL
Hermes/Gravograph
Hermes/Gravograph
format
machine
machine
New Hermes GravoStyle’98 Tutorial
1-6
Compatibility
Two transfer modes are available with the GravoStyle’98 version; HPGL and binary. The
binary language can be used with all IS400 engravers and the IS200 (which is the Vanguard
Unica with updated firmware).
The binary language was developed by Gravograph in order to reduce job transfer times
and speed processing of the files for your engraving machine.
There is a wide range of standard HPGL drivers available for the standard line of Vanguard
engravers as well as competitor engraving machines and CNC (Computerized Numerical
Control) equipment.
Contents of the Package
The GravoStyle’98 software package contains the following items:
•1 GravoStyle’98 folder put in a jacket
•1 program CDROM
•1 protection key ( Dongle )
•1 training manual
•1 user manual
Note: the protection key (dongle) is programmable which will allow you to add
supplementary options or to access a higher level by entering a new code.
New Hermes supplies this code.
Resources for Learning and Using GravoStyle‘98
For more help in learning and using GravoStyle’98
• Use the Help (F1) built-in to the software
• Refer to the User’s Manual
• If you are have exhausted all resources, call the New Hermes technical support hotline at
1-800-8-HERMES.
For help in learning and using the engraving equipment refer the machine user’s manual.
New Hermes GravoStyle’98 Tutorial
1-7
Chapter 2
Installation
• Connecting the Dongle
• Loading the Program
• Installing a Table Driver
• Directories and Files
• Upgrading Levels or Installing an Option
New Hermes GravoStyle’98 Tutorial
2-1
Installation
Connecting the Dongle
Make sure power is off before connecting dongle.
Plug the dongle into LPT1 or LPT2. The program will be able to automatically find it.
The dongle male pins plug into the LPT port female contacts.
Connect the cable between the PC and the machine according to the configuration
chosen (LPTx or COMx). Reconnect any other peripherals, such as the scanner.
CAUTION:
You can destroy the dongle if you accidentally plug it into the serial
port (male pins).
Restart your computer.
Note: If the dongle is not recognized when the program is later launched,
disconnect any other ‘unknown’ dongles or cables attached to the
dongle and start the operation again.
Loading the program
You will find the software pre-loaded on all computers purchased from New Hermes.
Important: This software can only be installed under Windows® 95, 98 or NT.
The following procedure describes the installation of GravoStyle’98 from:
• the D drive: internal or external CDROM drive
• to the C drive: corresponding to your computer’s hard disk
Note: if you use different drives, replace the D: and C: drives with the name
of the drives you selected.
Step-by-Step installation:
Insert the GravoStyle’98 CDROM in the CDROM drive.
On the Windows taskbar, click on
Click on Run
In the Run dialog box, type in the command :
D:\GravoStyle98\Setup.exe and click OK.
Follow the dialog boxes displayed and perform the indicated procedures:
New Hermes GravoStyle’98 Tutorial
2-2
DIALOG
PROCEDURE
Dialog box: Welcome
It is advised to close all running programs. Click NEXT
Dialog box: License
Software License Agreement. Click YES
Disk and directories destination
Select the drive and directory for the software installation. The default
c:\gravostyle98 is recommended.
Coordinates 1
This is the user identification that will be recorded in the dongle
Coordinates 2
How to be contacted – used when you order options or upgrades
Type of Install
Typical, compact or custom; Select "custom" to install fonts
Select Program folder
Name of the program group into which GravoStyle’98 should be
recorded. The default is recommended.
Reminder: throughout this progression of steps, it is possible to
• Cancel the software installation by clicking on Cancel
or
• Return to the previous dialog box to revise an error, by clicking the Previous key.
The installation has begun. The progress bar and window show the files being
installed.
Once the files are installed, you see a Setup Complete dialog. Click Finish to complete
the installation.
And finally, you see another Setup Complete dialog prompting you to restart your
computer. Click on the Yes option and the Finish button.
The first time you start GravoStyle’98, you will be prompted for the name to be
entered into the dongle. It is recommended that you enter your company name.
Next, a Setup Machine dialog box will ask you to select the engraver(s) you will be
using.
Click on the + symbol of the Add machine
icon to open the list of machines.
New Hermes GravoStyle’98 Tutorial
2-3
Installation
Loading the Program (cont’d)
Click on the + symbol of the GravoStyle
sub-directory to see all the types of
GravoStyle machines available.
Note: Binary entries refer to a high
performance binary data transfer protocol.
Otherwise, transfer is performed using
standard ASCII text.
Select the driver corresponding to the table
you will use.
Right click on the driver chosen and select
Add this machine contextual menu item
or click on the Add button at the bottom of
the window.
The next dialog box (right) prompts you
for the port used to connect the engraving
machine.
Double click on the Add item to start the
Windows Add Printer Wizard. The engraver
will be configured like a printer in the
Windows operating system.
New Hermes GravoStyle’98 Tutorial
2-4
Follow the dialog boxes displayed and perform the indicated procedures. Click on the
Cancel button at any time during this process to abort the printer install operation.
DIALOG
PROCEDURE
Add Printer Wizard
Click NEXT to begin procedure
How is this printer attached to your computer?
Choose local or network connection. Click NEXT
Define Network path
If Network was selected, enter the Network path or
queue name. Click NEXT
If local printer was selected, choose Generic in the left
Choose printer model
pane and Generic/Text Only in the right pane. Click
NEXT
Choose port
Define the port you will use for the transfer: LPTx,
COMx. Note: the mouse usually uses COM1. Click NEXT
Type in a friendly name such as IS400 on LPT1. If you
Name the printer
want this to be the default printer (recommended), select
the YES option. Click NEXT
Print a test page
Choose NO. Click FINISH
Installing a table driver
Additional table drivers (also known as post-processors) can
be configured any time after program installation. The
procedure is as follows:
From the main menu, select Machining > Setup machines
The window corresponding to machine
installations is displayed showing any drivers
previously configured.
The little man icon next to the machine icon
indicates the default machine.
Follow the machine installation procedure as
previously described.
New Hermes GravoStyle’98 Tutorial
2-5
Installation
Directories and Files
After installation has been completed, the program will have created the following
directories:
Directories & sub-directories
Contents
Files for program initialization
Personal Job Files
Program executable files
Filter files for Import/Export function
Gravograph engraving fonts and True
Type fonts
Drivers files for the dongle, For Win 95
& Win NT
Language files available in the software.
They are DLL files that cannot be
directly translated.
Installation customization files
Table driver (post processor) files
Symbol ( .syb) files
New Hermes GravoStyle’98 Tutorial
2-6
Upgrading Levels or Installing an Option
When you are ready to upgrade the GravoStyle’98 level or add an option, contact New
Hermes with the order information sheet. This sheet defines the current level and
options installed as well as your specific dongle serial number.
To generate this information sheet, click on the yellow question mark symbol
in
the Main Toolbar. Then click on the Order button. This automatically generates a text
file in Wordpad or Word for Windows. This information sheet can be emailed, mailed
or faxed to New Hermes. Make sure that all the contact information is included. Click
Exit to remove the Help > About dialog.
When you subsequently receive your upgrade or option codes, return to the Help >
About dialog by clicking on the yellow question mark symbol again. Type the codes
into the three text boxes and click on the Validate button. Depending on the upgrade,
you may be required to enter multiple sets of these codes, each time followed by
clicking on the Validate button. After you click the Validate button, the program
displays a message reporting success or a problem. Click Exit to remove the Help >
About dialog.
New Hermes GravoStyle’98 Tutorial
2-7