1
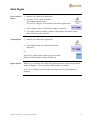
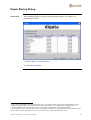
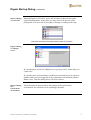
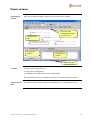
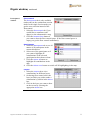
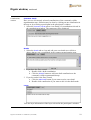
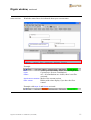
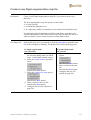
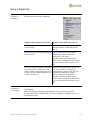
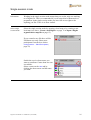
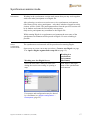
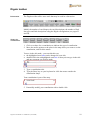
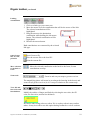
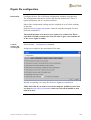
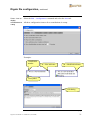
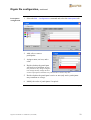
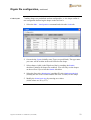
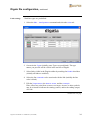
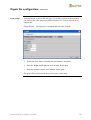
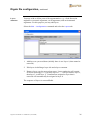
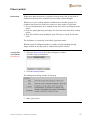
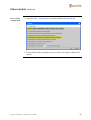
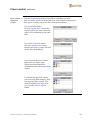
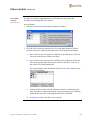
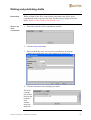
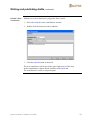
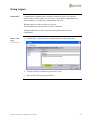
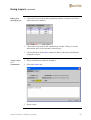
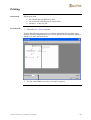
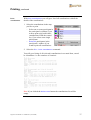
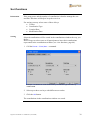
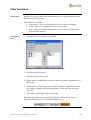
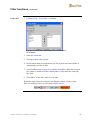
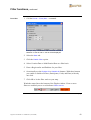
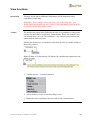
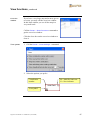
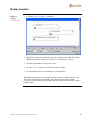
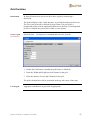
User’s Manual
Version 2.1 – 040204
Table of content
Digalo 4
Information 4
Single session mode 4
Synchronous mode on a „free“ server 4
Synchronous mode within a synchronous environment 4
Start Digalo 5
First startup of Digalo 5
Startup Digalo 5
Digalo Update 5
Digalo Startup Dialog 6
Information 6
Digalo running on a local PC 7
Digalo running on a Digalo server 7
Digalo running in a synchronous environment 7
Digalo window 8
Initial Digalo window 8
Tool bar 8
Argumentative map 8
Participant’s window 9
Contributions window 10
Status info line 11
Create a new Digalo file 12
Information 12
New Digalo file 12
Save a Digalo file 13
Alternative 1: File Menu 13
Alternative 2: Close Digalo 13
Upload a local Digalo file to a server 14
Procedure 14
Open a Digalo file 15
Information 15
Open Digalo file 15
Single session mode 16
Information 16
Select single session mode 16
Synchronous session mode 17
Information 17
Select synchronous session mode 17
Digalo toolbar 18
Digalo toolbar 18
Information 18
Shapes for contributions 18
Linking contributions 19
Open/Create file, save file, print file 19
Move selection to the back or front 19
Zoom tools 19
Text, fill, and line colors and line thickness 19
Digalo file configuration 20
Information 20
General settings and access rights 20
Views – how to display contributions in a map 21
Participants configuration 22
Cards layout 23
Links settings 24
Grid settings 25
Layers definition 26
Digalo-Users-Manual-v2.1-040204.doc (04.02.2004)
2
Floor control 27
Information 27
Change floor control mode 27
Floor control configuration 28
Floor control queue in a session 29
Force floor control 30
Writing and publishing drafts 31
Information 31
Write a new draft contribution 31
Publish a draft contribution 32
Using Layers 33
Information 33
Define a new layer 33
Edit a layer 34
Delete a layer 34
Hiding and showing layers 35
Assign a layer to a contribution 35
Printing 36
Information 36
Print the map 36
Print contributions 37
Print statistics 38
Sort functions 39
Information 39
Sorting 39
Filter functions 40
Information 40
Participants filter 40
Cards filter 41
Date filter 42
Disable filters 43
View functions 44
Information 44
Tooltips 44
Overview window 45
View options 45
Replay function 46
Replay a session 46
Grid function 47
Information 47
Create a grid 47
Use the grid 47
Background picture 48
Information 48
Install a background picture 48
Digalo-Users-Manual-v2.1-040204.doc (04.02.2004)
3
Digalo
Information
The Digalo tool is considered to support learners in learning to argue, to
negotiate, and to discuss.
For these purposes the Digalo tool may be run in three different modes:
Single session mode:
Start the Digalo tool on your local PC, select the Single session mode, open a
Digalo file or create a new one, and use the tool;
Synchronous mode on a “free” Digalo server
Start the Digalo tool on your local PC, select a file on the Digalo server
suggested in the startup dialog, open a Digalo file or create a new one, and
work together with other users on the Digalo file under consideration
Synchronous session mode:
Start the Digalo tool within a synchronous environment like the Dunes oasis,
open a Digalo file or create a new one, and work together with other users on
the Digalo file under consideration.
Single session
mode
The user
• has full access to Digalo;
• may create arbitrarily many participants;
• may select the name of a participant in whose name contributions will be
written.
Synchronous
mode on a
„free“ server
The user
• can open any available Digalo file;
• may select one participant in the file s/he likes to be;
• may write contributions in the name of the selected participant.
This mode may be run on a Digalo demonstration server for test purposes
(like the Digalo server at Fraunhofer).
Please, keep in mind that all files on a demonstration server are open to the
world. Every person having Digalo installed may open these files. There is no
security policy.
Synchronous
mode within a
synchronous
environment
The user
• has to login to the synchronous environment;
• may only open Digalo files s/he has access to;
• may only contribute with her/his unique name.
Digalo-Users-Manual-v2.1-040204.doc (04.02.2004)
4
Start Digalo
First startup of
Digalo
1. Start the Java Web Start application.
2. Open the “View” menu and select
“Downloaded applications”.
You will see “Digalo” and probably some other applications.
3. Select Digalo in the Java Web Start window and start it.
4. You will be asked to install a symbol on the desktop and in the startup
menu. Decide on what you like.
Startup Digalo
1. Start the Java Web Start application.
2. Select Digalo in the Java Web Start window
and start it.
or
If you have a Digalo alias symbol on your desktop:
Double click the symbol to start the Pad tool.
Digalo Update
Whenever you start the Java Web start application there will be an automated
update of Digalo – if you are online and an update is available.
So if you use Digalo on one day and some days later its outfit might have
changed.
Digalo-Users-Manual-v2.1-040204.doc (04.02.2004)
5
Digalo Startup Dialog
Information
After starting Digalo you get the startup dialog window1 for Digalo in a
synchronous session.
1. Select a map or create a new one.
2. Click the Next button.
continued on next page
1
Please, notice that Digalo starts up already with step 3 of a startup wizard. This has been implemented to avoid
running through all screens by answering always the same questions in an equal manner. Preceding steps are:
1. Select operation mode – Single user mode or synchronous mode (default is synchronous mode);
2. Select Digalo server – Enter the name of a server (default is teamserver-b.ais.fraunhofer.de if started from a local
PC or respectively the name of the server of a synchronous environment like the Dunes oasis).
Digalo-Users-Manual-v2.1-040204.doc (04.02.2004)
6
Digalo Startup Dialog, continued
Digalo running
on a local PC
Running Digalo on a local PC opens full freedom of choice between the
registered participants: At any time you may select to be the one of the
participants. You have full access rights to change everything in the map.
Easy user switching in the single session mode on a local PC.
Digalo running
on a Digalo
server
In a synchronous session on a Digalo server you may select a name who you
“want to be”.
In a synchronous session within a synchronous environment you are the user
with the name you have logged in to the synchronous environment (like the
Dunes oasis). Then the dialog above will not be shown.
Digalo running
in a
synchronous
environment
All participants are preselected by the settings of the synchronous
environment. No selection or user switching is possible.
Digalo-Users-Manual-v2.1-040204.doc (04.02.2004)
7
Digalo window
Initial Digalo
window
After successfully opening a map file you see the initial window:
Tool bar with
contribution shapes
and link lines
Argumentative
map
Participant’s
window
Contributions
window
Status info line
Tool bar
Use the tools in the tool bar to
• enter a new contribution
• establish a new link between two contributions
The tools in the tool bar are shadowed if you do not have the floor control.
Argumentative
map
The argumentative map contains all contributions of a running discussion.
continued on next page
Digalo-Users-Manual-v2.1-040204.doc (04.02.2004)
8
Digalo window, continued
Participant’s
window
Floorcontrol
The Floorcontrol tab is only available
(and useful) in the synchronous session
mode. In the single session mode you
get the user selection instead of the
floorcontrol.
1. Select the Floorcontrol tab if you
would like to contribute (add
shapes) to the arbumentative map.
2. Click the Request floor button if
you want to enter the floor control queue. If the floor control queue is
empty you get the floor control immediately.
Participants
1. Select the Participants tab to see all
names of all participants in the
current discussion.
2. Select one of the participants to if
you want to highlight all
contributions of the selected
participant in their chosen colour.
3. Click the Select all button to
highlight all contributions in the
map.
4. Click the Select none button to switch off all highlighting in the map.
Layers
1. Select the Layers tab to view
contributions on different layers.
2. On having floor control select the
layer in which you wish to make a
contribution by clickin in the Active
box.
3. Click in the layer you want to show
on the screen by selecting the
appropriate Show box.
continued on next page
Digalo-Users-Manual-v2.1-040204.doc (04.02.2004)
9
Digalo window, continued
Contributions
window
Common Cards
Here you see all currently selected contributions of the commonly visible
argumentation map. Selection may be done by clicking on one contribution in
the map or by selecting a participant in the participant’s window.
1. Select the Common Cards tab to view details of a contribution selected in
the contributions window. The comment will be displayed.
Drafts
1. Select the Drafts tab to view and edit your own drafts (not visible to
others) that are not yet published in the common argumentation map.
2. If you have the floor control
a. Double click a draft contribution
b. Click the Publish button to add your draft contribution to the
commonly visible argumentation map.
3. If you do not have the floor control
a. Click the Add Draft button if you want to write a new draft
b. Double click contribution if you want to edit it in the draft mode.
Layer
View the layer information of the layer selected in the participant’s window.
continued on next page
Digalo-Users-Manual-v2.1-040204.doc (04.02.2004)
10
Digalo window, continued
Status info line
Watch the status line to be informed about your current status.
Example:
User
Layer
Filters
This is your user setting: color, icon, and login name.
Current layer for new contributions.
off = all contributions are visible; there is no filter
activated.
Synchronous session Mode of the current session.
Floor owner
Blinks with a time display if you have the floor
control.
Example with Layer 2 and Filters activated:
Digalo-Users-Manual-v2.1-040204.doc (04.02.2004)
11
Create a new Digalo argumentative map file
Information
Create a new Digalo argumentative map file if you want to start a new
discourse.
The new argumentative map file may be created either
• on your local PC
• on a dedicated Digalo server
• in a repository within a synchronous environment like the Dunes oasis.
Use the Dunes upload command (available in the Dunes repositories for
sessions and studios) if the file has been created on your local PC and you
want to transfer it into a session repository on the Dunes Oasis.
New Digalo file
Start Digalo (if it is not yet started) or click the Open/New command in the
File menu (if Digalo is running). The Digalo file selection dialog appears.
In Single session mode
(on a local PC)
In Synchronous mode
(on a server)
1. Click the Prev. button in the Digalo
file selection dialog until you reach
step 1 of the Digalo startup wizard.
2. Select the single session operation
mode.
1. Select the Create new map
option.
and click the Next button.
3. Select the Create new map option.
and click the Next button.
2. Enter a name for the new
file
and click the New button.
3. Configure the new file
(details on page 20).
and click the Next button.
4. Enter a name for the new file
and click the New button.
5. Configure the new file (details on
page 20).
Digalo-Users-Manual-v2.1-040204.doc (04.02.2004)
12
Save a Digalo file
Alternative 1:
File Menu
Use the menu File menu commands.
Single session mode (on local PC)
Synchronous mode (on a server)
Save On Server will produce an
Save On Server immediately saves
error message.
the current state of the map on the
server.
Save Local saves the current map on
Save Local saves a copy of the
your local PC.
current map on your local PC,
asking for a file name.
Further work on the map will be
done on the synchronous map on the
server, not on the file stored to your
PC.
Save As Local will create a file copy
Save As Local will create a new file
on your local PC or on a device
connected to your PC (like drive A,
a portable hard disk or a flash
drive), asking for a file name.
Further work on the map will be
done on the synchronous map on the
server, not on the file stored to your
PC.
on your local PC, asking for a file
name. Further work on the map will
be done on the original map file, not
on the saved copy.
Alternative 2:
Close Digalo
Close Digalo.
A file save dialog will appear automatically if you work on a local PC.
Saving will be done automatically if you are working on a Digalo server on
on the Dunes Oasis.
Digalo-Users-Manual-v2.1-040204.doc (04.02.2004)
13
Upload a local Digalo file to a Dunes Oasis
Procedure
1. Enter a Dunes case.
2. Go to
• a session repository that is open,
• your personal studio directory
• a workgroup directory that you have access to.
3. Select a file on your local PC for uploading.
4. Click the upload button.
Refer the Dunes Users manual for details.
Digalo-Users-Manual-v2.1-040204.doc (04.02.2004)
14
Open a Digalo argumentative map file
Information
Open a Digalo file to contribute to an existing discussion.
Open Digalo
argumentative
map file
Start Digalo (if it is not yet started) or click the Open/New command in the
File menu (if Digalo is running). The Digalo file selection dialog appears.
In Single session mode
(on a local PC)
In Synchronous mode
(on a server)
1. Click the Prev. button in the Digalo
file selection dialog until you reach
step 1 of the Digalo startup wizard.
2. Select the single session operation
mode.
1. Select the Open existing
map option.
and click the Next button.
and click the Next button.
3. Select the Open existing map option.
and click the Next button.
4. Select a file on your local PC
and click the Open button.
Digalo-Users-Manual-v2.1-040204.doc (04.02.2004)
15
Single session mode
Information
Working in the single session mode means that you are the only one working
on a Digalo file. This is recommended if you do some kind of homework or
preparation. In the single session mode you have full access rights to do
anything you like. There is no floor control.
Select single
session mode
Select the single session mode by opening a local map or by creating a new
local map (see above: Create a new Digalo on page 12 or Open a Digalo
argumentative map file on page 15).
If you created a new file there will be
Facilitator user only. Enter more
participants if needed (see below:
Configuration – Edit Participants,
page 22)
Switch the user in whose name you
want to contribute if more than one user
is available.
Select a name on the User tab by
clicking the down arrow and the name
you want.
Digalo-Users-Manual-v2.1-040204.doc (04.02.2004)
16
Synchronous session mode
Information
Working in the synchronous session mode means that you may work together
with some other participants on a Digalo file.
After selecting a session on a session server in a synchronous environment
(like Dunes Oasis) acitve participants – only those who have logged in to this
session- will be visible. The participants names from the previous session will
be in shadow and cannot be activated by current users.
Only active participants may contribute to the Digalo file.
While running Digalo in a synchronous environment the user name of the
synchronous environment will be passed to Digalo. No user switching is
possible.
Select
synchronous
session mode
The synchronous session mode will be preselected on starting Digalo.
Open a map or create a new map (see above: Create a new Digalo on page
12 or Open a Digalo argumentative map file on page 15).
Working on a free Digalo Server
Working in a
synchronous
environment
(like Dunes)
Select the user name “who you want to be”
during the session on creating or opening a
map.
Your name is the login
name of the synchronous
environment.
User names and configuration may be altered
by a facilitator (see Digalo configuration –
Participants, page 22)
Digalo-Users-Manual-v2.1-040204.doc (04.02.2004)
17
Digalo toolbar
Information
The Digalo toolbar offers some tools that may be used in a discussion.
Modify the number of card shapes, the card descriptions, the number of link
line types and link descriptions using the Digalo configuration (see pages 23
and 24).
Shapes for
contributions
1. Click on a shape for a contribution to indicate the type of contribution.
2. Move the mouse pointer to the place in the map where you want to see the
contribution, and click the mouse.
You are in the edit mode - you can edit this way:
• the highlighted word title can be changed to your title;
• doubleclick in the unhighlighted word title so that you can type in the title
and any comment you wish to make.
3. Type a contribution title.
4. Type the Enter key on your keyboard or click the mouse outside the
contribution shape.
Your contribution is part of the map.
5. Potentially modify your contribution with a double click.
continued on next page
Digalo-Users-Manual-v2.1-040204.doc (04.02.2004)
18
Digalo toolbar, continued
Linking
contributions
1. Click on a link type you want to use.
2. Move the mouse over the contribution that will be the source of the link.
The selected contribution will be
highlighted.
3. Drag the mouse to the destination
contribution while holding the left mouse
button. The selected contribution will be
highlighted.
4. Release the mouse button.
Both contributions are connected by the selected
link type.
Open/Create
file, save file,
print file
Move selection
to the back or
front
Open/Create a file.
Save the current file to the local PC.
Print the current file.
Move the selected contribution to the back /to the front, if some
contributions overlap.
Zoom tools
Zoom in and out your map to get an overview.
The magnifying glases will zoom in (to enlarge the lettering in the boxes) and
zoom out (to get an overview) in 10 % steps in relation to the current map.
Text, fill, and
line colors and
line thickness
Modify the outline of shapes and links by selecting the text color, the fill
color, the line color, and the line thickness.
Be careful when using colors too often. If it is used too often it may confuse
others. It may be useful to use this option during feedback or review sessions.
Digalo-Users-Manual-v2.1-040204.doc (04.02.2004)
19
Digalo file configuration
Information
Configure the new file on different configuration windows using the taps.
The configuration alternatives will be described in detail below. This is a
typical preparatory job of a session facilitator.
Most of the configuration settings may be switched on or off while working
on the map.
Only the Record replay information cannot be switched on again if it once
has been switched off.
The default position is for most access rights to be switched on. Please
read them carefully to make sure that you want to give your students all
of the access rights available.
General
settings and
access rights
Select the Edit – Configuration command.
Assign access rights to the participants of the map.
Initially on creating a new map file all access rights are switched on.
Make shure that if you want to review the map in a feedback session that
you keep Record replay information otherwise you will be unable to turn
it back on later.
continued on next page
Digalo-Users-Manual-v2.1-040204.doc (04.02.2004)
20
Digalo file configuration, continued
Views – how to
display
contributions in
a map
Select the Edit – Configuration command and select the View tab.
All these configuration items refer to contributions in a map.
Examples:
Contribution
number
N = New indicator
M = Modified indicator
Usersymbol
Edit dialog
continued on next page
Digalo-Users-Manual-v2.1-040204.doc (04.02.2004)
21
Digalo file configuration, continued
Participants
configuration
1. Select the Edit – Configuration command and select the Participants tab.
2. Add, edit, or remove
participants.
3. Assign a name, an icon, and a
color.
4. Decide whether the participant
will work as a facilitator or not.
Only acilitators may change configuration settings and may change the floor
control request queue; facilitators may take the floor control at any time.
5. Decide whether the participant is active or not (only active participants
may contribute to a map).
6. Modify the order of participants if required.
continued on next page
Digalo-Users-Manual-v2.1-040204.doc (04.02.2004)
22
Digalo file configuration, continued
Cards layout
7 outline shapes are predefined and not configurable, i.e. the shape outline is
not configurable but having the shape on the tool bar is.
1. Select the Edit – Configuration command and select the Cards tab.
2. Overwrite the Types (initially some Types are predefined). The type name
you enter will be written in the tool bar below the shape.
3. Select shapes visible in the Digalo tool bar by marking the Enable
checkbox (initially all shapes are enabled). You will only see the shapes
on the tool bar if you select the Enable checkbox.
4. Select the line color (Bordercolor) and the fill color (Backgroundcolor)
(initially the line color is black and the fill color is white) for the shape.
5. Modify the Initial card size by entering new values
(initial values are 50 by 275).
continued on next page
Digalo-Users-Manual-v2.1-040204.doc (04.02.2004)
23
Digalo file configuration, continued
Links settings
3 link line types are predefined.
1. Select the Edit – Configuration command and select the Links tab.
2. Overwrite the Types (initially some Types are predefined). The type
names you provide will be visible in the tool bar of Digalo.
3. Select links visible in the Digalo toolbar by marking the Enable checkbox
(initially all links are enabled).
4. Select the line Linecolor to be associated with the link (initially the line
color is black).
5. Edit the Target arrow, the Source arrow, and the Linestyle.
Hint: All arrows point from a source to a target. Arrows or other symbols
may be selected to indicate the starting (source) and/or the ending (target)
of a link.
continued on next page
Digalo-Users-Manual-v2.1-040204.doc (04.02.2004)
24
Digalo file configuration, continued
Grid settings
You may decide to divide the map into 2, 4 or more sections so that students
can work on the same map but in different parts of it. Grids to a good job to
support this.
Select the Edit – Configuration command and select the Grid tab.
1. Enable the Grid feature (initially the grid feature is disabled).
2. Enter the Width and Height (in pixel format) for the grid.
3. Enter the number of rows and Columns for the grid.
The grid will be positioned in the top left corner of the map.
continued on next page
Digalo-Users-Manual-v2.1-040204.doc (04.02.2004)
25
Digalo file configuration, continued
Layers
definition
You may wish to define parts of the argumentation, e.g. a food discussion
might have economic arguments, social arguments, and environmental
arguments. For this purpose you may add layers.
Select the Edit – Configuration command and select the Layers tab.
1. Add layers as you need them (initially there is one Layer 0, that cannot be
removed).
2. Edit layers in defining a layer title and a layer comment.
3. Remove layers you do not need any more. Layer numbering will remain
as before removing (i.e. if you have layers 0 … 3 and you remove layer 2,
then layer 3 is still layer 3). Contributions assigned to layer that is
removed will automatically be assigned to layer 0.
The sequence of layers is not modifiable.
Digalo-Users-Manual-v2.1-040204.doc (04.02.2004)
26
Floor control
Information
When more than one person is working on a map, there may be the need of
additions to the map to be controlled, to encourage ordered thought.
Whenever you are working together simultaneous with other people on a
common map located on some server there are three modes of operation:
• Every participant may do everything at any time (all are working the same
time);
• Only one participant may participate if it is her/his turn in the floor control
queue;
• Only the facilitator may modify the map. The map is closed for all other
users.
The facilitator of a map may switch these operation modes.
With the general configuration there is another switch regarding moving
shapes around on the map with or without having floor control.
Change floor
control mode
1. Select the Floorcontrol tab in the participant’s window
(available only to facilitators).
(Facilitator)
2. Click the Manage button.
The management dialog window will pop up.
3. Make your choice.
continued on next page
Digalo-Users-Manual-v2.1-040204.doc (04.02.2004)
27
Floor control, continued
Floor control
configuration
1. Select the Edit – Configuration command and find the General tab.
2. Decide whether all participants may move and resize shapes without floor
control.
continued on next page
Digalo-Users-Manual-v2.1-040204.doc (04.02.2004)
28
Floor control, continued
Floor control
queue in a
session
Click the Request floor button if you like to contribute to a map.
Your user name will be put at the end of the floor control request queue.
If the queue is empty you get the floor control immediately.
User Josef is facilitator.
He may request floor control (his
request will be put at the end of the
queue) or he immediately may take
floor.
User Anna is not a facilitator.
She may request floor control.
Because the queue is empty she will
get the floor immediately.
User Anna has the floor control.
Other users are in the queue.
When Anna has finished her
contributions she will Release floor
control.
User Mona has the floor control,
seen from user Pauls monitor. Paul
has requested floor control. If he
wants to withdraw his request he
may click the Cancel request
button.
continued on next page
Digalo-Users-Manual-v2.1-040204.doc (04.02.2004)
29
Floor control, continued
Force floor
control
To make sure that the argumentation is not held up for any reason the
facilitator may manage the floor control.
(Facilitator)
As a facilitator:
1. Select the Floorcontrol tab in the participant’s window
2. Give the floor control to someone else if a participant forgets to release
the floor control or another participant has to do an urgent contribution.
a.
Next will force the current floor controller to be kicked out of the list.
The next in the queue will have the floor.
b.
Give will force the current floor controller to be kicked out of the list.
The selected participant in the queue will have the floor. The rest of
the queue will remain untouched.
The same happens if the facilitator clicks the Take floor button in the
participants window.
c.
Disable will force that only the facilitator is able to contribute to the
map. The queue remains untouched. Every participant sees a blinking
signal in the status line indicating that the floor is disabled.
d.
Deactivate will give the floor to everybody.
Digalo-Users-Manual-v2.1-040204.doc (04.02.2004)
30
Writing and publishing drafts
Information
While waiting for the floor control other participants may like to write
contributions ready to go onto the map. For this purpose Digalo offers the
drafts. Drafts are only visible to the local PC user.
Write a new
draft
contribution
1. Select the Draft tab in the contributions window.
2. Click the Add Draft button.
3. Edit your draft the same way as with a contribution on the map.
Change the contribution type if the default type does not fit.
4. Click the OK button after finishing your draft.
The draft
contribution will be
listed in the
contributions
window
under the
drafts tab.
continued on next page
Digalo-Users-Manual-v2.1-040204.doc (04.02.2004)
31
Writing and publishing drafts, continued
Publish a draft
contribution
Publish one or more drafts after you got the floor control.
1. Select the Draft tab in the contributions window.
2. Double click the draft you want to publish.
3. Click the Publish button of the draft.
The new contribution will be put in the upper right corner of the map.
In the contributions window the tab switches to the Cards tab.
The contribution is visible to all participants.
Digalo-Users-Manual-v2.1-040204.doc (04.02.2004)
32
Using Layers
Information
Contributions in Digalo can be assigned to different layers. So with one
mouse click you may enforce an overview of some basic contributions or a
more complex view with more contributions involved.
Default setting is to have at least one layer 0.
The facilitator may introduce more layers if required.
All participants may use the layers by entering the Details tab of a
contribution.
Define a new
layer
1. Call the Edit – Configuration command and select the Layers tab.
(Facilitator)
2. Click the Add layer button to create a new layer.
3. Enter a layer title and some comment.
continued on next page
Digalo-Users-Manual-v2.1-040204.doc (04.02.2004)
33
Using Layers, continued
Edit a layer
1.
Call the Edit – Configuration command and select the Layers tab.
2. Click the Edit layer button modify the layer’s information lines.
3. Modify the layer’s title or comment.
Delete a layer
1. Call the Edit – Configuration command and select the Layers tab.
2. Click the Remove layer button to delete a layer.
Remember: Layer 0 cannot be removed.
continued on next page
Digalo-Users-Manual-v2.1-040204.doc (04.02.2004)
34
Using Layers, continued
Hiding and
showing layers
1. Click on the Layers tab in the participants window. All layers are listed
with consecutive numbers.
2. Click on the Layers tab in the contributions window. Then you see the
information lines of the currently selected layer.
3. Click a checkbox in the Show column to hide or show the contributions
assigned to a layer.
Assign a layer
to a
contribution
1. Edit a contribution by double clicking it.
2. Select the Details tab.
3. Select a layer.
Digalo-Users-Manual-v2.1-040204.doc (04.02.2004)
35
Printing
Information
Digalo may print
• the current map (in different scales);
• all or selected contributions in textual form;
• statistics – a map log file.
Print the map
1. Select the File – Print command.
You get the following print preview window indicating on how many pages
the map will be printed (the preview is not as precise as the output an a printer
will be; it is just a quick preview):
2. Use the zoom buttons to resize your map if required.
continued on next page
Digalo-Users-Manual-v2.1-040204.doc (04.02.2004)
36
Printing, continued
Print
contributions
With Print contributions you will get a list of all contributions with all the
details of the contributions.
1. Select the contributions in the map
you like to print.
-
-
Select one or some participant in
the participant’s window if you
want to print only her/his/their
contributions. Hold the control
key if you select some single
participants.
Select all participants in the
participant’s window if you
wand to print all contributions
2. Select the File – Print contributions command.
You will get a listing of all (selected) contributions in a textual form, sorted
by id numbers (i.e. the sequence of creation):
Hint: If you clicked the Select none button the contributions list will be
empty.
continued on next page
Digalo-Users-Manual-v2.1-040204.doc (04.02.2004)
37
Printing, continued
Print statistics
Select the File – Print statistics command.
(Facilitator)
A log file of all actions done on the map will be printed:
Digalo-Users-Manual-v2.1-040204.doc (04.02.2004)
38
Sort functions
Information
If the map grows and the number of contribution is hard to manage the sort
and filter functions will help to keep the overview.
For sorting you may select some of these 4 keys:
• Creator
• Contribution Type
• Creation Date
• Modification Date
Sorting
Selected contributions will be sorted in the contributions window the way you
define.
Do not forget to select some or all participants to have their contributions
represented in the contributions window (see view functions, page 44).
1. Call the Extras – Filter/Sort… command.
Example: Contributions will be sorted first by contribution type and then by
creation date.
2. Select up to three sort keys with different sort orders.
3. Click the OK button.
The contributions in the contributions window are sorted.
Digalo-Users-Manual-v2.1-040204.doc (04.02.2004)
39
Filter functions
Information
Whenever you like to filter some contributions out of a great number the filter
functions will do a good job.
These filters are available:
• Participants – filter out contributions of one or some participants
• Cards – filter out contributions of one or some types
• Date – filter out contributions that have been created or modified in a
specified time interval
Participants
filter
1. Call the Extras – Filter/Sort… command.
Example: Contributions of Anna and Mona will be hidden.
2. Select the Participants tab.
3. Click the Enable Filter option.
4. Decide whose contributions you like to show and whose contributions you
like to hide.
5. Occasionally use the Enable All or Disable All buttons. With these buttons
you enable or disable all filters (Participants, Cards, and Date) with only
one click.
6. Click OK to let the filter work on your map.
Watch the status line at the bottom of the Digalo window. If one or more
filters are enabled you see a red indicator Filters active.
continued on next page
Digalo-Users-Manual-v2.1-040204.doc (04.02.2004)
40
Filter functions, continued
Cards filter
1. Call the Extras – Filter/Sort… command.
Example: Contributions of type Explanation and Information
will be hidden.
2. Select the Cards tab.
3. Click the Enable Filter option.
4. Decide which kind of contributions you like to show and which kinds of
contributions you like to hide.
5. Occasionally use the Enable All or Disable All buttons. With these buttons
you enable or disable all filters (Participants, Cards, and Date) with only
one click.
6. Click OK to let the filter work on your map.
Watch the status line at the bottom of the Digalo window. If one or more
filters are enabled you see a red indicator Filters active.
continued on next page
Digalo-Users-Manual-v2.1-040204.doc (04.02.2004)
41
Filter functions, continued
Date filter
1. Call the Extras – Filter/Sort… command.
Example: Only contributions that have been created
between 18 Jan 04 and 21 Jan 04 will be displayed.
2. Select the Date tab.
3. Click the Enable Filter option.
4. Select Creation Date or Modification Date as a filter basis.
5. Enter a Begin and/or and End date for your filter.
6. Occasionally use the Enable All or Disable All buttons. With these buttons
you enable or disable all filters (Participants, Cards, and Date) with only
one click.
7. Click OK to let the filter work on your map.
Watch the status line at the bottom of the Digalo window. If one or more
filters are enabled you see a red indicator Filters active.
continued on next page
Digalo-Users-Manual-v2.1-040204.doc (04.02.2004)
42
Filter functions, continued
Disable filters
1. Call the Extras – Filter/Sort… command.
2. Select the filter tab you like to disable.
3. Click the Disable Filter option.
With this click you disable the filter visible in the current tab window.
Maybe other filters are still enabled.
4. Occasionally use the Enable All or Disable All buttons. With these buttons
you enable or disable all filters (Participants, Cards, and Date) with only
one click.
5. Click OK to return to your map.
Watch the status line at the bottom of the Digalo window. If one or more
filters are still enabled you see a red indicator Filters active.
Digalo-Users-Manual-v2.1-040204.doc (04.02.2004)
43
View functions
Information
You may decide which additional information will be displayed with a
contribution on the map.
Remember: These settings refer to the local view on the map only. You
decide which information you see on your screen, and another participant like
to see other information on the screen.
Tooltips
The tooltips are popup infos displaying the title of a contribution if the mouse
remains for more than a second over a contribution. This is not needed if you
can reed all titles very well. The tooltips are very useful if you zoom out and
cannot reed the titles any more.
Moving the mouse over a contribution will show the title in readable tooltip at
the mouse position.
Right-clicking on a contribution will display the contributions comment at the
mouse position.
1.
Call the Extras – Tooltips command.
2. Select whether you like to see the tooltips or not.
3. Right-click on a contribution and you will see the comment lines.
continued on next page
Digalo-Users-Manual-v2.1-040204.doc (04.02.2004)
44
View functions, continued
Overview
window
If you have a very large map and want to get an
overview you may call the overview window.
In this little window you see all the map in a
very small scale.
Call the Extras – Show Overview command to
get the overview window..
Click the close box on the overview window to
close it.
View options
1. Call the Extras – View Settings… command.
2. Select the options you prefer.
Contribution
number
M = Modified indicator
N = New indicator
Usersymbol
Digalo-Users-Manual-v2.1-040204.doc (04.02.2004)
45
Replay function
Replay a
session
1. Call the Extras – Replay… command.
(Facilitator)
2. Modify the speed (recommended if replay contains more than 100 frames.
Maximum speed is 100 ms per frame (i.e. 10 frames per second).
3. Click the start button to replay the “film”.
4. Use the -1 or +1 buttons to click from frame to frame.
5. Use the slide bar to move manually to a certain frame.
Remember: When there is a long pause in the replay it is likely that this was
caused by floor taking and releasing. The replay can be paused so that
everyone can look at a particular shape and its content considered more fully
with the class.
Digalo-Users-Manual-v2.1-040204.doc (04.02.2004)
46
Grid function
Information
In larger discussions it may be useful to have a grid for structuring a
discussion.
The grid in Digalo is like a table function. A grid will be drawn on the screen.
The size of the grid will be defined in pixel format. The grid is like a
background picture with no automated influence on the map. If a background
picture is available the grid will be visible over the picture.
Create a grid
Select the Edit – Configuration command and select the Grid tab.
(Facilitator)
1. Enable the Grid feature (initially the grid feature is disabled).
2. Enter the Width and Height (in pixel format) for the grid.
3. Enter the number of rows and Columns for the grid.
The grid with thin lines will be positioned in the top left corner of the map.
Use the grid
Aggregate contributions in grid cells if appropriate.
Digalo-Users-Manual-v2.1-040204.doc (04.02.2004)
47
Background picture
Information
If you like a background picture for your discussion you may import one.
The picture format should be .GIF or .JPG.
Remember: Transferring a background picture over the Internet will consume
some time and may slow down the communication while opening a map.
Also, exchanging of a background picture will need some time for
distribution to all online clients. The smaller the picture the faster the transfer.
Install a
background
picture
1. Call the Graph – Background – Image… command.
2. Select any picture stored on your local PC.
Example: Map with a background picture and a grid
Digalo-Users-Manual-v2.1-040204.doc (04.02.2004)
48