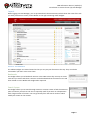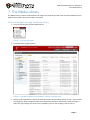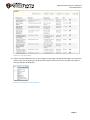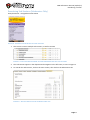
1
CMS Information Sheets (16/02/15) Contents CMS Information Sheets – Contents 1.0 Introduction to Terminal Four (T4) Site Manager 2.0 Creating a Section (Moderators Only) 2.1 Creating a Link Section (Moderators Only) 2.2 Moving and Deleting Sections (Moderators Only) 2.3 Previewing Sections 3.0 Adding Content 3.1 Adding Content – Essential Content 3.2 Adding Content – Optional Content 3.3 Adding Content – Reusing Existing Content 4.0 Editing Content 4.1 Editing Content – Formatting Text 4.2 Editing Content – Inserting Links 4.3 Editing Content – Inserting Images 4.4 Editing Content – Inserting Tables 4.5 Editing Content – Inserting Links to Documents 5.0 Moving and Deleting Content 6.0 Approving Content (Moderators Only) 7.0 The Media Library 8.0 Reordering a Section Appendix 1: Style Guide Page 1 CMS Information Sheets (21/02/14) CMS Information Sheet 1 (16/02/15) Introduction to Terminal Four (T4) Site Manager 1. Introduction to T4 Site Manager What is T4 Site Manager? T4 (Terminal Four) Site Manager is the Content Management System which is we use at Aberystwyth University (AU). Site Manager is used to create, review and publish content to the AU website. We use a Content Management System in order to separate the structure and look of the pages from the content within the pages. It also means that you don’t need to know html to create or work on web pages here. Access to T4 Site Manager Site Manager is accessed through a web interface at https://cms.aber.ac.uk/. Log in using your usual AU username and password. The preferred web browser for accessing the CMS is Firefox, but the system works on any browser. Users Users of Site Manager are assigned to edit different areas of the site. For each department there may be several site editors called “Moderators” and there may be other site editors called “Contributors”. Moderators and Contributors have different levels of permissions within their departments. Moderators can create and work with sections and content, whereas Contributors can only create and work with content. Page 1 CMS Information Sheet 1 (16/02/15) Introduction to Terminal Four (T4) Site Manager Layout When logging into Site Manager, you are presented with the Site Structure which shows the areas of the site you have permission to access, and a sidebar on the right containing useful widgets. FIGURE 1 ‐ SITE MANAGER The sidebar widgets can moved around so that you can put your favourite at the top. They can also be minimised if you don’t want to see them. Bookmarks This widget allows you to bookmark sections in the CMS so that they are easy to access next time you wish to edit them. Sections can be bookmarked via the section menu and then clicked on in the Bookmarks widget when required. Search System This widget allows you to search through section or content names to find the section or piece of content you wish to edit. This is especially useful if you work on a department with a large number of sections. You can go directly from the search results to either modify the section or the content. Page 2 CMS Information Sheet 1 (16/02/15) Introduction to Terminal Four (T4) Site Manager Scheduled and Running Publishes This widget keeps you updated as to when the next scheduled publish will be running. This allows you to see at a glance when your work will get published and what time you should aim for if you wish to get it published as soon as possible. Transfer Times This widget keeps you updated as to when the next scheduled transfer will be running. This allows you to see at a glance when your work will be live, and what time you should aim to have it published by if you want to get it live as soon as possible. Approval List (see Information Sheet 6 for more information on approval) This widget allows you to see your approval list (all content that is awaiting approval in sections you have permission to edit in – not just your content) without having to visit the main approval page. This gives you a visual reminder to approve content you’ve worked on and helps to avoid pending content getting forgotten about and never going live. The main approval page is still available from the Content menu. Last Modified Content This widget allows you to see what content has been worked on recently in sections you have permission to edit in. This can be useful if you are working in a department where there are several people working in the same area as you will be able to see which pages have been recently edited. Page 3 CMS Information Sheet 1 (16/02/15) Introduction to Terminal Four (T4) Site Manager Site Structure The site is organised into a tree‐like structure made up of sections and sub‐sections. Within sections is content as well as any sub‐sections. Terminology may be used which refers to parent sections and child sections depending on their location within the structure. In the example in Figure 1, the section ‘Test Department’ is the parent of the section ‘Staff List’, and the section ‘Dr Joe Bloggs’ is the child of the section ‘Staff List’. Parent of ‘Staff List’ Child of ‘Staff List’ FIGURE 2 ‐ SITE MANAGER H IERARCHY You can get back to the Site Structure at any time by clicking on the T4 logo in the top left of the screen. Creating Web Pages A web page is made of a section and content within it. To create a web page on your site, you can create a section (Moderators only) and add to it the content that you wish to be displayed on the page. Each page should have at least one block of content to hold the main text of the page, as well as contact information, and metadata – See information Sheet 3. Editing Content All editing is done through web based forms, using a WYSIWYG (What You See Is What You Get) editor. See Information Sheet 4. The Editor is not fully WYSIWYG as styling may be applied to content when previewed or viewed on the main website. Previewing your work When you create or edit a section in Site Manager, it is possible to preview it to see how it looks. There is a limited preview available from the content editing pages, but it may not look exactly like the final page. There is also a better preview available from the site structure view’s section menu – see Information Sheet 2.3. After content has been approved and published you can check how it looks on the staging server at http://cmspreview.aber.ac.uk/en/ (English version) or http://cmspreview.aber.ac.uk/cy/ (Welsh version). Version Control All versions of content created and edited within Site Manager are stored. This enables administrators to roll back content to a previous version if required. It is also possible to see which user made which change and when. Languages Site Manager is set up to use English and Welsh. Each piece of content should have an English version and a Welsh version. It is possible to change the interface itself to use Welsh by clicking on your user id in the top Page 4 CMS Information Sheet 1 (16/02/15) Introduction to Terminal Four (T4) Site Manager right of the CMS screen and changing the setting “TERMINALFOUR Site Manager User Interface Language” to Welsh. Documentation These documents are available on the Web Services website and that is the place you should go for up to date versions – check the date at the top of your paper copy with the dates on the website. http://www.aber.ac.uk/en/web/support/documentation/manual/ Help If you need help, you’ll get the quickest response by emailing [email protected]. This address is checked by four people who are all CMS administrators. If you want to speak to someone over the telephone, our central number is 1776. Jargon Buster URI = Universal Resource Indicator. Loosely, this is the path part of a URL (web address). For example, in the URL http://www.aber.ac.uk/en/undergrad/visit/, the URI is the section after the host name ‐ /en/undergrad/visit. Page 5 CMS Information Sheets (21/02/14) CMS Information Sheet 2 (16/02/15) Creating a Section (Moderators Only) 2. Creating a Section (Moderators Only) 1. A new section can be added at the top level of your Department (or area of the AU web site) or it can be added as a sub‐section of an existing section. 2. From the Site Structure view, find the section where you wish to work. 3. Put your mouse on the arrow to the right of the section you have chosen and the section menu will appear. Choose Add Section. FIGURE 1 – THE SECTION MENU 4. The Enter Details page will appear FIGURE 2 – THE ENTER DETAILS PAGE 5. Insert a name for the section. This name will be used as the page title, and will appear in the site navigation (left menu). Page 1 CMS Information Sheet 2 (16/02/15) Creating a Section (Moderators Only) 6. Insert an Output URI for the section. This will be used in the web address of the section – the CMS will build most of the web address but needs you to specify the last part of the web address for your new section. Note: How to choose an appropriate URI The URI should be lowercase, with spaces replaced by hyphens (‐). The following symbols are not permitted in a URI: !”£$%^*()_{}[]:;@’~<>.,/\| URIs should be “friendly” – i.e. they should make sense to the user and should be easy to type into a computer/device if the user has the web address on a leaflet. Much of the time, your output URI can use the same wording as the section name – e.g. if your section name is Web Services, then your output URI could be web‐services. 7. You may choose to add an SEO key phrase. This can be used as part of an SEO report to see if the page is performing well for this key phrase. 8. If you wish to work on this section without it becoming visible through the site navigation until you are ready, un‐tick the “Show in navigation?” check box. 9. Leave ‘eForm Section?’ unticked. 10. Leave ‘Make this a link section?’ unticked. See Information Sheet 2.1 for more information about link sections. 11. When you have finished, select the Add button at the bottom or top of the page. 12. You will now be able to view your new section within the site structure by expanding the section you created it in. Page 2 CMS Information Sheet 2 (16/02/15) Creating a Section (Moderators Only) Creating the Welsh Version of your section Note: You should only create the Welsh version of your section when you have the Welsh text ready. If you have sent your English text to Translation, wait for it to return before creating the Welsh section. 13. Click on the Language button at the top of the screen and select Cymraeg FIGURE 3 ‐ THE LANGUAGE SELECTOR 14. The Welsh version of the Site Structure page appears: FIGURE 4 ‐ THE WELSH VERSION OF THE SITE STRUCTURE 15. Find the section you just added. It will be called Not translated as the Welsh title has not been set. Click on the words Not translated to open the section for editing. Note: If there are lots of new sections which haven’t had their Welsh title set, it can be hard to find the right one that you need to work on – move your mouse over the words Not translated and a small box containing the English title of the page will appear. 16. The General Information about the section page will appear: Page 3 CMS Information Sheet 2 (16/02/15) Creating a Section (Moderators Only) FIGURE 5 ‐ THE WELSH VERSION OF THE M ODIFY SECTION, SHOW DETAILS PAGE 17. Add the name of the section – this should be the Welsh equivalent of the English Name. Type the same URI as you had in your English version into the Output URI box. Click on Update to save this change. 18. You will now be able to view your Welsh section within the site structure. 19. At this point you can prepare to add content to your section. See Information Sheets 3 to 3.3 for more information on content. NB. All new sections inherit styles from their parents. Depending on the section settings, if your new section’s parent is the top level page for your department, it may inherit the special style used on this page. This can only be changed by a CMS Administrator – please contact [email protected]. Page 4 CMS Information Sheet 2.1 (16/02/15) Creating a Link Section (Moderators Only) 2.1. Creating a Link Section (Moderators Only) Link sections can be used to add an item to your department’s navigation that is not actually within your department. Instead of being a section to which you add content to create a page, this section will merely direct to user to the web page of your choice. For example, many of the links in the menu on The University page (see image on the right) are link sections which take the user out of The University section. There are 2 types of link section – one is linking to a section within the CMS (in your department/area or elsewhere); the other is linking to a site outside of the CMS (this could be an AU site that is not yet in the CMS, or an external site) Link Section – within the CMS 1. From the Site Structure view, find the section where you wish to work. 2. Click on the arrow to the right of the section you have chosen and the section menu will appear. Choose Add Section. 3. The Enter Details page will appear FIGURE 1 – THE ENTER DETAILS ‘GENERAL’ TAB 4. Insert a name for the section. This name will appear in the site navigation (left menu). 5. Tick the ‘Make this a link section’ box. 6. Click on the Details tab. Page 1 CMS Information Sheet 2.1 (16/02/15) Creating a Link Section (Moderators Only) FIGURE 2 – INFORMATION ABOUT THIS LINK SECTION SCREEN 7. In the Link type line, select ‘Section’. 8. Click on the Select box in the Link Section line and a site structure window will pop up. Click on the section you wish to link to. 9. Click on Add to finish. 10. You will be returned to the site structure page, where you will see the internal section link icon next to the section name. Creating the Welsh Version of your link section Note: You shouldn’t create the Welsh version of your link section if the rest of your site doesn’t have Welsh pages yet. If you have sent your English text to Translation, wait for it to have been added to the site before creating the Welsh link section. 11. Click on the Language button at the top of the screen and select Cymraeg. The Welsh version of the site structure page appears. 12. Find the link section you just added. It will be called Not translated as the Welsh title has not been set but you should see the internal section link icon next to it. Click on the words Not translated to open the section for modifying. Note: If there are lots of new sections which haven’t had their Welsh title set, it can be hard to find the right one that you need to work on – move your mouse over the words Not translated and a small box containing the English title of the page will appear. 13. The Welsh version of the link section modifying screen will appear. 14. In the Link type line, select ‘Section’. 15. Click on the Select box in the Link Section line and a site structure window will pop up. Click on the section you wish to link to. 16. Click on the General tab and enter the Welsh translation of the name of the section. 17. Click Update to finish. 18. You will be returned to the site structure page, where you will see the internal section link icon next to the section name. Page 2 CMS Information Sheet 2.1 (16/02/15) Creating a Link Section (Moderators Only) Link Section – outside of the CMS 1. From the Site Structure view, find the section where you wish to work. 2. Click on the arrow to the right of the section you have chosen and the section menu will appear. Choose Add. (see Figure 1, above) 3. The Enter Details page will appear (see Figure 2, above) 4. Insert a name for the section. This name will appear in the site navigation. 5. Tick the ‘Make this a link section’ box. 6. Click on the Details tab. The ‘Information about this link section’ screen appears. (See Figure 3, above) 7. In the Link type line, select ‘External URL’. 8. Type or paste the URL to link to in the ‘Link URL’ box. 9. Click Add to finish. 10. You will be returned to the site structure page, where you will see external section link icon next to the section name. Creating the Welsh Version of your link section Note: You shouldn’t create the Welsh version of your link section if the rest of your site doesn’t have Welsh pages yet. If you have sent your English text to Translation, wait for it to have been added to the site before creating the Welsh link section. 19. Click on the Language button at the top of the screen and select Cymraeg. The Welsh version of the site structure page appears. 20. Find the link section you just added. It will be called Not translated as the Welsh title has not been set but you should see the internal section link icon next to it. Click on the words Not translated to open the section for modifying. Note: If there are lots of new sections which haven’t had their Welsh title set, it can be hard to find the right one that you need to work on – move your mouse over the words Not translated and a small box containing the English title of the page will appear. 21. The Welsh version of the link section modifying screen will appear. 22. In the Link type line, select ‘External URL’. 23. Type or paste the URL to link to in the ‘Link URL’ box. 24. Click on the General tab and enter the Welsh translation of the name of the section. 25. Click Update to finish. 26. You will be returned to the site structure page, where you will see the external section link icon next to the section name. Page 3 CMS Information Sheets (21/02/14) CMS Information Sheet 2.2 (16/02/15) Moving and Deleting Sections (Moderators Only) 2.2. Moving and Deleting Sections (Moderators Only) Sections can be moved to new locations in the CMS or deleted if they are no longer needed. This should be done with care. When sections are deleted you will still see them in the CMS marked as inactive until the CMS Recycle Bin is emptied by an administrator. Moving and deleting a section affects both the English and Welsh versions of the section. It is possible to create section in your site (hidden from menus) that is used as storage for deleted items. This allows you to unclutter your area. Call this section ‘BIN’ so that it is easily distinguishable. It is also possible to create a further section (hidden from menus) to be used as an archive where you can store items that you wish to remove but may need later. Call this section ‘ARCHIVE’ so that it is easily distinguishable. Moving a section 1. In Site Structure view, find the section you wish to move. 2. Click and hold your mouse on the section and drag it to the new location. The section you are dragging will have a yellow background and as you drag it over other sections they will highlight in blue. When the correct section is highlighted in blue, let go of the mouse. FIGURE 1 ‐ SECTION BEING DRAGGED OVER ANOTHER SECTION 3. A pop up will appear asking you if you are sure – click OK FIGURE 2 ‐ POP UP CONFIRMATION OF MOVE 4. You will now see your section in its new location in the Site Structure. Page 1 CMS Information Sheet 2.2 (16/02/15) Moving and Deleting Sections (Moderators Only) Deleting a section 1. In Site Structure view, find the section you wish to delete. 2. Put your mouse on the arrow to the right of the section you have chosen and the section menu will appear. Choose Delete Section. 3. A pop up will appear asking you if you are sure – click OK. FIGURE 3 ‐ POP UP CONFIRMATION OF DELETION 4. You will now see your section highlighted in red in the site structure – this indicates that it has been marked for deletion and will no longer be published. FIGURE 4 ‐ SITE STRUCTURE SHOWING DELETED SECTION 5. If the section that you are deleted was linked to from other sections of the site, you will be warned and shown a list of sections that link here. Please be sure that you update any sections you have permission to access and inform those responsible if you don’t have permission to update them yourself. Page 2 CMS Information Sheet 2.3 (16/02/15) Previewing Sections 2.3. Previewing Sections Sections can be previewed so that you can check how your page looks and functions. You should always preview your page before approving content. Previewing a Section 1. From the Site Structure view, find the section that you wish to preview. 2. Put your mouse on the arrow to the right of the section you have chosen and the section menu will appear: 3. Choose Preview Section 4. The preview of the page will open in a new window (or tab). 5. If the preview doesn’t appear: In Firefox: check at the top of your browser window for a message saying “Firefox prevented this site from opening a popup window”. Click on the Options button on the right and options will appear: Click on “Allow popups for cms.aber.ac.uk”. Retry your preview and it should now work correctly. In Chrome: check at the end of the browser address bar for a message saying “Pop‐up Blocked”. Page 1 CMS Information Sheet 2.3 (16/02/15) Previewing Sections Click on the message and options will appear: Select “Always allow pop‐ups from cms.aber.ac.uk” and click Done. Retry your preview and it should work correctly. 6. Check that the preview looks as you would expect. 7. Click on the links to make sure that they go where you expect them to 8. If you find there are things you need to change, you can leave this preview window/tab open so you can come back to it after making changes. 9. After making any necessary changes, click Update to save the content before refreshing the preview window/tab so that you will be able to see the changes there. You can refresh the page by clicking on the refresh button which is usually on the left or right of the browser address bar. Alternatively pressing the F5 key on your keyboard will refresh the page. 10. When you are happy with the preview of the section, you can proceed to approving the content. Please see Information Sheet 6 for more information on the Approval process. Page 2 CMS Information Sheet 3 (16/02/15) Adding Content 3. Adding Content Essential Content – see Information Sheet 3.1 The following pieces of content are essential and should be used in every section of the site in order to produce fully functioning web pages. General Content. This piece of content is where the main web page text is located. It is essential unless you have an alternative piece of content where the main text of the web page is held, e.g. the Academic Staff Profile. Contact Block. This piece of content contains the contact details relevant to the web page. On the web page the Contact Block is displayed at the bottom of the page. Meta Data. This piece of content contains information about the web page. This information is used by search engines to index pages appropriately. Optional Content – see Information Sheet 3.2 Related Links Related links appear under the left hand menu on your page and are designed to allow users to quickly access pages which are related to the current page. Academic Staff Profile This piece of content allows the creation of standard staff information pages. Non‐Academic Staff Profile This piece of content allows the creation of standard non‐academic staff information pages – it leaves out things like teaching and research areas. Student Profile This piece of content allows the creation of highlighted blocks of text within a page giving a quote and information from a student, usually regarding a course, a department, or an aspect of university life. There are other types of optional content for advanced users. Please ask for more information if you would like to find out more, or look at the Advanced Information Sheets on our website: http://www.aber.ac.uk/en/web/support/documentation/manual/ CMS Information Sheet 3 (16/02/15) Adding Content Reusing Content – see Information Sheet 3.3 It is possible to reuse existing content by mirroring or duplicating it from one section to another. See Information Sheet 3.3 for more information. Timeout When editing content, you should be aware of the system timeout. If you leave your edit window unused for a certain amount of time, a timeout will occur and your work could be lost. If you need to leave your work when you haven’t finished with it, remember to click on Add or Update to save what you have done so far. If you are still at your computer when the timeout occurs you will see a pop up message: FIGURE 1 ‐ THE TIMEOUT POP UP Click on OK to keep your content open for editing. Click on Cancel if you have finished and haven’t made any changes that need to be saved. CMS Information Sheet 3.1 (16/02/15) Adding Content – Essential Content 3.1. Adding Content – Essential Content General Content Note: This piece of content is essential unless you have an alternative piece of content where the main text of the web page is held, e.g. the Academic Staff Profile. If you are using an alternative piece of content for the main text of the page, you may leave out the General Content. 1. Open the Site Structure and browse to the section you want to add content to. Click on the name of the section to open it for editing. 2. The ‘Modify Section, Show Details’ page appears. Click on the ‘Content’ tab. (Contributors go directly to the ‘Content’ tab). FIGURE 1 ‐ THE MODIFY SECTION, SHOW DETAILS PAGE 3. Click on the ‘Add Content’ button on the right. 4. The ‘Choose Content Type to Use’ page appears – click on ‘General Content’ in the list under ‘Description of available Content Types’. FIGURE 2 – THE CHOOSE A CONTENT TYPE MENU 5. The General Content Content Type will now appear. Page 1 CMS Information Sheet 3.1 (16/02/15) Adding Content – Essential Content FIGURE 3 – THE GENERAL CONTENT EDITING PAGE 6. Insert a name for your new content in the Name box. This isn’t seen by people using the web site, but it is important that you choose something that will make sense to other CMS users. 7. Give your content a Main Heading by entering it into the Title box. This will be displayed as a Heading 1 by the CMS. 8. Add the main text of the page in the Body box using the HTML Editor. See Information Sheets 4 to 4.4 for more information on using the HTML Editor. Note: Please refer to the Content Web Pages section of the Web Site Style Guidelines for guidance on how to arrange your page content. 9. To preview your page click on the Preview button at the top or bottom of the page. Note: This preview will only gives an approximate idea what your page will look like. A better way to preview your page is to wait until you are finished and choose preview from the section menu on the site structure page. 10. When you have finished adding content click on the Add button or click on the right end of the button to select Save as Draft if you are going to come back to this piece of content later. 11. You will be returned to the Content tab, where you can see your newly added content listed along with any other content that you have added to this section. Page 2 CMS Information Sheet 3.1 (16/02/15) Adding Content – Essential Content FIGURE 4 – THE SHOW CONTENT PAGE 12. You will notice that the content appears with the Status ‘Pending’ or ‘Draft’. Pending content needs to be approved before being published. See Information Sheet 6 for more information on approval (Moderators only). Draft content will not enter the approval process – you can continue to edit it and when you are ready for it to enter the approval process you will be able to click the Update button to save it. Creating the Welsh Version of your General Content Note: You should only create the Welsh version of your content when you have the Welsh text ready. If you have sent your English text to Translation, wait for it to return before creating the Welsh content. 13. Click on the Language button at the top of the screen and select Cymraeg. FIGURE 5 ‐ THE LANGUAGE SELECTOR 14. The Welsh version of the section’s Show Details page appears. Click on the Content tab. (Contributors go directly to the ‘Content’ tab). Note: If you are returned to the Site Structure, click on the section you were working on and then click on the Content tab to get back to the list of content 15. The Name of the content appears as Not translated, as it hasn’t yet been named in Welsh. Click on the arrow to the right of the piece of content and select Modify. Note: If there are lots of new pieces of content which haven’t had their Welsh title set, it can be hard to find the right one that you need to work on – move your mouse over the words Not translated and a small box containing the English title of the content will appear. Page 3 CMS Information Sheet 3.1 (16/02/15) Adding Content – Essential Content 16. Insert a name for your content – this can be in English or Welsh depending on your preference. This isn’t seen by people using the web site, but it is important that you choose something that will make sense to other CMS users. 17. Give your content a Main Heading by entering it into the Title box. This should be the Welsh translation of the English Main Heading. 18. Add main text of the page in the Body box using the HTML Editor. This should be the Welsh translation of the English Body text. 19. When you have finished adding content click on the Update button or click on the right end of the button to select Save as Draft if you are going to come back to this piece of content later. 20. You will be returned to the Content tab, where you can see your newly updated Welsh content listed along with any other content that you have added to this section. It is no longer named Not translated. 21. You will notice that the content appears with the Status ‘Pending’ or ‘Draft’. Pending content needs to be approved before being published. See Information Sheet 6 for more information on approval (Moderators only). Draft content will not enter the approval process – you can continue to edit it and when you are ready for it to enter the approval process you will be able to click the Update button to save it. Page 4 CMS Information Sheet 3.1 (16/02/15) Adding Content – Essential Content Contact Block Note: The Contact Block is likely to be used around your site on many pages – you can use one piece of content in many different places by “mirroring” the content – see Information Sheet 3.3 for more information on reusing content. 1. Open the Site Structure and browse to the section you want to add content to. Click on the name of the section to open it for editing. 2. The ‘Modify Section, Show Details’ page appears. Click on the ‘Content’ tab. (Contributors go directly to the ‘Content’ tab). FIGURE 6 ‐ THE MODIFY SECTION, SHOW DETAILS PAGE 3. Click on the ‘Add Content’ button on the right. 4. The ‘Choose Content Type to Use’ page appears – click on ‘Contact Block’ in the list under ‘Description of available Content Types’. FIGURE 7 ‐ THE CHOOSE A CONTENT TYPE MENU 5. The Contact Block Content Type will now appear. Page 5 CMS Information Sheet 3.1 (16/02/15) Adding Content – Essential Content FIGURE 8 ‐ THE CONTACT BLOCK EDITING PAGE 6. Insert a name for your new content in the Name box. This isn’t seen by people using the web site, but it is important that you choose something that will make sense to other CMS users. 7. Fill in as many of the boxes as possible so that you provide users with all the options they need for contacting the department. 8. When you have finished adding content click on the Add button or click on the right end of the button to select Save as Draft if you are going to come back to this piece of content later. 9. You will be returned to the Content tab, where you can see your newly added content listed along with any other content that you have added to this section. FIGURE 9 ‐ THE SHOW CONTENT PAGE 10. You will notice that the content appears with the Status ‘Pending’ or ‘Draft’. Pending content needs to be approved before being published. See Information Sheet 6 for more information on approval (Moderators only). Draft content will not enter the approval process – you can continue to edit it and when you are ready for it to enter the approval process you will be able to click the Update button to save it. Page 6 CMS Information Sheet 3.1 (16/02/15) Adding Content – Essential Content Creating the Welsh Version of your Contact Block Note: You should only create the Welsh version of your content when you have the Welsh text ready. If you have sent your English text to Translation, wait for it to return before creating the Welsh content. 11. Click on the Language button at the top of the screen and select Cymraeg. FIGURE 10 ‐ THE LANGUAGE SELECTOR 12. The Welsh version of the section’s Show Details page appears. Click on the Content tab. (Contributors go directly to the ‘Content’ tab). Note: If you are returned to the Site Structure, click on the section you were working on and then click on the Content tab to get back to the list of content 13. The Name of the content appears as Not translated, as it hasn’t yet been named in Welsh. Click on the arrow to the right of the piece of content and select Modify. Note: If there are lots of new pieces of content which haven’t had their Welsh title set, it can be hard to find the right one that you need to work on – move your mouse over the words Not translated and a small box containing the English title of the content will appear. 14. Insert a name for your content – this can be in English or Welsh depending on your preference. This isn’t seen by people using the web site, but it is important that you choose something that will make sense to other CMS users. 15. Fill in as many of the boxes as possible, in Welsh, so that you provide users with all the options they need for contacting the department. 16. When you have finished adding content click on the Update button or click on the right end of the button to select Save as Draft if you are going to come back to this piece of content later. 17. You will be returned to the Content tab, where you can see your newly updated Welsh content listed along with any other content that you have added to this section. It is no longer named Not translated. 18. You will notice that the content appears with the Status ‘Pending’ or ‘Draft’. Pending content needs to be approved before being published. See Information Sheet 6 for more information on approval (Moderators only). Draft content will not enter the approval process – you can continue to edit it and when you are ready for it to enter the approval process you will be able to click the Update button to save it. Page 7 CMS Information Sheet 3.1 (16/02/15) Adding Content – Essential Content Meta Data 1. Open the Site Structure and browse to the section you want to add content to. Click on the name of the section to open it for editing. 2. The ‘Modify Section, Show Details’ page appears. Click on the ‘Content’ tab. (Contributors go directly to the ‘Content’ tab). FIGURE 11 ‐ THE MODIFY SECTION, SHOW DETAILS PAGE 3. Click on the ‘Add Content’ button on the right. 4. The ‘Choose Content Type to Use’ page appears – click on ‘Meta Data’ in the list under ‘Description of available Content Types’. FIGURE 12 ‐ THE CHOOSE A CONTENT TYPE MENU Page 8 CMS Information Sheet 3.1 (16/02/15) Adding Content – Essential Content 5. The Meta Data Content Type will now appear. FIGURE 13 ‐ THE META DATA EDITING PAGE 6. Insert a name for your new content in the Name box. This isn’t seen by people using the web site, but it is important that you choose something that will make sense to other CMS users. 7. Insert Meta Authors – e.g. ‘Aberystwyth University Web Team’ 8. Insert Meta Description – e.g. ‘IBERS News Page’ 9. Insert Meta Keywords – e.g. ‘IBERS, Biology, Rural, Aberystwyth, University, AU, Institute, Biological, Environmental, Sciences, News’ 19. When you have finished adding content click on the Add button or click on the right end of the button to select Save as Draft if you are going to come back to this piece of content later. 10. You will be returned to the Content tab, where you can see your newly added content listed along with any other content that you have added to this section. Page 9 CMS Information Sheet 3.1 (16/02/15) Adding Content – Essential Content FIGURE 14 ‐ THE SHOW CONTENT PAGE 11. You will notice that the content appears with the Status ‘Pending’ or ‘Draft’. Pending content needs to be approved before being published. See Information Sheet 6 for more information on approval (Moderators only). Draft content will not enter the approval process – you can continue to edit it and when you are ready for it to enter the approval process you will be able to click the Update button to save it. Creating the Welsh Version of your Meta Data Note: You should only create the Welsh version of your content when you have the Welsh text ready. If you have sent your English text to Translation, wait for it to return before creating the Welsh content. 12. Click on the Language button at the top of the screen and select Cymraeg. (Contributors go directly to the ‘Content’ tab). FIGURE 15 ‐ THE LANGUAGE SELECTOR 20. The Welsh version of the section’s Show Details page appears. Click on the Content tab. Note: If you are returned to the Site Structure, click on the section you were working on and then click on the Content tab to get back to the list of content 21. The Name of the content appears as Not translated, as it hasn’t yet been named in Welsh. Click on the arrow to the right of the piece of content and select Modify. Note: If there are lots of new pieces of content which haven’t had their Welsh title set, it can be hard to find the right one that you need to work on – move your mouse over the words Not translated and a small box containing the English title of the content will appear. Page 10 CMS Information Sheet 3.1 (16/02/15) Adding Content – Essential Content 13. Insert a name for your content – this can be in English or Welsh depending on your preference. This isn’t seen by people using the web site, but it is important that you choose something that will make sense to other CMS users. 14. Insert Meta Authors in Welsh – e.g. ‘Tim We Prifysgol Aberystwyth’ 15. Insert Meta Description in Welsh – e.g. ‘Tudalen Newyddion IBERS’ 16. Insert Meta Keywords in Welsh – e.g. ‘IBERS, Bioleg, Gwledig, Aberystwyth, Prifysgol, PA, Sefydliad, Biolegol, Amgylcheddol, Gwyddorau’ 17. When you have finished adding content click on the Update button or click on the right end of the button to select Save as Draft if you are going to come back to this piece of content later. 18. You will be returned to the Content tab, where you can see your newly updated Welsh content listed along with any other content that you have added to this section. It is no longer named Not translated. 19. You will notice that the content appears with the Status ‘Pending’ or ‘Draft’. Pending content needs to be approved before being published. See Information Sheet 6 for more information on approval (Moderators only). Draft content will not enter the approval process – you can continue to edit it and when you are ready for it to enter the approval process you will be able to click the Update button to save it. Page 11 CMS Information Sheets (21/02/14) CMS Information Sheet 3.2 (16/02/15) Adding Content – Optional Content 3.2. Adding Content – Optional Content Contents Related Links 2 Academic Staff Profile 5 Non‐Academic Staff Profile 9 Student Profile 13 Page 1 CMS Information Sheet 3.2 (16/02/15) Adding Content – Optional Content Related Links Related links appear under the left hand menu on your page and are designed to allow users to quickly access pages which are related to the current page. Related Links 1. Open the Site Structure and browse to the section you want to add content to. Click on the name of the section to open it for editing. 2. The ‘Modify Section, Show Details’ page appears. Click on the ‘Content’ tab. (Contributors go directly to the ‘Content’ tab). FIGURE 1 ‐ THE MODIFY SECTION, SHOW DETAILS PAGE 3. Click on the ‘Add Content’ button on the right. Page 2 CMS Information Sheet 3.2 (16/02/15) Adding Content – Optional Content 4. The ‘Choose Content Type to Use’ page appears – click on ‘Related Links’ in the list under ‘Choose a Content Type’. FIGURE 2 – THE CHOOSE A CONTENT TYPE MENU 5. The Related Links Content Type will now appear. FIGURE 3 ‐ RELATED LINKS EDITING PAGE 6. Insert a name for your new content in the Name box. This isn’t seen by people using the web site, but it is important that you choose something that will make sense to other CMS users. 7. In the Links box, create a bulleted list by clicking on the bulleted list button and add the links that you require as bullet points. For more information on adding links, see section 4.2. 8. When you have finished adding content click on the Add button or click on the right end of the button to select Save as Draft if you are going to come back to this piece of content later. 9. You will be returned to the Content tab, where you can see your newly added content listed along with any other content that you have added to this section. 10. You will notice that the content appears with the Status ‘Pending’ or ‘Draft’. Pending content needs to be approved before being published. See Information Sheet 6 for more information on approval (Moderators only). Draft content will not enter the approval process – you can continue to edit it and when you are ready for it to enter the approval process you will be able to click the Update button to save it. Page 3 CMS Information Sheet 3.2 (16/02/15) Adding Content – Optional Content Creating the Welsh Version of your Related Links Note: You should only create the Welsh version of your content when you have the Welsh text ready. If you have sent your English text to Translation, wait for it to return before creating the Welsh content. 11. Click on the Language button in the top of the screen and select Cymraeg. 12. The Welsh version of the section’s Show Details page appears. Click on the Content tab. Note: If you are returned to the Site Structure, click on the section you were working on and then click on the Content tab to get back to the list of content 13. The Name of the content appears as Not translated, as it hasn’t yet been named in Welsh. Click on the arrow to the right of the piece of content and select Modify. Note: If there are lots of new pieces of content which haven’t had their Welsh title set, it can be hard to find the right one that you need to work on – move your mouse over the words Not translated and a small box containing the English title of the content will appear. 14. The Welsh version of the Related Links editing page appears. 15. Insert a name for your content – this can be in English or Welsh depending on your preference. This isn’t seen by people using the web site, but it is important that you choose something that will make sense to other CMS users. 16. Insert the Welsh text you wish to appear as the title of the links column in the Title box – this should be the Welsh translation of the English title. 17. In the Links box, create a bulleted list by clicking on the bulleted list button and add the links, in Welsh, that you require as bullet points. For more information on adding links, see section 4.2. 18. When you have finished adding content click on the Update button or click on the right end of the button to select Save as Draft if you are going to come back to this piece of content later. 19. You will be returned to the Content tab, where you can see your newly updated Welsh content listed along with any other content that you have added to this section. It is no longer named Not translated. 20. You will notice that the content appears with the Status ‘Pending’ or ‘Draft’. Pending content needs to be approved before being published. See Information Sheet 6 for more information on approval (Moderators only). Draft content will not enter the approval process – you can continue to edit it and when you are ready for it to enter the approval process you will be able to click the Update button to save it. Page 4 CMS Information Sheet 3.2 (16/02/15) Adding Content – Optional Content Academic Staff Profile FIGURE 4 ‐ EXAMPLE OF AN ACADEMIC STAFF PROFILE 1. Open the Site Structure and browse to the section you want to add content to. Click on the name of the section to open it for editing. 2. The ‘Modify Section, Show Details’ page appears. Click on the ‘Content’ tab. (Contributors go directly to the ‘Content’ tab). FIGURE 5 ‐ THE MODIFY SECTION, SHOW DETAILS PAGE 3. Click on the ‘Add Content’ button on the right. Page 5 CMS Information Sheet 3.2 (16/02/15) Adding Content – Optional Content 4. The ‘Choose Content Type to Use’ page appears – click on ‘Academic Staff Profile’ in the list under ‘Choose a Content Type’. [Note: if you don’t see this Content Type in your list, contact the Web Team on [email protected] or 1776] FIGURE 6 ‐ THE CHOOSE CONTENT TYPE TO USE PAGE 5. The Academic Staff Profile Content Type will now appear. It may take a few moments to finish loading up. It’s best to avoid doing anything until it has finished. FIGURE 7 ‐ THE ACADEMIC STAFF PROFILE EDITING PAGE 6. Insert a name for your new content in the Name box. This isn’t seen by people using the web site, but it is important that you choose something that will make sense to other CMS users. 7. Insert as much information as you can in the boxes: Staff Name*, Staff Job Title*, Staff Qualifications*, Staff Office, Staff Email*, Staff Telephone*, Staff Fax, Staff Personal Web Site, Staff Responsibilities, Staff Teaching Areas, Staff Research Areas, Staff Biography, Staff Links, Staff Additional Information, Staff Publications, Staff Profile. The items marked with a star are compulsory boxes. All other boxes are optional. 8. To upload the photo of the staff member (compulsory), click on Browse to find the photo in your file system. The photo should ideally be 200px square. Page 6 CMS Information Sheet 3.2 (16/02/15) Adding Content – Optional Content Note: Photographs for Academic Staff Profiles are not uploaded into the Media Library before use – you upload them directly from your machine or network drive. If you don’t yet have one for the member of staff you are working on, please use a temporary “silhouette” image which can be obtained from the Web Team. 9. When you have finished adding content click on the Add button or click on the right end of the button to select Save as Draft if you are going to come back to this piece of content later. 10. You will be returned to the Content tab, where you can see your newly added content listed along with any other content that you have added to this section. 11. You will notice that the content appears with the Status ‘Pending’ or ‘Draft’. Pending content needs to be approved before being published. See Information Sheet 6 for more information on approval (Moderators only). Draft content will not enter the approval process – you can continue to edit it and when you are ready for it to enter the approval process you will be able to click the Update button to save it. Creating the Welsh Version of your Academic Staff Profile Notes: Welsh Academic Staff Profiles may not be needed for English‐speaking staff – you should check with your department and the Translation Unit. You should only create the Welsh version of your content when you have the Welsh text ready. If you have sent your English text to Translation, wait for it to return before creating the Welsh content. 12. Click on the Language button in the top of the screen and select Cymraeg. 13. The Welsh version of the section’s Show Details page appears. Click on the Content tab. Note: If you are returned to the Site Structure, click on the section you were working on and then click on the Content tab to get back to the list of content 14. The Name of the content appears as Not translated, as it hasn’t yet been named in Welsh. Click on the arrow to the right of the piece of content and select Modify. Note: If there are lots of new pieces of content which haven’t had their Welsh title set, it can be hard to find the right one that you need to work on – move your mouse over the words Not translated and a small box containing the English title of the content will appear. 15. The Welsh version of the Academic Staff Profile editing page appears. 16. Insert a name for your content – this can be in English or Welsh depending on your preference. This isn’t seen by people using the web site, but it is important that you choose something that will make sense to other CMS users. 17. Insert as much information in Welsh as you can in the boxes: Staff Name*, Staff Job Title*, Staff Qualifications*, Staff Office, Staff Email*, Staff Telephone*, Staff Fax, Staff Personal Web Site, Staff Responsibilities, Staff Teaching Areas, Staff Research Areas, Staff Biography, Staff Links, Staff Additional Information, Staff Publications, Staff Profile. The items marked with a star are compulsory boxes. All other boxes are optional. 18. To upload the photo of the staff member (compulsory), click on Browse to find the photo in your file system. Page 7 CMS Information Sheet 3.2 (16/02/15) Adding Content – Optional Content Note: Photographs for Academic Staff Profiles are not uploaded into the Media Library before use – you upload them directly from your machine or network drive. If you don’t yet have one for the member of staff you are working on, please use a temporary “silhouette” image which can be obtained from the Web Team. 19. When you have finished adding content click on the Update button or click on the right end of the button to select Save as Draft if you are going to come back to this piece of content later. 20. You will be returned to the Content tab, where you can see your newly updated Welsh content listed along with any other content that you have added to this section. It is no longer named Not translated. 21. You will notice that the content appears with the Status ‘Pending’ or ‘Draft’. Pending content needs to be approved before being published. See Information Sheet 6 for more information on approval (Moderators only). Draft content will not enter the approval process – you can continue to edit it and when you are ready for it to enter the approval process you will be able to click the Update button to save it. Page 8 CMS Information Sheet 3.2 (16/02/15) Adding Content – Optional Content Non‐Academic Staff Profile A Non‐Academic Staff Profile is similar to an Academic one, with a few less boxes to fill in. FIGURE 8 ‐ EXAMPLE OF A NON‐ACADEMIC STAFF PROFILE 1. Open the Site Structure and browse to the section you want to add content to. Click on the name of the section to open it for editing. 2. The ‘Modify Section, Show Details’ page appears. Click on the ‘Content’ tab. (Contributors go directly to the ‘Content’ tab). FIGURE 9 ‐ THE MODIFY SECTION, SHOW DETAILS PAGE 3. Click on the ‘Add Content’ button on the right. Page 9 CMS Information Sheet 3.2 (16/02/15) Adding Content – Optional Content 4. The ‘Choose Content Type to Use’ page appears – click on ‘Non‐Academic Staff Profile’ in the list under ‘Choose a Content Type’. [Note: if you don’t see this Content Type in your list, contact the Web Team on [email protected] or 1776] FIGURE 10 ‐ THE CHOOSE CONTENT TYPE TO USE PAGE 5. The Non‐Academic Staff Profile Content Type will now appear. It may take a few moments to finish loading up. It’s best to avoid doing anything until it has finished. FIGURE 11 ‐ THE NON‐ACADEMIC STAFF P ROFILE EDITING PAGE 6. Insert a name for your new content in the Name box. This isn’t seen by people using the web site, but it is important that you choose something that will make sense to other CMS users. 7. Insert as much information as you can in the boxes: Staff Name*, Staff Job Title*, Staff Qualifications, Staff Office, Staff Email*, Staff Telephone*, Staff Fax, Staff Personal Web Site, Staff Responsibilities, Staff Biography, Staff Links, Staff Profile. The items marked with a star are compulsory boxes. All other boxes are optional. 8. To upload the photo of the staff member (compulsory), click on Browse to find the photo in your file system. The photo should ideally be 200px square. Note: Photographs for Non‐Academic Staff Profiles are not uploaded into the Media Library before use – you upload them directly from your machine or network drive. If you don’t yet have one for the member of staff you are working on, please use a temporary “silhouette” image which can be obtained from the Web Team. Page 10 CMS Information Sheet 3.2 (16/02/15) Adding Content – Optional Content 9. When you have finished adding content click on the Add button or click on the right end of the button to select Save as Draft if you are going to come back to this piece of content later. 10. You will be returned to the Content tab, where you can see your newly added content listed along with any other content that you have added to this section. 11. You will notice that the content appears with the Status ‘Pending’ or ‘Draft’. Pending content needs to be approved before being published. See Information Sheet 6 for more information on approval (Moderators only). Draft content will not enter the approval process – you can continue to edit it and when you are ready for it to enter the approval process you will be able to click the Update button to save it. Creating the Welsh Version of your Non‐Academic Staff Profile Note: Welsh Academic Staff Profiles may not be needed for English‐speaking staff – you should check with your department and the Translation Unit. You should only create the Welsh version of your content when you have the Welsh text ready. If you have sent your English text to Translation, wait for it to return before creating the Welsh content. 12. Click on the Language button in the top of the screen and select Cymraeg. 13. The Welsh version of the section’s Show Details page appears. Click on the Content tab. Note: If you are returned to the Site Structure, click on the section you were working on and then click on the Content tab to get back to the list of content 14. The Name of the content appears as Not translated, as it hasn’t yet been named in Welsh. Click on the arrow to the right of the piece of content and select Modify. Note: If there are lots of new pieces of content which haven’t had their Welsh title set, it can be hard to find the right one that you need to work on – move your mouse over the words Not translated and a small box containing the English title of the content will appear. 15. The Welsh version of the Non‐Academic Staff Profile editing page appears. 16. Insert a name for your content – this can be in English or Welsh depending on your preference. This isn’t seen by people using the web site, but it is important that you choose something that will make sense to other CMS users. 17. Insert as much information as you can in the boxes: Staff Name*, Staff Job Title*, Staff Qualifications, Staff Office, Staff Email*, Staff Telephone*, Staff Fax, Staff Personal Web Site, Staff Responsibilities, Staff Biography, Staff Links, Staff Profile. The items marked with a star are compulsory boxes. All other boxes are optional. 18. To upload the photo of the staff member (compulsory), click on Browse to find the photo in your file system. Note: Photographs for Non‐Academic Staff Profiles are not uploaded into the Media Library before use – you upload them directly from your machine or network drive. If you don’t yet have one for the member of staff you are working on, please use a temporary “silhouette” image which can be obtained from the Web Team. 19. When you have finished adding content click on the Update button or click on the right end of the button to select Save as Draft if you are going to come back to this piece of content later. Page 11 CMS Information Sheet 3.2 (16/02/15) Adding Content – Optional Content 20. You will be returned to the Content tab, where you can see your newly updated Welsh content listed along with any other content that you have added to this section. It is no longer named Not translated. 21. You will notice that the content appears with the Status ‘Pending’ or ‘Draft’. Pending content needs to be approved before being published. See Information Sheet 6 for more information on approval (Moderators only). Draft content will not enter the approval process – you can continue to edit it and when you are ready for it to enter the approval process you will be able to click the Update button to save it. Page 12 CMS Information Sheet 3.2 (16/02/15) Adding Content – Optional Content Student Profile Student Profile FIGURE 12 ‐ EXAMPLE OF A STUDENT PROFILE 1. Open the Site Structure and browse to the section you want to add content to. Click on the name of the section to open it for editing. 2. The ‘Modify Section, Show Details’ page appears. Click on the ‘Content’ tab. (Contributors go directly to the ‘Content’ tab). FIGURE 13 ‐ THE MODIFY SECTION, SHOW DETAILS PAGE 3. Click on the ‘Add Content’ button on the right. Page 13 CMS Information Sheet 3.2 (16/02/15) Adding Content – Optional Content 4. The ‘Choose Content Type to Use’ page appears – click on ‘Student Profile’ in the list under ‘Choose a Content Type’. [Note: if you don’t see this Content Type in your list, contact the Web Team on [email protected] or 1776] FIGURE 14 ‐ THE CHOOSE CONTENT TYPE TO USE PAGE 5. The Student Profile Content Type will now appear. FIGURE 15 ‐ THE STUDENT PROFILE EDITING PAGE 6. Insert a name for your new content in the Name box. This isn’t seen by people using the web site, but it is important that you choose something that will make sense to other CMS users. 7. Add the details of the Student to the Student Name and Details box, add their Home Town if available. Add their Quote. Enter a description of the photograph you will be adding in the Alternative Text box – this might just say e.g. “A photograph of Sally Jones”. 8. To upload the photo of the student, click on Browse to find the photo in your file system. Note: Photographs for Student Profiles are not uploaded into the Media Library before use – you upload them directly from your machine or network drive. 9. When you have finished adding content click on the Add button or click on the right end of the button to select Save as Draft if you are going to come back to this piece of content later. 10. You will be returned to the Content tab, where you can see your newly added content listed along with any other content that you have added to this section. Page 14 CMS Information Sheet 3.2 (16/02/15) Adding Content – Optional Content 11. You will notice that the content appears with the Status ‘Pending’ or ‘Draft’. Pending content needs to be approved before being published. See Information Sheet 6 for more information on approval (Moderators only). Draft content will not enter the approval process – you can continue to edit it and when you are ready for it to enter the approval process you will be able to click the Update button to save it. Creating the Welsh Version of your Student Profile You should only create the Welsh version of your content when you have the Welsh text ready. If you have sent your English text to Translation, wait for it to return before creating the Welsh content. 12. Click on the Language button at the top of the screen and select Cymraeg. 13. The Welsh version of the section’s Show Details page appears. Click on the Content tab. Note: If you are returned to the Site Structure, click on the section you were working on and then click on the Content tab to get back to the list of content 14. The Name of the content appears as Not translated, as it hasn’t yet been named in Welsh. Click on the arrow to the right of the piece of content and select Modify. Note: If there are lots of new pieces of content which haven’t had their Welsh title set, it can be hard to find the right one that you need to work on – move your mouse over the words Not translated and a small box containing the English title of the content will appear. 15. The Welsh version of the Student Profile editing page appears. 16. Insert a name for your content – this can be in English or Welsh depending on your preference. This isn’t seen by people using the web site, but it is important that you choose something that will make sense to other CMS users. 17. Insert the Welsh translation of the English Alternative Text, Student Name and Details, Home Town and Quote. 18. To upload the photo of the student, click on Browse to find the photo in your file system. Note: Photographs for Student Profiles are not uploaded into the Media Library before use – you upload them directly from your machine or network drive. 19. When you have finished adding content click on the Update button or click on the right end of the button to select Save as Draft if you are going to come back to this piece of content later. 20. You will be returned to the Content tab, where you can see your newly updated Welsh content listed along with any other content that you have added to this section. It is no longer named Not translated. 21. You will notice that the content appears with the Status ‘Pending’ or ‘Draft’. Pending content needs to be approved before being published. See Information Sheet 6 for more information on approval (Moderators only). Draft content will not enter the approval process – you can continue to edit it and when you are ready for it to enter the approval process you will be able to click the Update button to save it. Page 15 CMS Information Sheets (21/02/14) CMS Information Sheet 3.3 (16/02/15) Adding Content – Reusing Existing Content 3.3. Adding Content – Reusing Existing Content Mirroring Content There may be occasions where you would like to use the same piece of content in a number of pages – e.g. the contact details may be the same for every page within a section. You can create an identical, linked ‘mirror’ version of the piece of content and place it in a new section. All mirrored versions are updated whenever any one of them is updated. 1. From the Site Structure, browse to the section (lets call it Section A) where the piece of content you want to reuse is located. Click on the name of the section to open it for editing. 2. The ‘Modify Section, Show Details’ page will appear. Click on the ‘Content’ tab. FIGURE 1 ‐ THE CONTENT TAB Note: Contributors go straight to the Content Tab. 3. You will now see the content currently in this section (A). Find the piece of content that you wish to reuse and put your mouse on the arrow to the right of it. Select ‘Mirror’. FIGURE 2 – THE CONTENT M ENU 4. The ‘Mirror Content, Choose Destination’ page will appear. Page 1 CMS Information Sheet 3.3 (16/02/15) Adding Content – Reusing Existing Content FIGURE 3 ‐ THE MIRROR CONTENT. CHOOSE DESTINATION SCREEN 5. Choose the section (let’s call it Section B) where you want the mirrored content to be placed, by clicking on the section name. 6. The ‘Modify Section, Show Details’ page for the original section (A) will reappear, with a message to tell you the mirroring has been successful. FIGURE 4 – THE CONTENT MIRRORED CONFIRMATION MESSAGE 7. If you wish to reuse more pieces of content from this section (A), repeat the process. Otherwise return to the site structure. 8. To check the mirrored content, browse to the section (B) where you placed the mirrored content and click on its name. The ‘Modify Section, Show Details’ page will appear – click on the Content tab. You should now see the mirrored content appearing in the list of pieces of content, with a red mark next to it which shows it is mirrored. FIGURE 5 – LIST OF PIECES OF CONTENT SHOWING THE MIRRORED PIECE OF CONTENT Copying Content If you are creating a number of similar pages, you may wish to copy some content from one section to another prior to modifying it. To do this, use the procedure above, choosing ‘Duplicate’ instead of ‘Mirror’ from the menu. Then you can browse to the newly copied content and edit it as required. Page 2 CMS Information Sheet 4 (16/02/15) Editing Content 4. Editing Content When editing content, you will use a web form which contains various boxes for different parts of the content. For some types of content e.g. General Content, there is an HTML Editor box used to enter text. Using the HTML Editor you can format your text and add links, pictures and tables. Other boxes do not allow formatting and you are only able to edit the text, or choose an image. Note: Remember to refer to the Content Web Pages section of the Web Site Style Guidelines for details of how to arrange your page content. Opening existing content for editing 1. Open the Site Structure and browse to the section containing the content you wish to edit. Click on the name of the section to open it for editing. 2. The ‘Modify Section, Show Details’ page will appear. Click on the ‘Content’ tab. (Contributors go directly to the ‘Content’ tab). 77 FIGURE 1 ‐ THE CONTENT TAB 3. Find the piece of content that you wish to edit and click on the arrow to the right of it. Select ‘Modify’. FIGURE 2 ‐ THE CONTENT MENU 4. The ‘Modify Content, Update Details’ page will appear. This will appear differently depending on the type of content you are editing. For more information about different types of content, see Information Sheets 3.0, 3.1 and 3.2. Page 1 CMS Information Sheet 4 (16/02/15) Editing Content 5. Make the necessary edits to the content. See Information Sheets 4.1, 4.2, 4.3, 4.4 and 4.5 for more information on editing content, using the HTML Editor. 6. When you have finished making your changes, click on the Update button or click on the right end of the button to select Save as Draft if you are going to come back to this piece of content later. Notes Timeout When editing content, you should be aware of the system timeout. If you leave your edit window unused for a certain amount of time, a timeout will occur and your work could be lost. If you need to leave your work when you haven’t finished with it, remember to click on Add or Update to save what you have done so far. Lines and Paragraphs To create a new line within the current paragraph, use Shift + Return. To create a new paragraph, just press Return. Information Sheets 4.1 Formatting Text Basic text formatting can be achieved using the HTML Editor. This Information Sheet introduces the formatting options available. 4.2 Inserting Links Links can be created between sections within the CMS or to external web pages. This Information Sheet describes how to add these links. 4.3 Inserting Images Images from the Media Library can be inserted into content. This Information Sheet describes how to insert an image. Please see Information Sheet 7 for information on adding images to the Media Library. 4.4 Inserting Tables Tables can be used to display data (not for page layout). This Information Sheet describes how to insert and format a table. 4.5 Inserting Links to Documents Links to documents stored in the Media Library can be inserted into content. This information sheet describes how to insert a link to a document. Please see Information Sheet 7 for information on adding documents to the Media Library. Page 2 CMS Information Sheet 4.1 (16/02/15) Editing Content ‐ Formatting Text (TinyMCE) 4.1. Editing Content – Formatting Text Open the content you wish to edit. Any boxes in content which can be edited using the HTML Editor will have a toolbar displayed above the editing area. The buttons are similar to those used in Microsoft Word and other text editing software. Paste Paste from Remove all Paragraph Menu from Text Word Italic Remove formatting – see below link Insert links Style Menu – Bold Cut, Copy & (4.2) Spellcheck see below Paste Find Find and Replace Insert image or document (4.3 & 4.5) Table editing tools Bulleted List Numbered List Increase Indent Decrease Indent Undo / Redo Sub‐ Script Citation Insert symbol Abbreviation Style Menu Super Insert content link (4.2) Fullscreen Mode Manage anchors (4.2) View HTML source ‐Script A variety of styles are available which allow you to mark text or objects to be styled in a set way: top‐align – allows you to align text to the top in a table split‐left – allows you to make sure your paragraph clears the previous one so that images do not overlap notification – allows you to encase your paragraph in an noticable shaded box notification‐centre – allows you to encase your paragraph in an noticable shaded box with the text centred image‐menu – allows you to mark your bulleted list as an image menu which will make it display in the image‐menu style, e.g.: course‐lightbox – this is used in very specific situations where course information is displayed in a lightbox These styles only work for the type of text or object noted – if you try and apply them to other items, they won’t work. Page 1 CMS Information Sheet 4.1 (16/02/15) Editing Content ‐ Formatting Text (TinyMCE) Format Menu A number of formats are available: Paragraph – producing basic unformatted text (default setting) Headings 2 to 6 – producing different levels of headings, using HTML tags H2 to H6. The Title of the content is displayed as a Heading 1, so this is not available in the format menu. Page 2 CMS Information Sheet 4.2 (16/02/15) Editing Content ‐ Inserting Links 4.2. Editing Content – Inserting Links There are 6 different types of links which are inserted in different ways. 1. Link to a section (page) within the CMS 2. Link to a specific piece of content within the CMS – this allows you to link to a specific piece of content within a page, even if it is one of a number of pieces of content in the page. For example it could be used to link to a particular question half way down a page containing a long list of frequently asked questions (assuming each question was in a separate piece of content). This also allows you to link to a specific news article in the news system. 3. Link to an external page – this means a link to a web page which is not in the CMS – this could be an Aberystwyth University page or an external website. 4. Link to an email address 5. Link to an anchor within the current page – this involves marking a point in the page with an anchor, then creating a link to this anchor allowing the user to jump to that point in the page – this is particularly useful in long pages. 6. Link to a document in the Media Library – see Information Sheet 4.5 Link Text For all links it is important to make sure that your link text is ‘friendly’. This means that if the user could only read the link text, they would still understand where the link was taking them. For example, this is a friendly link: If you would like to know more about using the CMS, please view the CMS Information Sheets page. This is not a friendly link: If you would like to know more about using the CMS, please click here. Page 1 CMS Information Sheet 4.2 (16/02/15) Editing Content ‐ Inserting Links Link to a page within the CMS 1. Select the text that you want to become the link and click on the Insert Section Link button 2. The “Choose a Section to Link” window pops up: FIGURE 1 ‐ THE SITE STRUCTURE WINDOW 3. If you know the name of the section you wish to link to, you can search for it by typing in the search box and pressing the search button. If there are several pages including your search term you will be able to choose the correct page by clicking on it, otherwise if there is only one search result, the system will automatically make your text link to that section. FIGURE 2 ‐ USING THE SEARCH OPTION 4. Alternatively you can browse through the site structure to find the page you want to link to – start by clicking on the + to expand www.aber.ac.uk, then expand Home. Page 2 CMS Information Sheet 4.2 (16/02/15) Editing Content ‐ Inserting Links FIGURE 3 ‐ THE SITE STRUCTURE WINDOW WITH WWW.ABER.AC.UK AND HOME EXPANDED 5. Use the + and – buttons to expand and close sections – only clicking on the name of a section to select it. You will be able to chose any section from the entire site, not just your department/area. When you find the section you wish to link to, click on it. 6. When using either the search or browse option, you can switch language using the “Choose a language” drop‐down menu and choose pages from the other language version of the site. This is useful if you are trying to direct a user to information that is available in only one language. 7. The site structure window closes, returning you to the content editor where you will see your link in place. Page 3 CMS Information Sheet 4.2 (16/02/15) Editing Content ‐ Inserting Links Link to a specific piece of content within the CMS 1. Select the text that you want to become the link and click on the Insert Content Link button 2. The Site Structure window pops up: FIGURE 4 ‐ THE SITE STRUCTURE WINDOW 3. If you know the name of the piece of content you wish to link to, you can search for it by typing in the search box and pressing the search button. However, as there may be many pieces of content with similar names, this may not be the best way to create your link. 4. Alternatively, browse through the hierarchy to find the section containing the content you want to link to – start by clicking on the + to expand www.aber.ac.uk, then expand Home. FIGURE 5 ‐ THE SITE STRUCTURE WINDOW WITH WWW.ABER.AC.UK AND HOME EXPANDED 5. Use the + and – buttons to expand and close sections – only clicking on the name of a section to select it. You will be able to chose any section from the entire site, not just your department/area. When you find the section containing the content you wish to link to, click on it. Page 4 CMS Information Sheet 4.2 (16/02/15) Editing Content ‐ Inserting Links 6. A window will pop up showing the content contained in the section. For example: FIGURE 6 ‐ THE LIST OF CONTENT IN THE CHOSEN SECTION 7. Click on the piece of content you wish to link to. 8. The window closes, returning you to the content editor where you will see your link. Page 5 CMS Information Sheet 4.2 (16/02/15) Editing Content ‐ Inserting Links Link to an external page 1. Select the text that you want to become the link 2. Click on the Insert/edit Link button 3. The Insert/edit Link window pops up: FIGURE 7 ‐ THE INSERT/EDIT LINK WINDOW 4. Type (or paste in) the web address in the Link URL box. 5. Don’t make any changes to the Target or Title. 6. Click Insert to finish. Note: If you forgot to put the http:// at the beginning of your web address a pop up window will appear asking you if you want to add it “The URL you entered seems to be an external link, do you want to add the required http:// prefix?”. However this only works for web addresses beginning with www – for other addresses be sure to remember to put http:// at the beginning of the the address. Page 6 CMS Information Sheet 4.2 (16/02/15) Editing Content ‐ Inserting Links Link to an email address 1. Select the text that you want to become the link 2. Click on the Insert/edit Link button 3. The Insert/edit Link window pops up: FIGURE 8 ‐ THE INSERT/EDIT LINK WINDOW 4. Type mailto: followed by the email address. 5. Don’t make any changes to the Target or Title. 6. Click Insert to finish. Page 7 CMS Information Sheet 4.2 (16/02/15) Editing Content ‐ Inserting Links Link to an anchor within the current page 1. First create the anchor: a. Place your mouse at the point in the page where you want the anchor to be. b. Click on the Insert/Edit Anchors button c. The Insert/edit anchor window pops up: FIGURE 9 – THE INSERT/EDIT ANCHOR WINDOW d. Type the name of your new anchor in the Anchor name box and click on Insert to add it. e. You will see a small anchor symbol has appeared in the content editor to mark this anchor. 2. Select the text that you want to become the link. 3. Click on the Insert/edit Link button 4. The Insert/edit Link window pops up: FIGURE 10 ‐ THE INSERT/EDIT LINK WINDOW 5. Leave the Link URL box blank. 6. Click on the Anchors drop down menu and choose the anchor you created. The name of your anchor with a # will appear in the Link URL box 7. Don’t make any changes to the Target, Title or Class. 8. Click Insert to finish. Page 8 CMS Information Sheet 4.3 (16/02/15) Editing Content ‐ Inserting Images 4.3. Editing Content – Inserting Images Note: Before inserting an image, it must be in the Media Library. If you want to use a new image that is not already in there, see Information Sheet 7 for details of how to upload an image to the Media Library. There are some exceptions to this, for example the Academic Staff Profile, where images are uploaded within the content template. 1. Place your mouse in the position on the page where you want the image to be. 2. Click on the Insert Item from Media Library button 3. The Media Library window pops up: FIGURE 1 ‐ THE MEDIA LIBRARY WINDOW SHOWING ITS DEFAULT OPENING VIEW 4. Browse through the categories to find your image. To see thumbnails of the images, click on the View Media in Preview Mode button ( ). Page 1 CMS Information Sheet 4.3 (16/02/15) Editing Content ‐ Inserting Images FIGURE 2 ‐ IMAGE THUMBNAILS IN THE PREVIEW MODE 1. Put your mouse over the image you wish to use and a box will appear around it with Select and Advanced buttons FIGURE 3 – HIGHLIGHTED IMAGE IN MEDIA LIBRARY 5. You can choose to look at different variants of the image that may have been created, or create your own variant. Please see Information Sheet 6 for more information on the Media Library and image variants. 6. When you are happy with the chosen image, click Select to continue. 7. The image will now be displayed in the Content Editor page. 8. Double click on the image ‐ the Set Media Atrributes window pops up. FIGURE 4 ‐ THE MEDIA ATTRIBUTES WINDOW 9. Enter a brief description of the image as the alt text in the box. Page 2 CMS Information Sheet 4.3 (16/02/15) Editing Content ‐ Inserting Images 10. You can put different classes in the class box to control how your image is positioned in your page: If you want the image to be displayed on the left of the page with the text wrapping round it (with a border), type “float‐left” in the class box. If you want your image to be on the left on a new line, type “float‐none” in the class box. If you want your image to be centred, type “centre” in the class box. Otherwise, leave the class box blank and the image will be displayed in the default location (on the right of the page with the text wrapping round it). Note that any changes to the class of the image will not appear to have any effect in the Editor window, but you will be able to see the results of the changes when you preview the page. Page 3 CMS Information Sheets (21/02/14) CMS Information Sheet 4.4 (16/02/15) Editing Content ‐ Inserting Tables 4.4. Editing Content – Inserting Tables Note: Tables should only be used for data, not as a way of laying out the page. See the Web Site Style Guidelines for more information. 1. Place your mouse in the position on the page where you want the table to be. 2. Click on the Insert New Table button 3. The Insert/Modify table window pops up: FIGURE 1 ‐ THE TABLE PROPERTIES WINDOW 4. Set the number of columns and rows that you require. 5. Do not edit the following options: Cellpadding, Cellspacing, Alignment, Border, Width & Height. 6. The table will be styled according to the default table style. This includes making the text in the cells left‐aligned. If you wish to change this, you can change it to be centre‐aligned by choosing ‘centre‐ align’ from the Class drop‐down menu. Alternatively you can set the text to be top‐aligned if required. If you wish to change this later on, right click on the table and choose “Table properties” which will take you back to these settings. FIGURE 2 ‐ THE TABLE CLASS DROP DOWN LIST 7. If you wish to add a caption for the table, tick the Table caption box – this will create a box in the top of the table where you can write your caption. 8. Tick either one or both of the header boxes ‐ Make first row a header and/or Make first column a header. All tables should have at least one of these so that users can understand what data the table contains. Page 1 CMS Information Sheet 4.4 (16/02/15) Editing Content ‐ Inserting Tables 9. Click on Insert to continue. The table now appears in the Content Editor. Note that the table will be very small at first. Don’t be tempted to stretch out the columns – they will automatically adjust as you type in them. FIGURE 3 ‐ EMPTY TABLE IMMEDIATELY AFTER INSERTING 10. If you chose to have a caption, type it into the space at the top of the table 11. Click on the cells to add content to the table. FIGURE 4 ‐ A NEWLY CREATED TABLE Note: You can not use tab to move between cells of the table like you do in Microsoft Word – you need to either use the arrows on your keyboard to move between cells or click in each cell to add data to it. 12. When the table is selected, additional buttons are available: Insert a table Table row properties Table cell properties Insert row before Insert row after Split merged table cells Merge table cells Delete column Delete row Insert column before Insert column after Note: Many of the actions that can be carried out using the buttons can also be carried out by right clicking on the table and using the menu that appears. 13. If you need to delete a whole table, this can be done by right clicking on the table and selecting “Delete table”. 14. If your table is at the top of your piece of content and you want to add text above it, right click on it and select “Add Paragraph before table” to force a paragraph to appear where you can then type. A similar option is available to add a paragraph after your table. Page 2 CMS Information Sheet 4.5 (16/02/15) Editing Content ‐ Inserting Documents 4.5. Editing Content – Inserting Links to Documents Note: Before inserting a link to a document, it must be in the Media Library. If you want to use a new document that is not already in there, see Information Sheet 7 for details of how to upload a document to the Media Library. PDF is the recommended document format for the web. 1. Place your mouse in the position on the page where you want the link to the document to be. 2. Click on the Insert Item from Media Library button 3. The Media Library window pops up: FIGURE 1 ‐ THE MEDIA LIBRARY WINDOW SHOWING ITS DEFAULT OPENING VIEW 4. Browse through the categories to find your document. When you find it, check that there is text in the Description column. Note: If the document you insert doesn’t have a description, the link will not work ‐ see Information Sheet 7 for more information on adding description text to media items. 5. Click on the item and you will be shown information about the document. Click the Select button to insert a link to the document in your page. 6. The link to the file will now be displayed in the Content Editor page, using the description as the link text. Page 1 CMS Information Sheets (21/02/14) CMS Information Sheet 5 (16/02/15) Moving and Deleting Content 5. Moving and Deleting Content Content can be moved to new locations in the CMS or deleted if necessary. This should be done with care. When content is deleted you will still see it in the CMS marked as inactive until the CMS Recycle Bin is emptied by an administrator. Moving and deleting content affects both the English and Welsh versions of the content. Moving content 1. Open the Site Structure and browse to the section containing the piece of content that you need to move. 2. Click on the section to open it. 3. The Modify Section, Show Details page will appear. Click on the ‘Content’ tab. (Contributors go directly to the ‘Content’ tab). 4. Find the piece of content that you wish to move and put your mouse over the arrow to the right of it. Select Move. FIGURE 1 ‐ THE CONTENT MENU 5. The ‘Move content, choose destination’ screen appears, click on the section where you wish to move the content to. FIGURE 2 ‐ THE 'MOVE CONTENT, CHOOSE DESTINATION' SCREEN 6. The list of content in the section is displayed, with a message to tell you that you have successfully moved the piece of content. The piece of content you moved will no longer be visible. If you look in the section you moved it to, you should see it listed in the content tab. Page 1 CMS Information Sheet 5 (16/02/15) Moving and Deleting Content FIGURE 3 ‐ MESSAGE WHEN CONTENT IS SUCCESSFULLY MOVED Deleting content 1. Open the Site Structure and browse to the section containing the piece of content that you need to delete. 2. Click on the section to open it. 3. The Modify Section, Show Details page will appear. Click on the ‘Content’ tab. (Contributors go directly to the ‘Content’ tab). 4. Find the piece of content that you wish to delete and put your mouse over the arrow to the right of it. Select Delete. FIGURE 4 ‐ THE CONTENT M ENU 5. A confirmation window pops up: FIGURE 5 ‐ THE CONTENT DELETION CONFIRMATION P OP ‐UP 6. Click OK. 7. If you have chosen to delete mirrored content, you will be shown a list of where the content is mirrored and asked if you just want to remove it from this one section, or delete it completely. Be careful that you make the right choice. Choose “Remove from Section” to just remove this one mirrored piece of content from this section, or choose “Delete Content” to completely remove this content from all sections that it is mirrored in. Click Confirm to continue. Page 2 CMS Information Sheet 5 (16/02/15) Moving and Deleting Content FIGURE 6 ‐ THE CONFIRM CONTENT DELETION SCREEN 8. The list of content in the section is displayed. The piece of content you deleted will now have the Status Inactive, or if it was mirrored content, it will now not be shown at all. The final deletion of pieces of unmirrored content will be carried out by the CMS Administrators. Note: If you need to move or delete a whole section, please see information sheet 2.2 (Moderators only). Note: Some departments have a section designated as their ‘bin’ where inactive content or sections can be moved to. This is useful if you find it confusing having inactive content in sections. Use the instructions in the first part of this document to move content into the ‘bin’ section. Page 3 CMS Information Sheets (21/02/14) CMS Information Sheet 6 (16/02/15) Approving Content (Moderators Only) 6. Approving Content (Moderators Only) 1. From the Content menu select ‘Approve Content’ FIGURE 1 ‐ THE CONTENT M ENU 2. The Approve Content page appears. FIGURE 2 ‐ THE APPROVE D OCUMENTS PAGE 3. If you are looking for a particular piece of content, you can order it by name or by the date it was last modified by clicking on the Name or Last Modified column headers. 4. Choose the piece of content you wish to approve and click on its title. 5. The content approval page appears. FIGURE 3 ‐ THE CONTENT APPROVAL PAGE 6. In most cases, when you are approving your own content and you have already previewed what you have done, you can now skip to point 9 below and approve the content, but if you need to look more carefully at the content before approval you can do so in the following ways: Page 1 CMS Information Sheet 6 (16/02/15) Approving Content (Moderators Only) 7. View content a. To see how the content looks, click on www.aber.ac.uk under Published Channels on the right of the screen. This will display a preview of the content very similar to the preview you have used when looking at content from the site structure. 8. Compare with last approved version a. To see what has changed, click on the “Compare with last approved version” button. [Note: This button will not appear if the content hasn’t ever been approved]. The Compare window pops up. b. Text and images are highlighted depending on whether they have been removed (red), added (green) or changed (orange). When you have finished looking at it, close the window to return to the approvals screen. FIGURE 4 ‐ HIGHLIGHTED CHANGES IN PREVIEW COMPARE 9. Content History a. To look at the history of the content and see who edited it and when, click on “Show History”. A pop up window will appear showing the different versions of the content. Page 2 CMS Information Sheet 6 (16/02/15) Approving Content (Moderators Only) FIGURE 5 ‐ LIST OF VERSIONS IN THE VERSION HISTORY b. You can view different versions by clicking on the appropriate View button. You can also compare different versions to see what has changed by ticking the appropriate boxes and clicking on Content Comparison or Visual Comparison. c. Choosing Content Comparison will enable you to compare specific parts of the content, e.g. for a piece of general content you can compare what was in the Name, Title or Body boxes. You can either compare the text, or if you understand HTML code, you can compare the code. The changes are colour coded in the same way as the “Compare with last approved version” option: FIGURE 6 ‐ CONTENT COMPARISON VIEW SHOWING CHANGES IN THE BODY BOX FOR A PIECE OF GENERAL CONTENT d. Choosing Visual Comparison works in the same way as the “Compare with last approved version” option and allows you to see the changes on a preview of the content. e. When you have finished looking at comparisons, close the window to finish Page 3 CMS Information Sheet 6 (16/02/15) Approving Content (Moderators Only) 10. If you are happy with the changes that have been made, click on Approve. If you are not happy with the changes that have been made, click on Reject. 11. Clicking on Approve returns you to the Approve Documents page, where the document you approved will no longer be listed. 12. In the majority of cases you will be approving your own content, so using the Reject option will not be necessary. However if you have Contributors within your department, you may be checking their content. If you are not happy with it, click on Reject. This takes you to the Rejected Content page. FIGURE 7 ‐ THE REJECTED C ONTENT PAGE 13. Add an explanation for why the content is being rejected in the Reject Reason box. If you change your mind click the Back link on the bottom left. Otherwise, click Submit to continue. 14. The person who wrote the content receives an email stating that the content has been rejected and giving them the reason you entered. They will then be able to edit the content, so that it goes back to the approval process. Page 4 CMS Information Sheet 7 (16/02/15) The Media Library 7. The Media Library The Media Library is where all documents and images are stored in the CMS. Files must be uploaded into the Media Library before they can be used in the pages. Find and Navigate through the Media Library 1. From the Content menu select Media Library FIGURE 1 ‐ THE CONTENT M ENU 2. The Media Library page appears: FIGURE 2 ‐ THE MEDIA LIBRARY PAGE SHOWING ITS DEFAULT OPENING VIEW 3. Browse to the appropriate category in the tree structure on the left by clicking on the + signs to open the categories. Some categories within your department will be for documents, some for images – select the right category for what you are uploading. Click on the category name to open it. Page 1 CMS Information Sheet 7 (16/02/15) The Media Library FIGURE 3 ‐ THE MEDIA LIBRARY WITH A CATEGORY OPENED Search The search option allows you to search for a file by typing a word from the file’s name in the search box – the results will show all items which include that word in their name, keywords or description. For example, searching for “regulations” gives: FIGURE 4 ‐ SEARCH RESULTS Page 2 CMS Information Sheet 7 (16/02/15) The Media Library Creating Sub‐Categories (Moderators Only) 4. It is possible to create sub‐categories in your departmental/area category to organise your files. We recommend that you do this to keep your section of the media library tidy and easy to use. There are 2 options: a. While viewing the category to which you wish to add the sub‐category, put your mouse over the Options button on the top left. Choose Add Category from the options that appear FIGURE 5 ‐ THE MEDIA LIBRARY CATEGORY OPTIONS b. Right click on the name of the category to which you wish to add the sub‐category, and select Add Sub‐Category. FIGURE 6 ‐ THE RIGHT‐CLICK MENU ON THE MEDIA LIBRARY CATEGORIES 5. A pop up window asks you to name your new Category – give your category a name and click OK. FIGURE 7 ‐ THE CATEGORY NAME POP UP MESSAGE 6. You will be returned to the Media Library view you will find that your main departmental category now has a + in front of its name (if it didn’t already). Click on the + to expand the category and you will be able to see your new sub‐category. FIGURE 8 ‐ THE MAIN DEPARTMENTAL CATEGORY WITH A SUB‐CATEGORY Page 3 CMS Information Sheet 7 (16/02/15) The Media Library Uploading Files to the Media Library 7. To upload files to the Media Library, choose the category you wish to place the files in. Click on its name. 8. Click on the Add New Media button . The Media Library upload page appears: FIGURE 9 – THE MEDIA LIBRARY UPLOAD PAGE 9. Give your file a name 10. Enter a description of your file. For image files this is optional and only seen by other CMS users. For Adobe PDF or Microsoft Office Documents, the Description is used as link text when you insert the file into a page, so it is vital that you include a description and that the text is sensible and useful. 11. You may wish to enter Keywords – these are used when searching for items in the media library, and are optional. 12. On the Media line, click on the Browse button to find the file on your computer or network drive. 13. The Type will automatically be set to the type of media you chose on the next line unless you are uploading an image – in which case you will need to choose from some different image options. For most situations use “Image”. a. b. c. d. e. Scroll Gallery Image – used in special image galleries Gallery Item – used in image galleries Right‐hand image – used in right hand columns Media Path – used in special pages Image – standard image – used in normal pages 14. Do not upload a thumbnail to the system – this functionality is not required. The system will create a thumbnail for images for you, and no thumbnails are used for non‐image files. Page 4 CMS Information Sheet 7 (16/02/15) The Media Library 15. Choose an option from the Media Language Dependence drop down list (for more information on these options, please see Information Sheet 18 – The Media Library & Bilingualism: a. Fully Independent – the file, it’s name and description, are the same for English and Welsh (this type is unlikely to be used in future, but exists for old media as these options didn’t previously exist) b. Independent Media File – there will only be one file, but it’s name and description need to be different depending on the language (this is useful if you have a bilingual document that you need to access from Welsh and English pages) c. Fully Dependent – there will be 2 files – one for each language, each with their own name and description (this is useful if there is a separate document for each language‐ they can be stored together, but have different names and information) 16. Click on Add to continue. 17. The file will be uploaded and you will be returned to the Media Library view, where you will see your newly added file. Changing the Media Library View 18. You can change the Media Library view to show image previews – click on the View Media in Preview Mode button: 19. Preview allows you to view thumbnails – this is most useful when looking at images. FIGURE 10 ‐ P REVIEW VIEW 20. You can return to the default Detailed Mode view by clicking on the View Media in Detailed Mode button: Page 5 CMS Information Sheet 7 (16/02/15) The Media Library FIGURE 11 ‐ D ETAILED VIEW 21. If there are files of different sorts in one category (e.g. images and right‐hand images), you may wish to filter your view by clicking on the drop down menu and select one of the file types. Only files of this type will then be displayed. FIGURE 12 ‐ THE FILTER DROP DOWN LIST Page 6 CMS Information Sheet 7 (16/02/15) The Media Library Modifying Media Library Files 22. If you are in Preview Mode, move your mouse over the image thumbnail – when it highlights you can click on the Advanced button which takes you to the editing screen. FIGURE 13 ‐ H IGHLIGHTED THUMBNAIL IMAGE 23. If in Detailed Mode, just click on the name of the media item to get to the editing screen. 24. From here you can modify the file (change its name, other information or reupload the file), create a new variant (if it is an image) or look at the file history and usage. FIGURE 14 ‐ MEDIA EDITING SCREEN 25. Select Modify to view the file information and edit it as required. You can add or edit the description, change the file type (if you mistakenly selected the wrong type when uploading), or re‐ upload the file if you have made changes to it on your machine. Click Update to complete your modifications. 26. You can also use the modification screen to re‐categorise your files if necessary. Click on the ‘Categories’ tab: Page 7 CMS Information Sheet 7 (16/02/15) The Media Library FIGURE 15 ‐ THE CATEGORIES TAB 27. The full list of all categories in the Media Library is displayed with your file’s category or ticked. You can untick this category if necessary and tick other categories instead, or your file can be in multiple categories. The categories with crosses instead of tick boxes are those which are outside of your Department or Area, and you don’t have permission to use them. When you have finished categorising your file, click Update to finish. Page 8 CMS Information Sheet 7 (16/02/15) The Media Library Creating a Variant 28. Creating a new variant can be done so that you can have multiple versions of an image to be used in different situations. To access this click on the “Add Variant” button. FIGURE 16 ‐ IMAGE VARIATION CREATION PAGE 29. The original image is shown on the left with the editing options over on the right. The following editing methods are available: a. Resize – You can adjust the size of the image and save it as a new variant. This can be useful if the image is to be used in different pages and should be different sizes on each, or if the image hasn’t been resized before uploading into the media library. i. Custom – if you leave the drop‐down menu set to Custom, you can choose your own width and height to resize the image. It’s best to have the “Keep aspect ratio” tick box ticked so that your image doesn’t get squashed. Tick the box before changing the width or height, and the ratio will be kept the same as your original image. Give the variant a name (so you can find it later) and click on save. ii. Predefined – there are some preset sizes available in the drop‐down menu – you can choose one of these to resize your image. After choosing the preset size, enter a variant name (so you can find it later) and click on save. Predefined sizes should be used with care as they can stretch or squash your image. b. Crop – If you want to create a new variant made of just part of the original image, you can use the Crop tool. Click on the Crop heading to show the Cropping tool. Click and drag on the image to select the part that you wish to crop. You can adjust the shape you have made by dragging the squares at the corners or sides. You can see the size of your crop shown in the Page 9 CMS Information Sheet 7 (16/02/15) The Media Library width and height boxes. When you are happy with your crop, give the variant a name and click save. FIGURE 17 ‐ CROPPING AN IMAGE 30. All the variants of the image you create will be shown along the bottom. If you click on one of them, a new tab/window will open so you can see how the variants look. FIGURE 18 ‐ IMAGE VARIANTS 31. When you insert this image into content, you will now be able to choose from either the original image or one of the variants that you have created. Note: It’s not possible to combine cropping and resizing – you can only do one or the other. Page 10 CMS Information Sheet 8 (16/02/15) Reordering a section 8. Reordering a section It is possible to reorder pieces of content or sub‐sections within a section. Reordering content doesn’t affect the position of the Contact Block or Related Links within the resulting page, but if you have more than one piece of content displaying as the main text of the page, reordering them can affect their positioning. Reordering sub‐sections affects their position in the site navigation. Note: Contributors can only reorder pieces of content within a section. Reordering Content Example Section – Resident Tutors: FIGURE 1 ‐ EXAMPLE PAGE WITH MULTIPLE PIECES OF CONTENT Page 1 CMS Information Sheet 8 (16/02/15) Reordering a section 1. This page includes multiple pieces of content: FIGURE 2 ‐ SHOW CONTENT PAGE SHOWING SECTION WITH MULTIPLE PIECES OF CONTENT 2. To reorder content, click on the section you want to reorder the content in then click on the Content tab. 3. To reorder the pieces of content, click on the up and down arrows in the Move column. The double arrows either move content all the way to the top or the bottom, and the single arrows just move content up or down one row. 4. Moving some content such as Contact Blocks or Related Links up or down will have no effect on how they appear on the page as they have set positions. Other types of content such as General Content or Student Profiles can have their positions changed on the resulting page by reordering them. 5. It is also possible to have the pieces of content ordered automatically. To enable this, tick the Automatic Ordering – Enabled box, and choose the ordering method from the Method drop down menu. FIGURE 3 ‐ THE METHOD DROP DOWN MENU 6. After selecting the method, click on the unlocked padlock icon to allow the CMS to automatically order the content for you. 7. It is important to remember to click on Save Changes when you have finished reordering, otherwise your changes will not take effect. Page 2 CMS Information Sheet 8 (16/02/15) Reordering a section Reordering Sub‐Sections (Moderators Only) Example Section – Postgraduate Information FIGURE 4 ‐ EXAMPLE PAGE WITH MULTIPLE SUB‐SECTIONS 1. This section contains multiple sub‐sections, as well as content FIGURE 5 ‐ SITE STRUCTURE SHOWING SECTION CONTAINING MULTIPLE SUB‐SECTIONS 2. The sub‐sections appear in the departmental navigation in the left menu, as seen in Figure 4. 3. To reorder the sub‐sections, click on the main section, then click on the Subsections tab. FIGURE 6 – SUB‐SECTIONS LISTED IN THE SUBSECTIONS TAB Page 3 CMS Information Sheet 8 (16/02/15) Reordering a section 4. Move the sub‐sections up or down as required by clicking on the up and down arrows in the Move column. The double arrows either move sub‐sections all the way to the top or the bottom, and the single arrows just move sub‐sections up or down one row. 5. It is also possible to have the sub‐sections ordered automatically. To enable this, tick the Automatic Ordering – Enabled box, and choose the ordering method from the Method drop down menu. FIGURE 7 ‐ THE METHOD DROP DOWN MENU 6. After selecting the method, click on the unlocked padlock icon to allow the CMS to automatically order the sub‐sections for you. 7. It is important to remember to click on Save Changes when you have finished reordering, otherwise your changes will not take effect. 8. When you preview the main section page, you will see that the navigation in the left menu has changed to reflect your reordering. Page 4 CMS Style Guide CMS Style Guide Introduction This guide is intended for Aberystwyth University Content Management System (CMS) users. It aims to assist CMS users in producing accessible, consistent web pages throughout our CMS‐driven site. Headings Use title case for all headings This means that words should begin with capital letters apart from words such as ‘and’ and ‘the’. However, headings shouldn’t be all in capital letters. Nest headings correctly All pages have a main heading – a Heading 1 – this comes from the Title field in the content. They shouldn’t have any additional Heading 1s. For further sub‐headings you should use Heading 2s, and beneath them Heading 3s etc. Text Use sentence case Do not use upper case for emphasis. Bold or italics can be used to emphasize occasional words if required. However, avoid using large blocks of text in bold or italics. Avoid abbreviations & acronyms Abbreviations and acronyms should be avoided unless it is clear that the user of the page will be aware of their meaning. If you need to use them, make sure to explain what they mean the first time they are mentioned in the text. Language changes If you need to use a different language in your page (for example some English text in your Welsh page), make sure to use the correct HTML markup. For assistance with this, please contact the Web Team. Bold & Italics Avoid using large blocks of text in bold or italics (or both) – this can be difficult to read for users with Dyslexia. Images All images should have associated ‘alt’ text Alternative or “alt” text is used to describe the image for users who can’t see the image for whatever reason. This should always be added to images so that our site is accessible to everyone. Links Link text should be ‘friendly’ This means that if the user could only read the link text, they would still understand where the link was taking them. For example, don’t use “Click Here” as your link text – the text to be linked should be something more descriptive and unique to where it is linking to. For example, this is a friendly link: “If you would like to know more about using the CMS, please view the CMS CMS Style Guide Information Sheets page”. This is not a friendly link: “If you would like to know more about using the CMS, please click here”. Tables Tables should only be used to display data Tables shouldn’t be used to lay out your page. If you want to wrap text around an image, this is the default behavior when an image is inserted. If you would prefer to have it aligned to the left, you can use the class “float‐left” to do this (See Information Sheet 4.3). A list of staff names, numbers and email addresses is data, some text and a picture isn’t data. Tables should have headers Tables should always have at least one header – it can be a header row or a header column or both. These are required so that users who can’t view the whole table can understand what the table will contain. This is important to make sure our site is accessible to everyone. Language Where Welsh and English versions of a page are provided, they should be kept synchronized Our site is bilingual. This means that if a page is updated in one language, it should be updated in the other language as soon as possible to keep the page versions saying the same thing. Small edits may be translated by a helpful colleague who speaks the appropriate languages. Larger edits may need to be sent to the translation Unit. Remember that if you make a new page, this will also need to be translated. Note: There are a small number of areas of the site where the decision has been made to not have a Welsh version (for example the International pages) so this does not apply to those areas. Information about the Page Contacts A Contact Block should be included on all pages so that users know who they can contact about the page. This can be mirrored in from another section if appropriate. Meta Data Meta Data should be included on all pages. This enables our pages to be searchable and index‐ able and makes them easier to find.