1
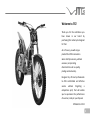
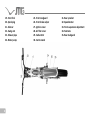
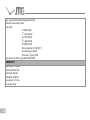
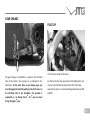
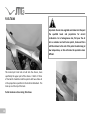
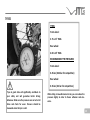
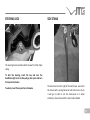
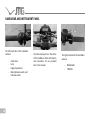
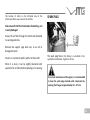
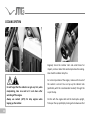
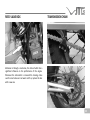
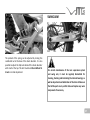
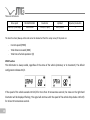
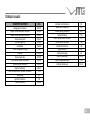
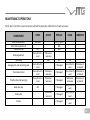
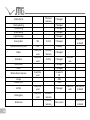
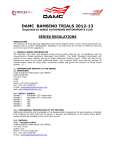
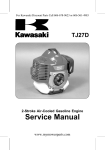
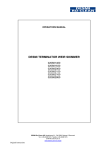
JTG JT300 USER MANUAL Welcome to JTG! Thank you for the confidence you have shown in our brand by purchasing this motorcycle designed for Trial. As a JTG user, you will enjoy a product that offers innovation where strictly necessary, without excesses, incorporating characteristics such as quality, prestige and exclusivity. Designed by off-road professionals to offer comfortable and effective service without forgetting a competitive spirit, that will enable you to experience the performance of a winner, ready at your disposal. JOTAGAS S.L. 2012 3 JTG ADVISES YOU: Please read this user manual carefully before using your motorcycle. In it you will find all the instructions necessary for correct operation of the machine as well as for your own safety, enabling you to attain optimum maintenance and service life from the very first day. Please pay special attention to notes bearing these symbols: ATTENTION! This symbol refers to aspects which if ignored could cause damage to your motorcycle. Non-observance of these warnings could render the guarantee void. PRECAUTION! This symbol refers to aspects which if ignored could result in physical danger to the user. In addition to the specific warning notes, this manual also contains other tips for better use of your motorcycle as well as better adjustment and control of important features of the vehicle. JTG reserves the right to modify this manual. 4 JTG RECOMMENDS: In case of any doubt as to possible adjustments of your motorcycle, please follow the instructions contained in this manual and/or contact an authorised JTG dealer. Please read the information contained in this user manual and familiarise yourself with the features of your vehicle before driving it at maximum power. It is recommended to establish an initial running-in period of at least 8-10 hours for the engine to bed in, during this period do not drive at high speed or full throttle. The first hours of use should be at moderate speed only. Fuel is highly inflammable. Take care when refuelling and always stop the engine first. Before running the engine at high speed, it is important to have reached an optimum operating temperature, especially when starting up the motorcycle or in low temperature conditions. This motorcycle uses synthetic two-stroke oil mixed with 98-octane fuel in a 1% proportion. Do not use any other type of lubrication without first consulting with an authorised JTG mechanic. This motorcycle is designed to carry only one person; it is not permitted to carry a passenger. For the longest possible service life, keep the motorcycle maintained according to the recommendations in this manual. This vehicle has been designed for safe riding, as long as the rider is equipped with the necessary safety gear (Helmet, body protection, etc.). Take care and ride in a sensible manner. 5 TABLE OF CONTENTS Description of parts Technical datasheet Vehicle information Starting and stopping the engine The choke Gear change Fuel tap Fuel tank Tyres Brakes Steering lock Side stand Handlebar and instrument panel Adjusting levers and the handlebar Checking the oil level Air filter 6 7 9 11 12 12 13 13 14 15 16 17 17 18 19 19 20 Sparkplug Cooling system Carburettor Adjusting the tick over Reed valve box Transmission chain Suspension Swing arm Maintaining the motorcycle Speedometer Torque values Storage Maintenance operations Homologation Troubleshooting 21 22 23 24 25 25 26 27 28 29 33 34 35 39 40 DESCRIPTION OF PARTS 1- Clutch lever 2- Indicator, horn and stop buttons 3- Brake lever 4- Accelerator 5- Radiator cap 6- Fuel tank cap 7- Starting pedal 8- Fuel tank 9- Radiator 10- Radiator drainage bolt 11- Sump oil level peep hole 12- Rear brake pedal 13- Engine breather 14- Fuel tap 15- Reed valve 16- Transmission chain 18- Gear change pedal 7 19- Front fork 20- Spark plug 21- Silencer 22- Swing arm 23- Exhaust pipe 24- Water pump 8 25- Front mudguard 26- Front brake caliper 27- Ignition cover 28- Air filter cover 29- Carburettor 30- Centre stand 31- Rear sprocket 32- Speedometer 33- Front suspension adjustment 34- Footrests 35- Rear mudguard TECHNICAL DATASHEET CHASSIS Type: Double beam with lateral suspension system and built-in fuel tank TYRES Front: 2.75 x 21" - 44 (160 kg) L Rear: 4.00 x 18" - 52 (200 kg) - L SUSPENSION Front: TECH Hydraulic telescopic fork COM-EX Ø39 mm (175 mm travel) Rear: V3 progressive system with OLLE mono adjustable shock absorber (175mm travel) BRAKES Front: Disc, Ø185 mm, 4-piston caliper Rear: Disc, Ø150 mm, 2-piston caliper ENGINE Type: Two-stroke, single cylinder, reed valve admission directly to the engine block, liquid cooled. Cubic capacity: 301.58 cc Piston diameter: 80 mm Stroke: 60 mm Carburettor: DELLORTO PHBL26 Lubrication system: 1% mixture (1:100) Ignition: Digital CDI HIDRIA Spark plug: NGK BPMR6A Generator: 12V / 110W TRANSMISSION 9 Type: 5-speed with hydraulically operated clutch. Secondary transmission: Chain. Gear ratios: st 1 3.000 (33/11) nd 2 2.571 (36/14) rd 3 2.187 (35/16) th 4 1.444 (26/18) th 5 0.889 (24/27) Primary reduction 2.778 (75/27) Final reduction 4 (40/10) th Total ratio (5 gear): 9.879 Transmission oil: 400 cc, type GEAR TRANS 0W75 DIMENSIONS Overall height: 1160 mm Overall width: 833 mm Seat height: 650 mm Wheelbase: 1180 mm Fuel capacity: 2.7 litres Dry weight: 64 kg 10 VEHICLE INFORMATION MANUFACTURER’S IDENTIFICATION PLATE (Under the fuel tank) This plate contains information regarding vehicle certification, take note of this for easy identification of your vehicle, when needed. SERIAL NUMBER AND KEY CODE These numbers identify your motorcycle and the steering lock, take note of them in this manual (e.g. for ordering new keys if you lose them). 1- MANUFACTURER’S IDENTIFICATION PLATE 2- CHASSIS NUMBER 3- KEY CODE (Supplied with the keys) We recommend you take note of the serial number and identification data of your motorcycle for use in case of theft or to order spare parts. 11 STARTING AND STOPPING THE ENGINE THE CHOKE Use the choke when the engine is cold to start without causing damage to the engine. This device, when used properly, will avoid excessive wear and mechanical damage when starting in cold temperature. To activate it, lift the black lever on the carburettor. To start the motorcycle, first make sure that the fuel tap is open and that the gearbox is in neutral or if not, that the clutch lever is pulled in. Then push the starting pedal, located on the right-hand side of the motorcycle. It will also be necessary to use the choke when starting from cold. To stop the engine, select neutral and press the stop button on the handlebar. 12 GEAR CHANGE FUEL TAP The gear change is controlled by a pedal on the left-hand side of the vehicle, the sequence is as indicated in the illustration. At the same time as you change gears you must disengage the clutch by pulling in the clutch lever on the left-hand side of the handlebar. The gearbox is nd th sequential, i.e., to change from 2 to 4 gear you must rd first go through 3 gear. The fuel tap is under the fuel tank. For the fuel to flow, the tap must be in the ON position. For reserve, select the RES position and to shut of the flow, leave the tap lever in an intermediate position between ON and RES. 13 FUEL TANK Important. Do not mix vegetable and mineral oil. Respect the specified levels and proportions for correct combustion. For a homogeneous mix, first pour the oil into a container and add some petrol, shake and then add the mixture to the rest of the petrol. Avoid mixing at low temperature, as this will make the operation more difficult. This motorcycle’s fuel tank is built into the chassis, more specifically the upper part of the chassis. It holds 2.7 litres of fuel which should be lead free petrol with two-stroke oil in the proportions specified on the technical datasheet. The tank cap is at the top of the tank. Petrol minimum octane rating: 98 octanes 14 TYRES TYRES Front wheel: 2.75 x 21" TRIAL Rear wheel: 4.00 x 18" TRIAL RECOMMENDED TYRE PRESSURES Front wheel: 0.45 bar (0.42 bar for competition) Rear wheel: 0.35 bar (0.3 bar for competition) Tyres in good state will significantly contribute to your safety and will guarantee better driving behaviour. Make sure the pressures are correct at all times and check for wear. Pressure should be measured when the tyre is cold. When riding on low adherence terrain, you can reduce the pressure slightly in order to favour adhesion and viceversa. 15 BRAKES The brake fluid level can be checked through the peephole on the front master cylinder and the fluid reservoir of the rear master cylinder. The level must reach the middle, fill both reservoirs if necessary. Use D.O.T. 4 brake fluid. You should regularly check the state of the front and rear brake pads as well as the brake fluid level. For your safety as well as precise and effective riding, do not use the motorcycle with excessively worn brake pads or brake fluid below the minimum level. If the brake pedal has a spongy feel, there may be air in the hydraulic system and it will need to be bled. 16 There are bleed nipples on both circuits in order to eliminate air bubbles that could have entered the system after any work has been carried out. The brake pedal must have some free play. STEERING LOCK SIDE STAND The steering lock is located under the lower front fork triple clamp. To lock the steering, insert the key and turn the handlebars right as far as they will go, then press and turn the key anti-clockwise. To unlock, insert the key and turn clockwise. The side stand is on the right of the motorcycle, secured to the chassis with a spring. Move the side stand out as far as it will go in order to rest the motorcycle on it when stationary. Never drive with the side stand unfolded. 17 HANDLEBAR AND INSTRUMENT PANEL The left-hand side of the handlebar contains: - 18 Clutch lever. Horn. Engine stop button. Main/dip beam switch, and indicator switch. The instrument panel is in the centre of the handlebar. (More information and instructions for use provided later in the manual) The right-hand side of the handlebar contains: - Brake lever Throttle ADJUSTING LEVERS AND THE HANDLEBAR Both levers must have a free play of 3 mm at the most. This play must be present, do not eliminate it. To adjust, use the adjustment nuts located on the levers. To adapt the handlebar to different types of riding, you can tilt it more or less by loosening the clamps that secure it to the fork. When adjusted as desired, tighten the bolts again, starting with the bolts closest to the seat and continuing with those closest to the speedometer. CHECKING THE OIL LEVEL The engine holds 400 cc of transmission oil. Try to keep the level between maximum and minimum levels for correct operation of the engine. Do not mix oils of different types, always top up with the same oil. We recommend 0W 75 GEAR TRANS type oil. 19 AIR FILTER Oil change There is a plug at the bottom of the sump for emptying the oil and another plug at the top for filling. To change the oil, start up the cold engine and let it tick over for 5 minutes. This will heat the oil enough for changing. Then place a tray under the engine and remove the oil plug. Let all the oil drain out and clean the plug removing any possible metal filings. When it is clean refit and fill with new oil through the upper filling plug orifice, until it reaches the correct level in the peep hole. 20 After removing the filter, it can be cleaned using a specific degreaser, then washed with water and detergent, let the filter dry and then coat it with special air filter oil. It is recommended to check the state of the air filter regularly, to avoid problems due to particles in the admission. Make sure you clean it in a ventilated place, without sparks nearby and do not use petrol for cleaning, as this could cause an explosion. The location of hatch on the left-hand side of the motorcycle offers easy access to the air filter. SPARK PLUG Take care with the filter foam when dismantling, as it is easily damaged. Access the air filter through the hatch and dismantle its securing elements. Remove the support cage with care, so as not to damage the foam. Clean it in a container and dry with a lint-free cloth. The spark plug fitted in the factory is as defined in the specifications datasheet. Tighten to 11 Nm. When it is clean, it can be slightly lubricated with special oil for air filters before replacing in its housing. For correct maintenance of the engine, it is recommended to clean the spark plug electrode with compressed air, ensuring that the gap is approximately 0.6 – 0.7 mm. 21 COOLING SYSTEM Regularly check the radiator inlet and outlet tubes for impacts, cracks or leaks that could compromise the cooling. Also check the radiator alloy fins. Do not forget that the radiator can get very hot, when manipulating, take care and let it cool down after switching off the engine. Always use coolant (-30°C) for alloy engines when topping up the radiator. 22 For correct operation of the engine, make sure the level of the coolant is correct. You can top up the radiator tank (preferably with the recommended coolant) through the cap at the top. Do this with the engine cold and the motorcycle upright, first open the cap partially by turning anti-clockwise and let any steam escape. Then open the cap completely and top up the fluid (if necessary) until it is just below the rubber. The coolant supplied in the factory is a permanent mix of ethylene glycol, diluted in distilled water at 50% concentration and with anticorrosion additives. It is recommended to change the fluid after some time in use and bleed the system. Pay attention to any abnormal colour of the fluid: white particles (corroded aluminium), brown particles (corroded steel parts), and be respectful with the environment, do not pour the fluid into inadequate places. There is a thermal switch at the bottom of the radiator; its job is to control the temperature of the liquid in the cooling circuit. This device should be in correct working order in order to avoid possible damage to the engine. CARBURETTOR The carburettor should be checked after a certain time, cleaning it and drying with compressed air so as to improve its performance. Check the height of the float that maintains the level of petrol in the carburettor and adjust it so it remains at 17mm within the specified margins. When Al manipular manipulating el carburador the carburettor y piezasand adyacentes adjacent pueden parts therequedar may be restos traces ofde fuel combustible that must firstque be previamente drained. Thisdeben fuel is serinflammable drenados. Dicho and combustible toxic, take es fácilmente inflamable y tóxico, tenga precaución. care. 23 Air-fuel mixture An optimum petrol-air mixture will enable you to obtain the maximum performance from your engine. For this purpose, the amount of air and fuel entering the carburettor must be adjusted. A good way discover the quality of the mixture is to inspect the spark plug. If the spark plug has a light brown colour, the mixture is correct; if it is black there is an excess of fuel, and if it is white there is an excess of air, in both cases the mixture entering the engine is incorrect. ADJUSTING THE TICK OVER To adjust the amount of petrol reaching the engine, you can modify the position of the main jet, which has a scale where the larger numbers indicate greater passage of petrol. You can also control the mixture with the air adjustment screw. Screwing in to enrich the mixture and vice-versa. There are two screws on the carburettor that can be used to adjust the tick over: The air adjustment screw and the tick over screw, that will enable you to change the speed of operation if necessary. 24 REED VALVE BOX TRANSMISSION CHAIN Admission is through a reed valve, the state of which has a significant influence on the performance of the engine. Whenever the carburettor is removed for cleaning, make sure the reed valves are not worn and if so, replace the box with a new one. 25 Correct tension of the chain should allow a play of approximately 10-15 mm in the area between the frame and the tensioner. SUSPENSION To tension the chain, first loosen the rear wheel axle nut and then adjust the chain using the tensioner adjustment bolts, which are in the swing arm. When adjusted, retighten the rear axle nut, paying special attention to the alignment of the chain, ensuring that it is not twisted. Take care with this adjustment. A misaligned rear wheel axle or with the nut loose could cause an accident. Keep the chain lubricated for optimum service life, preferably using viscous oil, for longer life. 26 The front fork can be adjusted with the bolts at the top of the fork. Turning the bolt on the left-hand fork tube you can adjust the compression and it you turn the bolt on the right-hand tube you adjust the extension. Choose the best option according to your needs, always bearing in mind that the left and right-hand cylinders must be adjusted to the same level and perfectly aligned. SWING ARM The preload of the spring can be adjusted by turning the castellated nut at the base of the shock absorber. It is also possible to adjust the hydraulic brake of the shock absorber with a bolt at the top. This bolt must be in the middle of its travel in normal adjustment. For correct maintenance of the rear suspension system and swing arm, it must be regularly dismantled for cleaning, checking and lubricating the internal bearings, as well as adjustment and lubrication of the chain. Make sure that all the parts are in perfect state and replace any worn components if necessary. 27 MAINTAINING THE MOTORCYCLE The greater the care given to the motorcycle, the longer its service life will be and the better it will perform. Check all the elements listed below and keep them clean and lubricated for optimum service: LEVER ARTICULATIONS REAR BRAKE PEDAL GEAR LEVER FOOTRESTS AND SIDE STAND STARTER PEDAL THROTTLE STEERING COLUMN TRANSMISSION CHAIN AND SWING ARM ARTICULATIONS CHAIN TENSIONER 28 SPEEDOMETER These are the most important features of the control panel and speedometer fitted to your motorcycle: 29 These are its features: Max. speed Overestimation Resolution Updated Impulses/revolution 300 Km/h (186 Mph) 4% constant 1 Km/h (1 Mph) Every 500ms 1 The basic functions (Always visible and cannot be deselected from the setup menu) of the panel are: - Current speed (SPEED) Total distance covered (ODO) Total time of vehicle operation (H) SPEED function This information is always visible, regardless of the status of the vehicle (stationary or in movement). The default configuration indicates Km/h. If the speed of the vehicle exceeds 110 km/h for more than 20 consecutive seconds, the status on the right-hand illustration will be displayed flashing. This signal will continue until the speed of the vehicle drops below 110 km/h for at least 10 consecutive seconds. 30 ODO function Clock function (CLK) This information can only be seen by pushing the MODE button, regardless of whether the vehicle is stationary or in movement. The predetermined configuration indicates Km and each Km is permanently stored in the in the memory. This function indicates the current time in "hh:mm:ss" format. The clock remains active even when Sleep Mode is activated. H function This function indicates the hours the vehicle has been in operation and can be seen by pressing the MODE, button, regardless of whether the vehicle is stationary or in movement. The counter associated with this function only works when the vehicle is in movement, on receiving the first impulse from the speed sensor, and it stops 3s after receiving the last impulse from the sensor. The time can only be set when the vehicle is stationary, pressing the MODE button several times until the display screen is as illustrated above. When the CLK mode is displayed, pressing the MODE button for a few seconds, the active digits will begin to flash (In this order: hours, minutes, seconds and in display mode), which can be modified with the UP and DOWN buttons, and select with the MODE button. In time configuration mode, if 20 seconds pass without pressing any button or if the vehicle begins to move, the system will return to standard operational mode, saving the modified configuration. 31 Trip, Average speed and functions (TR1, A1 and S1) Automatic Chronometer These functions indicate the partial distance covered, average time and the time the vehicle has been on the current trip. They are activated automatically and are displayed on the screen with the indicators TR1, A1 and S1 respectively, displaying the distance covered in km, speed in km/h and time in hours, minutes and seconds by default. Manual Stopwatch function(LAP) This function enables you to activate or deactivate a stopwatch manually, either if the vehicle is stationary or in movement. To activate the stopwatch, press the UP button on the screen displayed below, and to deactivate, press the UP button again. To delete the average time, press the DOWN button. For more information on the rest of functions of the system, go to: http://www.jotagas.com 32 TORQUE VALUES ELEMENTS FASTENED Nm Swinging arm-Chassis Upper shock absorber fastener Lower shock absorber fastener Front wheel axle Connecting rods Handlebar Front mudguard bridge Silencer Rear wheel axle Front brake caliper fasteners Exhaust pipe fasteners Engine fasteners Rear brake master cylinder fasteners Spark plug Ignition fasteners Clutch fasteners 40-50 40-50 40-50 40-50 40-50 25-30 7-10 10-15 40-50 25-30 10-15 30-35 7-10 11 7-8 20-25 Cylinder stud fasteners Reed valve fasteners Clutch spring fasteners Sump fasteners Water pump cover fastener Clutch cover fasteners Flywheel fasteners Ignition cover Sump drain plug Starter pedal bolt Gear change pedal bolt Cylinder head nuts 25 7-8 3-4 7-8 7-8 7-8 40 7-8 12 12-13 7-8 12-13 33 STORAGE If it is necessary to store the motorcycle for a long period of time, the following operations are recommended before storage: Clean the whole vehicle. Lubricate or grease the components that need it. Empty the fuel tank. (Take care with the fuel, which is inflammable and toxic) Empty the sump, removing the old transmission oil and refilling with new oil (If the engine is cold, it is recommended to start up and leave running for a few minutes to warm up the oil and favour draining). Cover the exhaust with a plastic bag, protecting it form the elements. Any unpainted metal parts that could get rusty should be coated with oil. Avoid the tyres touching the ground by placing a piece of cardboard or similar material under them. Protect the motorcycle as much as possible form dust and dirt by covering it with a plastic or canvas sheet. When putting the motorcycle back into service, first: 34 Remove the plastic protection used. Check the oil and lubrication of components. Check the spark plug. Adjust type pressure to the recommended value. Fill the petrol tank. MAINTENANCE OPERATIONS (NOTE: Bear in mind that a clean motorcycle will facilitate inspection and detection of faults and wear) COMPONENT CHECK Rear shock absorber Front fork suspension oil Transmission oil Annually Brake adjustment 30h Every time it is used Spark plug Swinging arm and connecting rods Transmission chain Throttle cable and twist grip Reed valve box Carburettor Chassis Every time it is used Every time it is used Every time it is used ADJUST REPLACE CLEAN LUBRICATE Every 2 years 60h 60h Whenever necessary 30h 60h If damaged Whenever necessary Whenever necessary 30h If damaged If damaged If damaged Whenever necessary If damaged If damaged 15h Every time it is used Every time it is used Whenever necessary Every time it is used Every time it is used Every time it is used Whenever it is cleaned Whenever it is cleaned Whenever it is cleaned 35 Whenever necessary Carburettor jet Steering bearing Piston bearing Wheel bearing Engine bearings If damaged If damaged If damaged If damaged Rear sprocket 30h Cylinder head and cylinder 60h Every time used Every time used Brakes Brake discs First 5h Whenever necessary If damaged First 5h If damaged Every time used Steering play Brake hoses 36 Every time used Every time used Every two uses If damaged If damaged In case of a fall 500h 100h Escape Silencer fibre Air filter Every time it is cleaned If damaged Annually Clutch plates Clutch Wheel-silencer clearance If damaged If damaged Whenever necessary Whenever necessary Every 2 years Every time used Every time it is cleaned Every time it is cleaned Whenever necessary Coolant General lubrication Every time used Front and rear wheel Tyres Annually If damaged Every time used If damaged Chain guide slipper If damaged Starter pedal and gear change pedal If damaged Front suspension Exhaust seal Nuts, bolts and other fasteners Every time it is cleaned If damaged If damaged Annually 60h Front and rear wheels Fuel system Every time it is cleaned Whenever necessary Brake fluid level Brake master cylinder piston and dust cover Brake piston and dust cover Piston and rings Every time used Every time used Every time used 5h Every time used If damaged Every time used If damaged Whenever necessary Whenever If damaged If damaged If damaged 37 Petrol tube Radiator tube and joints Chassis protective adhesive elements Sump protector 38 Every time used Every time used necessary Whenever necessary Whenever necessary If damaged If damaged If damaged If damaged HOMOLOGATION All the components fitted in this vehicle comply with legal homologation requirements, including the identification marks on part that require them. Pay attention to the component that are compulsory for using the motorcycle on public roads and must be present on the vehicle in order to pass the Vehicle Technical Inspection Test: - Registration plate holder Speedometer Lighting system and reflectors Indicators Horn Rear view mirrors Steering lock Manufacturer’s identification plate Air filter restrictor Exhaust system with catalyser Silencer Carburettor jets Side stand IMPORTANT NOTE: The vehicle is also supplied with a RACING KIT containing additional components. Bear in mind that the modifications provided by this kit are NOT covered by the vehicle homologation. 39 TROUBLESHOOTING (IMPORTANT NOTE: For all internal adjustments or replacement of parts that are not normal wearing components it is recommended to take the motorcycle to an authorised workshop. Bear in mind that unskilled manipulation of the motorcycle can be dangerous for you and/or possibly render the guarantee void.) PROBLEM The engine will not start POSSIBLE CAUSES - Dirty spark plug. - Engine flooded. - Fuel badly mixed. The motorcycle starts well and then stops Engine excessively hot Engine runs erratically 40 - Incorrect air supply, engine flooded. - Insufficient petrol. - Low level of coolant. - Radiator dirty or obstructed. - Problems with the spark plug and/or plug cap. - Fault in the ignition rotor. - Water in the fuel. ACTIONS - Clean and dry the spark plug or change it. - Open the throttle fully and kick the starter pedal 5 to 10 times and then start the engine. - Check for obstruction in the petrol tank tubes and air filter. - Close the choke, check the fuel pipes. - Fill the fuel tank. - Add coolant, check for possible leaks. - Clean the radiator fins. - Check the state of both. - Change the rotor. - Empty the tank and refill with new petrol. Engine makes strange noises - Ignition problems. - Overheated engine. Engine lacks power - Admission problems. - Exhaust system problems. - Carburettor jets dirty. - Damaged crankshaft bearings. - Clutch slipping. Exhaust gives off white smoke Exhaust gives off brown smoke Explosions in the exhaust Clutch not working correctly - Water in the cylinder. - Accelerator cable incorrectly adjusted. - Lack of air in the mixture. - Main jet too high. - Carbon deposits in the combustion chamber. - Incorrect type of fuel. - Spark plug in bad condition or wrong type. - Exhaust system gaskets damaged. - No play in the clutch lever. - Clutch worn. - Take motorcycle to an authorised workshop. - Stop the engine and check the state of the cooling and exhaust systems. - Clean the fuel admission system and air filter. - Check for leaks in the system and clean or replace the silencer fibre. - Remove the carburettor and clean them. - Replace the bearings. - Check its adjustments. Take bike to a specialised workshop. - Change the cylinder head O-ring. - Check accelerator adjustment. - Clean or change the air filter. - Check the main jet. - Clean the combustion chamber. - Empty fuel tank and refill with correct type of fuel. - Replace spark plug with correct type. - Check state of gaskets and replace if necessary . - Take bike to a specialised workshop. 41 - Clutch springs broken or weak. Gears engage badly Abnormal noises Unstable ride - Problems in forks, gears or additional gearbox systems. - Worn or badly adjusted chain - Rear sprocket teeth worn. - Chain needs lubrication. - Badly aligned rear wheel. - Lack of oil in the front fork. - Problems with the front fork springs. - Worn brake disc. - Brake pads glazed or badly fitted. - Steering shaft nut too tight. - Steering bearings worn or damaged. - Bent steering shaft. Suspension too hard - Too much oil in fork. Suspension too soft - Oil in fork too dense. - Twisted or bent fork. - Excessive tyre pressure. - Rear shock absorber badly adjusted. - Low oil level in fork. - Oil with excessively low density. 42 - Take bike to a specialised workshop. - Take bike to a specialised workshop. - Take bike to a specialised workshop. - Adjust or change chain. - Change rear sprocket. - Apply appropriate chain lubricant. - Take bike to a specialised workshop. - Add fork oil to the specified level. - Replace front fork spring. - Replace brake disc. - Refit pads or replace. - Loosen the steering nut a little. - Replace bearings. - Take bike to a specialised workshop. - Remove excess oil. - Replace oil with correct density. - Take bike to a specialised workshop. - Adjust tyre pressure. - Adjust rear shock absorber. - Add the right oil to the specified level. - Replace oil with correct density. - Adjust rear shock absorber. Handlebar vibration Brakes working badly - Rear shock absorber badly adjusted. - Worn tyre, swinging arm or bearings worn. - Rim out of true. - Badly aligned wheel. - Steering shafts, handlebar supports or fasteners with play. - Pads worn - Discs worn. - Loss of brake fluid. - Brake fluid in bad state. Fusing bulbs - Master cylinder piston worn. - System badly adjusted. - Voltage regulator problems. - Take bike to a specialised workshop. - Take bike to a specialised workshop. - Take bike to a specialised workshop. - Tighten nuts and fasteners to specified torque. - Change pads -Change discs. - Check circuits. Replace leaking parts and top up fluid to the correct level. - Remove brake fluid circuit and replace with fresh fluid of the right type. - Replace master cylinder piston. - Adjust brakes. - Check connections. Check voltage regulator and fuses. 43