1
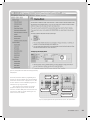
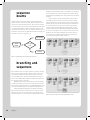
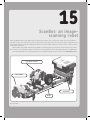
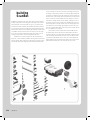
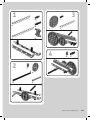
THE lego
mindstorms nxt
idea book
®
®
®
design, invent, and build
martijn boogaarts, jonathan a. daudelin, brian l. davis,
jim kelly, david levy, lou morris, fay rhodes, rick rhodes,
matthias paul scholz, christopher r. smith, and rob torok
Excerpts from Chapter 2: The Grammar of NXT-G (pages 9-13) and
Chapter 15: ScanBot: An Image-Scanning Robot (pages 249-251)
®
2
the grammar of NXT-G
The first problem most people have with the LEGO NXT MINDSTORMS kit is the studless architecture. Where did all the studs go? How can
you connect the pieces firmly, in the ways you want to? With a little bit of help from the building instructions and some experimenting, you
can cross that hurdle only to immediately face another one: How do you program your creation? What are all these funny icons snapped to
a beam on the screen, and how do they work?
is NXT-G a toy programming language?
For some people used to a text-based language, NXT-G just looks . . . well, weird. Instead of a series of ordered instructions, it looks as if
we have a bunch of brightly colored blocks lined up along the midline of the screen. Even more confusing, few text clues onscreen hint at
what these various blocks are trying to do or how they work together. As a result, a lot of folks are likely to throw their hands up in frustration, decrying the fact that LEGO and National Instruments (NI) created a “toy language.”
Well, to a point, they’re correct.
NXT-G is indeed a computer language designed to explicitly run on a toy; after all, that is what the NXT is and what LEGO produces.
So any language that ships with the NXT should be easily used by the target audience, which is kids . . . not a bunch of folks with years (or
decades!) of experience programming in high- and low-level text-based languages.
But don’t let that fool you into thinking that NXT-G is “just a toy” or that it can’t be used to write “real programs.” True, some things
have been limited or hidden to make the environment a little easier for a first-time user to navigate (and true, there are some things that
are missing), but there is a lot of power under the hood in NXT-G. The trick is that in order to use it, you have to approach it as a new
language and learn its intricacies and strengths, as well as its weaknesses.
NXT-G is no more a crippled toy than the graphical user interface (GUI) on your PC at work is a toy—humans can use pictures to communicate a lot of information rapidly, and graphical languages (and interfaces) take advantage of this.
n ote NXT-G was developed on top of (and owes a lot to) a highly regarded professional development language called LabVIEW.
Far from being a toy, LabVIEW is used in complex data acquisition and control systems all over the world, serving as a flexible and
powerful tool for scientists and engineers. Since a full LabVIEW environment retails for hundreds to thousands of dollars, you can
consider NXT-G a wonderful and inexpensive way to sample a graphical programming language.
Now I’ll be the first to admit that there’s no way to explain the entire NXT-G language in a single chapter. There’s just too much to
talk about. There are 28 stock blocks (and a lot more can be added), and each block can have as many as 8 different sections in its configuration pane, as well as multiple configuration panes, and so on. In fact, an entire book could be written about programming in NXT‑G.
Instead, I’m going to try to explain some of the quirks and tricks that you can use to do much more in NXT-G. I’ll assume that you have
programmed at least some in NXT-G, but need a little boost to understand some of the oddities about the language or how to use some
specific blocks. But this really begs the question of how you get this basic competency.
where’s the
guidebook?
The first step most people take in learning NXT-G is to work
through at least some of the programming examples in the Academy content (those detailed “build and program” instructions that
are initially available along the right-hand side of the main window).
Figure 2-1 shows the Academy area.
or structure on the programming sheet, and a brief explanatory
note will pop up in the Help pane in the lower-right corner of the
window. Actually, there are two useful panes down there: Clicking
the upper question mark tab brings the Help pane forward, while
clicking the lower magnifying glass tab brings the navigation pane
forward. More about that later.
These brief notes are helpful, but the real secret is what’s
under them. If you click the More Help link, NXT-G obediently opens
a full, detailed, linked web page of information about almost every
aspect of the block, including what each input or output plug does,
what the limits on certain parameters are, how it can be used (and
in some cases how it shouldn’t be used), and so on.
help index
You can also open this detailed help from the NXT-G menus by
selecting Contents and Index from under the Help menu in the
menu bar. The index that opens along the left side of your screen
is valuable (see Figure 2-2). It not only contains the help files for
every NXT-G block, but it also starts with some important overview
subjects, such as sequence beams and data wires, for example. In
short, LEGO and NI have included a wonderful, detailed, block-byblock description of the language right in the product.
For example, open up the Help window and click Starting Point
in the General Topics section in the left pane. This not only tells you
that the odd little symbol at the start of your program has a name,
but lets you know that by selecting it, it opens up a comments text
box in the configuration pane.
You can document anything you like about your program here:
your name, when you wrote it, special hardware it needs, your
grocery list, and so on.
There are many more little gems like this in the documentation, but you have to actually read the documentation to find them.
(If I sound like your fourth-grade teacher, there’s a reason; teachers
know that a student usually has to actively process something to
learn it, not just have it available and unread.) How many times
have you heard the words Did you read the instructions? Well, in
support of beleaguered spouses everywhere, I have to repeat them:
Read the instructions (now that you know where they are).
Figure 2-1: The Academy area as it appears when the program starts
While these instructions will walk you through building a
program step-by-step, they don’t offer much at all in the way of
detailed explanations. So how can you learn the language? Where
did LEGO put the programming guide?
help is built in
LEGO put the programming guide right into the programming environment: Just hover (don’t click) the mouse pointer over any block
10
chapter 2
the basics:
starting out
First, let’s lay out some terminology—not because terminology is
fun, but because it’s useful to have a common language in which to
talk (and think) about such things.
The hard-copy user’s manual that comes with NXT does a
great job of describing the programming environment, including
things like the configuration panel (or configuration pane), the
Figure 2-2: The Help HTML screen with the index and the page describing
the Display block
work area (sometimes called the programming sheet
because you can have multiple sheets open and hidden
behind each other like sheets of paper), and so on. But
as far as elements of the actual NXT-G programs, the
manual doesn’t go into great detail.
There are three basic elements used to build
programs in NXT-G: sequence beams, blocks and
structures, and wires. Okay, that’s four, but blocks and
structures are really very closely related. Figure 2-3
shows each of these elements.
My Block
Block
Number wire
Sequence beam
Logic wire
Switch structure
Figure 2-3: A simple program that shows sequence beams, blocks, wires, and a Switch structure
the grammar of nxt-g
11
sequence
beams
Sequence beams are the white studless beams that link blocks
together onscreen. The order of blocks along the sequence beam
controls the order in which they execute: The first block connected
to the start symbol executes first; then (usually when the first block
is completely finished) the next block along that sequence beam
executes; then the third one, and so on. Sequence beams are just a
visual way to represent the program flow, not unlike the arrows in a
flowchart, as you can see in Figure 2-4.
(actually, it could be below it, above it, or anywhere else, as long as
it doesn’t link up to the sequence beam). Such an “orphan” block is
normally ignored by NXT-G and not incorporated into your finished
program.
Now, to branch a sequence beam and link in this first block
of a parallel sequence, hover the arrow cursor over the existing
sequence beam at the point you want it to branch, and press and
hold the shift key. You can now click and drag out a new branch of
the sequence beam to the start of your orphan block, and that’s
it—you’ve started a new parallel sequence. Any blocks you drop
behind this newly connected block will obediently join the rank and
file of the second sequence. You can branch a new sequence from
anywhere: the start symbol, midway along a sequence beam, or
even within a Loop or Switch (although that’s a bit trickier). Figure 2‑5 shows a sample three-pane sequence.
Play a sound
Yes
Get a
number
Is it equal
to 0?
No
Continue
Figure 2-4: A simple flowchart for the program shown in Figure 2-3
branching and
sequences
Like a flowchart, these “execution sequences” can branch, but they
branch in two very different ways. The first is when a choice has
to be made: Should the execution follow this path, or that one?
In a text language this is done with something like an if-then or a
switch-case command, while in NXT-G the Switch block takes over
this role (more on that in a second).
And NXT-G offers another very different, very powerful way
to make the execution proceed: You could have it go down two different branches simultaneously. This is parallel programming: using
two or more parallel sequences to accomplish two things at once.
In NXT-G, parallel programming is as natural as breathing.
Once you have laid down one sequence (or even a portion of that
sequence), you can start a second sequence by dropping a block
somewhere below it, not connected to the existing sequence beam
12
chapter 2
Figure 2-5: A three-pane sequence of creating a parallel sequence beam
multitasking: no such thing as a free lunch
Don’t think that running two sequences in parallel makes things twice as fast. Just like you, the NXT can’t really
do multiple tasks at once (there’s only one primary processor trying to execute your code). Behind the scenes
it rapidly switches between all the currently executing sequences: It first executes a little bit of code from this
sequence; it then skips down and executes a little bit of code from the next parallel sequence, and so on. In
effect, running two sequences in parallel means that each sequence is running significantly slower than if the
processor were running only one. There are still times when these parallel sequences are handy (for instance,
watching a sensor for something to change while at the same time calculating some math or moving the robot),
but it doesn’t mean your NXT is working “twice as fast.”
blocks and
structures
Blocks and structures are the real workhorses of NXT-G. They are
specialized chunks of code that do something specific, such as play
a sound, control a motor, get the current reading from a sensor,
and so on.
Almost any time you place a block or a structure, you need
to set up its various limits and conditions from the configuration
panel, such as what port a sensor is connected to, how long to run a
motor, and so on—and there can be a lot of things to configure.
blocks
Of the two, blocks are the simplest; they’re just one-square icons
that accomplish something specific. Program execution usually halts
while a block is executing; that is, the next block on the sequence
doesn’t start doing its thing until the previous “upstream” block has
completely finished. But that’s not always the case: Some blocks
can start actions and then let the sequence continue executing,
even while these actions are still taking place. A good example of
such a block is the Sound block, which enables you to check or
uncheck the box next to the words Wait for completion.
cloning blocks
Re-editing the configuration panel every time you drop a new block
gets old fast. Every block has only one default state when dropped
from the palette, but that’s not much help if you want to repeat a
block that is set with something other than the default state.
To repeat an existing block you can clone it. If you alt-drag
an existing block (option-drag on the Mac), the environment makes
a “clone” of the block you selected—copying every setting from
its configuration pane into the new one, and even imitating the
data plugs that are currently displayed. This is another wonderful
feature inherited from NXT-G’s “parent language” LabVIEW, and it’s
great that the developers left such things in to help the advanced
user.
loop and switch
structures
The Loop and Switch structures function almost like composite
blocks, or blocks that contain other blocks. When they are first
placed they do nothing, because there is nothing inside them to do;
you must drop blocks into them to set up their sequences.
configuration hints
Notice that the block icons give you hints about how the configurations are
set up. For instance, a Move block set to unlimited displays a little infinity symbol in its lower-right corner, telling you how it is configured without
your having to view the configuration pane. Another great example is the
mini–Venn diagram on the Logic block, which changes to represent the sort of
logical operation that it is configured to perform (in this case a logical AND).
the grammar of nxt-g
13
15
ScanBot: an imagescanning robot
Before the NXT was released, I was always impressed when someone made a robotic scanner. Since scanners are used in everyday life
and require very precise measurements to function properly, they’re some of my favorite robots. But since the RCX in the RIS set had very
limited display capabilities, designers of LEGO scanners had to come up with a way to display the scanner’s picture on a computer monitor
instead of on the robot itself.
When the NXT came out with enhanced display capabilities, I immediately saw a great opportunity to build a simple robotic scanner.
After a few tries, I succeeded with ScanBot, a robot that can scan black-and-white pictures and display them right on the NXT’s LCD.
This chapter will show you how to build and program your own ScanBot (see Figure 15-1), using only one basic MINDSTORMS NXT kit.
Light Sensor carriage
Motor module
NXT module
Bridge
Figure 15-1: ScanBot
building
ScanBot
ScanBot has a simple design and is quite easy to build. It works by
moving a Light Sensor across every part of an image to be scanned,
taking hundreds of measurements as it goes. It compares each
measurement with a variable threshold and determines whether
to represent the tiny area from which the measurement was taken
with a black or white dot on the NXT’s LCD. A unique and fun aspect
of ScanBot’s design is that the entire robot moves over the image
to be scanned, instead of feeding the image through the robot or
moving the Light Sensor over the image within the robot.
ScanBot has four main components, which are labeled in
Figure 15-1. In the middle of ScanBot, two long beam constructions
form the bridge, which supports the Light Sensor carriage, a motorized carriage that holds a Light Sensor and travels back and forth
250
chapter 15
across the bridge to scan successive lines of the image. Each end of
the bridge is supported by a wheel: one under the NXT module, and
one (which isn’t visible in Figure 15-1) under the motor module. The
two wheels are connected by a drive shaft, which the motor module
rotates to move the entire ScanBot across the image. To scan, the
Light Sensor carriage travels over the bridge, scanning one line of
the image. Then the motor module moves ScanBot down a tiny bit,
and the Light Sensor carriage travels across the bridge again, scanning another line of the image right below the previous line. This
process is repeated many times, until as much of the image that can
fit on the LCD has been scanned.
First, build the motor module, which moves ScanBot down
the image being scanned. The motor module includes the wheel
beneath it and part of the drive shaft that extends toward the other
side of the bridge. This will later be connected to the wheel, which
sits under the NXT module on the other side of the bridge. Both
wheels will then turn the same amount, giving a preciseness to the
downward movements that is necessary to get a good scan.
1
3
4
2
scanbot: An Image-Scanning Robot
251