1
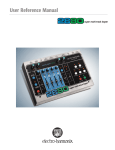
LP1
Version 1.20
ROUGH DRAFT
User Manual
September 21, 2006
2
Table of Contents
Getting Started..................................................................................................................... 5
Quick Start...................................................................................................................... 5
Setting Audio Levels....................................................................................................... 5
Recording your first loop................................................................................................ 6
Installation.......................................................................................................................6
Back Panel........................................................................................................................... 7
Power...............................................................................................................................7
Network...........................................................................................................................7
MIDI connectors..............................................................................................................7
Audio inputs.................................................................................................................... 8
Audio outputs.................................................................................................................. 8
Front panel........................................................................................................................... 9
Menu Operation...............................................................................................................9
Rec/Dub Button.............................................................................................................10
Play/Stop Button........................................................................................................... 10
Track Buttons................................................................................................................ 10
All Button......................................................................................................................10
Track lights....................................................................................................................10
Recording and Playing Loops............................................................................................ 11
Recording a new unsynchronized loop......................................................................... 11
Recording a new internally synchronized loop............................................................. 11
Recording a new MIDI synchronized loop....................................................................12
Starting and stopping a recorded track.......................................................................... 13
Track Bouncing............................................................................................................. 13
Cue Track...................................................................................................................... 14
Replace.......................................................................................................................... 14
Audio Manipulations......................................................................................................... 15
Feedback Control.......................................................................................................... 15
Reverse.......................................................................................................................... 15
Speed Changing.............................................................................................................15
Scramble........................................................................................................................16
Re-trigger...................................................................................................................... 16
Configuring the LP1...........................................................................................................17
Edit Group.....................................................................................................................17
MIDI Channel................................................................................................................17
Noise Gate..................................................................................................................... 18
Wet/Dry Mix................................................................................................................. 18
Time Display................................................................................................................. 18
Pedal Mode....................................................................................................................19
MIDI Clock Out............................................................................................................ 19
Selecting tracks by changing volume or feedback........................................................ 20
Altering fade speed........................................................................................................20
Programming the LP1 to use MIDI pedals or dials....................................................... 20
3
Programming the LP1 to respond to MIDI buttons or USER buttons.......................... 21
Network configuration.................................................................................................. 22
Assignable Functions.................................................................................................... 23
Internal Web Server........................................................................................................... 26
Software Upgrades.............................................................................................................27
LIMITED WARRANTY.................................................................................................. 28
4
Getting Started
Quick Start:
●
●
●
●
●
●
●
●
●
●
Unpack the LP1 from shipping carton. Please save shipping carton.
Mount the LP1 in an empty space in your rack. The LP1 is not designed for desktop
use. Please properly mount your LP1 in a rack case or floor-standing rack.
Connect the audio source to the audio inputs on the rear panel. The LP1 accepts
unbalanced tip-ring 1/4” connectors. The audio inputs accept line levels only. Only
connect line-level outputs from other equipment.
Connect the audio outputs to line-level inputs on your amplifier, mixing console, or
other effects boxes.
If you are using a remote MIDI controller, attach it with a MIDI cable to the MIDI
input connector on the back of the LP1.
Plug the cable of the supplied power adapter into the power connector on the back of
the LP1.
Plug the power adapter into an appropriate power outlet.
Turn on the power to your LP1.
Your LP1 will display “LP1 loading ...”
After about 8 seconds, the LP1 will display “Looperlative LP1” on the top line and the
software version on the bottom line.
Setting Audio Levels:
To get the best possible audio from your sound system. It is important to correctly set
audio levels. On the display are two bars that indicate input and output audio levels. The
bar on the left indicates the input audio level and the bar on the right indicates the output
audio level.
If the input audio level is too low or too high, adjust the volume on your audio source.
Audio levels should be set as high as possible without distortion.
When using multiple tracks or overdubbing it is possible to overdrive the output of the
LP1 and cause distortion. If this occurs, adjust the “Master Level” from the “All Tracks”
menu. A setting of -1 or -2 is often sufficient.
5
Recording your first loop:
●
●
●
●
●
Press “REC/DUB” or program change 0 on your MIDI controller to begin recording.
Play your musical phrase that you want looped.
Press “REC/DUB” or program change 0 on your MIDI controller to end the loop and
enter overdub mode.
When you have completed overdubbing to the track, press “REC/DUB” one more time
to change from overdub mode to play mode.
Press “PLAY/STOP” to stop playback of the loop.
Installation:
●
●
●
●
●
●
●
Connect audio connections to other equipment.
Connect MIDI connections if they will be used.
Connect network connection if it will be used.
Connect power supply to back of the unit.
Plug power supply into wall socket or power strip.
Turn on power switch on the front panel.
Wait approximately 15 seconds for the unit to complete its software load procedure.
The front panel will display the software version number when the unit is ready to use.
6
Back Panel
The prototype LP1 has 9 connectors on the back. From left to right, these connectors are:
●
●
●
●
●
●
●
●
●
●
●
●
●
Power (9-12VDC, positive center)
Network connector
MIDI in
MIDI through
MIDI out
Audio input left
Audio input right
Audio output left
Audio output right
Aux 1 output left
Aux 1 output right
Aux 2 output left
Aux 2 output right
Power:
Use the adapter supplied with the LP1. The LP1 requires a 9 or 12VDC power supply
capable of supplying at least 700mA of power.
Network:
The LP1 accepts a standard Category 5 RJ45 connector for ethernet. The other end of the
cable can be connected to any 10 or 100 MBPS ethernet connection. If connected to a
network with access to the Internet, the LP1 can be commanded to update its software.
By default the LP1 is configured to automatically obtain its network configuration from a
DHCP server. This is usually your Internet router. However, if your network does not
have a router that automatically configures the devices that connect to it, then you will
need to manually configure the IP address, gateway address, DNS server address, and
netmask. All of these must have a value other than 000.000.000.000 otherwise the LP1
will attempt automatic configuration.
MIDI connectors:
The MIDI connectors accept the standard 5-pin circular DIN connector for MIDI. It is
recommend that any MIDI controller be placed in the chain as close to the LP1 as
7
possible to avoid delays caused by some MIDI devices.
The LP1 accepts MIDI commands and clock pulses from the MIDI In connector. By
default, the LP1 accepts messages on channel 1. The LP1 can be configured through a
setting on the main menu to use one of the other 16 MIDI channels.
The LP1 passes all MIDI In data to the Through connector. This connector is electrically
connected to the MIDI In connector and adds only a minimal delay to the chain.
The LP1 is capable of generating MIDI messages on the MIDI Out connector. At the
present time the LP1 can be configured to transmit a MIDI clock derived from track 1. It
is also able to send song start and stop commands on user command.
Audio inputs:
Audio inputs are ¼-inch unbalanced connectors. These inputs accept line-level inputs
with an impedance of approximately 20k Ohms. Audio levels should be adjusted to
achieve the maximum signal level without distortion. This will provide the best possible
signal-to-noise ratio. On the front panel display, the left bar indicates the input audio
level. The best audio quality is achieved when this bar nearly reaches the top or reaches
the top very infrequently. Please adjust your audio level feeding the LP1 to achieve this
condition.
Audio outputs:
Audio output are ¼-inch unbalanced connectors. These are line-level outputs and should
only be connected to line-level inputs of other equipment. Audio connections should be
made before powering on the unit. By default, the LP1 is configured to pass the audio
input with almost exactly the same level at the output. However, when multiple loops are
running simultaneously or after an overdub, it is possible to overdrive the output
converter. In this case, it is recommend that you reduce the Master Level from the ALL
track menu. A setting of -2 is usually sufficient to guarantee that this type of distortion
does not occur.
8
Front panel
The front panel has the following items:
●
●
●
●
●
●
●
●
●
●
●
1 power switch
1 two-line display
1 selector knob
1 MENU button
1 ENTER button
1 REC/DUB button
1 PLAY/STOP button
4 user programmable buttons
1 ALL track menu selection button
8 track selection buttons labeled 1 through 8
8 track status lights
Menu Operation:
The selector knob allows you to scroll through menu items and to change the value of a
menu item. Menu items are displayed on the second line of the panel. To select a menu
item:
●
●
Turn the knob until the menu item is displayed.
Press ENTER.
To change the value of a menu item:
●
●
●
Select the menu item.
Turn the knob until the value you want to select is displayed.
Press ENTER
The MENU button returns the display to the previous menu.
The track selection buttons select a track for recording or changing. After selecting a
track, turn the knob to select a menu choice. Selecting a track also allows you to record,
overdub, start or stop that track.
9
Rec/Dub Button:
The Rec/Dub button controls record and overdub operations of tracks. It is a
multifunction button depending on the state of the currently selected track. If the track is
currently empty or stopped, then the Rec/Dub will begin recording a new loop. If the
track is recording, the loop is closed and placed in overdub mode. If the track is playing,
the loop is placed in overdub mode.
Play/Stop Button:
The Play/Stop button is a multifunction button that controls playback of a loop. If a track
is stopped, the loop begins playing when the loop counter reaches the beginning of the
loop. If the track is playing, the loop stops playing when the loop reaches the end. If the
track is empty and a master track is recorded, a blank synchronized track is created.
Track Buttons:
The numbered track buttons are used to select a specific track. Other functions such as
record or play work on the currently selected track. The track buttons are also used
during advanced MIDI button programming to select the sequence position. The display
will show the track menu when one of these buttons are pressed.
All Button:
The All button selects all tracks. The all track menu is displayed when this button is
pressed.
Track lights:
The track lights above each track selection button indicate the state of each track. The
states displayed are:
Light color and action
Track state
Light off
Track empty
Light blinking red
Audio recording to the track
Light blinking green
Audio overdubbing on the track
Light solid red
Audio recorded to the track, but the track is
not playing
Light solid green
Audio recorded to the track and it is
playing
10
Recording and Playing Loops
Recording a new unsynchronized loop:
To record a loop to a track:
●
●
●
●
Select an empty track (track light is off).
Press the REC/DUB button or press the MIDI button assigned to this function.
Play the audio that you want to record.
Press the PLAY/STOP button or the MIDI button assigned to this function to begin
looping the audio.
Recording a new internally synchronized loop:
Synchronized loops are loops that are locked in time with each other. In other words, if
you have two tracks, the music in those tracks will always stay together. You
synchronize a loop to the master track. By default, the master track is the first loop
recorded. You can change the master track at any time, which will not affect previous
synchronizations.
Any track can be selected as the master track using the track menu. To select a master
track:
●
●
●
Press the track number button.
Turn the knob until the front panel displays, "Set As Master."
Press ENTER.
Or,
●
Do nothing, and the first loop recorded will be the master track.
There are two methods available to create new synchronized tracks. The first method
creates a synchronized track that is exactly the same length as the master track.
Method 1 for creating a new synchronized track:
●
●
●
●
●
Select an empty track.
Press the PLAY/STOP button or equivalent MIDI button. This will create an empty
loop of exactly the same length as the master track.
Press the REC/DUB to begin overdubbing on the new empty track.
Play the audio that you want to record.
Press the PLAY/STOP button to end overdubbing and continue looping.
11
Method 2 for creating a new synchronized track:
●
●
●
●
Select an empty track.
Choose the Sync Rec/Dub function or equivalent MIDI button. This begins the
recording of a new synchronized track.
Press REC/DUB or the same button as in the last step to end the track and enter
overdub mode on the new track.
Press REC/DUB or the same button as in the last step to stop overdubbing and simply
replay the loop.
Recording a new MIDI synchronized loop:
It is possible to use an external MIDI clock source such as a drum machine to create loops
that stay synchronized. Recording new MIDI synchronized tracks is very similar to
method 2 of recording internally synchronized tracks. However, before you record a
MIDI sync track, you need to tell the LP1 how many beats per measure there are. This
allows the LP1 to create loops which consist of only complete measures. To set the
number of beats measure:
●
●
●
●
●
Press the ALL button on the front panel.
Turn the knob until the bottom line reads “Beats / Measure”.
Press the ENTER button.
Turn the knob until the current number of beats per measure are displayed.
Press the ENTER button.
After the measure length has been configured and the MIDI clock source is sending clock
messages to the MIDI input port of the LP1, you may now record a MIDI sync track. To
do this:
●
●
●
●
●
Select an empty track.
Choose the MIDI Sync Rec function or equivalent MIDI button to start recording.
To end recording and enter overdub mode, press the same button used in the last step.
Finally, press the same button one last time to exit overdub mode.
Your new loop will now be synchronized with the MIDI clock.
If your MIDI clock fluctuates a bit, the LP1 will adjust playback to remain synchronized.
The LP1 will try to remain synchronized even if you alter the MIDI clock speed. The
results of changing speed are unpredictable and if the speed is changed by a large enough
amount the LP1 will lose synchronization. However, this can be an interesting musical
technique.
12
Starting and stopping a recorded track:
The PLAY/STOP button starts and stops playback of a track when it is not currently
overdubbing or recording. This button is synchronized to the end of loop. Using this
button to stop a playing track will be delayed until the loop ends. A USER button or
MIDI button can be programmed to perform a “Stop Now” function which does not wait
for the end of the loop. Also, “Stop Now” can be selected from the track menu.
To stop all of the playing tracks, press the ALL button and then the PLAY/STOP button.
The “Stop Now” functions are also available for stopping all tracks.
An important thing to know is that the stop function actually acts as a mute. To maintain
synchronization of synchronized tracks, the audio position of a stopped track continues to
move in time. When all tracks are stopped, then the first track to be played will cause all
of the tracks to shifted in time to allow the track to start playing at its beginning. If more
than one track is started after all tracks are stopped, the LP1 will shift all of the tracks to
allow the longest track to restart at its beginning.
Track Bouncing:
Because the LP1 is designed to treat each track as an independent looping box, it will
sometimes be desirable record a new track from the output of an existing track. This
would be the same as taking the output of one looping box into the input of another. The
original track can be altered using the various audio manipulations allowed in the LP1,
and that altered output will be recorded into the bounce track. Track bouncing can also
be used to capture a small portion of a larger loop and repeat it.
There are three bounce functions the same as there are three record functions: bounce,
sync bounce, and MIDI sync bounce. The bounce function is asynchronous. The first tap
of the bounce button starts the recording and the second tap immediately ends the
recording.
The sync bounce function is nearly the same as the asynchronous bounce except that the
end of the recording is delayed after the second tap until the new loop is an integer
multiple of the master track length. The sync bounce function thus gives you a new loop
that will remain synchronized with the master track.
The MIDI sync bounce gives you a new track that is synchronized with the MIDI clock.
The MIDI sync bounce also makes use of the beats per measure setting in the all track
menu. When this type of bounce is used, the new track will be an integer number of
measures long based on the MIDI clock and the number of beats per measure
programmed in the LP1.
Unlike the record functions, the bounce function is always ended by pressing the same
13
button used to start the bounce. After recording ends on the new track, all tracks that are
being recorded into the bounce track are stopped. They may be immediately restarted if
you desire.
The bounce function automatically chooses the new track that you will record. It always
picks the highest numbered track that is currently empty (the front panel light is off). If
no track is empty, then the bounce function will not start.
Cue Track:
The cue function is used to mark a track as ready to play or record. When used on an
empty track, it prepares a track to record the next time that any other track stops. When
used on a stopped track, it prepares the track to begin play the next time that any other
track stops. This can be used to switch between sections of a song.
Replace:
Replace records new audio while erasing the old audio in a track. Press replace once to
begin replacing and press it a second time to end replacing. The replace function may
also be assigned to a MIDI note. In this case, the replacement starts when the note is
pressed and replacement ends when the note is released.
There are two varieties of this function: replace and replace+original. The replace
function replaces while silencing the old audio that is being replaced. The
replace+original function continues to play the replaced audio one last time during the
replace.
14
Audio Manipulations
Being able to record and play multiple loops is useful for musicians. However, the LP1
doesn't stop there. The LP1 is capable of altering the audio in a recorded loop in several
ways. These manipulations can be used to assist in creating a unique musical
composition that otherwise could not exist without the assistance of the looper.
Feedback Control:
Audio delay lines normally have a feedback control. At 100%, all of the audio that exits
the delay line is reinserted at the beginning of the delay. At 0%, none of the audio is sent
back to the beginning. Thus the feedback level determines how much of the delay output
is sent back to the beginning after it is heard delayed.
An audio loop is a long delay line. Audio heard playing from a loop is considered the
same as audio exiting a delay line. If the feedback setting on a track is reduced below
100%, then the audio sample is reduced by the feedback setting after it is played. Thus,
any feedback setting below 100% will cause a loop to fade. The lower the feedback
setting, the faster it will fade.
The feedback setting can be controlled in different ways. The first way is through the
track menu. There is a menu option to change the feedback level.
The second way to adjust feedback is to assign a MIDI controller. See the section on
programming MIDI controllers to learn how to assign your MIDI controller to the track
feedback level.
The last way is to assign buttons to adjust the feedback level. This is useful if you have a
MIDI remote control that only has buttons.
Reverse:
The reverse function causes the audio to play back in the reverse direction. This would
be similar to reversing the direction of an audio tape that is playing. Reversing a track
that is playing in reverse will cause it to play forward again.
Speed Changing:
The LP1 is capable of changing the playback speed of a track. Changing the speed will
alter both the timing of the notes and the pitch of the notes. Changing the speed of a track
to half-speed will shift the notes one octave down. Overdubbing is allowed on a track
15
that has been slowed below normal speed. When the speed is increased again, the
overdubbed audio will increase in pitch.
Speed can be toggled between half and normal using the track menu or by using a button
assigned to the half-speed function. The LP1 also allows you to assign a MIDI controller
such as a pedal to speed control. This allows you to adjust a track speed to values
between half and normal.
Scramble:
A unique feature of the LP1 is the ability to randomly scramble a track. The scrambling
divides a loop into smaller chunks. These chunks are then randomly reordered during
playback. Three different varieties of the scramble function are available: slow, medium,
and fast. The slow scramble divides the loop into 1.6 second long chunks. The medium
scramble divides the loop into 0.4 second chunks. The fast scramble divides the loop into
0.1 second chunks.
Pressing scramble on a scrambled track will restore it to normal. Each time a track is
scrambled, it is scrambled in a different order. If a track is left scrambled, the pattern will
repeat each time through the loop.
Re-trigger:
The play re-trigger function does two things. If the track is stopped, it will begin playing
it from the beginning of the track. If the track is already playing, it will instantly rewind
back to the beginning of track and start playing from there again. Repeatedly using this
function creates a stutter effect.
16
Configuring the LP1
The LP1 main menu offers ways to configure the device for your specific needs. This
section of the document is devoted to the options seen in the main menu.
Edit Group:
Track groups are used to manipulate more than one track with a single command.
Grouping can be used to create song sections which can be stopped and started together.
Grouping can also be used with track bouncing to combine several tracks into a single
track.
To create a new group:
●
●
●
●
●
●
●
●
●
●
Press the MENU button until the main menu is selected. The main menu says
“Looperlative LP” on the top line of the display.
Turn the knob until the second line of the display reads “Edit Group.”
Press ENTER
The top line will read “Select group:”
Turn the knob to select the group that you wish to edit.
Press ENTER.
The top line will now indicate the group number that you selected.
Press the track buttons for the track that you want in this group. The track buttons are
toggle controls. The first press adds the track, the next press removes the track. The
display shows which tracks are selected on the second line.
Press ENTER when you have selected the tracks that you want in this group.
Press MENU to return to normal operating mode.
MIDI Channel:
To change the MIDI channel that the LP1 responds to:
●
●
●
●
●
●
Press the MENU button until the main menu is selected. The main menu says
“Looperlative LP” on the top line of the display.
Turn the knob until the second line of the display reads “MIDI channel.”
Press ENTER
The top line will read “MIDI channel”
Turn the knob to select the channel that you wish.
Press ENTER.
17
Noise Gate:
The LP1 contains a built-in noise gate to assist in eliminating noise build up when using
overdub. The default settings are adequate for most circumstances. If you need to adjust
it, there are two parameters: noise gate level and noise gate delay.
Both parameters are adjusted in a similar manner:
●
●
●
●
●
●
Press the MENU button until the main menu is selected. The main menu says
“Looperlative LP” on the top line of the display.
Turn the knob until the second line of the display reads “Noise Gate Level” or “Noise
Gate Delay”.
Press ENTER
The top line will read “Noise Gate Level” or “Noise Gate Delay.”
Turn the knob to select the setting that you wish.
Press ENTER.
Wet/Dry Mix:
The main output normally outputs the audio in and the track audio. If you want to output
only the track audio and not the input audio, then the wet/dry mix needs to be set to wet
only. To do this:
●
●
●
●
●
●
Press the MENU button until the main menu is selected. The main menu says
“Looperlative LP” on the top line of the display.
Turn the knob until the second line of the display reads “Wet/Dry Mix”.
Press ENTER
The top line will read “Wet/Dry Mix.”
Turn the knob to select the setting that you wish.
Press ENTER.
Time Display:
The LP1 normally shows track times increasing from 0 at the beginning. If you prefer to
see this reversed where the display indicates time until the end of the loop, you can
change the setting from the main menu:
●
●
●
●
●
●
Press the MENU button until the main menu is selected. The main menu says
“Looperlative LP” on the top line of the display.
Turn the knob until the second line of the display reads “Time Display”.
Press ENTER
The top line will read “Time Display.”
Turn the knob to select the setting that you wish.
Press ENTER.
18
Pedal Mode:
The LP1 normal respond immediately to pedal changes. However, when switching tracks
this can lead to sudden jumps in volume or feedback level. The LP1 offers a mode where
pedal changes don't occur until the pedal is brought to about the same location that it was
the last time it was changed on the current track. This mode is called “catch first”.
To change the setting:
●
●
●
●
●
●
Press the MENU button until the main menu is selected. The main menu says
“Looperlative LP” on the top line of the display.
Turn the knob until the second line of the display reads “Pedal mode”.
Press ENTER
The top line will read “Pedal mode.”
Turn the knob to select the setting that you wish.
Press ENTER.
MIDI Clock Out:
The LP1 is capable of providing a MIDI clock output. This is used to synchronize
another LP1, a drum machine, or any other device that accepts a MIDI clock input. The
clock output is based on the length of the first track and the number of beats per measure
configured in the ALL track menu.
To enable MIDI clock output from the main menu:
●
●
●
●
●
●
Press the MENU button until the main menu is selected. The main menu says
“Looperlative LP” on the top line of the display.
Turn the knob until the second line of the display reads “MIDI Clock Out”.
Press ENTER
The top line will read “MIDI Clock Out.”
Turn the knob to select the setting that you wish.
Press ENTER.
19
Selecting tracks by changing volume or feedback:
When using multiple MIDI continuous controllers (CC) to change volume or feedback,
the LP1 can be programmed to automatically change track to the last track modified by a
MIDI CC message. To enable this feature:
●
●
●
●
●
●
Press the MENU button until the main menu is selected. The main menu says
“Looperlative LP” on the top line of the display.
Turn the knob until the second line of the display reads “Track Follows CC”.
Press ENTER
The top line will read “Track Follows CC.”
Turn the knob to select the setting that you wish.
Press ENTER.
Altering fade speed:
It is possible to alter the fade speed of the LP1 to best suit your musical piece. Faster fade
speeds can result in clicking noises in some musical pieces and slower fade speeds can
result in short sounds being lost. It is important to select a fade speed that best suits your
musical style. The default setting is appropriate for many people. To change the fade
speed:
●
●
●
●
●
●
Press the MENU button until the main menu is selected. The main menu says
“Looperlative LP” on the top line of the display.
Turn the knob until the second line of the display reads “Vol Change Speed”.
Press ENTER
The top line will read “Vol Change Speed.”
Turn the knob to select the setting that you wish.
Press ENTER.
Programming the LP1 to use MIDI pedals or dials:
The LP1 can accept MIDI CC messages to control volume and feedback. To program a
MIDI pedal, follow the following procedure:
●
●
●
●
●
Press the MENU button until the main menu is selected. The main menu says
“Looperlative LP” on the top line of the display.
Turn the knob until the second line of the display reads “Calibrate Pedal.”
Press ENTER.
The display will read “MIDI controller?”
Change the pedal position and then press ENTER.
20
●
●
●
●
●
●
●
●
The display will read “Move nn To Min.” “nn” will be replaced by the CC number of
the pedal.
Move the pedal to its minimum position.
Press ENTER.
The display will read “Move nn To Max.” “nn” will be replaced by the CC number of
the pedal.
Move the pedal to its maximum position.
Press ENTER.
Turn the knob to the desired function that you want to assign to this pedal.
Press ENTER.
Programming the LP1 to respond to MIDI buttons or USER
buttons:
The LP1 can accept MIDI program change messages to activate a variety of functions.
To program a button on a MIDI controller, follow the following procedure:
●
●
●
●
●
●
●
●
Press the MENU button until the main menu is selected. The main menu says
“Looperlative LP1” on the top line of the display.
Turn the knob until the second line of the display reads “MIDI/USER btn.”
Press ENTER.
The display will read “Press button.”
Press the MIDI button or USER button that the LP1 will respond to.
The display will indicate which button you selected.
Turn the knob to change the LP1 function on the second line of the display. This is the
function that will be assigned to the selected button.
Press ENTER to accept the selection.
The MIDI configuration is remembered when the unit is powered off.
ADVANCED BUTTON CONFIGURATION:
Each button can perform up to 8 different functions in order with a single button press.
When using the above procedure to assign functions to each button, you are actually
assigning a sequence of functions to each button. In the above procedure, you only assign
the first step in each sequence.
To assign additional functions in the sequence, you use the track selection buttons to
select the sequence position that you want to assign. For example, to assign the second
step, press the track 2 button.
EXAMPLE: Assigning the USER 4 button to reverse and half-speed
21
●
●
●
●
●
●
●
●
●
●
●
●
●
Press the MENU button until the main menu is selected. The main menu says
“Looperlative LP1” on the top line of the display.
Turn the knob until the second line of the display reads “MIDI/USER btn.”
Press ENTER.
The display will read “Press button.”
Press the USER 4 button.
The first line will now read, “USER 4 : 1”.
Turn the knob until the second line reads, “Reverse Track.”
Press the track 2 button.
The first line will now read, “USER 4 : 2”.
Turn the knob until the second line reads, “Half Speed Tr.”
Press the track 3 button.
Turn the knob until the second line reads, “end sequence.”
Press ENTER to accept the selection.
Network configuration:
By default, the LP1 attempts to automatically obtain its network configuration from a
DHCP server which is normally a function provided by your network router. If you wish
to directly connect the LP1 to a computer then it becomes necessary to manually
configure the LP1 network parameters.
All of the network parameters are assigned from the the main menu. These parameters
are:
IP Address
This is the IP address that the LP1 will respond to. If you are
creating a link from an LP1 to a computer, then the recommended
value for this parameter is 192.168.99.2.
Gateway Addr
This is the address of your network router. If there is no router, then
it is recommended that you assign the value of your computers IP
address to this. For an LP1 directly connected to a computer, the
recommended value is 192.168.99.1.
Netmask
This is the network mask for your network. For most small
networks, the value of 255.255.255.0 is appropriate. This value
must match the network mask assigned to the other devices on your
network.
DNS Server
This is the address of the domain name server (DNS) on your
network. If you don't have one, then assign your computers address
to this value. This parameter is only used if you use the “Upgrade”
option from the main menu. Upgrade needs the DNS server to
locate the Looperlative upgrade server.
22
Assignable Functions:
Function:
Meaning:
Rec/Dub
This is the same as the Rec/Dub button on the front panel. First
press begins recording a loop. The second press ends the loop
and places the loop in overdub mode. The third press ends
overdub and leaves the loop in play mode. Subsequent presses
toggle overdub on and off.
Play/Stop
This is the same as the Play/Stop button on the front panel. This
is a multifunction button that starts or stops playback of a loop,
creates an empty synchronized loop, or closes a loop depending
on the current state of the loop.
All Tracks
Select all tracks for next command.
Select Track(n)
Select track n (n = 1,2,3,4,5,6,7,8) for next command.
Select Group(n)
Select group n (n = 1,2,3,4,5,6,7,8,9,10) for next command.
Track Erase
Erase selected track(s).
Track Level
Change track level.
Play Now
Start playing selected track(s) immediately.
Stop Now
Stop playing selected track(s) immediately.
Play
Start playing selected track(s) when loop counter reaches the
beginning.
Stop
Stop playing selected track(s) when loop reaches the end.
All Play Now
Start playing all tracks immediately.
All Stop Now
Stop playing all tracks immediately.
All Play
Start playing all tracks when loop counters reach the beginning.
All Stop
Stop playing all tracks when the loops reach the end.
Set As Master
Select the current track as the master track for newly
synchronized tracks.
Next Track
Select the next higher track number. If all tracks were selected,
then track 1 is selected.
Prev Track
Select the next lower track number. If all tracks were selected,
then track 8 is selected.
Double
Duplicate the loop making it twice as long.
Triple
Make the loop three times as long copying the loop to fill the new
time.
23
Function:
Meaning:
Quadruple
Make the loop four times as long copying the loop to fill the new
time.
MIDI sync rec
Same as Rec/Dub button except that when recording a new loop,
it is synchronized to the incoming MIDI clock.
Sync Rec/Dub
Same as Rec/Dub button except that when recording to track that
isn't the master track, the track is extended to a multiple of the
master track length making it synchronized with the master track.
If there is no master track or if the master track is the current
track, then this operates exactly as the Rec/Dub button.
Reverse Track
Reverse direction of playback of the currently selected track(s).
Half Speed Tr
Toggle between normal speed and half speed for the currently
selected track(s).
Feedback 100%
Set the feedback level for currently selected track(s) to 100%
Feedback +10%
Increase the feedback level for currently selected track(s) by 10%
Feedback -10%
Decrease the feedback level for currently selected track(s) by 10%
Feedback +5%
Increase the feedback level for currently selected track(s) by 5%
Feedback -5%
Decrease the feedback level for currently selected track(s) by 5%
Play Retrigger
Starts playback of a loop from the beginning. If the track is
currently playing, it instantly restarts it at the beginning. If the
track is stopped, it is started from the beginning.
Cue Track
Marks selected track(s) as ready to play. They will be started
from the beginning as soon as any other track stops.
Replace
This function is used to replace a portion of a track. First press of
a button assigned to this function begins a replacement and the
second press ends the replacement. The track light will flash red
during a replacement. The original track contents are lost and not
played during replacement.
Replace+Original
This is identical to the “Replace” function except that the original
track contents are played during the replacement.
Assign to AUX 1
A button assigned to this function will cause the current track or
group to be assigned to the AUX 1 output instead of the main
output.
Assign to AUX 2
A button assigned to this function will cause the current track or
group to be assigned to the AUX 2 output instead of the main
output.
24
Function:
Meaning:
Fast Scramble
Splits the loop into 0.1 second long pieces and randomly reorders
the pieces.
Medium Scramble
Splits the loop into 0.4 second long pieces and randomly reorders
the pieces
Slow Scramble
Splits the loop into 1.6 second long pieces and randomly reorders
the pieces
Replay/All Stop
If any tracks are running, this button immediately stops all tracks.
If no tracks are running then it starts playing the tracks that were
playing before the very last stop command.
Bounce
This takes the output of this track and any manipulations done to
it and records them to a new track until this button is pressed a
second time.
Sync Bounce
This takes the output of this track and any manipulations done to
it and records them to a new track until this button is pressed a
second time. When bounce is pressed the second time to end the
bounce, the new loop continues to record until it is long enough to
remain synchronized with the master loop.
MIDI Sync Bounce
This is similar to the Sync Bounce function except that
synchronization is maintained with the external MIDI clock rather
than the internal master track.
Play/Stop Now
This is similar to the PLAY/STOP button on the front panel, but
instead of a delayed play and stop, it uses the play now and stop
now functions.
25
Internal Web Server
The LP1 has an internal web server for interfacing to your computer. Currently the web
interface can be used for three things: upgrading the LP1 software, exporting digital
audio, and importing digital audio.
To access the LP1 web pages, you must first configure the LP1 networking parameters
and connect the LP1 to your network. It is possible to connect the LP1 directly to the
ethernet port on your computer. In this case, you must assign compatible network
addresses to your computer and to the LP1. If you are connecting the LP1 to an existing
home or office network, the LP1 can automatically obtain its IP address from your router.
To determine what IP address is currently assigned to your LP1, press MENU until the
display indicates the current software version number, and then press the ENTER button.
It may take a few seconds before the display reads the IP address. The IP address looks
something like this: 000.000.000.000. The zeros in this example will be different
numbers and will indicate your actual IP address.
After you have determined the IP address of your LP1, you can open your web browser
and type in the URL: http://000.000.000.000 where the zeros are replaced by your actual
IP address. Your web browser should display a page giving you the main options
available.
When importing or exporting audio, the format is 24-bit packed PCM WAV sampled at
48kHz. This is important because you cannot import audio into the LP1 in any other
format. If you send another format, the LP1 will reject the audio file. Exported audio
from the LP1 will always be in this format.
26
Software Upgrades
The LP1 is designed for future upgrades. Looperlative will periodically offer new
features over the Internet. Upgrade announcements and instructions are posted to the
Looperlative support forum. Go to the Looperlative web site:
http://www.looperlative.com and click on the “forum” link. Upgrade instructions and
announcements are contained in the forum titled “Looperlative Upgrade
Announcements”.
27
LIMITED WARRANTY
This product is warranted to the original consumer purchaser to be free from
defects in materials and workmanship under normal installation, use and
service for a period of one (1) year from the date of purchase as shown on
the purchaser's receipt.
The obligation of Looperlative Audio Products under this warranty shall be
limited to repair or replacement (at our option), during the warranty period
of any part which proves defective in material or workmanship under
normal installation, use and service, provided the product is returned to
Looperlative Audio Products, transportation charges prepaid. Products
returned to us must be accompanied by a copy of the purchase receipt. In
the absence of such purchase receipt, the warranty period shall be one (1)
year from the date of manufacture.
This warranty shall be invalid if the product is damaged as a result of
defacement, misuse, abuse, neglect, accident, destruction or alteration of the
serial number, improper electrical voltages or currents, repair, alteration or
maintenance by any person or party other than our own service facility, or
any use violative of instructions furnished by us.
This one-year warranty is in lieu of all expressed warranties, obligations or
liabilities. Any implied warranties, obligations, or liabilities, including but
not limited to the implied warranties of merchantability and fitness for a
particular purpose, shall be limited in duration to the one year duration of
this written limited warranty. Some states do not allow limitations on how
long an implied warranty lasts, so the above limitation may not apply to
you.
In no event shall we be liable for any special, incidental or
consequential damages for breach of this or any other warranty,
expressed or implied, whatsoever. Some states do not allow the exclusion
or limitation of special, incidental or consequential damages so the above
limitation or exclusion may not apply to you. This warranty gives you
specific legal rights, and you may also have other rights which vary from
state to state.
28