1
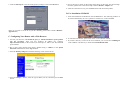
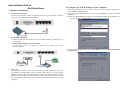
Quick Installation Guide for
4Port Switch Router
A. Hardware Installation
1.
Set up LAN connection:
Wired LAN connection: connect an Ethernet cable from your computer’s Ethernet
port to one of the LAN ports of this product.
2.
Set up WAN connection:
a. connect the network cable from your cable (or DSL) modem to the WAN port of
this product.
b. Connecting this product with your printer:
Use the printer cable to connect your printer to the printer port of the
product.(Optional)
B. Configure the TCP/IP Settings of Your Computer
1. Install the TCP/IP protocol for your PC if it has not yet been installed. (Please refer to
User’s Manual - Appendix A.1.)
2. From the Windows Start button on your PC, choose Settings, and select the Control
Panel item.
3. Double click the Network icon. Select the TCP/IP line that has been associated to your
network card in the Configuration tab of the Network window.
4. Click on the Properties button. Click the IP Address tab. Select Obtain an IP address
automatically.
3.
Power on:
By connecting the power cord to the power inlet and turning the power switch on,
this product will automatically enter the self-test phase. When it is in the self-test
phase, the indicators M1 will be lighted ON for about 5 seconds, and then M1 will be
flashed 3 times to indicate that the self-test operation has finished. Finally, the M1
will be continuously flashed once per second to indicate that this product is in normal
operation.
5. Click the Gateway tab. Clear all of the gateway settings. Click on the OK button.
5. Key in the proper values for the setting items shown on the page. For the meaning of
the items, please refer to the online help or User’s Manual – Chapter 4.4.
6. After all of the items are set, press the Save button and reboot this product.
D. Use Installation CD-ROM
1. Insert the installation CD-ROM into the CD-ROM drive. The following window will
be shown automatically. If it isn’t, please run “install.exe” on the CD-ROM.
(Note: If you want to set the IP of your PC manually, please refer to User’s Manual –
Appendix A.2.)
C. Configuring Your Router with a Web Browser
1. Activate your browser, and disable the proxy or add the IP address of this product
into the exceptions. Then type this product’s IP address (for example:
http://192.168.123.254) in the Location (for Netscape) or Address (for IE) field and
press ENTER.
2. Key in the system password (the factory default setting is ”admin”) in the System
Password field and click on the Log in button.
3. Press the Primary Setup button and the following screen will be shown.
4. Press the Change… button, select the type of WAN you use, and then press the Save
button.
2. To read the User Manual, please click on the “User’s Manual” button.
3. If you don’t have any viewer for the User’s Manual, you can execute “rs405eng.exe”
in the “viewer” sub-directory to install the Acrobat Reader 4.05.