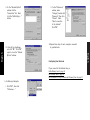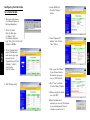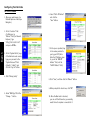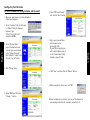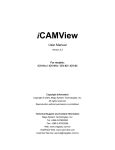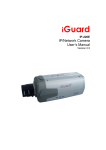
1
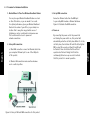
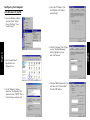
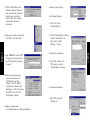
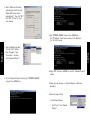
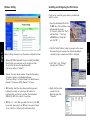
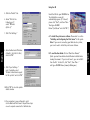
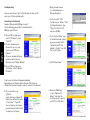
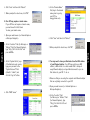
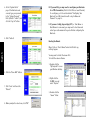
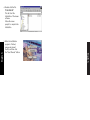
SMC Wireless
Barricade™ Routers
User Guide
SMC7004AWBR
V1.0
Hardware Installation
2.1.2. Rear Panel
2.1
The rear panel features three 10/100 Mbps Ethernet ports and one
Wide Area network (WAN) port. The WAN port connects your DSL or
cable modem to the router. The LAN ports are used to connect to
your computers or other network devices.
Panel Layout
2.1.1. Front Panel
LEDs monitor the status of each port.
LED
Function
Colour
Status
Description
POWER
Power indication
Green
On
Power is being applied
to this product.
M1
System status 1
Orange
Blinking
This product is
functioning properly.
M2
System status 2
Orange
On
This product is working
for a specific service.
Blinking
This product is being
configured or upgraded.
Don’t turn it off !
On
The WAN port is linked.
Blinking
Green
Green
WAN
W.LAN
WAN port activity
Wireless activity
Link/Act. Link status
1~3
SPEED
1~3
Data Rate
Green
Green
Figure 2-2 Rear Panel Ports
Port
Description
RESET
To reset system settings to factory defaults,
please follow the steps:
1. Power off the device,
2. Press the reset button and hold,
3. Power on the device,
4. Keep the button pressed about 5 seconds,
5. Release the button,
6. Watch the M1 and M2 LEDs, they will flash
8 times and then M1 flashes once per second.
The WAN port is sending
or receiving data.
PRINTER
Printer Port (Optional)
Blinking
Sending or receiving data
via wireless
COM
Serial port (connect dial-up modem or console cable)
On
An active station is
connected to the
corresponding LAN port.
WAN Port
The port where you will connect your cable (or DSL)
modem or Ethernet router.
Port 1-3
The ports where you will connect networked
computers and other devices.
DC IN
Power inlet (DC 12V)
Blinking
The corresponding LAN port
is sending or receiving data.
On
Data is transmitting in
100Mbps on the
corresponding LAN port.
English
English
Figure 2-1 Front Panel LED
2.2 Procedure for Hardware Installation
1. Decide Where to Place Your Wireless Broadband Router:
You can place your Wireless Broadband Router on a desk
or other flat surface, or you can mount it on a wall.
For optimal performance, place your Wireless Broadband
Router in the center of your office (or your home) in a
location that is away from any potential source of
interference, such as a metal wall or microwave oven.
This location must be close to power and
network connections.
a. Wired LAN connection: connect an Ethernet cable from
your computer’s Ethernet port to one of the LAN ports
of this product.
b. Wireless LAN connection: make sure the antennae
are in a vertical position.
Figure 2-3 Setup of LAN and WAN connections for this product.
Connect an Ethernet cable from the WAN port
to your cable/xDSL modem or Ethernet backbone.
Figure 2-3 illustrates the WAN connection.
4. Power on:
By connecting the power cord to the power inlet
and turning the power switch on, this product will
automatically enter the self-test phase. When it is in the
self-test phase, the indicators M1 and M2 will be lighted
ON for about 10 seconds, and then M1 and M2 will
be flashed 3 times to indicate that the self-test
operation has finished. Finally, the M1 will be
continuously flashed once per second to indicate
that this product is in normal operation.
English
English
2. Set up LAN connection:
3. Set up WAN connection:
Configuring Your Computer
with Windows 95/98/ME
4. Select the “IP Address” tab.
Click “Obtain an IP address
automatically.”
5. Click the “Gateway” tab. If there
are any “Installed Gateways”
listed, highlight each one
and click “Remove.”
2. From “Control Panel”
Double-click the
“Network” icon.
3. In the “Network” window,
under the “Configuration” tab,
double-click the “TCP/IP” that is
listed with your network card.
6. Click the “DNS Configuration” tab,
and then select “Disable DNS.”
Click the “OK” button.
English
English
1. From the Windows desktop,
click the “Start” button.
Choose “Settings”, then
“Control Panel.”
7. Click the “OK” button in the
“Network” window. Windows
may copy some files, then will
prompt you to restart your
system. Click “Yes” and your
computer will shut down
and restart.
a. For Internet Explorer:
i. Click “Tools”, then
“Internet Options.”
ii.In the “Internet Options” window
click the “Connections” tab.
Next, click the “LAN
Settings…” button.
iii. Clear all the checkboxes.
9. Type “WINIPCFG” and click “OK.”
It may take a minute or two for
the “IP Configuration” window
to appear
10.From the drop-down menu,
select your network card.
Click “Release” and then
“Renew.” Your “IP Address”
should now be similar to the
Barricade (i.e. 192.168.123.xxx).
Click “OK” to close the “IP
Configuration” window.
iv. Click “OK”, and then click
“OK” again to close the
“Internet Options” window.
b. For Netscape Navigator:
i. Click “Edit”, then click
“Preferences…”
11.Open your web browser
(i.e. Internet Explorer or Netscape Navigator).
English
English
8. Once your computer has restarted,
click “Start”, and then “Run…”
12.Clear all proxy settings:
ii. In the “Preferences”
window, under
“Category” double-click
“Advanced”, then click
“Proxies”. Select
“Direct connection
to the internet.”
Click “OK”
13.Repeat these steps for
each Windows 95/98/Me computer connected to your Barricade
2. Double-click the “Network &
Dial-Up Connections” icon.
3. Double-click the icon that
corresponds to the connection to
your Barricade
If you connect to the Internet using a:
Cable Modem, turn to page 13
DSL Modem, turn to page 15
DSL Modem via PPP over Ethernet, turn to page 17
4. Click “Properties.”
Configuring Your Computer with Windows 2000
1. From the Windows desktop,
click the “Start” button.
Choose “Settings”, then
“Control Panel.”
5. Double-click “Internet Protocol
(TCP/IP).”
English
English
Configuring Your Barricade
6. Select “Obtain an IP address
automatically” and then select
“Obtain DNS server address
automatically.” Then click “OK.”
Click “OK” or “Close” to close
each window.
7. From the Windows desktop,
click the “Start” button,
then “Programs”, then
“Accessories”, and then
click “Command Prompt.”
English
English
9.Type “IPCONFIG /RENEW” and press the <ENTER> key.
Your “IP Address” should now be similar to the Barricade
(i.e. 192.168.123.xxx).
10.Type “EXIT” and press <ENTER> to close the “Command Prompt”
window.
8. In the “Command Prompt” window, type “IPCONFIG /RELEASE”
and press the <ENTER> key.
11.Open your web browser (i.e. Internet Explorer or Netscape
Navigator).
12.Clear all proxy settings:
a. For Internet Explorer:
i. Click “Tools”, then “Internet
Options.”
iii. Clear all the checkboxes
and click “OK.” Click “OK”
again to close the “Internet
Options” window.
ii. In the “Preferences”
window, under
“Category” double-click
“Advanced”, then click
“Proxies”. Select
“Direct connection
to the internet.”
Click “OK.”
13.Repeat these steps for each computer connected
to your Barricade.
Configuring Your Barricade
If you connect to the Internet using a:
Cable Modem, turn to page 13
DSL Modem, turn to page 15
DSL Modem with a Log In name and Password, turn to page 17
b. For Netscape Navigator:
i. Click “Edit”, then click
“Preferences…”
English
English
ii. In the “Internet Options”
window click the
“Connections” tab. Next,
click the “LAN Settings…”
button.
Configuring Your Barricade
for a Cable Modem
5. Under “WAN Type”
Click the “Change…”
button.
1. Open your web browser
(i.e. Internet Explorer or
Netscape Navigator).
3. In the ”System Status”
page of the Barricade
web console, type your
password in the
“System Password” field
(default is “admin”)
and click the
“Log In” button.
4. Click “Primary Setup”
6. Select “Dynamic IP
Address” and click the
“Save” button.
English
English
2. In the “Location”
field (for Netscape)
or “Address” field
(for Internet Explorer),
type “http://192.168.123.254”
and press <ENTER>.
7. Key in your “Host Name”
if your Internet Service
Provider has given you
one (i.e. CX123456-A).
8. Click “Save”, and then
click the “Reboot” button.
9. When prompted to reboot
now, click “OK.”
10.Once the Barricade is
rebooted, you can surf the Internet
as you normally would from all
computers connected to it.
Configuring Your Barricade
for a DSL Modem
1. Open your web browser (i.e.
Internet Explorer or Netscape
Navigator).
6. Select “Static IP Address”
and click the
“Save” button.
3. In the ”System Status” page
of the Barricade web console,
type your password in the
“System Password” field
(default is “admin”) and
click the “Log In” button.
7. In the spaces provided, key
in the values provided to
you by your ISP. (Note:
Enter the IP Address given
to you in the “WAN IP
Address” field, not the
“LAN IP Address” field.)
4. Click “Primary Setup”
8. Click “Save”, and then click the “Reboot” button.
9. When prompted to reboot now, click “OK.”
5. Under “WAN Type” Click the
“Change…” button.
10. Once the Barricade is rebooted,
you can surf the Internet as you normally
would from all computers connected to it.
English
English
2. In the “Location” field
(for Netscape) or
“Address” field (for Internet
Explorer), type
“http://192.168.123.254”
and press <ENTER>.
Configuring Your Barricade
for a DSL Modem with a Log-In Name and Password
1. Open your web browser (i.e. Internet Explorer
or Netscape Navigator).
6. Select “PPP over Ethernet”
and click the “Save” button.
3. In the ”System Status”
page of the Barricade web
console, type your password
in the “System Password”
field (default is “admin”) and
click the “Log In” button.
7. Key in your Account Name
and Password in the
appropriate fields.
If your ISP has supplied you
with a Service Name, enter it
in the “Service Name” field;
otherwise, leave it blank.
4. Click “Primary Setup”
8. Click “Save”, and then click the “Reboot” button.
9. When prompted to reboot now, click “OK.”
5. Under “WAN Type” Click the
“Change…” button.
10.Once the Barricade is rebooted, you can surf the Internet as
you normally would from all computers connected to it.
English
English
2. In the “Location” field (for Netscape)
or “Address” field (for Internet
Explorer), type
“http://192.168.123.254”
and press <ENTER>.
Wireless Setting
Installing and Configuring the Print Server
If you are not connecting your printer to your Barricade,
skip this section.
Wireless settings allow you to set the wireless configuration items.
1. Network ID (SSID): Network ID is used to identify the WLAN.
Client stations can roam freely on this product and other
Access Points that have the same Network ID.
(The factory setting is “default”)
2. Click the “Install” button. Follow the prompts on the screen.
After rebooting your computer, the software installation is
complete, but your computer must still be configured.
3. Click “Start”, click “Settings”,
and then select “Printers.”
2. Channel: The radio channel number. The permissible number
of channels depends on the Regulatory Domain.
The factory setting is as follow: Channel 6 for North America;
Channel 7 for European (ETSI); Channel 7 for Japan.
3. WEP Security: Select the data privacy algorithm you want.
Enabling the security can protect your data while it is
transferred from one station to another. The standardized
IEEE 802.11 WEP (128 or 64-bit) is used here.
4. WEP Key 1, 2, 3 & 4: When you enable the 128 or 64 bit WEP
key security, please select one WEP key to be used and input
26 (for 128-bit) or 10 (for 64-bit) hexi-decimal digits.
4. Right click the printer
connected to the
Barricade, then click
“Properties.”
English
English
1. Insert the installation CD into the
CD-ROM drive. The installation screen
will automatically appear.
(If it doesn’t, please click “Start”,
and then “Run…” Then type
<CD-ROM Drive>“:\install.exe”
and click “OK.” .)
Using the CD
5. Click the “Details” tab.
6. Under “Print to the
following port:”,
select “PRTmate:
(All-in-1).”
Insert the CD into your CD-ROM drive.
The installation screen will
automatically appear. (If it doesn’t,
please click “Start”, and then “Run…”
Then type <CD-ROM
Drive>“:\install.exe” and click “OK.”)
7. Click “Port Settings.”
8. Enter the Barricade IP Address
(default is 192.168.123.254)
and click “OK.”
9. Click “Spool Settings…”
and, if available, select
“Disable bi-directional support
for this printer” and click “OK”
10.Click “OK” to close the printer
details window.
11.Your computer is now configured to print
via the Barricade Print Server. Repeat these steps
on each computer connected to the Barricade.
B. To read the User Guide: Click on “Read User Manual.”
(Note: you must have Adobe Acrobat Reader installed before
viewing the manual. If you do not have it, you can install it
from the CD. To install it, click “Start”, then “Run…”
and type <CD-ROM Drive>:\viewer\rs405eng.exe.)
English
English
A. To install the print server software: Please refer to section
“Installing and Configuring the Print Server” in this guide.
Note: If you are not connecting your Barricade to a printer,
you do not need to install the print server software.
Troubleshooting
Here are some things to try if, after following the steps in this
guide, you still have problems with:
A. If your ISP has given you a
specific “IP Address”, select
“Static IP.”
B. If use a Username and a
Password to log in to your
service, select “PPP over
Ethernet.”
C. If you use an external dial-up
modem connected to your
Barricade, select “Dial-up Network.”
D. If your ISP has given you a
“host-name”, select “Dynamic
IP Address.”
2. In the “Location” field
(for Netscape) or “Address” field
(for Internet Explorer), type
“http://192.168.123.254”
and press <ENTER>.
3. In the ”System Status” page
of the Barricade web console,
type your password in the
“System Password” field
(default is “admin”) and click
the “Log In” button.
4. Click “Primary Setup”
I can’t access the Internet through my Barricade.
Depending on your Internet Service Provider (ISP), there are
settings that you must change in order to connect to the Internet.
A. If you subscribe to an
“@Home”
service and have a dynamic IP
address, you will need to enter
a “host name.” If your ISP
does not require a host name,
you must leave this field blank.
To enter your host name:
5. Make sure “WAN Type”
is set to “Dynamic IP
Address” and enter the
host name given to you by
your ISP (i.e. CX123456).
English
English
Connecting to the Internet
How do I find out which WAN type to select?
Use the following general rules to determine which
WAN type your ISP uses:
1. Open your web browser
(i.e. Internet Explorer or
Netscape Navigator).
6. Click “Save” and then click “Reboot.”
7. When prompted to reboot now, click “OK.”
5. In the “Domain Name”
field, key in the domain
name given to you by
your ISP (i.e.
xxx.yyy.home.com).
B. Your ISP may require a domain name.
If your ISP does not require a domain name,
you must leave this field blank.
To enter your domain name:
2. In the “Location” field (for Netscape) or
“Address” field (for Internet Explorer),
type “http://192.168.123.254” and
press <ENTER>.
3. In the ”System Status” page
of the Barricade web console,
type your password in the
“System Password” field
(default is “admin”) and
click the “Log In” button.
6. Click “Save” and then click “Reboot.”
7. When prompted to reboot now, click “OK.”
C. You may need to have your Barricade clone the MAC address
of your Ethernet adapter. Your ISP may register your MAC
address (a MAC address is a serial number that is unique to
every Ethernet adapter), and your Barricade needs to pass on
that address to your ISP. To do so:
1. Make sure that you are using the computer and Ethernet adapter
that was originally connected to your ISP.
2. Open your web browser (i.e. Internet Explorer or
Netscape Navigator).
4. Click “DHCP Server.”
3. In the “Location” field
(for Netscape) or “Address” field
(for Internet Explorer), type
“http://192.168.123.254” and
press <ENTER>.
English
English
1. Open your web browser (i.e. Internet Explorer
or Netscape Navigator).
4. In the ”System Status”
page of the Barricade web
console, type your password
in the “System Password”
field (default is “admin”) and
click the “Log In” button.
D. If you use DSL, you may need to reconfigure your Barricade
for a PPPoE connection (Point to Point Protocol over Ethernet).
To reconfigure, go to the section labeled “Configuring Your
Barricade for a DSL Connection with a Log-In Name and
Password” on page 19.
E. If you use a totally plug and play ISP (i.e. Time Warner or
Road Runner in some areas) you may need to shut down and
restart your cable modem after you’ve finished configuring the
Barricade.
5. Click “Toolbox”.
Reading the Manual
You may need to install the viewer first.
To install the viewer software:
1. Double-click the
“My Computer” icon on
your Windows desktop.
6. Click the “Clone MAC” button.
2. Right-click the
CD-ROM icon and
select “Explore”.
7. Click “Save” and then click
“Reboot.”
3. Double-click the
“viewer” folder.
8. When prompted to reboot now, click “OK.”
English
English
When I click on “User’s Manual” when the CD starts up,
nothing happens
5. When the installation
program is finished,
remove and reinsert
the CD, and then click
the “User’s Manual” button.
English
English
4. Double-click the file
“RS405ENG.EXE.”
This will start the
installation of the viewer
software.
Follow the screen
prompts to complete the
installation.