1
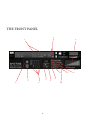
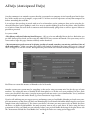
OR CHESTR AL
GRAND PIANO
by
S P I T F I R E
USER MANUAL
V 1 . 0
V 1 . 1
Welcome.
Thanks for purchasing the Orchestral Grand Piano, an essential addition to your orchestral palette made “the
Spitfire way”.
Reading manuals is a bore, so stick this next to your loo and give a read whenever you can, you may find a host
of good tips and ideas on how to get the best out of your purchase.
About Spitfire:
Spitfire was formed in 2008 by a group of successful British composers as a means of producing the tools they
needed for their busy work schedules. Sick of dry, humourless, ugly, unrealistic, enormously untamable sounding libraries, Spitfire set about redefining the way samples were created.
Our aim is to reproduce the conditions of top movie recording sessions and approach sampling as if we were
recording a film score one note at a time. To record performances, and parts thereof, not scientifically created
samples. To capture the timbre of a world-class set of players but also to record the room they were playing in.
About This Module:
Orchestral Grand Piano is a super realistic “contextual” piano designed specifically to fit proudly within your
full orchestral arrangements. Having recorded it in one of the greatest studios in the world we’re confident it
will fit in with any palette. But if you’re an existing Spitfire user, this VI will seamlessly integrate.
Pianos tend to be recorded in a very scientific manner which is why, for larger orchestral mockups and realisations they can often be very difficult to blend in and mix. You will have no such problems here. We simply recorded the piano as we have the rest of our modules. In situ, a real-world setting with mics placed as they would
be for any orchestral session. The end result a piano sounding as it would, where it would be and recorded as it
would be for any of the great film scores to have been recorded in Air-Studios Lyndhurst Hall.
The piano is not designed to be super versatile, we specifically designed it for one purpose; to sit in with large
cinematic arrangements. We have concentrated on this so it excels at it. We see it almost like an addition to the
brilliant percussion library where everything has been produced and recorded specific to the requirements of
orchestral cinematic arrangements.
Having said this the piano is not without it’s own sonic versatility. With four mic positions available to dial in
and mix, tape or direct signal and spacial width controls. You will be able to tailor the piano to fit in with the
specifics of your palette and arrangement.
System Requirements
KONTAKT
Orchestral Grand is NOT a Kontakt Player library, so you WILL need a full version Kontakt to run it. But
because it doesn’t authorise through the NI Service Centre and is personally watermarked to you. This means
you will be able to authorise it and install on all the machines you own. Owning a full version of Kontakt will
afford you the luxury of being able to edit and revise the patches to your particular preference. Remember we
pride ourselves in making truly esoteric tools, so if there’s a sample you don’t like, you can change it for another
with relative ease.
RECOMMENDED SPEC:
The better your computer, the better the performance of any Spitfire module. But not to worry if you’re not
spec’d up to the hilt. All programs are provided with a set of parameters that enable you to tone back the CPU
demands of any given patch. But moving forward, we’re confident this module will keep your computer busy
for many years to come! We recommend a combination of high processor speeds, a good chunk of memory
and a devoted 7200rpm eSata, USBII, Thunderbolt, or Firewire audio drive. The more memory you have, the
less demand placed on your drive, and having a totally devoted drive gives you the chance to load less into
memory and reduce load times. The higher the speed of your CPU, the more capable your computer will be to
deal with some of the amazing, but complicated scripts we’ve written.
PCs:
We recommend an i5, or i7 Quad or 8 Core machine with 8 Gig or above memory. Vista 64 or Windows 7.
However, it will work with SP2, Pentium or Athlon XP 1.4GHz 1Gig RAM.
MACs:
We recommend a Mac-Pro Intel Based Dual, Quad or 8 Core machine with 8 Gig or above memory. Mac OS
10.6.1 (Snow Leopard). However, we have made the module work satisfactorily on a Mac Mini 2.4 GHz and a
MacBook Pro 2.4GHz Intel Core 2 Duo.
DRIVES:
Firewire, USBII, or eSata, 7200rpm. Ask your dealer for drives that are suitable for “AV use”. We always recommend as small a drive as possible, as the platter will be smaller and the seek time less. The library will eventually
take up 5-6 Gig on your hard drive. If using several large libraries, or a number of Spitfire modules from the
same machine, we really recommend having your samples distributed over a number of drives. Lacie eSata or
Quadras 7200rpm we highly recommend. Moreover, an exciting development lies in the recent arrival of some
amazing solid state (SSD) drives. With seek times reduced to a fraction (0.1ms vs 6-9ms) of what standard
drives can offer, we are certain you will be able to reduce your sampler’s “pre-load” (page 15.) buffer tenfold
meaning you’ll be able to load enormous orchestral palettes into a single machine.
HOST:
The Kontakt 4 platform should work comfortably on most commonly found platforms and DAWs. As always
make sure you’re as up-to-date as you can afford! If you’re planning on building or adding Spitfire to an already
large orchestral palette, we recommend running your library independently of your DAW, either on your host
computer (e.g. via Re-Wire) or on a slave device (e.g.. via Midi or MOL). This will assist your loading times,
and will allow your DAW to do what it does best, sort out all your note ons and note offs! We heartily endorse
Plogue Bidule (www.plogue.com) as a virtual rack/ routing system. For more advice and information about
setting up please check our website.
CONTENTS:
INSTALLATION05
GETTING STARTED05
THE FRONT PANEL06
SURROUND USE08
AFAQs10
INSTALLATION
Because you’re reading this manual, we can presume you have successfully downloaded The Orchestral Grand
Piano. Included in your download email are some detailed installation instructions, please follow these carefully before going any further. We’ll see you back here, when you’re installed!
GETTING STARTED
If you have never used Kontakt before we wholeheartedly recommend your familiarise yourself with the basics
of patch (or instrument) loading, multi management, outputting and MIDI routing detailed in the Kontakt
user-manual and Native Instruments website:
http://www.native-instruments.com/#/en/products/producer/kontakt-4/?page=975
5.
THE FRONT PANEL
2.
1.
3.
14.
11.
4.
5.
7.
6.
6.
8.
9.
10.
12.
13.
THE FRONT PANEL KEY:
This manual presumes that you have already used Kontakt. If the main Kontakt window is unfamiliar to you
please consult your Kontakt manual or the Native Instruments site. They explain it better than we ever could:
http://www.native-instruments.com/#/en/products/producer/kontakt-player/
1. Voices & Max.
The left numeral refers to how many voices are currently being processed in the Kontakt engine. Max.
Refers to the maximum number of voices assigned to this instance of Kontakt. If you’re experiencing dropouts,
clicks or crackles you may want to have a look at these two numbers. If the “voices” numeral creeps up and
equals the “max” numeral you may want to increase your voice ceiling (the max setting).
2. Samples Load Status.
Again, if you’re hearing clicks or crackles or if your sample is cutting out erratically check that the rightmost bar is illuminated. This signals that all the samples for your patch are fully loaded. If the lefter-most panel
is illuminated the patch has yet to start loading, the middle, the patch is in the process of doing so.
3. Custom Velocity Curve Table
Patches with large numbers of velocity layers can very much react differently to different MIDI controllers. We have found several controllers that don’t actually reach 127 even if you make your assistant hit it
as hard as possible! This table allows you to tweak a velocity curve that suits your controller and your playing
style. The table works from left to right 0-127 boost the bars in the table at any given point and you’ll boost the
amount of juice your controller gives to the patch at that given velocity point.
4. & 5. Signal Path Toggles: We’ve recorded both an analogue 2” tape (4.) signal and a direct digital (5.) signal.
Use these controls to toggle between them.
6. Mic Controllers
One of the most exciting aspects of the Spitfire range. C(lose) T(ree) A(mbient) & O(utboard) mics.
Above these letters are the mic cut buttons that dial the mic signals in or out, this will unload or load the samples needed to keep your system lean. Above the cut buttons are fader controls that allow you to mix the mic
signals to your liking. If you drag these faders to 0 this will also unload the associated samples.
C - Close mics, two matched valve mics placed for optimum focus close to the instrument. This mic
control is great to add in for added definition and at times a bit of “rounding of sound”, in isolation it can be a
way of achieving a more intimate or pop-music style sound.
T - Tree. This refers to the “Decca” tree of three mics placed above the conductor’s podium. In the case
of Albion; 3 priceless vintage Neumann M50s. These are placed to give the ultimate sound of the band, the hall
and are the default mic position that loads in with each patch.
A - Ambient. A set of condenser mics set wide apart on either side of the same lateral plane as the Tree.
O - Outriggers. A set of condenser mics placed high up in the gallery away from the band. This mic
position gives a massive amount of stereo spread and room sound over the band. Great mixed in with the other
mics but also ideal fed to your Ls & Rs speaker sends for true surround information (see page 9).
As a new feature to our MM (Multi Mic) VI’s we are now mapping the mic controllers to C=CC22,
T=CC23, A=CC24, O=CC25. This is a feature requested by users with larger rigs/ palettes which enables mix
tweaking/ unloading/ loading of samples (value = 0) via a controller without having to go into the UI.
7.
7. Close Mics Stereo Width Controller:
This control appears when you have the close mics activated. It controls the pan width of the matched
pair used in this signal. We’d recommend reducing the width if you’re wanting a “placed” orchestral sound,
combined with the pan pot (below). For more of a stylized produced and “close” sound a broad signal is very
useful.
8. Close Mics Stereo Pan Control.
Again, this controller only appears when the C(lose) mic is activated. This controls the pan direction of
the close mics, the narrower the image selected above the more effective this spacial tool.
9. Releases
When off, no release trigger samples play. When on, release samples play with the slider control below.
10. Release Trigger Slider
By-popular-demand, this slider controls the volume of release triggers 1-100%.
11. Use Neighbouring Zones
This activates a script that utilizes neighbouring zones to increase Round Robins from 4 to 12. This can
sound a little off though which is why the default is off.
12. Reset On Key B-2
When using round robins there may be a point where you clearly want to use a specific note. This enables you to control where you are in the round robin* cycle, or if you are using duplicates of patches in a surround format (page 23) this will be how you can guarantee your round robins are in sync. Simply program or
hit a note event on B-2 on your selected patch and it’s duplicates. (You can click to change the default note.)
13. Use 4x Round Robin
This refers to the number of round robins your patch uses, the number can be dragged up and down
(1-4) to save your memory.
14. Purge Unused
This control keeps unloading any samples you are not using to keep your memory usage as low as possible.
8.
SURROUND USE:
If you are lucky enough to work in 5.1 you will be delighted by how the piano works in this respect and with
the number of mic combinations, there’s a number of different ways of doing it.
The basic principal is to load in several instances of the same patch routed to the same MIDI channel with different mics selected and each instance routed to a different out, or panning selection on your surround panner.
Each, and all microphone samples have been edited to sample accuracy together, so provided you give each
instance identical MIDI information, or indeed the same channel, everything will remain true as recorded. If
you are concerned that a round robin cycle may be out of sync, hit C0 on your keyboard controller to reset.
Here’s some suggestions:
Basic Quad (2 instances):
Output an instance with T(ree) to your L&R, A(mbient) to your Ls & Rs.
Intermediate 5.0 (3 instances)
Output an instance with T(ree) to your L&R, A(mbient) to your Ls & Rs. Bus a slightly smaller amount of Tree
into your C alongside a final instance with C(lose).
Posh 5.1 (4 instances + some clever routing):
It would be easy for us to suggest you simply pull up the LFE fader as found in Logic (pictured above) on one
of your 4 instances. Indeed, the C(lose) mic would be a nice focussed signal for this task. But your dubbing
engineer wont like your for it, and 9 times out of 10, he’ll simply cut all of your LFE tracks.
You can make his life easier by understanding the much misunderstood roll of the LFE track in cinemas. This
is, as the title suggests, an “effects” track. It is for intermittent use (albeit these-days, often used!). This should
never be part of your bass management and should be used in a selective manner. If you give them continuous
program, they’ll strip it out as it will interfere with their room tones, nice bangs and thuds. And with a 60 piece
orchestra all sorts of info gets into the sub range if you simply route your mix to it, even with instruments playing in a pitch range well clear of the sub.
Your C(lose) signal is a good starting point. Route this to a sub bass synthesizer, the Waves MaxxBass is a great
plug, alongside many free plugs bundled with DAWs. But the DBX 120A is very much the industry standard,
and inexpensive bit of outboard kit for this purpose. Send your C(lose) into this but also make sure you noise
gate it. Judge a point that you feel is a loud peak, and set the threshold to that, with a nice slow attack and release. Hey presto, you just made friends with a dubbing engineer.
9.
AFAQs (Anticipated FAQs)
Our first comment is to remind everyone that this is a manual to accompany v1.0 of a totally new line for Spitfire. With a totally new set of samples, scripts, and UI. We have used our experience as busy film composers to
deliver something that we’d like.
It is our hope that you keep in touch with us to let us know how you’re getting on, how you’re using the Orchestral Piano, how you’re finding it, and, if we were to consider looking at areas in the future, what you’d like
us to look at. From this we’ll form a consensus and wholeheartedly pledge that we will act upon it wherever
possible or practical.
See you at v10.0!
• This library really isn’t behaving how I’d expect. - OK, so we’re now officially blue in the face. But before you
go ANY further please check you are using the ABSOLUTE latest version of Kontakt. Visit your trusty service
centre and we hope this page remains relatively under-thumbed.
• My instrument or patch seems to be playing just bits of sound, some keys are missing, and there’s lots of
clicks and crackles. - Make sure that your patch is fully loaded (detailed on the front panel, page 9). Some of
these are biggies so can take a while. But if problems persist make sure Kontakt memory manager is activated:
then:
You’ll have to restart this instance of Kontakt to feel it’s benefits.
Another reason your system may be struggling is that you’re using too many mics live for the spec of your
machine. Try cutting the mics as detailed on the front panel to see if this cures your problem. If it does, don’t
worry you can still use these mics, just play in your parts with one active (we recommend the T(ree)) and then
activate multiple mics and render down (eg. freeze function in Logic Studio).
If you’re still suffering may we suggest you try and manage your pre-load buffer. Kontakt pre-loads some samples into memory so that when you hit a note Kontakt plays it out from RAM whilst addressing the rest of your
samples from your hard drive(s). The slower your drives, the more you may want to rely on RAM, the faster
the drives, or smaller RAM available, the more you may want to rely or your drives. If you’re using the latest
generation of SSDs you’ll find you can radically reduce your pre-load buffer. Referring to the plate above tick
the “Instruments Default Pre-Load Buffer Size” and drag the fader to a setting you’re happy with.
10.
• I’m a media composer, and my cues take an age to load between cues. - Ha ha, we too wish that some DAWs
handled memory a bit better. Make sure the Kontakt Memory Manager is on (detailed above), and try and create a palette from which all your cues derive. But most importantly, if you’re using a lot of our sounds. Try and
run your orchestral palette in the background, either via rewire using Plogue Bidule for example, or indeed
from an entirely different “slave” computer. We’d recommend loading the Brunel Loops into your host however
so you can enjoy the beat-matching. You can beat match in Plogue, using the MIDI Clock To SYNC bidule.
• You keep mentioning “round robins”, what are they? - * Round Robins are a method of recording a number
of versions of the same sample so that when playing repeated notes in fast succession you don’t get “machine
gunning” a rapid repeat of the same sample that gives the game away immediately.
• You keep mentioning “release trigger samples”, what are they? - These are individual samples of the sound
of the release trail the minute the piano keys are lifted and give you the true character of the hall. They are designed to trigger when you lift your key and the level of these can be controlled with the slider provided.
• How do I make this piano work for intimate or quiet cues. - It’s not really designed for this kind of work.
This is a piano that designed to sit within large orchestral arrangements. We would suggest our Felt Piano in
our spitfire labs range as a great intimate piano ( http://www.spitfireaudio.com/spitfire-labs-intro ) or the many
fine piano libraries out there. With this piano we’re doing what we do best at Spitfire and that is orchestral.
Hence the orchestral grand piano.
11.
A QUICK THANKS
Christian & Paul would like to thank Dominic Kelly, Alison Burton and the whole of the Air Studios team. To
Jake Jackson for making everything sound so marvellous, and the remarkable talents, immense intellect and
invention of Andrew Blaney, Blake Robinson and Stu Kennedy.
Most of all we would like to thank the amazing support and loyalty of our user-base, our Facebook friends and
everyone at VI Control.
We are in the same boat as all of you. We’re not software developers by trade, so appreciate your honesty in
paying your way to be a part of our family and not distributing this illegally. But more importantly, if you have
any ideas or criticism please let us know directly via our website and in a constructive manner. You never know,
you just may have thought of something that we hadn’t considered. We want to make our entire range the best
there is, and we rely on you to help us achieve that..... With thanks.
C & P.
COPYRIGHT SPITFIRE AUDIO LLP 2012
www.spitfireaudio.com