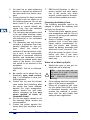
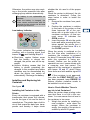
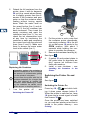
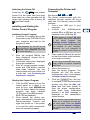
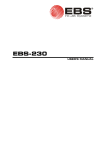
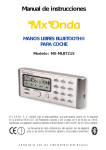
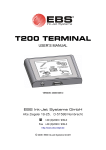
1
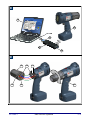
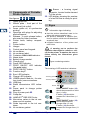
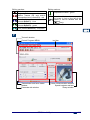
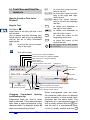
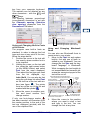
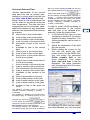
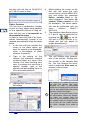
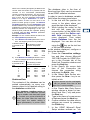
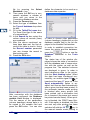
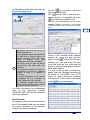
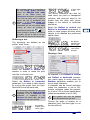
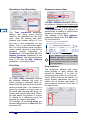
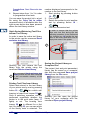
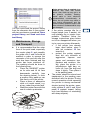
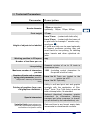
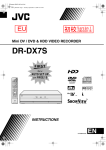
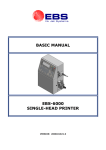
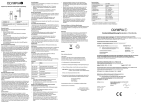
Operating Manual v. 20111028#4.2 EN English A 21 16 POWER CHARGE PRINT ON / OFF 17 20 ERROR F 19 18 8 9 10 33 1 12 13 2 3 11 4 7 5 15 14 6 B C 25 22 14 26 24 23 15 2 EBS Ink-Jet Systeme 20111028#4.2 D 27 28 PC-USB 23 22 24 E 10 12 20111028#4.2 29 31 30 28 EBS Ink-Jet Systeme 3 Components of Portable Printer System See figures 1. 2. EN 3. 4. 5. 6. 7. 8. 9. 10. 11. 12. 13. 14. 15. 16. 17. 18. 19. 20. 21. 22. 23. 24. 25. 26. 27. 28. 29. 30. 31. 4 A B C D E. Upper guide roll. Nozzle plate - front part of the print head (ink outlet). Lower guide roll, to synchronise printing. Openings with plugs for adjusting electromagnets. Release - a print release button, also used by other functions. Printer base, battery compartment. Printer holder. Hanger. Control panel and keypad. Ink container. Ink container label. Container OPEN-CLOSED indicator. Name plate. Battery charge socket. Charge plug. Power LED indicator. PRINT ON/OFF LED indicator (the print state). PRINT ON/OFF button. Function key F. Error LED indicator. Charge LED indicator. USB-Bluetooth Module - for wireless (radio) communications. USB plug. Radio transmission LED indicator. Power pack to charge printer batteries. Plug of power pack 25. Computer. HANDJET® EBS 250 Printer. Non-return valves in the ink container and ink system. Guide bayonets in the ink container. Ink container gasket. EN Buzzer - a buzzing signal generator, located inside element 7 of the printer. 33. LED display showing the number of a text file that is ready for printing. 32. Signs ! Information signs indicating: 6 that the actions described need to be taken with extra or special care, 6 the printer’s additional or specific functions or options, which are not described anywhere else, 6 untypical behaviour of the printer and other hints. ! A warning not to perform the operation that might be unsafe or critical for the printer. It requires the user to follow closely the instructions given therein. A B C Figure numbering notation The meaning of LED and other indicators: The lamp glows The lamp flashes POWER CHARGE PRINT ON/OFF ERROR F Buzzer PRINT ON/OFF F PRINT ON/OFF 3 sec. F 3 sec. EBS Ink-Jet Systeme PRINT ON/OFF button (18) should be pressed for a short time (<1 sec) F button (19) should be pressed for a short time (<1 sec) PRINT ON/OFF button (18) should be pressed for a longer time (>3 sec) F button (19) should be pressed for a longer time (>3 sec) 20111028#4.2 Editing markers: Font change marker - brown Beginning-of-monospaced-text marker (inserts F1) and end-ofmonospaced-text (inserts F2) - red Variable field - incremental counter (inserts Shift+F1) - blue Variable field - decremental counter (inserts Shift+F2) - green Variable field - universal date and time (inserts Shift+F12) - turquoise Editing markers: Wraparound marker - green A marker white in colour means that the cursor is just on the left of the marker (it can be deleted with the BackSpace key). EN F Text edit window Control Program MENU Transmission and error status window Parameter tab window 20111028#4.2 tool bar Printer communication window Special register and text library window EBS Ink-Jet Systeme EN 5 TABLE OF CONTENTS COMPONENTS OF PORTABLE PRINTER SYSTEM.................................... 4 SIGNS ....................................... 4 OPERATIONAL SAFETY ......... 7 EN GENERAL SAFETY INSTRUCTIONS ............ 7 PROTECTING THE BATTERY PACK ............ 8 WHEN INK OR WASH-UP SPILLS ............... 8 CONTROL OF ELECTROMAGNETIC INTERFERENCE ....................................... 9 MEDICAL EQUIPMENT .............................. 9 Pacemaker.......................................... 9 Other Medical Equipment ................... 9 OPERATION IN EXPLOSION HAZARD AREAS .................................................... 9 OPERATION IN AREAS OF BLASTING ......... 9 CONFORMITY MARKING ........................... 9 ENVIRONMENTAL PROTECTION .............. 10 APPLICATION ........................ 10 INSTALLING AND STARTING UP ........................ 10 PREPARING THE PRINTER FOR OPERATION ...................................... 10 CHARGING THE BATTERY ...................... 10 LOW-BATTERY INDICATOR ..................... 11 INSTALLING AND REPLACING INK CONTAINER ...................................... 11 INSTALLING INK CONTAINER IN THE PRINTER ............................................... 11 HOW TO CHECK WHETHER THERE IS ANY INK IN INK CONTAINER? .................. 11 REPLACING INK CONTAINER .................. 12 SWITCHING THE PRINTER ON AND OFF ................................................. 12 SWITCHING THE PRINTER ON ................ 12 SWITCHING THE PRINTER OFF ............... 13 INSTALLING AND STARTING THE PRINTER CONTROL PROGRAM ............ 13 INSTALLING CONTROL PROGRAM ........... 13 STARTING THE CONTROL PROGRAM ...... 13 CONNECTING THE PRINTER WITH COMPUTER ....................................... 13 TEXT FILES AND PRINT PARAMETERS ....................... 14 6 EN HOW TO CREATE A TEXT TO BE PRINTED? .........................................14 REGULAR TEXT ..................................... 14 Changing Proportional Spacing and Monospacing ............................. 14 Using and Changing Built-in Fonts of the Printer ..................................... 15 Using and Changing Windows® Fonts ................................................. 15 VARIABLE FIELDS .................................. 16 Date and Time .................................. 16 Universal Date and Time .................. 17 Object Counters ................................ 18 Database Data .................................. 19 PRINT PREVIEW .................................... 21 HOW TO CREATE AND EDIT A GRAPHICS FILE FOR PRINTING? ............22 HOW TO MODIFY PRINT PARAMETERS ..22 Character Resolution ........................ 22 Intensity of Ink Drops ........................ 22 Mode of Timing ................................. 22 Reflecting a text ................................ 23 Rotating a Text ................................. 23 Repeating a Text (Repetition) ........... 24 Print Delay ........................................ 24 Distance between Texts ................... 24 Row Repetition ................................. 24 INTELLIGENT CONTROL OF HAND MOVEMENT........................................25 HOW TO TRANSFER/SAVE TEXT FILES TO/IN THE PRINTER ....................25 HOW TO CHANGE A TEXT FILE STORED IN THE PRINTER .....................25 PRINTING ................................26 PRINTING A TEXT FILE SAVED IN THE PRINTER............................................26 LINE PRINTING ...................................26 USING A NUMBER OF TEXTS ................27 CREATING A TEXT LIBRARY IN THE PRINTER ............................................... 27 QUICK SAVING/RETRIEVING TEXT FILES TO/FROM TEXT LIBRARY .............. 28 PRINTING TEXT FILES FROM LIBRARY .... 28 SAVING THE PROJECT LIBRARY ON COMPUTER DISC .................................. 28 MAINTENANCE, STORAGE AND TRANSPORT ..................29 USER SUPPORT .....................30 EBS Ink-Jet Systeme 20111028#4.2 PROBLEMS WITH FUNCTIONING AND OPERATION OF THE PRINTER .............. 30 Some of the nozzles do not jet ink ... 30 Rinse the nozzles ............................. 30 The printer does not print ................. 30 Boldfaced or Blurred Prints .............. 30 ELECTRONIC GUIDES ......................... 30 TECHNICAL PARAMETERS.. 31 PRINTER ACCESSORIES ..................... 34 QUESTIONS AND PROBLEMS ............... 30 Dear Users of EBS Ink-Jet Systeme equipment, Please read this manual necessarily in order to get full information about the operation of your device. Disclaimer: • We shall bear no responsibility for damage to the device if it is operated improperly, i.e., inconsistently with this manual. • The application and use of the products are beyond our control and therefore fall exclusively into your scope of responsibility. • As we wish to keep pace with permanently progressing technological development and individual requirements of our clients, we need to reserve the right to change the form, make and technical solutions of our devices. Therefore no data, illustrations or descriptions of this manual shall form any grounds for claims. • We spare no effort to ensure that this manual is reliable, includes all modifications and is free from errors. However, the drawing up and publication process is complex and an error can occur in spite of our endeavours and wishes. We shall bear no responsibility for the consequences of editorial and printing errors in this manual. If your device contains a particular piece of equipment or needs performing an operation that have not been illustrated or described in this manual, or if you have queries on reading this manual, please contact any representative of EBS Ink-Jet Systeme for additional information. EBS Ink-Jet Systeme, the manufacturer, shall not be responsible for damages to the device due to the operation that is inconsistent with the Operating Instructions or due to consequences of drafting or printing errors in these Instructions. ! The printer control program to be installed on your computer is a versatile tool for operating EBS-230 series stationary printers and EBS 250 series manual printers. Therefore some of its components and functions which (i) are used exclusively for EBS-230 series printers or (ii) could be used in EBS-250 series printers but are of little significance for manual printers, will not be described in these Instructions or will be described only briefly. These instructions apply to EBS-250C printers with the control program version 2.1.015. In order to check the version of your program view the About menu. Operational Safety ! Before you start your printer for the first time read the hints given below and follow the underlying principles for your own and other persons’ safety. 20111028#4.2 General Safety Instructions 1. The printer must not be operated in rooms where explosion hazard exists. 2. No prints can be made on objects whose temperature exceeds 100°C at the time of printing. EBS Ink-Jet Systeme EN 7 EN 3. 4. EN 5. 6 No open fire or spark producing devices or objects are allowed in the area where the device operates. During printing ink drops invisible to people’s eye are jetted out of the head at pressure. Do not aim head outlet 2 at any persons, animals or casual objects because they may get splashed with ink unintentionally. The following requirements need to be met when washing, cleaning and maintenance operations are performed or ink containers are replaced: The operations can only be performed in a workplace that is especially designed for that purpose, when the device is switched off and protective clothing is worn. A fire extinguisher designed to extinguish electrical devices and flammable solvent fires must be placed within easy reach of the device. Air ventilation needs to be ensured at the workplace. WARNING: The ink is inflammable! 6 6 6 6. 8 Be careful not to splash the ink. Especially eyes need protecting. It is advisable to wear protective glasses. Protect the ink and the solvent (also waste fluid remaining after the printer has been washed) against fire, high temperature, sparks, electric arc and other electric discharge as they may cause ignition of these inflammable fluids! Do not use plastic vessels to do the washing. Metal vessels are recommended. Protect the printer against dirt, heavy dust and excessive moisture. EN 7. EBS Ink-Jet Systeme is able to ensure perfect and safe operation of the printer only when original, printer-specific accessories and consumables are used. Protecting the Battery Pack The following principles need to be obeyed to protect the batteries that are built into the printer: 6 Protect the printer against excessive temperature and fire. Do not expose it to strong solar radiation for a longer time. 6 Avoid a sudden change in temperature (cold Æ hot) that might cause vapour condensation inside the printer and thereby speed up battery discharge and electronic circuit corrosion. Condition the printer for about 1 hour before use after it has been moved from a cool place to a warm one. When Ink or Wash-up Spills 6 Should the eyes or skin get irritated with ink or wash-up: ! 6 6 EYES rinse the eyes with running water for at least 15 minutes, then see your oculist. SKIN wash the skin with water and soap. If the clothing has been splashed, take it off as soon as possible. When ink or wash-up spill, wipe out the spilled fluid with a piece of absorbent material, and then remove the material in compliance with fire and health and safety-at-work regulations. EBS Ink-Jet Systeme 20111028#4.2 Control of Electromagnetic Interference 1. Properties of high-frequency devices. Your Ink-Jet printer contains a highfrequency transmitter and receiver. When it is in the ON state, the printer receives and transmits high-frequency (HF) signals. The controller of the Ink-Jet printer system controls energy emitted during printer operation on an on-going basis. The HANDJET® EBS 250 printer complies with all the requirements of the regulations concerning the impact of the HF energy on humans in your country. 2. Printer accessories. If you do not use original EBS parts or printer accessories, including batteries or electronic components, the statutory requirements may not be met and the HF electromagnetic emission limits may be exceeded. remove them from the printer and follow all instructions and precautions. Sparking generated by batteries may cause an explosion and/or fire in this hazardous area and result in personal injuries or even death. The regions where a potential explosion hazard exists are usually marked appropriately. The examples of such regions are: solvent storage areas, fuel storage areas and petrol stations, below-decks onboard ships, storage areas for explosive gases, air mixtures, chemicals and metal or flour powders. Operation in Areas of Blasting In order to avoid interference during blasting (shot firing) the printer should be switched off in blasting areas or in places where the use of radio devices is prohibited. Follow the operating instructions and information signs. Medical Equipment Pacemaker The pacemaker manufacturers recommend that the distance between a transmitter and the pacemaker be at least 15 cm so that any mutual interference between the two devices is avoided. Other Medical Equipment If you use a piece of medical equipment, please ask the equipment manufacturer whether the equipment is sufficiently shielded against electromagnetic radiation. In certain circumstances your doctor may help you gain the information you require. Operation in Explosion Hazard Areas If you work in an explosion hazard area, switch your Ink-Jet printer off, do not replace the batteries or do not 20111028#4.2 Conformity Marking The HANDJET® EBS 250 printer has followed the conformity assessment procedure which resulted in the issue of Declaration of Conformity. This forms the basis for the statement that ® the HANDJET EBS 250 printer and the manufacturer’s accessories, to which this Declaration relates, meet the general requirements and other relevant provisions of the Directive if the printer and the accessories are installed and used in compliance with the manufacturer's instructions: 1999/5/EC and that they meet the following norms that are harmonised with the above Directives EN 60950-1:2006, EN 61000-6-2:2001, EN 61000-6-4:2001, EN 50371:2002, EBS Ink-Jet Systeme EN 9 EN EN 301 489-1 V1.8.1, EN 301 489-17 V2.1.1, EN 300 328 V1.7.1:2006, if the printer and the accessories are installed and used following the manufacturer’s instructions. ® The HANDJET EBS 250 printer and USB-Bluetooth modules will bear the following mark: charged at any stage of printer operation. The battery that is new or has not been used for a long time cannot be charged up to its full capacity. Therefore, in order to form the battery follow three charge-and-then-discharge cycles. See figures 1. EN 2. Environmental Protection After the printer and USBBluetooth modules have been put out of service, do not take them out together with other domestic waste. According to Directive No 2002/96/EC of the European Council on electrical and electronic equipment waste, the ® HANDJET EBS 250 printer and USBBluetooth modules that have been put out of service must be separated from domestic waste and processed in an environmentally friendly way. Application The HANDJET® EBS 250 printer is designed for marking, labelling, putting prints and simple graphics wherever the use of a manual labelling device is required or preferred. Prints are put on objects in a noncontact INK-JET way. Installing and Starting up Preparing the Printer for Operation Charging the Battery A LI-ION top-quality battery has been installed in the printer. It can be re 10 EN 3. 4. 5. A and C . Pull out plug 15 from socket 14 and tilt it. Insert power pack connector 26 to socket 14, and connect power pack 25 to a wall outlet. Lamp 21 glows when the battery is being charged. Wait until the charging is over and lamp 21 starts flashing. Remove the power pack plug 26 and secure socket 14 with plug 15. Detach the power pack from the mains and place it into the bag. Do not recharge the battery until it is completely discharged - see Low-battery Indicator. The HANDJET® EBS 250 printer should be stored with its batteries charged. If the printer is to be stored for a longer time (6 months or longer) and its batteries are not recharged, it may work for a shorter time after it has been recharged afterwards or in certain circumstances even stop working. Such a phenomena is caused by the properties of the batteries, which are always subject to the process of self-discharging. In the consequence of self-discharging and long-term storage in the discharge state, the maximum capacity of the batteries may lower or the batteries may get damaged completely. In order to avoid such a situation, it is necessary to charge batteries of the HANDJET® EBS 250 printer at least twice a year (however not less frequently than every 6 months). EBS Ink-Jet Systeme 20111028#4.2 Otherwise, the printer may stop working or the printer operation time after recharging may shorten dramatically. ! The battery is not replaceable as standard. When the battery is charged, the printer cannot communicate with the computer but the printer can be used for printing at that time. Low-battery Indicator POWER CHARGE PRINT ON/OFF ERROR F The printer indicates the low-battery condition with a buzzing signal from buzzer 32 and flashing lamp 21: 6 Short-time, regular flashes mean that the battery is almost discharged, the printer can still be operated, 6 Uniform blinking means that the battery is almost completely discharged. In this condition any further operation may be discontinued because the printer can switch off automatically. Recharge the battery. Installing and Replacing Ink Container See figure E. Installing Ink Container in the Printer Every ink container is equipped with a transponder that stores the information on the type of ink and its date of manufacture. The printer has a built-in circuit that scans the data from transponder and thereby it helps check 20111028#4.2 whether the ink used is of the proper quality. When the printer is delivered, the ink container is detached. Follow the steps below in order to install the container: 1. Remove the container from packing 10. 2. Position the container in relation to the back of the printer so that three bayonets 30 of the container aim at guide holes of the container connector. At that moment arrow 12 indicates the OPEN position. 3. Insert bayonets 30 into the guide holes and while pressing the container against the printer turn it clockwise, so that arrow 12 is in the CLOSE position. When the printer is switched on for the first time after installation of a container, the container is reviewed for about 10 seconds (lamp 16 flickers while this operation is being performed). Neither can the printer be operated nor can it communicate with a computer over that period. The approval of the container is signalled with lamps 16 and 17 which flicker three times and with audible signal 32 . If the container is not approved, then after the PRINT ON/OFF key 18 has been pressed, lamp ERROR 20 flickers. Another container needs to be installed in such a case. How to Check Whether There is any Ink in Ink Container? When the printer stops printing make sure that there is no ink in the container. You can assess the ink level in the container in two ways: 1. Weigh the printer on installing a new container - write down the weight. When the container is empty, the weight of the printer is smaller by about 83 grams. EBS Ink-Jet Systeme EN 11 EN 2. EN Detach the full container from the printer, place it with its bayonets 30 up into a vessel whose diameter is slightly greater than the diameter of the container and pour water so that the container starts floating without turning upside down. Mark the water level on the vessel before (line 1) and after (line 2) the full container has been immersed. Then insert the empty container and mark the immersion level (line 3). You can check the ink consumption level at any time by immersing the container in water and comparing the current level with the previous lines (lines 2 and 3). Make sure there is always the same water level in the vessel (line 1). 2 full ink container empty ink container 3 1 Replacing Ink Container If possible, replace the container in dustfree conditions so as to minimise the amount of contaminants getting in to the printer’s ink system. Do not leave the printer with the ink container detached for a longer time than that required to replace the container. While detaching or installing the container be careful not to splash anyone or anything with ink. ! 1. Turn off Switching the Printer Off. 12 EN the printer - see a 12 10 2. 3. b Put the printer in such a way that the container points downwards, turn empty container 10 to the left (a) so that arrow 12 points to the OPEN position. Wait about 3 seconds while holding the container to equalize the pressure. Remove the container carefully (b). See figure E . 4. If gasket 31 and contact plates in the guide holes for bayonets are dirty, remove ink leftovers from them with wash-up. 5. Install a new container - see Installing Ink Container in the Printer. Switching the Printer On and Off See figure A. Switching the Printer On PRINT ON/OFF Press key 18, , and while holding it down press release button 5. When the printer is switched on, lamp 16 glows and a sound signal is heard . from buzzer 32 Once the printer has been switched on, you can start printing a text that is stored in the printer memory - see Printing. EBS Ink-Jet Systeme 20111028#4.2 Switching the Printer Off F 3 sec. Press key 19, , and release button 5 at the same time and keep them down for a few seconds until all lamps stop glowing after buzzing 32 has been heard. Installing and Starting the Printer Control Program Installing Control Program 1. Insert the CD supplied along with the printer to the CDROM drive in your computer and wait for the program to start. ! If the programs on the CD do not start running on the computer automatically, start setup.exe from the CD’s main directory. Connecting the Printer with Computer See figures B , D and F . The printer communicates with the computer through module 22 via a radio link. The module uses an USB interface. 1. Find a free USB port in your computer. 2. Connect the USB-Bluetooth module 22 to a USB port on your computer via a USB plug 23. ! If USB drivers of module 22 have been installed during the installation of the control program (see Installing Control Program), then the module is automatically detected and installed on your computer. Otherwise you are prompted to indicate the location of the drivers on the CD. After the program MENU has been displayed, choose the installation option. Follow the instructions displayed during the installation. After all control program components and USB drivers required have been installed, you can communicate with your printer via a radio link - see Connecting the Printer with Computer. 3. 4. 5. Switch the printer on. Start the control program. The program will find the printer, communicate with it and display a Printer is found message. Starting the Control Program 1. Click the EBS printer icon on the control panel or, if there is no such an icon, start EBS200.exe from the folder where the control program has been installed (C:\Program Files\EBS printers\ EBS-250\ as standard). 2. Once started, the control program automatically activates the find-the-printer(s) function and signs the printer on, if the printer is on and the radio communications link operates properly. 6. key (the key Click the is available in the communication window only after the Adv. options item has been ticked) to view the printer configuration. Data have been transmitted properly if an O.K. message is displayed in the transmission status window. 2. 3. 4. 20111028#4.2 ! ! Place module 22 and the printer so that the widest radio transmission range is ensured. Do not cover module 22 with unnecessary shields or objects, especially metal ones. If you cannot communicate with the printer, try to configure it in the system once again. From the Guides menu start the Network configuration creator and follow the creator’s prompts. EBS Ink-Jet Systeme EN 13 EN Text Files and Print Parameters How to Create a Text to be Printed? Regular Text EN See figure G . Insert texts in the text edit line in the edit window. Use a mouse and the following keyboard keys to edit a text as standard and as you do in other Windows® applications: ¡ to move the cursor horizontally to the right, G to move the cursor horizontally to the left, Y¡ to move the cursor horizontally to the right and highlight the text, Y¢ move the cursor horizontally to the left and highlight the text, Delete to delete one character to the right of the cursor, BackSpace to delete one character to the left of the cursor, Home to move the cursor to the beginning of the text, End to move the cursor to the end of the text. ¢ ! You can type in up to 1300 characters in one text. Text edit window copy a text to the clipboard (Ctrl+C) cut and copy a text to the clipboard (Ctrl+X) paste a text from the clipboard (Ctrl+V) preview a print preview other prints change font sample position of the cursor maximum text height Hmax Hmax text edit line character insertion mode printer font type at the current cursor position F2 end-of-monospaced-text marker total length of text beginning-of-monospaced-text marker cursor position in the text F1 MENU button (corresponds to the right mouse button) Changing Proportional and Monospacing Spacing Proportional fonts are used to insert texts as standard. This means that each letter takes a space proportional to the character width. For example, a letter W takes more space than a letter I. 14 EN When monospaced fonts are used, the character width does not depend on the character. In other words, each character has the same width. The beginning of a monospaced piece of text is usually marked with the F1 key and the end of a monospaced piece of text is usually marked with the F2 EBS Ink-Jet Systeme 20111028#4.2 key from your computer keyboard. The markers can be deleted as any other characters - with the Delete and BackSpace keys. The spacing between proportional (monospaced) characters is set with the Character spacing (Selective char. spacing) parameter from the Parameters 2 tab sheet. EN Using and Changing Built-in Fonts of the Printer The program uses built-in fonts as standard. In order to change the font type and size at any point of the text, follow the steps below: 1. Position the cursor in the text edit line exactly where another font is to be inserted. 2. Holding the cursor on the text edit line, press the right mouse button (or the MENU button) and select Font from the menu displayed. Then select the font type you need from the list displayed, e.g. Latin 16x10. You can also do that using the pull-down list called Font on the tool bar of the text edit win- 3. dow (see figure F ). The printer fonts are at the top of the list and marked with the symbol . Move the cursor to another position and insert another fontchange marker. If only one font-change marker has been inserted, all characters from the marker position to the end of the text are displayed (printed) with the use of the replaced font. 20111028#4.2 font-change marker (Latin 7x5) font-change marker (Latin 16x10) Using and Changing Windows® Fonts You can also use Windows® fonts to create texts in your printer. 1. Move to the Font list and replace build-in font with one of fonts installed in your Windows®. You can change the font Size and the keyboard "language" in Windows®. While increasing the text height do not exceed Hmax line because otherwise the excessive top part of the text will be cut off. change Windows® keyboard language other parameters of Windows® fonts change the font the line indicating the maximum print height Hmax change the font size character insertion mode for Windows® fonts if you use Windows® fonts type excessive-font-size indicator in characters in this widow 2. Move the cursor to the position where you want to start a text and type in the text. You can change the font at any time. EBS Ink-Jet Systeme EN 15 3. EN There are three character insertion modes you can use: Single character, mode 1, Single character, mode 2, Multi character. Each of them matches Windows® font characters with the capabilities of your printer in a different way according to the font type, language and character insertion mode (the Right to left editing parameter). ! The number of characters to be input with the use of the Windows fonts is limited – it depends on the font type and size. printer with the In order to insert the date (time) field that is updated automatically, follow the steps below: 1. In the text edit line position the cursor in the place where you want the date (time) to be displayed. 2. While holding the cursor on the text edit line press the right mouse button (or the MENU button) and select the command Define variable field from the menu displayed. Then select Insert date (Insert time) in the list displayed. You can also do Variable Fields Variable fields are designated fields of text whose contents are updated automatically after every print. The following events can impact on the contents of variable fields: change in date, change in time, activation of release button 5 and other. Up to 10 variable fields can be used in one text at the same time. ! key. that using the ( ) key on the tool bar of text edit window. Only the printer built-in fonts can be used to print variable fields; no Windows® fonts can be used. Date and Time In order to synchronize the date and time of your printer with those of your computer move to the Date tab and click the keys successively. and 3. 4. You can insert a font-change marker on the left or right of the date (time) field. You can change separators inside the date (time) field by replacing the existing separators with different characters. You can also remove proportional-text markers. You can set a different date or time in your printer by setting them in the Date tab and transferring to the 16 EN EBS Ink-Jet Systeme 20111028#4.2 Universal Date and Time Various components of the current date and time can be printed automatically on every object with the use of a Univ. date & time variable field. Below, there is a list of characters that can be used to encode the date and time components. The date and time components can be preceded, separated and followed by any characters different from those specified below or by a space. D tens of day in the current date, A units of day in the current date, M tens of month in the current date, O units of month in the current date, R thousands of year in the current date, L hundreds of year in the current date, Y tens of year in the current date, E units of year in the current date, B tens of hour in the current time in the 24-hour system, C units of hour in the current time in the 24-hour system, I tens of minute in the current time, J units of minute in the current time, T tens of second in the current time, U units of second in the current time, P hundreds of day number in the year Q tens of day number in the year S units of day number in the year W tens of week number in the year, K units of week number in the year, N number of day in the week (see But if you set 2 in the Day of week box and save the modified parameters (of time, date and day of week) to the printer (with the key), then the following encoding applies: 2-Monday, 3Tueday, ... , 1-Sunday. And if you set 5 in the Day of week box and save the setting to the printer, then the following encoding applies: 1-Thursday, 2-Friday, 3-Saturday, 4-Sunday, 5-Monday, 6Tuesday, 7-Wednesday. In order to insert a field consisting of various components of the current date and time to be updated automatically, follow the steps below: 1. In the text edit line type in a text containing a subset of the above specified coding characters. The coding characters can be input in any order. 2. Select the characters of the field with the mouse. 3. While holding the cursor on the text edit line press the right mouse button (or the MENU button) and select the command Define variable field in the menu displayed. Then select Univ. date and time in the list displayed. The same operation can be performed with the menu shortcut Shift+F12. below). The following encoding system is used as standard: 1-Sunday, 2-Monday, 3-Tuesday, ... , 7-Saturday). The numbering of weekdays can be changed in the following way: on checking the time on your computer (by clicking the key) or key) on your printer (by clicking the change the number-of-weekday parameter in the Day of week box for the date displayed. For example, Monday, 26th September 2011 is encoded as the first day of the week as standard. 20111028#4.2 On selecting the print preview option (see Print Preview) you can see what EBS Ink-Jet Systeme EN 17 EN the print will look like on 30-09-2011 at 11:08:01 hours or later. EN Object Counters You can print a consecutive number of print on every object being labelled or at a specified interval on long objects with the use of incremental or decremental counters. In order to insert the field of an incremental (decremental) counter to be updated automatically follow the steps below: 1. In the text edit line position the cursor in the place where you want the counter to be displayed. Insert a font-change or other markers, if required. 2. Type in the setting for the counter: the maximum required number of digits, e.g. zeros, if the counter is to start counting from zero. If counting is to start from a specific number, type in the number and add leading zeros to fill in all counter positions. 4. 5. While holding the cursor on the text edit line press the right mouse button (or the MENU button) and select the command Define variable field in the menu displayed. Then select Up counter (Down counter) in the list displayed. The same operation can be performed with the menu shortcut Shift+F1 (Shift+F2). The operation described at points 2, 3 and 4 can be performed by pressing the ( ) key on the tool bar (a 4-digit counter is inserted and you can adjust its length appropriately). 6. You can change other parameters of the counter. Double-click the counter in the variable field list. You can change the increment or select the Auto save parameter of the counter. Ö 3. Highlight the counter setting with the mouse. ! 18 EN The contents of a volatile counter are lost after the printer has been switched off. With a non-volatile counter the counting can be resumed from its last setting after the printer has been switched on again. If you place the mouse cursor in the text edit window, above the characters within the counter field, the colour of the non-volatile counter on the variable field list changes from blue to pink (for the volatile counter the colour changes from black to red). EBS Ink-Jet Systeme 20111028#4.2 NOTE: An increment (decrement) is added to the counter each time button 5 is pressed and the contents of the incremental (decremental) counter increases (decreases). The only exception is when a text is to be printed repeatedly, that is when the print parameter Text repetitions>1 or is set to Continuous. In such a situation button 5 does not time each of the prints but rather groups of prints. The Refresh var.fields parameter from the Parameters 3 tab decides whether every successive repetitive print modifies the contents of the counters or not. The distance between the beginnings of two consecutive prints produced with repetitive printing is defined with the Rep. distance parameter from the Parameters 2 tab. Example: For the counter defined as above set the Text repetitions parameter to 3. a). If the Refresh var.fields parameter is set to OFF, the following prints can be produced: If release button 5 is pressed for xth time 1 2 3 --999 The following counter contents are printed: 0000 0001 0002 --0999 0000 0001 0002 --0999 0000 0001 0002 --0999 b). If the Refresh var.fields parameter is set to ON, the following prints can be produced: If release button 5 is pressed for xth time 1 2 3 4 --333 334 The following counter contents are printed: 0000 0003 0006 0009 --0996 0999 0001 0004 0007 0010 --0997 1000 0002 0005 0008 0011 --0998 1001 Database Data The contents of the database can be printed automatically on every successive object to be labelled owing to the database variable field. ! The database handling option is available for the EBS250C printers after an enable code has been typed in. Contact your printer distributor to obtain the code. After the code has been input, the enable setting is saved permanently in printer memory. The database (also in the form of Excel and text files) can be accessed via an ODBC software interface. In order to insert a database variable field, follow the steps given below: 1. In the text edit line position the cursor in the place where you want the data to be displayed. 2. While holding the cursor on the text edit line, press the right mouse button (or the MENU button) and select the Define variable field command from the menu displayed. Then select Insert Database from the list displayed. You can also do that using the key on the tool bar of the text edit window. In the window displayed, configure a link to the database: 1. Press the Connection settings key and then choose Microsoft OLE DB Provider for ODBC Drivers in the Provider tab of the Data Link Properties window and press the Next key. 2. In the Specify the source data item of the Connection tab choose Use connection string and press the Build... key. 3. In the Select Data Source window press the New... key to establish a link. ! 4. 5. 6. 7. 20111028#4.2 If a given source is to be used again, it can be chosen from the list and steps 3 to 7 can be omitted. In the Create New Data Source window choose a driver for handling Excel files (*.xls) and press the Next key. Type in the name of a new source of data and press the Next key. Confirm whether the data source settings are correct by pressing the Finish key. In the ODBC Microsoft Excel Setup window indicate an *.xls EBS Ink-Jet Systeme EN 19 EN 8. 9. 10. EN 11. 12. 13. 14. file by pressing the Select Workbook... key. Then press the OK key in successive windows a number of times until you return to the Connecting database window. Press the Connect key. Select the type of database from the Type of database drop-down list box. Fill in the Table(File) name box. For Excel files type in the name of a spreadsheet. In the Search for box, select the column where all records (lines) are numbered. After the above mentioned options have been set, the first record of the table is read in. Using the Record number parameter you can choose the record to start printing with. Press the OK button. After connection with the database has been configured, the Database variable field window is displayed. Tick the names of the parameters (column headings) whose data is to be copied to the variable field and press the OK button. You can also 20 EN define the character to be used as a database data separator. In order to choose other parameters (column headings), double-click on the database variable field in the list displayed in the Variable Field window. In order to establish connection between the printer and the database, button or use the press the Database command in the Tools MENU. The status bar of the window displayed shows the state of connection with the database and of communication with the printer, as well as the progress bar. The selected columns are displayed in green. In order to start transferring data to the printer, click the Start sending button. When the data has been transferred successfully, an audible signal 32 is heard and the lamp 17 goes on. If the Send automatically option is enabled, text files are sent automatically after a given text has been printed. In the automatic transfer mode printing is blocked after every project has been printed until a successive text file is received (the same text cannot be printed several times). When printing is blocked, the PRINT lamp flickers. If this option is disabled, text files are sent only after printing has been PRINT ON/OFF switched off with the 18 key. In the manual transfer mode printing is EBS Ink-Jet Systeme 20111028#4.2 not blocked and the same text file can be printed many times. key to preview a print and Use the initiate variable fields. key is used to preview sucThe cessive prints; it is available after the key has been pressed once. Define a text containing one or more variable fields (incremental or decremental counters, date and time, information from database). ! The printer can work with only one database at a time. Every database table and Excel/TXT file shall have a column where successive records (lines) are numbered. In addition, every Excel spreadsheet shall have a heading. The printer and PC shall be able to communicate with each other permanently. The maximum number of columns in a table/file is 24 and the maximum number of lines in a table/file is 16 million. Only Latin characters can be used in a database file (for example, no Cyrillic characters can be used). No database variable field and no object counter register can be placed on a project at the same time. Check if the variable fields operate properly by using the print preview option. Press . In the Print Preview window you can see what the text looks like after the text, print and the printer’s general parameters required have been applied. If a text to be printed is defined as above, then the following contents can be printed on 30-09-2011 from 12:10 hours on, when printing is released with button 5 of the printer (simulated by the key in the program): For more information on the database refer to the document entitled HANDJET EBS 250 Printer Database Operating Manual. Print Preview On creating a text to be printed with the use of the variable fields you can check for proper operation of the counters using the print preview option. 20111028#4.2 EBS Ink-Jet Systeme EN 21 EN How to create and edit a graphics file for printing? The graphics (bitmap) editor enables a user to create and edit drawings which can then be inserted into texts to be printed. The graphics editor can be called up with the EN key on the toolbar (see figure F ). The window where graphics can be created/edited consists of dots and enables a user to generate graphics with a maximum height of 16 dots and length of 60 dots. Description of functions performed by the bitmap editor keys: - to insert bitmap into text file being edited, - to delete drawing being edited, to select draw mode. How to Modify Print Parameters ! The settings of the Text width print parameter are restricted not only by the above mentioned range limits. The current setting is controlled by the printer control program and can be further reduced according to the settings of other print parameters. Any attempt to set too high a print rate is automatically rejected. Intensity of Ink Drops This parameter impacts on the volume of every ink drop jetted out of the print head. If you increase intensity, you make the diameter of drops and colour saturation in the print increase. The settings of the Dot size parameter range from 0 to 10 with the interval of 1. ! Any increase in intensity setting increases ink consumption. Mode of Timing Character Resolution This parameter defines resolution (a number of rows/metre) of a text to be printed. The visual effect of any change in the Text width parameter is a change in the character width and in consequence, in the length of the entire text. The settings of the parameter can vary between 5 and 4000 with the increment of 1. 22 EN Timing determines the moments at which vertical rows of text are printed. Timing can be synchronised using: • Lower guide roll 3 - set the Impulse generator parameter to Lower roll. The movement of the roll makes the axis of the built-in encoder rotate (rotational speed converter). • Internal generator - set the Impulse generator parameter to Fixed speed. EBS Ink-Jet Systeme 20111028#4.2 ! The program makes it impossible to set the Fixed speed parameter unless the EBS-250 Safe mode option in the Tools menu, the Preferences submenu is unchecked. This limit has been set in order to reduce the risk of accidental print release – if the Fixed speed and Text repetitions - Continuous parameters are set, the printer starts printing as soon as printing is PRINT ON/OFF enabled with button 18 !!! When printing is timed by an internal generator, the pri nt rate is not synchronised with the printer travel rate. or from right to left The above reflections can also be used when you print on transparent surfaces, and printouts need to be legible from the other side (mirror images in the vertical or horizontal directions). Select the Reflect in vertical and Reflect in horizontal parameters in order to make proper printouts when objects to be labelled are positioned upside down. Reflecting a text The directions are defined as the printer "sees" them. the printer travels from left to right Reversed view of the printout Rotating a Text Select the Reflect in vertical parameter in order to make the print look like it is turned over. Select the Reflect in horizontal parameter if you need to label objects by moving the printer from the righthand side to the left-hand side. ! The following examples can be used in practice when the Shaft direction parameter is set to Disabled (this parameter is available in the Advance tab sheet after the Adv. options box has been ticked). the printer travels from left to right 20111028#4.2 As opposed to the Reflect in vertical and Reflect in horizontal parameters, which apply to entire texts, the Rotation parameter enables you to turn a single character. A character can be turned clockwise (when the parameter is set to 90), counter clockwise (when the parameter is set to 270) or turned upside down (when the parameter is set to 180). ! Text rotation can only be applied when Windows fonts are used. Choose the angle of rotation for a character (text), and then type it in on the text edit line. EBS Ink-Jet Systeme EN 23 EN Repeating a Text (Repetition) EN The Text repetitions parameter defines how many times printing needs to be repeated from the start point, after the printing has been initiated with release button 5. You can print a text repeatedly on one object - this is a so called text repetition. For long objects (such as pipes, hoses, cables, strips) you can set the repeated printing parameter to Continuous. This is possible after the Impulse generator parameter is set to Fixed speed. The interval between texts is set with the Rep. distance parameter - see further below. Print Delay The Print delay parameter defines the distance between the point at which printing is released (with release button 5) and the point at which printing should start. The distance is given as a number of empty rows to be timed after printing has been released until real printing starts. With it you can adjust the position of a print in relation to a reference point, for example the edge of an object. The settings of the Print delay parameter range from 0 to 9999 with the increment of 1. 24 EN Distance between Texts The Rep. distance parameter defines the distance between the beginnings of the texts that are printed repeatedly (Text repetitions>1). The distance is specified as a number of vertical rows (timed by a timing system). The settings of the Rep. distance parameter range from 0 to 9999 with the increment of 1. Example of printing for Text repetitions=3 printing released with the release button the printer travels in this direction 0, ...5,7, ... 14, Print delay ! ... Rep. distance 34 rows Rep. distance If the distance set with the Rep. distance parameter is smaller than the text length (given as a number of rows), then the texts will be printed one after another. Row Repetition The parameter defines how many times printing of each vertical row should be repeated. It is used for intensifying the prints on porous surfaces, which soak up ink heavily, on which printed characters are poorly visible due to surface granulation, if the characters are built of ink dots of the same sizes. EBS Ink-Jet Systeme 20111028#4.2 If you use the extended parameter panel (which is available after the Adv. options box has been ticked), Intelligent Control of Hand Movement The printer system controls the printing process and makes it impossible to produce a misprint should the operator’s hand or the printer be withdrawn by chance. The control is enabled if the Shaft direction parameter is set to Compatible with printing direction or Contrary to printing direction (depending on whether objects are labelled from left to right or from right to left). The system detects every withdrawal of the printer automatically and suspends printing. After the printer has returned to its proper position, printing is resumed from the place /text part in which the printer was drawn back. The Shaft direction parameter is available in the Advance tab sheet after the Adv. options box has been ticked. If the parameter is set to Disabled, the printer will produce labels in either direction. ! In order to ensure that printing is resumed exactly in the place where it was interrupted, the lower roll, 3, of the printer needs to have contact with the surface to be labelled on a continuous basis. How to Transfer/Save Text Files to/in the Printer See figure F . In order to send a text and print parameters to the printer, key or you need to click the use the command Send text and parameters from the Printer control menu. Wait until an O.K. message is displayed in the transmission status window. 20111028#4.2 ! the key has a different function. When such a panel is used and text is sent to the printer, the text file is not saved in the printer’s nonvolatile memory at the same time. If the printer is switched off the text file is lost. In order to save the text file in the non-volatile memory press the key or use the Save text and parameters command from the Save text and parameters menu. If you do that and switch the printer off and on, the text will be immediately ready for printing. How to Change a Text File Stored in the Printer Every text file can be changed in two ways. Method One: 1. Retrieve a text file from the printers memory by clicking the 2. 3. key or the command Retrieve text and parameters. Modify the text file and/or print parameters with the text editor. Save the text file in the nonvolatile memory of the printer by clicking the , bearing in mind that an O.K. message should be displayed in the transmission status window each time a file is saved. See also the note in the section entitled How to Transfer/Save Text Files to/in the Printer. Method Two: 1. Open a project (text and parameters) with the command Open project or only a text file with the command Open text (without parameters) on your computer. 2. Save the text file in the nonvolatile memory of the printer by EBS Ink-Jet Systeme EN 25 EN PRINT ON/OFF . Lamp 17 goes out. If the Stop printing method parameter is set to Complete & stop and you press button 18, lamp 17 will flash. This means that you have pressed release button 5 but not finished printing. In such a case you can finish printing or abandon printing by pressing button 18 once again. If the Stop printing method parameter is set to Immediate stop the printer will not remind you about the unfinished printing. The Stop printing method parameter is available in the Advance tab sheet after the Adv. options box has been ticked. clicking the , bearing in mind that an O.K. message should be displayed in the transmission status window each time a file is saved. See also the note in section How to Transfer/Save Text Files to/in the Printer. EN Printing Printing a Text File Saved in the Printer See figure A . 1. Switch the printer on. 2. Press and then release button PRINT ON/OFF 3. 4. - lamp 17 starts light18, ing. If ink pressure in the ink container is insufficient, a micro compressor starts to add some air. Wait until the micro compressor stops working. Move the head of the printer to an object to be labelled to ensure that drive rolls 1 and 3 touch the surface of the object. Press print release button 5 (the release button) and move the printer along the object ensuring that the drive rolls roll at a uniform speed. ! If the printer has been idle for longer than about 30 minutes, the nozzle outlets might become covered with dry ink. Before you start printing make a trial printing or use the rinsethe-nozzles function for a while in order to clear the nozzles - see Rinse the nozzles. If you label objects whose height is smaller than 60 mm (the distance between the rolls is 60 mm), make sure that at least lower roll 3 (designed for synchronising printing) touches the object being labelled - see figure H . The rule does not apply if printing is synchronised by the internal generator. Line Printing Line printing is used to print a few texts manually in a fast way: • on consecutive lines as shown in the figure below: the printer moves along the object here printing is released with the release button 5. 6. Make successive prints by pressing release button 5. After all prints have been made press and then release button 18, 26 EN EBS Ink-Jet Systeme 20111028#4.2 • or in different places on an object as shown in the figure below: 4. Transfer the text to the printer and you can start printing. Each text is selected and printed with release button 5. ! Create texts to be printed in the following way: 1. Create TEXT 1 in the text edit line. Every line of the text can have all the text elements (such as variable fields, various fonts, etc.) described previously. The number of texts to be printed in separate lines is not limited. Instead, the total number of characters in all lines is subject to limitation: it must not exceed 1300 characters. EN Using a Number of Texts You can store up to 10 projects (30 optionally) in the printer memory. Each project can contain any of the text elements described previously (such as variable fields, various fonts, etc.), and also the line printing function. Creating a Text Library in the Printer 1. In the Project library window, type in the name of a first text and confirm the name with the V key. 2. • • • 3. Place the cursor at the end of text TEXT 1 and insert a textchange marker. You can do that in a few ways: while holding the cursor on the text edit line press the right mouse button (or the MENU button) and select the commands Insert mark and Insert text divider in the menu displayed, key on the tool bar press the of the text edit window, use the F3 shortcuts. Type in successive texts separating them with the text-change marker. 2. Ö In the text edit line create a complete text and set print parameters for the text. 3. When the printer is on, click the key of the printer control program in order to send the text file to the printer. See also the note in section How to 20111028#4.2 EBS Ink-Jet Systeme EN 27 Transfer/Save Text Files to/in the Printer. 4. Repeat steps from 1 to 3 in order to programme other texts. You can save the project list to a text file using the Copy list to editor command which is available after the right mouse button has been pressed above the text library window. EN number displayed corresponds to the number in the text library. 1. Start printing by pressing button PRINT ON/OFF 2. 3. 18 . Print a text. Switch the printer to print another text by pressing button 19 F 4. 3 sec. . Print the successive text. In order to ensure that the printer skips over text files during the text switching operation (to be performed with function key 19) delete the text name in the library and save such an empty text name in the printer. Quick Saving/Retrieving Text Files to/from Text Library In order to save the entire text library to the printer use the command Send and save text library. ! F Similarly you can retrieve the text library from the printer using the command Retrieve text library. ! The command Send and save text library erases all text files contained in the non-volatile memory of the printer. 3 sec. Saving the Project Library on Computer Disc The project (text and print parameter) library can be saved on a computer disc with the command Save project library from the File menu. Printing Text Files from Library Select texts stored in the text library of your printer one by one by pressing F 3 sec. button 19 for a while until bussing is heard from buzzer 32 . Such a switching operation can be performed regardless whether the printer is in the print state (lamp 17 lights) or not. The buzzing from is different for a first buzzer 32 text. On display 33 you can see which of the library texts is selected. The 28 EN Similarly you can open the project library on your computer with the command Open project library. EBS Ink-Jet Systeme 20111028#4.2 ! You can quick-load the project library from the computer disc to your printer with two successive commands Open project library and Send and save text library. 6 Maintenance, Storage and Transport 6 It is recommended that the outer face of the print head, especially the nozzle plate 2, and possibly the guide rolls 1 and 3 should be washed in order to remove the remnants of ink and dirt after the work has been finished and the printer has been switched off. The washing should be done in the following way: • Place the HANDJET printer on its side and tilt its face downwards carefully (see the drawing below); in such a position dirty wash-up can flow freely out of the printer, • Place a piece of absorptive cloth or a metal vessel, e.g. a tray, under the printer face, • Wash the printer face with the use of a wash-up atomiser. 20111028#4.2 6 If the printer face is washed in a different way than that shown above, then wash-up may get in to the printer’s movable, bearingbased parts or inner electronic subassemblies unintentionally. In effect, the roll guides may seize or ever lockup permanently and the (shaft-encoder) position sensor and other electronic subassemblies may get damaged. If the printer remains idle for a longer period (over 3 weeks), ink may partially dry in printer components. Therefore follow the storage instructions given below not to be disappointed when you try to use your printer afterwards: • if the printer has already been used before, store it with ink container 10 fastened to it, • protect the printer against dust, dirt, any influence of aggressive vapours and gases and excessive temperature and moisture. Ideally, place the printer in a polyethylene tight bag, remove air from the bag and close it tightly. Then place it in the packing case. The printer should be stored and transported in the packing case delivered with the printer. During normal operation avoid exposing the printer to strong mechanical shocks (protect the printer, especially nozzles 2, rolls 1 and 3 and panel 9 against impact, falling onto hard surfaces or scratching with sharp objects). EBS Ink-Jet Systeme EN 29 EN User Support replacement operation be performed by qualified or EBS service staff. Problems with Functioning and Operation of the Printer Boldfaced or Blurred Prints The print is heavily saturated with ink, ink drops blur and the entire print seems to spread over the object being labelled. Some of the nozzles do not jet ink EN Rinse the nozzles Some drops are missing on a print. or Aim the nozzle outlet at a vessel, for example the one you use to wash the printer. Wash the nozzles with wash-up, if they are covered with dried ink. Start the rinse-the-nozzle function. Press release button 5 three times and hold it down for a few seconds. This causes all electromagnets in the head to open and ink to pour out at pressure after a warning buzzing signal has been generated by buzzer 32 ! When ink starts jetting regularly out of each nozzle, release button 18. 6 6 6 6 ! Frequent and long-lasting use of the rinse function increases ink consumption. The printer does not print On starting printing and making an attempt to print you can hear the electromagnets of the nozzle valves operating but ink drops are not always jetted out of the nozzles properly. The quality of printing deteriorates or no print is produced. After about 100 ink containers (or over 10 litres of ink) have been consumed, however not less frequently than every four years, the built-in ink filter should be checked and replaced, if need be. It is recommended that the 30 EN Decrease the setting of the Dot size parameter by moving the parameter slider to the left. Questions and Problems If these Instructions and other support in the form of electronic files contained on the installation CD, which has been delivered together with the printer, do not provide answers to all your questions, then: 6 look through the web site of the printer’s manufacturer, EBS Ink-Jet Systeme and try to find the answers to your queries, 6 try asking the question to the manufacturer’s representative, 6 present the problem in the contact form available on the manufacturer’s web site and forward the form following the instructions given therein. Electronic Guides Some operating instructions and programming operations are presented via interactive creators/guides available from the Guides menu of the control program. The creators are installed together with the control program. EBS Ink-Jet Systeme 20111028#4.2 Technical Parameters Pa ra met er Number of nozzles Nozzle diameter Print height De sc r ipt ion 16 150µm as standard optionally: 120µm, 170µm, 200µm. EN 27 mm from 70 mm (contact with both rolls), from 35 mm (contact with the lower roll to print with for example 7 nozzles only - Height of objects to be labelled Working position in 3D space Number of text lines per run see figure H ). A guide and rolls can be used optionally to support rectilinear printing; they are most useful for line printing, for labelling pipes, barrels and other cylindrical objects. any 1 Line printing Supports printing of up to 10 texts in successive lines. Maximum number of characters per text 1300 (including control characters for the printer’s built-in fonts). Number of texts and accompanying print-parameter (stored in from 1 to 10. Texts are loaded to the printer via a PC. from 1 to 30 Optionally. the printer’s memory at the same time) Printing of graphics (logo, special graphics characters ) Ability to edit and print text and graphic symbols with the application of Windows® fonts (True Type fonts) as well as with a bitmap editor, as standard. Special characters National (diacritical) characters, graphic characters for information, warning, transport and other purposes (a character set defined by the manufacturer), etc. Variable fields (texts whose contents vary dynamically according to occurrence of a specific event) 20111028#4.2 Date and time in any format, expiry date, incremental or decremental counters. EBS Ink-Jet Systeme EN 31 Pa ra met er Timing De sc r ipt ion Either synchronised with rotational speed of the lower guide roll or at time intervals by an internal generator regardless of the printer’s travel rate during printing. • Text and parameter processing software compatible with Windows® 98SE / ME / 2000 / XP / Vista®, EN Programming • Programming with the use of T200 Terminal (optionally), • The option of networking of up to 60 printers; such a network is radiocontrolled via a PC. Printer-computer communication: Operating frequency range: Range: Wireless link, radio transmission with Bluetooth 2.0, Class 1 2.400 - 2.485 GHz up to 100 m, according to land-surface configuration Power supply Battery powered with a pack of 3 Li-Ion cells. Approximate operating time with the battery fully charged 50 hours of non-stop printing at the temperature of 20°C, automatic lowbattery indication. Re-charging Automatically via an external 24V / 1 A DC power pack. Charging time - less than 150 minutes (<2.5 hours). Number of charging cycles: 500 (up to 70% of initial capacity). Ink It is available in easy detachable containers. It is made on the basis of alcohol, acetone or water, in various colours (among others in white, yellow, blue, green, red or black) to be ordered from a catalogue. Container capacity 110 ml enough to print about 100 000 characters with 7x5 dot matrix or about 17 000 characters with 16x10 dot matrix, 32 EN EBS Ink-Jet Systeme 20111028#4.2 Pa ra met er Working pressure Operating temperature range Storage temperature range from 0.03 MPa to 0.04 MPa (from 0.3 bar to 0.4 bar) from +5°C to +40°C (over a longer period) from +1°C to +45°C, if water-based ink is used for printing. from -10°C to +45 °C if acetone or ethanol -based ink is used for printing. Humidity Up to 95% without steam condensation - at temperatures higher than the dew point (the printer can be operated when it rains provided that the surface to be labelled is dry). Weight 980±10 g printer with a battery and full ink container, without power pack and cable. Dimensions in vertical position (length / width / height) Dimensions in working position 20111028#4.2 De sc r ipt ion 240 / 130 / 265 mm See figure H below (provided that the surface to be labelled is vertical). EBS Ink-Jet Systeme EN 33 EN Printer Accessories NOTE: some elements may not be part of a typical delivery or other elements which are not specified below may be included, depending on your order. The following elements are delivered most frequently as part of a typical system: • Packing case to hold all accessories............................................. 1 unit • HANDJET® EBS 250 Printer ......................................................... 1 unit • Power pack (24V /1A) with cable ............................................... 1 unit • Ink container................................................................................ 2 units • USB-Bluetooth Radio Communications Module............................ 1 unit • CD with utility software, operating instructions and usersupport files (instructions, advice, help in electronic form) .......... 1 disc Other elements to be delivered with the order as part of the system or separately: • Double guide rolls to support rectilinear printing, • Quadruple guide rolls to support rectilinear printing, • Guide rolls on cylinder-shaped elements to support rectilinear printing (at the radius length – along the perimeter), • Guide rolls on cylinder-shaped elements to support rectilinear printing (along the axle - longitudinally). EN H objects to be labelled 222 60 100 27 min. 70 min. 35 60 100 73 255 103 255 surface to be labelled 37 73 54 74 dimensions are given in millimetres The printer in its working position - dimensions (side and front views) 34 EN EBS Ink-Jet Systeme 20111028#4.2 EBS Ink-Jet Systeme GmbH Alte Ziegelei 19-25, D-51588 Nümbrecht, Germany +49 (0)2293 - 939-0 +49 (0)2293 - 939-3 http://www.ebs-inkjet.de EBS Ink-Jet Systems Poland Sp. z o.o. ul. Tarnogajska 13, 50-512 Wroclaw, Poland +48 71 367-04-11 +48 71 373-32-69 http://www.ebs-inkjet.pl © 2011 EBS Ink-Jet Systeme