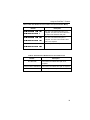
1
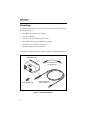
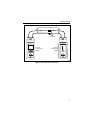
DSP-FTA410 Fiber Test Adapter Users Manual September 1998 Rev.1, 2/00 © 1998 , 2000 Fluke Corporation, All rights reserved. Printed in U. S.A. All product names are trademarks of their respective companies. LIMITED WARRANTY AND LIMITATION OF LIABILITY Each Fluke product is warranted to be free from defects in material and workmanship under normal use and service. The warranty period is one year and begins on the date of shipment. Parts, product repairs, and services are warranted for 90 days. This warranty extends only to the original buyer or end-user customer of a Fluke authorized reseller, and does not apply to fuses, disposable batteries, or to any product which, in Fluke’s opinion, has been misused, altered, neglected, contaminated, or damaged by accident or abnormal conditions of operation or handling. Fluke warrants that software will operate substantially in accordance with its functional specifications for 90 days and that it has been properly recorded on non-defective media. Fluke does not warrant that software will be error free or operate without interruption. Fluke authorized resellers shall extend this warranty on new and unused products to end-user customers only but have no authority to extend a greater or different warranty on behalf of Fluke. Warranty support is available only if product is purchased through a Fluke authorized sales outlet or Buyer has paid the applicable international price. Fluke reserves the right to invoice Buyer for importation costs of repair/replacement parts when product purchased in one country is submitted for repair in another country. Fluke’s warranty obligation is limited, at Fluke’s option, to refund of the purchase price, free of charge repair, or replacement of a defective product which is returned to a Fluke authorized service center within the warranty period. To obtain warranty service, contact your nearest Fluke authorized service center to obtain return authorization information, then send the product to that service center, with a description of the difficulty, postage and insurance prepaid (FOB Destination). Fluke assumes no risk for damage in transit. Following warranty repair, the product will be returned to Buyer, transportation prepaid (FOB Destination). If Fluke determines that failure was caused by neglect, misuse, contamination, alteration, accident, or abnormal condition of operation or handling, including overvoltage failures caused by use outside the product’s specified rating, or normal wear and tear of mechanical components, Fluke will provide an estimate of repair costs and obtain authorization before commencing the work. Following repair, the product will be returned to the Buyer transportation prepaid and the Buyer will be billed for the repair and return transportation charges (FOB Shipping Point). THIS WARRANTY IS BUYER'S SOLE AND EXCLUSIVE REMEDY AND IS IN LIEU OF ALL OTHER WARRANTIES, EXPRESS OR IMPLIED, INCLUDING BUT NOT LIMITED TO ANY IMPLIED WARRANTY OF MERCHANTABILITY OR FITNESS FOR A PARTICULAR PURPOSE. FLUKE SHALL NOT BE LIABLE FOR ANY SPECIAL, INDIRECT, INCIDENTAL, OR CONSEQUENTIAL DAMAGES OR LOSSES, INCLUDING LOSS OF DATA, ARISING FROM ANY CAUSE OR THEORY. Since some countries or states do not allow limitation of the term of an implied warranty, or exclusion or limitation of incidental or consequential damages, the limitations and exclusions of this warranty may not apply to every buyer. If any provision of this Warranty is held invalid or unenforceable by a court or other decision-maker of competent jurisdiction, such holding will not affect the validity or enforceability of any other provision. Fluke Corporation P.O. Box 9090 Everett, WA 98206-9090 U.S.A. 11/99 Fluke Europe B.V. P.O. Box 1186 5602 BD Eindhoven The Netherlands Table of Contents Title Introduction .......................................................................................... Unpacking ............................................................................................ Safety Information................................................................................ Fiber Test Adapter Features ................................................................. Getting Started...................................................................................... Cleaning the Fiber Connections ....................................................... Verifying Operation.......................................................................... Summary of Fiber Test Settings ........................................................... Setting Up for Fiber Tests .................................................................... Selecting a Test Standard and Fiber Type ........................................ Setting the Remote End Configuration............................................. Selecting the Adapter Type .............................................................. Setting the Number of Adapters and Splices .................................... Setting a Reference........................................................................... Setting a Reference for Smart Remote Mode ................................... Setting a Reference for Loopback Mode .......................................... Setting a Reference for Far End Source Mode ................................. Changing the Index of Refraction..................................................... Running an Autotest............................................................................. Saving Autotest Results........................................................................ Autotest Results for Smart Remote Mode ............................................ Pass/Fail and Headroom Results for Smart Remote Mode ............... Loss for Smart Remote Mode........................................................... Length Results for Smart Remote Mode .......................................... Bi-Directional Testing .......................................................................... Swapping Connections ..................................................................... Bi-Directional Autotest Results........................................................ Autotest Results for Loopback Mode ................................................... Pass/Fail and Headroom Results for Loopback Mode...................... Loss Results for Loopback Mode ..................................................... Length Results for Loopback Mode ................................................. i Page 1 2 3 4 5 6 6 8 9 9 10 10 11 11 12 14 15 16 16 21 22 22 22 24 25 25 25 26 26 26 27 Contents (continued) Autotest Results for Far End Source Mode........................................... Single Tests........................................................................................... Single Tests for Smart Remote Mode ............................................... Single Tests for Loopback Mode ...................................................... Single Test for Far End Source Mode............................................... Monitoring Optical Power .................................................................... Using the Talk Mode ............................................................................ ™ Using the FindFiber Feature ............................................................. Configuring a Custom Fiber Test.......................................................... Fiber Test Reports................................................................................. Maintenance.......................................................................................... Calibration ........................................................................................ Repair................................................................................................ Contacting Fluke................................................................................... Replacement Parts and Accessories ...................................................... Specifications........................................................................................ General Specifications ...................................................................... Optical Transmitter ........................................................................... Optical Receiver................................................................................ Fiber Troubleshooting Guide................................................................ Glossary ................................................................................................ Index ii 28 30 30 31 31 32 34 34 38 39 39 39 40 40 40 42 42 42 42 43 45 List of Tables Table 1. 2. 3. 4. 5. 6. 7. 8. 9. 10. Title Settings for Testing Fiber................................................................... Loss Results for Smart Remote Mode................................................ Length Results for Smart Remote Mode............................................ Loss Results for Loopback Mode ...................................................... Length Results for Loopback Mode................................................... Loss Results for Far End Source Mode ............................................. Main Unit Results for the FindFiber Test (Smart Remote Mode ....... Smart Remote LED Results for the FindFiber Test ........................... Replacement Parts and Accessories ................................................... Common Problems in Fiber Links ..................................................... iii Page 8 23 24 27 27 29 35 35 41 44 Contents (continued) iv List of Figures Figure 1. 2. 3. 4. 5. 6. 7. 8. 9. 10. 11. 12. 13. Title Standard Equipment........................................................................... Features of the DSP-FTA410 Fiber Test Adapter.............................. Attaching a DSP-FTA410.................................................................. Connections for a Self Test................................................................ Setting a Reference for Smart Remote Mode..................................... Setting a Reference for Loopback Testing ......................................... Setting a Reference for Far End Source Mode................................... Test Connections for Smart Remote Mode ........................................ Test Connections for Loopback Mode............................................... Test Connections for Far End Source Mode ...................................... Monitoring Optical Power ................................................................. Using FindFiber with a Smart Remote............................................... Using FindFiber with a Loopback Cable ........................................... v Page 2 4 5 7 13 14 15 18 19 20 33 36 37 Contents (continued) vi Introduction The DSP-FTA410 Fiber Test Adapter lets you use a DSP-4000 CableAnalyzer test tool to test and certify fiber optic cable installations. The fiber test adapter includes the following features: • Autotest function measures optical power loss (at 850 nm and 1300 nm) and length on dual-fiber multimode links. Provides pass/fail results based on common fiber test standards. • Includes built-in support for SFF (Small Form Factor) link testing. • With a separate laser source (such as the Fluke LS-1310/1550 Laser Source), you can test singlemode fiber at 1310 nm and 1550 nm. • Monitors power at 850 nm, 1300 nm, 1310 nm, and 1550 nm from optical sources, such as test equipment and optical interface cards. • Transmits or receives 850 nm or 1300 nm light for performing quick continuity checks. • Graphic Help screens show you how to make proper fiber connections. • FindFiber™ feature helps you verify optical connectivity. • Allows two-way voice communication over the fiber under test (using two DSP-FTA410 units and the headsets supplied with the DSP-4000 test tool). • Saves fiber test results for printing or uploading to a PC. 1 DSP-FTA410 Users Manual Unpacking The DSP-FTA410S Fiber Test Option Set includes the following items, which are shown in Figure 1: • Two DSP-FTA410 Fiber Test Adapters • Two ST/ST adapters • Four SC/ST 62.5 µm multimode patch cords • Two short ST/ST 62.5 µm multimode test jumpers • DSP-FTA410 Users Manual (not shown) • Warranty registration card (not shown) If anything is damaged or missing, contact the place of purchase immediately. DSP-FTA410 (2) BE R TE ST AD AP TE R S PFT A4 10 FI ST/ST Adapters (2) ST/ST Multimode test jumpers (2) SC/ST Multimode patch cords (4) tt14f.eps Figure 1. Standard Equipment 2 Safety Information Safety Information WWarning To avoid possible eye damage caused by hazardous radiation: • Never look directly into optical output connectors (see Figure 2). Some sources produce invisible radiation that can permanently damage your eyes. • Do not open the case; no user-serviceable parts are inside. • Do not use magnification to view the optical outputs without proper filtering. • Use of controls, adjustments, or procedures not stated herein might result in hazardous radiation exposure. • Read the safety information given in Chapter 2 of the DSP-4000 Users Manual. 3 DSP-FTA410 Users Manual Fiber Test Adapter Features Figure 2 describes the features of the DSP-FTA410 Fiber Test Adapter. 1 OUTPUT 2 INPUT 3 4 tt11f.eps A SC output connector. Transmits multimode optical signals at 850 nm and 1300 nm. B SC input connector. Receives multimode optical signals at 850 nm and 1300 nm and singlemode optical signals at 1310 nm and 1550 nm. C DB60 connector and latches for attaching the DSP-FTA410 unit to a DSP-4000 test tool. D Slide mechanism for locking the DSP-FTA410 unit to a DSP-4000 test tool or remote unit. Figure 2. Features of the DSP-FTA410 Fiber Test Adapter 4 Getting Started Getting Started This section describes how to connect the DSP-FTA410 units and verify their operation. Attach a DSP-FTA410 unit to your DSP-4000 test tool, as shown in Figure 3. Attach the second DSP-FTA410 unit to the DSP-4000 remote unit. The DSP-FTA410 units are identical, so either one can be attached to the remote. Notes The DSP-FTA410 Fiber Test Adapters are compatible only with DSP-4000 test tools and remote units. This manual assumes that you have used the DSP-4000 test tool to test copper cable. If you need more detailed instructions about using the DSP-4000 test tool, refer to the DSP-4000 Users Manual. tt02f.eps Figure 3. Attaching a DSP-FTA410 5 DSP-FTA410 Users Manual Cleaning the Fiber Connections Always clean the fiber endfaces before making connections. Use any of the following: • Lint-free swabs or wipes moistened with isopropyl alcohol • Pre-moistened swabs or wipes approved for use on fiber connectors • Cassette-style cleaning devices designed for use on fiber connectors (follow the manufacturer’s instructions for use) Canned air approved for use on fiber connectors is also useful for dislodging contamination. Protect all connectors with dust caps when not in use. Verifying Operation Use the DSP-4000 test tool’s self-test feature to verify that the DSP-FTA410 units are working properly, as follows: 1. Clean all fiber connections. 2. Connect as shown in Figure 4. 3. Run the self test from the test tool’s SPECIAL FUNCTIONS mode. 4. If the self test fails, verify that your patch cords are good, clean the fiber endfaces; then run the self test again. If it continues to fail, contact Fluke as described under "Contacting Fluke". 6 Getting Started Patch cords of the same type as the fiber to be tested and SC at test tool ends Adapters OUTPUT OUTPUT INPUT DSP-FTA410 DSP-FTA410 FIBER TEST ADAPTER DSP-4000 INPUT FIBER TEST ADAPTER DSP-4000 CABLE ANALYZER SMART REMOTE PASS TESTING 1 2 3 4 EXIT FAULT INFO TEST Test tool with fiber test adapter FAIL Remote with fiber test adapter TALKING LOW BATTERY TALK TALK ENTER SAVE MONITOR SINGLE TEST AUTO TEST OFF SETUP PRINT ON SPECIAL FUNCTIONS OFF tt03f.eps Figure 4. Connections for a Self Test 7 DSP-FTA410 Users Manual Summary of Fiber Test Settings Table 1 briefly describes the settings required for testing fiber links. See the descriptions under "Setting up for Fiber Tests" for more details on each setting. Table 1. Settings for Testing Fiber Setting Description of Options TEST STANDARD, CABLE TYPE In SETUP, select the test standard and cable type (multimode or singlemode) that applies to the fiber under test. REMOTE END CONFIGURATION In SETUP, select Smart Remote, Loopback, or Far End Source Mode. Smart Remote Mode uses two DSP-FTA410 units. Loopback Mode uses one DSP-FTA410 unit. Far End Source Mode requires a separate optical source, such as the Fluke FOS-850/1300 multimode source or the Fluke LS-1310/1550 laser source. Figures 8, 9, and 10 show the three configurations. NUMBER OF ADAPTERS NUMBER OF SPLICES 8 If required, in SETUP set the numbers of adapters and splices added to each fiber path since the reference was set. ADAPTER TYPE In SETUP, select the type of adapter. The graphic Help screens show how to connect the test unit with different adapter types. SET FIBER REFERENCE In SPECIAL FUNCTIONS, set the reference power level for the power loss test. Figures 5, 6, and 7 show the reference connections for the three remote end configurations. Setting Up for Fiber Tests Setting Up for Fiber Tests This section tells you how to configure your test tool for testing fiber links. Selecting a Test Standard and Fiber Type Fiber test standards define limits for losses in adapters and splices, the length of fiber optic links, and other parameters. When you select a standard, the test tool also prompts you to select a cable type. Note For more details on fiber test standards, refer to the document on the DSP-LINK diskette included with your DSP-4000 test tool. Select a fiber test standard and cable type as follows: 1. Attach a DSP-FTA410 unit to the DSP-4000 test tool. Turn the DSP-4000 test tool’s rotary switch to SETUP; then press E. 2. Use the arrow keys to highlight the desired test standard; then press E. 3. Use the arrow keys to select the appropriate fiber type; then press E. Your DSP-4000 test tool is programmed with the standards available when the unit left the factory. When new standards emerge, they will be included with DSP-4000 software upgrades available from Fluke. Refer to the DSP-4000 Users Manual for information on upgrades. Or, contact Fluke on the World Wide Web at www.fluke.com. 9 DSP-FTA410 Users Manual Setting the Remote End Configuration In the SETUP mode, select the remote end configuration that matches your test configuration (usually, you will use Smart Remote Mode): • Smart Remote Mode uses two DSP-FTA410 units: one on the DSP-4000 main unit and one on the remote unit. (Refer to Figure 8.) • Loopback Mode uses just one DSP-FTA410 unit on the DSP-4000 main unit. (Refer to Figure 9.) You can use this mode to test a single fiber or a spool of fiber. In this case, you would connect the fiber ends to the patch cords on DSP-FTA410 output and input ports. • Far End Source Mode is used with a laser source, such as the Fluke LS-1310/1550 Laser Source, to test singlemode fiber. You can also use Far End Source Mode with a separate multimode source, such as the Fluke FOS-850/1300 Fiber Optic Source. (Refer to Figure 10.) Selecting the Adapter Type The test tool provides graphic help screens to show you how to make the proper fiber connections for testing. Since the connections are not the same for all types of adapters, you will want to select the adapter type to match the connectors on the fiber links you will be testing. Selecting the adapter type will be particularly helpful when you are testing Small Form Factor (SFF) fiber links. In the SETUP mode, press the $ Page Down softkey until you find the adapter type setting. To modify the setting, press E. The default setting for the adapter type is General. Use this setting if you are not sure what type of adapter you are testing. 10 Setting Up for Fiber Tests Setting the Number of Adapters and Splices Some test standards use a calculated limit for the loss test. This limit includes the number of adapters and splices in the link. In the test tool’s SETUP mode, enter the number of adapters and number of splices added in each direction of the fiber path since the reference was set. For example, the reference connections in Figure 5 show one adapter in each path. When power loss is measured as shown in Figure 8, there are three adapters in each path. You have added two adapters in each path, so you would enter "2" for the "Number of Adapters" count in SETUP. The test tool uses the number of adapters and splices you enter and the measured length of the fiber to calculate the loss limit for the link. If the measured loss is greater than the calculated limit allows, the link fails. The insertion loss allowed for each adapter or splice depends on the selected test standard. If necessary, you can change the insertion loss used for adapters or splices by creating a custom test as described on page 38. Setting a Reference The reference is used for power loss and delay measurements. Setting a reference lets your DSP-4000 test tool automatically subtract out the losses or delays due to patch cords or the DSP-FTA410 units. The loss and delay for a fiber under test is automatically calculated as the difference between the reference loss and delay and those values measured with the fiber inserted. For the most accurate test results, you should set the reference at these times: • Anytime you start using a different DSP-FTA410 unit or other optical source. • Anytime you reconnect a patch cord or change the cord used on the DSP-FTA410 output port or other source. Note For the most accurate test results, set the reference at the beginning of each day using the test configuration (Figure 5, 6, or 7) you will be using that day. The test tool stores separate reference values for each remote end configuration. 11 DSP-FTA410 Users Manual Setting a Reference for Smart Remote Mode 1. Turn on the test tool and the remote. Let the DSP-FTA410 units warm up for five minutes. Set the remote end configuration to Smart Remote Mode. 2. Choose four known-good SC/ST patch cords. Clean all fiber endfaces. Note If the fiber to be tested does not use ST adapters, select patch cords with SC adapters on one end and the appropriate adapters on the other end. Mate the cables with the appropriate adapters. 3. Make the connections shown in Figure 5. 4. Turn the rotary switch to SPECIAL FUNCTIONS. Select Set Fiber Reference; then press E. 12 Setting Up for Fiber Tests Patch cords of the same type as the fiber to be tested and SC at test tool ends Adapters OUTPUT OUTPUT INPUT DSP-FTA410 DSP-FTA410 FIBER TEST ADAPTER DSP-4000 INPUT FIBER TEST ADAPTER DSP-4000 CABLE ANALYZER SMART REMOTE PASS TESTING 1 2 3 4 EXIT FAULT INFO TEST Test tool with fiber test adapter FAIL Remote with fiber test adapter TALKING LOW BATTERY TALK TALK ENTER SAVE MONITOR SINGLE TEST AUTO TEST OFF SETUP PRINT SPECIAL FUNCTIONS ON OFF tt03.eps Figure 5. Setting a Reference for Smart Remote Mode 13 DSP-FTA410 Users Manual Setting a Reference for Loopback Mode 1. Turn on the test tool. Let the DSP-FTA410 units warm up for five minutes. Set the remote end configuration to Loopback Mode. 2. Choose two known-good SC/ST patch cords. Clean all fiber endfaces. Note If the fiber to be tested does not use ST adapters, select patch cords with SC adapters on one end and the appropriate adapters on the other end. Mate the cables with the appropriate adapters. 3. Make the connections shown in Figure 6. 4. Turn the rotary switch to SPECIAL FUNCTIONS. Select Set Fiber Reference; then press E. Patch cords of the same type as the fiber to be tested and SC at test tool ends Adapter OUTPUT INPUT DSP-FTA410 FIBER TEST ADAPTER DSP-4000 1 CABLE ANALYZER 2 3 4 EXIT FAULT INFO TEST Test tool with fiber test adapter TALK ENTER SAVE MONITOR SINGLE TEST AUTO TEST OFF SETUP PRINT SPECIAL FUNCTIONS tt04.eps Figure 6. Setting a Reference for Loopback Mode 14 Setting Up for Fiber Tests Setting a Reference for Far End Source Mode 1. Turn on the test tool and the optional source. Set the remote end configuration to Far End Source Mode. Let the DSP-FTA410 units warm up for five minutes. Let the optional source warm up as required. 2. Choose two known-good patch cords with the appropriate connector types. Clean all fiber connectors. 3. Make the connections shown in Figure 7. 4. Turn the rotary switch to SPECIAL FUNCTIONS. Select Set Fiber Reference; then press E. Optical patch cords (SC at test tool end) Adapter OUTPUT INPUT CW MOD CAUTION DSP-FTA410 FIBER TEST ADAPTER LOW BATTERY DSP-4000 1 CABLE ANALYZER 2 3 4 EXIT FAULT INFO TALK ENTER TEST 1310 OFF 1550 SOURCE ACTIVE SAVE Test tool with fiber test adapter Optical source (such as Fluke LS-1310/1550 or FOS-850/1300) LS-1310/1550 LASER SOURCE MONITOR SINGLE TEST AUTO TEST OFF SETUP PRINT SPECIAL FUNCTIONS tt05f.eps Figure 7. Setting a Reference for Far End Source Mode 15 DSP-FTA410 Users Manual Changing the Index of Refraction The index of refraction, n, is the ratio of the velocity of light in free space to the velocity of light in a fiber. This value is used with the measured propagation delay to determine fiber length. The test tool can store n values for 50 µm multimode and 62.5 µm multimode cable types. One set is for the standard tests and four sets are used for custom tests. If you need to change the factory setting for n to match the fiber you are testing, proceed as follows: 1. Turn the rotary switch to SETUP. Use $ Page Down and E to find and highlight the index of refraction setting. 2. Use DU and LR to adjust the setting to the desired value; then press E. If you change n for a custom test setup, this n value will be used only for that custom test. If you are not setting up a custom test, the new n value will be used for all tests except custom tests. Running an Autotest The Autotest certifies dual-fiber links based on the fiber standard you select. You can also use the Autotest in Far End Source Mode to measure loss on a single fiber. (Using Autotest rather than a Single Test gives you the option of saving the test results.) You use an Autotest on multimode fiber links to check optical power loss (at 850 nm and 1300 nm), fiber length, and propagation delay. If you use an optional multimode source, such as the Fluke FOS-850/1300 source, Autotest measures optical power loss only. 16 Running an Autotest Singlemode fiber links are tested for loss at 1310 nm and 1550 nm (a separate laser source is required). Run an Autotest as follows: 1. Turn the test tool’s rotary switch to AUTOTEST and turn on the remote (if used). Let the DSP-FTA410 units warm up for five minutes. 2. Verify that the Autotest display shows the correct test standard, cable type, and remote end configuration. You can change these selections in the SETUP mode. 3. Select patch cords of the same type as the fiber to be tested. Refer to Figures 8, 9, and 10 for the number of patch cords required for your remote end configuration. Clean all fiber endfaces. 4. If you wish, you can press @ Help to show how to make the fiber connections. You can select the type of adapter in the SETUP mode. This will be particularly helpful when testing Small Form Factor (SFF) links. 5. Set the reference level if it has not already been set. (See "Setting a Reference" on page 101.) 6. Connect the test tool to the fiber cable as appropriate. Refer to Figures 8, 9, and 10. 7. To start the Autotest, press E. If you are using Far End Source Mode, select the wavelength that matches the source; then press E. For other modes, the DSP-4000 test tool automatically switches between 850 nm and 1300 nm during the Autotest. 8. If bi-directional testing is enabled, the test tool stops halfway through the bi-directional Autotest and prompts you to swap the fiber connections. Swap the connections at the patch panel or link connector, not at the DSPFTA410 ports. 17 DSP-FTA410 Users Manual Optical test jumpers Fiber Link Optical patch cords (SC at test tool ends) OUTPUT OUTPUT INPUT DSP-FTA410 Optical Connections FIBER TEST ADAPTER DSP-4000 Optical patch cords (SC at test tool ends) INPUT DSP-FTA410 FIBER TEST ADAPTER DSP-4000 CABLE ANALYZER SMART REMOTE PASS TESTING FAIL TALKING LOW BATTERY 1 2 3 4 EXIT FAULT INFO TEST TALK ENTER SAVE MONITOR SINGLE TEST AUTO TEST OFF SETUP PRINT SPECIAL FUNCTIONS Test tool with fiber test adapter Remote with fiber test adapter TALK ON OFF tt07f.eps Figure 8. Test Connections for Smart Remote Mode 18 Running an Autotest Optical test jumper Optical patch cords (SC at test tool ends) OUTPUT Fiber under test INPUT Optical Connections DSP-FTA410 FIBER TEST ADAPTER DSP-4000 1 CABLE ANALYZER 2 3 4 EXIT FAULT INFO TEST TALK ENTER SAVE MONITOR SINGLE TEST AUTO TEST OFF SETUP PRINT SPECIAL FUNCTIONS Test tool with fiber test adapter tt06f.eps Figure 9. Test Connections for Loopback Mode 19 DSP-FTA410 Users Manual Optical patch cord (SC at test tool end) OUTPUT Optical test jumper Fiber link Optical patch cord INPUT Optical connections DSP-FTA410 CW MOD CAUTION DSP-4000 1 2 3 4 EXIT TALK ENTER SOURCE ACTIVE LOW BATTERY CABLE ANALYZER FAULT INFO TEST 1310 OFF 1550 FIBER TEST ADAPTER SAVE Test tool with fiber test adapter Optional laser source OFF LS-1310/1550 LASER SOURCE MONITOR SINGLE TEST AUTO TEST SETUP PRINT SPECIAL FUNCTIONS tt08f.eps Figure 10. Test Connections for Far End Source Mode 20 Saving Autotest Results Saving Autotest Results To save the results of the last Autotest, press S. Use the test tool’s alphanumeric display to enter one or two fiber names, depending on which remote end configuration was used: • In Smart Remote Mode, the test tool saves two reports for each Autotest: one for the fiber connected to the output port and one for the fiber connected to the input port. Enter a name for the fiber connected to the DSP-FTA output port; then press S. Next, enter a name for the fiber connected to the input port; then press S again. • In Loopback Mode and Far End Source Mode, the test tool saves one report for each Autotest. Enter a name for the fiber; then press S. You can edit the fiber identification assigned to a saved report as follows: 1. Turn the rotary switch to SPECIAL FUNCTIONS; select View/Delete Test Reports, then press E. 2. Select the desired report, then press ! View Result twice (for the Far End Source Mode you only need to press ! View Result once). 3. Press Rename Report. Use the alphanumeric display to edit the fiber identification; then press S. You can edit a custom header, operator name, or site name in the PRINT mode under Edit Report Identification. 21 DSP-FTA410 Users Manual Autotest Results for Smart Remote Mode This section describes the DSP-FTA410 fiber tests and the results produced when you run an Autotest using Smart Remote Mode. The descriptions of loss and length tests also apply to Single Tests using Smart Remote Mode. To see the complete results for a test, press ! View Result on the first Autotest display, use D to highlight the desired test, then press E. Pass/Fail and Headroom Results for Smart Remote Mode The pass/fail result shown on the first Autotest display tells you if the fiber link tested within the limits of the selected test standard. Headroom is the smallest margin found between the measured power loss and the loss limit. Headroom indicates how much more loss you could have in the link without exceeding the limits of the selected test standard. If you tested two fibers, you can determine which fiber produced the smallest margin by viewing the loss results of the output and input fibers. Loss for Smart Remote Mode Loss is the optical power lost through the fiber, adapters, splices, and other components in a fiber link. The test tool determines power loss by calculating the difference between the received power and the reference power level. The loss is compared to the limit allowed by the selected test standard to produce a pass or fail result. Table 2 describes the loss results for Smart Remote Mode. 22 Autotest Results for Smart Remote Mode Table 2. Loss Results for Smart Remote Mode Result Fiber Description The fiber (output or input) that corresponds to the test results. If bi-directional testing is enabled, the output fiber is the fiber you connected to the output port of the main unit after swapping the fibers. Result Pass means the power loss is less than allowed for the link. Fail means the loss exceeded the limit. Direction (A-B or B-A): Direction A-B runs from the main unit to the remote; BA runs from the remote to the main unit. Loss (dB) The measured power loss. Loss is automatically measured at both 850 nm and 1300 nm. Limit (dB) The maximum loss allowed by the selected test standard. For some standards, the limit is calculated using the numbers of adapters and splices you entered and the losses allowed for these by the test standard. Margin (dB) The difference between the limit and the measured loss. This number is negative if the link failed. 23 DSP-FTA410 Users Manual Length Results for Smart Remote Mode The test tool determines fiber length by measuring the propagation delay through the fiber, then using the index of refraction to calculate the length. Table 3 describes the length results for Smart Remote Mode. Table 3. Length Results for Smart Remote Mode Result Description Length The length of each fiber. Limit The maximum length the test standard allows for one fiber. Result Pass means the measured length is less than the limit. Fail means the length exceeds the limit. Note When there is too much loss to determine length, the length is reported as a question mark. 24 Bi-Directional Testing Bi-Directional Testing When you need to test fibers in both directions, the DSP-FTA410 units can perform bi-directional testing and save the bi-directional results for each fiber. You enable this feature in the SETUP mode under BI-DIRECTIONAL TEST. Swapping Connections To get bi-directional results for Smart Remote Mode, the test tool stops halfway through a bi-directional Autotest and prompts you to swap the fiber connections. Swap the connections on both the main and remote units. Note To avoid disturbing the connections to DSP-FTA410 output ports, always swap the connections at the patch panel or adapter, not at the DSP-FTA410 connectors. The test tool does not support bi-directional testing in Loopback Mode. In Far End Source Mode, the test tool does not prompt you to swap connections. If you need bi-directional results in this mode, swap the locations of the test tool and the source; change the direction of the test (select A-B or B-A under @ Options on the Far End Source Autotest display); then run a second Autotest. Bi-Directional Autotest Results Bi-directional Autotest results list the test directions as A-B and B-A. In Smart Remote Mode, "A-B" runs from the main unit to the remote; "B-A" runs from the remote to the main unit. “Output Fiber” refers to the fiber that you connected to the main unit’s output port after you swapped the fibers. 25 DSP-FTA410 Users Manual Autotest Results for Loopback Mode This section describes the Autotest results for Loopback Mode. The descriptions of loss, length, and propagation delay tests also apply to Single Tests using Loopback Mode. To see the complete results for a test, press ! View Result on the first Autotest display, use D to highlight the desired test, then press E. Pass/Fail and Headroom Results for Loopback Mode The pass/fail result shown on the first Autotest display tells you if the fiber link tested within the limits of the selected test standard. Headroom indicates how much more loss you could have in the link without exceeding the limits of the selected test standard. Loss Results for Loopback Mode Table 4 describes the loss results for Loopback Mode. 26 Autotest Results for Loopback Mode Table 4. Loss Results for Loopback Mode Result Description Direction (A-B) Direction A-B is from the output port to the input port using the connections made when you started the Autotest. Loss (dB) The combined loss of all fibers in the link under test. Loss is automatically measured at both 850 nm and 1300 nm. Limit (dB) The maximum loss allowed by the selected test standard. For some standards, the limit is calculated using the numbers of adapters and splices you entered and the losses allowed for these by the test standard. Margin (dB) The difference between the limit and the measured loss. This number is negative if the link failed Length Results for Loopback Mode Table 5 describes the length test results for Loopback Mode. Table 5. Length Results for Loopback Mode Result Description Length The measured length. The result shows the combined length of all fibers between the output port and the input port. Limit The maximum length the test standard allows for a fiber. Result Pass means the measured length is less than the limit. Fail means the length exceeds the limit. Note When there is too much loss to determine length, the length is reported as a question mark. 27 DSP-FTA410 Users Manual Autotest Results for Far End Source Mode An Autotest using Far End Source Mode measures loss for singlemode or multimode fibers. The Autotest runs continuously until the e key is pressed. Table 6 describes the results. The results display also features softkeys that are available only for Far End Source Mode: • Options: Lets you set the direction of the test (A-B or B-A). • Power: Lets you measure optical power at the selected wavelength. 28 Autotest Results for Far End Source Mode Table 6. Loss Results for Far End Source Mode Result PASS/FAIL Description Pass means the power loss is less than allowed by the limit. Fail means the loss exceeded the limit. Loss (dB) The measured optical power loss. Limit (dB) The maximum loss you set with the @ Options softkey. Singlemode 1310 nm or 1550 nm The singlemode wavelength you selected before you ran the Autotest. Multimode 850 nm or 1300 nm The multimode wavelength you selected before you ran the Autotest. A-B or B-A The direction of the test. To set the direction, press @ Options; then select the desired direction. Reference The current reference value. See the earlier section “Setting a Reference for Far End Source Mode” for information. Date and time The date and time the reference was set. 29 DSP-FTA410 Users Manual Single Tests The SINGLE TEST mode on the DSP-4000 rotary switch lets you run individual fiber tests. Single Tests are useful for quick checks of continuity, length, or loss, and for isolating faults and testing repairs. Single Tests run continuously, so you can make adjustments to a link and watch the results as they happen. Single Tests for Smart Remote Mode If an Autotest fails, you can use these tests to isolate problems on one of the fibers in a link. To connect for a Single Test in Smart Remote Mode, refer to Figure 8. • Loss (Output Fiber or Input Fiber): Measures optical power loss on the fiber connected to the main unit’s output or input port. • Length: Measures fiber length, as done during an Autotest. • Propagation Delay: Determines the propagation delay of each fiber. • Near End Power or Far End Power: Measures the optical power received by the main unit (near end) or the remote unit (far end). • Send (850 nm or 1300 nm): The main unit continuously transmits 850 nm or 1300 nm light from its output port. 30 Single Tests Single Tests for Loopback Mode Use these tests to troubleshoot fiber links, test patch cords, and check spools of fiber before installation. • Total Loss: Measures the optical power loss between the output and input ports of the DSP-FTA410 unit. If two fibers are connected end-toend with a loopback cable, the total loss of both fibers is displayed. • Total Length: Measures the total length of the fiber between the output and input ports of the DSP-FTA410 unit. If two fibers are connected end-to-end with a loopback cable, the total length of all fibers is displayed. • Propagation Delay: Measures the total propagation delay of the of the fiber between the output and input ports of the DSP-FTA410 unit. • Power: Measures the optical power received at the input port on the main unit. Power is measured at 850 nm and 1300 nm. • Send (850 nm or 1300 nm): Continuously transmits a 850 nm or 1300 nm optical signal at the output port. Single Test for Far End Source Mode The Receive test, which requires a separate multimode or singlemode source at the far end, continuously measures optical power at the main unit. With a multimode source, you can measure power at 850 nm or 1300 nm. With a singlemode source, you can measure power at 1310 nm or 1550 nm. 31 DSP-FTA410 Users Manual Monitoring Optical Power You can use the MONITOR position of the DSP-4000 rotary switch to monitor the output power produced by a source such as an optical network interface card or optical test equipment. You can also monitor the power received at the end of a fiber link. To monitor optical power, proceed as follows: 1. Select a known-good patch cord. Clean all fiber connectors. 2. Connect the test tool to the optical source as shown in Figure 11. 3. Turn the rotary switch to MONITOR. 4. Select Optical Power; then press E. 5. Select the appropriate multimode or singlemode wavelength to monitor; then press E. 6. To switch between measurements in dBm and µW (microwatts), press !. 32 Monitoring Optical Power Optical patch cord (SC at test tool end) OUTPUT INPUT DSP-FTA410 1 OUTPUT FIBER TEST ADAPTER DSP-4000 CABLE ANALYZER 2 3 4 Test tool with fiber test adapter Optical network interface card or optical power source EXIT FAULT INFO TALK ENTER TEST SAVE MONITOR SINGLE TEST SETUP AUTO TEST PRINT SPECIAL FUNCTIONS OFF Monitoring optical power at a source Optical patch cord (SC at test tool end) OUTPUT Optical connections INPUT DSP-FTA410 Optical patch cord Fiber link FIBER TEST ADAPTER DSP-4000 CABLE ANALYZER OUTPUT 1 2 3 4 EXIT FAULT INFO TEST TALK ENTER SAVE MONITOR SINGLE TEST AUTO TEST OFF Test tool with fiber test adapter Optical network interface card or optical power source SETUP PRINT SPECIAL FUNCTIONS Monitoring optical power at the end of a link tt09f.eps Figure 11. Monitoring Optical Power 33 DSP-FTA410 Users Manual Using the Talk Mode With two DSP- FTA410 Fiber Test Adapters, you can use the DSP-4000 headsets for two-way voice communication over the two fibers under test. To use the Talk mode, connect the main and remote units for Smart Remote Mode, then press V on either unit. (Refer to Figure 8 for connections.) To adjust the volume at the main unit, use the U D keys. On the remote unit, press V to cycle through the volume settings. To exit Talk mode, press e on the main unit. The Talk mode turns off automatically when you start a fiber test or turn the rotary switch to a new position. Using the FindFiber™ Feature The FindFiber feature lets you quickly check fiber connectivity and can help you determine which fibers go to which connectors at a patch panel. Note The FindFiber feature is not available in Far End Source Mode. Use the FindFiber feature as follows: 1. For Smart Remote Mode, make the connections shown in Figure 12. For Loopback Mode, make the connections shown in Figure 13. 2. Turn the rotary switch to SPECIAL FUNCTIONS; then press E. Turn on the remote unit if you using Smart Remote Mode. 3. Press E to start the FindFiber test. 4. For Smart Remote mode, try various connections to the patch panel with the main unit’s INPUT fiber until the Receiving Near End result shows PASS. Then, try various connections with the main unit’s OUTPUT fiber until the Receiving Far End result shows PASS. Tables 7 and 8 show the main unit results and remote unit LED results for Smart Remote Mode. For Loopback Mode, try various connections with the main unit’s INPUT fiber until the Receiving Near End result shows PASS. 34 Using the FindFiber™ Feature Table 7. Main Unit Results for the FindFiber Test (Smart Remote Mode) Results Description Receiving Near End: FAIL The main unit’s INPUT fiber path is not complete. The main unit cannot determine the state of the OUTPUT fiber path. Receiving Far End: ? Receiving Near End: PASS Receiving Far End: FAIL The main unit’s INPUT fiber path is complete. The main unit’s OUTPUT fiber path is not complete. Receiving Near End: PASS Both fiber paths are complete. Receiving Far End: PASS Table 8. Smart Remote LED Results for the FindFiber Test Results No LEDs flash Description The remote unit’s INPUT fiber path is not complete. Only the TEST LED flashes The remote unit’s INPUT fiber path is complete. TEST and PASS LEDs flash Both fiber paths are complete. 35 DSP-FTA410 Users Manual Fiber Link OUTPUT OUTPUT INPUT DSP-FTA410 DSP-FTA410 FIBER TEST ADAPTER DSP-4000 INPUT FIBER TEST ADAPTER DSP-4000 CABLE ANALYZER SMART REMOTE PASS TESTING FAIL TALKING LOW BATTERY 1 2 3 4 EXIT FAULT INFO TEST TALK SAVE ENTER MONITOR SINGLE TEST AUTO TEST OFF SETUP PRINT SPECIAL FUNCTIONS Test tool with fiber test adapter Remote with fiber test adapter TALK ON OFF tt12f.eps Figure 12. Using FindFiber with a Smart Remote 36 Using the FindFiber™ Feature Fiber Link OUTPUT INPUT DSP-FTA410 FIBER TEST ADAPTER DSP-4000 1 CABLE ANALYZER 2 3 4 EXIT FAULT INFO TEST TALK ENTER SAVE MONITOR SINGLE TEST AUTO TEST OFF SETUP PRINT SPECIAL FUNCTIONS Test tool with fiber test adapter tt13f.eps Figure 13. Using FindFiber with a Loopback Cable 37 DSP-FTA410 Users Manual Configuring a Custom Fiber Test In some cases, you might want to create your own custom test, rather than use the standard tests stored in your test tool. The test tool’s Configure Custom Test function lets you define up to four custom fiber standards. You can set the following parameters for fiber tests: • Custom test name • Test standard for default test values (To save time when creating a custom test, you can base your custom test on a test standard or another custom test.) • Multimode (50 µm or 62.5 µm) or singlemode cable type • Maximum length of the fiber • Maximum loss at 850 nm and 1300 nm • Maximum loss per adapter • Maximum loss per splice • Index of refraction (n) Use Abort or e to exit the custom fiber test screens. Use Set to Default to reset a value to the standard value. 38 Fiber Test Reports Configure a custom test as follows: 1. On the last page of the SETUP mode, select a custom test name; then press E. 2. If you want to edit the name of the custom test, press E; then use the alphanumeric display to enter a new name. 3. To select a test standard, which determines the default values for your custom standard, select the current standard under USE DEFAULT VALUES FROM on page 1 of the custom test displays. 4. To see and change other parameters, return to page 1 of the CONFIGURE CUSTOM TEST displays; then press $ Page Down. Fiber Test Reports Fiber test reports can be saved, viewed, printed, and uploaded to a PC in the same way as other DSP-4000 test reports. See Chapter 5 in the DSP-4000 Users Manual for more information. Maintenance Clean the case with a soft cloth dampened with water or a mild detergent. Do not use abrasives or solvents. Clean the optical connectors as described under "Cleaning the Fiber Connections". Always cover the connectors with a dust cap when not in use. Do not open the DSP-FTA410 case. There are no user-serviceable parts inside. Calibration Have the DSP-FTA410 units calibrated at an authorized Fluke Service Center every 12 months. 39 DSP-FTA410 Users Manual Repair If a DSP-FTA410 unit requires service, pack it in the original shipping container and send it, postage paid and insured, to the nearest Fluke Service Center. Include a written description of the problem. Fluke assumes no responsibility for shipping damage. Refer to the warranty for warranty repair terms. Contact the nearest service center for post-warranty repair terms and prices. Contacting Fluke To contact Fluke, call one of the following telephone numbers: USA: 1-888-99-FLUKE (1-888-993-5853) Canada: 1-800-36-FLUKE (1-800-363-5853) Europe: +31 402-678-200 Japan: +81-3-3434-0181 Singapore: +65-738-5655 Anywhere in the world: +1-425-446-5500 Or, visit Fluke’s Web site at www.fluke.com. Replacement Parts and Accessories Table 9 shows the replacement parts and accessories available for the DSP-FTA410S Fiber Test Option Set. 40 Replacement Parts and Accessories Table 9. Replacement Parts and Accessories Description Fluke Part Number or Model Number SC/ST patch cord, multimode, 62.5 µm FOC-ST/SC ST/ST test jumper, multimode, 62.5 µm NF230 ST/ST adapter NF300SM SC/SC adapter NF310SM Dust cap for the SC connector on the DSP-FTA410 Fiber Test Adapter 669991 LS-1310/1550 Laser Source LS-1310/1550 FOS-850/1300 Fiber Optic Source (multimode) FOS-850/1300 DSP-FTA410 Users Manual, English 691656 DSP-FTA410 Users Manual, French 691659 DSP-FTA410 Users Manual, Spanish 691698 DSP-FTA410 Users Manual, Italian 691667 DSP-FTA410 Users Manual, German 691664 DSP-FTA410 Users Manual, Portuguese 691706 DSP-FTA410 Users Manual, Simplified Chinese 691683 DSP-FTA410 Users Manual, Japanese 691691 41 DSP-FTA410 Users Manual Specifications General Specifications Power supply: ±6 V supplied by the DSP-4000 test tool. Temperature range: Operating: 0 ºC to +40 ºC; Storage: -10 ºC to +60 ºC Warm-up time: 5 minutes Humidity range: Operating: 0 % to 75 % RH, non-condensing Storage: 0 % to 95 % RH, non-condensing Certifications: Dimensions: 3.3” x 4.6” x 1.9” (8.3 cm x 11.6 cm x 4.7 cm) Weight: 7.6 oz (215 g) Optical Transmitter Connector: SC, multimode Emitter type: LED Wavelengths: 850 nm and 1300 nm Power output at 850 nm and 1300 nm: -20 dBm (10 µW), typical (into 62.5/125 µm fiber) Power output stability (8 hours) at 850 nm and 1300 nm: ±0.25 dB at 23 °C Optical Receiver Power measurement accuracy: ±0.25 dBm at 23 °C, 45 % RH to 75 % RH, -20 dBm for 850 nm and 1300 nm, -10 dBm for 1550 nm Connector: SC, multimode or singlemode Detector type: Germanium Calibrated wavelengths: 850 nm, 1300 nm, 1310 nm, and 1550 nm Measurement range: 0 dBm to -40 dBm Power measurement linearity: ±0.25 dB at 23 °C Length measurement accuracy: ±1.5 m plus 2 % of length 42 Appendix A Fiber Troubleshooting Guide Table 10 on the next page lists some common problems in fiber links and gives possible causes. 43 DSP-FTA410 Users Manual Table 10. Common Problems in Fiber Links Problem Possible Causes No power is measured at a source The optical source is defective. Power loss is much more than expected The fibers are connected to the wrong ports on a DSP-FTA410 unit. The patch cord is defective. The fibers are swapped at one end of the link. A patch cord is broken. Retest using a different set of patch cords. Power loss is somewhat more than expected There is one or more dirty connections in the link. Clean all fiber endfaces and retest. The number of adapters or splices set in SETUP is too low. The reference power level is incorrect. Set the reference again using the same patch cords to be used for testing. A patch cord or fiber segment has the wrong core size. For example, you are using 62.5 µm patch cords to connect to a 50 µm fiber. Or, you are using multimode patch cords or adapters to connect to singlemode fiber. A known length of cable measures too long or too short. 44 The index of refraction is not set correctly for the fiber under test. Set the index of refraction to give the correct length for a known length of the fiber. Appendix B Glossary Adapter A device used to mate fiber connectors of the same or different styles. Attenuation A loss of optical power, mostly due to poor connections or to light diffusion caused by imperfections in the fiber material (scattering). Bandwidth The range of frequencies a fiber can transmit without significant power loss. Buffer A layer of protective material surrounding the cladding of a fiber. The buffer helps protect the fiber from physical damage. Cladding A glass coating surrounding a fiber core to reflect light back into the core. Core The light-conducting central portion of an optical fiber. 45 DSP-FTA410 Users Manual dBm A unit of power (in decibels), assuming a reference of 1 mW (1/1000 of a watt). The dBm unit expresses loss or gain as a ratio of output power to the reference power, as follows: dBm = 10 log output power 1 mW Full-duplex Simultaneous transmission of data in two directions. Headroom The smallest margin in a set of loss margins. Index of refraction (n) The ratio of the velocity of light in a vacuum to the velocity of light in a fiber. Light travels more slowly through a fiber than through a vacuum, so n values are always greater than or equal to one. Insertion loss Loss of optical power caused by adding a connector, adapter, splice, or other optical component to a fiber path. Launch cable A fiber patch cord used to couple an optical source to a fiber. Macrobending losses Light losses due to large-radius bends in a fiber, such as bends made during installation. 46 Glossary Margin The difference between the measured power loss and the maximum loss allowed for the link. Microbending losses Light losses due to microscopic imperfections in a fiber. Multimode fiber Fiber with a relatively large core (50 µm or more) that offers many paths, or modes, for propagation of light. n See index of refraction. Numerical aperture A parameter that represents a fiber’s ability to gather light. The numerical aperture is the sine of the maximum angle at which a fiber accepts light. A fiber with a higher numerical aperture gathers more light. Optical power Optical power measured at a source or the end of a fiber and expressed in microwatts (µW) or in decibels with reference to one milliwatt (dBm). Propagation delay The time taken for a light pulse to travel the length of a fiber. Propagation delay is a function of a the length of a fiber and its index of refraction. Receive cable A fiber patch cord used to couple a fiber to an optical receiver. 47 DSP-FTA410 Users Manual SC connector Subscription Channel Connector. An optical connector that originated in Japan and provides push-pull connections, low loss, and low backreflection. Singlemode fiber Fiber with a small core (8 µm to 10 µm) that offers just one path, or mode, for propagation of light. ST connector Straight-Tip Connector. A popular fiber connector originally developed by AT&T. SFF connector Small Form Factor Connector. Several different types are available on the market, including the MT-RJ, VF-45, LC, and Fiber Jack. 48 Index —A— —E— A-B, 25 accessories, 41 adapters, 11 attaching the FTA410, 5 Autotest bi-directional testing, 25 Far End Source Mode connections, 20 Far End Source Mode results, 28 Loopback Mode connections, 19 Loopback Mode results, 26 running, 16 saving results, 21 Smart Remote Mode connections, 18 Smart Remote Mode results, 21 equipment optional, 41 standard, 2 —B— B-A, 25 bi-directional testing, 25 —F— Far End Source Mode Autotest results, 28 reference connections, 15 softkeys, 28 test connections, 20 when to use, 10 fiber type, selecting, 9 FindFiber, 35 Fluke, contacting, 40 —G— glossary, 45 —H— headroom, 22 —C— —I— cable type, selecting, 9 calibration, 39 cleaning fibers, 6 compatibility with test tools, 5 connectors, 11 custom fiber tests, 38 index of refraction, changing, 16 input fiber, 23, 25 insertion loss, 11 —D— definitions, 45 direction (Far End Source Mode), 28 direction of tests, 25 —L— laser source reference connections, 15 test connections, 20 length Loopback Mode, 27 Smart Remote Mode, 24 1 DSP-FTA410 Users Manual limit (Far End Source Mode), 28 locating fibers, 35 Loopback Mode Autotest results, 26 reference connections, 14 test connections, 19 loss Far End Source Mode, 29 Loopback Mode, 27 Smart Remote Mode, 22 loss budget, 11 —M— maintenance, 39 margin, 22 multimode source, 10 Autotest with, 16 —N— n, changing, 16 number of adapters and splices, 11 —O— optical power, 32 options softkey, 28 output and input fibers, Autotest reports, 21 output fiber, 23, 25 —P— power softkey, 28 propagation delay Loopback Mode, 28 Smart Remote Mode, 24 —R— reference, 11 Loopback Mode, 14 Smart Remote Mode, 12 remote end configuration which to use, 10 2 repair, 40 replacement parts, 41 —S— safety information, 3 saving Autotest results, 21 self-test, 6 send Loopback Mode, 31 Smart Remote Mode, 30 service, 40 set fiber reference, 11 Far End Source Mode, 15 Loopback Mode, 14 Smart Remote Mode, 12 single tests, 30 singlemode (Far End Source Mode), 10 singlemode source reference connections, 15 test connections, 20 Smart Remote Mode Autotest results, 21 reference connections, 13 test connections, 18 specifications, 42 splices, 11 standard equipment, 2 —T— talk mode, 34 test standard, selecting, 9 testing the DSP-FTA410, 6 —V— voice communications, 34 volume for talk mode, 34 —W— website, Fluke, 40