1
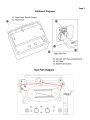
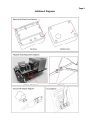
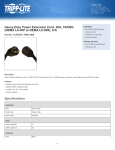
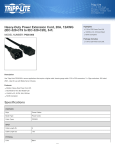
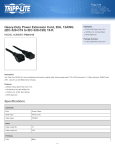
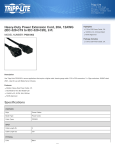
Manual v1.0 Serial#0001 and higher Table of Contents Page 1 Page 2 Page 3 Page 4 Specifications Top Panel Diagram Additional Diagrams Additional Diagrams Operating the SSTE Page 4 Page 5 Page 6 Initial Set‐Up Let’s Play! Let’s Play (Continued) Page 1 SSTE Specifications Impedance‐ Input 1.1megaohms Output 10K ohms Size‐ 9.56”wide x 7.8” deep x 6.3” tall (with lid on and closed) Weight‐ 9.2lbs Tape format‐ can only us ¼” magnetic tape in Fulltone ETC‐1 Tape Cartridge Electrical info‐ 100‐120VAC, 60hz, 6 watts. Can also be ordered factory‐wired for 220/240 VAC 50hz Fuse‐ 0.25amp/250mA 5mm x 20mm glass Slow‐Blow fuse. Included‐ 1 x Detachable 10’ IEC type AC power cable 1 x 3‐to‐2 Prong ground lift adapter for AC power cable 1 X ETC‐1 Tape cartridge (pre‐installed in SSTE) Optional‐ Fulltone ECF (Echo Cancel Footswitch. Page 2 Top Panel Diagram Page 3 Additional Diagrams Page 4 Additional Diagrams Page 5 Operating the SSTE Suggestion: Always unplug the guitar cable from the Main Output when not in use as leaving it plugged in for an extended time period may cause the pinch roller to go out‐of‐round making the tape transport unstable and the repeats out of tune. Initial Set‐Up Refer to Diagrams on Pages 2 and 3 1) Remove the Tape Cover (page 3, diagram item #32) by unscrewing the 2 thumbscrews (#’s 31) and sliding the plate carefully off to the left.. 2) Make sure that the Thumbscrews for the Echo Tape Cartridge (ETC‐1) are secure (#’s 30) and that the tape is following the correct path (Tape Path diagram, Page 3) Make sure that the tape is not too loose, knotted up, or has not slipped away from any of the Tape Guides (#25 & #19) Make sure that it is seated properly on the Fixed Tape Guide Post (#28), resting under the Tape Felt (#26), and Tape Felt Tension Arm. (#27) Now check that the tape is resting between the Capstan and Pinch‐roller (#16 & #17) 3) Insert the detachable AC cable (#34) in to the TTE AC Inlet ( #33) and connect other end to a wall power outlet. Make sure to use the same outlet as your guitar amplifier to avoid possible grounding issues. It is possible that you may choose to lift the ground on the SSTE with the supplied 3‐to‐2 prong Ground Lift Adapter (page#4) to eliminate hum issues. Only do so if you know what you’re doing, and check to make sure there’s no possibility of electrical shock hazard, especially if you’re singing into a Microphone…check for shock hazard always! Warning! You may want to try the ground lift adapter if amp you are using has a 3‐prong grounded power cable. 4) Turn on the Power Switch (see #35) and allow unit to run for about a minute, this lets the Tubes warm up. 5) Plug your guitar cable into the Input Jack. (#2) 6) Slide the Transport Clutch lever (#13) to the right…this starts the Tape Rolling. Hold it there and insert another guitar cable into the Output jack (#12). This cable holds the Transport Clutch Lever in place and keeps the Tape running while you’re using the SSTE. Tip: Let the Tape Cartridge (ETC‐1) run for a while and it will stabilize. When first turned on, the ETC‐1’s windings may be uneven and can cause the notes to seem out‐of‐tune. Allowing the ETC‐1 to spin for a minute or so evens out the Tape windings so that it rolls smoothly and stays that way for the remainder of your session. 7) Now connect the other end of the guitar cable to your amplifier. 8) Turn on your amp and you’re ready to make a few setting adjustments and play your SSTE! 9) Important! Please use “Low Speed” setting during first2‐3 hours of operation for proper break‐in Page 6 Replacing Fuse Use only a glass Slow‐Blow 5mm x 20mm 250volt, 0.25 amp (also called 250mA) These are widely available, standard type fuses, one place to get them is at amazon.com. Warranty Information: The SSTE carries a 5 year Limited Warranty Parts and Labor to the original owner only. This warranty covers failure due to manufacturer’s error only and does not cover items that are prone to daily wear including the ETC‐1. Owner is responsible for all shipping and insurance charges both ways. Fulltone Musical Products Inc. (and its employees) is not liable for any damages or injuries resulting from the misuse of this unit and/or carelessness of the user. For service, please contact [email protected] 4/23/2015 This is a preliminary, abbreviated manual, which will be added to as time allows. Please check www.fulltone.com for regular revisions to the posted Acrobat PDF Manual or contact us for a printed revised version in the future. Fulltone Musical Products Inc. 11018 Washington Blvd. Culver City, CA 90232 fax 204‐0156 www.fulltone.com email: [email protected]