1
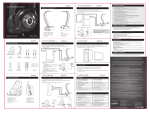
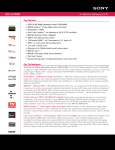
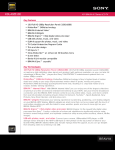
MIDI Rocker Quick Start Guide
Revision 1.1. October 16, 2008
First of all, I want to thank you for purchasing a MIDI Rocker box from Byte Arts. I really appreciate the business
and hope that it helps you get the same enjoyment from Rock Band that me and family have gotten. What a
great game! And now with the MIDI Rocker, you can take it to the next level!
This quick start guide is meant to help you get started using the MIDI Rocker. A full User's Manual is posted on
the Byte Arts website at www.ByteArts.com/midi.
Okay, so let's get started!
First, here's some charts to familarize yourself with the controls and connections on the MIDI Rocker:
FRONT PANEL CONTROLS AND INDICATORS
Control/Indicator
Function
Home Button
Equivalent to the “PS” button on a Playstation controller. Press this button to
access the XMB menu.
Back Button
Exits the current menu level and backs up a level. (Equivalent to hitting the RED
drum).
Nav Button
Like a little joystick, you can use this button to navigate up/down and left/right in
the menus. Press down on this button to select a menu item. (Pressing down is
equivalent to hitting the GREEN drum).
Start Button
Just like the Start button on a Playstation controller.
Function Switch
This switch is currently unused and is reserved for future functionality.
Mode Switch
Selects between normal (Play) mode and one of the two program modes. The
program modes are described below.
Adjust Knob
Adjusts the MIDI note velocity threshold. Turn this know all the way counterclockwise to set the velocity to 0, all the way clockwise to set the velocity to 128
(the max MIDI note velocity). Any MIDI notes received which are less than this
velocity are ignored.
Drum Buttons and LEDs
Buttons 1-4 are equivalent to the RED, YELLOW. BLUE and GREEN drums
respectively. Button 5 is equivalent to the BASS PEDAL. Each button has an LED
above it which shows when that input is active.
MIDI LED
Flashes briefly whenever a MIDI note is received on the MIDI input.
USB LED
Illuminates when the MIDI Rocker is connected to an active USB host such as
the Playstation or a PC. This LED and the MIDI LED will stay illuminated when
the System Mode switch is in “Update” mode. It will flash 3 times and then turn
off when in “Xbox 360” mode.
BACK PANEL CONTROLS AND CONNECTORS
Control/Connector
Function
USB Port
Connect this to the Playstation using the supplied cable.
System Mode Switch
Selects between firmware update mode (Update), Playstation Drum Controller mode
(PS3), and Xbox 360 Interface Mode (360). This switch should remain in the PS3
position for normal operation.
Ext. Input
Used to interface other electronic equipment to the MIDI Rocker. Contact
[email protected] for more information.
Ext. Output
Used to connect the MIDI Rocker to other electronic equipment. For example, this port
can be used to interface the MIDI Rocker to a “modified” Xbox Rock Band drum
controller using the special Xbox interface cable available from Byte Arts.
MIDI Input
Connect this to the MIDI output of your drum set, keyboard etc.
Setup the MIDI Rocker
To use the MIDI Rocker with your Playstation and MIDI instrument (drums, keyboard etc..), do the following:
1. Check that the system mode switch (next to the USB port on the back of the MIDI Rocker) is set to the
“PS3” position (the middle position) – unless you are using the Xbox Interface option, in which case you
should set it to the “Xbox 360” position.
2. Check that the Mode switch (on the front panel of the MIDI Rocker) is in the “Play” position.
3. Connect the MIDI cable from the MIDI OUT of your instrument to the MIDI port on the MIDI Rocker.
4. Connect the USB cable between the Playstation and the MIDI Rocker. When you plug in the MIDI
Rocker all the LEDs should flash briefly, and the USB indicator light should stay lit. Note: In 360 mode,
the USB LED will not stay on.
5. You should now be able to navigate the menus on the Playstation, and even play the drums in Rock
Band using the drum buttons on the front of the MIDI Rocker. Note: In 360 Mode, you will have to use
your Rock Bank drum controller to navigate the menus.
6. Now try playing a note on your instrument – the MIDI LED on the MIDI Rocker should flash briefly.
Assign a Single MIDI Note to a Drum Button
To program a drum button to correspond to a MIDI note, do the following:
1. Move the Mode switch to “Program 1”.
2. Press one of the 5 drum buttons. The LED above the button will stay illuminated.
3. Play the note on your instrument which you wish to assign to that button. The LED above the button will
go out, indicating success. If the LED doesn't go out, try turning down the Adjust knob to lower the
velocity threshold.
4. To program another button, simply press the desired button and repeat the process.
5. Move the Mode switch to the “Play” position – now when you play one of the programmed notes on your
instrument, the corresponding LED on the MIDI Rocker will flash and that drum note will “played” in Rock
Band.
Assign Multiple MIDI Notes to a Drum Button
You can program up to 10 MIDI notes to any of the drum buttons by doing the following:
1. Follow the steps above to program the a single MIDI note to a button.
2. Now, put the Mode switch into the “Program 2” position.
3. Press the drum button you wish to program – the LED above it will come on.
4. Play a note on your instrument – the LED above the button will flash, indicating that it has been
programed. This note is now added to any existing MIDI note that has been programmed to that button.
5. Repeat step 4 to program more notes to that button.
6. Move the Mode switch to the “Play” position and rock out!