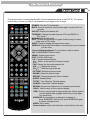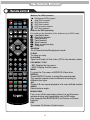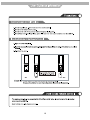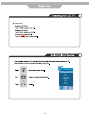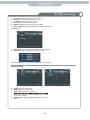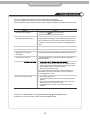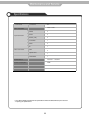
1
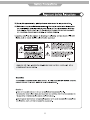
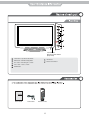
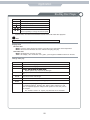
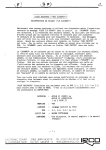
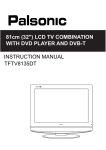
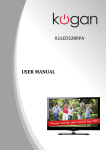
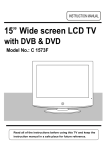
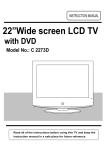
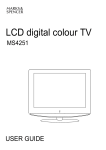
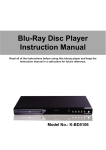
KGN1080PBD32VAA
USERMANUAL
CONTENTS
Safety Precautions
Power Supply
1
Installation
2
Use and Maintenance
3
Important Safety Instructions
4~5
User Guidance Information
Names of each part(Front View) / Accessories
6
Names of each part(Back View)
7
Remote control
Precautions / How to use remote control
8~9
10
Basic Use
Powering the LCD TV / Selecting input source
11
Application
Operating the Menu
12
Customizing the PICTURE Settings
13
Customizing the SOUND Settings
14
Customizing the TIMER Settings
15
Customizing the SETUP Settings
16
Customizing the LOCK Settings
17
Customizing the CHANNEL Settings
Blu-Ray Disc Player
18~19
20~31
Maintenance and Service
Trouble shooting
32
Specifications
33
1
Disconnect device: plug/coupler or all-pole mains switch locationˈ
2
3
4
5
1
2
3
4
5
6
7
Led Indicator
Remote Control window
(Keep clear)
1
INPUT button - Input Source Select Button
2
MENU button - OSD Menu Display Button
3
CH+/- button - Channel/Program +,- Button
4
VOL+/- button - Volume +,- Button
5
POWER button
POWER
6
LED Indicator
7
Remote Control Window
MUTE
LANGUAGE
POP-MENU
MEDIA
TITLE
CENTER
CH/LIST TV/RADIO
SUBTITLE
BONUS
2nd
VIEW
AUDIO
NICAM/A2
INPUT
EPG
DISPLAY
OK
MENU
1
EXIT
2
5
6
9
0
VOL
3
4
7
8
RETURN
CLEAR
FAV
PICTURE
ASPECT
SOUND
SLEEP
CH
BOOK
User’s Guide
Power Cable
PROG
MARK
TV/TXT
CANCEL
SETUP
DIGEST
ZOOM
REVEAL
D-MENU
REPEAT
A-B
HOLD
SIZE
SUBPAGE
INDEX
OSC
GOTO
ANGLE
INFO
Remote Control
6
L-in
USB-upgrade
HDMI1
2
1
10
HDMI2
3
1
AC POWER IN
2
USB-upgrade
3
HDMI1/2
4
VGA
5
PC audio in
R-in
PC audio in
L-in
4
5
6
6
7
2
Video
R -in
L-in
1
Video
R -in
L-in
R-in
7
8
9
Optical Fibre
USB
ETHERENT
10
11
12
Optical Fibre
YPbPr1
10
YPbPr2
11
USB
12
ETHERENT
8
AV×2
9
RF
. Connect network
Connect this product to the network to enjoy software updates and BD-Live bonus
content.
Connect the network cable (not supplied) to:
• the LAN jack on this product,
• the LAN jack on the broadband modem or router.
11
. Connect USB device
A USB device provides an additional memory to enjoy software updates
bonus content and for media play.
BD-Live
Connect the USB device to the USB jack on this product.
Note
• Connect a USB device only to the USB jack on this product.
• We does not guarantee 100% compatibility with all USB devices.
• If use USB device to play media. Please press MEDIA CENTER.
. Optional connections
• Route audio to other devices
• Digital amplifier/receiver
• Analog stereo system
• LAN
• USB device (As additional memory for software updates and BD-Live bonus contents).
12
Note
• Refer to the type plate at the back or bottom of the product for identification and
supply ratings.
• Before you make or change any connections, ensure that all devices are disconnected
from the power outlet.
• Different types of connectors can be used to connect this product, depending on
availability and your needs.
7
The remote control is using Infra-Red(IR). Point it towards the front of the LCD TV. The remote
control may not work correctly if it is operated out of range or out of angle.
MUTE
POWER
LANGUAGE
SUBTITLE
POP-MENU
MEDIA
BONUS
2nd
TITLE
CENTER
VIEW
AUDIO
NICAM/A2
EPG
CH/LIST TV/RADIO
INPUT
DISPLAY
OK
MENU
EXIT
1
2
3
4
5
6
7
8
RETURN
CLEAR
9
VOL
0
FAV
PICTURE
REPEAT
SOUND
SLEEP
CH
BOOK
PROG
MARK
DIGEST
ZOOM
TV/TXT
CANCEL
REVEAL
SETUP
D-MENU
REPEAT
A-B
HOLD
SIZE
SUBPAGE
INDEX
OSC
GOTO
ANGLE
INFO
POWER: Turn the TV on/standby.
MUTE: Press to mute the sound, press again or press VOL+ to
unmute.
CH/LIST: Display the channel list.
TV/RADIO: Change the state between DTV and RADIO in
DTV mode.
NICAM/A2:Nicam/A2 select.
EPG: To show the Electronic Program Guide during no-menu
state only in DTV mode.
INPUT: Press to display the input source menu.
DISPLAY: Display brief information concerning the current channel
you are view.
Cursor left/right/up/down: Cursor buttons used in menus.
OK: CONFIRM BUTTON for menu.
MENU: System setup menu.
EXIT: Exit the OSD menu.
0-9: Choose channel directly.
: Return to the previous channel viewed.
FAV: Display the favourite program list.
VOL / : Adjust the volume.
CH /
:Scan through channels.
PICTURE: Select the picture mode.
SOUND: Select the sound mode.
REPEAT: Repeat playing the title or chapter.
SLEEP: Standby timer.
TV/TXT: Turn off/on the Teletext display.
CANCEL: Cancel the Teletext display.
REVEAL: Reveal any hidden text, for example-quiz answer.
HOLD: Hold or carry on the current subpage.
SIZE: Press to see top half of page double size, Press again to
see the bottom half og page double size, Press again
for normal size.
SUBPAGE: For example to go directly to subpage 4:
press SUBPAGE, then 0,0,0,4; press SUBPAGE again
to cancel subpage mode.
INDEX: Go to index.
Colour buttons: short cuts-follow the coloured links in the text.
8
Buttons for USB operation
MUTE
POWER
LANGUAGE
SUBTITLE
POP-MENU
MEDIA
BONUS
2nd
TITLE
CENTER
VIEW
AUDIO
NICAM/A2
EPG
CH/LIST TV/RADIO
: Play/pause DVD program.
: Stop DVD program.
: DVD fast reverse.
: DVD fast forward.
: DVD previous chapter.
: DVD next chapter.
Buttons for DVD operating
You could use the functions of the buttons only in DVD mode.
INPUT
Load/eject disc.
Previous chapter.
Fast reverse.
Fast forward.
Next forward.
Start or resume play.
Stop play.
DISPLAY
OK
RANDOM
Go to Random/shuffle playback mode.
CLEAR
MENU
EXIT
To clear an entry.
2nd AUDIO
1
2
3
4
5
6
7
8
RETURN
CLEAR
Open 2nd Audio of 2nd video (PIP’s sub-window video)
POP-MENU / TITLE
9
VOL
0
FAV
PICTURE
REPEAT
SOUND
SLEEP
MARK
DIGEST
TV/TXT
CANCEL
REVEAL
SETUP
D-MENU
REPEAT
MENU
To open the Top menu of BD/DVD- Video disc.
CH
BOOK
PROG
• BD: Display the top menu.
• DVD: Display the title menu.
ZOOM
REPEAT
Press REPEAT button to select the repeat mode.
The specific repeat mode is different according to
different disc type.
A-B
A-B
HOLD
SIZE
SUBPAGE
INDEX
OSC
GOTO
ANGLE
INFO
Press A-B can repeat playback of a user defined section.
ANGLE
Select picture angle.
BONUS VIEW
Turn on or off the secondary video in a small screen
window during play (applicable only to BD-video
that supports the BONUSVIEW or Picture-In-Picture
feature).
OSC
To access On Screen Control menu.
9
10
DTV
ATV
AV1
AV2
COMPONENT1
COMPONENT2
VGA
HDMI1
HDMI2
Blue-ray
11
Use the
TV-MENU
and
buttons to select your main menu option
Allows you to customi e the aound options and effects.
TIMER MENU:
OPTION MENU:
Allows you to setup a variety of timer options.
Allows you to setup a variety of setup options.
LOCK MENU:
CHANNEL MENU:
Allows you to set up a variety of lock options.
Allows you to search channels and set up a variety of channel options.
Change Password
Block Progranme
Parental Guidance
No Block
4.
5.
EXIT
12
&XVWRPLVLQJ 3,&785( 6HWWLQJV
Tint
Quit
Back
Select
Quit
Tint
PC Setup
Size
Quit
Back
Select
13
Back
Select
V
Quit
Back
Select
14
&XVWRPLVLQJ WKH 7,0(5 6HWWLQJV
Quit
Back
Select
15
&XVWRPLVLQJ WKH 6(783 6HWWLQJV
Restore Setting
Quit
Back
Select
Restore Setting
16
Application
Customising the LOCK Settings
LOCK
Off
Lock Channel
Change Password
Block Programme
No Block
Parental Guidance
Quit
Back
Select
Use the
and
buttons to select the LOCK menu(as the picture above), press
menu.
Note: You should enter the code to operate the menu.(original code is 0000)
button to enter the
The LOCK menu includes the following options :
Lock Channel
When turn on, the user can not manual search and program edit.
Change Password
Press
Block Programme
Press
button to enter the submenu as the right
picture, select a program, and press GREEN button
to block it.
Parental Guidance
Cycles among ages: 4,5,6......18, or you could turn the function off.
button to enter the submenu, and you could change the password here.
17
&XVWRPLVLQJ WKH &+$11(/ 6HWWLQJV
Scan
Scan
Scan
Quit
Back
Select
Scan
Scan
Scan
System
18
Application
Customi ing the CHANNEL Settings
Program Edit: Press
button to enter the submenu as the following picture.
Delete: Select a program, and press RED button, on the right of program, “Delete” will appear, then press RED
button again, the program will be deleted. If you press “RED button once,but do not want to delete the
program, press “menu” to quit.
Rename: Select a program, and press GREEN button, then you could use and buttons to select the
position of the program’s name you want to change, and press and buttons to change the
character, press
or
button to confirm the change. Press menu to exit and it will automatically
save the current set.(It can only rename ATV program.)
SWAP : Select a program, and press YELLOW button, then you could use
and
buttons to change the
position of the program, Press menu to exit and it will automatically save the current set.
Skip: Slect a program, and press BLUE button to sign the program, while the program have been signed,
it will be skiped when you scan programs by CH+/-.
FAV: Select a program, press FAV button to set the program as the favorite channel.
Note: The function of “RENAME” and “MOVE” could not be used in DTV source.
19
Application
Blu-Ray Disc Player
Use the SETUP menu
Press SETUP to display the SETUP menu on the TV.
Navigate the menu
When a menu is displayed, press the buttons on the remote control to navigate through it.
•
•
•
Move up or down.
Move left or right.
Select menu display language
1.
2.
3.
4.
Select [General Settings] in the SETUP menu.
Press
/
to select [Language] in the menu
Press
to select [OSD], and press
again to enter the
select menu, then you can select the language you want.
Press ENTER
20
Application
Blu-Ray Disc Player
Play a disc
Caution
Do not place any objects other than discs into the disc compartment.
Do not touch the optical disc lens inside the disc compartment.
•
•
Note
•
•
•
Before playing a disc, check the types of discs sup-ported.
If the password entry menu is displayed, enter the password before you can play the locked or
restricted disc.
If you pause or stop a disc, the screen saver appears after 3 minutes of inactivity. Press any button to
deactivate the screen saver, press any button.
Disc content structure
The structure of a disc content is generally divided as shown below.
•
•
•
[title/chapter] (title/chapter) refers to the contents on a BD/DVD.
[track] (track) refers to the contents on an audio CD.
MP3/WMA/JPEG format.
Play video
Control video play
1.
2.
Play a title.
Use the remote to control the play back.
21
Application
Blu-Ray Disc Player
Buttons
Action
Pause play.
Start or resume play.
Stop play.
Skip to a previous/next title or chapter.
Search fast-backward or fast-forward.
Press repeatedly to change the search speed.
•
In pause mode, the forward and backwards search buttons will enable slow playback.
Note
•
For BD disc with Java application, the resume function is not available.
Display menu
BD-video disc:
MENU stops the video playing and returns to the disc menu. This feature is disc-dependent.
MENU will access the BD-video disc menu without interrupting disc play.
DVD-video disc:
MENU will display the root menu of a disc.
TITLE will display disc information and guide you through the available functions on the disc.
Change video play
Button
AUDIO
SUBTITLE
Action
Selects an audio language or channel on a disc.
Select the subtitle language on a disc.
REPEAT
•
DISPLAY
ZOOM
RANDOM
BOOK
MARK
A-B
Repeat options may vary from the disc type.
Display the current status or disc information.
Zoom in/out of the video image.
Selects the Random->Normal mode.
Bookmark the selected point during playback.
When a disc is playing, pressing this button once will save a “start point”
for repeating playback. Pressing this button again will save an “end
point” for repeated playback. Playback will repeat from the start point to
the end point.
•
The marked section for repeat play should be in one track/title.
22
Application
Blu-Ray Disc Player
Button
PROGRAM
Action
Edit the program and play.
back.
GOTO
BONUSVIEW
2nd AUDIO
OSC
Turn on or off the secondary video in a small screen window during play (applicable
only to BD-video that supports the BONUSVIEW or Picture-ln-Picture feature).
Switch over the audio displaying between the main window or PIP window.
Access options relating to the current activity or selection, and control the video play
back.
Note
•
•
Some operations may not work with some discs. See the information accompanying the disc for
details.
Applicable only to discs that contain multi-angle scenes.
Playing a Blu-ray video disc
Blu-ray video discs have larger capacity and support features
interactive menus and so on.
1.
2.
3.
4.
Insert a BD-video disc.
Playback will automatically start, or select a play option in the menu and press OK.
During playback, you can press MENU to display additional information, features or content stored
on the disc.
During playback, you can press MENU to display the disc menu without interrupting disc play.
Enjoying BONUSVIEW content
(Applicable only to a disc compatible with the BONUSVIEW or Picture-in-Picture feature) You can instantly view
additional content (such as commentaries) in a small screen window.
(A) Primary video
(B) Secondary video
1.
2.
Press BONUSVIEW to turn on the secondary video window.
Press AUDIO to switch over the audio between main Playback window and PIP window.
23
Application
Blu-Ray Disc Player
Enjoy BD-LIVE
You can enjoy the BD-Live functions which enable you to use interactive functions on the disc when the unit is c
onnected to the Internet.
Example of BD-Live interactive functions:
1. Additional content (such as movie’s trailer, subtitles and BD-Java, etc.) can be downloaded to the unit’s local
storage or a connected USB storage device.
2. Special video data may be played while being downloaded.
3. When a disc supporting BD-Live is played, the product or the disc’s ID can be sent to the content provider
via the Internet. Service and functions will differ depending on the disc.
Note
•
•
•
•
•
The unit must be connected and set up to access Internet.
Depending on the connection environment, it may take time to connect to the Internet.
When BD-Live functions are used and the unit is connected to the Internet, your standard internet
service provider charges will apply.
Follow the instruction given by the disc when using the BD-Live function.
It is recommended to use a USB storage device for download the content (at least 1GB free space
is recommended.
Playing music
Controlling music playback
Buttons
Action
Pause play.
Start or resume play.
Stop play.
Skip to a previous/next title or chapter.
Select an item to play.
Search fast-backward or fast-forward.
Press repeatedly to change the search speed.
REPEAT
Play MP3/WMA music
with mp3 or wma extensions).
1.
2. Select a music folder, then press OK .
3.
OK .
Note
•
Press MEDIA CENTER
24
Application
Blu-Ray Disc Player
Note
session will be played.
tected by Digital Rights Management (DRM),
This product does not support the MP3PRO audio format.
Special characters present in the MP3 track name (ID3) or album name, it might not be displayed
correctly
on the screen as these characters are not supported by the player.
product cannot be displayed or played.
•
•
•
•
•
Playing a photo slideshow
Play photos as slideshow
on the player as a slideshow.
Insert a disc or USB device that contains the JPEG photos.
Select a photo folder, then press OK to open.
•
To select a photo, use the Navigation buttons.
•
To enlarge the selected photo and start slideshow, press OK.
1.
2.
Note
•
•
•
It may require longer time to display the disc content on your TV if there are a large number of
songs/photos compiled onto one disc.
This product can only display digital camera pictures in the JPEG-EXIF format, typically used by
almost all digital cameras. It cannot display Motion JPEG, or pictures in formats other than JPEG, or
sound clips as sociated with pictures.
product cannot be displayed or played.
Controlling photo slideshow
1.
2.
Begin a photo slideshow.
Use the remote control to control the play as follows.
Buttons
Action
Rotate a photo anticlockwise/clockwise.
Flip a photo horizontally/vertically.
Stop play.
Note
•
Set slideshow interval and animation
1.
2.
3.
4.
During slideshow playback, press OSC. The options menu will be displayed.
Navigate the options with the Navigation button.
Select an option in the menu, then press OK .
Press OK .
25
Application
Blu-Ray Disc Player
Playing music during a photo slideshow
Note
•
1.
2.
3.
To create a musical slideshow, you must store the MP3/
Select your MP3/WMA music to play and start playback.
Press Media Center to return to the main menu.
Navigate to enter a photo folder, then press OK to start slideshow play.
•
Slideshow begins and continues till the end of the photo folder.
•
Audio continues to play until the end of the disc.
•
To stop the slideshow play, Press
.
•
To stop the music play, press
again.
Note
•
If the setup option is grayed out, it means the setting cannot be changed at the current state.
Basic operation for the menu
1.
2.
Press BD-SETUP.
Select a main menu by
3.
Select the menu you want to setting by
•
4.
You can press
Select the option by
•
You can press
.
, and press
to return to mains menu.
, and press
.
to return to the previous menu.
26
.
Application
Blu-Ray Disc Player
5.
6.
7.
Select by
, and press OK
•
You can press
to return to the previous menu.
To return to the mains menu from any submenu, press
To exit the menu, press BD-SETUP.
.
(RETURN).
General Player Settings
System
1.
2.
3.
4.
5.
6.
Screen Saver: Turns the screen save on/off, The screen saver will display in 3 mins if there is no operation
when the unit is turned on.
Disc Auto Playback: Turns the disc auto playback function on/off.
Load Default: Return the player to its default settings.
Upgrade: select this when you want to upgrade your player software to the latest version.
Easy Setup: Make default settings fast.
BUDA:
27
Application
Blu-Ray Disc Player
Language
1.
2.
3.
4.
OSD: Selects the OSD language.
Menu: Selects the menu language of the disc.
Audio: Selects the audio language for the program.
Subtitle: Selects the subtitle language for the program.
Note
•
You have to select the audio and subtitle language according to the requirements on the disc.
Playback
1.
2.
3.
4.
5.
6.
Closed Caption: Turns the Closed Caption function on/off.
Angle Mark: Turn the Angle Mark function on/off
PIP Mark: Turn the PIP Mark function on/off.
Secondary Audio...: Turn the secondary audio language selects on/off.
Last Memory: Turn the Last Memory function on/off.
PBC: PBC ON/OFF.
Security
28
Application
Blu-Ray Disc Player
1.
2.
3.
Change Password: Changes the password for parental control menu.
Parental Control: select this to set the parental control.
Country Code: Select the Country code.
Note
•
The original code is 0000. The code can be changed by user.
Network
•
•
•
Connect this product to a broadband modem or router.
This player will start to detect if there is a connection to the network.
If the connection test fails, select [Retry] and press ENTER to try and re-connect to the network again.
1.
2.
3.
4.
5.
6.
Internet Connection: Displays the internet connection state.
Information: Displays information of the current Network.
Connection Test: Tests the internet connection state.
IP Setting: Sets the IP for the player.
BD-Live Connection: Connection situation of BD-Live.
Proxy Setting: Setup proxy server.
Display Setting
TV
29
Application
Blu-Ray Disc Player
1.
2.
3.
4.
5.
6.
TV Screen: Selects the display mode for the TV.
Resolution: Selects the resolution for the TV.
TV System: Selects the TV system type.
Color Space: Selects the color space.
HDMI Deep Color: Selects deep color for HDMI.
HDMI 1080p 24Hz: Enable/disable HDMI 1080P 24Hz setting.
Video Process
1.
2.
Video Adjust: Enter the submenu to adjust the video display.
Sharpness: Select the playback sharpness mode.
Adjust the Brightness, Contrast, Hue, Saturation of the screen to suit.
Audio Setting
1.
2.
3.
4.
Spdif: Selects the spdif mode.
HDMI: Selects the HDMI mode.
Down_samp: Selects down_samp.
is not 96KHz compatible. 96 KHz signals will be down
converted to 48KHz)
DRC(Dynamic range compression): Selects the DRC
mode
30
Application
Blu-Ray Disc Player
Update software
For software updates that can enhance your players performance, check the current software version of your
players with the latest software (if available) .
1.
2.
3.
Press BD-SETUP.
Select [General Setting], then press .
Select [System] > [Upgrade], then press OK .
Update software via USB
1.
2.
3.
4.
5.
6.
panel.
In the SETUP menu, select [General Setting] >[System]>[Upgrade] >[USB Storage].
update operation.
Once the software update is complete, this product automatically switches into standby mode.
Disconnect the power cord for a few seconds; reconnect and turn on this player.
Note
•
To prevent possible damage of this product do not turn
software update is in progress.
31
Maintenance and Service
Trouble shooting
Do not use other functions that are not mentioned in this user’s manual.
In case a problem occurs with your LCD TV, please take the following steps first.
If you still have the problem, turn the power off and contact your dealer or an authorized service center.
Problem
Action
The screen does not appear.
Insert the power plug.
Is the power plu
Press the power button of the remote control.
The screen appears too
slowly after the power is turned on.
This problem occurs for a brief time in the process of
image elimination processing in order to hide temporary screen noise
that occurs when the power is turned on. But if the screen does not
come after 1 minute contact your dealer or an authori ed service
center.
Screen is too bright or too dark.
Perform brightness adjustment or Contrast adjustment.
Screen is too large or too small.
Adjust the screen size.
Stripes appear on the screen
and it shakes.
Keep any appliances that emit magnetic radiation away from the TV.
The screen does not move.
Screen appears
Press the PAUSE button. Check if the Pause button is pressed on
external equipment.
1.
2. Increase the sound level by pressing volume adjustment button.
3. Check if sound terminal of external input is connected properly.
4. Check if audio cables are connected properly.
5. Select and check the other input.
If the sound still does not work and the other channels are the
same after you have done as the above, contact your dealer or
an authori ed service center.
Remote control does not work
1. Check if main power is On.
2. Check that the batteries of the remote controller were loaded
properly.
3. Check to see if any obstacle exists between the LCD TV and
the remote control , then remove it, if any.
4. If the batteries have no power, replace them with two new
batteries.
This LCD TV is for household use and registered as harmless electromagnetic waves.
Therefore, you can use it in every location as well as residential areas.
32
Maintenance and Service
Specifications
LCD Panel
Panel Size
32”
1920 x 1080
Max. Resolution
Input Connector
Other Connector
VIDEO
2
YPbPr
2
AUDIO (L/R)
2
PC/AUDIO
1
HDMI
2
RF
1
USB
2
Optical Fibre
1
ETHERENT
1
Power Source
100-240V~ 50/60Hz
Power Consumption
180W
The cabinet design and electronics specifications will be modified without prior notice for
improving the performance.
33