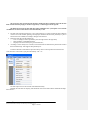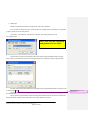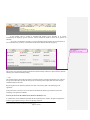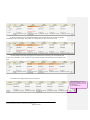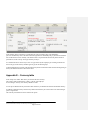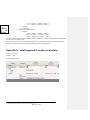
1
Content 15.6. Calculation rules............................................................................................................................... 3 15.6.1. Built in Salary types (Inconvenient time, overtime and extra pay for shift).................................... 3 15.6.2. Work agreement rule .................................................................................................................... 4 15.6.3. Day Rule – How it works.............................................................................................................. 7 15.6.4. Week Rule – How it works ........................................................................................................... 8 15.6.5. Extra payment – How it works ...................................................................................................... 8 15.6.6. Flextime and time bank............................................................................................................... 10 15.6.6.1. Enhancement on a single day for a single employee ................................................................ 14 15.6.6.2. Walk time ............................................................................................................................... 15 15.6.7. Absences .................................................................................................................................... 16 15.6.8. Holidays ..................................................................................................................................... 18 15.6.9. Export period definition .............................................................................................................. 21 15.6.10. Relation between export functionality and each employee ...................................................... 25 15.6.11. Internal account definition ...................................................................................................... 27 15.6.12. Define the Export file format .................................................................................................. 30 15.6.13. Define what should be exported .............................................................................................. 30 15.6.14. Issues to consider .................................................................................................................... 31 15.6.15. Converting to salary codes ...................................................................................................... 32 16. Setup for Period result ........................................................................................................................ 33 16.1.1. Ordinary mode ............................................................................................................................ 33 16.1.2. Debugging mode ........................................................................................................................ 34 16.1.2.1. Export procedure in debug mode............................................................................................. 35 17. Terminal configuration and Messages ................................................................................................ 38 17.1.1.1. Communication Management Service (CMS) ......................................................................... 38 17.1.1.2. Message Control Application (MCA)...................................................................................... 41 PART THREE – DETAILED EXAMPLES ............................................................................................... 44 18. Employee Information ........................................................................................................................ 45 19. What is normal time? ......................................................................................................................... 52 20. Absence Registrations ........................................................................................................................ 52 20.1. Several absences at the same day .................................................................................................... 60 21. Flextime Registrations ....................................................................................................................... 66 21.1.1.1. More about Time Bank ........................................................................................................... 77 21.1.1.2. Flex time handling .................................................................................................................. 80 22. Several weeks work cycles ................................................................................................................. 83 23. How to enter time strings.................................................................................................................... 86 PART FOUR – REPORT EXAMPLES ..................................................................................................... 87 24. Reports ............................................................................................................................................... 88 24.1. Week Plan ...................................................................................................................................... 90 24.2. Weekly Report ............................................................................................................................... 91 24.3. Work Report................................................................................................................................... 92 24.4. Registration report .......................................................................................................................... 93 24.5. Work Cost Report........................................................................................................................... 94 24.6. Statistical report.............................................................................................................................. 95 Appendix A – Technical reference ......................................................................................................... 97 Appendix B – When to calculate a break .............................................................................................. 97 Appendix C – Flextime and absence..................................................................................................... 98 QL Time 7th. Draft User Manual Printed: 23.01.2012 Document:D:\Perkelti\Documents\QL Time Manual\QL Time manual p2-v1.doc Page 1 of 107 Appendix D – Absence part of day followed by absence .................................................................... 98 Appendix E – Currency table ................................................................................................................. 99 Appendix F – Align list .......................................................................................................................... 100 Appendix G – Other data – countries .................................................................................................. 100 Appendix H – Absence – is a work time ............................................................................................. 100 Appendix I – Paid time and work time from wrong departments ...................................................... 103 Appendix J – Different types of department description used .......................................................... 104 Appendix K – Error when adding department .................................................................................... 105 Appendix L – FAQ ................................................................................................................................. 105 Appendix M – Budget detail window ................................................................................................... 106 Appendix N – what happened if vacation and holiday ....................................................................... 107 QL Time 7th. Draft User Manual Printed: 23.01.2012 Document:D:\Perkelti\Documents\QL Time Manual\QL Time manual p2-v1.doc Page 2 of 107 1.1. Calculation rules 1.1.1. Built in Salary types (Inconvenient time, overtime and extra pay for shift) QL Time has three different kind of built in salary types that follow specific rules in addition to ordinary (worked) hours: 1. Inconvenient time 2. Overtime 3. Shift pay This is the built in salary types that can not be changed. Of course as many salary codes or absence codes that may be needed can be added, but they are not calculated automatically. To use the built in salary types, a formula starting with preferred salary type should be entered and then the day defined within brackets. Example: Rule: OT(d) with a value of 30% yields 30% extra pay on all ordinary work days (in case when employee is entitled to overtime according to other rules, for example day rule). The input forms examples are described in the next section. Rules are applied in the following order: 1. Specific day rule, (S) (after you add the S you are enabled to add a date) 2. Holiday (H) 3. Week day rule (1, 2, 3, 4, 5, 6, 7) (1=Monday) 4. Normal work day (D) Monday to Friday Note! Saturday, Sunday and Holidays gives only ordinary pay if they are not defined Each of them may result in use of several different salary accounts, for example that overtime 40% and overtime 100% are paid due to special rules. When it comes to overtime and inconvenient time, three other rules may be configured separately: Day rule overtime Week rule overtime Minimum worked time before inconvenient time or overtime is calculated. The rules described above are used in the conjunction with the work agreement. QL Time 7th. Draft User Manual Printed: 23.01.2012 Document:D:\Perkelti\Documents\QL Time Manual\QL Time manual p2-v1.doc Page 3 of 107 1.1.2. Work agreement rule A work agreement rule is a collection of different calculation rules for inconvenient time, overtime and shift pay. To create or edit ‘Work Agreement’ rules click on ‘Setup’ at the top menu and then select ‘Validation rules’ or pres short cut key ‘Ctrl’ + ’Shift’ + ’R’. The example below explains how to create an agreement and declare special rules to be used. As shown in the form below, several work agreements may exist within one company. The example below shows some different rules regarding overtime. It is important to notice that each rule may exist in different timeframes with different rules or parameters. This makes it possible to change calculation on the fly and even in a middle of a period. QL Time 7th. Draft User Manual Note! Changing day rule and week rule may give unexpected results Printed: 23.01.2012 Document:D:\Perkelti\Documents\QL Time Manual\QL Time manual p2-v1.doc Page 4 of 107 Double clicking on a rule in the right grid or clicking on ‘Edit’ gives access to edition of each single rule. The rule in the example below shows that every Sunday and all holidays will be paid with extra overtime of 100%. QL Time 7th. Draft User Manual Printed: 23.01.2012 Document:D:\Perkelti\Documents\QL Time Manual\QL Time manual p2-v1.doc Page 5 of 107 If inconvenient time is related to employee work schedule, e.g. IC is 2 hours before and 2 hours after normal work hours, then formula should look like IC= D(-2), D(+2): QL Time 7th. Draft User Manual Printed: 23.01.2012 Document:D:\Perkelti\Documents\QL Time Manual\QL Time manual p2-v1.doc Page 6 of 107 1.1.3. Day Rule – How it works A day rule describes how many hours an employee can work during a day before overtime is triggered. This rule must be defined in the setup menu together with other calculation rules for overtime. QL Time calculates overtime on periods that exceeds the agreed work schedule. This principle makes the calculation accurate, fast and in most scenarios correct. To perform a manual calculation of overtime in a similar way is both time consuming and tricky to achieve. With an agreed work schedule of 8-16 and with a break scheduled from 12 to 12.30 the following could happen if any extra worked hour should be calculated as overtime: Work time 7-16 gives overtime from 7-8 = 1 hour Work time 7-17 gives overtime from 7-8 and 16-17 = 2 hours The break is reduced to 15 minutes and taken from 12.00-12.15 gives overtime 15 minutes from 12.15 to 12.30 If the scenarios above happen overtime could in fact be given with three different rates. QL Time’s way of calculation also influence on week rules regarding overtime. For example if the employee (a) is entitled to overtime after 37.5 hours in the week, (b) has a work schedule that also is 37.5 hours, (c) worked extra hour the first day in the week, he will get overtime on the first day in the week. QL Time 7th. Draft User Manual Printed: 23.01.2012 Document:D:\Perkelti\Documents\QL Time Manual\QL Time manual p2-v1.doc Page 7 of 107 1.1.4. Week Rule – How it works The week rule describes how many hours an employee must work during a week before overtime is triggered, so it is necessary set the preferred number of hours for overtime calculation. NB! The day rule will always be applied first. Comment [MR1]: This picture will be changed dome how Comment [UT2]: Monika / Paulius Flexibility how does it work? Comment [MR3]: Ulf, Average of cycle is always calculated. Flexibility option is moved from this window to Validation/Work agreement rules. Example: Employee’s work schedule Monday 8-17:030 Tuesday 8-17:030 Wednesday 8-17:030 Thursday 8-17:030 Friday 8-17:030 TOTAL: 8.5 hours 8.5 hours 8.5 hours 8.5 hours 3.5 hours 37.5 hours This gives a total of 37.5 hours and if the week rule is set to 37.5 all extra time will be calculated as overtime. If the employee works extra on Monday for example half hour from 7.30 to 8.00 this will be considered as a half hour overtime because the week exceeds 37.5 hour and the overtime period will be from 7.30 to 8.00. If two, free or more weeks work cycle is defined, QL Time counts the average of weeks, and overtime is only calculated if worked hours more than 37.5 multiplied by number of weeks during the cycle. To define several weeks work cycle is done from employee card, under the 'Work Agreement' view, for more detailed examples click here. 1.1.5. Extra payment – How it works The extra payment rule describes what payment will be calculated on top of the ordinary pay. Everything that are in addition to the salary cost and based on worked hours may be calculated in this function. QL Time does not export any extra cost calculation by default but it aims to give the opportunity to calculate almost everything. QL Time 7th. Draft User Manual Printed: 23.01.2012 Document:D:\Perkelti\Documents\QL Time Manual\QL Time manual p2-v1.doc Page 8 of 107 Comment [MR4]: should be changed to WA schedule ? The example below shows that extra payment may be specified with parameters that enhance the use of this cost calculation. The calculations are done in the sequence that is displayed in the grid, but user may change the order and thereby the result changing the sequence of the calculation. Change the order of calculation by clicking on UP and DOWN arrows on the right side of the window. Pressing the ‘New’ hyperlink gives access to the window similar as below: QL Time 7th. Draft User Manual Printed: 23.01.2012 Document:D:\Perkelti\Documents\QL Time Manual\QL Time manual p2-v1.doc Page 9 of 107 Note! Parameters may be specified to enhance the calculation logic. There are only a few variables to determine: The ‘Type’ parameter. When it clicked, a drop down box with predefined types is given in order to indicate what kind of parameter you are creating. The type text will be used for grouping in the work plan, registration and period result windows. The text field ‘Payment’ must be filled in because this is the formula that does the real calculation. Useful hints how to input the formula is shown below this field. Each payment may bee calculated based on: age or municipality tax code related to employees o living address or o the registered municipality of the business Calculate on: Check box ‘Daily salary’. When fixed amount is in use, it should be specified if the amount is based on worked days or the whole month, Check box ‘Base salary’. There is also a possibility to do the calculation based on base salary instead of the accumulated sum of salary plus calculated work cost. Base salary is salary without inconvenient, overtime or shift pay. 1.1.6. Flextime and time bank The term Flextime is used when an employee can choose within limits when to start working or finish working on a given day. QL Time 7th. Draft User Manual Printed: 23.01.2012 Document:D:\Perkelti\Documents\QL Time Manual\QL Time manual p2-v1.doc Page 10 of 107 The term Time bank is used when the manager decides that hours should be stored in the time bank account instead of paying for the hours right away or redrawing it from the payroll. The difference between flex time and time bank is minimal from a system point of view and the real difference is between data that is treated automatically or not. The basic idea of flextime function is to give each employee or a group of employees more influence on their own work schedule planning. The employee should in fact have the possibility to plan in advance their own schedule, for example, through a web interface. Employers motivation for the solution are: o Less cost (employee takes responsibility to do the right issues at the right time); o More flexibility in staff administration; o Employers are also forced by new governmental laws; According to some country laws overtime, inconvenient time and shift must be paid and not stored in the time bank and QL Time supports this possibility too.. To define a flextime / time bank rule press the ‘Setup’ choice on the top menu and select the item ‘Flex time rules’ in the menu or just press shortcut key ‘Ctrl’+’F’: The same input screen is also used for time bank functionality. Defining flex time rules in company, user should leave the ‘Fixed Time’ button clicked like example below shows: QL Time 7th. Draft User Manual Printed: 23.01.2012 Document:D:\Perkelti\Documents\QL Time Manual\QL Time manual p2-v1.doc Page 11 of 107 Defining flexibility, user chose to enter: ‘Time span’ is a time in which limits employee may be flexible regarding his work plan. According to the example above, it is 7.00-17.00, and ‘Core time’ is a time when employee must present at work, and according to the same example, it is from 9.00 to 15.00; or ‘Arrival’ - it means time period in which limits employee have start working (example 7.00-9.00), and ‘Departure’ - it means time period in which limits employee should finish working (example 15.0017.00). The result will be the same in both ways. If you check the box ‘Do not use timebank’, the time bank solution will not be used at all, and in fact this is the only way to prevent QL Time from using the time bank functionality. At the bottom of the ‘Edit Flextime rule’ form you will find a drop down list box that lets select from rules of how to manage hours with special calculation in selected limits: to pay for it or to add to time bank account. QL Time 7th. Draft User Manual Printed: 23.01.2012 Document:D:\Perkelti\Documents\QL Time Manual\QL Time manual p2-v1.doc Page 12 of 107 Comment [UT5]: If you input the total string it yields errors in input. To achieve the ‘Core time’ you must add 10-15 and press enter Comment [MR6]: If I enter Time span, then core time and press ENTER – that window is CLOSED Comment [UT7]: Missing Total account value and Total minus value in definition plus account binding Note! Default for both flextime and time bank functionality is that cost are calculated and arise when somebody work extra or outside plan. The possibilities for IC (Inconvenient time) and OT (overtime) handling are: 1. Pay out. 2. Add OT to time bank 3. Add (convert) both (IC and OT) to time bank o According to Norwegian law the overtime and inconvenient time (no law definition) must be paid In this version of QL Time you can not change the default rule. Comment [MR9]: This text is for user or a note for us The above mentioned difference between flextime and time bank is not big from a technically point of view. The hours from the flex bank is calculated in exactly the same way. We could say that when flex time is in use, the employee is in charge and can determine when to come and go within some limits. When the time bank functionality is in use, the user (manager) (but not each employee) decides when hours should or shouldn’t go into the time bank. Describing flex bank and the time bank solutions the basic principle is that the Time bank is relative to each employee’s work schedule and the handling is based on an individual schedule / plan instead of a general work time. If to take a closer look at the definitions, it is only core time that differs. To put a flex time or time bank rule into an action user must also add the appropriate rule to each single employee: 1. open the “Employee info” form and click ‘Salary info’. A ‘Flex time rule’ drop down box is at the bottom of the page, like example below shows: QL Time 7th. Draft User Manual Printed: 23.01.2012 Document:D:\Perkelti\Documents\QL Time Manual\QL Time manual p2-v1.doc Page 13 of 107 Comment [UT8]: If we add inconvenient time and overtime to the flex total and convert it this rise a problem if times are removed from the account do we remove overtime and inconvenient time at the same time? 2. press the “Flex time rule” drop down box in order to find the right rule (example bellow). Click on it and select the rule to apply. Comment [MR10]: If no rule is selected, perhaps VIEW button should be blank/inactive Comment [MR11]: More flexibility would be if “flex time – agreement” form would be possible to reach from “VIEW” form. Because sometimes rules with a bit different setting can be applied to each employee and possibility to change/create rule for selected employee from here would save time. Of course, perhaps this change would call other problems. Rule’s exact settings can be checked by pressing on “View” button nearby. If any flex time rule should not be applied, text in “Flex time rule” drop down box should be deleted. 1.1.6.1. Enhancement on a single day for a single employee This functionality is not implemented in QL Time yet. Note! The same result may be achieved using a flex time rule QL Time 7th. Draft User Manual Printed: 23.01.2012 Document:D:\Perkelti\Documents\QL Time Manual\QL Time manual p2-v1.doc Page 14 of 107 Comment [UT12]: Not implemented for a single employee Chapter to be revised To be able to allow some employees to arrive before or depart later than normally with automatic payment is possible to enhance the string parameter for example like this: Plan 9-19:030 is enhanced to 9-19:030:010:015 which says that if the employee arrive 10 minutes before it is automatically paid and also 15 minutes later is automatically paid The rest of the time is not paid if not approved. This functionality is the opposite of the normal use of ‘Walk Time’. ‘Walk Time’ and ‘Enhancement on a single day’ can be set up with parameters as follow: Paid Not paid and the functionality is built to be used on a single day action (from plan) then it may be considered as the same functionality. NB! This functionality is more or less used on special occasions and on a day level. Is it possible that we will run into a situation where it is used as a rule with ‘Walk Time’ and at the same time we want to ‘Enhance plan on a single day’? According to Robert the answer is ‘Yes’ because this is a way to force extra payment for full time employees but is not the best way to do it. It could be a solution that if used on fixed paid employees on a day level we force the hours directly to time / flex bank without acknowledge. Comment [UT14]: Not implemented for a single employee Chapter to be revised 1.1.6.2. Walk time This functionality is not implemented in QL Time yet. QL Time 7th. Draft User Manual Printed: 23.01.2012 Document:D:\Perkelti\Documents\QL Time Manual\QL Time manual p2-v1.doc Page 15 of 107 Comment [UT13]: Not relevant. Paying extra for full time must be solved in another way. 1.1.7. Comment [MR15]: To change terms – from absence to Event? Absences Definition of “Events” includes any absence from the ordinary workspace. Event includes sickness, child care or vacations, as well as external meetings, travelling and likewise. To create an event code, select ‘Setup’ from the top menu and then press ‘Absence reasons’. A form as shown in the example below will appear displaying all the absence codes that are available. To edit an existing code, the appropriate line should be clicked and then pressed the ‘Edit’ button. All information registering event should be entered to the form similar to bellow: QL Time 7th. Draft User Manual Printed: 23.01.2012 Document:D:\Perkelti\Documents\QL Time Manual\QL Time manual p2-v1.doc Page 16 of 107 Comment [MR16]: To change to Enebts in the app. as well First of all absences are classified by the field type. Pressing the down arrow to the right of the list box a pop up list will show which categories are available. The absence codes are also divided per country. This flag is used in conjunction with the selected country for each employee. If an employee is categorized as ‘Norwegian’ then can only be entered absences that are categorized as ‘Norway’ Note! Removing the filter allows you to use other absence codes The example below shows how the rules are created. the percentage of what should be paid (i.e. 100 percent) should be entered. In the example below it is in fact entered three rules (separated by comma (,)) for the same absence: Note! Start with the default payment rule and then add additional parameters. The first part of the formula ‘0,100(>2),0(>16)’ is the ‘0’ before the first comma, marked in bold and this is the default pay for the absence code, so: no salary is calculated for first two days of absence QL Time 7th. Draft User Manual Printed: 23.01.2012 Document:D:\Perkelti\Documents\QL Time Manual\QL Time manual p2-v1.doc Page 17 of 107 The second parameter is ‘100(>2)’ which means that it will be paid 100% salary for absence from day number three The third parameter is ‘0(>16)’ which means that this parameter overwrite the second parameter therefore salary is not calculated from the sixteenth day of absence. Keep in mind that the calculation is based on work days and holiday is considered as work days. The rules regarding which days that are counted may vary from country to country, for example Norway and Sweden counts calendar days and Lithuania work days. To be able to export the absences to i.e. a salary system see the chapter ‘Salary accounts’. Comment [MR17]: According to me, LT also calculate calendar days. Comment [UT18]: What about Saturday and sunday Comment [MR19]: Is this correct title? Note! Important: Number of rules entered here must match an appropriate internal account if you want to keep a correct track of the result of every calculation rule for example to be able to export to a salary system. The user can add absences in different ways from several different places like: Plan module Registration module Employee card Web module (not included in basic package) Mobile phones (not included in basic package) The most common way to add absences (like illness or business trip) is from Plan module or Registration module: If you at this stage want to know more about absence registration click here. 1.1.8. Holidays QL Time has predefined national holidays. To check out what predefined holidays the system use, user should select ‘Setup’ from the top menu and then ‘Holidays’. In addition to the predefined holidays user can also add special dates to the list. QL Time 7th. Draft User Manual Printed: 23.01.2012 Document:D:\Perkelti\Documents\QL Time Manual\QL Time manual p2-v1.doc Page 18 of 107 The view below gives an overview of all the holidays. The top line can be used to filter the list in order to easier overview of special codes or countries. Note! If a new holiday is added or removed make sure that you define new holiday rules from a given data. Selecting a row and then clicking enter opens the form where the rules for a specific day can be defined. QL Time 7th. Draft User Manual Printed: 23.01.2012 Document:D:\Perkelti\Documents\QL Time Manual\QL Time manual p2-v1.doc Page 19 of 107 Comment [MR20]: If rule regarding holiday move to next workday is changed tick should be removed. But in this case all previous data will be changes and –x hours will be instead of past moved holiday. It will change total worked hours. So before removing tick, registrations should be locked. It is important to keep in mind that a holiday may be only part of a day, i.e. Christmas Eve or New Years Eve. Properly registered holiday in this form is the base for correct use of holiday calculation rule (using the ‘H’ parameter). When an employee has a work schedule and the expected working day is on a holiday he/she is entitled to a salary even if they do not work. This is the standard solution. They are also entitled to extra pay for inconvenient time and if it is planned overtime (it should not be planned) QL Time looks at a holiday as an ordinary work day and pay according to ordinary rules even if there are no work done. Note! The only way to avoid paying is to register a null plan on the day. A holiday gives only ordinary pay if work is scheduled unless a holiday rule is used. NOTE! A special day definition (S) does not overwrite holiday definition and if holiday payment is not defined only ordinary time is calculated QL Time 7th. Draft User Manual Printed: 23.01.2012 Document:D:\Perkelti\Documents\QL Time Manual\QL Time manual p2-v1.doc Page 20 of 107 Comment [MR21]: What do you mean??? 1.1.9. Export period definition An export period defines which time periods will be: Exported and how Locked up for further editing Stored in the statistical database This window may be opened by pressing ‘Setup’ from the top menu and then ‘Salary periods’ or jusr pressing shortcut key ‘Ctrl’ + ‘S’: Pressing the ‘New’ button or double clicking on an existing appointment the ‘Edit agreement’ form as in the example below is opened. Two tabs in the form is available: The tab ‘Salary Periods’ refers to the time period within this agreement. The ‘Export files’ refers to what kind of export file name(s) we will use if we want to export the data to another data system. Tab ‘Salary Periods’ QL Time 7th. Draft User Manual Printed: 23.01.2012 Document:D:\Perkelti\Documents\QL Time Manual\QL Time manual p2-v1.doc Page 21 of 107 Comment [UT22]: Export period instead of Salary period. Change in application too, see example Pressing the ‘New’ button or double clicking on and existing period gives access to the ‘Edit salary period’ form, se example below: It is possible to set up three different export types: Registered Plan QL Time 7th. Draft User Manual Printed: 23.01.2012 Document:D:\Perkelti\Documents\QL Time Manual\QL Time manual p2-v1.doc Page 22 of 107 Differences Default is ‘Registered’ and this is the type that is used in most situations. If it is necessary to make some more advanced export for example at the end of the year it is possible to split a period into several time periods. Click on the ‘New’ button or ‘Edit’ button to open the ‘New salary period type’ form. See example below. Note! You can mix registered and plan data in one export This form lets user split an existing period into several sub periods with different types of export setup. As the text in the form below shows all sub periods that are not defined is equal to registered time. The idea is that most of the registration for December will be registered data but the last few days will be based on the plan. The logical thing to do, after using a feature like the one above, is to create the next salary period like the example below. When a period is reported based on plan the same period should in the next session be corrected and the plan should be compared with registrations and only the differences reported. QL Time 7th. Draft User Manual Printed: 23.01.2012 Document:D:\Perkelti\Documents\QL Time Manual\QL Time manual p2-v1.doc Page 23 of 107 Comment [UT23]: Plan or work schedule? Check Tab ‘Export files’ Clicking on the tab ‘Export files’ which is in the ‘Edit agreement’ window under ‘Export period’ opens the form similar to below. QL Time 7th. Draft User Manual Printed: 23.01.2012 Document:D:\Perkelti\Documents\QL Time Manual\QL Time manual p2-v1.doc Page 24 of 107 In this view user may select file format that will be used exporting data. Pressing the down arrow to the right of the list box a pop up list will show which file formats are available. For more information of how to store file formats click here. Using the parameter that is shown in the form in the file format name gives the possibility to automatically define file names for export and remove the hazel it is to tamper with the filenames when the export procedure is run. Before we leave this topic we want emphasize on the importance how to bind this export functionality to each employee. Read the following chapters to make sure that the whole topic is understood. 1.1.10. Relation between export functionality and each employee For information of how to open and work with employee info click here. QL Time 7th. Draft User Manual Printed: 23.01.2012 Document:D:\Perkelti\Documents\QL Time Manual\QL Time manual p2-v1.doc Page 25 of 107 Comment [MR24]: Unclear the end ofthis sentence There are two relation points between export functionality and each employee: 1. Define Salary Period for each employee. In the example bellow the Salary Period Type is named ‘Salary Periods’ 2. Define export reference number (salary number) for each employee. In the example below it is set to: 1234 QL Time 7th. Draft User Manual Printed: 23.01.2012 Document:D:\Perkelti\Documents\QL Time Manual\QL Time manual p2-v1.doc Page 26 of 107 Comment [MR25]: TYPE or AGREEMENT 1.1.11. Internal account definition Comment [MR26]: Since there is internal and External accounts should ne mentioned both. But the title of this chapter should be ~Salary account definition or just Account definition All accounts should be given a proper description and specified in the form for accounts. This form is opened selecting ‘Salary accounts’ under ‘Setup’ from the top menu or using shortcut key ‘Ctrl’ + ‘K’. It is basically three different types of accounts: Salary o The salary accounts are basically something you describe by adding the shift, overtime and inconvenient rules with parameter. In addition you must describe how each account should be exported. Manual o This is meant to give you the opportunity to do manual registrations that more or less override the automatic salary types. Extra Pay o This is a special type of accounts that may be calculated based on other accounts. They are used to give you the exact cost level and normally we do not export any figures from this type of account. Comment [UT27]: The name field must be enabled so that it is possible to link one specific absence code to and export account number Discussion the 27th. Of October Comment [MR28]: Columns Salary type to change to Account type??? Comment [UT29]: The header ‘Salary type should change to ‘Description’ User may add new, edit or delete selected existing account by clicking on appropriate buttons at the bottom of Account form. Here entries are grouped by account type. Selecting one of the presenting accounts types, user may select preferred salary type. QL Time 7th. Draft User Manual Printed: 23.01.2012 Document:D:\Perkelti\Documents\QL Time Manual\QL Time manual p2-v1.doc Page 27 of 107 Note! Clicking on ‘Select absence reason’ links directly to absence codes Remember to define external account number for export purposes There is in a one to many relations between an absence code and accounts. So the parameter field below gives possibility to add several other parameters. In this case records marked as salary type and are calculated with 50% and 70% overtime is exported to the same export account and the idea is that the receiving system handles the difference in the right way. Clicking on ‘Select absence reason’ gives a list box of absences that you can link to. For more information related to absences click here. To make it possible to store all results from the calculation formulas for later use it is necessary to link each work agreement rule to an account. QL Time 7th. Draft User Manual Printed: 23.01.2012 Document:D:\Perkelti\Documents\QL Time Manual\QL Time manual p2-v1.doc Page 28 of 107 Comment [MR30]: Event?? Comment [UT31]: This will cause some problems setting up the system and I guess we need some tools to print out all setups and show relations. How do we know that everything is exported? If more than one parameter for an absence code regarding how to pay is specified, the same number of accounts should be specified too and each parameter linked to the account code. Example: Absence 0% pay (not paid by company) Absence 100% (100% of ordinary pay from company) Link ‘Absence 0%’ to account ‘Absence not paid’ with adding the parameter 0% and Link ‘Absence 100%’ to account ‘Absence paid’ with adding the parameter 100%. CRITICAL: Check and double check your links between absence codes and accounts. QL Time 7th. Draft User Manual Printed: 23.01.2012 Document:D:\Perkelti\Documents\QL Time Manual\QL Time manual p2-v1.doc Page 29 of 107 1.1.12. Define the Export file format Select a predefined format or build your own 1.1.13. Define what should be exported QL Time 7th. Draft User Manual Printed: 23.01.2012 Document:D:\Perkelti\Documents\QL Time Manual\QL Time manual p2-v1.doc Page 30 of 107 There are several ways the information regarding one employee can be exported and it is important that the information is exported in such a way that it fits with the system that will use the data. It is basically three different export types: Export all registrations (normally hourly paid) – QL Time terminology = Full time Export the difference between the registrations and the work agreements schedule (Agreed Salary) – QL Time terminology = Only differences Only manual registrations = (Fixed pay) - QL Time terminology = Nothing o In addition special marked absence codes Comment [UT32]: This is not implemented 1.1.14. Issues to consider Export of sickness on holidays will be treated according to the absence definition. Vacation on holidays will not be exported and written to the database because it is actually not workday This must be checked with Robert Vacation is normally calculated as weeks QL Time 7th. Draft User Manual Printed: 23.01.2012 Document:D:\Perkelti\Documents\QL Time Manual\QL Time manual p2-v1.doc Page 31 of 107 Comment [UT33]: Robert Her må du ta stilling til hva som skal skje 1.1.15. Converting to salary codes As example in the previous chapter describes it is three different compensations for overtime: 1st.of April = NOK 120 Ordinary days = + 30% of hourly pay per hour Ordinary days but outside work plan (two hours before and two hours after) +50% Since it is three different solutions for how to pay it also requires to set up three different salary accounts for export. QL Time automatically detects that you define a new salary code and try to save it. At the same time you are forced to define the account number in QL Time’s account table. Without a proper definition of account number and a definition of export account you will not be able to lock up salary periods. QL Time 7th. Draft User Manual Printed: 23.01.2012 Document:D:\Perkelti\Documents\QL Time Manual\QL Time manual p2-v1.doc Page 32 of 107 2. Setup for Period result The goal of this chapter is to describe in more details the prerequisites needed for export. We suggest that you skip this chapter now and return after you have taken a look at the system configurations chapters. The export procedure is a one click solution when everything is set up and ready to export. This is the place where user may do the export when the period is finished. But before the export functionality can be put to work, several parameters must be set up and checked in order to export the appropriate information correctly, such as: Define Salary Type Export and break it down to time periods (normally months) If the information is going to be used in a salary system, check that all necessary information is correct. o Export account numbers must be the same as used in the salary system. o Employees Salary number must be the same as used in the salary system. Check that overtime and inconvenient time will be handled in a correct way and matching the salary systems requirements Set up file name that will be used for export and export type: Ascii file transfer XML Excel Database Define what will be exported o Define export settings (if everything, differences or nothing should be exported) for the different salary types: Fixed Salary Agreed Salary Hourly Pay The ‘Period result’ can be run in two different ways. Ordinary mode Debug mode Access to debug mode is only given to users with administrator rights and may be selected when the ‘period result’ tab is clicked. Comment [UT34]: This is not implemented yet 2.1.1.Ordinary mode In the example below the user should select ‘Department’. This automatically will give all Salary Period agreements related to selected department. If the selected department has sub departments that also belongs to the user all departments will be loaded at the same time if this option is selected in the setup. After selecting departments it will possible to select the corresponding ‘Salary Period agreement’ from the drop down list. QL Time 7th. Draft User Manual Printed: 23.01.2012 Document:D:\Perkelti\Documents\QL Time Manual\QL Time manual p2-v1.doc Page 33 of 107 Comment [UT35]: This is not implemented yet In the example below the ‘Fresh food’ department is selected and the ‘Period’ selected is “Salary periods” with period 2009 10A (2009-10-01…2009-10-06). After selecting parameters the ‘Read Data’ button must be pressed in order to get requested information: Export of period results can not be done if some of the employees in the department that belongs to the same salary period have some issues. A message regarding issues will be displayed and the export procedure will not be allowed to run before all issues are solved. The export is a one click solution and the only result the user will see is a log of the export saved in a pdf file and possible to view at a later stage. Comment [UT36]: This log has to be built 2.1.2.Debugging mode The view below will only be displayed in debugging mode and it is important that the user has a very good understanding on how to read this view in a correct way. Comment [MR37]: It is necessary to finish describing this view. All settings are moved to Chapter 7.2. This view gives information of what will be locked and exported to other systems. Example below shows that Brigitta is supposed to work in two departments (Fresh Food and Bakery). Since in this case user has access just to Fresh Food department, information related to Brigita’s work in QL Time 7th. Draft User Manual Printed: 23.01.2012 Document:D:\Perkelti\Documents\QL Time Manual\QL Time manual p2-v1.doc Page 34 of 107 Bakery department is inaccessible and it is shown in light gray color in Italic. User can’t modify that data. If there is any not fixed issues left, system will give notification messages when the user presses button ‘Export’ If user has limited access to company structure and data has been exported already, it will not be possible to undo without administrator rights. The user with administrator rights must unlock the appropriate period before export can be done for the second time. 2.1.2.1. Export procedure in debug mode If you are a super user then you will be able to see some extra forms during the export procedure. The first window shows you exactly what will be exported for each employee. Remember that QL Time never works with amounts, only with hours and minutes. What you see is depending on how the periods are defined and the settings for each type of salary (fixed pay, agreed salary and hourly pay). QL Time 7th. Draft User Manual Printed: 23.01.2012 Document:D:\Perkelti\Documents\QL Time Manual\QL Time manual p2-v1.doc Page 35 of 107 The window below gives you three different grids. The grid on the top shows you details per day. The second (middle) grid shows you what will be exported (summary for the whole period). The third grid is what will be written to the statistical database. QL Time 7th. Draft User Manual Printed: 23.01.2012 Document:D:\Perkelti\Documents\QL Time Manual\QL Time manual p2-v1.doc Page 36 of 107 QL Time 7th. Draft User Manual Printed: 23.01.2012 Document:D:\Perkelti\Documents\QL Time Manual\QL Time manual p2-v1.doc Page 37 of 107 3. Terminal configuration and Messages 3.1.1.1. Communication Management Service (CMS) Communication Management Service (CMS) is the main engine of data exchange. It is using for synchronizing Terminal’s database with main database. CMS sends data table to CReg and CReg sends clockings to CMS. CMS Client is the application used to manage data exchange between WinCE terminal and main databases. CMS Client connects to CMS and set what data should be sent. After pressing on “Terminal” in the top menu or press shortcut key ‘CTRL’ + ‘T’, Terminals list window will appear: First of all it is necessary to add terminals that will be used for data caption in the company. The follow steps should be carried out: 1. Press hyperlink “New” and window named “Edit terminal” appears. User should enter necessary terminal information: terminal name, IP address, description, and then we select if terminal will be QL Time 7th. Draft User Manual Printed: 23.01.2012 Document:D:\Perkelti\Documents\QL Time Manual\QL Time manual p2-v1.doc Page 38 of 107 used for concrete department or for all company. If few terminals are entered user may select terminal to replicate it to another one. 2. Then press 3. Enter CMS address, button to save entered information. QL Time 7th. Draft User Manual Printed: 23.01.2012 Document:D:\Perkelti\Documents\QL Time Manual\QL Time manual p2-v1.doc Page 39 of 107 4. This tool is actually ready to send and/or collect data: a. User should just select what information (Employees, departments, Time banks for different period, work plans and / or messages) should be sent to terminal. User may work with messages just pressing on hyperlink ‘Edit terminal messages’. How to define messages in the messaging control window click here. Press ‘Send data to marked terminals’and after some time message about successfully (or not successfully) sent data will appear. Unsuccessful data sent may be for example because of internet connection instability or wrong entered terminal information. b. Or user may get information – registrations - from terminals pressing on hyperlink ‘Read registrations from marked terminals’. All registrations will be places in the database and will be shown in the Registration window. 5. button should be pressed after user finished work with terminals. QL Time 7th. Draft User Manual Printed: 23.01.2012 Document:D:\Perkelti\Documents\QL Time Manual\QL Time manual p2-v1.doc Page 40 of 107 3.1.1.2. Message Control Application (MCA) If shortcut key ‘Ctrl’ +’M’ or “Terminal messages” under “Terminal” in the top menu is pressed, messaging control window like bellow one will be opened: MCA is useful to manage Messages. Three levels are available: Welcome. Department Individual Welcome Message can be set to each terminal individually or default to all terminals. Message can be set by date, time or can be used constantly. QL Time 7th. Draft User Manual Printed: 23.01.2012 Document:D:\Perkelti\Documents\QL Time Manual\QL Time manual p2-v1.doc Page 41 of 107 Department and / or Personal Messages department or personal message can be shown to employee after employee Clocks in. It can be used for informing Employee with important events or can be used like notification. Key Benefits: CMS scans network for Terminals connection All Terminals are not allowed to get data directly from main database, they are getting data through CMS Employees get all necessary information while clocking Easier to manage Employees by setting individual messages Possibility to clock on the different Terminals Information about Employees are shown in real time New Employee Management: CMS is always running and has direct access to main database CMS sending Data to Terminals and getting clocking from them automatically or by CMS Client request Employee swipes the card to clock. He can check work schedule, breaks, time bank, read Manager Messages, change Department, check who is working now Terminal holds all clocking data and at the same time is synchronizing clocking database to another Terminals Employee can clock in on the one Terminal and Clock out on another one Synchronization between Terminals’ databases and main database is running constantly using CMS If connection to one or more Terminals lost then CMS marks Terminals as offline and synchronize data when connection will appear To use of this tool is quite simple: 1. first of all user should define time period (and hours if needed) for message display in one of free level (Welcome, department or Personal), 2. Select terminal, department or person that the message is aimed for from the drop down list, 3. Then message should be entered. There is four lined to enter messages and it will be displayed exactly the same on the terminal. Then press ‘Save Message’ in order to save it ant message will appear in the bottom part of this window. Also default message may be defined and it will be shown on the terminal after current message expires. User can create as much messages as it is needed or delete existing messages. 4. It is left to send messages to terminal collect clocking from there. User should use CMS Client for this purpose. For more information how to do it click here. QL Time 7th. Draft User Manual Printed: 23.01.2012 Document:D:\Perkelti\Documents\QL Time Manual\QL Time manual p2-v1.doc Page 42 of 107 QL Time 7th. Draft User Manual Printed: 23.01.2012 Document:D:\Perkelti\Documents\QL Time Manual\QL Time manual p2-v1.doc Page 43 of 107 PART THREE – DETAILED EXAMPLES QL Time 7th. Draft User Manual Printed: 23.01.2012 Document:D:\Perkelti\Documents\QL Time Manual\QL Time manual p2-v1.doc Page 44 of 107 4. Employee Information All information regarding an employee is stored in the Employee card. It is one of the key components in QL Time. You can access it by left double click or right click and then OPEN on selected employee. In the example below you see the first page on the employee card. On the page above there are some fields that are mandatory and some that are not. Below you get a more detailed description on some of the fields and how they are intended to be used. Country This is not nationality but the country rules used for holiday calculations. ID The field is QL Time’s internal numbering system and this number can never be changed or altered in any way. Automatically created by QL Time when pressing the ‘New’ icon. Table No This number is used to give a special sort order for the absence report used in Lithuania. Card ID The number is used to create identification codes for magnet stripe readers and is the number sent to clocking terminals. Salary No Salary number is used for exchanging data between a salary system and QL Time. It is used both for import and export purposes. QL Time 7th. Draft User Manual Printed: 23.01.2012 Document:D:\Perkelti\Documents\QL Time Manual\QL Time manual p2-v1.doc Page 45 of 107 Soc Security Not used by QL Time, just for information Bank Account Not used by QL Time, just for information Tax region Depending on how social security should be calculated. If social security depends on the employees home address (read municipality) the calculation should / will be linked to this field. Cost Center This is the cost center (department id) that the employee belongs to and will be linked to if not otherwise specified in the contract. Keep in mind that an employee can work in more than one cost center but will only show up in the hierarchical structure together with the cost center. Position This field is linked to the ‘position’ table and gives you the possibility to categorize positions within your company. The field is not used in any basic reports or linked to special functionality. Hired From This is the first date that the employee will be paid at all. Work agreement schedules that starts with an earlier date will not yield any payment. Hired To If this date is set then no salary will be exported after this date even if registered hours after this time. Some fields, for example Employee name, Cost center or position, are necessary to fill in; other fields are optional. A menu is located on the left of the form that gives you access to different pages in the form. In this chapter we will concentrate on fields that are mandatory or highly recommended. Let’s see what we need to record to Employee card, that the system could give a precise calculation and right salary estimates: QL Time 7th. Draft User Manual Printed: 23.01.2012 Document:D:\Perkelti\Documents\QL Time Manual\QL Time manual p2-v1.doc Page 46 of 107 Clicking on ‘Work Agreement’ gives a form page equal to the example below. Comment [MR38]: QL Time does not save selected Pattern. According to Paulius, it just fill some fields automatically and is always blank On the top of the page is shown ’Salary period’ which is combined with a drop down list box to select from. This field sets how export and locking up transactions will be calculated. In most system setups there will only exist one possibility since people belong to the same salary system and that they are paid in the same intervals. Each employee must have a valid work agreement contract and you create the work agreement on this page of the employee card. First step is to add a new contract which is done by clicking on the asterisk in the grid and then add required information. There is no limit to how many agreement you can have per employee but they can’t be overlapping in time. It is possible to change the work agreement or add a new work agreement, but keep in mind that changing a working period that points back in time will influence on calculations dramatically. We recommend adding a new agreement instead of changing an existing. There are basically two types of ways user can set pay for an employee: 1. add the salary as pay per hour or 2. as a monthly pay with a specified amount of hours (See radio button ‘ Agreed salary’). When the radio button ‘Agreed salary’ is clicked there are two choices: ‘Fixed pay’ or ‘Pay difference’. To distinguish between fixed pay and pay difference do not matter if you are not going to export or import data from a salary system because the calculation is equal. This split is only used if you later specify to export data in separate ways. QL Time 7th. Draft User Manual Printed: 23.01.2012 Document:D:\Perkelti\Documents\QL Time Manual\QL Time manual p2-v1.doc Page 47 of 107 Comment [MR39]: Work in this window is quite problematical (table and separate fields are not synchronized, testing different scenarios errors appear or app. not responding) Normally fixed pay is in use for manager’s who has a kind of built in compensation for overtime and inconvenient time but in QL Time you create this by specifying different work agreement rules. It is also necessary to bind some calculation rules to each employee. These rules are often considered as agreements with unions. The field ‘Hours Per Month’ is used in a special way. Basically it is set if you use automatically import from a salary system. Then the salary system updates this field based on the contract information in the salary system. If you do not have an automatic upgrade this information is input from you based on the agreement done with the employee. For example full time position could equal 162.5 hours in an hourly month. This field is again measured against ‘Work Agreements Hours per Month’ which is the sum of all hours in the underlying work agreements schedule. If the are any discrepancies between the two fields a warning triangle is displayed to the right of the field ‘Hours per Month’. A contract of 162.5 hour per month and a work agreement schedule of for example 158.5 hours is bad business for the company and if the figures are switched are equal to cheating the employee. At the bottom of the page there are three drop down list boxes: ‘Work Agreement Rule’ ‘Cost Calculation Rule’ ‘Flex Time Rule’ To achieve any cost calculation at all it is necessary to select values for each field from the drop down box. The rules in the option list are declared in the ‘Setup’ menu. The Work Agreement Rule defines how the worked hours should be treated regarding how: Overtime is calculated Shift pay is calculated Inconvenient time is calculated In addition to salary calculation, there may be additional calculation of work cost. The Cost Calculation rule calculates additional cost such as: Vacation pay; Social Security Cost; Insurance cost; Other cost that should be calculated. The ‘Flex Time Rule’ must be defined if time bank functionality is not going to be used. The Flex Time Rule definitions can be used to handle flex time and time bank too. See how to set up flex time. There are no limits on how many additional types of extra cost that can be calculated on top of the salary cost. NB! Normally theses cost types are not exported to a salary system. QL Time 7th. Draft User Manual Printed: 23.01.2012 Document:D:\Perkelti\Documents\QL Time Manual\QL Time manual p2-v1.doc Page 48 of 107 The definitions we use throughout this document are: Salary Cost - the cost that you pay based on the monthly salary and the rules regarding overtime / shift pay and inconvenient pay. Work Cost - the extra cost that you must add to the salary cost to see your total cost for the worked hour, such as social fee or insurance cost. The rules user have created in the rule section will now be applied for this employee. Flex time rules determines rules for flex time and use of time bank. Clicking on one of the buttons named ‘View’ on the right of the definitions, pops up the rules that are selected and activated., see example below. For more detailed rules explanation please refer to the section ‘System Configuration’. Rules setup are normally done once or twice a year and done by the system administrator. In addition to create a work agreement a work schedule agreement should also be created. Clicking on ‘Work Schedule Agreement’ gives a form page equal to the example below: QL Time 7th. Draft User Manual Printed: 23.01.2012 Document:D:\Perkelti\Documents\QL Time Manual\QL Time manual p2-v1.doc Page 49 of 107 One of the fundamental ideas within QL Time is that each employee should have a work schedule even if it is not absolutely necessary and this is also regulated by law in many countries. A Work Agreement is a collection of different rules and it, basically, describes how the worked hours (and the plan) should be calculated. In the example below the employee should work: ‘Monday’ ‘Tuesday’, Thursday’, ‘Friday’ and ‘Saturday’ together 38.30 hours. Since this is more than allowed for the rules used a warning message pops up to guide the user on illegal contracts. In the case below that work hours on Monday exceed 9 hours and that the week is more than 37.5 hour. Since this is a continuous contract it is basically forbidden by law to plan with overtime. If we need to plan overtime for a week this should be done in the ‘plan’ section instead. QL Time 7th. Draft User Manual Printed: 23.01.2012 Document:D:\Perkelti\Documents\QL Time Manual\QL Time manual p2-v1.doc Page 50 of 107 Please notice that it is only registered a one week schedule and that the hours will be counted on ‘Department 1’. We strongly recommend that the number of cycles is reduced as much as possible and if you use a large number of cycles make sure that it is necessary from the business point of view. Increasing number of work cycles makes it a little bit harder for users to understand calculations based on average of several weeks. If you add a second week then you automatically get a two week cycle. If the employee is supposed to work in different departments then create a schedule for each department. QL Time 7th. Draft User Manual Printed: 23.01.2012 Document:D:\Perkelti\Documents\QL Time Manual\QL Time manual p2-v1.doc Page 51 of 107 5. What is normal time? If ordinary work time includes overtime and inconvenient time Example: Work time 10-21 with half hour break Worked time = 10.00-14.00 and 14.30 to 21.00 = 10.30 hours 1 and a half hour will be overtime. Export possibilities: Ordinary time 10.30 + Overtime 1.50 (in salary system 50% of hourly pay) Or Ordinary time 9.00 + Overtime 1.50 (in salary system 150% of hourly pay) Comment [MR40]: Should be moved to PART TREE 6. Absence Registrations QL Time 7th. Draft User Manual Printed: 23.01.2012 Document:D:\Perkelti\Documents\QL Time Manual\QL Time manual p2-v1.doc Page 52 of 107 Comment [UT41]: Hilde is responsible for testing out and outline this chapter All ‘Issue’ should be substituted and structured according to the document rules If you at this stage want to know more about absence registration click here. For example: In our example we have got the information that ‘Brigitta’ caught a cold and she will be on sick leave from Tuesday to Friday (to start with). Working in the plan window, we Right click with mouse on valid field -in our case it is Tuesday (the start of the absence) and we get the context menu, where we select “Absence” and then “Add. We get a view displaying all the absence codes we can select from and then register details for the absence. QL Time 7th. Draft User Manual Printed: 23.01.2012 Document:D:\Perkelti\Documents\QL Time Manual\QL Time manual p2-v1.doc Page 53 of 107 By default the absence is open, because normally we do not know the length of the absence. But we must set the ‘First day’ and the assumed (if possible) ‘Last day’. Absence may also be registered for only a part of the day if we check the mark ‘Part of the day’. We also point out that it is useful to add a comment. Just remember that the comment will be displayed as tooltip in Work Plan and the Registration Schedule in the edit field and user should therefore be careful with confidential comments. When the data is entered correctly, press the ‘OK’ to save the information. Since this is a sick leave, the plan will show a red cross, and if we hover over one of the fields with a cross we will get details of registered information. QL Time 7th. Draft User Manual Printed: 23.01.2012 Document:D:\Perkelti\Documents\QL Time Manual\QL Time manual p2-v1.doc Page 54 of 107 Remember, that we defined the rule how we pay for illness. If we press the plus sign on the left of the employee name, we will see the detailed information of how it is calculated. We can add absence from the Registration window exactly the same as we did it from the Plan window. Here we have 2 possibilities after right click on selected field 25th of May. From context menu we can choose: Absence like we did it before, or select ‘Edit’ and open a new detailed window. Here we have the Absence part and we can add new or modify existing absence from here too: QL Time 7th. Draft User Manual Printed: 23.01.2012 Document:D:\Perkelti\Documents\QL Time Manual\QL Time manual p2-v1.doc Page 55 of 107 This way is the quite handy when we want to combine absence (for example: employee’s visit to dentist) with registrations. The 3rd and the most important way adding absence is from the Employee card. Open the employee card by double clicking on the employee name. Then select ‘Absences’ from the menu on the left side: QL Time 7th. Draft User Manual Printed: 23.01.2012 Document:D:\Perkelti\Documents\QL Time Manual\QL Time manual p2-v1.doc Page 56 of 107 Pressing the ‘New’ button gives a view displaying all the absence codes user can select from. To each absence user should add a comment or a reference to i.e. the papers from the doctor. Comment [UT42]: Paulius we should prevent the user from overwriting earlier registrations. It has happened several times with me. When data is correct press button ‘OK’ in order to save the information. This way is very handy adding absences for longer period: for example planning vacations’ periods for next year. In this window we Comment [UT43]: Track information of who is creating note or changing/creating the record. QL Time 7th. Draft User Manual Printed: 23.01.2012 Document:D:\Perkelti\Documents\QL Time Manual\QL Time manual p2-v1.doc Page 57 of 107 get a list of all registered absences from the work place for selected employee. The view that shows all absence gives user a handy and quick overview of the employee’s absence history. Absence data can also be printed for statistical purposes. We can also add several absences on the same day, as long as they don’t overlap. It is also possible to use a separate registration module aimed for web to register absence. Eventually, the user must decide which way to add absence is the most suitable. Below are some examples showing how the calculation will be displayed and how cost is calculated. The rule used is: 100,50(>2),0(>4) as you can see from the list. The result for Wednesday and Thursday is recorded on its own line with ‘Fravær 100%’ and then ‘Friday’ with 50%. The rule also says that it should not be paid anything from day 5 so let’s take a look at next week. Comment [UT44]: Rules regarding working days and absence should be checked for all countries. As you see, on Monday it will be calculated ‘Absence 50%’ according to the rule. NB! Absence is always related to calendar days (not working days), so in the case above both Saturday and Sunday should be counted when it is absence (sick leave). When we count vacation days it is the calendar period that is used (but it is not relevant since we manually set the date). QL Time 7th. Draft User Manual Printed: 23.01.2012 Document:D:\Perkelti\Documents\QL Time Manual\QL Time manual p2-v1.doc Page 58 of 107 Comment [UT45]: Check this functionality. I guess we still have the wrong approach and what if it differs from one country to another. Comment [UT46]: This must be checked again with Robert If we change the absence date to Tuesday the result will be: An extra line is added and informing us that there is not calculated any cost for Tuesday due to the rule settings. User can turn off the parameter that allows seeing rows that do not trigger cost. User should select TOOLS form the top menu, then OPTIONS and chose TIME CALCULATION. User should uncheck the second parameter ‘Show unpaid absence in plan salary’ and click ‘OK’ Examples below show when: a) “Show unpaid absence in plan salary” is checked: QL Time 7th. Draft User Manual Printed: 23.01.2012 Document:D:\Perkelti\Documents\QL Time Manual\QL Time manual p2-v1.doc Page 59 of 107 b) “Show unpaid absence in plan salary” is unchecked: 6.1. Several absences at the same day Comment [MR47]: I think this part is not needed, because we wrote above: “We can also add several absences on the same day, as long as they don’t overlap” Comment [UT48]: This strike true solution must be explained instead of the illustration we use QL Time allows several absences at the same day and we will show you how it will be treated in some situations. QL Time 7th. Draft User Manual Printed: 23.01.2012 Document:D:\Perkelti\Documents\QL Time Manual\QL Time manual p2-v1.doc Page 60 of 107 In the example above a vacation is recorded from Tuesday and to Thursday at 12 o’clock. Unfortunately the employee got sick after the vacation started and could not return to his position on Thursday. As you see a sun illustrates a holiday, a red cross illustrates sickness and the flag is used if there is a mix of information. If you hover over the field with the mouse detailed information pops up. Comment [UT49]: This situation must be reconsidered. The example is not clear enough The result is more interesting and shows that the first and second day of absence is paid 100%, the third day (Monday) 50% and the fourth day nothing. -----test The illustration below shows the form used for registering absence. Select the right absence type in the list box (grid) and then make sure that the time span is set according to the length of the sick leave using the calendar drop down list boxes. Registering absence the whole day (default) will result in an absence equal to the underlying work agreement. In the plan section you will see an icon for absence that match the absence type and the time from the underlying work agreement schedule. Note! If you do not set the end date of an absence it will last for ever. A comment may also be added but remember that the comment will be visible in the plan and registration section so it is important to keep a strict line regarding comments. QL Time 7th. Draft User Manual Printed: 23.01.2012 Document:D:\Perkelti\Documents\QL Time Manual\QL Time manual p2-v1.doc Page 61 of 107 If this is a 100% sick leave or a 100% absence for other reason this is all that is needed. It is important to keep in mind that absence is equal to absence from the ordinary work space and therefore may be equal to ordinary work. In other word it is also possible to add hours using absence codes. By checking the box ‘Part of the day’ and then click on ‘Rest of day’ gives a different kind of calculation. Time specified in plan is now recognized as the time that should be worked and the cell is showed with a special fill. The difference between time in plan and the time in the underlying work agreements is considered as absence time. Using this functionality allows the user to enter the expected work time for people with part time absence and then in the plan get the accumulated absence percentage from the time the absence started to the end of the plan or registration period. This information is displayed in the tool tip box as you see in the example below The first line in the tool tip box reads Absence 75% (Total:66,67%) and the information actually tells that Tuesday the employee will work only two hours (from 1400-1600) while the agreement is 8 hours (8001600) and the absence percentage of the day is 100% * 2 hours / 8 hours = 75%. The Total 66.67% is for the whole absence period which is Monday, Tuesday and Wednesday. The second line in the toolbox reading Ilness (50%) – Rest of day: 15.03.2010-17.03.2010) is information of what kind of absence that is registered and that the accumulated absence percentage should be close to 50%. QL Time 7th. Draft User Manual Printed: 23.01.2012 Document:D:\Perkelti\Documents\QL Time Manual\QL Time manual p2-v1.doc Page 62 of 107 Absence may occur in several ways and we will look into some basic scenarios Absence the whole day Absence part of the day o Specified time o The rest of the time The examples below show some basic principles for how the calculation will be performed when only discrepancies will be exported. Absence the whole day If absence is registered for a whole day the absence will be registered according to the plan. A break will also be placed hence to the way the break is scheduled. As default the plan equals the underlying work agreement. Example 1: a) b) Plan and registration section: Work agreement 8-16:030 Plan 8-17:030 Absence 8-17:030 8-16:030 8-15:030 8-15:030 Export (export differences): Ordinary hours - 7.5 Absence +8.5 - 7.5 +6.5 Absence part of the day (rest of day) Absence defined as a whole day with registrations part of day. The rule is: Plan minus registrations equals absence. QL Time 7th. Draft User Manual Printed: 23.01.2012 Document:D:\Perkelti\Documents\QL Time Manual\QL Time manual p2-v1.doc Page 63 of 107 Example 2: Work agreement Plan/registration a) 8-16:030 8-12 b) 8-16:030 7-12 Ordinary hours Absence 8-12 12-16.30:030 7-12 12-16:030 Export (export differences): Ordinary hours Absence - 3.5 +3.5 - 2.5 - 3.5 Absence part of the day (specified time) Example 3: Work agreement Plan/registration Absence a) 8-16:030 8-16:030 8-13 b) 8-16:030 8-17:030 8-13 Export (export differences): Ordinary hours Absence - 4.5 +4.5 - 3.5 + 4.5 General rule: If it is punching or registrations on a day this will be treated as worked time even with absence set to full time. It does not matter if absence is registered first followed by registration of clocking or the other way around that registration is done first followed by a registration of absence. Sick leave for part of the day or part of the week. A 50% sick leave may be accomplished by selecting absence part of day and then click on the button ‘Rest of the day’. This will force QL Time to check absence against the underlying work schedule agreement. Then the plan section can be changed to the agreed work hours for the sick leave period. As mentioned above a percentage will guide you regarding the total accumulated sick leave. Active sick leave In some countries, for example Norway a sick leave where the employee comes and go as he please and where the government pays for the whole absence is possible. This gives a challenge regarding how to calculate payment for what is worked and also to be able to plan hours. There is no straight forward solution and the best solution seems to regulate salary to zero in the period and then use the solution for sick leave part of the day. QL Time 7th. Draft User Manual Printed: 23.01.2012 Document:D:\Perkelti\Documents\QL Time Manual\QL Time manual p2-v1.doc Page 64 of 107 Flextime can basically be used in different ways. One possible solution is that the employee can move the start of the normal day and then arrive earlier or later than the normal start of the day. Still the worked hours should be equal to the agreed hours of the day. The other solution is that the employee can enhance the day with a certain amount of hours and use the same hours another day to shorten the work day. The idea is to give the employee more influence on their own work situation and add flexibility. The ‘most’ normal way to handle the situation is to set up a core time where everybody should be present. SystemX offers the possibility to set the core time to fixed hour of the day or set it relative to the employees contract. Each employee must be bind to the flex time rule and the rule is defined true the setup. Selecting ‘Setup’ and then ‘Flex time rule’ gives access to the form for defining flextime and time bank. QL Time 7th. Draft User Manual Printed: 23.01.2012 Document:D:\Perkelti\Documents\QL Time Manual\QL Time manual p2-v1.doc Page 65 of 107 7. Flextime Registrations Note! It is also important to be aware of that enhancing the work hours or decrease work hours may give some special problems regarding absence. This section discuss different kind of setup regarding use of flextime and how the calculations are carried out. It is several issues that decide how flextime will be handled and stored in time bank. One of the most important parameters to be aware of is the parameter that tells if the extra cost for overtime should be paid immediately or not. This is defined in the window above by setting the parameter to ‘Pay out’ In this section we will take a look at how this influence on the calculation. The other important parameter is the one set in the option menu and that defines if all worked hours (included the time for overtime will be displayed as ordinary hours) or if the time for overtime is removed from ordinary time. QL Time 7th. Draft User Manual Printed: 23.01.2012 Document:D:\Perkelti\Documents\QL Time Manual\QL Time manual p2-v1.doc Page 66 of 107 In the section ‘Detailed examples’ different kind of setups and how they are supposed to work is explained. If we check the box ‘Normal time is full work time’ then we get the result displayed as you see in the example below. If the check box ‘Normal time is full work time’ is unchecked then we get the result displayed as you see in the example below. QL Time 7th. Draft User Manual Printed: 23.01.2012 Document:D:\Perkelti\Documents\QL Time Manual\QL Time manual p2-v1.doc Page 67 of 107 As you see from the example above the normal work time is reduced to 9 hours instead of 9 hours and 6 minutes and the amount cost reduced to NOK 900. The overtime is still 6 minutes but the pay for overtime is increased to NOK 15 instead of NOK 5. What you see is an exact cost calculation showing the total calculated salary for this work. Since we use the flextime solution and a time bank this is not equal to what we pay the employee. In fact we still pay only the ordinary agreed work time which is 7.5 hours plus the extra pay for overtime which is the hourly pay for 6 minutes multiplied with the overtime rule which is 50% of full time. The only thing that will be reported to the salary system is in fact the NOK 5 that is the extra pay for overtime. This is the basic rule for handling flextime and according to how rules should be implied in Norway. From the examples above you see that both calculations calculates the salary cost for the company to NOK 915 and that 1 hour and 36 minutes will be stored in the time bank. QL Time 7th. Draft User Manual Printed: 23.01.2012 Document:D:\Perkelti\Documents\QL Time Manual\QL Time manual p2-v1.doc Page 68 of 107 Changing the rule for handling overtime to: ‘Add overtime to time bank’ Rule ‘Add OT to time bank’ and ‘Normal time include over time hours’ The time bank is now changed from 1:36 minutes to 1:39. The reason is that the overtime period 6 minutes is increased with 50% which equals 3 minutes and this is added to the time bank instead of paid as a salary. Paulius: Still the result should be NOK 915. The overtime line should yield NOK 5 Rule ‘Add OT to timebank’ and ‘Normal time do not include over time hours’ QL Time 7th. Draft User Manual Printed: 23.01.2012 Document:D:\Perkelti\Documents\QL Time Manual\QL Time manual p2-v1.doc Page 69 of 107 Paulius: Still the result should be NOK 915. The overtime line should yield NOK 15 QL Time 7th. Draft User Manual Printed: 23.01.2012 Document:D:\Perkelti\Documents\QL Time Manual\QL Time manual p2-v1.doc Page 70 of 107 Ordinary time includes all work time The calculation is correct 2:39 goes to time bank and salary cost 965,- Ordinary time do not include inconvenient time or overtime. QL Time 7th. Draft User Manual Printed: 23.01.2012 Document:D:\Perkelti\Documents\QL Time Manual\QL Time manual p2-v1.doc Page 71 of 107 The calculation is correct 2:39 goes to time bank and salary cost 965,- QL Time 7th. Draft User Manual Printed: 23.01.2012 Document:D:\Perkelti\Documents\QL Time Manual\QL Time manual p2-v1.doc Page 72 of 107 Rule ‘Add OT to time bank’ and ‘Normal time include over time hours’ Rule ‘Add OT to timebank’ and ‘Normal time do not include over time hours’ QL Time 7th. Draft User Manual Printed: 23.01.2012 Document:D:\Perkelti\Documents\QL Time Manual\QL Time manual p2-v1.doc Page 73 of 107 What happens in the export module? The first two examples below is correct calculated except for time bank hours It is basically two possibilities to correct this: Reduce normal hours with the amount for time bank Export the amount placed in time bank as a separate account o May be preferred solution because this account can still be merged with ordinary hours in the export if necessary Setup: Normal time is full worked time and overtime is set to default: Pay out. In addition what is exported is defined in the ‘Setting parameter for the ‘Salary period agreement. Anders Andersen is defined with hourly pay and that the export should be ‘Full time’ which means that all time is exported. Pay out overtime and inconvenient time is set to true. In this case only time that exceeds the agreed time 9:06 minus 7:30 should be exported. This scenario cant be used in POK since hourly paid do not have an agreement. In the example below ordinary hours should have been reduced with 1:36 minutes since they are already stored in the time bank. QL Time 7th. Draft User Manual Printed: 23.01.2012 Document:D:\Perkelti\Documents\QL Time Manual\QL Time manual p2-v1.doc Page 74 of 107 1:36 is added to time bank. Paulius can we add that information regarding time bank? Exporting only differences between worked and work agreement schedule Exporting only differences between work agreement and worked time. Since 1:36 is going to time bank and the only thing we should pay out is the 6 minutes over time the result should be over time 0:06 with a cost of NOK 5,- QL Time 7th. Draft User Manual Printed: 23.01.2012 Document:D:\Perkelti\Documents\QL Time Manual\QL Time manual p2-v1.doc Page 75 of 107 The calculation above is correct. The third scenario is exporting nothing which means only manual payment types and absence codes. This should be tested separately Normal time includes over time and inconvenient time. QL Time 7th. Draft User Manual Printed: 23.01.2012 Document:D:\Perkelti\Documents\QL Time Manual\QL Time manual p2-v1.doc Page 76 of 107 Nothing is exported. Changing the rule to export differences 7.1.1.1. More about Time Bank Automatic use of time bank is default in QL Time. In the example below the employee is only bound to ‘Def Norwegian rule’ regarding IC and OT. The standard work agreement says: Monday to Friday from 8.00 to 16.00 with 30 minutes break. QL Time 7th. Draft User Manual Printed: 23.01.2012 Document:D:\Perkelti\Documents\QL Time Manual\QL Time manual p2-v1.doc Page 77 of 107 Comment [MR50]: Should be moved to PART TREE The example below shows the calculations in the registration window. One hour and 26 minutes are added to the time bank. The reason is that nothing have to be defined, because time bank is the default value. Since the break is missing, the total number of worked hours is 8 hours and 56 minutes. And more important that the cost in the example is NOK 100 per hour multiplied by 8 hours and 56 minutes. The cost reported to the salary system will of course only be 750 for 7.30 minutes that is the plan. If the default time bank functionality (to calculate TB or pay out for TB) is not preferred to use, then time bank rule defining that no discrepancies towards plan is allowed should be added. QL Time 7th. Draft User Manual Printed: 23.01.2012 Document:D:\Perkelti\Documents\QL Time Manual\QL Time manual p2-v1.doc Page 78 of 107 Adding rule to the employee card will apply this rule to selected employee. . QL Time 7th. Draft User Manual Printed: 23.01.2012 Document:D:\Perkelti\Documents\QL Time Manual\QL Time manual p2-v1.doc Page 79 of 107 Example above shows that there are 56 minutes outside the flex bank definition. In this case 30 minutes are automatically added to time bank and the rest of the time is removed. 7.1.1.2. Flex time handling Comment [u51]: This section is revised by Monika but not changed Comment [MR52]: Should be moved to PART TREE Flextime can basically be used in different ways. One possible solution is that the employee can move the start of the normal day and then arrive earlier or later than the normal start of the day. Still the worked hours should be equal to the agreed hours of the day. The other solution is that the employee can enhance the day with a certain amount of hours and use the same hours another day to shorten the work day. The idea is to give the employee more influence on their own work situation and add flexibility. The ‘most’ normal way to handle the situation is to set up a core time where everybody should be present. QL Time offers the possibility to set the core time to fixed hour of the day or set it relative to the employee’s contract. Each employee must be bind to the flex time rule and the rule is defined through the ‘Setup’ menu. Selecting ‘Setup’ and then ‘Flex time rule’ gives access to the form for defining flextime and time bank. Note! It is also important to be aware of that enhancing the work hours or decrease work hours may give some special problems regarding absence. QL Time 7th. Draft User Manual Printed: 23.01.2012 Document:D:\Perkelti\Documents\QL Time Manual\QL Time manual p2-v1.doc Page 80 of 107 The problem related to this topic is discussed in ‘Appendix C’ It is several issues that decide how flextime will be handled and stored in time bank. One of the most important parameters to be aware of is the parameter that tells if the extra cost for overtime should be paid immediately or not. This is defined in the window above by setting the parameter to ‘Pay out’ In this section we will take a look at how this influence on the calculation. The other important parameter is the one set in the option menu and that defines if all worked hours (included the time for overtime will be displayed as ordinary hours) or if the time for overtime is removed from ordinary time. If we check the box ‘Normal time is full work time’ then we get the result displayed as you see in the example below. QL Time 7th. Draft User Manual Printed: 23.01.2012 Document:D:\Perkelti\Documents\QL Time Manual\QL Time manual p2-v1.doc Page 81 of 107 If the check box ‘Normal time is full work time’ is unchecked then we get the result displayed as you see in the example below. In the section ‘Detailed examples’ several different kind of setups and how they are supposed to work is explained. QL Time 7th. Draft User Manual Printed: 23.01.2012 Document:D:\Perkelti\Documents\QL Time Manual\QL Time manual p2-v1.doc Page 82 of 107 8. Several weeks work cycles In this section we take a closer look at how the system calculates a work cycle that is more than one week. To create a work cycle that is more than one week must be done in the employee card. In the example above the first week is only 33 hours and the second week the cycle is 42 hours. It is 75 hours in total and there for no overtime because we on the week rule definition checked the box ‘Average’. When we move-on to the work plan for the first week, the basic work agreement is used as the plan and we can't modify the plan to fit the week's expected activities. We want to enhance the work plan on Monday with one hour from 8 to 7. QL Time 7th. Draft User Manual Printed: 23.01.2012 Document:D:\Perkelti\Documents\QL Time Manual\QL Time manual p2-v1.doc Page 83 of 107 As you see from the salary calculation, the result is one hour overtime from 7 o'clock to 8 o'clock in the morning. The reason is that we pass 75 hours during the two weeks period. Since we are placing extra hour on Monday morning compared to the work agreement, the overtime will also be paid for this hour. In our example the employee works from 8.00 to 16.00 and with a 30 minutes break. This gives 37.5 hour per week and no overtime. Changing the plan on Monday adds 50% overtime for 1 hour on Monday. The reason is that we during the week exceed the 37.5 hour rule for the week. Changing the day with one extra hour to Tuesday and adding the hour from 7.00 to 8.00 gives 50% overtime on Tuesday. QL Time 7th. Draft User Manual Printed: 23.01.2012 Document:D:\Perkelti\Documents\QL Time Manual\QL Time manual p2-v1.doc Page 84 of 107 In the next example we have changed both Monday and Tuesday. Removing one hour on Monday and adding one hour on Tuesday. The result is no overtime since we do not exceed 37.5 hour. Our last example shows what will happen if we add one hour on Tuesday, one on Wednesday and remove one on Thursday. As you see there is a split between Tuesday and Wednesday where both get a half hour. . The result will be displayed in the plan as seen below. Comment [UT53]: NB! Paulius the example above should show one hour on Friday since it will be the day we exceed the 37.5 hour rule. See the explanation below QL Time 7th. Draft User Manual Printed: 23.01.2012 Document:D:\Perkelti\Documents\QL Time Manual\QL Time manual p2-v1.doc Page 85 of 107 9. How to enter time strings To work with QL Time is quite easy since you can enter time strings directly into the cells. The format for adding a time string is ‘date from’ and ‘date to’ with a minus sign in the middle, for example: ’10-19’ gives a working plan from 10 o’clock a.m. to 7 o’clock p.m. The string ‘1000-1900’ is equal to ’10-19’ where the two last digits represents the minutes. You could also add ‘10-1930’ if the period should be half minute past seven p.m. To add a break for example 30 minutes you add a hyphen in addition to the time string and the length of the break, for example ’10-19:30’ will calculate a 30 minutes break in the middle of the day. If you want to add a specific time for the break you can write ’10-19:(13-1330)’ instead and the break is automatically calculated from one o’clock p.m. to half our past one p.m. To add two work sequences instead of one you can write ’10-14,17-23’ witch gives two separate sessions. To add two break to a session you can add comma after the first break and then add the second break for example like this: 10-19:(13-1330,17-1710) and the displayed string will be 10-19:040(13-1330,17-1710). Note that QL Time automatically calculates the total length of the breaks. The last issue to cover is the format for entering breaks, which is ‘hhmm’ where ‘h’ equals hours and ‘m’ minutes. This means that entering a break of one and a half hour should be entered as ‘130’ where ‘1’ equals one hour and ’30’ represents minutes. This is in fact all rules regarding how to enter time strings and you use it in the work agreement schedule, plan and registration forms. In some situations, for example in plan and registration the field will be colored brown if you enter the data directly into the cell. This is to emphasize that you have done a change to underlying work agreement schedule (in the ‘Plan’ section) or overwrite automatic data collection or clocking (in the ‘Registration’ section). If the field is displayed in red color this signals that the value entered in the field do not match the string rules and must be corrected. QL Time 7th. Draft User Manual Printed: 23.01.2012 Document:D:\Perkelti\Documents\QL Time Manual\QL Time manual p2-v1.doc Page 86 of 107 PART FOUR – REPORT EXAMPLES QL Time 7th. Draft User Manual Printed: 23.01.2012 Document:D:\Perkelti\Documents\QL Time Manual\QL Time manual p2-v1.doc Page 87 of 107 10. Reports There are some basic reports that you can print from QL Time several forms of registration. In this section we will tell you about the most common reports Plan o Week Plan o Work Report o Weekly Report o Absence sum report Registration o Registrations o Cost o Work Report o Weekly Report o Absence sum report When data is exported (locked), after each salary period, the data is stored in a statistical database that can be accessed through special user customized systems. In the section that follows you will find examples of the different types of reports that may be printed out. Some of the reports can be tailored to suit each department or employees special needs. If ‘Parameter’ is selected from the print menu a form with selectable parameters will be displayed. Notice that a special logo may be inserted for the reports. The reports are entirely built on the .net report object. QL Time 7th. Draft User Manual Printed: 23.01.2012 Document:D:\Perkelti\Documents\QL Time Manual\QL Time manual p2-v1.doc Page 88 of 107 QL Time 7th. Draft User Manual Printed: 23.01.2012 Document:D:\Perkelti\Documents\QL Time Manual\QL Time manual p2-v1.doc Page 89 of 107 10.1. Week Plan The week plan is meant to be distributed and shows how each department is planned staffed for the selected period. QL Time 7th. Draft User Manual Printed: 23.01.2012 Document:D:\Perkelti\Documents\QL Time Manual\QL Time manual p2-v1.doc Page 90 of 107 10.2. Weekly Report The week report also shows information about how the departments are staffed but gives additional information regarding cost and budgets. QL Time 7th. Draft User Manual Printed: 23.01.2012 Document:D:\Perkelti\Documents\QL Time Manual\QL Time manual p2-v1.doc Page 91 of 107 10.3. Work Report The work report summarize and gives you a kind of a grand view for how many hours will be worked and how planned / registered absence are planned. This report can be printed out from the plan section based on the plan or from the registration section based on registrations. The report can also be configured to show only specific absence codes. QL Time 7th. Draft User Manual Printed: 23.01.2012 Document:D:\Perkelti\Documents\QL Time Manual\QL Time manual p2-v1.doc Page 92 of 107 10.4. Registration report Example below shows a work schedule for one department and two weeks. NB! It is optional if work cost should be printed or not. QL Time 7th. Draft User Manual Printed: 23.01.2012 Document:D:\Perkelti\Documents\QL Time Manual\QL Time manual p2-v1.doc Page 93 of 107 10.5. Work Cost Report QL Time 7th. Draft User Manual Printed: 23.01.2012 Document:D:\Perkelti\Documents\QL Time Manual\QL Time manual p2-v1.doc Page 94 of 107 10.6. Statistical report When the period is finished the data will be stored in a statistical database for later use. Clicking on ‘Statistic’ on the main menu opens the form that allows to do selection from the database. QL Time 7th. Draft User Manual Printed: 23.01.2012 Document:D:\Perkelti\Documents\QL Time Manual\QL Time manual p2-v1.doc Page 95 of 107 PART FIVE – APPENDIXES QL Time 7th. Draft User Manual Printed: 23.01.2012 Document:D:\Perkelti\Documents\QL Time Manual\QL Time manual p2-v1.doc Page 96 of 107 Appendix A – Technical reference Comment [u54]: Not implemented yet Appendix B – When to calculate a break When to calculate a break. It is a couple of questions that must be handled: How many breaks and when to place the break Do we place the break based on plan or actual punched data Less than 5 hours = no break More than 9 two breaks (60 minutes) Else 30 minutes What happens if plan 8-16:030 but you start at 11 and work to the end of the day. Define the default breaks Per department and for the application it must be possible to plan breaks in an accurate way. The following table may solve the problem: Department Include sub departments Start or Plan One After x Break 1 Break hours After x hours Break 2 UAB Basic Partner True / False Start No 4:30 0:30 6:30 0:20 Plan Yes 5:00 0:30 9:00 0:30 QL Time 7th. Draft User Manual Printed: 23.01.2012 Document:D:\Perkelti\Documents\QL Time Manual\QL Time manual p2-v1.doc Page 97 of 107 Comment [u55]: Not implemented Appendix C – Flextime and absence When flextime is used some special situations will occur: Example: Normal time (planned time) 8-16 What will be the results of the situation below: Employee 1 Works from 7-12 (sick from 12) Employee 2 Works from 9-12 (sick from 12) Both will get paid the rest of day, but what should be consider to be the rest of the day? Since it is flex time the system must assume that the working time in hours equals planned time. For Employee number 1 – One hour should be added to the time bank For Employee number 2 – One hour should be drawn from the time bank This practice handles both employees equal to each other and seems to be a fair principle and a common solution in other systems as well. Employee number 2 may argue that he get sick during a day and should be entitled to a whole day pay (that the system should not draw one hour from time bank). If this is the basic the two employees will not be treated equal and everybody that gets sick will benefit from starting late. It may be important that both solutions can be handled but it must be done as a manual solution. Appendix D – Absence part of day followed by absence QL Time 7th. Draft User Manual Printed: 23.01.2012 Document:D:\Perkelti\Documents\QL Time Manual\QL Time manual p2-v1.doc Page 98 of 107 In the situation above an absences is registered from 12.00 on Tuesday until 19.00 Wednesday. QL Time automatically remove the time outside the agreement on Wednesday but pay for the time before the start of the absence code on Tuesday. The absence itself is not paid because the first day of the absence is paid with 0%. In this case QL Time pays fll salary for day 2. In a situation like this a normal way to do it is to pay for the day the employee get sick and goes home and then to not pay for the first day and then again to pay for the following days. To distinguish between sick part of the day followed by absence and sickness that start from the beginning of the day two different absence codes must be used. Appendix E – Currency table In the ‘Setup’ and ‘Other’ data choice you also find the tab ‘Currency’ The currency table is linked to the ‘country’ code for each employee. So if working in ‘Norway’ the currency should be ‘NOK’ You set up one default currency and all the other currencies you add must be related to the default currency. In addition to default currency each user may define which currency he or she wants to use when looking at plans or registrations. This currency translation will also be used for all reports QL Time 7th. Draft User Manual Printed: 23.01.2012 Document:D:\Perkelti\Documents\QL Time Manual\QL Time manual p2-v1.doc Page 99 of 107 Appendix F – Align list On the tool bar you will find a small icon to the right (flag) if the selection you have done contains employee working from different countries. To be able to see which time of the day they work together it is possible to click on the icon to see a ‘translated’ view showing the selected time zone. By default you get the same time zone as the language you have set up. Appendix G – Other data – countries Is country code and currency code the same Appendix H – Absence – is a work time In the absence registration form the checkbox ‘Is work time’ can be set for each absence code. The ‘Is work time’ flag has impact in several situations: If checked: The time for the absence is equal to ordinary work and counted as work time in the plan and registration section. The time is included in the week rule overtime calculation and in the day rule for overtime If not checked: The time is not calculated in the week rule and day rule The absence is still displayed in the plan and registration module If checked the flag also influence on what is displayed in the plan section If the absence is paid it will always be included in paid time If the type of absence is ‘Sick Leave’ then the time is not calculated in the ‘Worked hours’. QL Time 7th. Draft User Manual Printed: 23.01.2012 Document:D:\Perkelti\Documents\QL Time Manual\QL Time manual p2-v1.doc Page 100 of 107 Pok solution for showing absence in plan. Keep in mind that the plan must be displayed like this because work agreement schedule do not exist. The next session is discussed with Paulius the 23rd.. of March 2010 Is work time = related to day and week rule The field should be moved to last frame together with ‘pay over agreed time’ and may be change name to ‘Incorporate in day/week rule’ QL Time 7th. Draft User Manual Printed: 23.01.2012 Document:D:\Perkelti\Documents\QL Time Manual\QL Time manual p2-v1.doc Page 101 of 107 Then it is two other issues: What should be incorporated in planned/work cost and time. This is the original fields ‘Is work time’ and ‘Is work cost’. On top of that we have the last problem: Not display or how to display time on the row. I suggest that this is a separate parameter: ‘Show time in Plan’ According to Paulius this is tricky because we should show plan There may be other issues as well basically what to show in reports. Especially the Lithuanian report must be possible to filter so that for example the code for business trip is not included. My suggestion is that we make it possible to filter on the reports setup itself. That each report can be setup with absence codes checked or not checked. The last issue is that equal absence pay is listed in the same group in the plan and registration. This case it is two different types: Other and Illness but they are listed on the same line ‘Absence 100%’ The question is should it be possible to split in a different way. It also shows only one flag, the flag for ‘other’ QL Time 7th. Draft User Manual Printed: 23.01.2012 Document:D:\Perkelti\Documents\QL Time Manual\QL Time manual p2-v1.doc Page 102 of 107 Appendix I – Paid time and work time from wrong departments In the example above the time for Frank Fristad working in bakery is calculated in the total. QL Time 7th. Draft User Manual Printed: 23.01.2012 Document:D:\Perkelti\Documents\QL Time Manual\QL Time manual p2-v1.doc Page 103 of 107 Appendix J – Different types of department description used When the drop down list box for department is selected the department description is another type than the one used in department tree. It does not seem possible to change back to default department. Time estimated to 2400 in the evening. QL Time 7th. Draft User Manual Printed: 23.01.2012 Document:D:\Perkelti\Documents\QL Time Manual\QL Time manual p2-v1.doc Page 104 of 107 Appendix K – Error when adding department Possible to add overlapping hours but anyway error when saving Appendix L – FAQ Q: Can an employee work in several departments? Q: Can an employee belong to two departments? Q: What is CPWH? A: Cost per worked hour Q: What is ACPH? A: Average work cost per hour QL Time 7th. Draft User Manual Printed: 23.01.2012 Document:D:\Perkelti\Documents\QL Time Manual\QL Time manual p2-v1.doc Page 105 of 107 Q: What is difference between salary cost and work cost? A: Salary cost is the cost for what an employee work while work cost includes salary cost and additional cost for example social fee for the employee, insurance and so on Appendix M – Budget detail window You will of course see the total for the period as well. At the bottom of the page you will find a tab folder. Clicking on it and then click on the pin to make it display permanent at the bottom of the week plan. This component displays the selected day’s sales profile if the sale is imported. o The goal is to display as a C1 tab component the sale profile for each day. Built from sale per hour / half hour Built from number of employees Drag to increase/decrease time frame Show planned breaks o Displaying the week number in the budget screen o Possible to copy week for the rest of the year o Displaying holidays in the schedule o Exclude movable holidays in copy functionality (closed store - option) o Sum on totals o View with weeks (Week one, week two, week three….) o New table day profile Today built from different criteria such as articles and sale or it may be entered as minimum number of employees normal number of employees and maximum number of employees o In future the resources needed may come from other input variables as well Trucks delivered cubic meters Articles sold Number of customers o The result of the profile (min-nor-max) should be drawn on the c1.tab component at the bottom of the schedule and compared with the plan Should breaks be drawn at the same time (I think if planned – yes) Must be an option If the plan is below minimum (with calculated breaks) then an warning should be issued (symbol – blinking – status bar text) One solution is to build a day table based on fixed intervals Monday o 8.00 - 8.15 Min = 1 Normal = 2 Max = 3 QL Time 7th. Draft User Manual Printed: 23.01.2012 Document:D:\Perkelti\Documents\QL Time Manual\QL Time manual p2-v1.doc Page 106 of 107 Comment [UT56]: Pauilius The rest of this chapter is the basics of the functionality I want regarding day profile o 8.15 - 8.30 Min = 1 Normal = 2 Max = 3 o 8.30 – 8.45 Min = 2 Normal = 2 Max = 3 Note! Tuesday Clickin Wednesday Solution two is more flexible g on Monday ‘Select o 8.00 - 8.30 Min = 1 Normal = 2 Max = 3 absence o 8.30 – 10.00 Min = 2 Normal = 2 Max = 3 o 10.00 – 14.00 Min = 2 Normal = 3 Max = 4 reason’ Anyway it must be possible to build different profiles in addition to a traditional day profile, for example for links special days or for special events. directlyIt could be a flyer that comes every third week and always on Wednesday. This gives a special boost and some special needs this week on Wednesday afternoon and the rest of the week to absence codes Appendix N – what happened if vacation and holiday Vacation = not paid Holiday = paid Ulf Check this scenario QL Time 7th. Draft User Manual Printed: 23.01.2012 Document:D:\Perkelti\Documents\QL Time Manual\QL Time manual p2-v1.doc Page 107 of 107