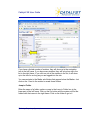
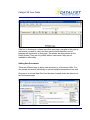
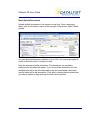
1
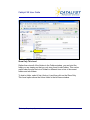
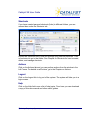
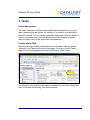
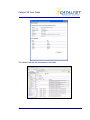
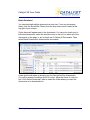
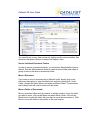
Catalyst XE
User Guide
Catalyst Repository Systems, Inc.
www.catalystsecure.com |877.557.4273 | [email protected]
Catalyst XE User Guide
Contents
What is Catalyst? ............................................................................................................ 1
What You Need to Run It.......................................................................................... 2
About the Free Acrobat Reader ............................................................................... 2
This Manual .............................................................................................................. 3
1. The Home Page .................................................................................................................4
The Starting Place........................................................................................................... 4
2 The Left Frame ....................................................................................................................7
Folders, Shortcuts and Actions ................................................................................ 7
Folders Window .............................................................................................................. 7
Jump to Folder.......................................................................................................... 9
Show Only This Level............................................................................................. 10
Shortcuts ....................................................................................................................... 12
Actions .......................................................................................................................... 12
Logout ........................................................................................................................... 12
Help............................................................................................................................... 12
3. Tasks ................................................................................................................................13
Project Management .............................................................................................. 13
Create a New Task ....................................................................................................... 13
Describing the Task................................................................................................ 14
Assigning a Task to a Folder .................................................................................. 14
Task Lead and Working Team ............................................................................... 15
Other Fields ............................................................................................................ 16
Task Reminders ..................................................................................................... 16
Email Tasks ............................................................................................................ 16
Save and Close ...................................................................................................... 17
Viewing or Editing Task Details .................................................................................... 17
Marking a Task Complete ............................................................................................. 17
Changing Tasks Viewing Options ................................................................................. 19
Using the Full Screen Tasks View ................................................................................ 20
© Catalyst Repository Systems, Inc.
i
Catalyst XE User Guide
Edit Folder..................................................................................................................... 20
Export............................................................................................................................ 21
4. Calendar ...........................................................................................................................23
Calendaring or Docketing ....................................................................................... 23
Creating a New Calendar Item...................................................................................... 23
Editing Calendar Items.................................................................................................. 24
Sending an Email about an Event................................................................................. 24
Sending a Reminder to a Lead User or Working Team................................................ 25
Adding a Calendar Item to your local Calendar ............................................................ 26
Changing Calendar Options.......................................................................................... 26
Using the Full Frame Calendar View ............................................................................ 27
5. Contacts............................................................................................................................30
Team Information ................................................................................................... 30
Adding a New Contact .................................................................................................. 30
Adding Comments to a Contact .................................................................................... 32
Adding a Contact to Local Email Contacts ................................................................... 32
6. News.................................................................................................................................33
Communicating Information.................................................................................... 33
Options.......................................................................................................................... 33
Adding a News Item ...................................................................................................... 34
Editing News Items ....................................................................................................... 34
Viewing News Items in Full Frame................................................................................ 34
7. Document Folders ............................................................................................................36
Documents and Recent Documents....................................................................... 36
Document Folders......................................................................................................... 36
Viewing Documents................................................................................................ 38
Adding New Documents ......................................................................................... 39
OCR A Document................................................................................................... 40
Upload a new Version of a Document.................................................................... 41
Batch Upload Documents....................................................................................... 43
Batch Download ..................................................................................................... 46
Order Documents in a Folder ................................................................................. 47
Secure Individual Document Folders ..................................................................... 49
© Catalyst Repository Systems, Inc.
ii
Catalyst XE User Guide
Move a Document .................................................................................................. 49
Move a Folder of Documents ................................................................................. 49
Copy or Move Multiple Documents ........................................................................ 50
Send an Email Notification ..................................................................................... 52
Email Document to a Folder ................................................................................... 54
Lower Tier Documents.................................................................................................. 55
Adding New Folders ............................................................................................... 56
Editing or Deleting Folders ..................................................................................... 57
Recent Documents........................................................................................................ 57
Recent Documents Folder...................................................................................... 57
My Uploads............................................................................................................. 58
Add Shortcut........................................................................................................... 58
Export ..................................................................................................................... 58
8. Forums..............................................................................................................................59
Threaded Discussions ............................................................................................ 59
Adding a New Topic ...................................................................................................... 59
Responding to a Topic .................................................................................................. 60
Subscribe to Topic Updates.......................................................................................... 62
Archiving Forum Postings ............................................................................................. 62
9. Links & Redirect Folders ..................................................................................................63
Connecting Outside Resources.............................................................................. 63
Links.............................................................................................................................. 63
Redirect Folders (Redirect Links) ................................................................................. 64
10. Shortcuts.........................................................................................................................66
A Quick Way to Jump to Folders............................................................................ 66
Creating a Shortcut ....................................................................................................... 66
11. Actions ............................................................................................................................68
Work quickly with Actions ....................................................................................... 68
Add Document .............................................................................................................. 68
Unfiled Documents........................................................................................................ 68
Change Password......................................................................................................... 69
Change Client ............................................................................................................... 69
Working Groups ............................................................................................................ 69
© Catalyst Repository Systems, Inc.
iii
Catalyst XE User Guide
12. The Next Level of Information ........................................................................................71
Tracking Details...................................................................................................... 71
The Next Level .............................................................................................................. 71
The Matter Window ....................................................................................................... 71
Cases ............................................................................................................................ 73
Opening a Case Page ............................................................................................ 73
Adding Comments to a Case ................................................................................. 74
Editing an Existing Case Page ............................................................................... 75
Claims Alleged........................................................................................................ 75
Portal ...................................................................................................................... 76
Clone a Case or Matter ......................................................................................... 77
13. Export .............................................................................................................................78
Creating Reports Using Export............................................................................... 78
14. Search ............................................................................................................................80
Finding Information and Documents ...................................................................... 80
Search Current Folder .................................................................................................. 80
How to Search............................................................................................................... 81
Advanced Site Search .................................................................................................. 83
Search Wizard............................................................................................................... 85
Folder Search Results ............................................................................................ 86
Appendix: Getting Started ....................................................................................................88
Registering With the System. ................................................................................. 88
The Registration Page .................................................................................................. 88
Logging In ..................................................................................................................... 90
Forgotten Passwords .................................................................................................... 90
© Catalyst Repository Systems, Inc.
iv
Catalyst XE User Guide
What is Catalyst?
Catalyst is an application to help manage litigation and other projects
involving widely-dispersed teams. Because it runs over the Internet, you can
use it to collaborate with people across multiple enterprises—insurers,
corporations, law firms and individuals. We designed Catalyst to hold all your
case files and case information. Once you start accessing case information
and files from anywhere, anytime, you will see the Catalyst advantage.
In litigation the one constant is paper⎯pleadings, letters, memos, etc.
Typically, somebody distributes that paper and files the original in a paper file.
Usually the process involves distribution to a team via mail, fax or courier,
where each team member also copies, distributes, and files.
Catalyst relies on a scanner and an Internet connection to streamline the
process. When paper arrives, scan it, open Catalyst, and upload the
documents. Once that is done, your entire team has access to the new
document. The paper is managed in one place and ready to be archived. Not
only can you view it from your desk, home, or the road, you can search it at
lightning speed. When you find what you need, you can review it on screen,
or print it. When you are done with the paper, toss it. It will be on the system
when you need it again.
Catalyst XE looks and works like Microsoft Exchange/Outlook. Anyone
familiar with Outlook’s interface for calendar, contacts, tasks, and folders will
feel right at home on our system. Training time and expense is reduced.
Our system is flexible. Create folders they way you want them. XE is
arranged in hierarchical fashion with tiers of data available. The top level is
your Home Page. It contains public information as well as information drawn
from all of your cases. Below that are the individual cases or matters, each
with their own folders for calendar, tasks, contacts, news and documents.
Our system is secure. You can grant users access to individual cases or
matters, set permissions to allow them to only view documents, give them
author rights and allow them to upload documents, or allow them to be
administrators and add other users.
Ultimately, our goal was to develop a system that works for you. At the Home
level, display key information from all the cases on which you work. Drill down
Catalyst Confidential
1
Catalyst XE User Guide
to the appropriate case, when you need to see specific documents, or
information. As you add new documents, your team members will see it in
recent documents the next time they log into the system.
What You Need to Run It
Catalyst runs over the Internet. To access the system you need Microsoft
Internet Explorer (version 5.5 or greater) and an Internet connection. We
recommend using a high-speed Internet connection. While the system will
work using a slower-speed modem connection, download times may be
unacceptable, especially for larger image files.
Images maintained on the site are often stored using the Adobe Acrobat
“portable document format.” These are often called “pdfs” because their file
names typically end in the extension “pdf”, e.g. pleading.pdf, or letter.pdf. The
pdf format provides a replica of the original document in a multi-page format.
Properly prepared, it will also support the full-text search of the document for
key words
About the Free Acrobat Reader
You will need a copy of the Adobe Acrobat Reader to view pdf images stored
on the site. A free copy of the Acrobat Reader is available from the Adobe
web site: www.adobe.com. In the alternative, you can purchase a copy of the
full-strength Adobe Acrobat product. The full version allows a user to create
and annotate your own pdf files.
When downloading the free Acrobat Reader make sure to select the option
for searching PDF files. The download process takes a little longer, but is
required to search PDF files and display hits within your documents.
© Catalyst Repository Systems, Inc.
2
Catalyst XE User Guide
This Manual
The Manual is broken into short chapters, each focusing on a single facet of
the Catalyst product (e.g. calendar, contacts, or tasks windows). Keep it
handy for reference. An online copy is available as well under the Help link.
There is also a short Appendix called Getting Started. Take a look at this
section if you have not gone through the registration process and logged into
Catalyst XE.
We have included a number of screen shots in the manual. They are based
on the Catalyst XE demo site and are created using the Windows XP
operating system. If you use different operating software, e.g. Windows 2000
or NT, your screens will look slightly different but the general functionality will
be the same.
The screen views may also look different because of information added to
your site (or because of software upgrades in the interim). The purpose of the
manual is to get you up and running. If something looks a little different on
your actual site, click on it and see what happens.
© Catalyst Repository Systems, Inc.
3
Catalyst XE User Guide
1. The Home Page
The Starting Place
When you login to Catalyst, you will see the home page.
Like Outlook, the site is organized into two frames (windows). The left frame
is used primarily for site navigation and for certain other actions. It contains
tabs to open the following windows: Folders, Shortcuts, Actions and Admin
(for users who have administrative rights). The Folders and Shortcuts
windows provide a way to move throughout the system quickly. Click on the
plus sign next to the icon to show sub folders. Click on the folder text to show
folder information in the right window. The Actions window allows you to
perform certain actions from anywhere in the site. Add a new document,
change your password and take other actions. If you have administrative
rights, you will see an Admin tab that allows you to add or edit new users or
user groups and do things like change the order of the folders in the Folders
© Catalyst Repository Systems, Inc.
4
Catalyst XE User Guide
window. (For information on Administrative functions, see the Administrator’s
User Guide.)
The right frame allows you to view information on the site itself, whether from
multiple folders for the Home page or from a single folder. It is like opening an
Outlook folder to see its contents.
Here is a quick summary of the items you may see at the home page level.
Each will be discussed in greater detail in succeeding chapters. The name of
each of these may be modified by the administrator of the site, but for
purposes of this manual, they are referred to as “Tasks”, “Calendar”, “News”,
“Links”, “Matters”, “Forum”, “Documents” and “Recent Documents”. You will
see these in the left frame of the window.
On the home page itself, you will see Tasks, News, Calendar, Matters and
Recent Documents. You can access any of these by clicking on the folder in
the left frame or clicking on the heading in the right frame home page.
Tasks: Shows task items assigned to you or the team for the cases in which
you have access. You can also access task information by clicking on the
Tasks icon in the left frame or clicking on the Tasks heading from the home
page.
Calendar: Shows the next five calendar events in your calendar. You can
access more detailed calendar information by clicking on the Calendar icon in
the left frame or clicking on the Calendar heading from the home page.
News: Shows the most recent news items entered into the system for your
cases. You can also access news information by clicking on the News icon in
the left frame or clicking on the News heading from the home page.
Links: Shows useful links that may be related or helpful to you. Click on the
links icon to access the full links page.
Forum: Shows threaded discussions from team members about topics
relating to your case or project. To access the full Forum page, click on the
icon in the left frame.
Matter (Tier): Shows those matters accessible to you. Click on a matter to go
to it. You can also access them using the left frame or clicking on the matter
heading from the home page.
© Catalyst Repository Systems, Inc.
5
Catalyst XE User Guide
Documents: Shows documents that are stored in the Documents folder. Go
to the documents folder by clicking on the Documents icon in the left frame.
Recent Documents: Shows documents recently added to the system in the
cases that are accessible to you. Click on the “More” link at the bottom of the
list to see more recent documents. You can also click on the Recent
Documents icon in the left frame or the Recent Documents heading from the
home page.
Each of the main windows on the home page (i.e. Tasks, Calendar, News,
etc.) can be expanded or collapsed by clicking on the little arrow to the left of
the heading.
Click on a heading to go to the full page of that folder.
© Catalyst Repository Systems, Inc.
6
Catalyst XE User Guide
2 The Left Frame
Folders, Shortcuts and Actions
The left navigation frame provides a Folders window for site navigation, a
Shortcuts window for quick access to favorite folders and an Actions window
for special site-wide tasks.
Folders Window
The Folders window provides a way to navigate through the site. Click
different folder icons and each will present a page of information appropriate
to the folder. For example, clicking on the Calendar folder will present the
calendar page in the main window.
© Catalyst Repository Systems, Inc.
7
Catalyst XE User Guide
If you see a “+” sign next to a folder or other icon, it means there are sub
folders that can be displayed. Click on the + sign to expand the folders. To
collapse the folders, click on the “-” sign.
To return to the Home Page, click on Home, which is always the top folder.
You will see an icon that looks like a file cabinet. This is the next level of
folders, called Tiers. For purposes of this user guide, we refer to the second
tier as Matters. (It may be called something different depending on how your
system is set up.) If you click on the Matters, you will see the list of matters
that you have access to in the right navigation frame.
© Catalyst Repository Systems, Inc.
8
Catalyst XE User Guide
If you have a limited number of matters, they will show up in the navigation
tree in the left frame. If you have many matters, they will only show up in the
list in the right frame. If you click on one of the matters in the list, it will show
up in the tree for as long as you are logged into the site.
You can navigate to the Matter sub-folders that appear below the Matter. Just
click on the + next to the matter to reveal those folders.
Jump to Folder
Enter the name of a folder, matter or case in the Jump to Folder box in the
lower part of the left frame. Click on the Go button and the system will list the
folders with that name in the right frame. Click on the folder to go to it.
© Catalyst Repository Systems, Inc.
9
Catalyst XE User Guide
Show Only This Level
Rather than view all of the folders in the Folders window, you can hoist the
folder you are viewing so that you only view it and its sub-folders. This can be
useful when the site has lots of folders in different tiers or lots of document
folders and sub-folders.
To hoist a folder, select it first (click on it) and then click on the Show Only
This Level option above the Home folder in the left frame window.
© Catalyst Repository Systems, Inc.
10
Catalyst XE User Guide
If you choose “Show only this level” in a matter folder for example, you would
see something like this. Notice how the matter and its subfolders appear in
the tree.
To show all of the folders and return to your original view, click on Show All
Levels. All of the folders will return.
© Catalyst Repository Systems, Inc.
11
Catalyst XE User Guide
Shortcuts
If you have created personal shortcuts (links) to different folders, you can
access them under the Shortcuts tab.
Expand the Shortcuts tree to see and manage your personal shortcuts. Click
on a shortcut to go to that folder. See Chapter on Shortcuts for how to create,
delete, and manage shortcuts.
Actions
Click on the Actions tab and you can perform actions from the window in the
Left Frame. For details on all Actions, go to the Chapter on Actions.
Logout
Click on the Logout link to log out of the system. The system will take you to a
login screen.
Help
Click on the Help link to see a list of help topics. From here you can download
a copy of this user manual and other useful guides.
© Catalyst Repository Systems, Inc.
12
Catalyst XE User Guide
3. Tasks
Project Management
The Tasks window on the home page shows tasks assigned to you or your
team (depending on the options you choose). It is similar in look and feel to
Microsoft Outlook. You can create a new task assignment, show the status of
work on a particular task, show the priority and send reminders or emails
about the tasks. Most of the options are self-explanatory.
Create a New Task
Open the menu by clicking on the chevron icon (the down-facing v) on the
right side of the Tasks bar from the home page. If you go to the full Tasks
page, the menu will appear on the upper right corner of the screen.
You will see a menu with the task options available to you. Choose New Task
and you will see the following Task Detail window.
© Catalyst Repository Systems, Inc.
13
Catalyst XE User Guide
The New Task window allows you to input information relating to your task.
You are required to enter the task and the folder that you want the task to
appear in. You can also enter task information such as its due date, the
person responsible for the task, its status and priority. Task and Folder are
required items and marked with a red asterisk. Many of the other items are
optional.
Describing the Task
Type the text appropriate to the task that you are adding. Keep the text
succinct and add further description in the comments box.
Assigning a Task to a Folder
In the Task detail box, next to the Folder text box, there is a Select button.
Choose Select to assign a task to a specific folder. Choose from the list of
task folders that are available to you. If you want to add the task to a different
folder then the one you are currently in, click on the up folder icon:
© Catalyst Repository Systems, Inc.
14
Catalyst XE User Guide
Task Lead and Working Team
From the task detail page, choose the Task Lead and Working Team
members by clicking on the Select button and selecting the appropriate
person or team.
© Catalyst Repository Systems, Inc.
15
Catalyst XE User Guide
Click on the Assign link to add users from the Available Users list. If you have
Working Groups created, you can click that category to bring up those
groups. (For more on working groups, see section on Actions.) Click on the
Remove link from the Assigned Users to remove them from the Working
Team. Click Close when you are finished.
Other Fields
Fill out the rest of the task items as appropriate.
You can enter information for a “Start Date”, “Status”, “Priority”, etc. Notice
that if you choose “high” from the Priority pull-down menu, that task will
appear in red lettering on the task list. You can also include Comments about
the task.
Task Reminders
Set a reminder so that the lead user and working team will get an email
reminding them of the task. Click Reminder and choose the number of days
prior to the due date of the task.
Email Tasks
Email notifications can be created from a Task. Select Send Email to fill in the
email information and users you want to send the email to.
© Catalyst Repository Systems, Inc.
16
Catalyst XE User Guide
Add the recipients to the To field or select them from the list by clicking the
button with the three dots. Change the Subject if you like and add a message.
The recipients will receive an email with the message and an Outlook
calendar task item that they can save directly to their Outlook calendar.
Save and Close
Once you have completed entering task information, click on the “Save/Close”
button at the bottom. Notice that task information is updated on your Home
Page after you close the task item.
Viewing or Editing Task Details
You can view or edit details regarding an existing task simply by clicking on
the task description. It will open the View Task detail page.
Once open, it can be changed (if you have editing rights). Click on the Edit
button to make changes or to delete the record.
Marking a Task Complete
There are several ways to mark a task done (complete). A quick way is to
click on the check box next to the task from the Home or the Tasks page. A
detail page will pop up with today’s date in the completion box and the status
set to Completed. Click on Save/Close to complete the process.
© Catalyst Repository Systems, Inc.
17
Catalyst XE User Guide
You can also mark a task complete by opening the detail page to Edit mode
and changing the status to Completed.
When you are done, the task will show as completed.
© Catalyst Repository Systems, Inc.
18
Catalyst XE User Guide
Changing Tasks Viewing Options
To change options for the tasks view, choose Options from the menu at the
top right side of the Tasks window. You can change these options from the
Home page or from the full Tasks page. From the Home page, you will be
presented with a view that looks like this:
Under Level Options, you can choose to view tasks from This Folder and
Below (meaning the tasks folder that you are currently in, and also those in
the task folders that are below that level) or This Folder Only (only the tasks
that are in the folder that you are currently in).
The second choice is “Ownership Options.” You can choose to view All tasks
or only tasks assigned to you (either as Task Lead or Working Team).
Typically, you make this decision in tandem with your determination of the
level of tasks you want to view.
The third choice provides three options: Open Tasks and Those Completed
Today, Open Tasks Only, or All Open and Completed Tasks.
Once you have decided on the appropriate options, click on the “Apply”
button. The view will close and you will be presented with those tasks
matching your selection criteria.
© Catalyst Repository Systems, Inc.
19
Catalyst XE User Guide
Using the Full Screen Tasks View
If you click on the word “Tasks” on the Left Navigation window or click on the
Tasks title bar from the right screen of the Home page, you will see a full
screen view of your task items. It will look something like this:
You can sort your task list by clicking on one of the column headings: Date,
Lead, Task, Status, or Case. Click the heading a second time and it will sort
in reverse order.
Working with tasks in the full screen view allows you to do much of what you
can do from the Home page but with some additional functionality.
Edit Folder
Depending on the rights that you have, you can choose Edit Folder to change
the name of the folder. Perhaps you want to call Tasks “Assignments”. Simply
choose Edit Folder from the drop down menu and change the name. You will
see the Edit Folder box that looks like this:
© Catalyst Repository Systems, Inc.
20
Catalyst XE User Guide
Rename it and click Save or Save/Close.
Export
You also have the option of exporting the Tasks into a report in another
format by choosing Export from the menu.
You will see several report format options:
© Catalyst Repository Systems, Inc.
21
Catalyst XE User Guide
Choose the format and select Go. The report will open for you in the new
format.
© Catalyst Repository Systems, Inc.
22
Catalyst XE User Guide
4. Calendar
Calendaring or Docketing
The Calendar window on the Home page displays your next five calendar
items. It works as a supplement to the calendar view, which you access by
clicking on the Calendar icon on the left navigation window or clicking on
Events on the Home page title bar.
Creating a New Calendar Item
Create a new calendar item by clicking on the menu on the right side of the
Calendar bar. Then click on New Calendar Item.
You will see a Calendar detail window that looks like this:
© Catalyst Repository Systems, Inc.
23
Catalyst XE User Guide
Much of this will be familiar to you if you have already created a new task
item. Name the event in the Subject textbox. You can link a calendar item to a
Folder location by choosing it from the Select list. (The default is the folder
that you are currently in.) Choose the Lead User by clicking the Select button.
Fill out the other fields as appropriate. Choose your Working Team just as
you did for Tasks (see Chapter on Tasks).
Editing Calendar Items
You can edit calendar items by clicking on the item’s description. When the
Calendar Detail box opens, choose Edit. From there, you can edit the entries
just as if you were creating a new item.
Sending an Email about an Event
You can notify a user of an event by sending them an email, exactly the way
you emailed the task. Click on the Event and choose Edit. Choose the Send
Email button under the Comments box.
Choose the user or users who you want to email from the list of available
users or simply type in the user’s email address in the box provided.
© Catalyst Repository Systems, Inc.
24
Catalyst XE User Guide
The Subject and Message will be filled in with the default messages above.
You can change these by typing a different subject or message into the
boxes. Now click Save or Save/Close and the email will be sent to the user
immediately with the calendar item as an attachment. You will see a
conformation box telling you that the email was sent.
Sending a Reminder to a Lead User or Working Team
On the Event Detail page, there is a Reminder option located toward the
bottom of the screen. Reminder emails are sent to the lead user and
members of the working team associated with the event.
Click Edit to enable Reminder and then check the Reminder box. An editable
box will appear next to “Days Before Start Date”. Enter the number of days
prior to the event that you want the reminder to be sent.
Reminder days can be entered as a whole number between 0 and 90 days.
© Catalyst Repository Systems, Inc.
25
Catalyst XE User Guide
Adding a Calendar Item to your local Calendar
If you keep a local Calendar, such as Outlook, you can add your Catalyst
calendar item to it with one click.
This will open your local calendar and fill in the event details with the same
details that are in the Catalyst event. Just select Save and Close from
Outlook and the item will appear in your Outlook Calendar.
Changing Calendar Options
Calendar options work just like task options.
To change options for the Calendar view, choose Options from the menu at
the top right side of the Tasks window. You will be presented with a view that
looks like this:
© Catalyst Repository Systems, Inc.
26
Catalyst XE User Guide
The system will allow you to choose whether to view calendar entries at the
existing level or to include all levels below as well. You can also choose
whether to view calendar entries that apply to you or to all team members.
Once you have decided on the appropriate options, click on the Apply button.
The view will close and you will be presented with those items matching your
selection criteria.
Using the Full Frame Calendar View
If you click on the Calendar folder in the Left Navigation window or click on
the Calendar title bar in the right frame from the Home page, you will see a
full screen view of your calendar items. It will look something like this:
© Catalyst Repository Systems, Inc.
27
Catalyst XE User Guide
You can view calendar information in a daily, weekly, monthly (default), or list
view. Click on the appropriate tab at the top of the screen to see a different
view.
© Catalyst Repository Systems, Inc.
28
Catalyst XE User Guide
From the daily or weekly views, you can move to different months by clicking
on the one of the calendars to the left of the screen. In those views, click from
day to day or week to week by clicking on the arrows. In the monthly view,
you can move from month to month or year to year.
You can view any item by clicking on its description. Click the Edit button to
edit the record or click Cancel to close the window.
In the List view, you can re-sort calendar items. Click on the heading to sort
by any of the columns. Click a second time to reverse your sort.
By default, the list view shows items starting with today and going forward. To
view items from an earlier (or later) date, enter it in the Choose start date box
and press Go. Select Clear to see all events in the list.
There are other choices from the Calendar menu: Edit Folder, Add Shortcut
and Export. These work exactly the same as in Tasks (see Chapter on
Tasks). With calendars, you can export to PDF from any of the views.
© Catalyst Repository Systems, Inc.
29
Catalyst XE User Guide
5. Contacts
Team Information
Click on the Contacts folder in the left frame Folders window to access
contacts. You will see a screen like this:
By default you will see all contacts. Click on any letter of the alphabet to see
contacts with last names starting with that letter. Click on All to see all
contacts.
Information about each contact in the system is displayed in alphabetical
order. Click on any individual’s name to see more contact details.
Adding a New Contact
To add a new contact, click on the menu chevron on the right side of the
Contacts bar and choose New Contact.
If you are at the site Home level, you will see a screen that looks like this:
© Catalyst Repository Systems, Inc.
30
Catalyst XE User Guide
The contact can be linked to a case, matter, or project by selecting the folder
it belongs to. It can be included with public contacts if the folder selected is
Home. Fill out the other information as appropriate. Last names and first
names are required.
If you are at a level other than home, you will see a screen that looks like this:
© Catalyst Repository Systems, Inc.
31
Catalyst XE User Guide
Simply choose from the list of existing site contacts to add the contact to the
folder that you are in. If the contact is not on the list, select Add New at the
bottom of the screen. You can then follow the steps above to add the contact.
Adding Comments to a Contact
Once you have saved the record, any user can add comments relating to a
contact. Click on the Add Comments link at the bottom of the screen and
place comments in the resulting window. The system will track the user
adding the comments and the date they were input.
Adding a Contact to Local Email Contacts
Once you have saved a contact, you can add it to your local email contacts by
choosing Add to Contacts at the bottom of the contacts page.
A new contact card will open from your Outlook contacts with the information
filled in.
There are other choices from the Contacts menu: Edit Folder, Add Shortcut
and Export. These work exactly the same as in Tasks (see Chapter on
Tasks).
© Catalyst Repository Systems, Inc.
32
Catalyst XE User Guide
6. News
Communicating Information
News items are not necessarily meant to refer to information retrieved from
public news sources. Rather, they are intended to provide an alternative to
the phone or e-mail for communications about a case, matter or project that
the team is working on. In other words, instead of sending e-mails to every
member of your team regarding new developments, create a news item linked
to that case, matter or project and it will be distributed to all team members
via the News window.
This can be a better method for communications for two reasons. First, it is
integrated with all other case information and the interested viewer will see it
as part of the site. Second, you can archive news items in one place. With email, all team members have to archive these items separately.
Options
By default, the News window on the home page will show news items from all
of your cases or projects. To limit the items shown, click on the menu and
choose Options. You can choose to see News items from all folders or just
the folder you are on.
© Catalyst Repository Systems, Inc.
33
Catalyst XE User Guide
Adding a News Item
Click on the menu on the right side of the News bar and choose New News.
You will see a News Detail box that looks like this:
Fill in as many fields as appropriate. You can make the news item public by
selecting home or you can link it to a specific case. You can also upload a
document to the news item by selecting Browse next to the upload textbox.
You can also reference a Web URL. Click Save/Close when you are finished.
Editing News Items
To edit a News item, click on the text link for its subject. The News Detail box
will open. Choose Edit to edit the news item or to delete it.
Viewing News Items in Full Frame
To view News items in a full-frame view, click on the News folder icon in the
Left Navigation Window or the News title bar from the Home page. You will
see something like this:
© Catalyst Repository Systems, Inc.
34
Catalyst XE User Guide
The options work the same in full-frame view. The Edit Folder and Add
Shortcut options work as they did in tasks. You can also change the folder
name or delete the folder by choosing Edit Folder from the menu options. To
add a shortcut, click Add Shortcut. To export the news items, click on Export
and you will be prompted for the format option. Once selected, it will export
the data for you.
© Catalyst Repository Systems, Inc.
35
Catalyst XE User Guide
7. Document Folders
Documents and Recent Documents
The system provides several types of document folders. While each may
have a different purpose, they all function the same way.
Document Folders
Document folders are folders where you can store relevant documents. You
can place documents folders at the home level and or at the lower tier levels.
All document folders can contain sub-folders to help you organize your
documents. With the proper permissions, you may create them as you wish.
The Document folder or folders at the Home page level may contain a set of
sub-folders that can be used for documents relating to the whole site or
generic types of documents. It depends on how the administrator of your site
sets up the folders and how you want to use them, but they will be available
to all users of the site who have access to the home level. Click on the
Documents link or the plus sign to the left of the Documents icon to view the
sub-folders it contains. Your site may be set up differently.
© Catalyst Repository Systems, Inc.
36
Catalyst XE User Guide
Sub-folders appear at the top of the Documents page with the individual
documents located below. The icon under the Open column (the first column)
will tell you the document file type (e.g. Word, Acrobat, Excel) and provide a
link to open the document itself. Other information on the page will tell you the
date of the document, the author and the description of the document. In
parentheses after the description, you will see the case or location of the
document.
You can view the document details by clicking on the Description.
© Catalyst Repository Systems, Inc.
37
Catalyst XE User Guide
From the details page, you can choose to see only the Details, the Detail with
Document, which will show you a side-by-side view, or you can choose to see
the Document only. You can also download the document so that you can
work with it locally or print it from the download document option. Just choose
which view you want by selecting one of the tabs at the top of the details
page.
Viewing Documents
Navigate from document to document while viewing a document or document
detail page.
Use the navigation when you are reviewing a folder of documents and you
want to scroll from one to the next. Select one of the documents to view, and
you will see arrow buttons allowing you to move from document to document.
You can quickly get to the first or last document too.
© Catalyst Repository Systems, Inc.
38
Catalyst XE User Guide
If the list of documents contains more than one page, navigate to the page of
documents you want to view, and then use the arrow buttons to move
between the documents on that page. The arrows are also present on the
Detail Screen (They are only visible while in view-mode, they are not
available in edit-mode).
Adding New Documents
There are different ways to add a new document to a Document folder. You
can upload documents individually or upload multiple documents at one time.
One way is to choose New Doc from the menu located under the chevron on
the Documents page.
© Catalyst Repository Systems, Inc.
39
Catalyst XE User Guide
Fill out the resulting document profile and select the folder where you want
the document to be located. By default, it will select the document folder that
you are currently in, but you can save it to any document folder that you have
rights to. You can also copy the document into another document folder by
choosing the Select button next to the Copy Document to Folder box.
Next you will need to upload the document. Select Browse to find the
document to upload.
You can also add comments to a document in the same way as in tasks, and
contacts.
Another way to add a document is to add it through the Actions menu. Select
Actions in the left frame and choose Add Document. Add the document in the
exact same way that you added it from the documents folder.
OCR A Document
If you would like the document to be captured so that you can search the text
of the document, put a check in the box next to “OCR?”. (OCR stands for
Optical Character Recognition.) Select Save or Save/Close.
© Catalyst Repository Systems, Inc.
40
Catalyst XE User Guide
Upload a new Version of a Document
If the document that you are uploading is a replacement or a new version of
an existing document, you can choose to overwrite the old document, or add
a new version of the document to the existing document details card. Click on
the description of the document that is currently in the system to bring up the
document detail card. Select Edit and you will see the editable document
card. If you want to upload a new document to replace the one that is
currently in the system, put a check in the box “Overwrite existing file?”
© Catalyst Repository Systems, Inc.
41
Catalyst XE User Guide
If you would like to keep both versions of the document, do not put a check in
the box. Multiple versions will look something like this:
The document detail card now shows the version number, and other
information, like Last Modified By and Last Modified Date. To look at the older
versions of documents click on the icon under Open (in the example above,
the Adobe icon).
© Catalyst Repository Systems, Inc.
42
Catalyst XE User Guide
Batch Upload Documents
Upload multiple documents to the system at one time. From a document
folder, click on the chevron menu at the top right of the screen. Select “Batch
Upload”.
You can upload documents in batches of up to 100. You may be prompted to
install an ActiveX control. Hit okay to install.
Enter the document profile information. The description you provide is
prefixed to the document file name. If you do not enter information, the last
modified date will be the document date in the document detail information
and file name will be the description. Click Add to choose the documents that
you want to upload or drag and drop the files into the window.
© Catalyst Repository Systems, Inc.
43
Catalyst XE User Guide
Select the documents from your computer. They will be listed in the Upload
Files portion of the Batch Upload page. Click Upload.
The system will upload the files and show the progress as it is doing so. You
will then see the confirmation page.
© Catalyst Repository Systems, Inc.
44
Catalyst XE User Guide
You should now see the documents in the folder.
© Catalyst Repository Systems, Inc.
45
Catalyst XE User Guide
Batch Download
You can download multiple documents at one time. From any documents
folder, click the Show/Hide Checks from the drop-down menu located at the
top right of your screen.
Check boxes will appear next to the documents. You can put a check next to
individual documents, select the checkbox next to the red x to select all of the
documents on the page, or put a check next to Select All Documents. Then
select Batch Download to download the documents.
A new window will open up showing you the files that will be downloaded.
(You will be asked to install an Active X control. Allow the Active X control to
run.) Click Select Download Folder to select the folder where you want the
documents to be downloaded to.
© Catalyst Repository Systems, Inc.
46
Catalyst XE User Guide
Select your folder and then click Download files. You will be asked to confirm
the download. Click Yes.
Order Documents in a Folder
Display documents in a specific order within a folder.
The first step must be done by an administrator of the site. Open the Folder
detail page by clicking on the Menu and selecting Edit Folder. There is a
checkbox called Ordered Folder. Check this box and then click Save/Close.
© Catalyst Repository Systems, Inc.
47
Catalyst XE User Guide
The Document Detail page will display a field called Item #. This number
determines the sort order of the document.
Click Edit and fill in the number. Click on Save/Close to save the number.
You will see that your documents are in order based on that Item # field. An
extra column is created in your display, showing the sort order.
© Catalyst Repository Systems, Inc.
48
Catalyst XE User Guide
You can still sort on any other column by clicking on the column headers. Any
document that does not have a number will display a zero.
Secure Individual Document Folders
In order to secure a documents folder, you must have Administrative rights to
the site. See the Administrators Guide to create a secure folder and create a
group of users to be able to access that folder.
Move a Document
If you want to move a document into a different folder, simply click on the
document description to view the detail card, and then choose Edit. Under
Folder, choose the Select button and select a different folder. The document
and its detail card will now be saved into that folder.
Move a Folder of Documents
Move a document folder and its contents to another location. From the folder
you want to move, click on the Menu and select Move Folder. Click on the
Select button to pick the folder that you want to move the documents to. Click
Move to move the folder of documents to the new location.
© Catalyst Repository Systems, Inc.
49
Catalyst XE User Guide
Copy or Move Multiple Documents
You can copy or move document from folder to folder. Use the same
checkbox steps as mentioned in the section on Batch Downloading. This
time, select Batch Move/Copy towards the top of the screen.
Select the document folder that you want to Move or Copy the documents to
and then select either Move or Copy.
© Catalyst Repository Systems, Inc.
50
Catalyst XE User Guide
Edit or Delete a Document
If you want to Edit a Document profile or Delete a Document, click on the
Description and select the view Detail Only.
© Catalyst Repository Systems, Inc.
51
Catalyst XE User Guide
After you select Edit, the fields become editable. Make your changes and
select Save/Close.
To Delete the document, you need to have Administrative privileges. Select
Edit from the document profile, and the select Delete. You will be asked to
confirm the deletion. Choose Yes and the document will be deleted from the
system.
Send an Email Notification
Send an email to a user to notify them that a new document has been
uploaded. You can also send an email notifying a user of a document that is
already in the system by selecting Edit on the document profile. Click on Send
Email.
© Catalyst Repository Systems, Inc.
52
Catalyst XE User Guide
You can either enter the email address of the person you wish to notify or you
can select the user from a list by clicking on the button with the three dots:
Change the Subject or Message if you wish, or use the default message. You
will receive a confirmation that your email has been sent.
© Catalyst Repository Systems, Inc.
53
Catalyst XE User Guide
The person who you send the email to will receive a link to the document.
Email Document to a Folder
You can email documents directly into a folder.
When this option is enabled, a text box will appear that allows the
administrator to create or edit an email address for the folder.
The Administrator will tell you what the email address is for the folder and you
can simply email the documents to that address. Here is an example of an
email address specifically for a folder:
[email protected]
The description of the document will automatically contain information about
who emailed the document, the date it was emailed, and the subject line of
the email.
Import Email
When emailing documents into the system, the email that sends the
documents can be preserved as a document in the system with the sender,
recipient, subject and message body text preserved. The icon associated with
the email is an HTML icon (a blue “e”). You will see a paperclip which
indicates that it came with documents attached.
© Catalyst Repository Systems, Inc.
54
Catalyst XE User Guide
When you click on the document to view it, you will see a box in the upper left
displaying the documents that came in together. Click on these documents to
navigate between the related documents. You can remove the relationship by
deleting the email message.
Lower Tier Documents
Lower tiers, for example a tier that represents a case, may have a set of
document folders that you can access to view the documents relating to that
specific case. Click on the Documents link in the left frame Folders window to
see the case documents folders.
© Catalyst Repository Systems, Inc.
55
Catalyst XE User Guide
By default the documents are sorted in reverse order by date. You can
change the sort order or choose another column for your sort by clicking on
the same or a different heading.
You can view the document profile by clicking on the Description link.
Adding New Folders
Administrators can add sub-folders to any document folder. Simply click on
the New Folder option in the chevron menu.
The new folder will appear as a sub-folder of the folder from which you
started. Create as many sub-folders as you like.
Choose to have the folder an Ordered Folder – meaning the documents in the
folder can be ordered, or chose to have it Email Enabled.
© Catalyst Repository Systems, Inc.
56
Catalyst XE User Guide
Editing or Deleting Folders
To edit or delete a folder, click on the menu for that folder and choose Edit
Folder.
Recent Documents
The Recent Documents folder is a special folder designed to show
documents recently uploaded into any folder on the site. You will find a
Recent Document window is at the bottom of your screen on the Home page.
It is designed to show you the last fifteen documents added to the system in
any of the tiers that you have access to.
Just like with all Documents folders, you can view the document details by
clicking on the Description link.
Recent Documents Folder
By default, the system only shows the last fifteen documents that have been
uploaded into the system. You can see all documents uploaded in the last 30
© Catalyst Repository Systems, Inc.
57
Catalyst XE User Guide
days by clicking on the Recent Documents folder in the left navigation
window.
Documents are sorted in reverse order so that the most recently edited
document will be first. You can change the sort order or choose another
column for your sort by clicking on the same or a different heading.
My Uploads
Click on the My Uploads tab to see documents that you have recently
uploaded.
Add Shortcut
Add a shortcut to the folder by selecting Add Shortcut from the drop-down
menu.
Export
Create a report of the documents by selecting Export from the drop-down
menu.
© Catalyst Repository Systems, Inc.
58
Catalyst XE User Guide
8. Forums
Threaded Discussions
The Forum link provides a platform for threaded discussions about one or
more topics that may be of interest to the team. For example, a team member
might post a question about a legal issue knowing that the responses may be
of interest to others either now or later. Responses are kept under the original
posting and replies can follow responses. All of this is kept in an outline form
which is often referred to as a “topic thread.”
Adding a New Topic
To add a new topic, click on the New Topic icon located at the top right-hand
side of the Forum screen.
The system will present a New Topic window that will allow you to enter a
topic title and add a message. You can also upload a document in
conjunction with your topic.
© Catalyst Repository Systems, Inc.
59
Catalyst XE User Guide
Fill out the fields as appropriate and click the Post Topic button. The topic will
be saved and available to all other users.
Responding to a Topic
To see more detail about the topic from the topics page, click on the plus
symbol to expand it.
© Catalyst Repository Systems, Inc.
60
Catalyst XE User Guide
Click the View Replies link or Add Reply. If you choose View Replies you will
the replies (which can also be accessed simply by clicking on the topic title).
© Catalyst Repository Systems, Inc.
61
Catalyst XE User Guide
From here you can add a reply to the response, create a new response, or
return to the Forum home page.
If you are the author of either the topic or one of the replies, you will also have
the ability to edit or delete your reply. Simply click on the appropriate link.
Subscribe to Topic Updates
You can subscribe to topic updates by clicking on the subscribe checkbox,
either when creating your topic or when replying. When replies or responses
are posted, you will receive an email advising you of that fact.
Archiving Forum Postings
When a new topic is created, you can specify the number of days before the
topic is archived, i.e. taken off the site. The default is 60 days.
© Catalyst Repository Systems, Inc.
62
Catalyst XE User Guide
9. Links & Redirect Folders
Connecting Outside Resources
Links
Click on the Links folder to see useful links to outside Web sites that may
relate to your cases, matters, projects or company.
To access the site, simply click on the Website/URL and a new browser
window will open to that site.
To add a new link, click on the menu and choose New Link. A link detail page
will appear.
© Catalyst Repository Systems, Inc.
63
Catalyst XE User Guide
Enter a short link name and the URL (Web address). Remember to add http://
before entering the www.address (http://www.address.com).
To edit or delete a link, click on its name and choose Edit.
You can also choose to edit the Links folder name or delete the links folder by
selecting Edit Folder from the menu. You can also choose to add the Links
page to your shortcuts under the menu.
Redirect Folders (Redirect Links)
Redirect folders are similar to links in that they are direct links to other URLs
or websites. These special links live outside the Links folder and may exist at
the Home, Matter, Case or lower tier levels.
If your site is set up with a redirect folder, you simply click on the folder to go
to the link. Here is an example of what a Redirect folder looks like in the tree
at the home level.
© Catalyst Repository Systems, Inc.
64
Catalyst XE User Guide
Depending on how your administrator set up the Redirect link, the URL that it
directs to can open in a new window, the window you are in, or the right frame
of your Catalyst XE site.
Here is an example of the Redirect folder in the tree at a matter level and
what it looks like when linked to the left hand frame of Catalyst XE:
© Catalyst Repository Systems, Inc.
65
Catalyst XE User Guide
10. Shortcuts
A Quick Way to Jump to Folders
The Shortcuts section provides personal links to different folders in Catalyst
for each user. Thus, you could have a shortcut to a particular matter, to a
case folder, to a document sub-folder or just about any folder you choose.
Rather than navigating to that particular folder, you could access it by clicking
on a shortcut. To access your shortcuts, click the Shortcuts tab next to
Folders in the left frame window.
Creating a Shortcut
Creating a shortcut is simple. First, navigate to the folder for which you want
to create a shortcut. Then click on the menu and choose Add Shortcut.
You will see an Add Shortcut box that looks like this:
© Catalyst Repository Systems, Inc.
66
Catalyst XE User Guide
Type in the Shortcut name and choose Save/Close. Your Shortcut will appear
under the Shortcut folder.
Click on the Shortcut to access the desired folder.
© Catalyst Repository Systems, Inc.
67
Catalyst XE User Guide
11. Actions
Work quickly with Actions
Add Document
Click on the Add Document link and you will see a Document Detail page.
Fill out the form and upload your document just as you did in the chapter on
Documents.
Unfiled Documents
If you email a document into the system, you will see it listed under the
Unfiled Documents folder. This is a private folder set up for each user. Once
you send a document to the Unfiled documents folder, you can move it to any
other folder in the system. Simply edit the document profile and choose
another folder in which to place it.
© Catalyst Repository Systems, Inc.
68
Catalyst XE User Guide
Your administrator will give you your personal email address for your Unfiled
Documents folder.
Change Password
Click on the Change Password link and you will see a form that will allow you
to change your password.
Your password change will take effect for your next login.
Change Client
If you have access to more than one Catalyst, click on the Change Client link
and you will see a list of Catalysts that you have access to.
Working Groups
Users with Author rights can create named groups of users. This is used for
assigning a group as a working team or sending email notifications to a group
of people. From Actions, click on Working Groups and then New Group from
the menu in the top right hand corner. Name your Working Group and then
click Save/Close.
© Catalyst Repository Systems, Inc.
69
Catalyst XE User Guide
Click Add Users to add individuals to the working group. When selecting a
user or group, you will have the option to choose one or the other. The
system remembers the last-used mode when a new window is opened.
In group mode, when you select a group, all members of that group, which
you have permissions to view, are added to the right (assigned) side of the
selection window.
© Catalyst Repository Systems, Inc.
70
Catalyst XE User Guide
12. The Next Level of Information
Tracking Details
The Next Level
The next level of folders will contain information that may pertain to Matters,
Cases, Clients, Claims, Departments or some other grouping. It will depend
on your particular system set-up, but for purposes of this guide, we refer to it
as Matters.
The Matter Window
Under the Matters heading is a list of Matters that you have access to. From
the Home Page, you will see a list of the five Matters that you have most
recently accessed.
You can access the full folder of Matters that you have access to by clicking
on the Matters title bar from the home page. You can also access it by
clicking on the Matters folder in the left frame. The list of Matters will look
something like this:
© Catalyst Repository Systems, Inc.
71
Catalyst XE User Guide
As an alternate, click on the plus sign besides the matters icon and you will
see a list for which you have access. If you have more than a few matters
(usually more than 20), they will not be listed in the left frame tree. To have a
matter show under the tree in the left frame, click on it in the right frame and it
will appear in the left frame for the duration of your session. Click on the plus
sign to the left of a particular matter and you can display all of its folders.
© Catalyst Repository Systems, Inc.
72
Catalyst XE User Guide
Click on the Matter name link from the tree or from the list of Matters and you
will open the Matter. This will bring you to that Matter’s home page. It looks
similar to the main home page already discussed in this guide.
Cases
The next tier of folders may be called Cases. Cases may be located under
Matters or may have a heading of their own from the Home Page. It will
depend on how your system has been set up.
Opening a Case Page
When you click on a specific case, you will see a case detail page that looks
like this.
Case information appears on this page. You can access the Edit button at the
bottom of the page.
© Catalyst Repository Systems, Inc.
73
Catalyst XE User Guide
Adding Comments to a Case
The Case page will also provide the ability for users to add comments. Scroll
to the bottom of the page and you will see a place to add Comments.
Click on the Add Comment link and enter your comments in the text box that
appears.
When you click on Save Comment, your comments will be saved. The system
will log the user who made the comment and the date of the comment.
© Catalyst Repository Systems, Inc.
74
Catalyst XE User Guide
Editing an Existing Case Page
To edit a case page, click on the Edit button at the bottom of the Case page.
(This will appear only if you have case editing privileges.)
The Edit page presents a series of text boxes, drop-down menus and
Add/Edit buttons. Make your choices as appropriate and click Save/Close
when you are finished.
Claims Alleged
Click on the Edit button to add or edit the claims at issue.
Choose from the list of claims and click on the right-facing chevrons to add a
claim. To remove the choice, click on the left-facing chevrons.
If you don’t see the claim on the list, you can add it. Enter the claim name in
the text box and click Add Other. The claim will be added to the list and will be
available in future cases. You can select and add it to the case like any other
claim.
© Catalyst Repository Systems, Inc.
75
Catalyst XE User Guide
When you have finished editing the Cases page, remember to click
Save/Close.
Portal
Select the Portal tab to see the Portal (or Home) page for the particular case
that you are viewing. Any folders that were created for the case will show up
on the Portal page – much like the Home page. In the following, the folders
that were exits for the case are Tasks, News, Calendar and Documents. The
Home portal for a case may look very different if the case does not have
Task, News, and Calendar folders.
© Catalyst Repository Systems, Inc.
76
Catalyst XE User Guide
Administrators of the site can add new cases, add folders to cases, and do
other administrative actions.
Clone a Case or Matter
You can clone a matter or case with all of its document subfolders. The
documents themselves are not cloned, but the full folder structure is. Click on
the matter or case and select Clone from the drop-down menu. Name the
new matter or case. The same document folders will now appear in your new
case.
© Catalyst Repository Systems, Inc.
77
Catalyst XE User Guide
13. Export
Creating Reports Using Export
There are several reports that you can create using the Export function. You
can export lists of tasks, news, contacts, documents, calendar items and
cases. The Export link is located in the menu.
When you select Export, you will get a pop-up box with formatting options.
© Catalyst Repository Systems, Inc.
78
Catalyst XE User Guide
Select your format and choose Go. The data will export to the format that you
selected.
Now you can manipulate the data in the formatted report.
© Catalyst Repository Systems, Inc.
79
Catalyst XE User Guide
14. Search
Finding Information and Documents
There are several ways to search your Catalyst site for documents and other
information. Here is how searching works.
Search Current Folder
The Search Current Folder option provides a quick way to search for items in
the folder that you are currently in. It will search the text fields and document
text. Simply enter a word or phrase and then choose “Go” (Search). The
system will search against the following items: calendar, cases, documents,
news and tasks.
The system will search for all records that match your search term. You will
see a results page that looks like this.
© Catalyst Repository Systems, Inc.
80
Catalyst XE User Guide
How to Search
You can perform simple “AND/OR” searches using the Current Folder
Search.
Atlanta AND deposition
Atlanta OR deposition
If you need to include the words “and” or “or” in a search phrase, enclose the
words in curly braces or the system will treat them as Boolean operators.
Truth {or} consequences
Ham {and} eggs
You can also group your searches using parentheses.
(Atlanta AND deposition) OR document
© Catalyst Repository Systems, Inc.
81
Catalyst XE User Guide
Site Search is not case sensitive. A search for atlanta will bring back the
same results as Atlanta.
Wild Cards: Use the star wildcard “*” for multiple characters. A search for
John* will find Johnson, Johns, Johnstone, etc. Use the underline character
“_” for single characters. A search for _ail will find nail, sail, jail, etc.
Special Searches: The system supports a number of specialized searches:
Near: A search for Atlanta NEAR deposition will find records where the
two words are within100 words of each other.
Not: A search for: Jones NOT Bobby with find records with Jones but
not the word Bobby.
Stem: To search for stem variants of a word, e.g. film, films, filming,
place a dollar sign “$” in front of the word--$film will retrieve word
stems.
Fuzzy: You can expand your search to include similar spellings (or
misspellings) through a fuzzy search. Place a question mark “?” in front
of the word, e.g. ?government.
If you want to narrow your current search, put the narrower term in the
secondary search box:
© Catalyst Repository Systems, Inc.
82
Catalyst XE User Guide
To search the folder that you are in and all the folders that fall under the level
or tier that you are in, put a check in the box that says “Home and Below”
under the Search Current Folder search box. (At a level below the Home
level, the option will say “This Matter and Below” or “This Case and Below”
depending on the type of level that you are in. In a documents folder, the
option is to search in the subfolders that fall under the documents folder that
you are currently in.)
This will bring back all of the items from the lower tiered folders where the
search term appears. For example, if you are searching a Matter and have
Cases under that matter – choose “This Matter and Below” and your search
will return all hits from the Matter and all of the Cases under that Matter.
If you want to search a particular category of items (Tasks, News, etc.) go to
Advanced Search and choose the appropriate Tab. The link to the Advanced
search is directly under the Search Current Folder box.
Advanced Site Search
The Advanced Search allows you to create more precise searches using form
fields. Select Advanced from the top right of your screen, under the Search
Current Folder box. Choose the tab for the type of item to be searched:
Documents, Calendar, Contacts, News, Tasks or Tiers. Then enter a value
into one or more fields (using the drop-down menus where appropriate) and
choose Search.
© Catalyst Repository Systems, Inc.
83
Catalyst XE User Guide
The system will search for all records containing any variation of the
requested search word, phrase or character string. Thus a search in the
author field for John will find John Smith, Steve Johnson, Johnstone, etc.
Wildcards: Use the star character, “*”, for multiple wildcard characters. (Note:
the system places a * before and after your search term automatically so you
may not need to use a wildcard.) Use the underscore character “_” for single
character wildcards. For example, _ail will find nail, sail, jail, etc.
Dates: Search for a date range by entering the beginning date in the first box
and the ending date in the second. If you enter only a single date in the first
box, the system will search for all records having a date equal to or greater
than that date. If you enter a single date in the second box, the system will
search for records having a date equal to or less than that date. To find
records matching a single date, enter it in both boxes.
Any Text Searches: The Any Text field is a special field that allows you to
search for matching words or phrases in both data fields (text only) and
© Catalyst Repository Systems, Inc.
84
Catalyst XE User Guide
related document text. Simply enter a word or phrase in the box. You can also
combine fielded searches, e.g. Author—Smith* and Any Text—dismissal.
The search syntax for the Any Text search works just like the syntax for
simple Site Searching. You can connect terms or phrases with AND or OR, use
parentheses and even run more specialized searches.
Search Wizard
Select Search Wizard from the Advanced Search page. The link to the
Search Wizard is in the top right corner.
The Search Wizard looks like this:
© Catalyst Repository Systems, Inc.
85
Catalyst XE User Guide
Choose the folder you want to search in and choose whether to include subfolders. Use the Search Helper to construct your search. Use the drop down
menus to select fields and operators. Use connectors like AND or OR to make
a complex search. A search may look something like this:
Folder Search Results
The results of you search will look something like this:
© Catalyst Repository Systems, Inc.
86
Catalyst XE User Guide
By default, results are sorted by date in descending order. Click on the Date
heading to sort in ascending order. Click again to sort in descending order.
You can sort results by most of the column headers. Just click on the header
once to sort in ascending order and a second time for descending order.
© Catalyst Repository Systems, Inc.
87
Catalyst XE User Guide
Appendix: Getting Started
Registering With the System.
When your administrator sets you up in the system, you will receive an email
providing a special link to the system that will allow you to complete the setup
process and create your own password. When you receive the email, click on
the link to complete the process.
The Registration Page
The link will take you to an initial registration page.
© Catalyst Repository Systems, Inc.
88
Catalyst XE User Guide
Enter your email address and click Submit. The next screen will ask you to
choose a password and a secret question. Check with your administrator
regarding password requirements but typically you will be required to use at
least six characters and some combination of numbers and letters.
© Catalyst Repository Systems, Inc.
89
Catalyst XE User Guide
Logging In
Once you submit the requested information, you will be allowed to login to the
site. Here is the standard login interface.
Your Catalyst Home Page will appear after you provide the correct username
and password. (Your user name is the login ID that was provided in the
registration email that you received when you were added as a new user.) It
is the starting point for accessing your case information.
Forgotten Passwords
If you later forget your password, click on the Forgot Password link. It will ask
you for your login name and then ask your secret question.
© Catalyst Repository Systems, Inc.
90
Catalyst XE User Guide
A correct answer will cause the system to send an email to your registered
address with a special link that will allow you to create a new password and
login to the system.
© Catalyst Repository Systems, Inc.
91