1
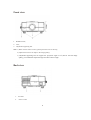
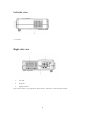
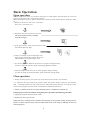
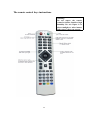
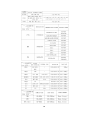
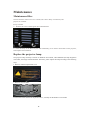
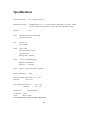
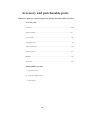
HD Home cinema projector
MODEL NO: SPV312/SPV312TV
User's Manual
CONTENTS
Warning……………………………………………………………………………………………1
Safely Precautions…………………………………………………………………………………2
Caution…………………………………………………………………………………………… 3
Appearance Instruction…………………………………………………………………………...4
Top view………………………………………………………………………………………. . 4
Bottom view ……………………………………………………………………………………..4
Front view ……………………………………………………………………………………….5
Back view ………………………………………………………………………………………..5
Sides view ……………………………………………………………………………………….6
Installation of projector……………………………………………………………………………7
Full setting……………………………………………………………………………………… 7
Standard setting (front projection)……………………………………………………………… 7
Installation of method……………………………………………………………………………8
Signal connection instruction…………………………………………………………………… 8
Basic Operation…………………………………………………………………………………… 9
Open operation………………………………………………………………………………… …9
Close operation ………………………………………………………………………………… …9
Panel key-press instruction…………………………………………………………………… …10
Remote control instruction ………………………………………………………………………11
Image trapezoid adjustment…………………………………………………………………… …12
Focus adjustment…………………………………………………………………………………12
Keystone adjustment………………………………………………………………………………12
Menu setting method………..………………………………………………………………………13
System function operation…………………………………………………………………………13
TV menu……………………………………………………………………………… …………13
Picture menu………………………………………………………………………………………14
Option menu ………………………………………………………………………………………14
Audio menu……………………………………………………………………………………15-16
Maintenance…………………………………………………………………………………………17
Filter clearance……………………………………………………………………………………17
Lamp replacement………………………………………………………………………………17-18
Cleaning of LCD panel ……………………………………………………………………………18
Trouble shooting……………………………………………………………………………………19
Specification…………………………………………………………………………………………20
Accessory……………………………………………………………………………………………21
Warranty Card………………………………………………………………………………………22
WARNING
Warning:
Please remember the model Number
MODEL NUMBER:SPV312/SPV312TV
and series number if you need.
SERIES NUMBER:
And please check all accessories
when you drop the carton package
When you use this projector, please read this manual carefully
Warning:
Do not stare directly into the light of the lens, it is very
high bright lamp. It will damage your eyes specially
for children.
Warning: Do not place the projector in the wet condition, avoid to
getting an electric shock
High volage, donot open it ,
It indicates there is a
Except for profession!
instruction for important operation
WARNING
It indicates there is a dangerous voltage
Warning
when close the projector ,the fans will continue to turn 90seconds. Before
unplugging the power cable, please be sure the fans have stopped, in order to
avoid damaging the projector lamp.
About the remote control battery:
The remote control battery should be fixed
correctly , Or it will damage the remote control.
Make sure the remote control out of children or pers.
1
Safety precautions
Warning:
when using this projector ,please read this manual carefully.
If wrong operation, it will cause electric shock or fire. so when use and repair this
projector ,please comply with the following points
1,Read manual
Because use this projector, please read full manual carefully and operate according to this manual
Instruction.
2, Cleaning instructions:
when cleaning this projector ,please make sure the power cable is unplugged.. Use the wet
cloth to clean, not the cleasner.
3, Accessories:
To avoid any damaged to the projector,
use accessories enclosed in the package.
4, Environment conditions:
Do not place the projector in wet or moist environment.
5, Installation and fix:
Please place this projector on a stable and leveled areas.
6, Ventilation:
The ventilation in the projector is best for projector work stably. Do not let the dust wall up the filter, or
it will cause the projector to overheat and high-temperature protected. Poor heat dissipation will
shorten the service life of the projector, and will lead to dangerous. So please rinse he filter monthly.
7, Power:
Match power source(220V or 110V)
8, Ground Cable: It is a 3 pin plug.
9, Power cable:
Inspect the power cable before plugging into the power source.
10, Thunder:
When the thunder happen or long time no use, please pull the power cable out of projector.
11, Repairment:
As the high voltage inside, please do not open or try to repair the projector by yourself. Please ask a
professional technician refer to the manual or the dealer’s advice to repair.
the projector.
12, Far away Heat sensitive device:
please make sure this projector far away other heat device . It will damage the projector service life.
2
Caution
About the installation
In order to improve the projector service life, It should not place in a wet, dusty condition.
Do not put the projector under the sunshine directly
Projector working temperature:0.c~+60℃
Projector store temperature: -20.c~+70℃
Do not block the ventilation-window of projector
If the projector interior temperature is too hot, the machine will be shut off automatically.
This is hot - protected system.
So please clean the filter of projector monthly. It is very important. Do not let the dust
cover the filter.
About Opening and closing the projector
when open the projector ,connect
the power cable and press the "power"
key on the panel .the projector will work ,but the lamp will be bright gradually
.
After 5 minutes, the lamp work normally
when close the projector , press the power key again . And then the lamp shut off.
But the fans still work until 5minutes later. When close the projector, do not pull out the power
cable directly . After 5minutes, the projector will shut off automatically.
Warning
Fans will adjust the temperature. It is controlled by system when the projector work,
the fans turn slowly or quickly, so the fans noise are different .But it is normal.
when the projector work ,do not pull out the power cable. If the fans stop to work, it
will cause the projector interior temperature very high, so may damage the projector.
3
Appearance instruction
Top view
1.
Panel key-press
2.
Speaker
3.
Bulb compartment cover
Bottom view
1.
Holes for ceiling mount;
3.
Bottom cover;
5.
Supporting feet
2. Ventilation window;
4. Ventilation window
Note: Please remove the high-feet adjustment(A and B) when ceiling the projector, and the length of the
screw rod in position A B C D should not exceed 10mm, to avoid an electric shock when the plastic
enclosure is broken and the rod touched the high-tension electricity inside the machine.
4
Front view
1.
Remote sensor;
2.
Lens;
3.
Adjustable supporting feet
Note: 1) When use the remote control, please point this receiver directly;
2) Adjust the lens focus to improve the image quality;
, but for the best image
3) Adjustable supporting feet can support the projection angle to 15℃
quality, you would better adjust the angle less than 8℃or no angle.
Back view
1.
2.
Air outlet
Power socket
5
Left side view
1. Air outlet
Right side view
1.
Air inlet
2.
Keystone
3.
Signal interface
Note: This air inlet is very important, do not block it, otherwise, it will burn the projector.
6
Installation
PROJECTOR INSTALLATION
Please use the setup instruction below:
In order to get good image quality, do not let
the sunlight shine the screen directly .If you
use the projector in the day time.
Projector Installation
Standard setting Front projection
Please refer to the following sheet , adjust your picture size and distance (from the lens to screen )
Size
4:3
50"
2.38m
72"
100"
3.41m
4.73m
16:9
2.61m
3.74m
5.15m
The data maybe have 3% error, due to the image size according to the distance between projector
and screen. Distances may vary from setup to setup, please only use these measurements as a
guide and always measure the throw distance before mounting. If the distance is less 2m or over
5m,the image maybe not clear.
Warning: Please check the following picture to show the trapezoid adjustment.
7
Projector installation
Installation method:
Contact a professional service Technical staff to mount this projector to a ceiling. Follow the
Instructions below for the correct projector positions:
Warning:
1) To avoid damaging beyond repair or bodily injury, secure projector mounts firmly to the ceiling or a
stable surface.
2)This projector can only be used in an environment with a temperature not exceeding the range
of 0- 35 ℃.The projector may malfunction if temperatures vary outside the normal operating
Range.
3)The sharpness of the screen might be interrupted when the projector is being used in a dusty,
wet, moist or smoke filled environment. The projector might malfunction in a moist or wet
Environment.
4)Take care of sufficient ventilation around the projector. Otherwise this projector might
overheat and cause life threatening situations
Projector Installation
Signal connection instruction
SPV312TV will have the TV input more.
Notice: Before opening the projector, please complete the connection of the external devices (With PC,
DVD, etc.) If any device has the power open, may result in equipment damaged.
8
Basic Operation
Open operation
Notice: If the projector is the new one please read projector “install chapter” placed the projector connect the
signal wire and the power wire, the operation as follow:
Before opening the projector, please complete the connection of the external devices (With PC, DVD,
etc.)
1, Before use the remote. Put in two 7 size batter
Put in two 7 size battery in it
2, Plug the power cable into the power socket.
The power indicator shows red light.
Open the lens gap.
3, press the power key on the remote control or panel
the indicator light turn light
4, After 2 second the projector lamp begin work
began appear unclear white light on the screen
after 2 minutes, the projector begin work.
5, For the new projector. When the first time to use maybe will appear image
unclear or trapezoid distortion, please read image adjustment chapter
6, After the image is clear then you can watch program during watching
you also can setup the system parameter, please read menu setting chapter
Close operation
1. During use the projector, press power key can let the projector switch to stay situation.
2. 2. After inter into stay situation, the projector under auto protect & auto release hot. The indicator
light
is flashing situation, but here the projector is under auto protect. Situation not accept any order,
if need to startup again must wait about 3-4 minutes for finished the release hot.
3. About 3-4 minutes later, the fan stops and the projector is completely switched off.
If the projector is not to be used for a long time, please proceed to the following procedure.
4. Unplug the projector from the power socket.
5. Reattach the lens cap to the lens.
NOTE: Be sure to waiting at least 3 minutes after the lamp is lit on before turning off the projector.
Failure to observe this rule may result in reduced usable life of the lamp or difficulty for the next
startup operation.
9
Panel key-press instruction
Panel key-press sketch map
1. Power Key
It can open or close the projector, its function same as the “power” in the remote control.
2. Sources Key
It can choose the input signal (such as AV, YPBPR, HDMI1, HDMI2, USB1, USB2, PC or TV)
3. Menu Key
MENU key to display the main menu or return to superior menu, CH + / - key to move up and
down options, V + / - keys to select or enter the option to move around.
4. Indicator light
5.The “TOP↑” and “DOWN↓”
“CH-”
key on the remote controller corresponds to the
“CH+” and
key on the operating panel.
They are used to move the cursor to up or down in the “Function menu window” and in the
sub-menus.
6. The “LEFT-” and “RIGHT+”
key on the remote controller corresponds to the
“V- ” and
“V+”
key on the operating panel.
They are used to move the cursor to left or right or to decrease or increase the volume of sound.
10
The remote control keys instruction:
:
Warning:
Do not expose the remote
control to shocks, liquid or high
humidity. Do not expose it to
direct sunlight or other intense
light source when you operate.
11
Image trapezoid adjustment
The new projector, using it first time, commonly will
appeared
with
image faintness
and
the
image
is
trapezoid, it is course that not adjust well of the lens
focus and the trapezoid. Following the step to adjust
focus
Focus adjustment
1、Turn the lens into the projector then turn it out slowly
at the same time looking at the resolution point Carefully
when the image is very clearly (take the middle area of the image),it is the best situation of the lens
NOTE: When you replace the projector from a cold to a warm environment water vapour
might occur. Don't turn the projector on when this occurs but wait until the vapour has disappeared.
Trapezoid adjustment
If a projected picture has keystone distortion, correct image with Keystone adjustment. The image
becomes trapezoid shape when the screen or project is not level. Please reposition, the projector to
improve its angle to the screen. However, the circumference of the image may not be focussed.
If not able to use the Keystone correction function to correct the trapezoid distortion, please reduce of
the projector to centre the screen vertically.
12
Menu setting
System function operation
Menu basic operation
MENU key to display the main menu or return to superior menu, CH + / - key to move up and down
options, V + / - keys to select or enter the option to move around.
Source choice
Press “Source” key to display the signal source selection menu:
When the selected signal path without signal input screen displays "NO SYNC":
TV Menu
Function
Channel
Auto Turning
Analog Manual Turning
Program Edit
Favorite, Skip, Delete, Move, Rename
In the other mode, TV is automatically hide
Notice: Only SPV312TV model has TV input.
13
Picture Menu
Picture Mode Standard
You can adjust the picture display mode, according to personal preference settings, including
standard, vivid, movies and user mode
Color Temperature Medium
User normal, cold color temperature, warm temperature
Aspect Ratio 16:9
Includes eight screen zoom and 16:9 display
Noise Reduction Middle
Image background noise reduction
PC Setup
In VGA mode, picture mode only contrast and brightness can be adjust
Option Menu
You can adjust the OSD language, transparency, menu display time.
Memory recall: the machine can be set back to factory settings
14
Audio Menu
When playing, press V + / - adjust the volume directly.
Sound Mode Standard
Select the sound playing mold
Balance
Left, right sound channel Equilibrium
Auto Volume Off
According ambient noise a just the Volume
Surround Sound Off
Sound accompaniment surround
SPDIF MODE PCM
Sound accompaniment surround
EQ
Select the accompanying sound effect
15
16
Maintenance
Maintenance filter
The filter should be cleaned at least once a month (more often in dusty environments),or the
projector will overheat
the step as follow
1、Remove the screws and the grille like indicated below
2、Clear the dusty on the filter. Dry the filter sufficiently, never install a moist filter in this projector,
and complete the installation.
Replace the projector lamp
Our projector lamp warranty 6 months. In different environment, after 8000hours,the lamp brightness
will reduce, the image will become dark. Therefore, please replace the lamp according to the following
steps.
1. Remove of bulb compartment cover.
2. Remove of view finder
Unscrew the 2 bolts showed in the picture above, vertically lift the holder of view finder.
17
3. Remove of bulb
As showed in above picture, take one end of the bulb, follow the direction of arrow 1 to lift the bulb so
that the bulb’s end come out of the socket; then take out the bulb by following the direction of arrow 2.
4. Installation of bulb
Bulb’s installation is an opposite process of bulb remove.
Note: When installing a bulb, please make sure to have the bulb’s glass mouth face downward.
Before replacing the lamp, make sure the lamp are cold
Before open the lamp cover board, pull out the power cable
When replacing the lamp, donot drop some dirty goods inside the projector.
Cleaning of LCD panel
Unscrew the bolt showed in picture below, take out the cover, then do the cleaning of LCD with
dry and soft cloth.
Warning: Faulty operation of this cleaning would possibly cause a fatal failure to the projector.
Nonprofessionals are not allowed to do the LCD cleaning. For any failure caused owing to the LCD
cleaning by the end users privately, the manufacturer reserves the right to refuse a service request.
18
Trouble Shooting
TROUBLE SHOOTING
Please refer to this chapter when you encounter a problem list prior to contacting your
dealer.
Symptom
Possible Solution(s)
No power
1、Is the power cord properly connected?
2、Is the fuse broken?(If you don’t where is the fuse, please refer to the
Appearance instruction chapter. )
The lamp does not
work when turning
on the power
No Image
Remote control does
not work
1、The lamp is broken or out of service life, please replace the lamp and
test it again.
2、Is the power turned on and off frequently? Reset it for 15 minutes.
1、Have you open the lens cap at first?
2、Is the connecting correct? Make sure all the signal cords are correctly
connected and select the correct input signal.
1、Are the batteries in the remote control used up? Are the batteries
installed correctly?
2、Aim remote correct at the IR receiver(At the front of projector)
3、Projector turned on to quickly after last turn off(Need about 5
minutes)
1、Dust cover the filter, please wash this filter by water.
2、Some of fans are broken, donot turn again, It
Projector turns off
automatically
is high temperature
protected system. Please replace the broken fans quickly.
The laptop choose VGA output example:
If have connected to the projector with laptop, you maybe need the keyboard or function setting to
change destination of output. Please press the button "Fn", and press the button "F*" at the same
time.( Here with such as the sign "
" on the button)
VGA output choose example
NEC
Fn+F3
SOTEC
Panasonic
Toshiba
Fn+F5
HP
Fn+F4
SONY
Fn+F7
LENOVO
IBM
Fujitsu
Fn+F10
DELL
Fn+F8
19
Specification
Display Technology:
TFT – Single LCD Panel
Multimedia Interface:
2*HDMI(Support 1.1-1.3), 2*USB (Support Hard Disk), VGA (PC), YPbPr,
S-Video, Composite A/V, Audio out (L/R), Analog TV input(SPV312TV)
Speaker:
LCD
5W
800*600, 1024*768, 720P, 1080P
Contrast ratio: 1000:1
Lens
aperture: 3.8
Focus: 160mm
Lamp
power: 150w
Color-Temperature: 9300k
Life: 8000 hours
Working time: <24 hours
Image
size: 50-120inch(suggested)
Brightness: 2200lumens
Keystone:+/- 20 degree
Power
Supply:AC Input 100-240V, 50-60Hz
Power consumption: < 230w
Working condition temperature:0.C~ +70.C
Humidity:
10%---65%
Store condition temperature:
Humidity:
Machine size:
-20.c~+70.c
10% ~ 90%
30x240x100mm
Net Weight:
2.7 KG
Color:
Black or white
Note: Specifications are subject to change without notice.
20
Accessory and purchasable parts
When you open the carton of projector, please check the full accessories
Accessory list:
Projector……………………………………………………………………1unit
Remote control…………………………………………………………… 1pc
Power cable………………………………………………………………
1pc
AV signal cable………………………………………………………………1pc
VGA signal cable……………………………………………………………1pc
Warranty card……………………………………………………………… 1pc
Manual………………………………………………………………………1pc
Spare fuse……………………………………………………………………1pc
Purchasable accessory
1、projector screen
2、projector ceiling mount
3、spare lamps
21
Warranty Card
Name/Company:
Telephone:
Address:
Fax No:
Product Purchased:
Model No:
Serial No:
Dealer Name:
Date of Purchase:
Invoice No:
This card to be remained by customer
Thank you very much for the purchase of this product.
We offer free repair service for a period of two years from the date of purchase in accordance with the
terms and condition state on the back of this card.
In the event of servicing, please return faulty product with complete Warranty Card and original
invoice to the following.
22