
1
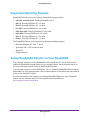
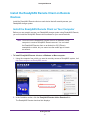
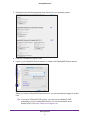
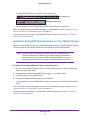
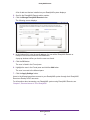
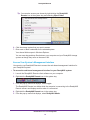
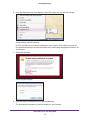
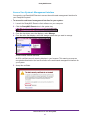
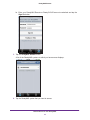
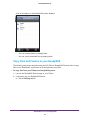
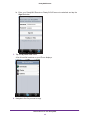
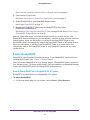
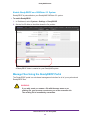
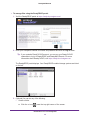
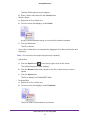
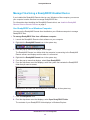
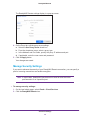
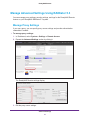
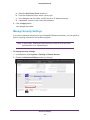
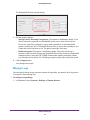
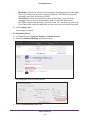
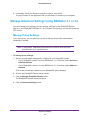
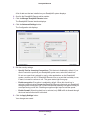
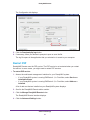
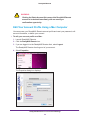
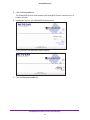
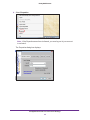
ReadyNAS Remote User Manual June 2013 202-11078-03 350 East Plumeria Drive San Jose, CA 95134 USA ReadyNAS Remote Support Thank you for selecting this NETGEAR product. After installing your device, locate the serial number on the label of your product and use it to register your product at https://my.netgear.com. You must register your product before you can use NETGEAR telephone support. NETGEAR recommends registering your product through the NETGEAR website. For product updates, additional documentation, and support, visit http://support.netgear.com. Phone (US & Canada only): 1-888-NETGEAR. Phone (Other Countries): Check the list of phone numbers at http://support.netgear.com/general/contact/default.aspx. Trademarks NETGEAR, the NETGEAR logo, and Connect with Innovation are trademarks and/or registered trademarks of NETGEAR, Inc. and/or its subsidiaries in the United States and/or other countries. Information is subject to change without notice. © NETGEAR All rights reserved. 2 Contents Chapter 1 Getting Started ReadyNAS Remote Basic Concepts . . . . . . . . . . . . . . . . . . . . . . . . . . . . . . 6 Supported Operating Systems . . . . . . . . . . . . . . . . . . . . . . . . . . . . . . . . . . . 7 Set Up ReadyNAS Remote on Your ReadyNAS . . . . . . . . . . . . . . . . . . . . . 7 Install the ReadyNAS Remote Client on Remote Devices . . . . . . . . . . . . . . 8 Install the ReadyNAS Remote Client on Your Computer . . . . . . . . . . . . . 8 Install the ReadyNAS Remote Client on Your Mobile Device . . . . . . . . 10 Allow Cloud Users to Access Your ReadyNAS System . . . . . . . . . . . . . . . 11 Allow Cloud Users to Access Your ReadyNAS OS 6 System . . . . . . . . 11 Allow Cloud Users to Access Your RAIDiator 5.3 System . . . . . . . . . . . 13 Allow Cloud Users to Access Your RAIDiator 4.1 or 4.2 System . . . . . . 14 Chapter 2 Remote Access to Your ReadyNAS Access Your ReadyNAS Using ReadyNAS Remote . . . . . . . . . . . . . . . . . 17 Use ReadyNAS Remote on a Windows Computer . . . . . . . . . . . . . . . . 17 Use ReadyNAS Remote on a Mac Computer . . . . . . . . . . . . . . . . . . . . 20 Use ReadyNAS Remote on a Mobile Device . . . . . . . . . . . . . . . . . . . . . . . 22 Browse Files and Folders on Your ReadyNAS. . . . . . . . . . . . . . . . . . . . 22 Copy Files and Folders to your ReadyNAS . . . . . . . . . . . . . . . . . . . . . . 24 Use ReadyDROP . . . . . . . . . . . . . . . . . . . . . . . . . . . . . . . . . . . . . . . . . . . . 26 Enable ReadyDROP. . . . . . . . . . . . . . . . . . . . . . . . . . . . . . . . . . . . . . . . 27 Manage Files Using the ReadyDROP Portal . . . . . . . . . . . . . . . . . . . . . 29 Manage Files Using a ReadyDROP-Enabled Device. . . . . . . . . . . . . . . 32 Chapter 3 Advanced Settings Manage Advanced Settings Using ReadyNAS OS 6 . . . . . . . . . . . . . . . . . 35 Manage Proxy Settings . . . . . . . . . . . . . . . . . . . . . . . . . . . . . . . . . . . . . 35 Manage Security Settings. . . . . . . . . . . . . . . . . . . . . . . . . . . . . . . . . . . . 36 Manage Logs . . . . . . . . . . . . . . . . . . . . . . . . . . . . . . . . . . . . . . . . . . . . . 38 Manage Advanced Settings Using RAIDiator 5.3. . . . . . . . . . . . . . . . . . . . 41 Manage Proxy Settings . . . . . . . . . . . . . . . . . . . . . . . . . . . . . . . . . . . . . 41 Manage Security Settings. . . . . . . . . . . . . . . . . . . . . . . . . . . . . . . . . . . . 42 Manage Logs . . . . . . . . . . . . . . . . . . . . . . . . . . . . . . . . . . . . . . . . . . . . . 43 Manage Advanced Settings Using RAIDiator 4.1 or 4.2. . . . . . . . . . . . . . . 46 Manage Proxy Settings . . . . . . . . . . . . . . . . . . . . . . . . . . . . . . . . . . . . . 46 Manage Security Settings. . . . . . . . . . . . . . . . . . . . . . . . . . . . . . . . . . . . 47 Manage Logs . . . . . . . . . . . . . . . . . . . . . . . . . . . . . . . . . . . . . . . . . . . . . 49 Restart P2P . . . . . . . . . . . . . . . . . . . . . . . . . . . . . . . . . . . . . . . . . . . . . . 51 3 ReadyNAS Remote Chapter 4 ReadyNAS Remote Account and Client Settings Edit Your ReadyNAS Remote Account Profile . . . . . . . . . . . . . . . . . . . . . . 54 Edit Your Account Profile Using a Windows Computer . . . . . . . . . . . . . 54 Edit Your Account Profile Using a Mac Computer . . . . . . . . . . . . . . . . . 56 Manage Your ReadyNAS Remote Client Settings . . . . . . . . . . . . . . . . . . . 59 Manage Client Settings on a Windows Computer . . . . . . . . . . . . . . . . . 59 Manage Client Settings on a Mac Computer . . . . . . . . . . . . . . . . . . . . . 66 4 1. 1 Getting Started This manual describes how to use ReadyNAS Remote to remotely access your ReadyNAS storage system. ReadyNAS Remote lets you access your storage system anywhere you have Internet access. With ReadyNAS Remote, you can drag and drop files between your ReadyNAS system and your computer or smartphone as though they were on the same LAN. Data transmission over the Internet goes through an encrypted tunnel, so your data stays private as it transfers to and from your ReadyNAS system. This chapter covers the following topics: • ReadyNAS Remote Basic Concepts • Supported Operating Systems • Set Up ReadyNAS Remote on Your ReadyNAS • Install the ReadyNAS Remote Client on Remote Devices • Allow Cloud Users to Access Your ReadyNAS System For more information about the topics that are covered in this manual, visit the ReadyNAS Remote FAQs web page at www.readynas.com/?page_id=2545. You can also visit the ReadyNAS Remote support forum at www.readynas.com/forum/viewforum.php?f=75. 5 ReadyNAS Remote ReadyNAS Remote Basic Concepts The ReadyNAS Remote software has two parts: • ReadyNAS Remote for ReadyNAS. Runs on your ReadyNAS system. • ReadyNAS Remote client. Runs on each remote device (computer, smartphone, or tablet) that you want to use to access your ReadyNAS system over the Internet. When both of these parts are set up, you can drag and drop files between your ReadyNAS system and your remote device, using simple tools like Windows File Explorer or OS X Finder. All file permissions and share security settings are retained as though you were on a local area network (LAN). With ReadyNAS Remote, your ReadyNAS system and your remote devices access a remote server at NETGEAR and use a peer-to-peer (P2P) virtual private network (VPN) connection. Data transmission over the Internet goes through an encrypted tunnel, so your data stays private as it transfers to and from your ReadyNAS system. Using ReadyNAS Remote involves these high-level steps: 1. Set up ReadyNAS Remote on your ReadyNAS storage system. • If your storage system is running ReadyNAS OS 6 or RAIDiator 5.3, simply enable the ReadyNAS Remote feature on your storage system. • If your storage system is running RAIDiator 4.2 or 4.1, install the ReadyNAS Remote add-on and enable it on your storage system. See Set Up ReadyNAS Remote on Your ReadyNAS on page 7. 2. Install ReadyNAS Remote client software on your computer. If you want, you can also install the ReadyNAS Remote client (app) on your smartphone or tablet. See Install the ReadyNAS Remote Client on Remote Devices on page 8. 3. Grant access to Cloud users. See Allow Cloud Users to Access Your ReadyNAS System on page 11. 4. Use ReadyNAS Remote to remotely access your ReadyNAS. See Chapter 2, Remote Access to Your ReadyNAS. Getting Started 6 ReadyNAS Remote Supported Operating Systems ReadyNAS Remote runs on the following ReadyNAS storage systems: • 100, 300, and 500 series. Running ReadyNAS OS 6. • NV+ v2. Running RAIDiator 5.3.1 or later. • Duo v2. Running RAIDiator 5.3.1 or later. • Pro 2/4/6. Running RAIDiator 4.2.4 or later. • Ultra Plus 2/4/6. Running RAIDiator 4.2.4 or later. • Ultra 2/4/6. Running RAIDiator 4.2.4 or later. • NV+ v1. Running RAIDiator 4.1.5 or later. • Duo v1. Running RAIDiator 4.1.5 or later. The ReadyNAS Remote client supports the following operating systems: • Microsoft Windows XP, Vista, 7, and 8 • Apple Mac OS X 10.5 Leopard or later • Apple iOS • Google Android Set Up ReadyNAS Remote on Your ReadyNAS If your storage system is running ReadyNAS OS 6 or RAIDiator 5.3, all you need to do is enable the ReadyNAS Remote feature on your storage system. Use a computer that is on the same local area network (LAN) as the ReadyNAS system. If your storage system is running RAIDiator 4.2 or 4.1, install the ReadyNAS Remote add-on and enable it on your storage system. Use a computer that is on the same local area network (LAN) as the ReadyNAS system. For more information about installing or enabling ReadyNAS Remote on your ReadyNAS system, see the software manual for your system, which is available at www.readynas.com/documentation. Getting Started 7 ReadyNAS Remote Install the ReadyNAS Remote Client on Remote Devices Install the ReadyNAS Remote client on each device that will remotely access your ReadyNAS storage system. Install the ReadyNAS Remote Client on Your Computer Before you can remotely access your ReadyNAS storage system using ReadyNAS Remote, you must install the ReadyNAS Remote client software on your remote devices. Note: You must use the ReadyNAS Remote client on a Windows or Mac computer to create a ReadyNAS Remote account. You can install the ReadyNAS Remote client on an Android or iOS (iPhone) smartphone or tablet, but you cannot use the mobile app to create an account. To install ReadyNAS Remote client on a Windows or Mac computer: 1. Using the computer from which you want to remotely access a ReadyNAS system, visit http://www.netgear.com/ReadyNAS-remote. 2. In the Quicklinks section, click the ReadyNAS Remote Addon Download link. The ReadyNAS Remote download site displays. Getting Started 8 ReadyNAS Remote 3. Download and install the appropriate client software for your operating system. 4. Launch the ReadyNAS Remote client. 5. Log in to your ReadyNAS Remote account or create a free ReadyNAS Remote account. When you create a ReadyNAS Remote account, you are automatically logged in as that user. Tip: If you have a ReadyCLOUD account, you can use your ReadyCLOUD credentials to log in to ReadyNAS Remote. For more information about ReadyCLOUD, visit https://readycloud.netgear.com. Getting Started 9 ReadyNAS Remote The ReadyNAS Remote icon displays in the system tray. Mac system tray Windows system tray You are logged in to your ReadyNAS Remote account from your computer. Next, you need to allow Cloud users to access your ReadyNAS system (see Allow Cloud Users to Access Your ReadyNAS System on page 11). Cloud users can then access your ReadyNAS system remotely (see Chapter 2, Remote Access to Your ReadyNAS). Install the ReadyNAS Remote Client on Your Mobile Device Before you can remotely access your ReadyNAS storage system using ReadyNAS Remote, you must install the ReadyNAS Remote client software on your remote devices. Note: You can install the ReadyNAS Remote client on an Android or iOS (iPhone) smartphone or tablet, but you cannot use the mobile app to create an account. You must use the ReadyNAS Remote client on a Windows or Mac computer to create a ReadyNAS Remote account. To install the ReadyNAS Remote client on a mobile device: 1. On your iOS or Android mobile device, visit the app store for your device (Apple App Store or Google Play store). 2. Download and install the ReadyNAS Remote app on your mobile device. 3. Launch the app on your mobile device. 4. Provide your ReadyNAS Remote account credentials. You are logged in to your ReadyNAS Remote account from your iOS or Android mobile device. Next, you need to allow Cloud users to access your ReadyNAS system (see Allow Cloud Users to Access Your ReadyNAS System on page 11). Cloud users can then access your ReadyNAS system remotely (see Chapter 2, Remote Access to Your ReadyNAS). Getting Started 10 ReadyNAS Remote Allow Cloud Users to Access Your ReadyNAS System Before you can remotely access your ReadyNAS system using the ReadyNAS Remote client, you must first grant access to Cloud users. Cloud users are ReadyNAS Remote or ReadyCLOUD accounts. To grant access to a Cloud user, you must add the user’s ReadyNAS Remote or ReadyCLOUD account to a remote access list on your ReadyNAS System. The following sections explain how to grant access to Cloud users on various ReadyNAS systems. For more information about ReadyCLOUD, visit https://readycloud.netgear.com. Allow Cloud Users to Access Your ReadyNAS OS 6 System To access your ReadyNAS system from your remote device (computer, smartphone, or tablet), you must first set up ReadyNAS Remote on your ReadyNAS system. (See Set Up ReadyNAS Remote on Your ReadyNAS on page 7.) Next, you must install the ReadyNAS Remote client software on each device that will remotely access your ReadyNAS storage system. (See Install the ReadyNAS Remote Client on Remote Devices on page 8.) Then, you can add Cloud users to your ReadyNAS system. Cloud users can access your ReadyNAS system using their ReadyNAS Remote or ReadyCLOUD accounts. To add a Cloud user to your ReadyNAS OS 6 system: 1. On the local admin page for your ReadyNAS OS 6 system, select Cloud > Cloud Users. 2. Click the Invite User button next to the Cloud Users list. Getting Started 11 ReadyNAS Remote A pop-up screen displays. 3. Enter the email address of the person to whom you want to grant access. 4. Click the Search button. • If that person has a ReadyNAS Remote or ReadyCLOUD account, that person’s user name appears in the search results list. Select the person’s user name and click the Invite button. That person’s user name appears in the Cloud Users list with a user icon. • If that person does not have a ReadyNAS Remote or ReadyCLOUD account, you are prompted to send the person an invitation to create a ReadyNAS Remote account. That person is added to the Cloud Users list with an envelope icon. When the new user creates a ReadyNAS Remote account, the envelope icon changes to a user icon. Cloud users have access to your ReadyNAS system through their ReadyNAS Remote or ReadyCLOUD account. For information about accessing your ReadyNAS system using ReadyNAS Remote, see Chapter 2, Remote Access to Your ReadyNAS. Getting Started 12 ReadyNAS Remote Allow Cloud Users to Access Your RAIDiator 5.3 System To access your ReadyNAS system from your remote device (computer, smartphone, or tablet), you must first set up ReadyNAS Remote on your ReadyNAS system. (See Set Up ReadyNAS Remote on Your ReadyNAS on page 7.) Next, you must install the ReadyNAS Remote client software on each device that will remotely access your ReadyNAS storage system. (See Install the ReadyNAS Remote Client on Remote Devices on page 8.) Then, you can add Cloud users to your ReadyNAS system. Cloud users can access your ReadyNAS system using their ReadyNAS Remote or ReadyCLOUD accounts. To add a Cloud user to your ReadyNAS RAIDiator 5.3 system: 1. In Dashboard, select Configure > System > Settings > Remote Access. 2. Click the + button at the top of the Access List. A pop-up screen displays. 3. Enter the email address of the person to whom you want to grant access. 4. Click the Search button. Getting Started 13 ReadyNAS Remote • If that person has a ReadyNAS Remote or ReadyCLOUD account, the person’s user name appears in the Search Result list. Select the person’s user name and click the Add button. That person’s user name appears in the Access List with a user icon. • If that person does not have a ReadyNAS Remote or ReadyCLOUD account, you are prompted to send the person an invitation to create a ReadyNAS Remote account. That person is added to the Access List with an envelope icon. When the new user creates a ReadyNAS Remote account, the envelope icon changes to a user icon. Users on your Access List have access to your ReadyNAS system through their ReadyNAS Remote or ReadyCLOUD account. For information about accessing your ReadyNAS system using ReadyNAS Remote, see Chapter 2, Remote Access to Your ReadyNAS. Allow Cloud Users to Access Your RAIDiator 4.1 or 4.2 System To access your ReadyNAS system from your remote device (computer, smartphone, or tablet), you must first set up ReadyNAS Remote on your ReadyNAS system. (See Set Up ReadyNAS Remote on Your ReadyNAS on page 7.) Next, you must install the ReadyNAS Remote client software on each device that will remotely access your ReadyNAS storage system. (See Install the ReadyNAS Remote Client on Remote Devices on page 8.) Then, you can add Cloud users to your ReadyNAS system. Cloud users can access your ReadyNAS system using their ReadyNAS Remote or ReadyCLOUD accounts. To add a Cloud user to your ReadyNAS RAIDiator 4.1 or 4.2 system: 1. Access the web-based management interface for your ReadyNAS system: • If your ReadyNAS system is running RAIDiator 4.1, in FrontView, select Services > Installed Add-ons. • If your ReadyNAS system is running RAIDiator 4.2, in FrontView, select Add-ons > Installed. Getting Started 14 ReadyNAS Remote A list of add-ons that are installed on your ReadyNAS system displays. 2. Scroll to the ReadyNAS Remote add-on section. 3. Click the Manage ReadyNAS Remote button. The following screen displays. 4. In the Lookup field, enter the email address of a user with a ReadyNAS Remote or ReadyCLOUD account and click the Find button. A pop-up window notifies you that the user was found. 5. Click the OK button. The user is listed in the Found pane. 6. Highlight the user in the Found pane and click the Add button. The user is moved to the Allowed pane. 7. Click the Apply Settings button. Users in the Allowed pane have access to your ReadyNAS system through their ReadyNAS Remote or ReadyCLOUD accounts. For information about accessing your ReadyNAS system using ReadyNAS Remote, see Chapter 2, Remote Access to Your ReadyNAS. Getting Started 15 2. Remote Access to Your ReadyNAS 2 Once you set up ReadyNAS Remote on your ReadyNAS storage system and remote devices, you can use ReadyNAS Remote to access your storage system anywhere you have Internet access. ReadyNAS Remote allows you to easily and securely access data on your ReadyNAS using the familiar Windows File Explorer or Mac Finder. To keep your information safe, data transfers between your remote device and the ReadyNAS system are encrypted. ReadyNAS systems running ReadyNAS OS 6 or RAIDiator 5.3 can also use the ReadyDROP feature. ReadyDROP allows you to synchronize files in real time between your ReadyNAS system and ReadyDROP-enabled remote devices. This chapter covers the following topics: • Access Your ReadyNAS Using ReadyNAS Remote • Use ReadyNAS Remote on a Mobile Device • Use ReadyDROP 16 ReadyNAS Remote Access Your ReadyNAS Using ReadyNAS Remote You can use ReadyNAS Remote to drag and drop files between your computer and your ReadyNAS system, even when your computer is not on the same LAN as your ReadyNAS system. You can also use ReadyNAS Remote to access the web-based management interface for your ReadyNAS system. Use ReadyNAS Remote on a Windows Computer ReadyNAS Remote allows you to easily and securely access data on your ReadyNAS system using the familiar Windows File Explorer. Access Your Shares As long as you have Internet access, you can use ReadyNAS Remote to access shares (shared folders) on your ReadyNAS. To access your shares using ReadyNAS Remote on a Windows computer: 1. Launch the ReadyNAS Remote client software on your computer. 2. Right-click the ReadyNAS Remote icon in the system tray. 3. From the pop-up menu that displays, select Log In. The ReadyNAS Remote icon blinks while the computer is connecting to the ReadyNAS Remote servers and displays as blue when it is connected. 4. Click the ReadyNAS Remote icon in the system tray. 5. A list of your ReadyNAS storage systems displays. Remote Access to Your ReadyNAS 17 ReadyNAS Remote Tip: You can also access your shares by right-clicking the ReadyNAS Remote icon in the system tray and selecting Open Folder. 6. Click the storage system that you want to access. 7. Enter user or admin credentials for the selected system. Your shared folders open in Windows Explorer. You can now drag and drop files between your computer and your ReadyNAS storage system as though they were on the same LAN. Access Your System’s Management Interface You can also use ReadyNAS Remote to access the web-based management interface for your ReadyNAS system. To access the web-based management interface for your ReadyNAS system: 1. Launch the ReadyNAS Remote client software on your computer. 2. Right-click the ReadyNAS Remote icon in the system tray. 3. From the pop-up menu that displays, select Log In. The ReadyNAS Remote icon blinks while the computer is connecting to the ReadyNAS Remote servers and displays as blue when it is connected. 4. Right-click the ReadyNAS Remote icon in the system tray. 5. From the pop-up menu that displays, select ReadyNAS Admin. Remote Access to Your ReadyNAS 18 ReadyNAS Remote 6. From the drop-down menu that displays, select the system that you want to manage. A new browser window launches. An SSL certificate security warning displays in your browser. This warning ensures an encrypted authentication and secure access to the web-based management interface for your system. 7. Accept the certificate. A login prompt displays. 8. Enter the admin credentials and click the Log In button. The web-based management interface displays in your browser. Remote Access to Your ReadyNAS 19 ReadyNAS Remote Use ReadyNAS Remote on a Mac Computer ReadyNAS Remote allows you to easily and securely access data on your ReadyNAS system using the familiar Mac Finder. Access Your Shares As long as you have Internet access, you can use ReadyNAS Remote to access shares (shared folders) on your ReadyNAS. To access your shares using ReadyNAS Remote on a Mac computer: 1. Launch the ReadyNAS Remote client software on your computer. 2. Click the ReadyNAS Remote icon in the system tray. 3. From the drop-down menu that displays, select Shares. 4. From the menu that displays, select the storage system that you want to access. 5. Enter user or admin credentials for the selected system. A list of shared folders on the selected storage system displays. 6. Select the shared folders you want to access and click the OK button. Your shared folders open in Finder. You can now drag and drop files between your Mac and your ReadyNAS storage system as though they were on the same LAN. Remote Access to Your ReadyNAS 20 ReadyNAS Remote Access Your System’s Management Interface You can also use ReadyNAS Remote to access the web-based management interface for your ReadyNAS system. To access the web-based management interface for your system: 1. Launch the ReadyNAS Remote client software on your computer. 2. Click the ReadyNAS Remote icon in the system tray. 3. From the drop-down menu that displays, select Manage. 4. From the menu that displays, select the storage system that you want to manage. A new browser window launches. An SSL certificate security warning displays in your browser. This warning ensures an encrypted authentication and secure access to the web-based management interface for your system. 5. Accept the certificate. Remote Access to Your ReadyNAS 21 ReadyNAS Remote A login prompt displays. 6. Enter the admin credentials and click the Log In button. The web-based management interface displays in your browser. Use ReadyNAS Remote on a Mobile Device The FTP file-sharing protocol must be enabled on the ReadyNAS system that you want to access from a mobile device (smartphone, tablet). For more information about how to enable file-sharing protocols, see the software manual for your ReadyNAS system. Browse Files and Folders on Your ReadyNAS The following instructions describe using the iOS (iPhone) ReadyNAS Remote client to browse files and folders on your ReadyNAS. Instructions for Android phones are similar. To access your ReadyNAS using ReadyNAS Remote on an iPhone: 1. Launch the ReadyNAS Remote app on your iPhone. 2. If necessary, log in to ReadyNAS Remote. a. Tap the Settings button. Remote Access to Your ReadyNAS 22 ReadyNAS Remote b. Enter your ReadyNAS Remote or ReadyCLOUD account credentials and tap the Sign On button. 3. Tap the ReadyNAS Remote button. A list of the ReadyNAS systems to which you have access displays. 4. Tap the ReadyNAS system that you want to access. Remote Access to Your ReadyNAS 23 ReadyNAS Remote A list of the shares on that ReadyNAS system displays. • You can browse folders by tapping them. • You can view or download files by tapping them. Copy Files and Folders to your ReadyNAS The following instructions describe using the iOS (iPhone) ReadyNAS Remote client to copy files to your ReadyNAS. Instructions for Android phones are similar. To copy files from your iPhone to a ReadyNAS system: 1. Launch the ReadyNAS Remote app on your iPhone. 2. If necessary, log in to ReadyNAS Remote. a. Tap the Settings button. Remote Access to Your ReadyNAS 24 ReadyNAS Remote b. Enter your ReadyNAS Remote or ReadyCLOUD account credentials and tap the Sign On button. 3. Tap the My Local Files button. A list of local file locations on your iPhone displays. 4. Navigate to the file you want to copy. Remote Access to Your ReadyNAS 25 ReadyNAS Remote In this example, a photo is selected. 5. Tap the Upload button. 6. Navigate to the folder on the ReadyNAS system where you want to copy the file. The file is copied to the specified folder on the ReadyNAS system. Use ReadyDROP ReadyDROP allows you to synchronize files in real time between your ReadyNAS storage system and ReadyDROP-enabled remote devices. Any files that you put in a ReadyDROP folder on your ReadyNAS system or on ReadyDROP-enabled remote devices are synchronized automatically, in the background, as long as the devices have Internet access. Changes are synchronized to all of your ReadyDROP folders in the background, in real time. Note: ReadyDROP is only available for ReadyNAS systems running RAIDiator 5.3 or ReadyNAS OS 6. Using ReadyDROP involves these high-level steps: 1. Set up ReadyNAS Remote on your ReadyNAS storage system. See Set Up ReadyNAS Remote on Your ReadyNAS on page 7. 2. Install ReadyNAS Remote client software on your computer. If you want, you can also install the ReadyNAS Remote client (app) on your smartphone. Remote Access to Your ReadyNAS 26 ReadyNAS Remote See Install the ReadyNAS Remote Client on Remote Devices on page 8. 3. Grant access to Cloud users. See Allow Cloud Users to Access Your ReadyNAS System on page 11. 4. Enable ReadyDROP on your ReadyNAS storage system. See Enable ReadyDROP on page 27. 5. Manage your ReadyDROP folder using the ReadyDROP portal or from a ReadyDROP-enabled device. See Manage Files Using the ReadyDROP Portal on page 29 and Manage Files Using a ReadyDROP-Enabled Device on page 32. After you follow these steps, your ReadyNAS system and your remote devices have ReadyDROP folders that begin to sync immediately in real time as long as the devices have Internet access. When you add, delete, or edit files in the ReadyDROP folder on your ReadyNAS system, the changes are made in the ReadyDROP folder on all remote devices. When you add, delete, or edit files in the ReadyDROP folder on a remote device, the changes are made in the ReadyDROP folder on your ReadyNAS system and any other remote devices. Enable ReadyDROP ReadyDROP uses ReadyNAS Remote technology. To use ReadyDROP, you must first set up ReadyNAS Remote (see Chapter 1, Getting Started). When you enable ReadyDROP on your storage system, a ReadyDROP folder is created on your storage system. This folder synchronizes in real time between your ReadyNAS storage system, the ReadyDROP portal, and ReadyDROP-enabled devices. Enable ReadyDROP on a ReadyNAS OS 6 System ReadyDROP is preinstalled on your ReadyNAS OS 6 system. To enable ReadyDROP: 1. On the local admin page for your system, select Cloud > Cloud Services. Remote Access to Your ReadyNAS 27 ReadyNAS Remote 2. Select the check box next to the ReadyDROP icon. 3. (Optional) If you have more than one volume on your ReadyNAS system, specify the volume on which you want to create the ReadyDROP folder. a. Click the ReadyDROP icon. b. Select Settings from the pop-up menu that displays. c. In the pop-up screen that displays, select a volume for the ReadyDROP folder. A ReadyDROP folder is created on that volume. Remote Access to Your ReadyNAS 28 ReadyNAS Remote Enable ReadyDROP on a RAIDiator 5.3 System ReadyDROP is preinstalled on your ReadyNAS RAIDiator 5.3 system. To enable ReadyDROP: 1. In Dashboard, select System > Settings > ReadyDROP. 2. Set the On-Off slider so the slider shows the On position. A ReadyDROP folder is created on your ReadyNAS system. Manage Files Using the ReadyDROP Portal The ReadyDROP portal is a web-based management interface for all of your synchronized ReadyDROP files. WARNING: If you add, create, or rename a file with the same name as an existing file, your browser cannot warn you of the overwrite risk. The existing file is immediately overwritten. Remote Access to Your ReadyNAS 29 ReadyNAS Remote To manage files using the ReadyDROP portal: 1. Visit the ReadyDROP portal at https://readydrop.netgear.com/. 2. Enter your ReadyNAS Remote user name and password and click the Log in button. Tip: If you created a ReadyCLOUD account, you can use your ReadyCLOUD credentials to log in to ReadyDROP and ReadyNAS Remote. For more information about ReadyCLOUD, visit https://readycloud.netgear.com. The ReadyDROP portal displays. Your ReadyDROP-enabled storage systems are listed on the left. 3. (Optional) You can do any of the following: • Create a folder. a. Click the + icon( ) near the top right corner of the screen. Remote Access to Your ReadyNAS 30 ReadyNAS Remote The New Folder pop-up screen displays. • b. Enter a folder name and click the Create button. Delete a folder. a. Right-click a file or folder icon. b. From the menu that displays, select Delete. A pop-up screen displays asking you to confirm the delete command. c. Click the Yes button. The file is deleted. • Copy a file or folder from your computer by dragging a file to the portal window and dropping it. Note: Your browser must support drag-and-drop capability. • Upload files. a. Click the Upload icon( ) near the top right corner of the screen. The Upload file pop-up screen displays. b. Click the Browse button and navigate to the file or folder that you want to upload. c. Click the Upload icon. The file is added to the ReadyDROP folder. • Download files. a. Right-click a file or folder icon. b. From the menu that displays, select Download. The file or folder is downloaded to your device. Remote Access to Your ReadyNAS 31 ReadyNAS Remote Manage Files Using a ReadyDROP-Enabled Device If you installed the ReadyNAS Remote client on your Windows or Mac computer, you can use your computer’s native interface to manage ReadyDROP files. For information about installing the ReadyNAS Remote client, see Install the ReadyNAS Remote Client on Remote Devices on page 8. Use ReadyDROP on a Windows Computer You can use the ReadyNAS Remote client installed on your Windows computer to manage ReadyDROP files. To manage ReadyDROP files from a Windows computer: 1. Launch the ReadyNAS Remote client software on your computer. 2. Right-click the ReadyNAS Remote icon in the system tray. 3. From the pop-up menu that displays, select Log In. The ReadyNAS Remote icon blinks while the computer is connecting to the ReadyNAS Remote servers and displays as blue when it is connected. 4. Right-click the ReadyNAS Remote icon in the system tray. 5. From the pop-up menu that displays, select Open ReadyDROP. 6. From the drop-down menu that displays, select the system that contains the ReadyDROP folder that you want to access. ReadyDROP launches and the ReadyDROP icon displays in the system tray. 7. Click the ReadyDROP icon. 8. From the drop-down menu that displays, select Open ReadyDROP Folder. The contents of your ReadyDROP folder displays in Windows Explorer. Remote Access to Your ReadyNAS 32 ReadyNAS Remote You can now add, delete, or edit files in the ReadyDROP folder using the standard interface on your Windows computer. Changes are synchronized with your ReadyNAS system and all other ReadyDROP-enabled devices. Use ReadyDROP on a Mac Computer You can use the ReadyNAS Remote client installed on your Mac computer to manage ReadyDROP files. To manage ReadyDROP files from a Mac computer: 1. Launch the ReadyNAS Remote client software on your computer. 2. Click the ReadyNAS Remote icon in the system tray. 3. From the drop-down menu that displays, select ReadyDROP. 4. From the drop-down menu, select the system that contains the ReadyDROP folder that you want to access. ReadyDROP launches and a ReadyDROP icon displays in the system tray. 5. Click the ReadyDROP icon in the system tray. 6. From the drop-down menu that displays, select Open ReadyDROP Folder. The contents of your ReadyDROP folder displays in Finder. You can now add, delete, or edit files in the ReadyDROP folder using the standard interface on your Mac computer. Changes are synchronized with your ReadyNAS system and all other ReadyDROP-enabled devices. Remote Access to Your ReadyNAS 33 3. 3 Advanced Settings If your network is complex with strict firewalls, your computer or smartphone might not be able to easily connect to your ReadyNAS system over the Internet. If so, you can use advanced settings to specify more details about the connection. You can also manage the logs that ReadyNAS Remote maintains. This chapter covers the following topics: • Manage Advanced Settings Using ReadyNAS OS 6 • Manage Advanced Settings Using RAIDiator 5.3 • Manage Advanced Settings Using RAIDiator 4.1 or 4.2 34 ReadyNAS Remote Manage Advanced Settings Using ReadyNAS OS 6 You can manage proxy settings, security settings, and logs for the ReadyNAS Remote feature on your ReadyNAS OS 6 system. Manage Proxy Settings If you use a proxy, you can specify proxy server settings and provide authentication credentials if needed. To manage proxy settings: 1. On the local admin page, select Cloud > Cloud Services. 2. Click the ReadyNAS Remote icon. 3. On the pop-up menu that displays, select Settings. Advanced Settings 35 ReadyNAS Remote The ReadyNAS Remote settings display in a pop-up screen. 4. On the Proxy tab, edit the proxy server settings: a. Select the Use Proxy Server check box. b. From the drop-down menu, select a proxy type. c. In the Address and Port fields, specify the proxy IP address and port. d. If applicable, enter the user name and password. 5. Click the Apply button. Your changes are saved. Manage Security Settings If you want to enhance the security of your ReadyNAS Remote connection, you can specify a port for incoming connections and enable encryption. Note: In most cases, ReadyNAS Remote does not need to have the router port-forward to it on a specified port. To manage security settings: 1. On the local admin page, select Cloud > Cloud Services. 2. Click the ReadyNAS Remote icon. Advanced Settings 36 ReadyNAS Remote 3. On the pop-up menu that displays, select Settings. The ReadyNAS Remote settings display in a pop-up screen. 4. Click the Security tab. 5. Edit the security settings: • Specify Port for Incoming Connections. This feature is disabled by default. If you want to control the port that your ReadyNAS system uses, select this check box. Do not use a port that is already in use by other applications on the ReadyNAS system, such as port 443. If ReadyNAS Remote runs on a port that is already in use, it starts but cannot continue to run. The green status light turns gray. • Encryption. Encryption is enabled by default. When this check box is selected, communication between the ReadyNAS Remote client and your ReadyNAS storage Advanced Settings 37 ReadyNAS Remote system is encrypted. NETGEAR recommends enabling encryption unless you are experiencing a slow link. Disabling encryption might improve transfer speed. 6. Click the Apply button. Your changes are saved. Manage Logs You can specify debug levels, maximum number of log entries, and when to flush log entries. You can also download log files. To configure log settings: 1. On the local admin page, select Cloud > Cloud Services. 2. Click the ReadyNAS Remote icon. 3. On the pop-up menu that displays, select Settings. The ReadyNAS Remote settings display in a pop-up screen. Advanced Settings 38 ReadyNAS Remote 4. Click the Logs tab. 5. From the Debug Level drop-down menu, select a debug level. You can specify one of the following debug levels: • Message. Shows a debug message for every packet. • Message Info. Does not log every packet but is more verbose. • Info. This level is the default, which shows information, warnings, and errors. • Warn. Shows warnings and errors. • Error. Shows only errors. • None. No debugging messages are logged. 6. Adjust the Max Entries and Flush Entries settings. • Max Entries. Specify the number of log messages to be stored in the file. Setting Max Entries to 0 means that the log file can grow indefinitely. NETGEAR recommends choosing a value from 100 through 100,000. • Flush Entries. Specify how frequently to write to the log file. If you want every message written to the log file immediately, enter 1 in the Flush Entries field. NETGEAR recommends choosing a value of at least 100. The value you enter in the Flush Entries field cannot be larger than the value you enter in the Max Entries field. 7. Click the Apply button. Your changes are saved. To download log files: 1. On the local admin page, select Cloud > Cloud Services. 2. Click the ReadyNAS Remote icon. Advanced Settings 39 ReadyNAS Remote 3. On the pop-up menu that displays, select Settings. The ReadyNAS Remote settings display in a pop-up screen. 4. Click the Logs tab. 5. Click the Download Logs button. 6. If necessary, follow your browser’s prompts to open or save the file. The log file opens in the application that you selected or is saved to your computer. Advanced Settings 40 ReadyNAS Remote Manage Advanced Settings Using RAIDiator 5.3 You can manage proxy settings, security settings, and logs for the ReadyNAS Remote feature on your ReadyNAS RAIDiator 5.3 system. Manage Proxy Settings If you use a proxy, you can specify proxy server settings and provide authentication credentials if needed. To manage proxy settings: 1. In Dashboard, select System > Settings > Remote Access. 2. Expand the Advanced Settings section by clicking it. The ReadyNAS Remote settings display. 3. Edit the proxy server settings: Advanced Settings 41 ReadyNAS Remote a. Select the Use Proxy Server check box. b. From the drop-down menu, select a proxy type. c. In the Address and Port fields, specify the proxy IP address and port. d. If applicable, enter the user name and password. 4. Click the Apply button. Your changes are saved. Manage Security Settings If you want to enhance the security of your ReadyNAS Remote connection, you can specify a port for incoming connections and enable encryption. Note: In most cases, ReadyNAS Remote does not need to have the router port-forward to it on a specified port. To manage security settings: 1. In Dashboard, select System > Settings > Remote Access. 2. Expand the Advanced Settings section by clicking it. Advanced Settings 42 ReadyNAS Remote The ReadyNAS Remote settings display. 3. Edit the security settings: • Specify Port for Incoming Connections. This feature is disabled by default. If you want to control the port that your ReadyNAS system uses, select this check box. Do not use a port that is already in use by other applications on the ReadyNAS system, such as port 443. If ReadyNAS Remote runs on a port that is already in use, it starts but cannot continue to run. The green status light turns gray. • Enable encryption. Encryption is enabled by default. When this check box is selected, communication between the ReadyNAS Remote client and your ReadyNAS storage system is encrypted. NETGEAR recommends enabling encryption unless you are experiencing a slow link. Disabling encryption might improve transfer speed. 4. Click the Apply button. Your changes are saved. Manage Logs You can specify debug levels, maximum number of log entries, and when to flush log entries. You can also download log files. To configure log settings: 1. In Dashboard, select System > Settings > Remote Access. Advanced Settings 43 ReadyNAS Remote 2. Expand the Advanced Settings section by clicking it. The ReadyNAS Remote settings display. 3. From the Debug Level drop-down menu, select a debug level. You can specify one of the following debug levels: • Debug Mesg. Shows a debug message for every packet. • Debug Mesg Info. Does not log every packet but is more verbose. • Debug Info. This level is the default, which shows information, warnings, and errors. • Debug warn. Shows warnings and errors. • Debug error. Shows only errors. • Debug none. No debugging messages are logged. 4. Adjust the Max Entries and Flush Entries settings. Advanced Settings 44 ReadyNAS Remote • Max Entries. Specify the number of log messages to be stored in the file. Setting Max Entries to 0 means that the log file can grow indefinitely. NETGEAR recommends choosing a value from 100 through 100,000. • Flush Entries. Specify how frequently to write to the log file. If you want every message written to the log file immediately, enter 1 in the Flush Entries field. NETGEAR recommends choosing a value of at least 100. The value you enter in the Flush Entries field cannot be larger than the value you enter in the Max Entries field. 5. Click the Apply button. Your changes are saved. To download log files: 1. In Dashboard, select System > Settings > Remote Access. 2. Expand the Advanced Settings section by clicking it. The ReadyNAS Remote settings display. 3. Click the Download p2p Logs button. Advanced Settings 45 ReadyNAS Remote 4. If necessary, follow your browser’s prompts to open or save the file. The log file opens in the application that you selected or is saved to your computer. Manage Advanced Settings Using RAIDiator 4.1 or 4.2 You can manage proxy settings, security settings, and logs for the ReadyNAS Remote add-on on your ReadyNAS RAIDiator 4.1 or 4.2 system. If necessary, you can also restart the P2P service. Manage Proxy Settings If you use a proxy, you can specify proxy server settings and provide authentication credentials if needed. Note: In most cases, ReadyNAS Remote does not need to have the router port-forward to it on a specified port. To manage proxy settings: 1. Access the web-based management interface for your ReadyNAS system: • If your ReadyNAS system is running RAIDiator 4.1, in FrontView, select Services > Installed Add-ons. • If your ReadyNAS system is running RAIDiator 4.2, in FrontView, select Add-ons > Installed. A list of add-ons that are installed on your ReadyNAS system displays. 2. Scroll to the ReadyNAS Remote add-on section. 3. Click the Manage ReadyNAS Remote button. The ReadyNAS Remote interface displays. 4. Click the Advanced Settings button. Advanced Settings 46 ReadyNAS Remote The Configuration tab displays. 5. Edit the proxy server settings: a. Select the Use Proxy Server check box. b. From the drop-down menu, select a proxy type. c. In the Address and Port fields, specify the proxy IP address and port. d. If applicable, enter the user name and password. 6. Click the Apply Settings button. Your changes are saved. Manage Security Settings If you want to enhance the security of your ReadyNAS Remote connection, you can specify a port for incoming connections and enable encryption. You can also enable a firewall. Note: In most cases, ReadyNAS Remote does not need to have the router port-forward to it on a specified port. To manage security settings: 1. Access the web-based management interface for your ReadyNAS system: • If your ReadyNAS system is running RAIDiator 4.1, in FrontView, select Services > Installed Add-ons. • If your ReadyNAS system is running RAIDiator 4.2, in FrontView, select Add-ons > Installed. Advanced Settings 47 ReadyNAS Remote A list of add-ons that are installed on your ReadyNAS system displays. 2. Scroll to the ReadyNAS Remote add-on section. 3. Click the Manage ReadyNAS Remote button. The ReadyNAS Remote interface displays. 4. Click the Advanced Settings button. The Configuration tab displays. 5. Edit the security settings: • Specify Port for Incoming Connections. This feature is disabled by default. If you want to control the port that your ReadyNAS system uses, select this check box. Do not use a port that is already in use by other applications on the ReadyNAS system, such as port 443. If ReadyNAS Remote runs on a port that is already in use, it starts, but cannot continue to run. The green status light turns gray. • Enable encryption. Encryption is enabled by default. When this check box is selected, communication between the ReadyNAS Remote client and your ReadyNAS storage system is encrypted. NETGEAR recommends enabling encryption unless you are experiencing a slow link. Disabling encryption might improve transfer speed. • Enable firewall. When this check box is selected, only SMB traffic is allowed through the tunnel and all other traffic is blocked. 6. Click the Apply Settings button. Your changes are saved. Advanced Settings 48 ReadyNAS Remote Manage Logs You can specify debug levels, maximum number of log entries, and when to flush log entries. You can also download log files. To configure log settings: 1. Access the web-based management interface for your ReadyNAS system: • If your ReadyNAS system is running RAIDiator 4.1, in FrontView, select Services > Installed Add-ons. • If your ReadyNAS system is running RAIDiator 4.2, in FrontView, select Add-ons > Installed. A list of add-ons that are installed on your ReadyNAS system displays. 2. Scroll to the ReadyNAS Remote add-on section. 3. Click the Manage ReadyNAS Remote button. The ReadyNAS Remote interface displays. 4. Click the Advanced Settings button. The Configuration tab displays. 5. From the Debug Level drop-down menu, select a debug level. You can specify one of the following debug levels: • Debug Mesg. Shows a debug message for every packet. • Debug Mesg Info. Does not log every packet but is more verbose. • Debug Info. This level is the default, which shows information, warnings, and errors. • Debug warn. Shows warnings and errors. Advanced Settings 49 ReadyNAS Remote • Debug error. Shows only errors. • Debug none. No debugging messages are logged. 6. Adjust the Max Entries and Flush Entries settings. • Max Entries. Specify the number of log messages to be stored in the file. Setting Max Entries to 0 means that the log file can grow indefinitely. NETGEAR recommends choosing a value from 100 through 100,000. • Flush Entries. Specify how frequently to write to the log file. If you want every message written to the log file immediately, enter 1 in the Flush Entries field. NETGEAR recommends choosing a value of at least 100. The value you enter in the Flush Entries field cannot be larger than the value you enter in the Max Entries field. 7. Click the Apply Settings button. Your changes are saved. To download a P2P log: 1. Access the web-based management interface for your ReadyNAS system: • If your ReadyNAS system is running RAIDiator 4.1, in FrontView, select Services > Installed Add-ons. • If your ReadyNAS system is running RAIDiator 4.2, in FrontView, select Add-ons > Installed. A list of add-ons that are installed on your ReadyNAS system displays. 2. Scroll to the ReadyNAS Remote add-on section. 3. Click the Manage ReadyNAS Remote button. The ReadyNAS Remote interface displays. 4. Click the Advanced Settings button. Advanced Settings 50 ReadyNAS Remote The Configuration tab displays. 5. Click the Download p2p logs button. 6. If necessary, follow your browser’s prompts to open or save the file. The log file opens in the application that you selected or is saved to your computer. Restart P2P ReadyNAS Remote uses the P2P service. The P2P service is not restarted when you restart the add-on. In some cases, you might need to restart P2P services. To restart P2P service: 1. Access the web-based management interface for your ReadyNAS system: • If your ReadyNAS system is running RAIDiator 4.1, in FrontView, select Services > Installed Add-ons. • If your ReadyNAS system is running RAIDiator 4.2, in FrontView, select Add-ons > Installed. A list of add-ons that are installed on your ReadyNAS system displays. 2. Scroll to the ReadyNAS Remote add-on section. 3. Click the Manage ReadyNAS Remote button. The ReadyNAS Remote interface displays. 4. Click the Advanced Settings button. Advanced Settings 51 ReadyNAS Remote The Configuration tab displays. 5. Click the Restart p2p button. The P2P service restarts. Advanced Settings 52 4. ReadyNAS Remote Account and Client Settings You can use the ReadyNAS Remote client installed on your Windows or Mac computer to access your ReadyNAS Remote account profile. You can also edit the settings for your ReadyNAS Remote client. This chapter covers the following topics: • Edit Your ReadyNAS Remote Account Profile • Manage Your ReadyNAS Remote Client Settings 53 4 ReadyNAS Remote Edit Your ReadyNAS Remote Account Profile You can use the ReadyNAS Remote client installed on your Windows or Mac computer to access your ReadyNAS Remote account profile. Edit Your Account Profile Using a Windows Computer You can access your ReadyNAS Remote account profile and reset your password, edit account information, or delete your account. To edit your account profile on a Windows computer: 1. Launch ReadyNAS Remote. 2. Right-click the ReadyNAS Remote icon in the system tray. 3. Select View Profile. The ReadyNAS Remote client launches the ReadyNAS Remote member site in a browser window. 4. If prompted, log in to your ReadyNAS Remote account. ReadyNAS Remote Account and Client Settings 54 ReadyNAS Remote In your browser, the Welcome window displays. 5. Click the View your profile link. The Account Information window displays. 6. (Optional) Manage your account: • To reset your password, click the Reset Password link and follow the prompts. • To edit your first name, last name, or email address, click the Edit Account Information link and follow the prompts. • To delete your account, click the Delete Account link. ReadyNAS Remote Account and Client Settings 55 ReadyNAS Remote WARNING: Clicking the Delete Account link causes this ReadyNAS Remote account to be deleted immediately, with no warning or confirmation opportunity. Edit Your Account Profile Using a Mac Computer You can access your ReadyNAS Remote account profile and reset your password, edit account information, or delete your account. To edit your account profile on a Mac: 1. Launch ReadyNAS Remote. 2. Click the ReadyNAS Remote icon. 3. If you are logged in to the ReadyNAS Remote client, select Logout. The ReadyNAS Remote client logs out of your account. 4. Select Properties. The Properties dialog box displays. ReadyNAS Remote Account and Client Settings 56 ReadyNAS Remote 5. Click the View profile link. The ReadyNAS Remote client launches the ReadyNAS Remote member site in a browser window. 6. If prompted, log in to your ReadyNAS Remote account. In your browser, the Welcome window displays. 7. Click the View your profile link. ReadyNAS Remote Account and Client Settings 57 ReadyNAS Remote The Account Information window displays. 8. (Optional) Manage your account: • To reset your password, click the Reset Password link and follow the prompts. • To edit your first name, last name, or email address, click the Edit Account Information link and follow the prompts. • To delete your account, click the Delete Account link. WARNING: Clicking the Delete Account link causes this ReadyNAS Remote account to be deleted immediately, with no warning or confirmation opportunity. ReadyNAS Remote Account and Client Settings 58 ReadyNAS Remote Manage Your ReadyNAS Remote Client Settings This section describes how to configure the settings for your ReadyNAS Remote Windows or Mac client. Manage Client Settings on a Windows Computer After you install the ReadyNAS Remote client on your Windows computer, you can edit the login, connection, advanced, and service settings. Edit Login Settings You can change the ReadyNAS Remote account that your client logs in to. To edit the login settings: 1. Launch the ReadyNAS Remote client. 2. Right-click the ReadyNAS Remote icon in the system tray. 3. If necessary, select Logout and log out of your account. 4. Select Properties. Note: If the Properties menu item is dimmed, you must log out of your account to activate it. ReadyNAS Remote Account and Client Settings 59 ReadyNAS Remote The Properties dialog box displays. 5. In the Application Settings tab, edit the login settings. • User ID. Change the ReadyNAS Remote account that the client logs in to by editing the user ID and password. • Password. Change the ReadyNAS Remote account that the client logs in to by editing the user ID and password. • Remember my ID & password. When this check box is selected, the client saves the information that you entered in the User ID and Password fields. • Log me in automatically. When this check box is selected, the client uses the user ID and password that you provided to automatically log in to your ReadyNAS Remote account whenever the client is launched. 6. Click the OK button. Your changes are saved. Edit Connection Settings You can manage encryption, port forwarding, and proxy settings for your ReadyNAS Remote client. To edit the connection settings: 1. Launch the ReadyNAS Remote client. 2. Right-click the ReadyNAS Remote icon in the system tray. 3. If necessary, select Logout and log out of your account. ReadyNAS Remote Account and Client Settings 60 ReadyNAS Remote 4. Select Properties. Note: If the Properties menu item is dimmed, you must log out of your account to activate it. The Properties dialog box displays. ReadyNAS Remote Account and Client Settings 61 ReadyNAS Remote 5. Click the Connection settings tab. 6. Edit the connection settings: • Enable Encryption. When this check box is selected, communication between the ReadyNAS Remote client and your ReadyNAS storage system is encrypted. NETGEAR recommends enabling encryption unless you are experiencing a slow link. Disabling encryption might improve transfer speed. • Enable port forwarding. If either the ReadyNAS Remote client or the ReadyNAS storage system cannot make a direct connection to the other through their respective firewalls, they instead use a relay server, which reduces speed. In this case, you can enable a port forward on the firewall on either the ReadyNAS Remote client or on the ReadyNAS storage system (but not both) and specify which port is forwarded here. • Proxy Settings. Use these settings if your network uses a proxy server to manage Internet traffic. When the Enable Automatic Proxy Detection check box is selected, the client tries to determine proxy settings itself. When the Manually Set Proxy Server check box is selected, you must specify the proxy settings manually. 7. Click the OK button. Your changes are saved. Edit Advanced Settings You can edit various advanced settings for your ReadyNAS Remote client. To edit the advanced settings: 1. Launch the ReadyNAS Remote client. 2. Right-click the ReadyNAS Remote icon in the system tray. 3. If necessary, select Logout and log out of your account. ReadyNAS Remote Account and Client Settings 62 ReadyNAS Remote 4. Select Properties. Note: If the Properties menu item is dimmed, you must log out of your account to activate it. The Properties dialog box displays. ReadyNAS Remote Account and Client Settings 63 ReadyNAS Remote 5. Click the Advanced tab. 6. Edit the advanced settings: • Enable Notifications. Select this check box to enable notifications from your status bar; clear this check box to disable notifications. • Priority. Set the network traffic priority of the ReadyNAS Remote client’s P2P activity. • Enable firewall. Select this check box to allow only SMB traffic through the tunnel, blocking all others. • Enable Log File. Mostly used by support to troubleshoot ReadyNAS Remote issues, select this check box to a log file with debugging information in the directory where the ReadyNAS Remote client is installed. • Rescan device list. If you added a NIC, select this check box to direct the ReadyNAS Remote client to check for new devices. • Reuse connection method. Select this check box to direct the ReadyNAS Remote client to use the same connection method (either direct or through the ReadyNAS Remote tunnel) as its last run. 7. Click the OK button. Your changes are saved. Edit Service Settings If you have a ReadyNAS system with the ReadyDROP feature, you can edit settings for the local ReadyDROP folder on your computer. To edit the service settings: 1. Launch the ReadyNAS Remote client. 2. Right-click the ReadyNAS Remote icon in the system tray. 3. If necessary, select Logout and log out of your account. ReadyNAS Remote Account and Client Settings 64 ReadyNAS Remote 4. Select Properties. Note: If the Properties menu item is dimmed, you must log out of your account to activate it. The Properties dialog box displays. ReadyNAS Remote Account and Client Settings 65 ReadyNAS Remote 5. Click the Services tab. 6. Edit the service settings: • Home Folder. Change the location of the ReadyDROP folder on your computer. • Add Shortcut to Desktop. Creates a shortcut on your desktop to your local ReadyDROP folder. 7. Click the OK button. Your changes are saved. Manage Client Settings on a Mac Computer After you install the ReadyNAS Remote client on your Mac computer, you can edit the login and connection settings. Edit Login Settings You can change the ReadyNAS Remote account that your client logs in to. To edit the login settings: 1. Launch the ReadyNAS Remote client. 2. Click the ReadyNAS Remote icon. 3. If necessary, select Logout and log out of your account. 4. Select Properties. ReadyNAS Remote Account and Client Settings 66 ReadyNAS Remote Note: If the Properties menu item is dimmed, you must log out of your account to activate it. The Properties dialog box displays. 5. In the Application settings tab, edit the login settings: • User ID. Change the ReadyNAS Remote account that the client logs in to by editing the user ID and password. • Password. Change the ReadyNAS Remote account that the client logs in to by editing the user ID and password. • Remember my ID & password. When this check box is selected, the client saves the information that you entered in the User ID and Password fields. • Log me in automatically. When this check box is selected, the client uses the user ID and password that you provided to automatically log in to your ReadyNAS Remote account whenever the client is launched. 6. Click the OK button. Your changes are saved. Edit Connection Settings You can manage encryption, port forwarding, and proxy settings for your ReadyNAS Remote client. To edit the connection settings: 1. Launch the ReadyNAS Remote client. 2. Click the ReadyNAS Remote icon. 3. If necessary, select Logout and log out of your account. ReadyNAS Remote Account and Client Settings 67 ReadyNAS Remote 4. Select Properties. Note: If the Properties menu item is dimmed, you must log out of your account to activate it. The Properties dialog box displays. 5. Click the Connection settings tab. 6. Edit the connection settings: ReadyNAS Remote Account and Client Settings 68 ReadyNAS Remote • Enable Encryption. When this check box is selected, communication between the ReadyNAS Remote client and your ReadyNAS storage system is encrypted. NETGEAR recommends enabling encryption unless you are experiencing a slow link. Disabling encryption might improve transfer speed. • Enable port forwarding. If either the ReadyNAS Remote client or the ReadyNAS storage system cannot make a direct connection to the other through their respective firewalls, they instead use a relay server, which reduces speed. In this case, you can enable a port forward on the firewall on either the ReadyNAS Remote client or the ReadyNAS storage system (but not both) and specify which port is forwarded here. • Proxy Settings. Use these settings if your network uses a proxy server to manage Internet traffic. When the Enable Automatic Proxy Detection check box is selected, the client tries to determine proxy settings itself. When the Manually Set Proxy Server check box is selected, you must specify the proxy settings manually. 7. Click the OK button. Your changes are saved. ReadyNAS Remote Account and Client Settings 69


![[PDF版:13.4MB] (日)](http://vs1.manualzilla.com/store/data/006537897_2-bdc033a127f4fc7c5a7cbb1be387ee25-150x150.png)