1
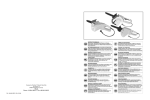
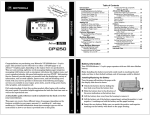
GLOBAL ACCESS - EXPLORER
USER MANUAL
This manual is a companion to the EXPLORER alphanumeric 4/2 line pager.
Control Buttons
Left Button (red square)
This button controls the lamp on/off function. Also used to display the
Function Menu and Escape.
Right Button (blue rectangle)
This button is used to read user messages. Also used to control the select
functions.
Left Arrow Button <
Used to go left through the Function menu and your messages. Used to
decrease the numbers through the functions like time, alarm and date settings.
Right Arrow Button >
Used to go right through the Function menu. Used to increase the numbers
through the functions like time, alarm, date settings.
OPERATION
Turning the pager on.
Press the left button (red square). "Pager On? Yes" is displayed. Press the left
button again. When the pager is on and no activity is taking place, the Standby
screen is displayed.
The Standby screen displays the service area indicator and may display other
indicators according to the current pager status.
Turning the pager off.
From the Standby screen, press the left button twice to display the Function
menu. Press the left arrow button. When "Pager Off? is displayed push the right
button to select and then use the right arrow button to change "Yes/No" selection
to "YES" and push the right button (blue rectangle) to select this function. Your
pager will say "goodbye" and sound an alert.
Read Personal Text Message
From the standby screen press the right button to display the message initial
screen. The current date and time are displayed. When a message is unread a
blinking black note pad is displayed in the lower right corner of the display.
Select the Message Status Screen by pressing the right button again. Unread
messages are indicated by a black envelope, while retained read messages are
indicated by a clear note pad. Locked messages are indicated by the lock
symbol. The latest unread message will display the receive date in the lower
portion of the display.
Select a message to read by using the left arrow or right arrow button to the
message and the envelope will blink. When envelope is blinking press the right
button to select.
At the top of the message the message number will be indicated as well as the
time of the message. An icon with two overlapping squares indicates a duplicate
message.
Delete Personal Text Message
From the message screen press the left button to display. Press the left or right
arrow button to move the cursor to the "X" symbol. Press the right button to
select this function.
To delete all personal messages select the "bow tie" symbol and press the right
button.
Lock Personal Message
Up to 30 messages can be locked to prevent them from being deleted or from
being replaced when memory is full. From the Message Screen press the left
button to display. Use the arrow keys to choose the lock symbol and the right
button to select.
Unlock Personal Message
First, read the locked message. Then press the left button then move the cursor
to the key symbol and press the right button to unlock the message.
Move Personal Message to Notebook
From the message screen press the left button to display. Move the cursor to the
"phone" symbol and press the right button to select.
Function Menu
The function menu provides access to the many functions of your pager through
the use of symbols and their descriptions.
As you move through the function menu, the pager will show the description of a
function the cursor selects.
The function menu is displayed by pressing the left button twice.
Read Maildrop
From the function menu press the left or right arrow to move the cursor to the
blackened envelope which indicates you have one or more unread maildrops.
Undeleted maildrops which have been read are indicated by a clear envelope.
The date of the maildrop is indicted at the bottom right of the display when the
cursor blinks on the envelope. While the cursor is on the envelope press the
right button to select it and read.
Delete Individual or All Maildrops
While the maildrop is displayed press the left button and then move the cursor to
the "x" symbol. To delete all maildrops move the cursor to the "bow tie" symbol.
To delete press the right button to select this function.
Calendar
From the Function Menu Screen, move the cursor with the arrow buttons to the
calendar symbol. Press the right button to select this function. Use the arrow
buttons to select the year then press the right button to select the month. Use
the arrow buttons to scroll through the months.
Setting the Incoming Message Alert
From the Function Menu Screen, use the arrow buttons to move the cursor to the
musical note symbol. Select this function by pressing the right button.
There are 4 different alert modes, an audible alert, a vibrating alert, an audible
alert after vibration alert and no alert, or silent mode. Move the cursor over the
symbols while the pager gives you a sample of each alert mode.
Setting an audible alert
From the choose alert menu, press the right button while the cursor is on the first
symbol. Move the cursor through the alerts (3 tones / 5 melodies) and press the
right button to select.
Setting the incoming Maildrop Alert On/Off
Move the cursor to the Select Alert function and press the right button twice to
select the maildrop alert then use the arrow button to select on or off.
Select the type of alert by pressing the right button to select while the cursor is in
position over the alert you desire.
Setting the Date & Time
From the function menu move the cursor to the "Set Time" icon / clock and press
the right button to select
Adjust the year with the arrow buttons then press the right button to move to the
month. Select the month and move to the day by pressing the right button
again. Press the right button again to move to the clock type select. Choose 12
or 24 hour time format with the arrow button and press the right button to move to
the hour numbers. Select the hour and note the am/pm before pressing the right
button to move to the minute numbers. Select the format to display time date in
the manner you choose, MDY/DMY/YMD.
Use the right button to select and the arrow buttons to increase or decrease the
numbers.
Setting the alarm
The pager has an alarm that can be set for 1. a daily specific time. 2. a specific
time and date. 3. a specific time and day.
From the function menu move the cursor to the bell symbol and press the right
button to select this function.
The cursor is on No. 1. Press the arrow button to move from #1 through #3
#1 alarm is set for a daily specific time. #2 is time and day. #3 is time and date.
Use the right button to select the appropriate alarm. Press the right button again
to move to the bell symbol. The alarm is on when the bell is clear. The alarm is
disabled when the bell has a stroke through it.
Setting Auto Power On/Off
You can set the pager to automatically turn on and off. This feature can greatly
improve battery life.
From the Function Menu move the cursor to the "Auto On/Off?" icon. Press the
right button to select this function. The cursor is now on the circle icon, use the
arrow button to activate "arrows around the circle" or deactivate "dots around the
circle"
Press the right button to move to the time settings and set your time on and off.
Arrow buttons to increase or decrease the numbers, right button to move to the
next selection.
To disable the auto time on/off just select the "dots around the circle" as above
and exit.
Setting the Scroll On/Off
From the Function Menu select the "Set Scrolling" icon by pressing the right
button. Use the arrow button to choose between Fixed, Fast or Slow Scrolling.
Reminder Alert for Unread Messages
When you have an unread message(s), the pager gives periodic reminder alerts
until all unread messages are read. You may adjust the frequency of the
reminder or disable it as follows
From the Function Menu select the "Set Reminder" icon. Press the right button
to select this function.
The icon is now on a "loop with an arrow" (enabled) or "loop with a dot"
(disabled) symbol. If you desire to enable you may press the right button and
select the frequency of the reminder. 2, 5, 10,15 or 30 minutes.
Use the "loop with a dot" to disable and you will see ** in place of minutes.
Note: Even though the pager is set to enable this reminder alert for unread
messages, it won't remind you when incoming message alert is set to "no alert"
or silent mode.
Setting the Display Duration Time
When the pager is left unbuttoned for a certain period, the screen of the pager is
automatically converted to be blank but is still ready to receive messages. This
feature allows for extended battery life.
From the Function Menu select the "Time Out" icon by pressing the right button.
Use the arrow button to adjust the display duration time from 4, 8, 12, 16, 20
seconds. Press the right button to select.
Note: The longer the display duration the shorter your battery life.
Zoom In/Out 4 Line display to 2 Line display.
From the Function Menu select the "Zoom In/Out" icon by pressing the right
button. Use the arrow button to select 2 or 4 line and press the right button.
Timepiece / Stopwatch
From the Function Menu select the "Timepiece" icon and press the right button.
Press the left arrow button to begin timing. Press the right arrow button to stop
timing. Press the right arrow button again to reset the clock.
Notebook
You can move the personal messages important to you to NoteBook to prevent
them from being deleted accidentally. Up to 20 messages can be stored in
NoteBook.
In order to read the message stored in Notebook.
From the Message Initial Screen press the left button and move the flashing
cursor to the message in Notebook and press the right button to read.
Memory Full Indicator
When the memory is full (50 messages) the full icon is displayed in the lower
right corner of the initial message screen. Delete any unnecessary messages.
Your oldest unlocked message will be deleted automatically when a new
message is received. Prevent message loss by locking or moving messages to
Notebook.
Out of Range Indicator
Your pager has an antenna icon on the upper row of the screen that indicates
you are in range of service. This feature may be turned off by your service
provider. If you see the indicator in your home area this function is enabled.
Battery Gauge
A battery icon keeps you informed of the battery level.
Lamp On/Off
Press the left button and then press and hold again for about 1 second. This will
turn on your lamp.
Easy way to change Alert Mode
You can easily change the incoming alert mode by pressing the arrow button
twice fast.