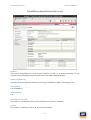
1
Linux Security Review 2015
www.av-comparatives.org
AV-Comparatives
Linux Security Review
Language: English
May 2015
Last revision: 26th May 2015
www.av-comparatives.org
-1-
Linux Security Review 2015
www.av-comparatives.org
Contents
Introduction ....................................................................................................................... 3
Reviewed products ............................................................................................................... 4
Malware for Linux systems..................................................................................................... 5
Linux security advice ............................................................................................................ 6
Items covered in the review .................................................................................................. 7
Avast File Server Security ...................................................................................................... 8
AVG Free Edition for Linux.................................................................................................... 11
Bitdefender Antivirus Scanner for Unices................................................................................ 13
Clam Antivirus for Linux....................................................................................................... 17
Comodo Antivirus for Linux .................................................................................................. 20
Dr.Web Anti-virus for Linux .................................................................................................. 24
eScan Anti-Virus for Linux .................................................................................................... 28
ESET NOD32 Antivirus for Linux Desktop ................................................................................. 31
F-PROT Antivirus for Linux Workstations ................................................................................. 35
F-Secure Linux Security ........................................................................................................ 38
G Data Client Security Business ............................................................................................. 42
Kaspersky Anti-Virus for Linux File Server ............................................................................... 47
McAfee VirusScan Enterprise for Linux .................................................................................... 53
Panda Endpoint Protection Plus ............................................................................................ 56
Seqrite Antivirus for Linux.................................................................................................... 59
Sophos Anti-Virus for Linux .................................................................................................. 60
Symantec Endpoint Protection for Linux ................................................................................. 63
Trend Micro ServerProtect for Linux ....................................................................................... 68
Appendix – Feature list ........................................................................................................ 71
Copyright and Disclaimer ..................................................................................................... 72
-2-
Linux Security Reviews 2015
www.av-comparatives.org
Introduction
Linux operating systems are often considered to be immune to malware attacks, which would mean
that antivirus software for Linux would be redundant. In reality, the situation is not so simple. Linux
malware does exist, even if the number of programs is small; for example, in March 2014, ZDNet1
reported the discovery of the cybercrime campaign “Operation Windigo”. One of Windigo’s
components – Ebury – provided attackers with a backdoor to infected servers and the ability to steal
SSH credentials and send spam mails. Researchers observed that Ebury had infected approximately
26,000 Linux servers since May 2013.
Another reason for using an antimalware program on a Linux computer is to intercept any Windows
malware before it can be passed on to a Windows system that it could infect.
We mostly used Ubuntu Linux (details below) for our review and test. Ubuntu is a very popular
distribution, with support and management packages available from Canonical, the manufacturer,
making it suitable for business use.
We used CentOS to test Trend Micro’s Linux solution, since there are no Ubuntu versions available for
their product. CentOS is a distribution based the commercial Red Hat Enterprise Linux distribution,
but without the commercial support by Red Hat.
The aim of this report is to provide an overview of available antivirus products for Linux systems. We
tried to focus on products targeted at home users. Only if a vendor does not offer a home user
version for Linux did we install the business version.
The report is targeted at Linux users, i.e. some basic Linux knowledge is assumed, since every
product requires the usage of the Linux terminal at some point.
1
http://www.zdnet.com/article/botnet-of-thousands-of-linux-servers-pumps-windows-desktop-malware-ontoweb
-3-
Linux Security Reviews 2015
www.av-comparatives.org
Reviewed products
We have reviewed the following products for this report, using the newest version available in spring
2015:
-
Avast File Server Security 1.2.0
AVG Free Edition for Linux 13.0.3118 (free, but no longer maintained)
Bitdefender Antivirus Scanner for Unices 7.14
Clam Antivirus 0.98 (free)
Comodo Antivirus for Linux 1.1.268025 (free)
Dr.Web Anti-Virus for Linux 10.0.0.0
eScan Anti-Virus for Linux 7.0-5
ESET NOD32 Antivirus for Linux Desktop 4.0.81.0
F-Prot Antivirus for Linux Workstations 6.7.10.6267 (free, but no longer maintained)
F-Secure Linux Security 10.20.358
G Data Client Security Business 13.1.0
Kaspersky Anti-Virus for Linux File Server 8.0.2.256
McAfee VirusScan Enterprise for Linux 2.0.1.29052
Panda Endpoint Protection Plus for Linux 2.10
Seqrite Antivirus for Linux 1.0
Sophos Anti-Virus for Linux 9.7.2 (free)
Symantec Endpoint Protection for Linux 12.1.5.5337
Trend Micro ServerProtect for Linux 3.0
At the time this review was written, several Linux security products did not support the latest
Ubuntu LTS version (released in April 2014). Some vendors informed us that the next release version
of their products - which will be released in the near future - would also include support for newer
Linux distributions.
-4-
Linux Security Reviews 2015
www.av-comparatives.org
Malware for Linux systems
Most Linux-malware targets the server space, not desktops. Therefore,
Anti-Virus software is mostly needed on Linux file and mail servers.
Nevertheless, Linux desktops are not completely safe either, as there
exists also cross-platform malware and phishing is a threat for any
operating system. Furthermore, as mentioned previously, Linux users
might receive and save (malicious) file attachments on their Linux
machine and act as a vector for Windows malware.
One reason why the number of Linux malware programs is relatively
small might be the large number of existing Linux kernel versions. Not
only are there various different standard versions that are currently in
use, some distributions also use a customized version of the Linux
kernel.
A survey, which gathered data concerning the different Linux kernel
versions used on Linux servers, showed that there were almost 1,300
different Linux kernel version distributed among the roughly 20,000
Linux servers included in the survey.
Not only the kernel itself, but also the software stack on top of it
comes in the form of hundreds of different Linux distributions.
The graph on the right shows an overview of these Linux
distributions2; 480 in total by October 2012, not considering that even
within the same distribution, different versions are used in practice.
The large number of different software configuration certainly makes
it harder for adversaries to produce malware that is compatible with a
bigger fraction of these configurations.
The large number of software configurations does not only affect
malware authors, however.
During the review, we found that there are essentially two ways that
vendors implement on-access scanning: either use or implement a
Linux kernel module to intercept file accesses, or build the protection
component around the fanotify file-system monitoring interface built
into newer Linux kernel versions.
A problem with the kernel module approach is that updates to the
Linux kernel can cause these low level kernel modules to become
incompatible, resulting in a malfunctioning real-time protection
module. Since the Linux kernel may be updated quite frequently –
especially on non-server machines – these modules can be hard to
maintain for vendors of security software.
2
Graph source: GNU/Linux Distribution Timeline 2012, http://futurist.se/gldt/
-5-
Linux Security Reviews 2015
www.av-comparatives.org
While the fanotify approach seems a bit easier to maintain, it has its own downsides – some
distributions disable this kernel extension by default, for instance.
The relatively low market share of Linux based operating systems on home user workstations might
be another factor that influences the amount of Linux malware. According to Netmarketshare3, the
market share of Linux is only 1.5% in the Desktop section, making Linux systems a rather unlucrative target for attackers. The low market share might also explain the relatively low numbers of
available antivirus programs targeted at Linux home users.
One last factor, we would like to mention is the way third-party software is typically installed on
Linux distributions. This kind of software is mostly installed via software repositories that contain
trusted software and are maintained by the community and/or authors of the distribution. This
makes it harder for malware authors to distribute malware by hiding it in seemingly benign software.
Linux security advice
Employing good security practices can help to further secure your Linux system. We recommend the
following:
1. Keep installed software up-to-date
2. Use phishing protection (at least the one provided in most
browsers)
3. Only install software from trusted sources (e.g., the package
manager of your Linux distribution)
4. Don’t log on as root – use the sudo utility to gain temporary
administrator access
5. Use strong passwords
6. Disable services that you don’t use (IPv6, for instance)
7. Don’t run commands you do not understand
8. Backup your data/system regularly
3
http://www.netmarketshare.com
-6-
Linux Security Reviews 2015
www.av-comparatives.org
Items covered in the review
Features: We note whether the program features real-time protection, phishing protection, firewall
etc.
System requirements: Supported Linux versions, according to the manufacturer’s documentation.
Test platform: All programs were initially tested on 64-bit Ubuntu 14.04.1 LTS. In the event that a
program did not work at all on this platform, or that an included core feature such as real-time
protection did not function properly, we additionally tested the program on 64-bit Ubuntu 12.04.2
LTS. In such cases, we have noted which features worked on which Ubuntu version.
Version tested: The version number of the program tested; we note if there are separate 32 and 64bit installers.
Home/business version: We state whether the program tested is marketed as a home or business
program, or if there are separate home and business versions.
Licence: Is the program free or commercial? Is there is a free trial version?
Installation: How to install the program on the Linux system. Where Linux Terminal commands are
needed, we have noted these, along with a description of GUI installation where this is available.
Deinstallation: How to remove the program from the computer, with Terminal commands where
necessary.
Accessing the program: Whether there is a tray icon, entry in the applications menu, or context
menu for scanning specific drives, files or folders.
Non-administrator access: Can a Linux user account without administrator privileges deactivate the
protection?
Main program window: We describe the program’s main window, and note how to access the
following functions: Status/Reactivation; Scan; Update; Logs; Quarantine; Scheduler; Licence
information; Help; Settings.
Malware alerts: Description of the malware alert shown when a threat is detected.
Help: Help features such as manuals and knowledgebase articles.
Verdict: We summarise the functionality and ease of use overall.
-7-
Linux Security Reviews 2015
www.av-comparatives.org
Avast File Server Security
Features
Avast File Server Security is part of Avast’s Linux Security Suite. It features an on-demand commandline scanner, as well as a fanotify-based real-time protection component.
System requirements
Avast lists the following distributions as compatible:
CentOS 7, Debian 7, Red Hat Enterprise Linux 7, Ubuntu 12.4 LTS
Test platform
64-bit Ubuntu 14.04.1 LTS
Version tested
1.2.0, 64 bit (a 32 bit version is available as well)
Licence
Commercial. The user can apply for a 30-day trial licence.
Installation
As documented on Avast’s website4, prior to installation, the licence file and Avast’s PGP public key
file need to be copied onto the target machine.
To install Avast File Server Security and be able to receive product updates, Avast’s debian repository
should be added to Ubuntu’s list of package repositories:
sudo su
echo "deb http://deb.avast.com/lin/repo debian release" >> /etc/apt/sources.list
apt-key add /path/to/avast.gpg
apt-get update
exit
After that, the scanner and the real-time protection component can be installed using the command
sudo apt-get install avast avast-fss. No additional packages are required.
To be able to actually start the downloaded programs, the licence file needs to be copied into the
/etc/avast folder: sudo cp /path/to/licence.avastlic /etc/avast.
4
https://www.avast.com/linux-server-antivirus
-8-
Linux Security Reviews 2015
www.av-comparatives.org
Next, to enable file system monitoring, the configuration file at /etc/avast/fss.conf needs to be
edited. In the “Monitor” section of the file, the directories that should be monitored need to be
added.
The following Monitor section adds the home directory of the user “user” to the monitored
directories:
[MONITORS]
SCAN = “/home/user/”
Once started, the file system monitor will monitor all write access to files located in the specified
directory or any of its subdirectories.
Finally, the required services need to be started: sudo service avast start and sudo service avast-fss
start.
Deinstallation
The program can be removed using the command sudo apt-get remove avast avast-fss
Accessing the program
Users interact with the program by using the Linux terminal.
Non-administrator access
In our default setup, unprivileged users can perform on-demand scans on every directory in the file
system, regardless of their access rights. However, this can be changed by using different
configuration options. Changing the application’s configuration files requires administrative
privileges.
Main program functions
Status/Reactivation The real-time protection component can be de-/reactivated using the command
sudo service avast-fss stop and sudo service avast-fss start, respectively.
Scan On-demand scans can be performed using the scan command. For example, the command scan /
will scan the whole file system. For infected files, a report is displayed. There is no option to move
infected files to the quarantine.
Update During installation, a cron job, which updates the virus definitions hourly, is created. To
perform a manual update, the included update script can be used: sudo
/var/lib/avast/Setup/avast.vpsupdate
Logs The file system monitor logs the original path of infected files in the log file located at
/var/lib/avast/fss.log
Quarantine By default, the quarantine directory for the real-time protection component is located
at /var/lib/avast/chest
Scheduler Scheduled scans can be implemented by creating cron jobs that start scan.
Licence Licence information is contained in the installed licence file at /etc/avast/licence.avastlic.
Help Documentation is available in the man-pages of the respective components (man avast / man
avast-fss).
Settings The application’s settings can be changed by editing the configuration files of the
respective program component (/etc/avast/avast.conf and /etc/avast/fss.conf).
-9-
Linux Security Reviews 2015
www.av-comparatives.org
Malware alerts
If the real-time protection component detects an infected file, the file is moved into the quarantine
folder. No alerts are displayed.
Help
A pdf document containing program documentation is available on Avast’s website5. On the machine
where the program is installed, man-pages for each installed component are available (man avast /
man avast-fss).
The man-pages are also included in the program documentation.
Verdict
Avast File Server Security is easy to install for an experienced Linux user. Although the scanner is a
command-line only tool, performing scans is straightforward. We feel that the program’s
configuration options are rather limited, however.
5
http://deb.avast.com/lin/doc/techdoc.pdf
-10-
Linux Security Reviews 2015
www.av-comparatives.org
AVG Free Edition for Linux
Features
AVG Free Edition for Linux is a command-line only scanner that features on-demand as well as onaccess scans. An installation also includes optional plugins for mail filtering and scanning of Samba
shares.
Note: while the program’s virus database can still be updated normally, AVG informed us that “AVG
Free Edition for Linux” itself is no longer developed nor maintained.
System requirements
During installation, the install script displays required libraries for Linux systems:
libc.so.6, for amd64 architecture, the lib32 compat libraries are needed
For on-access scanning redirfs, dazuko, dazukofs or a kernel supporting fanotify is needed.
Test platform
64-bit Ubuntu 14.04.1 LTS
64-bit Ubuntu 12.04.2 LTS
Version tested
13.0.3118, 32 bit (no 64 bit version available)
Home/business version
AVG Free is targeted at home users. There is no business version that runs on Linux systems.
Licence
As the name suggests, AVG Free Edition for Linux is available free.
Installation
Before installing the program using the installer from AVG's website6, the 32-Bit compatible C library
needs to be installed (sudo apt-get install libc6-i386). After marking the installer file as executable,
the downloaded file needs to be run as the root user: chmod +x avg2013flx-....sh followed by
sudo ./avg2013flx-....sh. After accepting the licence agreement, default settings can be used for the
rest of the installation configurations. In the last step of the installation process, a setup script can
be run to configure on-access scanning or other plug-ins.
6
http://free.avg.com/de-de/download-free-all-product
-11-
Linux Security Reviews 2015
www.av-comparatives.org
On our testing system, we tried to activate on-access scanning using the fanotify module, since the
other options – dazuko and redirFS – are no longer supported for newer kernel versions. However,
activating the on-access scanning rendered the system unusable – every time a file was opened, the
whole system froze, not even allowing a login using the tty terminals.
Deinstallation
The program can be uninstalled
/opt/avg/av/bin/uninstall.sh by default.
using
the
provided
uninstaller
located
at
Accessing the program
Users interact with the program by using the Linux terminal.
Non-administrator access
The avgscan command can only access files that the user invoking the command is allowed to access.
Therefore, it may be necessary to run the scanner with administrative privileges to be able to scan
all files. The program’s configuration can be changed by an unprivileged user.
Main program functions
Status/Reactivation Not applicable
Scan On-demand scans can be performed using the avgscan command. For example, the command
sudo avgscan / -u -x /dev/ will scan the whole file system except the /dev/ directory, moving
infected files into the quarantine (the -u flag – by default infected files will only be reported).
Update The avgsched scheduler component is by default configured to automatically check for
program- (every 12h) and virus database updates (every 4h). The user can run the update manually
using the avgupdate command (sudo avgupdate).
Logs The event log can be accessed using the avgevtlog command.
Quarantine By default, the quarantine folder – or “vault”, as the application calls it – is located in
the user's home folder in .avg/vault. The vault can be managed using the avgvvctl tool.
Scheduler Scheduled scans can be implemented by creating cron jobs that start avgscan.
Licence Licence information can be displayed using the avgctl --licinfo command.
Help Documentation is available in the man-pages of the respective components.
Settings The program's configuration files are not stored in plain text, so the avgcfgctl commandline tool is necessary to access the configuration files. The settings that affect each component are
documented in the respective man-pages.
Malware alerts
Unknown, since on-access scanning could not be enabled.
Help
The program installation includes readme files for available plug-ins. Other than those files, only the
man pages of the respective components (e.g., man avgscan) are available.
Verdict
AVG Free for Linux is highly configurable and performing on-demand scans is straightforward.
Unfortunately, we were unable to make the real-time protection run without the computer being
rendered inoperative, which we feel is a major drawback of the program.
-12-
Linux Security Reviews 2015
www.av-comparatives.org
Bitdefender Antivirus Scanner for Unices
Features
The BitDefender Antivirus Scanner for Unices features an on-demand command-line scanner and an
optional graphical user interface for the scanner (included in the downloaded package).
System requirements
Linux kernel 2.6 or newer
glibc version 2.3.2 or newer, gcc 4.x
Supported Distributions:
Debian GNU/Linux 6 or newer
Ubuntu 10.04 or newer
RedHat Enterprise Linux 5.6 or newer
CentOS 6.1 or newer
SuSE Linux Enterprise Server 11 or newer
OpenSUSE 11 or newer
Fedora 15 or newer
Test platforms
64-bit Ubuntu 14.04.1 LTS
64-bit Ubuntu 12.04.2 LTS
Version tested
7.14
-13-
Linux Security Reviews 2015
www.av-comparatives.org
Home/business version
Bitdefender Antivirus Scanner for Unices is intended for business use, there is no home version.
Licence
Commercial, with a 30-day free trial available. There is no option to pay for the program on the
website.
Installation
Firstly the installer file needs to be downloaded from Bitdefender’s website7, marked as executable
(chmod +x BitDefender-Antivirus-Scanner-7.7-1-linux-amd64.deb.run) and started. The installer will
ask the user to accept the licence agreement and choose whether he/she wants to install the
graphical user interface.
No additional packages are required to install either the scanner or its user interface. If the
graphical interface has been installed, it can be opened from the application menu and will start
with an activated 30-day trial period.
Deinstallation
To remove the program, the original installer file needs to run again with the additional –uninstall
argument (sudo ./BitDefender-Antivirus-Scanner-<version>.deb.run --uninstall).
Accessing the program
The application should display an icon in the system tray while running. On Ubuntu 14.04 however,
no tray icon is shown not even after installing the libappindicator1 package (because of that, the
start hidden setting and the hide button cannot be used, since a hidden main window can only be
restored using the tray icon).
On Ubuntu 12.04, the tray icon can be displayed, but the user needs to manually add a system tray
whitelist entry for the program (the quickest way of doing this is to simply whitelist all programs
using the command gsettings set com.canonical.Unity.Panel systray-whitelist “['all']”).
The application also includes a program that is supposed to integrate the scanner into Ubuntu's
default file manager nautilus. On our test system, however, the program did not add any menu
entries to nautilus.
Non-administrator access
All program features can be used by unprivileged users, only installation and deinstallation requires
administrative privileges.
7
http://enterprise.bitdefender.com/de/Downloads/businessSolutions/
-14-
Linux Security Reviews 2015
www.av-comparatives.org
Main program window
The main window contains three buttons at the top, which enable the user to start a scan of a
single directory, update the signature database and open the program's settings. Below these
buttons, the program displays information about the antivirus engines (version numbers, date of
last update, etc.) and the currently active licence. The user can activate the “file drop zone” from
the settings dialog. This creates a small window that can be used to scan files or folders by dragand-dropping them into it.
Status There is no status display in the normal sense, as there is no real-time protection.
Scan Scans can be started by clicking the “Scan Now” button in the main window or by dragging and
dropping files onto the file drop zone (if activated).
Update The signature database is not updated automatically by default. The database can be
updated manually using the update button in the main window or using the command sudo bdscan -update. Automatic updates can be scheduled by creating a cron job that invokes the update
command. Even though the process of creating such a cron job is documented quite well in the user
manual, we still think the graphical interface should contain options for performing this task for the
user.
Logs The location of log files can be changed in the settings dialog as well (defaults to
~/.local/share/BitDefender-scanner/logs). For faster access to the log files, the program also
-15-
Linux Security Reviews 2015
www.av-comparatives.org
includes a log file viewer that can be started by clicking the respective link in the main window.
Quarantine The location of quarantined files can be changed in the settings dialog (by default
quarantined files are copied into ~/.local/share/BitDefender-scanner/quarantine).
Scheduler Scheduled scans cannot be configured from the user interface – similar to automatic
updates, the user could create a cron job that starts the command line scanner for this purpose.
Licence This is displayed on the program’s home page
Help There is a ? icon in the bottom left-hand corner of the window.
Settings The settings can be accessed by clicking the respective button in the main window.
Malware alerts
These are not applicable, as there is no real-time protection.
Help
A user guide in pdf format can be accessed offline by clicking on the “Help” link in the main window.
The program also installs man pages for both the command line scanner (man bdscan) and the user
interface (man bdgui).
Verdict
BitDefender Antivirus Scanner for Unices provides an easy-to-user on-demand scanner, which can be
controlled using both the Linux command-line and the included graphical user interface. The
graphical interface is easy-to-use and the program’s help facilities are good.
-16-
Linux Security Reviews 2015
www.av-comparatives.org
Clam Antivirus for Linux
Features
ClamAV is an open source anti-virus engine with versions for Windows, Mac OS X, BSD, Solaris and
Linux systems. ClamAV provides on-demand scanning to detect trojans, viruses and other malware.
On-access scanning (using the fanotify API) is also included. By default, ClamAV does not include a
graphical user interface. However, third-party GUIs are available (e.g. ClamTk).
System requirements
According to ClamAV’s website, there are precompiled packages available for the following Linux
distributions: Debian, Red Hat Enterprise Linux, CentOS, Fedora, Mandriva, Gentoo, openSUSE and
Slackware. No information about specific supported versions is provided. For compiling the program
manually, the only mandatory requirements are a C compiler and the gzip library to extract the
archive containing the source code.
Test platform
64-bit Ubuntu 14.04.1 LTS
64-bit Ubuntu 12.04.2 LTS
Version tested
0.98.6, 64 bit (32-bit systems are supported as well)
Home/business version
Clam does not distinguish between home and business versions.
Licence
ClamAV for Linux is free to all users.
Installation
ClamAV can either be compiled from source or installed for various Linux distributions using the
packages on the ClamAV website or the package repositories of the respective distribution.
-17-
Linux Security Reviews 2015
www.av-comparatives.org
To install ClamAV on an Ubuntu system, the user has to enter the following command in a command
shell: sudo apt-get install clamav clamav-daemon clamav-freshclam libclamunrar6. clamav contains
the core anti-virus engine, clamav-daemon is a daemon that loads the libraries necessary for a scan
at boot time, thereby decreasing the overhead for single scans. freshclam is required to
automatically keep the virus definition database up-to-date. To enable scanning of *.rar archives,
the optional packet libclamunrar6 is used. The installation also includes the ClamAV library, which
can be used by developers to include virus scanning into their programs. No other dependencies
need to be installed on an Ubuntu system. According to the program’s documentation, to enable onaccess scanning, some lines in ClamAV’s configuration file need to be changed/added:
ScanOnAccess yes
OnAccessIncludePath /
OnAccessExcludePath /proc
These lines should enable on-access scanning in all directories except the /proc directory. On our
testing system however, this did not work. According to ClamAV’s log file
(/var/log/clamav/clamav.log), clamd needs to be started by root for the on-access scanning to work.
Setting the user the daemon should be started by to root within the configuration file only resulted
in the daemon not starting at all, however.
Deinstallation
To uninstall ClamAV, the command sudo apt-get remove clamav* can be used.
Accessing the program
ClamAV is accessed using the Linux Terminal.
Non-administrator access
Since ClamAV’s configuration file is located in the /etc folder, administrative privileges are required
to edit it. Unprivileged users are only allowed to perform on-demand scans.
Main program window
Status/Reactivation Not applicable, as on-access scanning could not be configured
Scan Files and directories can then be scanned using the clamscan or the clamdscan command:
To detect potentially unwanted applications, the --detect-pua=yes argument needs to be provided to
clamscan or DetectPUA needs to be set to true within the configuration file for clamdscan,
respectively.
Update Virus database updates can be obtained by using the freshclam command. By default,
freshclam will look for updates once every hour. To manually update the databases, invoke sudo
freshclam from the command-line.
Logs By default, the log file is located at /var/log/clamav/clamav.log.
-18-
Linux Security Reviews 2015
www.av-comparatives.org
Quarantine The scanner does not define a default quarantine location. The user can specify a
quarantine directory for each scan, however.
Scheduler Scheduled scans can be performed by creating cron jobs that invoke the clam(d)scan
command.
Licence Not applicable
Help Documentation can be accessed through the installed manpages for each component (e.g.,
man clamdscan for the on-demand scanner or man clamd.conf for available configuration options)
Settings If the ClamAV daemon is installed, it can be configured using the options in the
/etc/clamav/clamd.conf config file.
Malware alerts
Not applicable – as mentioned in the installation section, real-time protection could not be enabled
using the method described in the program’s documentation.
Help
A user manual in .pdf format is available on ClamAV's website8. More detailed information about the
usage of the included commands can be found in the respective man-pages (e.g., man clamscan).
Verdict
ClamAV is included in Ubuntu's package repository, allowing easy installation. Using the program to
perform on-demand scans is straightforward. One drawback of the application is the inability to run
real-time protection on the tested operating systems.
8
http://www.clamav.net/
-19-
Linux Security Reviews 2015
www.av-comparatives.org
Comodo Antivirus for Linux
Features
Besides a real-time and on-demand anti-virus scanning component, COMODO AV also provides a mail
gateway that can filter spam and emails with malicious attachments. The mail gateway is designed
to filter traffic on mail servers.
System requirements
The Comodo website states that 32 and 64-bit versions of the following operating systems are
supported: CentOS 5.8, 6.2; Mint 13 CentOS 5.9, 6.2; Debian 6.0; OpenSUSE Linux; SUSE Linux
Enterprise Server 1112.1; Fedora 17; Linux Server 5.9, 6.3; Red Hat Enterprise; Ubuntu 12.04.
Test platforms
64-bit Ubuntu 14.04.1 LTS
64-bit Ubuntu 12.04.2 LTS
Version tested
1.1.268025 x64
Home/business version
Comodo Antivirus for Linux is found in the Home & Home Office section of the vendor’s website.
Licence
The program is free to use and no trial licence needs to be activated to use the program features.
-20-
Linux Security Reviews 2015
www.av-comparatives.org
Installation
A Debian package (*.deb) for Ubuntu can be downloaded from the COMODO website9. The package
can be installed simply by double-clicking the downloaded package, and then clicking Install in the
Ubuntu Software Centre. No additional packages are required. To configure the software, the
included configuration script needs to be run after installation (sudo /opt/COMODO/post_setup.sh):
During the post-setup routine, the user needs to accept the licence agreement and select a preferred
language. After selecting a language, the script tries to compile a kernel module that is required for
real-time protection.
When we tried to configure the software on Ubuntu 14.04.1 LTS10, the real-time protection
component was not available. A post on ubuntuforums.org11 provides a fix for this problem. After
downloading the driver mentioned in the post and moving it into the program's install directory
(sudo mv driver.tar /opt/COMODO) the setup could be completed successfully. (Note: we used a
virtual machine to test the setup process. We do not recommend installing system drivers from
untrusted websites on your physical machine).
On Ubuntu 12.04.2 with Linux kernel 3.5.0-23, this additional step was not necessary, as the
included kernel driver compiled without any additional action being required.
Deinstallation
The program can be uninstalled from the Ubuntu Software Centre by clicking on the program’s entry
and then clicking Remove.
Accessing the program
COMODO AV did not add an icon to Ubuntu's system tray while the application was running.
It also did not add any options to the context menu of Ubuntu's default file explorer (Nautilus).
Specific files need to be scanned from the application's main window.
Non-administrator access
Unprivileged users may disable/enable the anti-virus component without having to provide
administrator credentials. However, the user can activate the Parental Control feature in the
application's settings. This feature allows the user to define a password that needs to be entered
whenever the application's settings are accessed and thereby also restricts the disabling of the antivirus component.
9
10
11
https://www.comodo.com/home/download/download.php?prod=antivirus-for-linux
As noted in the System Requirements, only Ubuntu 12.04 is supported by the manufacturer.
http://ubuntuforums.org/showthread.php?t=2205814#post12930865
-21-
Linux Security Reviews 2015
www.av-comparatives.org
Main program window
The program window is laid out with a narrow left-hand column, and a row of four horizontal tabs
(Summary, Antivirus, Mail Gateway and More) above a larger right-hand pane.
Status/Reactivation A status display is shown in a column on the left-hand side of the window. If
the anti-virus component is disabled, the status display on the left-hand side of the main window
will display a warning and provide a button to quickly re-enable the component:
Scan Scans can be started from the main window by clicking the "Scan now" link in the summary tab
or the "Run a Scan" item in the “Antivirus” tab.
Both actions open a window in which the user can select a full scan or a scan of "critical areas". The
user can also create a custom scan profile, including only specified directories.
Update The virus database can be updated by clicking on the date of the last database update in
the "Summary" tab, or by clicking the relevant item in the "Antivirus" tab.
Quarantine and Logs Quarantined files and anti-virus logs can also be found in the Antivirus tab.
Scheduler The "Scheduled scans" item in the “Antivirus” tab enables the user to create schedules
for automatic scanning (using the same profiles as the manual scan).
Licence The program is free, so no licence expiry date is displayed.
Help There is a link to the program’s online help page on the More tab.
Settings Settings for the anti-virus and Mail Gateway components can be found in their respective
tabs. General settings like the current language or interface theme are located in the “More” tab.
Malware alerts
When an attempt is made to download the EICAR test file, the program blocks the action and
displays the following alert in response:
By default, the window is shown for 120 seconds (can be changed in the program's preferences).
Ignoring the window for two minutes is equivalent to selecting "Ignore once" - another pop-up
window will be shown once the file or the folder containing the file is accessed. Clicking "Clean" will
not delete the file, but add it to the program's "Quarantined Items". The real-time protection
component did not detect access to the EICAR test file located on a USB flash drive (the on-demand
scan did).
-22-
Linux Security Reviews 2015
www.av-comparatives.org
Help
Clicking Help on the More tab opens the program’s online help page.
Furthermore, all sub-windows that can be opened from the application's main window contain a
"What do these settings do?" link at the bottom of the window. This link leads to a website that
provides detailed information on all available options of that window.
The “More” tab of the main window also contains a link to COMODO's support forum.
Verdict
Although the initial installation of Comodo Antivirus for Linux is entirely GUI-based, post-setup
configuration and enabling real-time protection require use of the terminal. On Ubuntu 14.04.1, we
found that enabling real-time protection required manual replacement of a driver (not recommended
for Linux novices). Once the program is up and running, it can be used in very similar fashion to a
typical Windows antivirus program. The main window makes important status information and
important functions such as update and scan easily accessible. The help feature is good. Suggestions
for improvement, in addition to full compatibility with Ubuntu 14.04.1, would be to increase the
sensitivity of the real-time protection to detect malware on a flash drive.
-23-
Linux Security Reviews 2015
www.av-comparatives.org
Dr.Web Anti-virus for Linux
Features
Dr.Web Anti-virus for Linux features real-time protection as well as on-demand scanning. The
program also includes a web protection component that works with all browsers. Similar to the
business version of the program, also the home user version can be setup to be centrally managed
using the Dr.Web Control Center.
System requirements
The manufacturer states that the program requires GNU/Linux distributions supporting Intel
x86/amd64 with kernel 2.6.37 (and later) and glibc 2.13 (and later). 32-bit and 64-bit versions of
the software are available.
Test platform
64-bit Ubuntu 14.04.1 LTS.
Version tested
10.0.0.0 64-bit (a separate 32-bit version is available as well)
Home/business version
We tested the home version of Dr.Web Anti-virus for Linux. A business version is available; this can
be purchased as part of a business package, and the software can be managed by the Dr.Web Control
Center.
-24-
Linux Security Reviews 2015
www.av-comparatives.org
Licence
Dr.Web provides two test options: a one-month trial, or a three-month trial that requires the user to
register, but provides a discount if a licence is subsequently purchased. There are also two options
for buying the program, namely with and without support. Both of these include a free licence for a
handheld device as well.
Installation
Firstly, the installer for Dr.Web for Linux needs to be downloaded from Dr.Web’s website12. The
installer is a .RUN file. This cannot be started by simply double-clicking the file – the user needs to
type chmod +x [filename].run followed by ./[filename].run in a Linux terminal to start the installer’s
GUI. For the protection components of the program to work, the 32-bit version of libc is required
(installed via the terminal using this command: sudo apt-get install libc6-i386).
To enable the application to display a tray icon, the additional libappindicator1 packet is required
(sudo apt-get install libappindicator1). The only steps in the setup wizard are to accept the licence
agreement, and either enter a licence key or select the trial version.
Deinstallation
The application can be removed using the uninstaller provided.
Accessing the program
When running, the application displays an icon in the system tray. From the icon menu, a user can
open the program's main window, disable/enable protection components, update the virus database
and open the “My Dr.Web” website:
The application does not add a context-menu entry to nautilus.
Non-administrator access
Changing the application's settings or disabling the protection components requires the user to
specify administrator credentials (entering their user password is sufficient if the user is allowed to
use sudo). Enabling the components does not require administrator privileges.
Main program window
The main window consists of two sections – a small menu bar on the left hand side of the window,
and a main pane with status and licence information, as well as scan and update buttons. When an
option on the home screen is selected, a corresponding icon is added to the end of the tool bar,
allowing quicker access to the respective status information in the future (similar to tabs in a webbrowser). The home screen also allows individual files to be scanned easily by dropping them onto
the marked area.
12
https://download.drweb.com/demoreq/home/?demo_for=3
-25-
Linux Security Reviews 2015
www.av-comparatives.org
Status/Reactivation The real-time protection (SpIDer Guard) and the web protection (SpIDer Gate)
components can be enabled/disabled from the tray icon menu or in their respective tabs from the
main window (after the user entered his password to gain administrator privileges). When these
components are disabled, exclamation marks are shown as a warning on the main screen and the
tray icon:
Scan Scans can be started from the Scanner tab (the magnifier icon in the tool bar).
The express scan only scans “critical areas” (system library and binary folders, /boot/, /home/),
while the full scan scans all accessible files on the system.
As with the home screen, files can also be dragged and dropped onto the Scanner screen to start a
scan of single files or directories. By clicking on the respective caption, a custom scan can be
started for which the user can specify multiple files or directories to scan and/or choose some
existing scan options (e.g., scan boot records, scan system binaries and libraries).
Update By default, the virus database is automatically updated every 30 minutes (can be changed).
A manual update can be performed by opening the update status from the home screen and then
clicking the Update button.
Quarantine The quarantine can be accessed by clicking on the Quarantine icon in the tool bar (jar
icon).
Logs The application does not create log files when it detects malware using the real-time scan
component. The on-demand scan allows the user to view and export the scan journal during and
after the scan.
Scheduler Scheduled scans can be configured in the Settings tab.
Licence information is clearly displayed in the Home tab.
Help features can be accessed by clicking the question mark icon at the bottom of the menu
column.
Settings The settings menu can be accessed by clicking the cog wheel icon in the tool bar.
Configuring the real-time- and web-protection components requires the user to obtain
administrative privileges by clicking on the lock icon at the bottom of the settings tab and entering
their password.
Malware alerts
When Dr.Web detects an attempted download of the EICAR test file, it displays a notification
message in Unity's notification area:
The notification is displayed for 10 seconds, the duration cannot be changed in the application's
settings (apparently Unity's notification component NotifyOSD does not support setting a display
duration, the duration is determined automatically considering the amount of text displayed).
-26-
Linux Security Reviews 2015
www.av-comparatives.org
The application's “SpIDer Gate” component is able to detect attempted access to websites it deems
malicious. When we tried to access the AMTSO phishing test page, we could not navigate to the test
page, as the entire domain was blocked by the program. When Dr.Web blocks a site, it displays an
alert message inside the browser:
Help
The help features include offline HTML documentation that provides a detailed description of the
program's functionality. Links to the Dr.Web online forum and tech support are also included in the
help menu.
Verdict
Dr.Web Anti-virus for Linux requires the use of the Linux terminal to install necessary packages and
start the installer’s GUI. The program itself can be operated entirely using the graphical user
interface, which makes status information and everyday tasks easily accessible. Help facilities are
very good.
-27-
Linux Security Reviews 2015
www.av-comparatives.org
eScan Anti-Virus for Linux
Features
eScan for Linux provides on-demand scanning using a command line scanner or the included
graphical user interface.
System requirements
Supported operating systems are listed on the manufacturer’s website:
CentOS 5.4; Fedora 11 (64 bit); RedHat Enterprise 4, 5 and 6; openSUSE 11.3 (32 bit); Ubuntu 9.04,
9.10 and 10.04
Test platform
64-bit Ubuntu 14.04.1 LTS
Version tested
7.0-5. There are separate installers for 32 and 64-bit systems.
Home/business version
There is only one version of the program, which is listed in both the Home and Business sections of
the manufacturer’s website.
Licence
eScan Anti-Virus for Linux is a paid-for program, which can be tried out free of charge for 30 days.
-28-
Linux Security Reviews 2015
www.av-comparatives.org
Installation
eScan provides a .deb package on their website13 that can be installed using Ubuntu's Software
Center. No other packages are required to install the software.
Deinstallation
The program can be removed via the Ubuntu Software Center.
Accessing the program
The application neither displays a tray icon, nor does it add menu entries to Ubuntu's file manager
nautilus.
Non-administrator access
The main program window can be started as a regular user or as root (after the user has provided
administrator credentials). The interfaces shown for root (displayed above) adds the Scheduler
section to the interface, allowing admins to create scheduled scans.
Main program window
The program opens on the Scans page. There is no status display, as the program does not include
real-time protection. Scans can be started from the home page of the application, with options to
scan the whole computer, memory, home directory or specific drives/folders/files. There is an
Update tab at the top of the window; Logs and Quarantine are both available from the Scans page.
If opened with Root privileges, the program displays a Scheduler tab at the top of the window.
There are links to Licence information and Help in the top right-hand corner of the window.
Settings can be found by clicking Options on the home page.
Malware alerts
These are not applicable, as real-time protection is not included.
13
http://www.escanav.com/english/content/products/escan_linux/escan_linux_desktops.asp
-29-
Linux Security Reviews 2015
www.av-comparatives.org
Help
The program's help facilities can be accessed by clicking the respective link at the top of the main
window. All facilities listed in this menu are only available online: live-chat with the eScan support,
an online help containing a somewhat outdated user guide and a link to the MicroWorld forum.
Additionally, a man page is available for the command line scanner (man escan).
Verdict
eScan Anti-Virus for Linux provides an on-demand scanner only, with no real-time protection. For
users who do not require RTP, the program is easy to install, and provides a straightforward
graphical interface.
-30-
Linux Security Reviews 2015
www.av-comparatives.org
ESET NOD32 Antivirus for Linux Desktop
Features
The NOD32 Antivirus features real-time protection as well as on-demand scanning. It detects not
only Linux malware, but also malware and “potentially unwanted programs” for Windows.
System requirements
ESET list the following Linux distributions as compatible: Debian, RedHat, Ubuntu, SUSE, Fedora,
Mandriva and the majority of RPM and DEB distributions. However, no further information is given
as to specific version numbers. Further requirements are kernel 2.6 or newer, GNU C Library 2.3 or
newer, GTK+ 2.6 or newer, LSB 3.1 compatibility recommended. Both 32 and 64-bit versions of the
software are available.
Test platform
64-bit Ubuntu 14.04.1 LTS
Version tested
4.0.81.0, 64-bit
Home/business version
We used the home version of NOD32 for Linux in our test. A business version is available; this has a
different pricing model and can be managed by ESET’s Remote Administrator console14.
Licence
NOD32 for Linux can be tested for 30 days free of charge, after which the user has to purchase a
licence. ESET’s Unilicense model allows licence keys to be used for Windows, Mac or Linux programs
interchangeably, and also lets users protect up to 3 operating systems on the same physical machine
(for dual-boot or virtualised systems).
14
http://www.eset.com/int/business/endpoint-protection/linux-antivirus/?productdd=2
-31-
Linux Security Reviews 2015
www.av-comparatives.org
Installation
Before starting the installer (which can be downloaded from the ESET website15), some preparations
have to be made by the user:
• The file needs to be marked as executable first (chmod +x eset_nod32av_64bit_en.linux).
Alternatively, the user can right-click it, click Properties, Permissions, and then enable Allow
executing file as a program. This is described in the program’s manual.
• Even if the 64-bit version of the software is used on 64-bit Ubuntu, the installer will not start
without having the 32-bit version of libc installed (sudo apt-get install libc6-i386).
After performing these steps, the installer can be run from the console
(sudo ./eset_nod32av_64bit_en.linux). During installation, the Custom installation option should be
selected, so that the current user can be added to the list of Privileged users in subsequent pages of
the install wizard (without this step a non-root user cannot activate the product later). The rest of
the installation process is straightforward – the only choice the user has to make is whether he or
she
wants
to
enable
the
detection
of
"Potentially
unwanted
applications".
After a reboot, the software needs to be activated by starting the trial licence or providing username
and password for an existing full licence. To enable the application to display a tray icon (which is
necessary to open the main window after it was closed once), the additional packet libappindicator1
is required (sudo apt-get install libappindicator1).
Deinstallation
The program can be uninstalled by running the uninstall wizard, which can be found in the
Applications menu, System Tools folder.
Accessing the program
The application displays a tray icon that allows quick access to program features such as the
computer scan or signature updates. Enabling the “advanced mode” in the main window will also
add more options to the menu of the tray icon:
There is an option to enable context-menu entries within the application preferences (User | Context
Menu). According to ESET's user manual for the Linux version of Nod32, the nautilus-actions package
is required for the context-menu entry to work correctly. However, on our test system, no entry was
displayed even after we installed the packet (and rebooted the system).
Note: if the main window is closed, it can only be re-opened using the system tray icon – clicking
the program's system menu entry has no effect.
15
http://www.eset.com/int/download/home/detail/family/71/
-32-
Linux Security Reviews 2015
www.av-comparatives.org
Non-administrator access
Users can be labelled as Privileged or Unprivileged within the application. Privileged users are
allowed to change application preferences or disable the real-time protection component. By default,
only Ubuntu Administrators are registered as Privileged users. However, this can be changed within
the application settings.
Main program window
The application's main window consists of two panes, a narrower left-hand pane with the menu
items Protection Status, Computer Scan, Update, and a larger right-hand pane with details.
At the bottom of the window, the user can enable the application's “advanced mode” which adds
some sub-options and a Tools section from which log files, quarantine and the scheduler can be
accessed.
Licence information is displayed at the bottom of the main window. There is a Help menu in the
main menu panel on the left-hand side of the window.
The signature database is updated automatically. It can be updated manually by clicking the update
link in the Update tab.
The real-time file system protection can be disabled in the “Setup” tab. If it is disabled, a warning
will be displayed in the Protection Status tab as well as the tab icon and the colour of the tray icon
changing):
Protection can be reactivated by clicking Start real-time file system protection.
Scans can be started from the “Computer scan” tab of the main window. The user can run a “Smart
scan”, scanning all local disks, or create a custom scan in which he can create scanning profiles to
specify which directories to scan. Scheduled scans can be run from the Tools menu (requires
Advanced Mode).
Application settings can be found in the “Setup” tab (most of the configuration options are only
available if the “advanced mode” is activated).
Malware alerts
When ESET NOD32 detects an attempted download of the EICAR test file, it displays a notification
message in the centre of the screen:
By default, the notification disappears after 5 seconds, if the mouse cursor is positioned outside the
notification area (the display time can be changed in the application preferences).
The program’s real-time protection also detects malicious files on removable media as soon as the
drive is accessed by the user.
-33-
Linux Security Reviews 2015
www.av-comparatives.org
Help
ESET provide two manuals in PDF format, a Quick Start Guide and a comprehensive User Guide, both
produced to a very high standard 16 . There is also a local help feature, which provides simple
instructions for using key features, with some screenshots. There is also a link on the program’s Help
page to the ESET Knowledgebase, which includes an FAQ section for the program, and detailed,
illustrated instructions for installation and activation17.
Verdict
ESET NOD32 for Linux is a fully featured antivirus program, including real-time protection as well as
on-demand scanning. The program requires some terminal commands to install (e.g. setting the root
password), but the setup wizard and the program itself have a very user-friendly GUI that will be
familiar to users of its Windows counterpart. There is a clear status display, and all the important
functions are easily accessible from the program’s main menu panel. Malware alerts are good, and
the help facilities are excellent.
16
17
http://www.eset.com/int/download/home/detail/family/71/
http://kb.eset.com/esetkb/index?page=content&id=SOLN2653
-34-
Linux Security Reviews 2015
www.av-comparatives.org
F-PROT Antivirus for Linux Workstations
Features
F-PROT Antivirus for Linux includes a command-line scanner and an update tool.
Note: while the program’s virus database can still be updated normally, it seems that since the
company Frisk Software has been acquired by Cyren, “F-Prot Antivirus for Linux” itself is no longer
developed nor maintained.
System requirements
GNU C Library (glibc) 2.2.5 or compatible
Perl 5.8 interpreter
Test platform
14.04.1 LTS
Version tested
6.7.10.6267 64-bit business edition
Home/business version
There are both business and home versions; the home version is only available as 32-bit.
Licence
The business version of the product requires a paid licence, but the home version is free for private
use.
-35-
Linux Security Reviews 2015
www.av-comparatives.org
Installation
To install F-PROT Antivirus on a Linux machine, the archive downloaded from F-PROT's website18
needs to be extracted and the extracted folder copied/moved to the desired install location: tar xzf
fp-linux.x86.64-ws.tar.gz and sudo mv f-prot /opt/. Then the install script in the new directory needs
to be run as root: sudo /opt/f-prot/install-f-prot.pl.
The install script will prompt for the locations of the installed executables and man-pages – using
default locations should be fine. No other packages are required to install the application.
Deinstallation
The downloaded archive does not contain a script for uninstalling the application – to uninstall, the
user has to manually remove all installed files:
• Remove the update job from the /etc/crontab file: sudo nano /etc/crontab and remove
the line containing fpupdate
• Delete the installed files: sudo rm –rf /opt/f-prot
• Remove symbolic links pointing to the install directory: sudo find /usr/local -lname ‘/opt/fprot/*’ –delete
Accessing the program
The program can be accessed using the terminal. No tray icons or context-menu entries are available
by default.
Non-administrator access
Changing the program’s configuration, as well as removing the program files requires the use of sudo
to invoke administrator privileges.
Main program window
Status/Reactivation As there is no real-time protection, a status display is not applicable.
Scan Scans can be performed using the fpscan command. For example, the command fpscan / -e
/dev/ --disinfect will scan the whole file system except the /dev/ folder, automatically
disinfecting/deleting infected files without prompt.
Update By default, the virus definitions are updated once every hour. To manually update the
database, the fpupdate executable can be used: sudo /opt/f-prot/fpupdate.
Logs The scanner does not write log files of scanning events.
Quarantine The application does not specify a default quarantine directory and it is not possible to
define a quarantine directory for single scans.
Scheduler Scheduled scans can be configured by creating a cron job to run fpscan.
Licence We could not find any licence information.
Help Help documents are available online19. Besides the online help, there are man-pages available
for fpscan and fpupdate (man fpscan and man fpupdate).
Settings The scanning daemon can be configured using the configuration file located at /opt/fprot/f-prot.conf. The configuration options are documented within the configuration file.
18
19
http://www.f-prot.com/download/trial
http://www.f-prot.com/support/helpfiles/unix/workstation/index.html
-36-
Linux Security Reviews 2015
www.av-comparatives.org
Malware alerts
Not applicable, as there is no real-time protection or GUI.
Help
The documents are quite outdated, as they still refer to old versions of the programs. However, the
general procedures should also be applicable to the newer program version.
Verdict
F-PROT Antivirus for Linux is an easy to install command-line scanner. Uninstalling the product
might become tedious however, since no uninstall script is provided. Performing on-demand scans
using the product is straightforward.
-37-
Linux Security Reviews 2015
www.av-comparatives.org
F-Secure Linux Security
Features
F-Secure Linux Security is a business security solution that includes virus protection and a firewall
component, as well as a host-based intrusion detection system. It can be installed as a stand-alone
program on each workstation, or centrally managed.
System requirements
The following Linux distributions are supported: CentOS 5.5; CentOS 6.4, 6.5, 6.6; CentOS 7.0 (64-bit,
command-line edition only); Debian 6.0; Debian 7.0-7.6; Red Hat Enterprise Linux 5.5, 5.9, 5.10,
5.11; Red Hat Enterprise Linux 6.4, 6.5, 6.6; Red Hat Enterprise Linux 7.0 (64-bit, command-line
edition only); SUSE Linux Enterprise Server 11 SP1; SUSE Linux Enterprise Server 11 SP3; Ubuntu
10.04 (Lucid Lynx); Ubuntu 12.04 and 12.04.2 (Precise Pangolin);
Ubuntu 12.04 is supported with the following conditions: On-access scanning in the full version
installation is supported up to minor release 12.04.2 using kernel 3.5.0-23. Command-line-only
installation is supported up to Ubuntu 12.04.5 and it does not depend on the kernel version support.
On 64-bit systems, additional compatibility packages are required.
-38-
Linux Security Reviews 2015
www.av-comparatives.org
Test platforms
64-bit Ubuntu 14.04.1 LTS
64-bit Ubuntu 12.04.2 LTS
Version tested
10.20.358. There is one installer for both 32 and 64-bit systems.
Home/business version
F-Secure Linux Security is a business product, there is no home version.
Licence
The program is commercial, with a 30-day free trial available.
Installation
Before installing the program, some additional packages need to be installed: sudo apt-get install
rpm libstdc++6:i386 libgcc1:i386 libpam-modules:i386 libc6-i386. To install the application, the
archive downloaded from F-Secure's website20 needs to be extracted first (tar xzf fsls-10.20....tar.gz).
After extracting, the installer file within the extracted folder needs to be run with administrative
privileges (sudo ./f-secure-linux-security-10.20.358). After reading and accepting the licence
agreement, the installation completes without further user interaction. To further configure the
installation (restrict access to the web interface by requiring the user to input his username and
password, for instance), the config script can be run: sudo /opt/f-secure/fsav/fsav-config.
Note that the kernel drivers included in the packet do not compile on the Linux kernel versions used
in Ubuntu 14.04. To test the on-access scanning component, we also installed the program on
Ubuntu 12.04.2 with Linux kernel 3.5.0-23. According to a statement of the vendor, version 11 of FSecure Linux Security will include on-access scanning using fanotify and therefore support newer
Linux kernels. The new version of F-Secure Linux Security is scheduled to be released in September
2015.
Deinstallation
The program can be uninstalled by running the uninstall script at /opt/f-secure/fsav/bin/uninstallfsav as root.
Accessing the program
The application does not display a tray icon or add context-menu entries to Ubuntu's default file
explorer.
Non-administrator access
During setup, the program can be configured to allow access to the configuration user interface only
for a specific user, or to entirely disable local access. This way the program's protection components
can only be configured by a specific user or only remotely by an administrator using the web
interface or F-Secure's policy manager.
20
https://www.f-secure.com/en/web/business_global/downloads/linux-security/latest
-39-
Linux Security Reviews 2015
www.av-comparatives.org
Main program window
F-Secure Linux Security provides a web user interface, which, by default, can be accessed at
http://localhost:28080/fsecure/webui. The interface mainly consists of two sections. The section on
the left hand side contains a menu with available options. The section on the right hand side
contains status information or further actions for the option selected in the menu.
If the “Advanced mode” checkbox is unchecked, the number of available options is reduced. In the
standard mode, the program's core functionality can be accessed after selecting the “I want to...”
option (scanning for malware, adding firewall rules, integrity checking)
Status/Reactivation The program's protection components can be disabled/enabled from the
summary tab of the web interface. The interface will display a “Malfunction” warning as well as error
icons in front of the respective protection components if some of the components are disabled:
Scan Scans can be started from the “I want to...” tab by clicking the “Scan the computer for
malware and riskware” option. In the wizard that is displayed after selecting the scan option, the
user needs to specify the full path of all files and/or directories he wants to scan manually – no file
selection dialog is available.
Update The virus definition database is updated automatically by the program. Manual database
updates can only be performed using the dbupdate command line script included in the installation.
Logs In advanced mode, alerts can be viewed by selecting the respective menu item. Alerts can also
be forwarded by e-mail.
Quarantine The program does not use a quarantine. However, the user can specify a custom action
for infected files. Using this functionality, it is possible to create scripts that will be run as root to
process the infected files.
Scheduler In advanced mode, scan schedules can be defined in the “Scheduled Scanning” section.
Licence When using the evaluation version, the remaining evaluation period is displayed in the
summary section.
-40-
Linux Security Reviews 2015
www.av-comparatives.org
Help This can be accessed by clicking the ? symbol in the top right-hand corner of the web page.
Settings In advanced mode, the user can change the settings of the protection components by
selecting the respective menu entries.
Additional Features
Firewall Firewall rules can be created using the firewall wizard in the “I want to...” tab. The user
can choose to allow/deny traffic from or to specific network services and/or specific hosts.
In advanced mode, the order of the recorded firewall rules can be changed and rules can be
activated/deactivated. The user can also choose between different pre-configured firewall profiles.
Integrity checking From the “I want to...” menu, the user can create and verify a “baseline” of
system files (the baseline contains hashes and attribute information such as file size). If the realtime protection components are activated, the integrity checker can deny changes to the recorded
system files or automatically report changes to the administrator.
To perform a system update, the user first needs to activate the software installation mode from the
“I want to...” tab, as the integrity checker will otherwise react to all updated files.
Malware alerts
On Ubuntu 12.04, the real-time scanner detects an attempted download of the EICAR test file, but
does not display any pop-up notification messages (email alerts can be configured in the web
interface).
Findings of the real-time scanner are displayed as “Unread security alerts” in the Summary section of
the web interface and can be accessed from the Alerts section.
Help
The program includes HTML documentation that can be accessed offline by clicking the ? symbol in
the web interface. The help document is also available in .pdf format on F-Secure's Linux Security
website.
Verdict
F-Secure Linux Security provides a variety of security features, also including a firewall and a host
IDS. In its standard mode, the web interface allows quick access to the program's functionality,
while the advanced mode offers well-structured configuration options.
-41-
Linux Security Reviews 2015
www.av-comparatives.org
G Data Client Security Business
Features
The G Data AntiVirus client for Linux, included in the G Data Client Security Business suite, features
on-demand scanning and on-access scanning for samba shares in the file server version. Multiple
clients are centrally managed from the G Data Management Server.
System requirements
The program’s manual document lists the following requirements for the Linux client (both 32 and
64-bit):
Debian 6.0, 7
OpenSUSE 11.4, 12.2, 12.3, 13.1
SUSE Linux Enterprise Server 10 SP4, 11 SP3, 12
Red Hat Enterprise Linux 5.11, 6.6, 7.0
Ubuntu 10.04.4 LTS, 12.04.5 LTS, 14.04.1 LTS, 14.10
CentOS 5.11, 6.6, 7
Fedora 19, 20, 21
Test platform
64-bit Ubuntu 14.04.1 LTS
Version tested
13.2.0 (There is one installer for both 32- and 64-bit systems)
Home/business version
As the product name implies, G Data Client Security Business is targeted at business users. No homeuser version is available.
Licence
Commercial with a 30-day trial licence available.
-42-
Linux Security Reviews 2015
www.av-comparatives.org
Installation
G Data's business security solution can only be used with a centrally managed architecture.
Therefore a Windows machine is required to host the application's management server. The necessary
installation files for all components can be downloaded from G Data's website21 (we used the .zip
version). After extracting the compressed files, the first installation step involves installing the
Management Server and the G Data Administrator on a Windows machine using the setup executable.
After accepting the licence agreement, the user can choose to install the server as a main or
secondary server, and choose the type of database that the server will use. As we only installed one
instance of the Management Server, we chose the main server option and the Microsoft SQL Express
server as a backing database. Lastly, the user needs to enter his/her licensing information.
At the first start of the G Data Administrator a setup wizard is displayed. On the second page of the
wizard, computers on which the G Data Client should be installed can be specified by entering the
respective computer names (if the client is to be deployed remotely, the computer name should be
the computer’s IP address). Subsequent pages can be used to configure other settings such as
updates and mail notifications. If the automatic installation option is selected during the setup, a
remote deployment window is displayed after the wizard exits. This window only supports
deployment for Windows clients, however.
To install the Linux client remotely, an activated root account on the target machine and an
installed and running SSH server are required. On Ubuntu, the root account is deactivated by default
and needs to be activated by setting a password using the command sudo passwd root. The
OpenSSH server can be installed using the command sudo apt-get install openssh-server. Since the G
Data Administrator requires remote root login, this feature has to be enabled first: open the sshd
config file with sudo nano /etc/ssh/sshd_config, change the value of the “PermitRootLogin” option
from “without-password” to “yes” and save the file (we would recommend changing the value back
to its original once the client is installed, since this authentication method can pose a security risk).
For the changes to take effect, the SSH server needs to be restarted with sudo service ssh restart.
Once these steps are performed on the target machine, the Linux client can be deployed by selecting
the name of the target machine in the Clients tab of the G Data Administrator and selecting Install G
Data Security Client for Linux from the context menu. After specifying the root password, the
installation then proceeds without further user interaction.
If no ssh server is to be installed on the target machine, the client can be installed by copying the
installation files contained in the Setup/LinuxClient folder of the extracted archive onto the
machine manually. The installation script requires the type of client to be installed, the IP of the
management server, and the desired client name as parameters: sudo ./installer.bin -t WS -s <server
IP> -c <client name>. The install script installs all required dependencies automatically without
further user interaction.
Note: when we first tried to install the Linux anti-virus client of G Data Client Security Business,
most features of the software could not be used. The vendor informed us that these problems
occurred due to (not clearly documented) incompatibilities with the Ubuntu version we used. They
subsequently provided us with the new version of G Data Client Security Business (version 13.2),
which is scheduled for release at end of May 2015 and supports newer Ubuntu versions.
21
https://www.gdata.at/kundenservice/downloads
-43-
Linux Security Reviews 2015
www.av-comparatives.org
Deinstallation
The program can be uninstalled using the uninstaller provided.
Accessing the program
The program does not display a tray icon or add entries to the context menu of nautilus.
Non-administrator access
By default, unprivileged users are only allowed to update the virus signatures. This can be changed
in the G Data Administrator (in the Client settings tab).
Main program window
On the client side, the graphical user interface of G Data AntiVirus can by default only be used to
perform and configure updates. The administrator can allow scans to be run from the GUI as well.
On the server side, the G Data Administrator’s main window mainly consists of two sections. On the
left-hand side, a tree structure menu displays managed computers and groups. The tabbed section
on the right-hand side can be used to display status information and reports/statistics, to configure
settings and to display and create scan tasks for the currently selected tree menu item.
Status/Reactivation not applicable, since there is no real-time protection component for the
client’s local file system.
Scan in the Tasks tab of the G Data Administrator, on-demand scan tasks can be created and started
for single computers or for a group of computers (depending on the selection in the tree-menu).
On the client side, scans can be started using the gdavclientc command-line tool or from the
graphical interface (if allowed by the management server – command-line scans can be performed
even if scanning is restricted by the management server). The command gdavclientc scan:/, for
example, starts a scan of the whole file system. Reports of detections during on-demand scans are
sent to the management server and can be reviewed in the Reports or the Statistics tab. Note that
the Linux antivirus client only supports scanning using one (Engine A) of the two possible scan
engines (Bitdefender engine).
-44-
Linux Security Reviews 2015
www.av-comparatives.org
Update By default, the security clients are configured to receive virus database updates from the
management server automatically. On the server side, no update schedule is created by default. This
can be changed from the Options → Internet update window of the G Data Administrator. If allowed
by the management server, the clients may also create their own update schedules or perform
manual updates from the Signature update window of the client application’s user interface.
Logs for specific tasks can be displayed from the Tasks tab of the G Data Administrator by selecting
a task and clicking the notepad icon in the toolbar above the task list.
Quarantine Quarantined files are stored centrally on the management server. From the G Data
Administrator, quarantined files can be displayed on the Reports tab.
Scheduler An execution schedule can be configured for each scan task.
Licence Information about currently used licences can be accessed from the Licence management
menu of the G Data Administrator.
Help an HTML version of the program manual can be accessed from the help menu of the G Data
Administrator’s main window (the “?” menu)
Settings Anti-virus settings can be displayed and changed from the Client settings tab of the G Data
Administrator.
Malware alerts
No notifications are displayed on the client side. If an on-demand scan detects malware, a red virus
alert message will be displayed in the status bar of the G Data Administrator. Clicking on the
message displays details about the detection.
-45-
Linux Security Reviews 2015
www.av-comparatives.org
Help
The archive containing the installation files contains a comprehensive program manual in pdf format.
An HTML version of the manual can be accessed from G Data Administrator’s help menu (“?” in the
menu bar). On the client side, the available options for the command line scanner and updater can
be accessed from the respective man-pages (man gdavclientc and man gdavupdate).
Verdict
G Data Client Security Business allows multiple security clients running on different platforms
(Windows, Linux, Android, iOS) to be managed from a central server. Remote installation of the
Linux client requires some additional configuration. The provided installer then resolves all required
dependencies automatically, providing a straightforward installation process. Configuring single or
multiple clients from the G Data Administrator is simple.
-46-
Linux Security Reviews 2015
www.av-comparatives.org
Kaspersky Anti-Virus for Linux File Server
Features
Kaspersky Anti-Virus for Linux File Server is an antivirus program with real-time protection and ondemand scanning. It is designed to be centrally managed by the Kaspersky Security Center, but can
also be installed as a stand-alone program on each server/workstation.
System requirements
Kaspersky Lab lists the following compatible distributions on their website:
Canaima 3 (32/64 bit)
Asianux Server 3 SP4, 4 SP1 (32/64 bit)
Red Hat Enterprise Linux Server 5.x, 6.x (32/64 bit); 7 (64 bit)
Fedora 14 (32/64 bit)
CentOS-5.x, 6.x (32/64 bit); 7.0 (64 bit)
SUSE Linux Enterprise Server 11 SP1 and SP3 (32/64 bit); 12 (64 bit)
Novell Open Enterprise Server 2 SP3 (32/64 bit); 11 SP1 and SP2 (64 bit)
Ubuntu Server 14.04 LTS, 14.10 (32/64 bit)
Ubuntu 10.04 LTS, 12.04 LTS (32/64 bit)
Oracle Linux 6.5 (32/64 bit), 7.0 (64 bit)
Debian GNU/Linux 6.0.5, 7.1, 7.5, 7.6, 7.7 (32/64 bit)
openSUSE Linux 11.3 (32/64 bit); 13.1 (64 bit)
Test platforms
64-bit Ubuntu 12.04.2 LTS (AV Client)
64-bit Windows 7 Professional (Management Server)
-47-
Linux Security Reviews 2015
www.av-comparatives.org
Version tested
8.0.2.256, 32-bit (no dedicated 64-bit version available, the 32-bit version also works on 64-bit
systems).
Home/business version
Kaspersky Anti-Virus for Linux File Server is a business program, there is no home version.
Licence
The program can be tried out as a fully functional trial version, after which a licence needs to be
purchased.
Installation
If Kaspersky Anti-Virus for Linux File Server should be centrally managed using the Kaspersky
Security Center, the Kaspersky Security Center Administration Server needs to be installed on a
Windows machine. For that, firstly the respective installation package needs to be downloaded from
Kaspersky Lab’s website 22 onto the machine that should host the server. Using the “typical
installation” option, the server setup is straightforward. The only extra information the setup wizard
requires is the rough number of workstations that should be managed by the server. After the
installation is completed, the user has the option to open the Administration Console. As the
Administration Console is opened for the first time, the Quick Start Wizard is displayed. Using this
wizard, the user needs to provide his licence key for the software. The user can also choose whether
he or she wants participate in the Kaspersky Security Network or not. After configuring updates and
creating a list of trusted applications to exclude from the control of the Endpoint Protection clients,
the wizard downloads the latest signature database updates and finishes the setup process.
Installation files for the anti-virus client and other tools can be found in the product update section
on Kaspersky Lab’s website23.
To be able to set up Kaspersky Anti-Virus for Linux File Server with central management capabilities,
three files are required:
1. The installation file for the anti-virus client (.deb version for Ubuntu, packages for other
distributions are available as well)
2. The Administration Agent to establish a connection with the management server (same
package formats as for the client installer)
3. The Administration plug-in for the Kaspersky Security Center to be able to create specific
anti-virus policies for Linux file server installations.
If the program should not be used in a centrally managed environment, the first installation file
suffices.
To install the anti-virus client on the target Linux machine, the 32-Bit compatibility C library needs
to be installed first: sudo apt-get install libc6-i386. Next, the client can be installed using the
command sudo dpkg -i --force-architecture kav4fs_<version>_i386.deb. Similarly, the Administration
Agent can be installed using the command sudo dpkg –i --force-architecture
klnagent_<version>_i386.deb. During the installation of the Administration Agent, the user is
prompted to enter the network address of the management server.
22
23
http://www.kaspersky.com/product-updates/security-center
http://www.kaspersky.com/de/downloads/productupdates/downloads_linux_file
-48-
Linux Security Reviews 2015
www.av-comparatives.org
To finish the installation, the setup script of the antivirus client needs to be run: sudo
/opt/kaspersky/kav4fs/bin/kav4fs-setup.pl. After accepting the licence agreement, the user needs to
specify the path where the licence file is located. Next, the newest virus definition updates are
downloaded by the script. The user is then prompted whether scheduled updates, on-access
scanning or samba-support should be enabled. When connected to a management server, all
configuration of the client can be done remotely. Nevertheless, the user can choose to activate a
web management console on the protected server/workstation by specifying a login password in the
post-setup dialogue. After the client was installed successfully, the computer should be moved into
a group of managed computers from the Kaspersky Security Center. This can be done by selecting
the computer from the list located in the “Administration Server → Reports and notifications →
Computer selections → Unassigned computers with Network Agent” section and adding it to the
desired group. Lastly, the Linux file server anti-virus plug-in for the Security Center needs to be
installed.
At the time of this review, the product version available on the Kaspersky Lab website did not
support on-access scanning on Ubuntu 12.04.5 (or 14.10). However, Kaspersky Lab have informed us
that the next version of the program (to be released soon) will support newer Linux kernel versions.
By contacting the vendor’s support service24, customers can obtain a copy of the new version prior
to its official release.
Deinstallation
The program can be uninstalled using the command sudo dpkg –r kav4fs.
Accessing the program
The application does not display a tray icon or add context-menu entries to Ubuntu's default file
explorer, as it is primarily designed for usage on server systems that are often not used with a
graphical interface.
Non-administrator access
Security relevant settings should be configured centrally by administrators by creating and assigning
policies at the management server.
On the client side, settings can also be changed using the command-line and the web interface.
Both methods require administrator credentials (admin password for the web interface and root
credentials for the command-line tools).
Main program window
On the client side, the Web Management Console can be accessed at http://<name/ip>:9080. The
web interface features the full configuration capabilities of the included command-line tools,
including configuration of the real-time protection component and creation of scan or update tasks.
In particular, all tasks, which use the web interface and are described in this section, can also be
performed using the included command-line tools.
On the management server side, the main window of the Kaspersky Security Center consists of a
tree-structure menu on the left-hand side and a section displaying information according to the
currently selected option on the right.
24
http://support.kaspersky.com/12006
-49-
Linux Security Reviews 2015
www.av-comparatives.org
Status/Reactivation From Kaspersky Security Center, real-time protection can be disabled/enabled
for specific machines or for all computers in an administration group. For single-machines, real-time
protection can be disabled/enabled by opening the machine’s Properties window from the contextmenu of the Managed computers list and stopping or starting the Real-time protection task in the
Tasks section. To disable or enable real-time protection for an administration group, a policy for the
File Server Anti-Virus can be created. Policies for groups can be created from the Policies tab of the
respective group. The “New Policy Wizard” allows administrators to specify scan areas, exclusions
and whether Real-time protection should be enabled.
If real-time protection is disabled for a computer, both the Security Center and the management
console on the client side will display a warning:
Management Center
Client web console
-50-
Linux Security Reviews 2015
www.av-comparatives.org
Scan From the client’s web console, on-demand scans can be started by starting one or more scan
tasks from the On-demand scan section (creating new tasks is also possible). From the Security
Center scan tasks can be created and started – either for specific computers, or for the whole
administration group.
Update Manual updates can be performed from the client’s web console. Similar to scanning, update
tasks can be assigned to specific computers or groups from the Security Center.
Logs Logs can be accessed from the Log section of the client web console. Detailed statistics about
various activities can be accessed from the Reports and notifications tree menu of the Security
Center.
Quarantine The quarantine of individual machines can be accessed from the client’s web console.
From the Security Center, files quarantined or backed-up by clients can be accessed from the
Repositories menu.
Scheduler An execution schedule can be applied to every task (e.g., update or scan tasks) created
either from the client’s web interface, or from the Kaspersky Security Center.
Licence Licence information is clearly displayed in the summary section of the client’s web console.
In the Security Center, detailed reports on the usage of different licence keys on managed
computers can be generated from the Reports and notifications menu.
Help In the client’s web console window, there is a link to the help document in the top right-hand
corner of the window. Kaspersky Security Center provides access to help facilities from the top-most
menu entry of the main window. Every sub window that can be opened from the Security Center also
provides a help link in the bottom left-hand corner.
Settings Settings can be specified and changed via an application policy applied to Anti-Virus for
Linux File Server. On the client side, settings can be changed using the web interface.
Malware alerts
On the client side, malware detections are displayed in the web console. Email notifications can be
configured from the Notification section of the web interface. In the Kaspersky Security Center,
malware detections on managed computers can be compiled into a virus report.
-51-
Linux Security Reviews 2015
www.av-comparatives.org
Help
Apart from the help documents that are available from the client’s web console and the Kaspersky
Security Center, detailed documentation is available from the download pages of the Anti-Virus
Client22 and the Kaspersky Security Center23.
Verdict
Kaspersky Anti-Virus for Linux File Server provides an easy-to-use web management console. By
connecting multiple anti-virus clients to an administration server, all instances can be configured
separately or in administration groups. Creating policies and tasks from the Kaspersky Security
Center is straightforward.
-52-
Linux Security Reviews 2015
www.av-comparatives.org
McAfee VirusScan Enterprise for Linux
Features
McAfee VirusScan Enterprise for Linux features on-access and on-demand malware scans. It is also
fully manageable from the McAfee ePolicy Orchestrator Server, allowing multiple deployments to be
administered and reported on through the enterprise level console.
System requirements
64-bit versions of:
Red Hat Enterprise 5, 6, and 7
SuSE Linux Enterprise Server/Desktop 10, 11, and 12
Novell Open Enterprise Server 2 and 11
Ubuntu 12.04, 12.10, 13.04, 13.10, 14.04, and 14.10
CentOS 5, 6, and 7
Oracle Linux 5, 6, and 7 (Both Red Hat compatible and Unbreakable Enterprise Kernel)
Amazon Linux 3.2 Kernels and above
Support for public cloud such as Amazon EC2
Test platform
64-bit Ubuntu 14.04.1 LTS
Version tested
2.0.1.29052
Home/business version
As the name suggests, the product is designed for business users. There is no consumer counterpart.
-53-
Linux Security Reviews 2015
www.av-comparatives.org
Licence
The program is commercial, with a 30-day free trial available.
Installation
Firstly, the archive containing the necessary installation files needs to be downloaded from the
download section of McAfee's website25. Next, the archive and further archives contained in the main
one need to be extracted: tar xzf McAfeeVSEForLinux-...-full.x86_64.tar.gz, followed by tar xzf
McAfeeVSEForLinux-....tar.gz and tar xzf McAfeeVSEForLinux-...-others.tar.gz (or using Ubuntu's
archive manager). After extracting the archives, the McAfee runtime and agent need to be installed:
sudo dpkg -i MFErt.i686.deb, sudo dpkg -i MFEcma.i686.deb. Finally, the main installer can be
started using the command sudo ./McAfeeVSEForLinux-...-installer.
After accepting the licence agreement, the user needs to set a password for the new user that is
created for logging into the web user interface (nails). Installation directories and settings for
email-notifications can be changed after the password for the new user is set (we used default
settings for all remaining options).
No additional packages are required to install the software.
Deinstallation
The software can be uninstalled from the command line using the following commands: dpkg --purge
mcafeevseforlinux, dpkg --purge mfecma, dpkg --purge mfert.
Accessing the program
McAfee VirusScan does not display a tray icon or add context-menu entries to nautilus. The
application provides a web user interface that can be accessed from https://localhost:55443 by
default.
Non-administrator access
Access to the program is restricted by the need to enter login credentials for the administration
console.
Main program window
The interface is mainly divided into three parts: a menu on the left, the content of the currently
selected menu entry in the centre and (optionally) a quick help section on the right-hand side of
the page.
The menu is structured into three categories: View, containing various status information; Schedule,
containing options to create update and scheduled scans; and Configure, containing options to
configure the program behaviour.
Real-time protection status is shown in the console entry for the machine in question. The onaccess scanner can be disabled/enabled from the “On-Access Settings” option in the Configure
section. The status of the on-access scanner is shown in the “Host Summary” view:
25
http://www.mcafee.com/apps/downloads/free-evaluations/default.aspx?pc=productcategory&plat=linux
-54-
Linux Security Reviews 2015
www.av-comparatives.org
On-demand scans can be performed by creating a scan task and scheduling it to run immediately
(from the On-Demand Scan option in the Schedule section). The user can specify which directories to
scan and define a configuration for the scan (e.g. to scan archives, exclude certain directories). At
the end of the task setup, the task is assigned a name, so it can be re-run using the same settings
as the previous run.
Settings All available settings can be accessed from the Configure section of the web interface.
Logs Logs can be accessed and queried from the web interface (View → Scanning Summary, System
Events or Detected Items).
Quarantine By default, the quarantine is located in the /quarantine directory. Unprivileged users do
not have permissions to read the contents of this directory. Privileged users can use the following
command to list all files currently contained in the quarantine: sudo /opt/NAI/LinuxShield/bin/nails
quarantine --list and use sudo /opt/NAI/LinuxShield/bin/nails quarantine --recover <filename> to
recover files from the quarantine.
Update By default, the program is configured to update the virus definition database once every day.
To update the database manually, the user needs to click the Run Now button of the update task in
the Scheduled Tasks view.
Licence We could not find licence information in the console.
Help The help column can be shown or hidden using the link at the bottom of the menu panel.
Malware alerts
No desktop notification is shown when malware is discovered. However, the application can be
configured to send notification emails in such cases. The file is silently treated according to the
scanner's configuration, which by default means it is moved to quarantine.
Help
A detailed product guide in .pdf format is included in the archive that also contains the other
installation files. Additionally, the web interface displays a quick help section for the currently
selected menu entry, providing short but helpful descriptions of the available options and including
links to corresponding topics in the HTML version of the product guide (available offline).
Verdict
McAfee VirusScan Enterprise for Linux provides an intuitive web user interface that provides access
to use almost all program features without having to use the Linux terminal. The help facilities
provided are very useful.
-55-
Linux Security Reviews 2015
www.av-comparatives.org
Panda Endpoint Protection Plus
Features
Panda Endpoint Protection Plus is designed to provide centrally managed protection for different
platforms (Mac OS X, Windows, Linux, and Android). Its Linux client mainly consists of an ondemand scanner.
System requirements
Panda Security’s website lists the following supported Linux distributions: Ubuntu version 12 or
later, Red Hat Enterprise (64-bit) version 6.0 or later, Debian Squeeze, OpenSUSE version 12 or later,
SUSE Enterprise Server (64-bit) version 11 SP2 or later, CentOS 6.x or later.
Test platforms
64 bit Ubuntu 14.04.1 LTS
64 bit Ubuntu 12.04.2 LTS
32 bit Ubuntu 14.04.2 LTS
32 bit Ubuntu 12.04.5 LTS
Version tested
2.10. There is one installer for both 32- and 64-bit systems.
Home/business version
The product is targeted as business users. No home-user version is available.
Licence
Commercial. A 30-day free trial licence is available.
Installation
To install Panda Endpoint Protection on a Linux machine, the matching package needs to be
downloaded from the control-panel of the online management console26. Furthermore, the following
command needs to be executed to install necessary additional packages: sudo apt-get install
libglib2.0-0:i386 libsoup2.4-1:i386 libmcrypt4:i386 libgssapi-krb5-2:i386 at. After installing these
packages, the installer can be started: sudo ./LinuxWAAgent.run.
After the installer has finished, the two processes “PCOPScheduler” and “PCOP_AgentService” should
be running on the system. This can be checked by inspecting the output of the command ps aux |
grep PCOP.
26
Accessible from: https://managedprotection.pandasecurity.com
-56-
Linux Security Reviews 2015
www.av-comparatives.org
Note: when we first tried to install Panda Endpoint Protection on our test system, the required
processes could not be started. The reason for this was that we were missing some required packages
that were not clearly documented on the website. After we informed the vendor of our difficulties,
they responded quickly and updated the requirements website.
Deinstallation
The program can be uninstalled using
/opt/PCOPAgent/Common/PCOP_Uninstaller.sh).
the
uninstaller
provided
(located
at
Accessing the program
The program does not display a tray icon or add entries to the context-menu of nautilus.
Non-administrator access
Most of the available settings can only be changed from the web management console by an
administrator. Changing the configuration file on the client machines requires root privileges, as
does starting manual on-demand scans.
Main program window
The Linux client of Panda Endpoint Protection does not include a graphical user interface.
The cloud hosted web management console consists of a tabbed menu on the top and a bigger
section, displaying information according to the currently selected tab, below the menu.
-57-
Linux Security Reviews 2015
www.av-comparatives.org
Status/Reactivation Not applicable, since there is no real-time protection component.
Scan On the client side, manual scans can be started using the pavsl.sh script located in the
/opt/PCOPAgent/PCOPScheduler/pavsl-bin folder. Executed with root privileges, the command
/opt/PCOPAgent/PCOPScheduler/pavsl-bin/pavsl.sh -heu -rpt /tmp/log.txt / starts a scan of the file
system with heuristic scanning enabled. The log file is stored in the /tmp/log.txt file.
From the web management console, scheduled or one-time scans can be created from the Settings
tab by selecting the profile assigned to the group of computers to be scanned, and creating a new
task in the Windows and Linux → Scheduled scans section.
On our testing system, scanning only worked on 32 bit Ubuntu 12.04.5. On the other systems, the
policy files were downloaded from the server, but no scan process was started.
Update Virus definitions are downloaded automatically. The documentation does not reveal a way to
start updates manually.
Logs From the web console, detection and status logs can be compiled into reports from the Reports
tab. On the client side, the scan logs, which are sent to the server, are located in the
/opt/PCOPAgent/Common/DATA/ScansLogs folder.
Quarantine Quarantined files can be managed from the respective tab in the web management
console
Scheduler Every scan task can be assigned a schedule at creation.
Licence information is clearly displayed in the Licences section of the Status tab of the web
console.
Help The web console includes a help menu to access help documents or contact the technical
support. On the client side, no help facilities are available.
Settings can be configured from the Settings tab of the web console. Those settings can be applied
to a group of computers, but not individually. On the client side, the frequency of policy checks and
transmissions of status messages can be changed in the /etc/PCOPLinux/PCOPLinux.conf file. The
time after which the client should label old policies as expired can be changed in the
/opt/PCOPAgent/Common/DATA/AgentChkP.ini file.
Malware alerts
On the client side, no malware alerts are displayed. In the web management console, malware
detections are displayed in the Detected Threats graph of the Status tab.
Help
The help menu of the web management console contains a link to an online help document, the
technical support page and an administration guide.
Verdict
Using Panda Endpoint Protection Plus, multiple clients on different platforms can be managed
centrally from a cloud-based server. The Linux client of the security suite requires some additional
packages, but is still easy to install. From the web management console, computers can be
configured in administrative groups.
-58-
Linux Security Reviews 2015
www.av-comparatives.org
Seqrite Antivirus for Linux
On Seqrite’s website27, a demo of their Linux antivirus solution can be requested, but obtaining a
trial licence directly is not supported. We tried to apply for a demo via the website, but did not
receive an answer, probably because the product is mainly targeted at the Indian market.
Features
According to the datasheet on the vendor’s website, Seqrite Antivirus for Linux includes on-demand
an on-access scanning, with a web user interface that allows remote administration.
System requirements
The datasheet lists the following supported distributions:
32 bit: Fedora 14, 19; openSUSE 11.4, 12.2, 12.3; Ubuntu 10.10, 12.04, 12.04.3, 13.04, 13.10
64 bit: Fedora 14, 18, 19; openSUSE 12.1; Ubuntu 12.04.2, 13.04, 13.10; CentOS 6.3
27
http://www.seqrite.com/seqrite-for-linux
-59-
Linux Security Reviews 2015
www.av-comparatives.org
Sophos Anti-Virus for Linux
Features
Sophos Anti-Virus for Linux includes an on-demand scanner, as well as on-access scanning.
System requirements
Sophos support a very wide range of Linux distributions, details can be found on their website28.
Test platform
64-bit Ubuntu 14.04.1 LTS
Version tested
9.7.2. There is one installer for both 32 and 64-bit systems.
Home/business version
Sophos Anti-Virus for Linux is available as a basic standalone program; there is also a commercial
version that includes management integration and support.
28
http://downloads.sophos.com/readmes/supported_kernels_9.txt
-60-
Linux Security Reviews 2015
www.av-comparatives.org
Licence
The basic version of the program is available free29.
Installation
To be able to download the installer, the user first needs to create a “MySophos” account on Sophos'
website. After the first login to the newly created account, the web interface will prompt the user to
enter his/her licence username and password. Once the credentials are entered, the user can
download the installer in a .tgz archive from the Downloads section (Standalone Installers → AntiVirus for Linux).
After extracting the files within the archive (tar xzvf sav-linux-9-i386.tgz), the software can be
installed by running the install script as root: sudo ./sophos-av/install.sh. During the installation
process little user interaction is required – the user needs to accept the licence agreement, specify a
username and password to access the web user interface and again enter his/her licence username
and password to enable updates.
No additional packages are required to install the software.
Deinstallation
The software can be uninstalled using the included uninstaller (located at /opt/sophosav/uninstall.sh by default).
Accessing the program
The application does not display a tray icon or add context menu entries to nautilus.
Non-administrator access
The web interface can only be accessed using the credentials that were created during the
installation process. Unprivileged users are therefore unable to change the program's configuration
or enable/disable the on-access component from the graphical interface. The only action an
unprivileged user may perform is an on-demand scan using the savscan command from the
command-line.
Main program window
Sophos Anti-Virus for Linux provides a web user interface that can be accessed at
http://localhost:8081. The interface consist of different tabs containing the available configuration
options or status information.
The interface is mainly used to configure the protection components. Manual updates and ondemand scans need to be started from the command-line.
Status/Reactivation On-access scanning can be disabled from the web interface on the “Control”
tab. If disabled, the new status will be displayed in the “Status” section.
Scan Manual scans can only be started from the command-line. For example, the command savscan
Downloads/ --quarantine will scan the “Downloads” folder within the current working directory,
changing the access permissions of discovered malware to deny execution of the malicious file.
29
https://www.sophos.com/en-us/products/free-tools/sophos-antivirus-for-linux.aspx
-61-
Linux Security Reviews 2015
www.av-comparatives.org
Update The virus definition database is updated automatically every 60 minutes (by default). To
update the database manually, the savupdate command needs to be invoked as root from the
command-line (sudo /opt/sophos-av/bin/savupdate).
Logs Logs can be viewed from the “Log viewer” tab of the web interface. The logger will record
events of both the on-access scanner and on-demand scans.
Quarantine The application does not use a pre-defined quarantine directory, instead, the user can
specify a different quarantine directory for each on-demand scan by adding the --quarantine move=<directory> flags to the savscan command.
Scheduler Scheduled scans need to be configured from the command line. Sophos Anti-Virus allows
administrators to create and schedule multiple so-called “named scans” (/opt/sophosav/doc/namedscan.example.en contains an example of how to configure such a named scan). For
example, a scan called “DailyScan” that uses the configuration file at /home/user/dailyscan can be
added using the command sudo /opt/sophos-av/bin/savconfig add NamedScan DailyScan
/home/user/dailyscan.
Licence We could not find licence information in the graphical user interface.
Help The graphical interface does not contain links to help facilities, locally the user has to rely on
the provided man pages (e.g., man savconfig).
Settings The application's settings can be accessed using the web interface or the savconfig
command from the command-line.
Malware alerts
Sophos Anti-Virus detects a download of the EICAR test file and displays a pop-up window upon
detection. By default, the on-access scanner will not quarantine or delete malicious detected files; it
only restricts access to them.
The notification window does not disappear automatically.
Help
Detailed install- and configuration guides can be obtained in .pdf format from the download section
of Sophos' website.
Verdict
Sophos Anti-Virus for Linux provides a very straightforward installation process and an intuitive user
interface to configure the application components. It requires administrators to possess some
experience in using the Terminal on Linux systems.
-62-
Linux Security Reviews 2015
www.av-comparatives.org
Symantec Endpoint Protection for Linux
Features
Symantec Endpoint Protection for Linux is part of a business security solution that includes ondemand and real-time scanning for Linux systems. The client software is centrally managed by the
Symantec Endpoint Protection Manager, which allows administrators to define security policies for
all managed clients.
System requirements
Symantec provides a comprehensive list of kernels with Auto-Protect support on their
knowledgebase website30.
Test platform
64-bit Ubuntu 14.04.1 LTS
64-bit Ubuntu 12.04.2 LTS
Version tested
12.1.5 (one installer for both 32- and 64-bit systems)
Home/business version
Symantec Endpoint Protection is very much a business-oriented program.
Licence
The program is commercial, with a 60-day free trial available.
30
https://support.symantec.com/en_US/article.TECH223240.html
-63-
Linux Security Reviews 2015
www.av-comparatives.org
Installation
The first step in installing Symantec Endpoint Protection is setting up the management server on a
Windows machine. To install the management server, download the installation files from Symantec's
website31 and run the Setup executable. After accepting the licence agreement, the rest of the
installation process is quite straight-forward. Once the server is installed, the server configuration
program automatically starts. For less than 100 clients, the default configuration option on the first
page of the wizard is sufficient. On subsequent pages, the user needs to create an administrative
account to log in to the management server and optionally specify mail server options to send
notifications.
To create the installation package for the Linux client, the user needs to start and log in to the
Endpoint Protection Manager. Selecting “Install protection client to computers” from the “Common
tasks” menu opens a wizard create an installation package. Selecting Linux as the target operating
system and choosing the save location of the package finishes the process.
To install the Linux client on Ubuntu 14.04, the created archive needs to be copied onto the Linux
machine and extracted into the root file system32: sudo unzip SymantecEndpointProtection.zip -d /.
This problem did not occur on Ubuntu 12.04. There, unzipping the archive into the current directory
also works (unzip SymantecEndpointProtection.zip).
Before starting the install script, some additional packages are required: sudo apt-get install libc6i386 libx11-6:i386.
Furthermore, Java 833 and the Java Cryptography Extension (JCE) unlimited strength policy files34 are
needed. To install these components, the following steps are necessary (if no JRE is installed yet):
1. Download the respective archives from the websites linked above
2. Extract the archive and copy it to the install location: sudo tar xzf jre-8uxx-linux-x64.tar.gz C /opt
3. Setup alternatives system:35
sudo update-alternatives --install "/usr/bin/java" "java" "/opt/jre1.8.0_xx/bin/java" 1
sudo update-alternatives --install "/usr/bin/javaws" "javaws" "/opt/jre1.8.0_xx/bin/javaws" 1
sudo update-alternatives --set "java" "/opt/jre1.8.0_xx/bin/java"
sudo update-alternatives --set "javaws" "/opt/jre1.8.0_xx/bin/javaws"
4. Extract the policy files and run: sudo cp UnlimitedJCEPolicyJDK8/local_policy.jar
/opt/jre1.8.0_xx/lib/security/
5. Change the owner of the install directory to root: sudo chown -R root:root /opt/jre1.8.0_xx
(“xx” being a placeholder for the current revision number)
To finish the installation, finally the install script needs to be run as root: sudo chmod +x ./install.sh
&& sudo ./install.sh -i.
Note: the real-time protection component “Auto-Protect” does not work for the Linux kernel
included in Ubuntu 14.04. To test this component, we also installed the client on Ubuntu 12.04.2
with Linux kernel 3.5.0-23. The vendor informed us that the Auto-Protect issue, as well as the other
31
http:/www.symantec.com/endpoint-protection/
The install script seems to contain a malformed path expression that will cause the installation to fail, if the
script is executed from a different directory – this problem seems to be specific to Ubuntu 14.x versions.
33
http://www.oracle.com/technetwork/java/javase/downloads/index.html
34
http://www.oracle.com/technetwork/java/javase/downloads/jce8-download-2133166.html
35
The alternative systems manages the symbolic links to different versions of the same or similar programs –
different versions of Java, for instance.
32
-64-
Linux Security Reviews 2015
www.av-comparatives.org
problems with Ubuntu 14.04 we encountered during this review, will be resolved in the upcoming
release of the new version of Symantec Endpoint Protection.
Deinstallation
The program can be uninstalled using the included install.sh script by providing the “-u” flag.
Accessing the program
The Endpoint Protection client only displays a tray icon on Ubuntu 12.04. There the icon can be
used to open the status window or exit the program (if the client is closed, no notifications of
malware detections of the auto-protect component will be shown).
On Ubuntu 14.04 no tray icon is displayed. The application does not add context-menu entries for
nautilus.
Non-administrator access
The policies that dictate the client's behaviour can only be changed by an administrator within the
Endpoint Protection Manager. Users without administrative access to their Linux machine may only
perform manual updates.
Main program window
The main window on the client side only contains information regarding the current program version
and the status of the connection to the management server.
The main window of the Endpoint Protection Manager consists of a tab-like menu on the left-hand
side and a section displaying information according to the currently selected option on the righthand side.
-65-
Linux Security Reviews 2015
www.av-comparatives.org
Status/Reactivation The application's protection components can be configured by changing the
respective policy in the “Policies” tab. For example, the Auto-Protect component can be disabled in
the “Virus and Spyware Protection” policies. If security problems are detected, a warning in the
main window is displayed, and the cause can be accessed in the details window.
Scan On-demand scans can be started from both the server and the client side of the application.
From the server side, scans can be started manually by right-clicking the client to be scanned and
sending the “Scan” command.
On the client side, the command-line tool sav can be used to perform manual scans. The command
sudo /opt/Symantec/symantec_antivirus/sav manualscan -s / starts a full filesystem scan, for
instance.
The results of the manual scans are sent to the management server, where they can be displayed in
the “Monitor” tab.
Update By default, new clients are assigned an update policy that performs virus definition updates
every 4 hours (can be changed in the “Policies” tab of the Endpoint Protection Manager). Manual
updates can be executed by sending an update command from the manager (right-click the client in
the “Clients” tab and select “Run Command on Computers” → “Update Content”).
On the client side, the graphical interface can be used to perform a manual update by clicking the
“LiveUpdate” button.
Logs On the server side, different types of log files can be accessed from the “Monitor” → “Logs” tab.
On the client side, logs can be exported to a file using the command sudo
/opt/Symantec/symantec_antivirus/sav log -e <filename>.
-66-
Linux Security Reviews 2015
www.av-comparatives.org
Quarantine On the server side, quarantined files can be viewed in the “Monitor” → “Logs” tab by
selecting the risk logs. On the client side, an administrator can manage the quarantine using the sav
quarantine command (e.g., sudo /opt/Symantec/symantec_antivirus/sav quarantine -l lists all
quarantined files).
Scheduler Scheduled scans can be configured in the anti-virus policies. By default, a scheduled scan
is performed daily.
Licence Licence information is clearly displayed in the top right-hand corner of the “Home” tab.
Help The help menu can be accessed using the “Help” link located in the top right-hand corner of
the Manager’s main window.
Settings Settings that affect the application's protection components are represented as options of
the policy that is currently applied to clients. These settings can be changed in the “Policies” tab of
the Endpoint Protection Manager.
Malware alerts
Using Ubuntu 12.04, the Symantec Endpoint Protection client blocks an attempted download of the
EICAR test file and displays the following alert:
The text displayed in the alert message can be configured in the Anti-virus policy on the
management server.
Help
The installation of the Endpoint Protection Manager includes a detailed HTML help document that
can be accessed offline by clicking “Help” → “Help Topics...”. The help menu also contains links to
the customer support- and support forum websites.
On the client side, man-pages for the installed command-line tools are available (man sav for
instance)
Verdict
Symantec Endpoint Security offers centralized management security client programs running on
different platforms. The clients can be installed on Mac, Windows, as well as Linux systems. The
policies defined in the Endpoint Protection Manager allow quick configuration for a large number of
clients.
-67-
Linux Security Reviews 2015
www.av-comparatives.org
Trend Micro ServerProtect for Linux
Features
Trend Micro ServerProtect for Linux features on-access as well as on-demand scanning. It also
supports central management by connecting to the Trend Micro Control Manager.
System requirements
32/64-bit versions of: Red Hat Enterprise Linux 4/5/6, CentOS 5/6, SUSE Linux Enterprise 10
Test platform
64-bit CentOS 6.6
Version tested
3.0
Home/business version
The product is designed for business users. No home-user version is available.
Licence
The program is commercial, with a 30-day free trial available.
-68-
Linux Security Reviews 2015
www.av-comparatives.org
Installation
Firstly, the archive containing the installer needs to be downloaded from Trend Micro’s website36.
Since the Linux kernel included with CentOS 6.6 is not supported out-of-the-box, the matching
kernel module update also needs to be downloaded from the mentioned website (the module for
kernel 2.6.32-504.el6.x86-64.x86-64 in our case).
Next, some additional packages are required before starting the installer. Those packages can be
installed using the command sudo yum install compat-libstdc++-296.i686 libuuid.i686 zlib.i686.
After installing the required packages, the downloaded archive can be extracted and the installer
can be started (sudo ./SProtectLinux-3.0.bin).
During the installation process, the user only needs to accept the licence agreement and input the
licence key.
To enable real-time protection, the kernel module contained in the downloaded kernel update
archive needs to be copied or moved into the program’s kernel module directory and marked as
executable: sudo mv splxmod-<kernel_name>.o /opt/TrendMicro/SProtectLinux/SPLX.module and
sudo chmod 744 /opt/TrendMicro/SProtectLinux/SPLX.module/splxmod-<kernel_name>.o.
Deinstallation
The software can be uninstalled using CentOS’ package manager: yum remove SProtectLinux.x86_64.
Accessing the program
Trend Micro ServerProtect does not display a tray icon or add context menu entries to nautilus.
Non-administrator access
Access to the program is restricted by the need to enter login credentials for the administration
console. By default the password to access the interface is empty, which should be changed by
specifying a password from the “Password” option of the Administration menu of the web interface.
Main program window
Trend Micro ServerProtect provides a web user interface that can be accessed at
https://localhost:14943.
The interface is mainly divided into three parts: a menu on the left, the content of the currently
selected menu entry on the right and a banner containing a logout link and a drop-down box
containing the Help menu at the top of the page.
Real-time protection status is shown in the summary section. The on-access scanner can be
disabled/enabled from the “Real-time Scan” option in the Scan Options menu.
On-demand scans can be started from the “Manual Scan” option in the Scan Option menu. The user
can specify which directories should be included in the scan (or scan all directories). The user can
also choose which file types to scan and which action to take for infected files. The selected
configuration can be saved, enabling it to be re-used for other on-demand scans.
Settings for scanning and updating can be accessed from the Scan Options and the Update sections
of the web user interface.
Logs can be accessed from the Logs section of the web interface.
36
http://downloadcenter.trendmicro.com/index.php?regs=NABU&clk=latest&clkval=111&lang_loc=1
-69-
Linux Security Reviews 2015
www.av-comparatives.org
Quarantine
is
located
by
default
in
the
quarantine
in
the
/opt/TrendMicro/SProtectLinux/SPLX.Quarantine folder (can be changed from the “Quarantine
Directory” option in the Scan option menu). Files are quarantined by being moved into the
quarantine directory. Administrators can therefore view the content or empty the quarantine
directory using the file explorer or the terminal.
Update By default, the program is configured to update the virus definition database once every day.
Manual updates can be performed from the “Manual Update” option in the Update menu or by
clicking the “Update now” button in the Summary section.
Licence Licence information can be accessed from the “Product Registration” option in the
Administration menu.
Help The help menu is located at the top right-hand corner of the web interface. Every menu option
also includes a help link at the top, providing helpful information about the currently selected
option.
Malware alerts
On our testing system, no notifications were displayed on malware detection. However, the
application can be configured to send notification emails in such cases. The file is silently treated
according to the actions defined in the real-time scan options (by default, the scanner will try to
clean the file and quarantine it, if cleaning did not succeed).
Help
Getting Started and Administrator Guides are available on Trend Micro’s website. Additionally, the
web interface can be used to access help topics for each of the menu options, Trend Micro’s
knowledge base and other online support facilities.
Verdict
Trend Micro ServerProtect for Linux provides a straightforward web user interface, which enables the
user to change all of the program’s configuration options without having to use the terminal. The
help facilities provide quick access to specific information about program features.
-70-
Feature List Linux (as of April 2015)
Product name:
avast File Server
Security for Linux
AVG Free Edition
for Linux
Bitdefender
Antivirus Scanner
for Unices
ClamAV
COMODO Antivirus
for Linux
Dr.Web for Linux
eScan Anti-Virus for
Linux
ESET NOD32
Antivirus for Linux
F-PROT Antivirus
for Linux
Workstations
12.04
discontinued
10.04 or newer
9.04 or newer
12.04
11.04 or newer
9.04 - 10.04
12.04
discontinued
Main User Target
Business Users
Home Users
Business Users
Home Users
Home Users
Home Users
Home Users
Home Users
Home Users
License type
COMMERCIAL
FREE
COMMERCIAL
FREE
FREE
COMMERCIAL
COMMERCIAL
COMMERCIAL
FREE
Sophos Anti-Virus
for Linux
Symantec Endpoint
Protection for Linux
Trend Micro
ServerProtect for
Linux
Officially Supported Ubuntu Versions:
Graphical User Interface (GUI)
On-demand scanner
only up to 12.04.2
Real-Time protection
Block access to malicious/phishing sites
Firewall / IDS
Removable media blocking
Quarantine
manual cron
Scheduled Tasks
Statistics
Online Help, User Forum & User Manual
Feature List Linux (as of April 2015)
Product name:
F-Secure Linux
Security
G Data Client
Security Business
for Linux
Kaspersky AntiVirus for Linux File
Server
McAfee VirusScan
Panda Endpoint
Seqrite Antivirus for
Enterprise for Linux Protection for Linux
Linux
Officially Supported Ubuntu Versions:
10.04 - 12.04.2
10.04.4 - 14.10
10.04 - 14.10
12.04 - 14.04
12.04 or newer
12.04.2 - 13.10
10.04 - 14.04 (LTS)
11.10 - 13.04
N/A
Main User Target
Business Users
Business Users
Business Users
Business Users
Business Users
Business Users
Business Users
Business Users
Business Users
Licence type
COMMERCIAL
COMMERCIAL
COMMERCIAL
COMMERCIAL
COMMERCIAL
COMMERCIAL
FREE
COMMERCIAL
COMMERCIAL
Graphical User Interface (GUI)
only 32-bit 12.04
On-demand scanner
Real-Time protection
Block access to malicious/phishing sites
Firewall / IDS
Removable media blocking
Quarantine
Scheduled Tasks
Statistics
Online Help, User Forum & User Manual
only up to 12.04.2
only up to 12.04.2
Linux Security Reviews 2015
www.av-comparatives.org
Copyright and Disclaimer
This publication is Copyright © 2015 by AV-Comparatives®. Any use of the results, etc. in whole or in
part, is ONLY permitted after the explicit written agreement of the management board of AVComparatives, prior to any publication. AV-Comparatives and its testers cannot be held liable for any
damage or loss, which might occur as result of, or in connection with, the use of the information
provided in this paper. We take every possible care to ensure the correctness of the basic data, but a
liability for the correctness of the test results cannot be taken by any representative of AVComparatives. We do not give any guarantee of the correctness, completeness, or suitability for a
specific purpose of any of the information/content provided at any given time. No one else involved
in creating, producing or delivering test results shall be liable for any indirect, special or
consequential damage, or loss of profits, arising out of, or related to, the use or inability to use, the
services provided by the website, test documents or any related data.
For more information about AV-Comparatives and the testing methodologies please visit our website.
AV-Comparatives (May 2015)
-72-