1
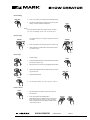
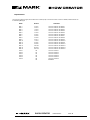
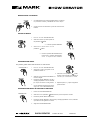
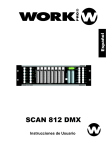
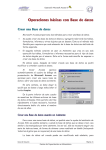
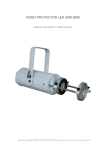
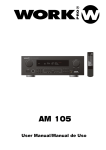
SHOW CREATOR
User Manual/Manual de uso
DMX Scanners Controller
Controlador de Scanners DMX
English Version
Page 1
Versión Español
Página 11
MAIN FEATURES
- 192 DMX Channels
- 30 Banks each composed of 8 programmable scenes
- Built-in microphone for Audio sync
- AUTO mode controlled by TAP SYNC and SPEED
- MIDI interface
- 4 digits LED display
- Blackout function
- CHASE programming and CHASE running
- Fade Time control
- DMX polarity selects
- FOG Mchine control
TECHNICAL SPECIFICATIONS
Power Input
DC 9 - 12 V. 300 mA. min.
DMX Output
XLR 3 pin Female
MIDI Signal
Standard Interface 5 pin
Audio Input
Built-in Microphone
Dimensions
483 x 132 x 73 mm.
Weight
2,5 Kg
This symbol on the product or on its packaging indicates that this product
shall not be trated as household waste. Instead it shall be handed over to
the applicable collection point for the recycling of electrical an electronic
equipment. By ensuring this product is disposed of correctly, you will help
prevent potential negative consequences for the environment and human
health, which could otherwise be caused by inappropriate waste handling
of this product. The recycling of amterials will help to conserve natural
resources. For more detailed information sabout recycling of this product,
please contact your local city office, your household waste disposal service
or the shop where you purchased the product.
SHOW CREATOR
MANUAL DE USO
PAGINA 1
1
3
2
5
4
6
7
8
9
14 13 12
15
16
1
17 18
19
Scanners Buttons 1-12.
12 scanners of 16 DMX channels & fader control.
Fader
Scanners DMX Channels control
1
2
3
4
5
6
7
8
9
10
11
12
1 - 16
17 - 32
33 - 48
49 - 64
65 - 80
81 - 96
97 - 112
113 - 128
129 - 144
145 - 160
161 - 176
177 - 192
Off
Off
Off
Off
Off
Off
Off
Off
Off
Off
Off
Off
11 10
LED
Fader
Scanners DMX Channels control
Off
Off
Off
Off
Off
Off
Off
Off
Off
Off
Off
Off
1
2
3
4
5
6
7
8
9
10
11
12
1 - 16
17 - 32
33 - 48
49 - 64
65 - 80
81 - 96
97 - 112
113 - 128
129 - 144
145 - 160
161 - 176
177 - 192
On
On
On
On
On
On
On
On
On
On
On
On
LED
On
On
On
On
On
On
On
On
On
On
On
On
Press a scanner button to turn on manual fader control. Press the scanner button again to turn off fader control. The LED besides
the button lights or goes out to indicate this selection.
SHOW CREATOR
USER MANUAL
PAGE 2
2
Scene Buttons
Press the scene buttons to load or stored your scenes. There are maximum of
240 programable scenes.
3
Segment Display
Shows the currnt activity or programming state.
4
Bank Buttons(Up/Down)
Press the Up/Down buttons to select a bank 30 banks.
5
Chase Buttons(1-6)
Used to select your programmed chase consisting a maximum of 240 scenes.
6
Program Button
Used to activate Program mode.
7
MIDI/Rec Button
Used to control MIDI operation or to record programs.
8
Auto/Del Button
Used to activate Auto mode or to delete scenes and chases.
9
Music/Bank Copy
Used to activate Music mode or to create scenes and chase programs.
10
Blackout Button
Used to disable channel output.
11
Tap Sync/Display
Used to create a standard beat or to change the values display between % and 255.
12
Fade Time Slider
Used to adjust the Fade Time. Fade Time is the amount of time it takes for a fixture
(scaner) to move from one position to another, for the dimmer to fade in or fade out.
13
Speed Slider
Used to adjust the speed at which the scenes will chase.
14
Page Select Button
Used to select faders for the fixture between Page A (1-8) and Page B (9-16)
15
Faders
This faders are used to control intensity of channel 1-8 or channel 9-16 depending
upon the selected page.
16
MIDI IN
Receives MIDI data.
17
DMX Polarity Select
Used to select DMX polarity.
18
DMX Out
This connector sends your DMX value to the DMX fixture or DMX pack.
19
DC Input
DC +9-12 V. 300 mA min.
SHOW CREATOR
USER MANUAL
PAGE 3
Program Enable
When the power is turned on, this unit enters Manual mode
automatically.
Press the Program button for three seconds to activate Program
mode, a fast blinking light in the Segment Display next to PROG.
Indicates its selection.
Programming Scenes
1 . Enter Program mode.
2 . Press the Scanner button to turn on its fader control, which
is indicated by lit LED.
You may select several scanners at a time by tapping of these
Scanner buttons, so you can assign several fixtures at a time
with this unit.
MIDI / REC
3 . Create a desired scene using the faders. The DMX value is
0 when the fader is fully down(bottom) and 255 when it is fully
up(top).
4 . If necerssary, you may tap the Page Select button to control
the second set of 8 DMX channels.
5 . Once the scene is satisfactory, tap the MIDI/Rec button to
program this scene into memory.
6 . Tap the Bank Up/Down button to select the bank you want to
store your scene into. There are total 30 bank you can select,
you may store up to 8 scenes into each bank.
SCENE BUTTONS 1-8
BANK
7 . Tap the Scene button to store your scene, all LEDs and the
Segment Display will flash three times briefly indicating this
operation, then the Segment Display will show the bank and
the scene.
SCANNER BUTTONS 1 - 12
PROGRAM
8 . Repeat steps 3-7 until all desired scenes have been
programmed into memory. Tap the Scanner button again to
turn off its fader control.
To assing another scanner (fixture), you may tap the
corresponding Scanner button to turn on its fader control, the
you may begin your programming again.
9 . If you wish not continue your programming, press and hold
mode, the blinking light in the Segment Display goes out
down the Program button for three seconds to exit Program
indicating this selection.
Scene Editing
1 . Program enable.
BANK
2 . Tap the Bank Up/Down button to select the bank that contains
the scene you wish to edit.
SCENE BUTTONS 1-8
3 . Select the sceneyou want to edit tapping its Scene button.
4 . Use the Faders to make your desired adjustments.
SHOW CREATOR
USER MANUAL
PAGE 4
Scene Editing
5 . Once you've made your changes, tap the MIDI/Rec button
MIDI / REC
6 . Tap the Scene button that corresponds to the scene you're
editing. This will overwrite the exited scene.
SCENE
NOTE:
Be sure to select the same scene in steps 3 and 6, otherwise
you may accidentally record over an exited scene.
Scanner Copy
SCANNER
This function allows you to copy the setting of one scanner
to another.
SCANNER
1 . Press and hold down the Scanner button you want to copy.
2 . While holding the Scanner button, tap the Scanner button
you want to copy to.
Scene Copy
1 . Program enable.
BANK
SCENE
2 . Tap the Bank Up/Down button to select the bank that contains
the scene you wish to copy.
3 . Select the scene you want to copy by tapping its Scene button.
BANK
4 . Tap the Bank Up/Down button to select the bank you wish to
copy the scene to.
MIDI / REC
5 . Tap the MIDI/Rec button.
SCENE
6 . Tap the Scene button you wish copy the scene to.
Delete a Scene
SCENE
1 . Tap the desired Scene button to select the scene you
wish to delete.
2 . Press and hold down the Auto/Del button.
While holding down the Auto/Del button, tap the Scene
button that stores the scene you wish to delete.
When a programmed scene is deleted, all DMX channel
in this scene is set to 0.
SHOW CREATOR
AUTO/DEL
USER MANUAL
SCENE
PAGE 5
Delete all Scenes
This function will reset all DMX channel to 0 output.
PROGRAM
1 . With the power off, press and hold down the Program and
Bank Down buttons at a time.
BANK
2 . Apply power again, all scenes should be cleared.
Bank Copy
1 . Program enable.
2 . Tap the Bank Up/Down button to select the bank you wish
to copy.
MIDI / REC
3 . Tap the MIDI/Rec button.
BANK
4 . Tap the Bank Up/Doown button to select the bank you wish
copy to.
5 . Tap the Music/Bank Copy button, all LEDs and the Segment
Display will flash three times briefly indicating the function
has been completed.
MUSIC/BANK COPY
6 . Press the Program button for three seconds to exit
Programming mode.
Programming Chase
You must program scenes before you can program chases, this
function allows you to store up to 240 scenes into one chase.
CHASE BUTTONS 1-6
1 . Program enable.
BANK
2 . Tap the Chase button to select the chase to program. Each
time you can select a chase only.
3 . Select a desired scene from the bank that has stored
scenes.(described in Programming Scenes).
MIDI / REC
4 . Tap the MIDI/Rec button.
5 . Repeat steps 3-4 until you've reached your desired effect.
You may record up to 240 scenes into a chase.
Program a bank of scenes into a Chase
1 . Program enable.
2 . Select the chase using Chase buttons 1-6.
MUSIC/BANK COPY
MIDI / Rec Copy
3 . Use Bank Up/Down button to select the bank that contains
the scenes you wish to copy.
4 . Tap the Music/Bank Copy button.
5 . Tap the MIDI/Rec Copy button, all LEDs and the Segment
Display button causing a highlight next to STEP, the first digit
in the Segment Display shows the chase and the next three
digits show its step.
SHOW CREATOR
USER MANUAL
PAGE 6
Add a Step
1 . Program enable.
2 . Select the chase you wish to add a step to.
3 . Tap the Tap Sync/Display button causing a highlight next to
STEP, the firt digit in the Segment Display shows the chase
and the next three digits shows its step.
TAP SYNC/DISPLAY
BANK
4 . Tap the Bank Up/Down button to scroll to the step you wish
to add a step after.
MIDI / REC
5 . Tap the MIDI/Rec button, the Segment Display will read the step one higher than before.
For example, if you want to insert a step between step 3 and step 4, and you scroll to step
3, when you tap the MIDI/Rec button, the Segment Display will read step 4.
6 . Tap the Tap Sync/Display button again, the Segment Display shows the current chase, scene and bank.
Create a desired scene and record it as a new step or select a programmed scene you wish to add into this chase.
Hints : You may tap the Tap Sync/Display button to change the display mode between and the bank.
7 . Tap the MIDI/Rec button again, all LEDs and the Segment Display will flash three times briefly indicating the new step has
been inserted into this chase.
Delete a Step
1 . Program enable.
2 . Select the chase that contains the step you wish to delete.
TAP SYNC/DISPLAY
3 . Tap the Tap Sync/Display button causing the Segment Display
shows the steps.
BANK
4 . Tap the Bank Up/Down button to scroll to the step you wish
to delete.
AUTO/DEL
5 . Tap the Auto/Del button to delete the step, all LEDs and the
Segment Display will flash three times briefly indicating that
the step has been deleted.
Delete a Chase
CHASE Button 1-6
1 . Select the chase you wish to delete.
AUTO/DEL
CHASE
2 . Press and hold down the Auto/Del button.
Tap the Chase button while holding down the Auto/Del
button, all LEDs and the Segment Display will flash three
times briefly indicating this chase has been deleted.
SHOW CREATOR
USER MANUAL
PAGE 7
Delete all Chases
AUTO/DEL
1 . With the power off, press and hold down the Auto/Del and Bank Down buttons same time.
BANK
2 . Apply the power again.
Running Scenes
Manual Mode
SCENE
1 . When the power is turned on, this unit enters Manual mode automatically.
2 . Make sure Auto trigger and Music trigger indicators in the Segment Display are both off.
3 . Use the bank Up/Down button to select the bank that contains the scenes you wish to run.
4 . Tap the Scene button to select the scene to run.
Auto Mode
This function allows you to run a bank of programmed scenes in a sequential loop.
1 . Tap the Auto/Del button to activate Auto mode.
A highlight nex t AUTO TI¡RIGGER will indicate Auto mode.
BANK
AUTO/DEL
2 . Use the Bank Up/Down button to select a bank of scenes to run
3 . After selecting the bank of scenes you wish to run, you can use the Speed slider(or Tap
Sync/Display button) and Fade Time slider to adjust the scenes to your desired effect.
Hints:
The Tap Sync button is used to set the speed by tapping the button
several times, the last two taps will define the speed with a
maximum of 10 minutes. Tap Sync will override any previous
setting of the Speed slider unless the slider is moved again.
SPEED
AUTO/DEL
FADE TIME
4 . Tap the Auto/Del button again to exit Auto mode.
Music Mode
1 . Tap the Music/Bank Copy button to activate Music mode.
A highlight next to MUSIC TRIGGER indicates Music Mode.
MUSIC BANK COPY
2 . Use the Bank Up/Down button to select the bank that holds
the scenes you wish to run. The scenes you've selected will
chase in a sequential order according to the music rhythms
detected by the built-in microphone
BANK
3 . Tap the Music/Bank Copy button again to exit Music mode.
SHOW CREATOR
USER MANUAL
PAGE 8
Running Chases
You must program scenes before you can run chases.
Manual Mode
1 . When the power is turned on, this unit enter Manual mode automatically.
BANK
2 . Select your desired chase by tapping one of the six Chase buttons. A second tap of this button
will deactivate this function.
3 . Use the Speed slider (or Tap Sync button) and Fade Time slider to adjust the current scenes
to your desired effects.
4 . Use the Bank Up/Down button to scroll through the chase to run all banks of scenes.
Auto Mode
AUTO/DEL
1 . Tap the Auto/Del button to activate Auto mode. A highlight nex to
AUTO TRIGGER will indicate Auto mode.
2 . Select yor desired chase by tapping one of the six Chase buttons.
A second tap of this button will desactivate this function.
CHASE BUTTONS 1-6
3 . Use the Speed slider (or Tap Sync) and Fade Time slider to adjust
the chase to your desired effects.
SPEED
You may select several chases at a time, the chases will run in
sequence that you select the chases.
FADE TIME
Music Mode
MUSIC/BANK COPY
1 . Tap the Music/Bank Copy button to activate Music mode. A
highlight in the Segment Display next to MUSIC TRIGGER will
indicate Music mode.
CHASE BUTTONS 1-6
2 . Select your desired chase by tapping one of the six Chase
buttons, the chase will be triggered by the music rhythms.
You may select several chases at a time.
MIDI Operation
MIDI Channel Setting
1 . Press and hold down the MIDI/Rec button for three seconds,
the last two digits of the Segment Display will flash to indicate
MIDI channel setting is ready.
MIDI/REC
2 . Use the Bank Up/Down button to select the DMX channel 0116 to assign to MIDI channel.
BANK
3 . Press and hold down the MIDI/Rec button for three seconds
to store your setting and to deactivate MIDI setting.
If you wish to give up your setting, tap any other button (except
Bank Up/Down buttons) to exit MIDI mode.
SHOW CREATOR
USER MANUAL
PAGE 9
Implementation
This unit receives Note On signals, which enables to run 15 bank (01-15) of scenes and 6 chases of scenes. In addition, blackout function can
be activated by MIDI signal.
BANK
NOTE Nº
FUNCTION
Bank 1
00 to 07
Turn on or off Scenes 1-8 of Bank 1
Bank 2
08 to 15
Turn on or off Scenes 1-8 of Bank 2
Bank 3
16 to 23
Turn on or off Scenes 1-8 of Bank 3
Bank 4
24 to 31
Turn on or off Scenes 1-8 of Bank 4
Bank 5
32 to 39
Turn on or off Scenes 1-8 of Bank 5
Bank 6
40 to 47
Turn on or off Scenes 1-8 of Bank 6
Bank 7
48 to 55
Turn on or off Scenes 1-8 of Bank 7
Bank 8
56 to 63
Turn on or off Scenes 1-8 of Bank 8
Bank 9
64 to 71
Turn on or off Scenes 1-8 of Bank 9
Bank 10
72 to 79
Turn on or off Scenes 1-8 of Bank 10
Bank 11
80 to 87
Turn on or off Scenes 1-8 of Bank 11
Bank 12
88 to 95
Turn on or off Scenes 1-8 of Bank 12
Bank 13
96 to 103
Turn on or off Scenes 1-8 of Bank 13
Bank 14
104 to 111
Turn on or off Scenes 1-8 of Bank 14
Bank 15
112 to 119
Turn on or off Scenes 1-8 of Bank 15
Chase 1
120
Turn on or off Chase 1
Chase 2
121
Turn on or off Chase 2
Chase 3
122
Turn on or off Chase 3
Chase 4
123
Turn on or off Chase 4
Chase 5
124
Turn on or off Chase 5
Chase 6
125
Turn on or off Chase 6
126
BLACKOUT
SHOW CREATOR
USER MANUAL
PAGE 10
CARACTERISTICAS PRINCIPALES
- 192 Canales de control DMX
- 30 bancos cada uno compuesto de 8 escenas programables
- Micrófono incorporado para sincronismo por Audio
- Modo AUTO controlado por TAP SYNC y SPEED
- Interfaz de control MIDI
- Pantalla LED de 4 dígitos
- Función Blackout
- Programación y ejecución de Chase
- Control de tiempo de fundido
- Selección de polaridad DMX
- Interfaz de control para máquina de humo
ESPECIFICACIONES TÉCNICAS
Alimentación
Salida DMX
Señal MIDI
Entrada Audio
DC 9 - 12 V. 300 mA. min.
Hembra XLR 3 pin
Standard Interfaz 5 pin
Micrófono incorporado.
Dimensiones
483 x 132 x 73 mm.
Peso
2,5 Kg
Este símbolo en su equipo o embalaje, indica que el presente producto
no puede ser tratado como residuos domésticos normales, sino que deben
entregarse en el correspondiente punto de recogida de equipos electrónicos
y eléctricos. Asegurándose de que este producto es desechado
correctamente, Ud. está ayudando a prevenir las consecuencias negativas
para el medio ambiente y la salud humana que podrían derivarse de la
incorrecta manipulación de este producto. EL reciclaje de materiales
ayuda a conservar las reservas naturales. Para recibir más información,
sobre el reciclaje de este producto, contacte con su ayuntamiento, su
punto de recogida más cercano o el distribuidor donde adquirió el producto.
SHOW CREATOR
MANUAL DE USO
PAGINA 11
1
5
3
2
4
6
7
8
9
14 13 12
15
16
17 18
11 10
19
FRONTAL
Pulsadores SCANNER 1-12.
1
Fader
Scanners DMX Channels control
1
2
3
4
5
6
7
8
9
10
11
12
1 - 16
17 - 32
33 - 48
49 - 64
65 - 80
81 - 96
97 - 112
113 - 128
129 - 144
145 - 160
161 - 176
177 - 192
Off
Off
Off
Off
Off
Off
Off
Off
Off
Off
Off
Off
Seleccione los Scaners 1-12 en grupos de 16 canales cada uno.
LED
Off
Off
Off
Off
Off
Off
Off
Off
Off
Off
Off
Off
Fader
Scanners DMX Channels control
1
2
3
4
5
6
7
8
9
10
11
12
1 - 16
17 - 32
33 - 48
49 - 64
65 - 80
81 - 96
97 - 112
113 - 128
129 - 144
145 - 160
161 - 176
177 - 192
On
On
On
On
On
On
On
On
On
On
On
On
LED
On
On
On
On
On
On
On
On
On
On
On
On
Al volver a presionar el pulsador SCANNER se libera el Scaner previamente seleccionado.
SHOW CREATOR
MANUAL DE USO
PAGINA 12
2
Pulsadores SCENE
Carga o Graba una escena (240 max)
3
DISPLAY
Muestra el estado de ejecución de la consola.
4
Pulsadores BANCK
Presione UP o DOWN para seleccionar uno de los 30 bancos disponibles.
5
Pulsadores CHASE
6
Pulsador PROGRAM
Activa el modo PROGRAM.
7
Pulsador MIDI/REC
Activa el modo MIDI. También se usa para grabar programas.
8
Pulsador AUTO/DEL
9
Pulsador MUSIC/BANK COPY
Activa el modo MUSIC. Crea escenas y programas.
10
Pulsador BLACKOUT
Deja todos los canales a cero.
11
Pulsador TAP SYNC/DISPLAY
Utilizado para asignar la velocidad de ejecución de un chase mediante la frecuencia
de pulsación. Cambia los valores del Display de % a 255.
12
Potenciómetro FADE TIME
Utilizado para controlar los tiempos de fundido de un paso (escena) a otro.
13
Potenciómetro SPEED
Controla la velocidad de los Chases.
14
Pulsador PAGE SELECT
Selecciona las páginas A y B de los 8 potenciómetros de canal.
15
Potenciómetro de Canal
Controla el nivel de los 16 canales (A: 1-8, B: 9-16), asignados a cada canal.
Selecciona el Chase a reproducir. Cada Chase puede tener un máximo de 240 escenas
Activa el modo AUTO de reproducción. También sirve para borrar Escenas y Chases.
TRASERA
16
MIDI IN
Entrada de MIDI.
17
Polarizador DMX
Selecciona la polarización del DMX (+2, -3 ó -2, +3).
18
Conector DMX
Salida de señal DMX.
19
Entrada DC
Entrada Tensión de Alimentación (+9-12 V DC. 300 mA. min.)
SHOW CREATOR
MANUAL DE USO
PAGINA 13
INICIO DE PROGRAMACIÓN
Cuando se conecta la alimentación de la consola, ésta entra en el "MODO MANUAL"
automáticamente.
Presione durante 3 segundos el pulsador "PROGRAM", un rápido parpadeo del led "PROG"
indicará que ha entrado en el modo PROGRAMACIÓN.
PROGRAMAR ESCENAS
SCANNER BUTTONS 1-12
1 . Entre en el modo PROGRAMACIÓN
2 . Presione el pulsador SCANNERS según el
móvil a seleccionar (1-12). Puede seleccionar
uno o varios móviles al mismo tiempo.
3 . Cree la escena deseada utilizando los
potenciómetros del canal 1-8.
MIDI / REC
4 . Para controlar los canales 9-16 de cada
móvil, presione el pulsador PAGE SELECT.
5 . Una vez configurada la escena, presione el
pulsador MIDI/REC para preparar la
inserción de esta escena en la memoria.
6 . Presione los pulsadores
de BANK para
seleccionar el banco donde grabará las
escenas. Tiene un total de 30 bancos, en
los que puede grabar hasta 8 escenas en
cada uno de ellos.
BANK
SCENE BUTTONS 1-8
7.
Presione el pulsador SCENES 1-8 donde
quiera ubicar esta escena. Todos los Leds
y el Display parpadearán tres veces,
indicando que la programación de la escena
SCANNER BUTTONS 1 - 12
se ha realizado.
8 . Repita los pasos 3 - 7 para crear las
siguientes escenas.
PROGRAM
9 . Para finalizar la programación, presione
durante 3 segundos el pulsador PROGRAM.
La consola pasará automáticamente a la
función BLACK OUT.
EDITAR ESCENAS
1 . Entre en el modo PROGRAMACIÓN.
BANK
2 . Selecione con el pulsador BANK
la escena que desea editar.
SCENE BUTTONS 1-8
3 . Con el pulsador 1-8 de SCENES elija la
escena a editar.
4 . Use los potenciómetros de canal y los
pulsadores 1-12 SCANNER para seleccionar
el móvil y darle nuevos niveles.
SHOW CREATOR
MANUAL DE USO
PAGINA 14
EDITAR ESCENAS
MIDI / REC
5 . Una vez efectuados los cambios en la
escena, presione el pulsador MIDI/REC.
SCENE
6 . Presione el pulsador SCENES que se
corresponda con la escena editada. La
nueva programación se escribirá sobre la
escena anterior.
7 . Salga del modo PROGRAMACIÓN.
COPIAR UN MOVIL
SCANNER
Esta función permite copiar la preparación de un móvil a otro.
1 . En el modo PROGRAMACIÓN presione y mantenga el
pulsador SCANNER a copiar.
2 . Mientras mantiene presionado el pulsador del móvil original,
presione el pulsador SCANNER al que desea transferir la
preparación del móvil anterior. La copia ha sido realizada.
COPIAR UNA ESCENA
SCENE
1 . Entre en el modo PROGRAMACIÓN
BANK
BANK para
2 . Presione los pulsadores
seleccionar el banco que contiene la escena
a copiar.
3 . Seleccione la escena a copiar.
BANK
BANK para
4 . Presione los pulsadores
seleccionar el banco donde se copiará la
escena.
MIDI / REC
5 . Presione el pulsador MIDI/REC
SCENE
6 . Presione la escena donde será descargada
la escena copiada.
BORRAR UNA ESCENA
SCENE
1 . En el modo PROGRAMACIÓN seleccione
la escena que será borrada.
2 . Presione y mantenga, el pulsador
AUTO/DEL. Seguidamente presione el
pulsador de la escena que desea borrar.
AUTO/DEL
SCENE
La escena ha sido borrada y todos los
canales de ésta, están a cero.
SHOW CREATOR
MANUAL DE USO
PAGINA 15
BORRAR TODAS LAS ESCENA
PROGRAM
1 . Con la alimentación de la consola apagada presione y mantenga
los pulsadores BANK y PROGRAM al mismo tiempo.
BANK
2 . Conecte entonces la alimentación y todas las escenas serán
borradas.
COPIAR UN BANCO
1 . Entre en el modo PROGRAMACIÓN.
2 . Seleccione el banco que será copiado con
los pulsadores
BANK.
BANK
MIDI / REC
3 . Presione el pulsador MIDI/REC.
4 . Seleccione el nuevo banco con los
pulsadores
BANK.
5 . Presione el pulsador MUSIC/BANK COPY,
todos los leds y el display parpadearán 3
veces. La copia ha sido realizada.
PROGRAMAR UN CHASE
Se pueden grabar hasta 240 escenas en cada chase.
CHASE BUTTONS 1-6
1 . Entre en el modo PROGRAMACIÓN.
BANK
2 . Seleccione el chase a programar con los
pulsadores CHASE 1-6.
MIDI / REC
BANK,
3 . Seleccione con los pulsadores
el banco o bancos donde se encuentran las
4 . Selecione con los pulsadores SCENNES 1-8
escenas que conformarán el chase.
la escena elegida.
5 . Presione el pulsador MIDI/REC. Los leds y
el display parpadearán 3 veces, indicando
que el paso del chase ha sido grabado.
7 . Una vez finalizada la grabación del chase,
salga del modo PROGRAMACIÓN.
6 . Repita los pasos 3, 4 y 5 para los siguientes
pasos del chase.
PROGRAMAR UN BANCO DE ESCENAS EN UN CHASE
1 . Entre en el modo PROGRAMACIÓN.
MUSIC/BANK COPY
2 . Seleccione con los pulsadores
BANK el banco que será copiado en el chase.
3 . Presione el pulsador MUSIC-BANK COPY.
4 . Presione el pulsador MIDI-REC. Todos los leds y el display parpadearán 3 veces, indicando
que el banco ha sido grabado en el chase.
5 . Salga del modo PROGRAMACIÓN.
SHOW CREATOR
MANUAL DE USO
PAGINA 16
AÑADIR UN PASO A UN CHASE
1 . Entre en el modo PROGRAMACIÓN.
2 . Seleccione el chase a modificar.
TAP SYNC/DISPLAY
3 . Presione el pulsador TAP SYNC/DISPLAY.
Se encendera STEP. Ahora el primer dígito
del display muestra el chase elegido y los
3 siguientes digitos muestran el nº de paso
del chase.
BANK
BANK hasta
4 . Presione los pulsadores
visualizar la escena a la que "DESPUES"
añadira el nuevo paso.
MIDI / REC
5 . Presione el pulsador MIDI/REC, el display
mostrará ahora el nº del paso nuevo que va
a ser insertado.
6 . Presione de nuevo TAP/SYNC, vuelve a
mostrar el nº de chase, la escena y el banco.
7 . Cree una nueva escena o puede elegirla de
cualquier banco, si ya está creada y grabela
presionando MIDI/REC. Los leds y el display
parpadearán 3 veces, indicando que el paso
ha sido añadido.
9 . Salga del modo PROGRAMACIÓN.
8 . Repita los pasos 3, 4, 5, 6 y 7 si desea
añadir nuevos pasos al chase.
BORRAR UN PASO DE UN CHASE
1 . Entre en el modo PROGRAMACIÓN.
2 . Seleccione el chase a modificar.
TAP SYNC/DISPLAY
AUTO/DEL
3 . Presione el pulsador TAP SYNC/DISPLAY.
Se encenderá STEP. Ahora el primer dígito
del display muestra el chase elegido y los
3 siguientes dígitos muestran el nº de paso
del chase.
5 . Una vez elegida la escena a eliminar,
presione el pulsador AUTO/DEL. Todos los
leds y el display parpadearán 3 veces
indicando que el paso ha sido borrado.
BANK
BANK hasta
4 . Presione los pulsadores
visualizar la escena a la que "DESPUES"
añadira el nuevo paso.
6 . Salga del modo PROGRAMACIÓN.
BORRAR UN CHASE
CHASE Button 1-6
1 . Entre en el modo PROGRAMACIÓN.
AUTO/DEL
CHASE
2 . Seleccione el Chase a borrar.
3 . Presione y mantenga el pulsador AUTO/DEL
4 . Mientras mantiene el pulsador AUTO/DEL,
pulse el Chase que desea borrar.
5 . Todos los Leds parpadearán 3 veces,
indicando que el Chase ha sido borrado.
6 . Salga del modo PROGRAMACIÓN.
SHOW CREATOR
MANUAL DE USO
PAGINA 17
BORRAR TODOS LOS CHASES
AUTO/DEL
BANK
1 . Con la alimentación de la consola desconectada, presione y mantenga los pulsadores
AUTO/DEL y BANK.
2 . Conecte la alimentación.
3 . Todos los Leds y el Display parpadearán 3 veces, indicando que se han borrado todos los
chases.
EJECUTAR ESCENAS
MODO MANUAL
1 . Cuando conectamos la alimentación, la
consola pasa automáticamente a MODO
MANUAL
2 . Asegurese que los Leds MUSIC TRIGGER
y AUTO TRIGGER están apagados.
3 . Use los pulsadores
BANK para
seleccionar el banco que contiene las
escenas a ejecutar.
4 . Seleccione con los pulsadores SCENES 1-8
la escena que desea visualizar.
SCENE
MODO AUTO
Este modo permite ejecutar las escenas en un Loop secuenciado.
1 . Seleccione el banco con los pulsadores
BANK
2 . Presione el pulsador AUTO/DEL, el led
A U TO T R I G G E R s e e n c e n d e r á .
BANK
AUTO/DEL
3 . Ajuste la velocidad del loop con el
potenciómetro FADE TIME.
4 . También puede ajustar la velocidad del Loop
presionando dos veces el pulsador TAP
SYNC. La frecuencia entre los dos
pulsadores será la velocidad de ejecución
del Loop.
SPEED
FADE TIME
AUTO/DEL
5 . Al volver a mover el potenciómetro SPEED
se perderá la información de velocidad
grabado con el TAP SYNC.
6 . Presione el pulsador AUTO/DEL para salir
del modo AUTO.
MODO MUSIC
BANK el
1 . Seleccione con el pulsador
banco que contiene las escenas a ejecutar.
MUSIC BANK COPY
2 . Presione el pulsador MUSIC/BANK COPY
para que el programa se ejecute al ritmo de
la musica.
BANK
3 . Presione de nuevo MUSIC/BANK COPY
para salir del MODO MUSIC.
SHOW CREATOR
MANUAL DE USO
PAGINA 18
EJECUTAR CHASES
MODO AUTO
CHASE BUTTONS 1-6
1 . Seleccione el chase con el pulsador CHASE 1-6.
2 . Presione el pulsador AUTO/DEL para iniciar
el Loop.
AUTO/DEL
3 . Utilice los potenciómetros SPEED y FADE
TIME para ajustar los parámetros de
velocidad.
4 . Puede añadir diversos chases que serán
ejecutados en el orden que sean
seleccionados.
5 . El control del tiempo y fundido es el mismo
para los chases.
SPEED
FADE TIME
6 . Puede ajustar la velocidad del chase con el
pulsador TAP SYNC del mismo modo que
se ajustan las escenas.
MODO MUSIC
CHASE BUTTONS 1-6
1 . Seleccione el chase con el pulsador CHASE 1-6.
MUSIC/BANK COPY
2 . Presione el pulsador MUSIC/BANC COPY
para que el chase empiece a ejecutarse al
ritmo de la música.
3 . Presione de nuevo MUSIC/BANK COPY
para salir del MODO MUSIC.
FUNCIÓN MIDI
1 . Presione durante 3 segundos el pulsador
MIDI/REC. Los últimos 2 dígitos del Display
parpadearán indicando que el canal MIDI
está preparado.
MIDI/REC
2 . Presione el pulsador BANK UP/DOWN para
seleccionar el canal de DMX 1-16 para
asignar el canal MIDI.
BANK
3 . Para grabar nuevos ajustes presione
durante 3 segundos el pulsador MIDI/REC.
Para salir presione cualquier pulsador
excepto Bank Up/Down.
SHOW CREATOR
MANUAL DE USO
PAGINA 19
PUESTA EN FUNCIONAMIENTO
Cuando recibe la señal NOTE ON nos permite el acceso a los bancos de escenas del 1 al 15 y a 6 chases de escenas. También se pude activar
el BLACK OUT con la señal MIDI.
BANCO
NOTE Nº
FUNCIÓN
BANCO 1
00 al 07
Encender o Apagar Escenas 1-8 del Banco 1
BANCO 2
08 al 15
Encender o Apagar Escenas 1-8 del Banco 2
BANCO 3
16 al 23
Encender o Apagar Escenas 1-8 del Banco 3
BANCO 4
24 al 31
Encender o Apagar Escenas 1-8 del Banco 4
BANCO 5
32 al 39
Encender o Apagar Escenas 1-8 del Banco 5
BANCO 6
40 al 47
Encender o Apagar Escenas 1-8 del Banco 6
BANCO 7
48 al 55
Encender o Apagar Escenas 1-8 del Banco 7
BANCO 8
56 al 63
Encender o Apagar Escenas 1-8 del Banco 8
BANCO 9
64 al 71
Encender o Apagar Escenas 1-8 del Banco 9
BANCO 10
72 al 79
Encender o Apagar Escenas 1-8 del Banco 10
BANCO 11
80 al 87
Encender o Apagar Escenas 1-8 del Banco 11
BANCO 12
88 al 95
Encender o Apagar Escenas 1-8 del Banco 12
BANCO 13
96 al 103
Encender o Apagar Escenas 1-8 del Banco 13
BANCO 14
104 al 111
Encender o Apagar Escenas 1-8 del Banco 14
BANCO 15
112 al 119
Encender o Apagar Escenas 1-8 del Banco 15
CHASE 1
120
Encender o Apagar Chase 1
CHASE 2
121
Encender o Apagar Chase 2
CHASE 3
122
Encender o Apagar Chase 3
CHASE 4
123
Encender o Apagar Chase 4
CHASE 5
124
Encender o Apagar Chase 5
CHASE 6
125
Encender o Apagar Chase 6
BLACKOUT
126
SHOW CREATOR
MANUAL DE USO
PAGINA 20
Equipson, S.A.
www.equipson.es
[email protected]